文章目录
- 前言
- 一、SpringBoot自动配置-Condition-1
- 1、观察spring自动创建bean过程
- 2、创建自定义bean对象
- 3、根据条件创建自定义bean
- 二、 SpringBoot自动配置-Condition-2
- 三、SpringBoot自动配置-切换内置web服务器
- 1、查看继承关系图
- 2、shift+delete 排除Tomcat
- 四、SpringBoot自动配置-Enable注解原理
- 五、SpringBoot自动配置-@Import详解
- ①导入Bean
- ②导入配置类
- ③导入 ImportSelector 实现类
- ④导入 ImportBeanDefinitionRegistrar 实现类
- 六、SpringBoot自动配置-@EnableAutoConfiguration详解
- 总结
前言
Springboot目前是Java开发中最主流的框,因此在我们的工作和面试中都会经常用到,SpringBoot主要解决了传统spring的重量级xml配置Bean,实现了自动装配。接下来将从注解已经源码来学习SpringBoot自动装配原理。
一、SpringBoot自动配置-Condition-1
Condition是Spring4.0后引入的条件化配置接口,通过实现Condition接口可以完成有条件的加载相应的Bean。
@Conditional要配和Condition的实现类(ClassCondition)进行使用
接下来我们以下面例子来学习:
• 创建模块 springboot-condition
1、观察spring自动创建bean过程
改造启动类如下:
@SpringBootApplication
public class SpringbootConditionApplication {

    public static void main(String[] args) {
        ConfigurableApplicationContext run = SpringApplication.run(SpringbootConditionApplication.class, args);
        System.out.println(run);
        //只要引入Redis起步依赖,就有了RedisTemplate对象
        Object redisTemplate = run.getBean("redisTemplate");
        System.out.println(redisTemplate);
    }
启动:获取不到对象
 导入
导入 redis起步依赖
<dependency>
     <groupId>org.springframework.boot</groupId>
     <artifactId>spring-boot-starter-data-redis</artifactId>
</dependency>
再启动则可以获取到bean对象。

2、创建自定义bean对象
①新建user实体类com.lp.springbootcondition.pojo.User
package com.lp.springbootcondition.pojo;
public class User {
    int id;
    String name;
    int age;
    public User() {
    }
    public User(int id, String name, int age) {
        this.id = id;
        this.name = name;
        this.age = age;
    }
    public int getId() {
        return id;
    }
    public void setId(int id) {
        this.id = id;
    }
    public String getName() {
        return name;
    }
    public void setName(String name) {
        this.name = name;
    }
    public int getAge() {
        return age;
    }
    public void setAge(int age) {
        this.age = age;
    }
    @Override
    public String toString() {
        return "User{" +
                "id=" + id +
                ", name='" + name + '\'' +
                ", age=" + age +
                '}';
    }
}
②新建配置类com.lp.springbootcondition.config.ConditionConfig
@Configuration
public class ConditionConfig {
    @Bean
    public User user() {
        return new User();
    }
}
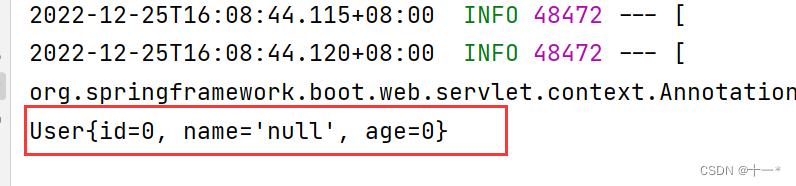
③启动类获取。测试可以获取到
@SpringBootApplication
public class SpringbootConditionApplication {
    public static void main(String[] args) {
        ConfigurableApplicationContext run = SpringApplication.run(SpringbootConditionApplication.class, args);
        System.out.println(run);
        //只要引入Redis起步依赖,就有了RedisTemplate对象
//        Object redisTemplate = run.getBean("redisTemplate");
//        System.out.println(redisTemplate);
        User user = (User) run.getBean("user");
        System.out.println(user);
    }
}
3、根据条件创建自定义bean
创建ClassCondition 类com.lp.springbootcondition.condition.ClassCondition
public class ClassCondition implements Condition {
    @Override
    public boolean matches(ConditionContext context, AnnotatedTypeMetadata metadata) {
        return false;
}
}
改造userConfig
@Configuration
public class ConditionConfig {
    @Bean
    @Conditional(ClassCondition.class)
    public User user(){
        return new User();
    }
}
启动起启动类,测试不能自动创建user这个bean

1、改造ClassCondition。根据是否导入redis来决定是否创建userBean
public class ClassCondition implements Condition {
    @Override
    public boolean matches(ConditionContext context, AnnotatedTypeMetadata metadata) {
        try {

            Class.forName("redis.clients.jedis.Jedis");
            return true;
        } catch (ClassNotFoundException e) {
            e.printStackTrace();
            return false;
        }
    }
}
测试。获取不到userBean
@SpringBootApplication
public class SpringbootConditionApplication {

    public static void main(String[] args) {
        ConfigurableApplicationContext run = SpringApplication.run(SpringbootConditionApplication.class, args);
        System.out.println(run);
        //只要引入Redis起步依赖,就有了RedisTemplate对象
//        Object redisTemplate = run.getBean("redisTemplate");
//        System.out.println(redisTemplate);
        User user = (User) run.getBean("user");
        System.out.println(user);
    }
}
 导入Redis依赖,再测试
<dependency>
   <groupId>redis.clients</groupId>
   <artifactId>jedis</artifactId>
   <version>2.9.0</version>
</dependency>
可以获取到userBean

二、 SpringBoot自动配置-Condition-2
需求:将类的判断定义为动态的。判断哪个字节码文件存在可以动态指定。
1、创建自定义条件注解类ConditionClass
@Target(ElementType.TYPE) //可以用在哪些地方
@Documented//生成javadoc
@Retention(RetentionPolicy.RUNTIME) //运行时起作用
@Conditional(ClassCondition.class)
public @interface ConditionClass {
    String[] value();
}
2、改造ClassCondition类
public class ClassCondition implements Condition {
    @Override
    public boolean matches(ConditionContext context, AnnotatedTypeMetadata metadata) {
        try {
            //必须引入动态传来的包名,才生成对象
            Map<String, Object> annotationAttributes = metadata.getAnnotationAttributes("com.lp.springbootcondition.condition.ConditionClass");
            System.out.println(annotationAttributes);
            if (annotationAttributes != null) {
                String[] values = (String[]) annotationAttributes.get("value");
                for (String value : values) {
                    Class.forName(value);
                }
            }
            return true;
        } catch (ClassNotFoundException e) {
            e.printStackTrace();
            return false;
        }
    }
}
3、改造ConditionConfig
注意: 此处@ConditionOnClass为自定义注解
@Configuration
public class ConditionConfig {
//    @Bean
//    public User user() {
//        return new User();
//    }
    @Bean
//    @Conditional(ClassCondition.class)
    @ConditionOnClass({"redis.clients.jedis.Jedis"})
    public User user(){
        return new User();
    }
4、测试User对象的创建
@SpringBootApplication
public class SpringbootConditionApplication {

    public static void main(String[] args) {
        ConfigurableApplicationContext run = SpringApplication.run(SpringbootConditionApplication.class, args);
        System.out.println(run);
        //只要引入Redis起步依赖,就有了RedisTemplate对象
//        Object redisTemplate = run.getBean("redisTemplate");
//        System.out.println(redisTemplate);
        User user = (User) run.getBean("user");
        System.out.println(user);
    }
}
 查看Springboot条件注解源码
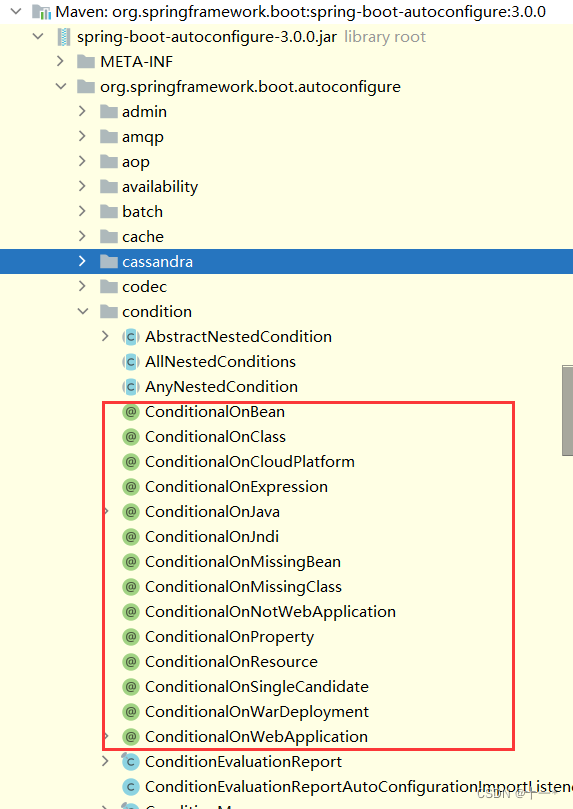 我们会发现Springboot都已经帮我们写好了
SpringBoot 提供的常用条件注解:
ConditionalOnProperty:判断配置文件中是否有对应属性和值才初始化Bean
ConditionalOnClass:判断环境中是否有对应字节码文件才初始化Bean
ConditionalOnMissingBean:判断环境中没有对应Bean才初始化Bean
三、SpringBoot自动配置-切换内置web服务器
如果我们需要切换内置web服务器可以按一下操作进行切换
1、查看继承关系图
2、shift+delete 排除Tomcat

pom文件中的排除依赖效果
<dependency>
   <groupId>org.springframework.boot</groupId>
   <artifactId>spring-boot-starter-web</artifactId>
   <!--排除tomcat依赖-->
   <exclusions>
   <exclusion>
   <artifactId>spring-boot-starter-tomcat</artifactId>
   <groupId>org.springframework.boot</groupId>
   </exclusion>
   </exclusions>
   </dependency>

<!--引入jetty的依赖-->
<dependency>
    <artifactId>spring-boot-starter-jetty</artifactId>
    <groupId>org.springframework.boot</groupId>
</dependency>
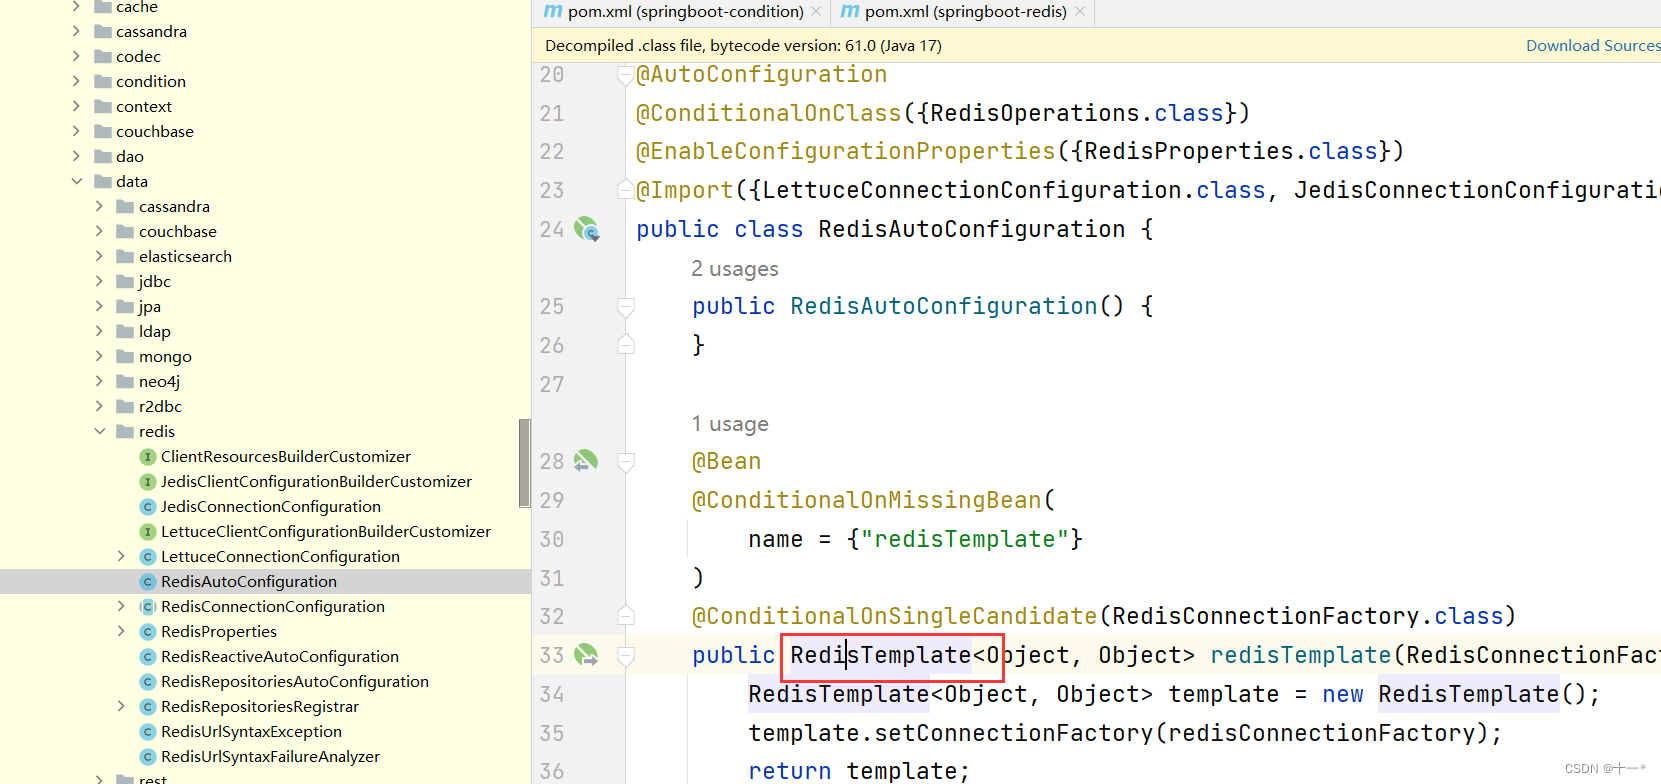
根据上面的例子,我们能够知道 为什么引入了starter-data-redis起步依赖,我们就能在项目中,直接拿redistemplate?
因为在springboot中的autoconfigure工程里把常用的对象的配置类都有了,只要工程中,引入了相关起步依赖,这些对象在我们本项目的容器中就有了。
四、SpringBoot自动配置-Enable注解原理
重要:SpringBootApplication 由三个注解组成
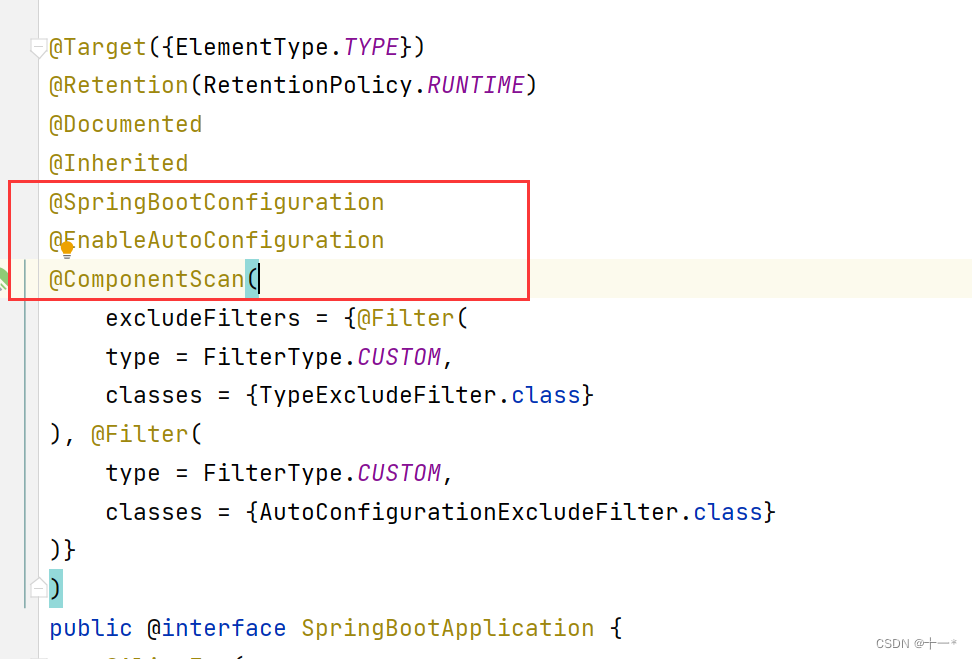
@SpringBootConfiguration 自动配置相关
@EnableAutoConfiguration
@ComponentScan 扫本包及子包
SpringBoot不能直接获取在其他工程中定义的Bean。
springboot-enable工程,编写主启动类
代码如下(示例):
/**
 * @ComponentScan 扫描范围:当前引导类所在包及其子包
 *
 * //1.使用@ComponentScan扫描com.lp.springbootenableother.config包
 * //2.可以使用@Import注解,加载类。这些类都会被Spring创建,并放入IOC容器
 * //3.可以对Import注解进行封装。
 **/
package com.lp.springbootenable;

import com.lp.pojo.User;
import org.springframework.boot.SpringApplication;
import org.springframework.boot.autoconfigure.SpringBootApplication;
import org.springframework.context.ConfigurableApplicationContext;

@SpringBootApplication
public class SpringbootEnableApplication {

    public static void main(String[] args) {
        ConfigurableApplicationContext run = SpringApplication.run(SpringbootEnableApplication.class, args);
        User user = (User) run.getBean("user");
        System.out.println(user);

    }
}
pom中引入springboot-enable-other
<dependency>
            <groupId>com.lp</groupId>
            <artifactId>springboot-enable-other</artifactId>
            <version>0.0.1-SNAPSHOT</version>
</dependency>
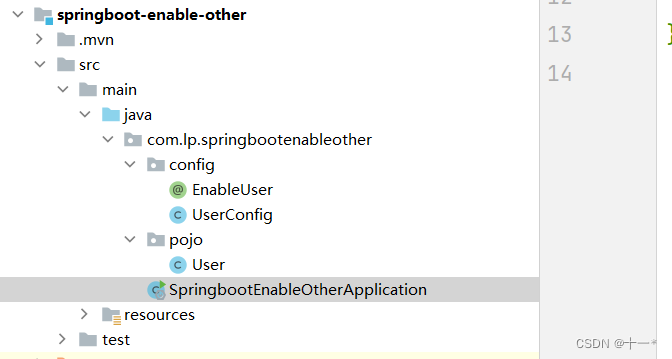
新建springboot-enable-other工程
 编写User
public class User {}
编写UserConfig
@Configuration
public class UserConfig {

    @Bean
    public User user() {
        return new User();
    }
}
启动主启动类,确实,本工程中没有这个第三方jar包中的bean对象
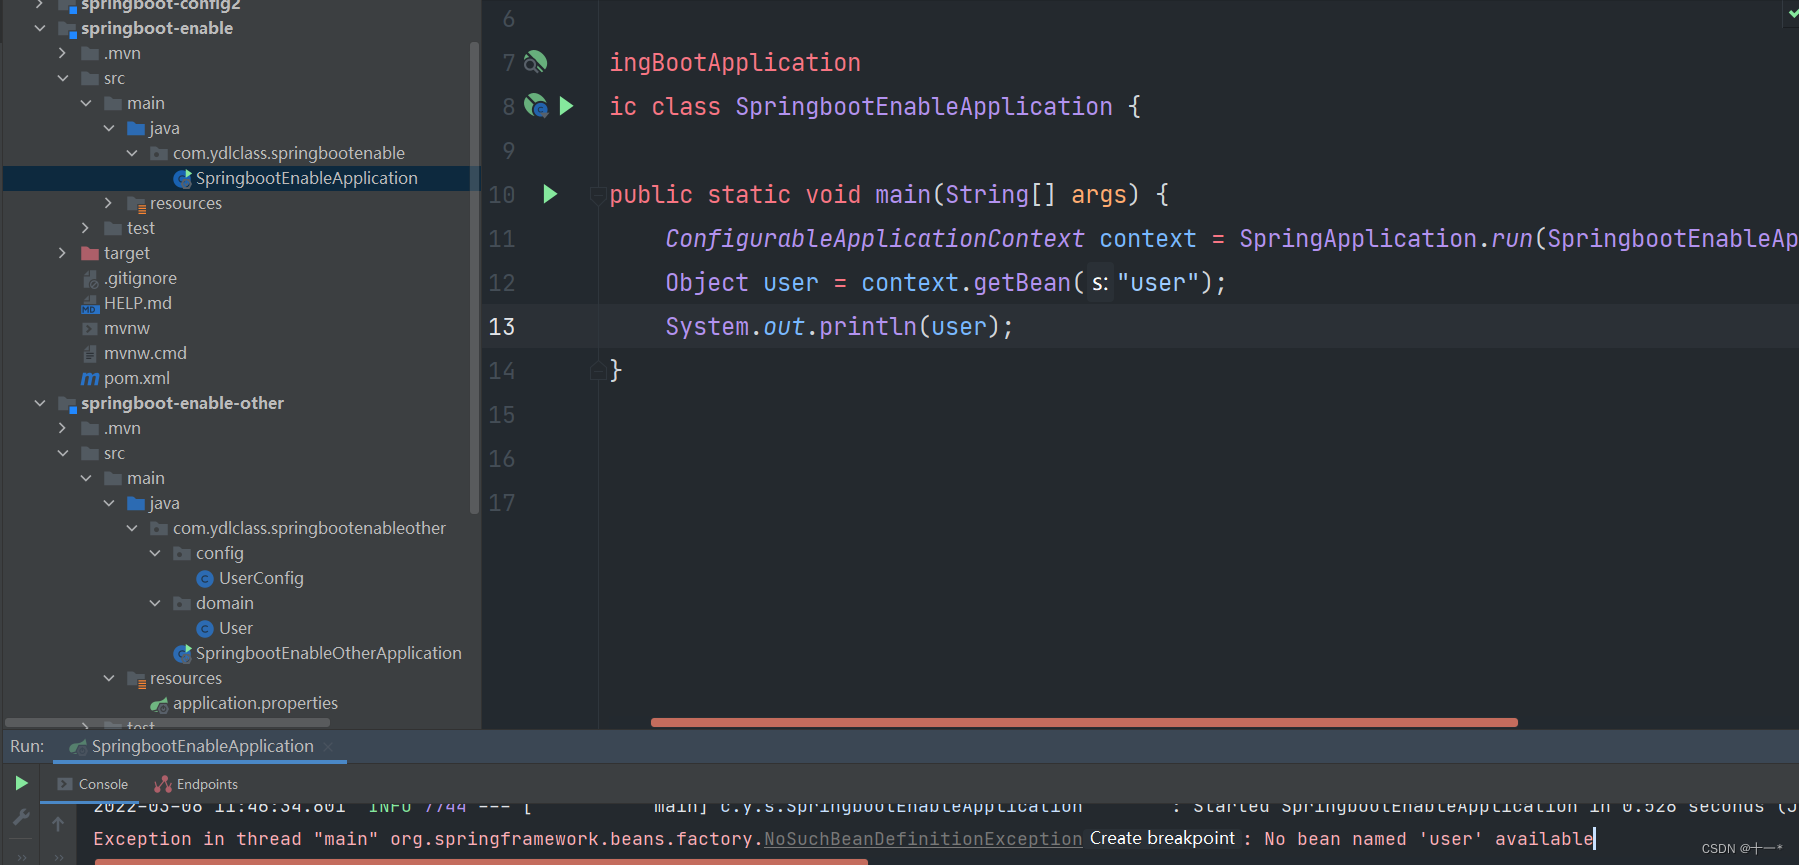 原因:
原因:@ComponentScan 扫描范围:当前引导类所在包及其子包
三种解决方案:
1.使用@ComponentScan扫描lp.config包
2.可以使用@Import注解,加载类。这些类都会被Spring创建,并放入IOC容器
3.可以对Import注解进行封装。
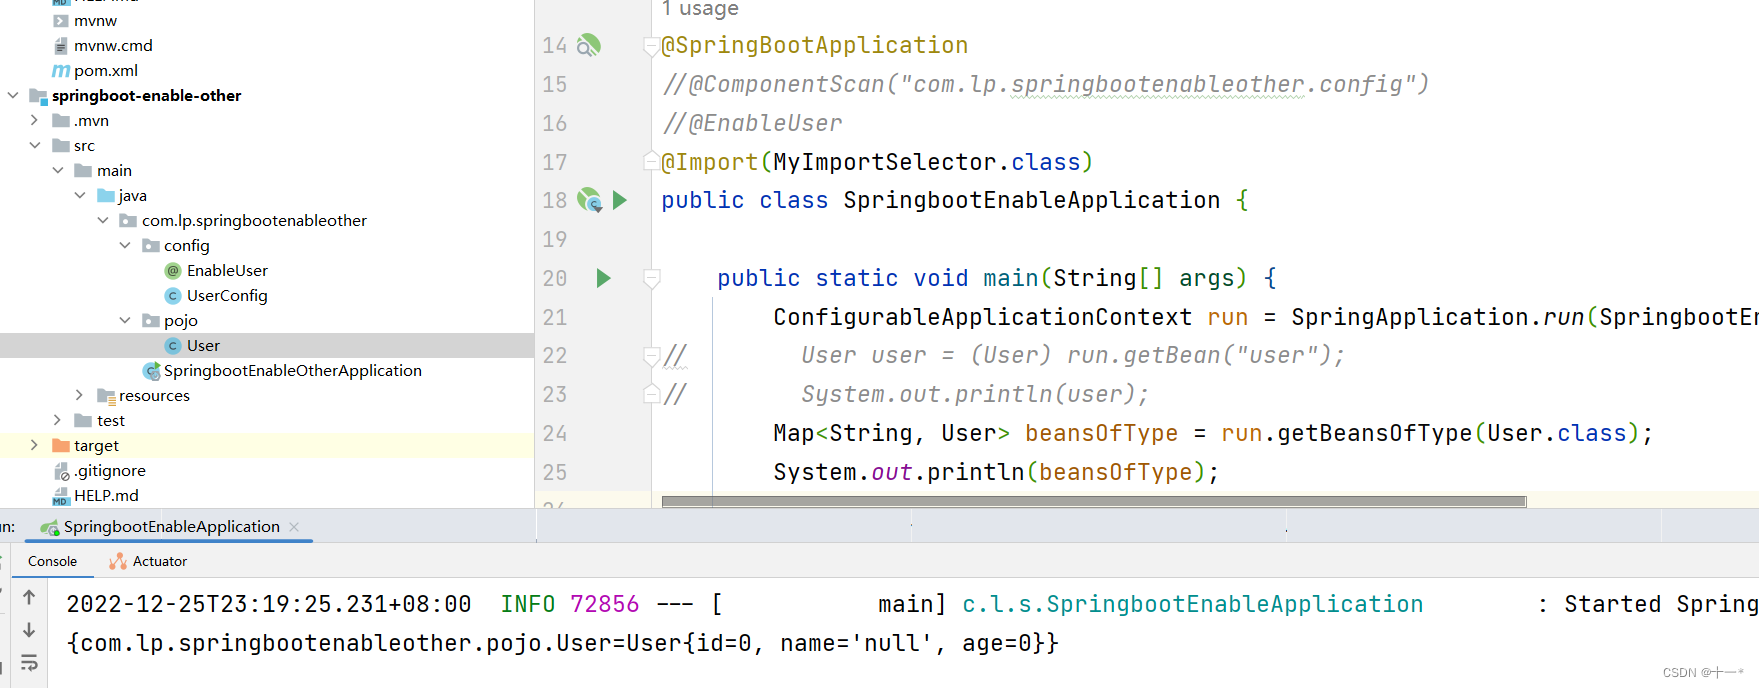
@SpringBootApplication
//@ComponentScan("com.lp.springbootenableother.config")
//@Import(UserConfig.class)
@EnableUser
public class SpringbootEnableApplication {

    public static void main(String[] args) {
        ConfigurableApplicationContext run = SpringApplication.run(SpringbootEnableApplication.class, args);
        User user = (User) run.getBean("user");
        System.out.println(user);

    }
}
编写EnableUser注解
@Target(ElementType.TYPE)
@Retention(RetentionPolicy.RUNTIME)
@Documented
@Import(UserConfig.class)
public @interface EnableUser {
}
启动,能够获取
)。
示例代码
@Import(User.class)
public class SpringbootEnableApplication {
    public static void main(String[] args) {
        ConfigurableApplicationContext run = SpringApplication.run(SpringbootEnableApplication.class, args);
        User user = (User) run.getBean("user");
        System.out.println(user);

    }
}
②导入配置类
示例代码
@Import(UserConfig.class)
public class SpringbootEnableApplication {
    public static void main(String[] args) {
        ConfigurableApplicationContext run = SpringApplication.run(SpringbootEnableApplication.class, args);
        User user = (User) run.getBean("user");
        System.out.println(user);

    }
}
③导入 ImportSelector 实现类
一般用于加载配置文件中的类
示例代码
public class MyImportSelector implements ImportSelector {
    @Override
    public String[] selectImports(AnnotationMetadata importingClassMetadata) {
        return new String[]{"com.lp.domain.User", "com.lp.domain.Role"};
    }
}
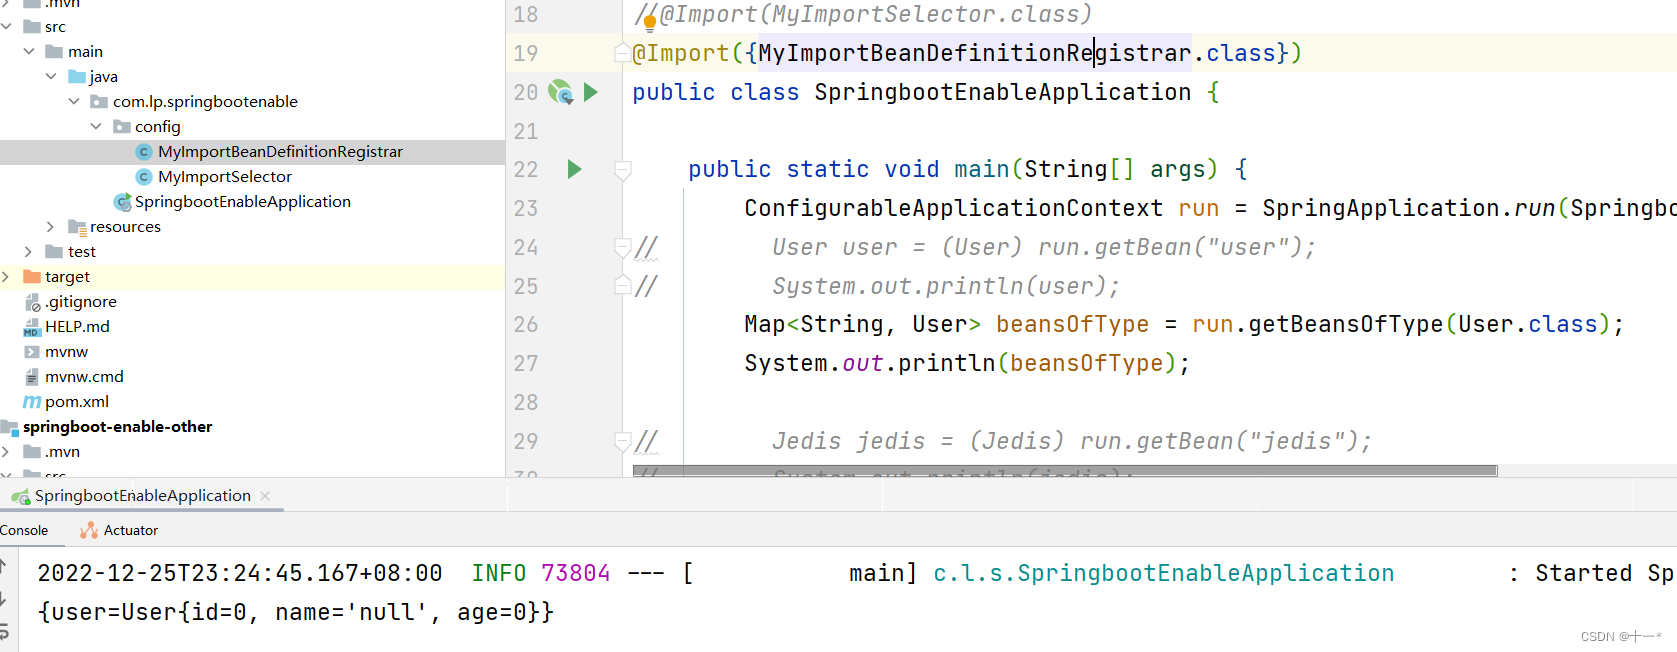
④导入 ImportBeanDefinitionRegistrar 实现类
@Import({MyImportBeanDefinitionRegistrar.class})
示例代码
public class MyImportBeanDefinitionRegistrar implements ImportBeanDefinitionRegistrar {
    @Override
    public void registerBeanDefinitions(AnnotationMetadata importingClassMetadata, BeanDefinitionRegistry registry) {
        AbstractBeanDefinition beanDefinition = BeanDefinitionBuilder.rootBeanDefinition(User.class).getBeanDefinition();
        registry.registerBeanDefinition("user", beanDefinition);
    }
}
 SpringbootEnableApplication测试代码
   Import4中用法:

*  1. 导入Bean
*  2. 导入配置类
*  3. 导入ImportSelector的实现类。
*  4. 导入ImportBeanDefinitionRegistrar实现类
      */
@SpringBootApplication
//@ComponentScan("com.lp.springbootenableother.config")
//@Import(User.class)
//@EnableUser
//@Import(MyImportSelector.class)
//@Import({MyImportBeanDefinitionRegistrar.class})
public class SpringbootEnableApplication {

    public static void main(String[] args) {
        ConfigurableApplicationContext run = SpringApplication.run(SpringbootEnableApplication.class, args);
//        User user = (User) run.getBean("user");
//        System.out.println(user);
        Map<String, User> beansOfType = run.getBeansOfType(User.class);
        System.out.println(beansOfType);

//        Jedis jedis = (Jedis) run.getBean("jedis");
//        System.out.println(jedis);
//        jedis.set("hello", "world");
//        String hello = jedis.get("hello");
//        System.out.println(hello);
    }
}
@EnableAutoConfiguration中使用的是第三种方式:@Import(AutoConfigurationImportSelector.class)
六、SpringBoot自动配置-@EnableAutoConfiguration详解
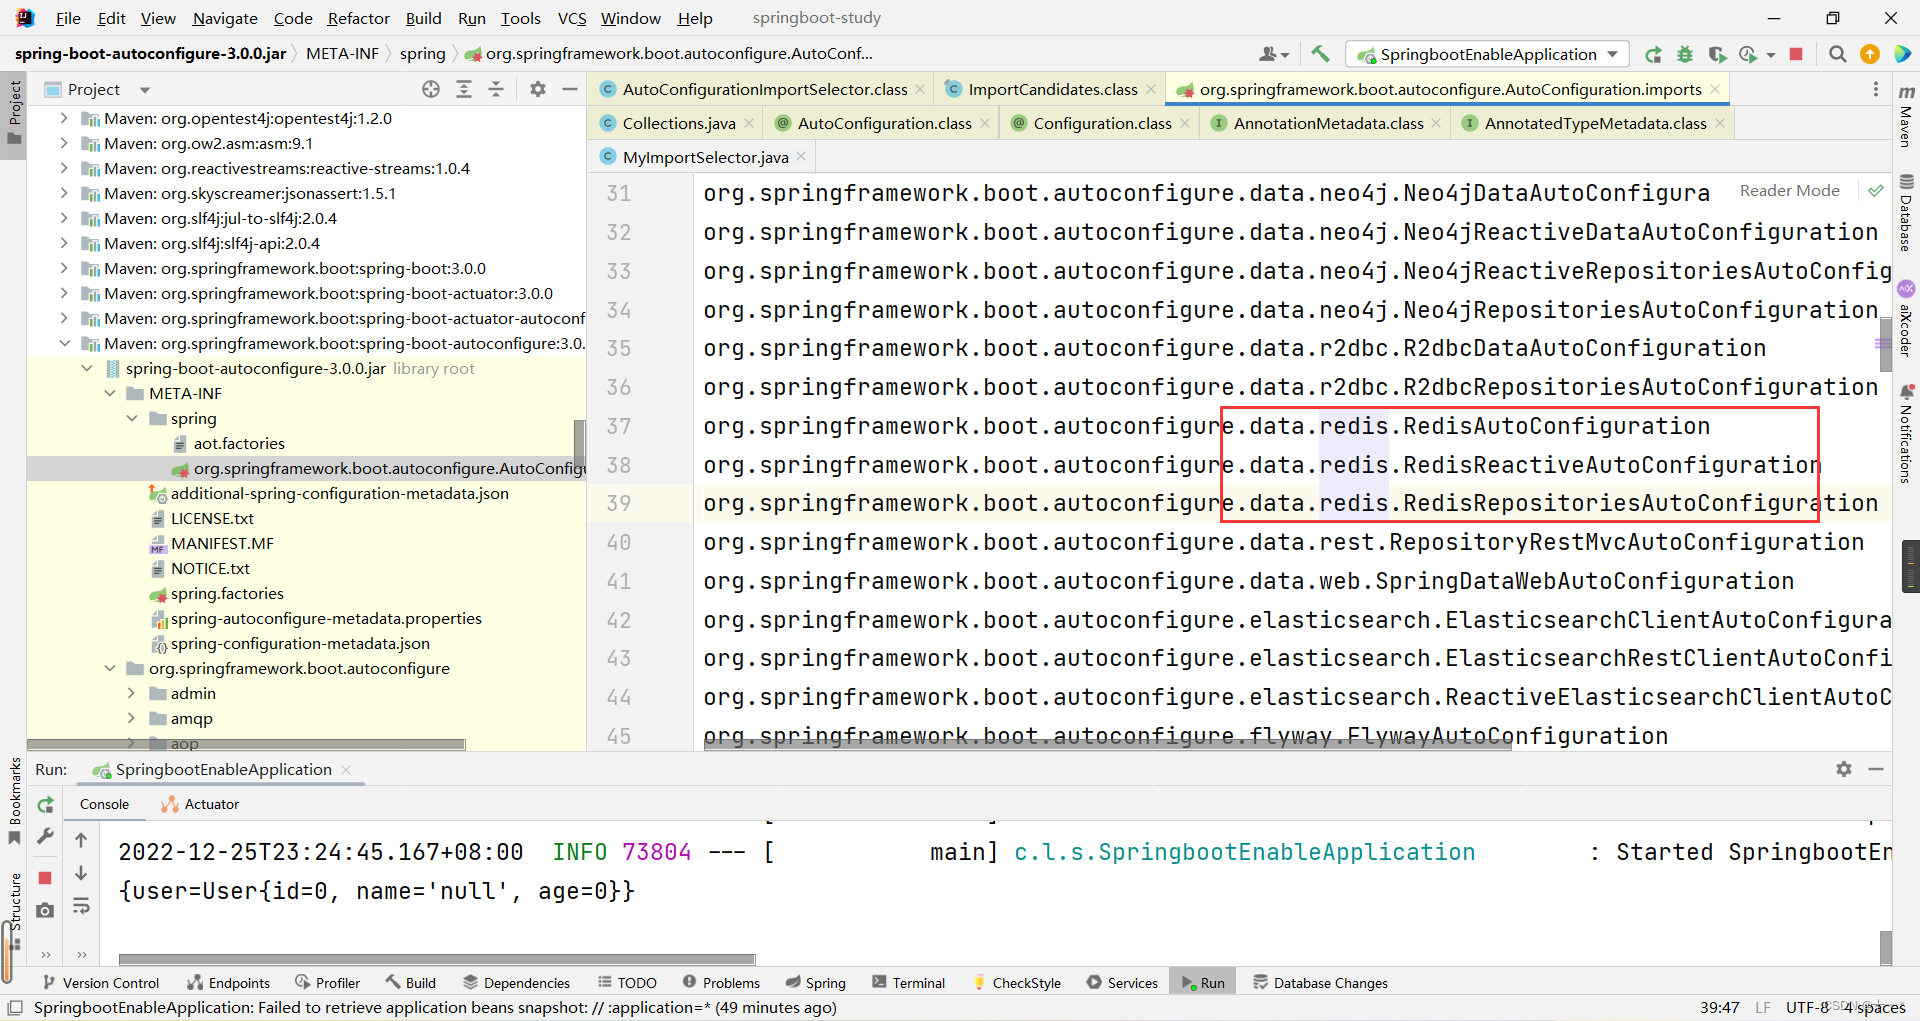
@EnableAutoConfiguration注解内部使用
@Import(AutoConfigurationImportSelector.class)来加载配置类。- 配置文件位置:
META-INF/spring/org.springframework.boot.autoconfigure.AutoConfiguration.imports,该配置文件中定义了大量的配置类,当 SpringBoot应用启动时,会自动加载这些配置类,初始化Bean - 并不是所有的Bean都会被初始化,在配置类中使用Condition来加载满足条件的Bean
总结
SpringBoot中的主启动类@SpringBootApplication由三个注解组成,分别是@SpringBootConfiguration、@EnableAutoConfiguration、@ComponentScan其中
@SpringBootConfiguration表示启动类为配置类;
@ComponentScan实现启动时扫描启动类所在的包以及子包下所有标记为bean的类由IOC容器注册为bean。
@EnableAutoConfiguration通过@Import(AutoConfigurationImportSelector.class)注解来加载AutoConfigurationImportSelector类,然后通过AutoConfigurationImportSelector中的selectImports方法去读取spring-boot-autoconfigure 下的META-INF/spring/org.springframework.boot.autoconfigure.AutoConfiguration.imports文件中的全类名,并根据一定规则过滤掉不符合的全类名,然后将剩余读取到的类全名集合返回给IOC容器并将这些组件注册为bean。


![[Python图像识别] 五十一.水书图像识别之利用数据增强扩充图像数据集](https://img-blog.csdnimg.cn/22b1dae5ef244d4f9ff86a826cf69ff2.png?x-oss-process=image/watermark,type_d3F5LXplbmhlaQ,shadow_50,text_Q1NETiBARWFzdG1vdW50,size_20,color_FFFFFF,t_70,g_se,x_16#pic_center)