用HTML+CSS构建一个绚丽的登录页面
参考文章:
动态水滴页面
自动切换背景的登录页面
登录页面代码
<!DOCTYPE html>
<html lang="en">

<head>
    <meta charset="UTF-8">
    <meta http-equiv="X-UA-Compatible" content="IE=edge">
    <meta name="viewport" content="width=device-width, initial-scale=1.0">
    <title>登录</title>
    <style>
        body{
            background: url(./images/樱花.png);
            /* 设置背景铺满 */
            background-repeat:no-repeat;
            background-size:100%;

        }
        form{
            /* 设置form大小 */
            width: 400px;
            height: 250px;

            /* 加个背景颜色 */
            background-color: #E1E9EF;

            /* 设置透明度 */
            opacity: 80%;

            text-align: center;
            /* 再设置内边距 使得内容更偏向于中央位置 */
            /* 上方,下方内边距为120px 与 左边与右边均为100px 按照逆时针 */
            /* 但是会撑大盒子 */
            padding: 120px 100px;

            /* 设置文本文字的大小 */
            font-size: 18px;

            /* 添加圆角边框 */
            border-radius: 10px;

            /* 增加外边距 */
            /* 上下120px 然后左右居中 */
            margin: 120px auto;
        }

        .textinput{
            /* 设置宽高 */
            height: 40px;
            width: 300px;

            /* 设置内边距 */
            padding: 0 35px;

            /* 去除边框 */
            border: none;

            /* 设置背景颜色 */
            background: #F8F9F9;

            /* 设置字体大小 */
            font-size: 15px;

            /* 给文本框加上阴影 */
            box-shadow: 0px 1px 1px rgba(255, 255, 255, 0.7), inset 0px 2px 5px #aaaaaa;

            /* 给文本框加上圆角边框 */
            border-radius: 5px;

            /* 给文本框中输入文字加上颜色 */
            color: saddlebrown;
        }

        /* 筛选input标签中 type为"submit"的 进行渲染*/
        input[type="submit"]{
            /* 设置宽高 */
            width: 110px;
            height: 40px;

            /* 内部文本居中 */
            text-align: center;

            /* 圆角边框 */
            border-radius: 5px;

            /* 设置字体 */
            font:16px "黑体";

            /* 设置背景颜色 */
            background-color: #C0C6CB;
        }
        a {
            /* 去除下划线 */
            text-decoration: none;
        }

        a:hover {
            /* 悬空的时候有被选中的样子 出现下划线*/
            text-decoration: underline;
        }
    </style>
</head>

<body>
    <form>
        <p>用户名<br />
            <input type="text" class="textinput" placeholder="请输入用户名" />
        </p>
        <p>密码<br />
            <input type="password" class="textinput" placeholder="请输入密码" />
        </p>
        <p>
            <input id="remember" type="checkbox" /><label for="smtxt">记住密码</label>
        </p>
        <p>
            <input type="submit" value="登录" />
        </p>
        <p class="smtxt">还没有账户?<a href="注册界面.html">注册</a></a>

        </p>
    </form>
</body>

</html>
添加JS逻辑
<script>
        // 定义图片资源数组
        var imgs = ["images/1.jpg","images/2.jpg", "images/3.jpg", "images/4.jpg"]
        // 获取body元素
        // 添加自动切换背景的函数
        // 定义当前的index
        let index = 0;
        // 每隔一秒换一张背景
        setInterval(function(){
            index += 1;
            index = index % 4;
            document.body.style.background = 'url(' + this.imgs[index] + ')';
        }, 1000);

    </script>
完整代码
<!DOCTYPE html>
<html lang="en">

<head>
    <meta charset="UTF-8">
    <meta http-equiv="X-UA-Compatible" content="IE=edge">
    <meta name="viewport" content="width=device-width, initial-scale=1.0">
    <title>登录</title>
    <style>
        body{
            background: url("https://pic3.zhimg.com/v2-92879d7d6ddae16c6c880bf936a2b2ae_r.jpg");
            /* 设置背景铺满 */
            background-repeat:no-repeat;
            background-size:100%;

        }
        form{
            /* 设置form大小 */
            width: 400px;
            height: 250px;

            /* 加个背景颜色 */
            background-color: #E1E9EF;

            /* 设置透明度 */
            opacity: 80%;

            text-align: center;
            /* 再设置内边距 使得内容更偏向于中央位置 */
            /* 上方,下方内边距为120px 与 左边与右边均为100px 按照逆时针 */
            /* 但是会撑大盒子 */
            padding: 120px 100px;

            /* 设置文本文字的大小 */
            font-size: 18px;

            /* 添加圆角边框 */
            border-radius: 10px;

            /* 增加外边距 */
            /* 上下120px 然后左右居中 */
            margin: 120px auto;
        }

        .textinput{
            /* 设置宽高 */
            height: 40px;
            width: 300px;

            /* 设置内边距 */
            padding: 0 35px;

            /* 去除边框 */
            border: none;

            /* 设置背景颜色 */
            background: #F8F9F9;

            /* 设置字体大小 */
            font-size: 15px;

            /* 给文本框加上阴影 */
            box-shadow: 0px 1px 1px rgba(255, 255, 255, 0.7), inset 0px 2px 5px #aaaaaa;

            /* 给文本框加上圆角边框 */
            border-radius: 5px;

            /* 给文本框中输入文字加上颜色 */
            color: saddlebrown;
        }

        /* 筛选input标签中 type为"submit"的 进行渲染*/
        input[type="submit"]{
            /* 设置宽高 */
            width: 110px;
            height: 40px;

            /* 内部文本居中 */
            text-align: center;

            /* 圆角边框 */
            border-radius: 5px;

            /* 设置字体 */
            font:16px "黑体";

            /* 设置背景颜色 */
            background-color: #C0C6CB;
        }
        a {
            /* 去除下划线 */
            text-decoration: none;
        }

        a:hover {
            /* 悬空的时候有被选中的样子 出现下划线*/
            text-decoration: underline;
        }
    </style>
</head>

<body>
    <form>
        <p>用户名<br />
            <input type="text" class="textinput" placeholder="请输入用户名" />
        </p>
        <p>密码<br />
            <input type="password" class="textinput" placeholder="请输入密码" />
        </p>
        <p>
            <input id="remember" type="checkbox" /><label for="smtxt">记住密码</label>
        </p>
        <p>
            <input type="submit" value="登录" />
        </p>
        <p class="smtxt">还没有账户?<a href="注册界面.html">注册</a></a>

        </p>
    </form>
    <script>
        // 定义图片资源数组
        var imgs = ["images/1.jpg","images/2.jpg", "images/3.jpg", "images/4.jpg"]
        // 获取body元素
        // 添加自动切换背景的函数
        // 定义当前的index
        let index = 0;
        // 每隔5秒换一张背景
        setInterval(function(){
            index += 1;
            index = index % 4;
            document.body.style.background = 'url(' + this.imgs[index] + ')';
        }, 5000);

    </script>
</body>

</html>
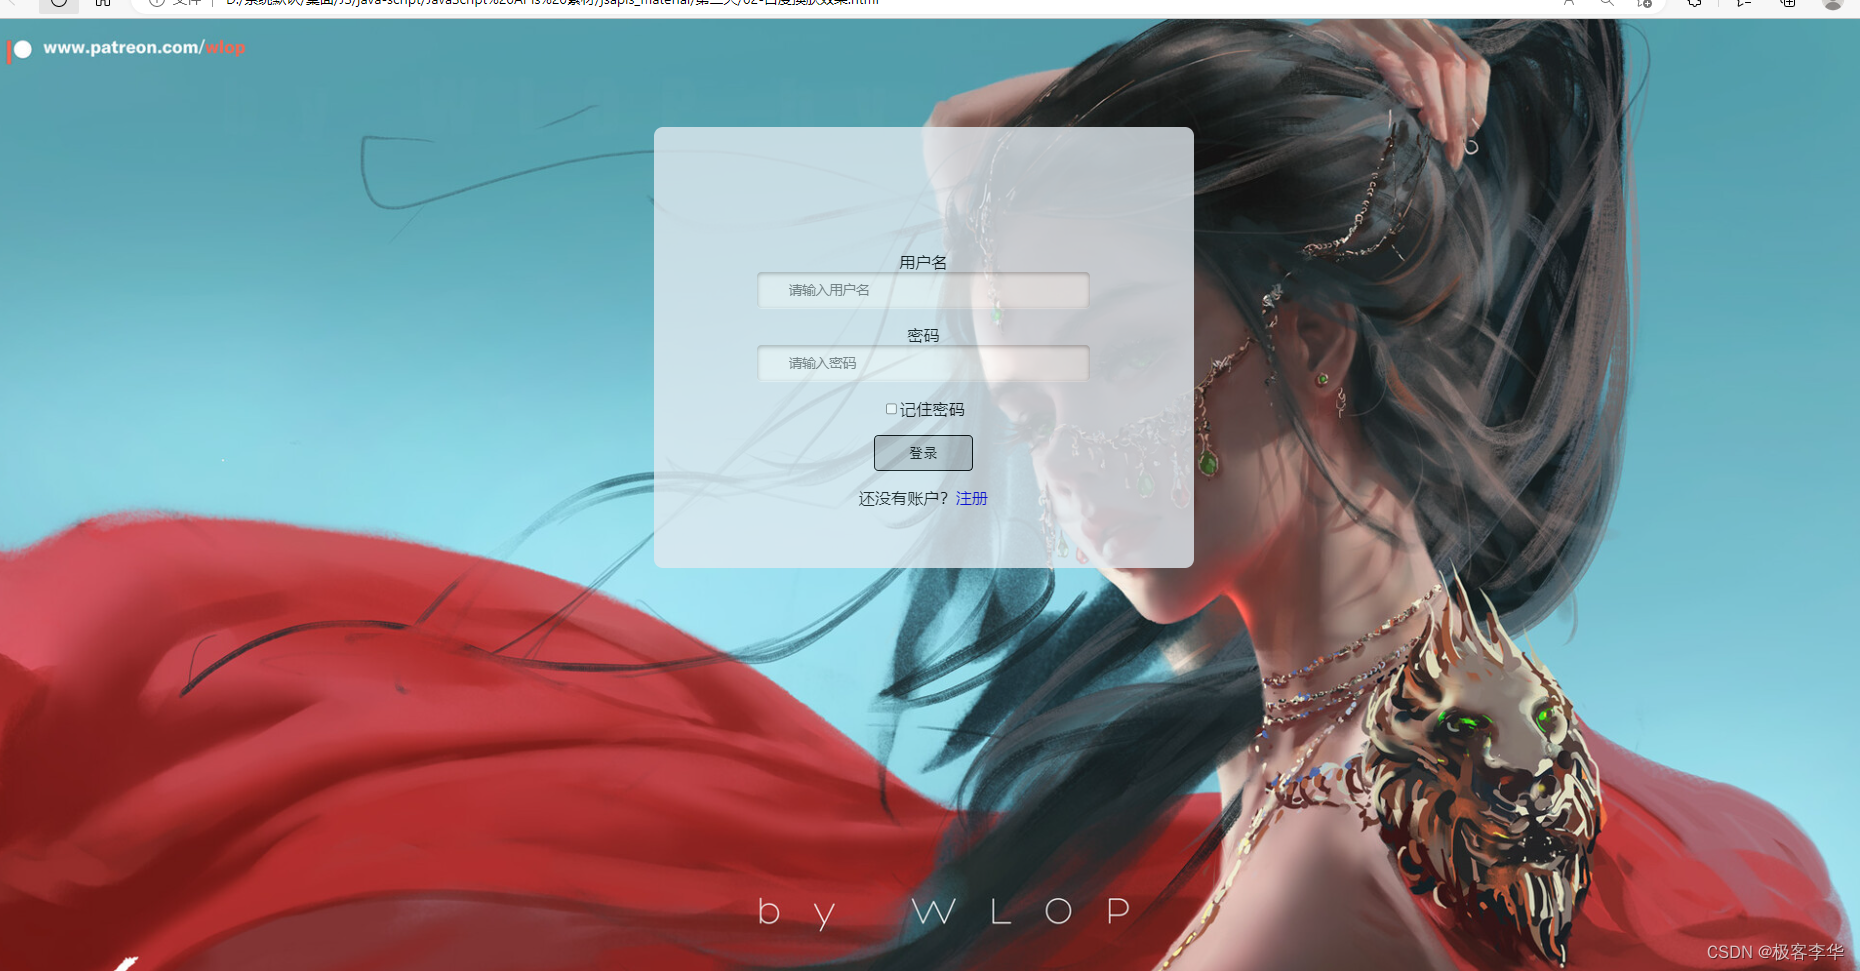
此时的效果:
加上水滴渲染
<!DOCTYPE html>
<html lang="en">

<head>
    <meta charset="UTF-8">
    <meta http-equiv="X-UA-Compatible" content="IE=edge">
    <meta name="viewport" content="width=device-width, initial-scale=1.0">
    <title>登录</title>
    <style>
        body{
            background: url("https://pic3.zhimg.com/v2-92879d7d6ddae16c6c880bf936a2b2ae_r.jpg");
            /* 设置背景铺满 */
            background-repeat:no-repeat;
            background-size:100%;

        }
        form{

            /* 设置透明度 */
            opacity: 80%;

            text-align: center;
            /* 再设置内边距 使得内容更偏向于中央位置 */
            /* 上方,下方内边距为120px 与 左边与右边均为100px 按照逆时针 */
            /* 但是会撑大盒子 */
            padding: 0px 100px;

            /* 设置文本文字的大小 */
            font-size: 18px;

            /* 添加圆角边框 */
            border-radius: 10px;

            /* 增加外边距 */
            /* 上下80px 然后左右居中 */
            margin: 80px auto;
        }


        .textinput{
            /* 设置宽高 */
            height: 40px;
            width: 100px;

            /* 设置内边距 */
            padding: 0 35px;

            /* 去除边框 */
            border: none;

            /* 设置背景颜色 */
            background: #F8F9F9;

            /* 设置字体大小 */
            font-size: 15px;

            /* 给文本框加上阴影 */
            box-shadow: 0px 1px 1px rgba(255, 255, 255, 0.7), inset 0px 2px 5px #aaaaaa;

            /* 给文本框加上圆角边框 */
            border-radius: 5px;

            /* 给文本框中输入文字加上颜色 */
            color: saddlebrown;
        }

        /* 筛选input标签中 type为"submit"的 进行渲染*/
        input[type="submit"]{
            /* 设置宽高 */
            width: 110px;
            height: 40px;

            /* 内部文本居中 */
            text-align: center;

            /* 圆角边框 */
            border-radius: 5px;

            /* 设置字体 */
            font:16px "黑体";

            /* 设置背景颜色 */
            background-color: #C0C6CB;
        }


        a {
            /* 去除下划线 */
            text-decoration: none;
        }

        a:hover {
            /* 悬空的时候有被选中的样子 出现下划线*/
            text-decoration: underline;
        }
        .main {
            /* 设置为绝对定位 */
            position: absolute;
            /* 设置盒子放在中间的位置 */
            left: 50%;
            top: 50%;
            /* 设置动态效果 */
            transform: translate(-50%, -50%);
            /* 设置盒子大小 */
            width: 400px;
            height: 400px;
            /* 把边框算入盒子大小 */
            box-sizing: border-box;
            border-radius: 50%;
            /* 背景透明 */
            background: transparent;
            /* 设置阴影边框 */
            box-shadow: inset 10px 20px 30px rgba(0, 0, 0, 0.5), 10px 10px 20px rgba(0, 0, 0, 0.3), 15px 15px 30px rgba(0, 0, 0, 0.05), inset -10px -10px 15px rgba(255, 255, 255, 0.8);
            /* 设置动画效果 */
            animation: move 6s linear infinite;
        }

        .main::after {
            position: absolute;
            content: "";
            width: 40px;
            height: 40px;
            background: rgba(255, 255, 255, 0.5);
            left: 80px;
            top: 80px;
            border-radius: 50%;
            animation: move2 6s linear infinite;
            filter:blur(1px);
        }

        .main::before {
            position: absolute;
            content: "";
            width: 20px;
            height: 20px;
            background: rgba(255, 255, 255, 0.5);
            left: 130px;
            top: 70px;
            border-radius: 50%;
            animation: move3 6s linear infinite;
            filter:blur(1px);
        }

        /* 设置移动方位 */
        @keyframes move {
            50% {
                border-radius: 50% 50% 66% 34% / 26% 62% 38% 74% ;
            }
            75% {
                border-radius: 750% 50% 49% 51% / 26% 62% 38% 74% ;
            }
            25% {
                border-radius: 50% 50% 49% 51% / 52% 62% 38% 48% ;
            }
        }
    </style>
</head>

<body>
    <div class="main">
        <form>
            <p>用户名<br />
                <input type="text" class="textinput" placeholder="请输入用户名" />
            </p>
            <p>密码<br />
                <input type="password" class="textinput" placeholder="请输入密码" />
            </p>
            <p>
                <input id="remember" type="checkbox" /><label for="smtxt">记住密码</label>
            </p>
            <p>
                <input type="submit" value="登录" />
            </p>
            <p class="smtxt">还没有账户?<a href="注册界面.html">注册</a></a>
        </form>
    </div>
</body>
<script>
        // 定义图片资源数组
        var imgs = ["ihttps://pic2.zhimg.com/v2-9142793b20533b5e2e5cc91eab9ee101_r.jpg","https://pic1.zhimg.com/v2-abdc2de175b7bf0ed358ee5828cdf858_r.jpg", "https://pic2.zhimg.com/v2-168c35bda16e110ecf9b4aa6e97d0b01_r.jpg", "https://pic2.zhimg.com/v2-dcc1ea1a8b0c398c826ef9469d1e8b96.jpg"]
        // 获取body元素
        // 添加自动切换背景的函数
        // 定义当前的index
        let index = 0;
        // 每隔一秒换一张背景
        setInterval(function(){
            index += 1;
            index = index % 4;
            document.body.style.background = 'url(' + this.imgs[index] + ')';
        }, 5000);

    </script>
</html>
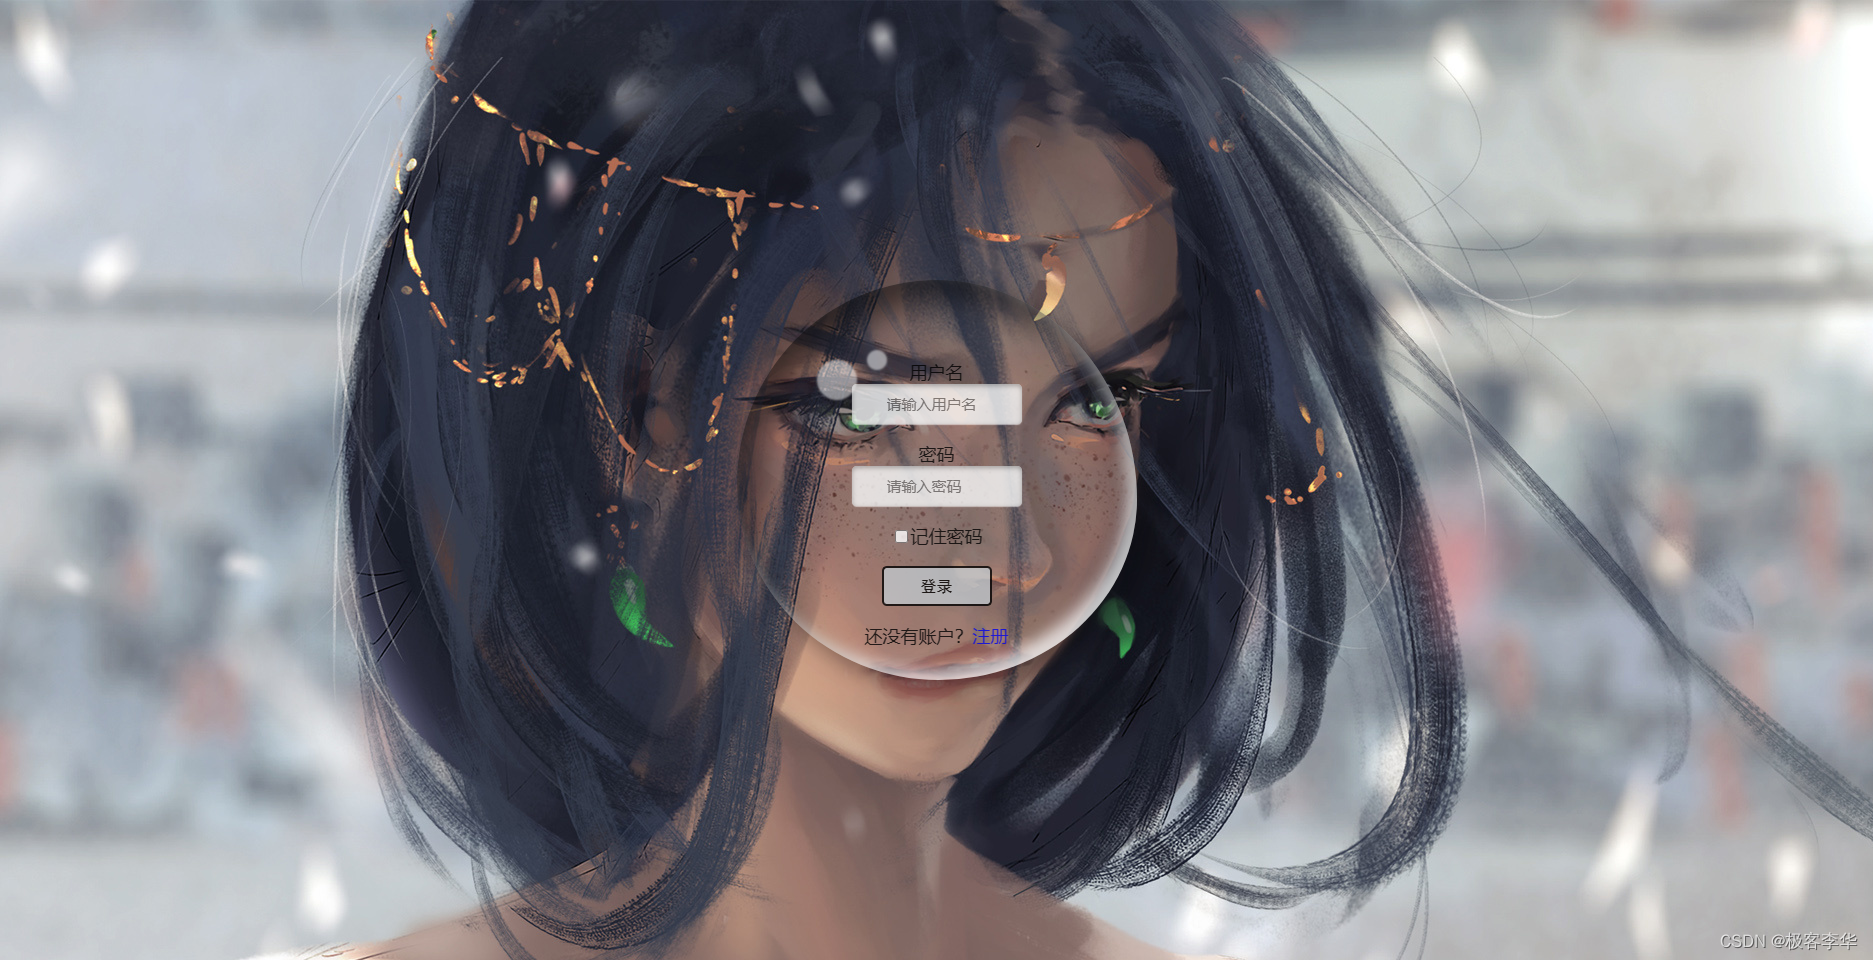
最后效果
直接复制代码即可。
![[~/vulhub]/log4j/CVE-2021-44228-20221225](https://img-blog.csdnimg.cn/img_convert/863dd7e2db55cb643e1283a5a8350ec6.png)
