文章目录
- 前言
- 配置内核
- 简单的AB-BA死锁案例
- 实际项目中的死锁
前言
死锁是指两个或多个进程因争夺资源而造成的互相等待的现象,如进程A需要资源X,进程B需要资源Y,而双方都掌握对方所需要的资源,且都不释放,这会导致死锁。
在内核开发中,时常要考虑并发设计,即使采用正确的编程思路,也不可能避免会发生死锁。在Linux内核中,常见的死锁有如下两种:
- 递归死锁:如在中断延迟操作中使用了锁,和外面的锁构成了递归死锁。
- AB-BA死锁:多个锁因处理不当而引发死锁,多个内核路径上的锁处理顺序不一致也会导致死锁。
Linux内核在2006年引入了死锁调试模块lockdep,lockdep会跟踪每个锁的自身状态和各个锁之间的依赖关系,经过一系列的验证规则来确保锁之间依赖关系是正确。
配置内核
要在Linux内核中使用lockdep功能,需要打开CONFIG_DEBUG_LOCKDEP选项:
CONFIG_LOCK_STAT=y
CONFIG_PROVE_LOCKING=y
CONFIG_DEBUG_LOCKDEP=y

在proc目录下会有lockdep、lockdep_chains和lockdep_stats三个文件节点,这说明lockdep模块已经生效:

然后重新编译内核,更换内核重启系统。
简单的AB-BA死锁案例
下面举一个简单的AB-BA死锁的例子:
#include <linux/module.h>
#include <linux/init.h>
#include <linux/kernel.h>

static DEFINE_SPINLOCK(hack_spinA);
static DEFINE_SPINLOCK(hack_spinB);

void hack_spinAB(void)
{
    printk("hack_lockdep:A->B\n");
    spin_lock(&hack_spinA);
    spin_lock(&hack_spinB);
}

void hack_spinBA(void)
{
    printk("hack_lockdep:B->A\n");
    spin_lock(&hack_spinB);
}

static int __init lockdep_test_init(void)
{
    printk("figo:my lockdep module init\n");

    hack_spinAB();
    hack_spinBA();

    return 0;
}

static void __exit lockdep_test_exit(void)
{
  printk("goodbye\n");
}

module_init(lockdep_test_init);
module_exit(lockdep_test_exit);
MODULE_LICENSE("GPL");
上述代码初始化了两个自旋锁,其中hack_spinAB()函数分别申请了hack_spinA锁和hack_spinB锁,hack_spinBA()函数要申请hack_spinB锁。因为刚才锁hack_spinB已经被成功获取且还没有释放,所以它会一直等待,而且它也被锁在hack_spinA的临界区里。
现象:
[root@imx6ull:~]# insmod lockdep_test.ko
[  437.981262] figo:my lockdep module init
[  437.985145] hack_lockdep:A->B
[  437.989054] hack_lockdep:B->A
[  437.992304]
[  437.993819] =============================================
[  437.999229] [ INFO: possible recursive locking detected ]
[  438.004641] 4.9.88 #2 Tainted: G           O
[  438.009180] ---------------------------------------------
[  438.014589] insmod/367 is trying to acquire lock:
[  438.019303]  (hack_spinB){+.+...}, at: [<7f00a030>] lockdep_test_init+0x30/0x3c [lockdep_test]

[  438.028006] but task is already holding lock:
[  438.032547]  (hack_spinB){+.+...}, at: [<7f008038>] hack_spinAB+0x38/0x3c [lockdep_test]

[  438.040715] other info that might help us debug this:
[  438.045950]  Possible unsafe locking scenario:
[  438.045950]
[  438.051883]        CPU0
[  438.054337]        ----
[  438.056790]   lock(hack_spinB);
[  438.059975]   lock(hack_spinB);
[  438.063160]
[  438.063160]  *** DEADLOCK ***
[  438.063160]
[  438.069094]  May be due to missing lock nesting notation
[  438.069094]
[  438.075896] 2 locks held by insmod/367:
[  438.079740]  #0:  (hack_spinA){+.+...}, at: [<7f008030>] hack_spinAB+0x30/0x3c [lockdep_test]
[  438.088358]  #1:  (hack_spinB){+.+...}, at: [<7f008038>] hack_spinAB+0x38/0x3c [lockdep_test]
[  438.096977]
[  438.096977] stack backtrace:
[  438.101352] CPU: 0 PID: 367 Comm: insmod Tainted: G           O    4.9.88 #2
[  438.108410] Hardware name: Freescale i.MX6 UltraLite (Device Tree)
[  438.114628] [<801136cc>] (unwind_backtrace) from [<8010e78c>] (show_stack+0x20/0x24)
[  438.122396] [<8010e78c>] (show_stack) from [<804ccc34>] (dump_stack+0xa0/0xcc)
[  438.129646] [<804ccc34>] (dump_stack) from [<8018f020>] (__lock_acquire+0x8bc/0x1d4c)
[  438.137502] [<8018f020>] (__lock_acquire) from [<80190b78>] (lock_acquire+0xf4/0x2f8)
[  438.145358] [<80190b78>] (lock_acquire) from [<80c94a0c>] (_raw_spin_lock+0x4c/0x84)
[  438.153129] [<80c94a0c>] (_raw_spin_lock) from [<7f00a030>] (lockdep_test_init+0x30/0x3c [lockdep_test])
[  438.162638] [<7f00a030>] (lockdep_test_init [lockdep_test]) from [<80102004>] (do_one_initcall+0x54/0x184)
[  438.172315] [<80102004>] (do_one_initcall) from [<80229624>] (do_init_module+0x74/0x1f8)
[  438.180431] [<80229624>] (do_init_module) from [<801dac54>] (load_module+0x201c/0x279c)
[  438.188461] [<801dac54>] (load_module) from [<801db648>] (SyS_finit_module+0xc4/0xfc)
[  438.196317] [<801db648>] (SyS_finit_module) from [<80109680>] (ret_fast_syscall+0x0/0x1c)
提示信息显示:尝试获取hack_spinB锁,但是该锁已经在函数hack_spinAB中被锁定:
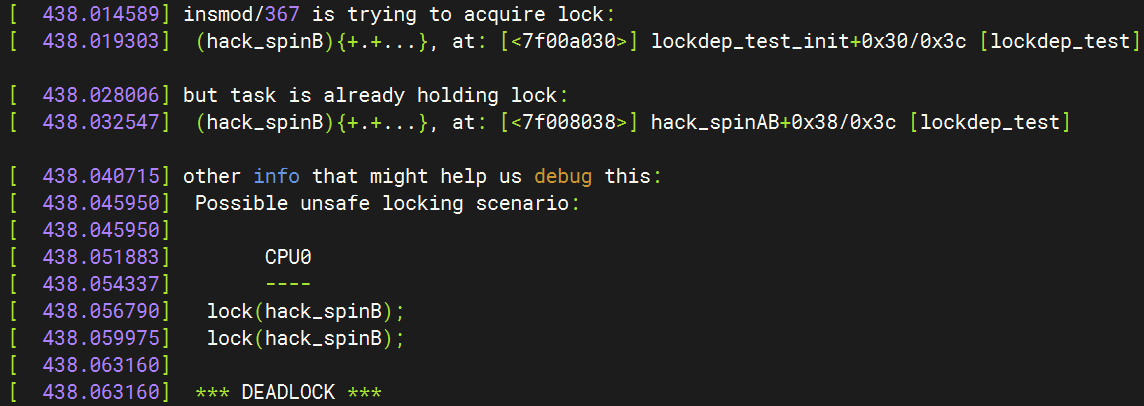
lockdep已经很清晰地显示了死锁发生的路径和发生时函数调用的栈信息,根据这些信息可以很快速地定位问题和解决问题。
实际项目中的死锁
下面的例子要复杂一些,这是从实际项目中抽取出来的死锁,更具有代表性。
#include <linux/init.h>
#include <linux/module.h>
#include <linux/kernel.h>
#include <linux/kthread.h>
#include <linux/freezer.h>
#include <linux/delay.h>


static DEFINE_MUTEX(mutex_a);
static struct delayed_work delay_task;
static void lockdep_timefunc(unsigned long);
static DEFINE_TIMER(lockdep_timer, lockdep_timefunc, 0, 0);

static void lockdep_timefunc(unsigned long dummy)
{
    schedule_delayed_work(&delay_task, 10);
    mod_timer(&lockdep_timer, jiffies + msecs_to_jiffies(100));
}

static void lockdep_test_work(struct work_struct *work)
{
    mutex_lock(&mutex_a);
    mdelay(300);//处理一些事情,这里用mdelay替代
    mutex_unlock(&mutex_a);
}

static int lockdep_thread(void *nothing)
{
    set_freezable();//清除当前线程标志flags中的PF_NOFREEZE位,表示当前线程能进入挂起或休眠状态。
    set_user_nice(current, 0);
    while(!kthread_should_stop()){
        mdelay(500);//处理一些事情,这里用mdelay替代

        //遇到某些特殊情况,需要取消delay_task
        mutex_lock(&mutex_a);
        cancel_delayed_work_sync(&delay_task);
        mutex_unlock(&mutex_a);
    }

    return 0;
}


static int __init lockdep_test_init(void)
{
    printk("figo:my lockdep module init\n");

   struct task_struct *lock_thread;

   /*创建一个线程来处理某些事情*/
   lock_thread = kthread_run(lockdep_thread, NULL, "lockdep_test");

   /*创建一个延迟的工作队列*/
   INIT_DELAYED_WORK(&delay_task, lockdep_test_work);

   /*创建一个定时器来模拟某些异步事件,如中断等*/
   lockdep_timer.expires = jiffies + msecs_to_jiffies(500);
   add_timer(&lockdep_timer);

    return 0;
}


static void __exit lockdep_test_exit(void)
{
  printk("goodbye\n");
}

MODULE_LICENSE("GPL");
module_init(lockdep_test_init);
module_exit(lockdep_test_exit);
首先创建一个lockdep_thread内核线程,用于周期性地处理某些事情,然后创建一个名为lockdep_test_worker的工作队列来处理一些类似于中断下半部的延迟操作,最后使用一个定时器来模拟某些异步事件(如中断)。
在lockdep_thread内核线程中,某些特殊情况下常常需要取消工作队列。代码中首先申请了一个mutex_a互斥锁,然后调用cancel_delayed_work_sync()函数取消工作队列。另外,定时器定时地调度工作队列,并在回调函数lockdep_test_worker()函数中申请mutex_a互斥锁。
以上便是该例子的调用场景,下面是运行时捕捉到死锁信息:
[root@imx6ull:~]# insmod lockdep_test.ko
[  370.477536] figo:my lockdep module init
[root@imx6ull:~]# [  371.124433]
[  371.125970] ======================================================
[  371.132162] [ INFO: possible circular locking dependency detected ]
[  371.138445] 4.9.88 #2 Tainted: G           O
[  371.142987] -------------------------------------------------------
[  371.149265] kworker/0:2/104 is trying to acquire lock:
[  371.154414]  (mutex_a){+.+...}, at: [<7f004078>] lockdep_test_work+0x24/0x58 [lockdep_test]

[  371.162852] but task is already holding lock:
[  371.167392]  ((&(&delay_task)->work)){+.+...}, at: [<80157104>] process_one_work+0x1ec/0x8bc

[  371.175912] which lock already depends on the new lock.
[  371.175912]
[  371.182799]
[  371.182799] the existing dependency chain (in reverse order) is:
[  371.190291]
-> #1 ((&(&delay_task)->work)){+.+...}:
[  371.195432]        flush_work+0x4c/0x278
[  371.199371]        __cancel_work_timer+0xa8/0x1d0
[  371.204088]        cancel_delayed_work_sync+0x1c/0x20
[  371.209157]        lockdep_thread+0x84/0xa4 [lockdep_test]
[  371.214658]        kthread+0x120/0x124
[  371.218423]        ret_from_fork+0x14/0x38
[  371.222529]
-> #0 (mutex_a){+.+...}:
[  371.226374]        lock_acquire+0xf4/0x2f8
[  371.230487]        mutex_lock_nested+0x70/0x4bc
[  371.235036]        lockdep_test_work+0x24/0x58 [lockdep_test]
[  371.240797]        process_one_work+0x2b0/0x8bc
[  371.245342]        worker_thread+0x68/0x5c4
[  371.249538]        kthread+0x120/0x124
[  371.253301]        ret_from_fork+0x14/0x38
[  371.257407]
[  371.257407] other info that might help us debug this:
[  371.257407]
[  371.265424]  Possible unsafe locking scenario:
[  371.265424]
[  371.271353]        CPU0                    CPU1
[  371.275891]        ----                    ----
[  371.280428]   lock((&(&delay_task)->work));
[  371.284656]                                lock(mutex_a);
[  371.290098]                                lock((&(&delay_task)->work));
[  371.296843]   lock(mutex_a);
[  371.299768]
[  371.299768]  *** DEADLOCK ***
[  371.299768]
[  371.305704] 2 locks held by kworker/0:2/104:
[  371.309981]  #0:  ("events"){.+.+.+}, at: [<80157104>] process_one_work+0x1ec/0x8bc
[  371.317729]  #1:  ((&(&delay_task)->work)){+.+...}, at: [<80157104>] process_one_work+0x1ec/0x8bc
[  371.326690]
[  371.326690] stack backtrace:
[  371.331066] CPU: 0 PID: 104 Comm: kworker/0:2 Tainted: G           O    4.9.88 #2
[  371.338558] Hardware name: Freescale i.MX6 UltraLite (Device Tree)
[  371.344760] Workqueue: events lockdep_test_work [lockdep_test]
[  371.350643] [<801136cc>] (unwind_backtrace) from [<8010e78c>] (show_stack+0x20/0x24)
[  371.358409] [<8010e78c>] (show_stack) from [<804ccc34>] (dump_stack+0xa0/0xcc)
[  371.365659] [<804ccc34>] (dump_stack) from [<8018c6e4>] (print_circular_bug+0x208/0x320)
[  371.373774] [<8018c6e4>] (print_circular_bug) from [<801900a0>] (__lock_acquire+0x193c/0x1d4c)
[  371.382408] [<801900a0>] (__lock_acquire) from [<80190b78>] (lock_acquire+0xf4/0x2f8)
[  371.390259] [<80190b78>] (lock_acquire) from [<80c8fda0>] (mutex_lock_nested+0x70/0x4bc)
[  371.398373] [<80c8fda0>] (mutex_lock_nested) from [<7f004078>] (lockdep_test_work+0x24/0x58 [lockdep_test])
[  371.408140] [<7f004078>] (lockdep_test_work [lockdep_test]) from [<801571c8>] (process_one_work+0x2b0/0x8bc)
[  371.417988] [<801571c8>] (process_one_work) from [<8015783c>] (worker_thread+0x68/0x5c4)
[  371.426099] [<8015783c>] (worker_thread) from [<8015e6c8>] (kthread+0x120/0x124)
[  371.433516] [<8015e6c8>] (kthread) from [<8010971c>] (ret_from_fork+0x14/0x38)
lockdep信息首先提示可能出现递归死锁"possible circular locking dependency detected",然后提示"kworker/0:2/104"线程尝试获取mutex_a互斥锁,但是该锁已经被其他进程持有,持有该锁的进程在&delay_task->work里。
接下来的函数调用栈显示上述尝试获取mutex_a锁的调用路径。两个路径如下:
(1)内核线程lockdep_thread首先成功获取了mutex_a互斥锁,然后调用cancel_delayed_work_sync()函数取消kworker。注意,cancel_delayed_work_sync()函数会调用flush操作并等待所有的kworker回调函数执行完,然后才会调用mutex_unlock(&mutex_a)释放该锁。

(2)kworker回调函数lockdep_test_worker()首先会尝试获取mutex_a互斥锁。注意,刚才内核线程lockdep_thread已经获取了mutex_a互斥锁,并且一直在等待当前kworker回调函数执行完,所以死锁发生了。

下面是该死锁场景的CPU调用关系:
        CPU0                      CPU1
----------------------------------------------------------------
内核线程lockdep_thread
lock(mutex_a)
   cancel_delayed_work_sync()
等待worker执行完成
                                  delay worker回调函数
                                  lock(mutex_a);尝试获取锁


