文章目录
- 0. 代码仓库
- 1 安装
- 1.1 windows 下的安装
- 1.2 Linux 下的安装
- 1.2.1 相关环境配置问题
- 1.2.2 准备安装
- 1.2.2.1 安装scons
- 1.2.2.2 安装jsoncpp
- Ubuntu系统下
- Centos8系统下
- 2 编译 c++ 测试文件: json-test.cpp
- 2.1 配置库文件
- 2.2 配置VS
- 2.3 Winsows系统下cpp文件测试
- 2.3.1 写json测试结果
- 2.3.2 读json测试结果
- 3 jsoncpp常用API
- 3.1 Value -> 对Json支持的数据类型进行封装/解析
- 3.2 Reader
- 3.3 FastWriter
0. 代码仓库
https://github.com/Chufeng-Jiang/OpenSSL_Secure_Data_Transmission_Platform/tree/main/Preparation
1 安装
1.1 windows 下的安装
-
在windows下 将
jsoncpp-0.10.7.tar.gz解压缩 -
进入到解压目录
jsoncpp-0.10.7, 在进入到子目录makefiles\msvc2010 -
使用
vs打开项目文件jsoncpp.sln -
编译该项目, 生成库文件
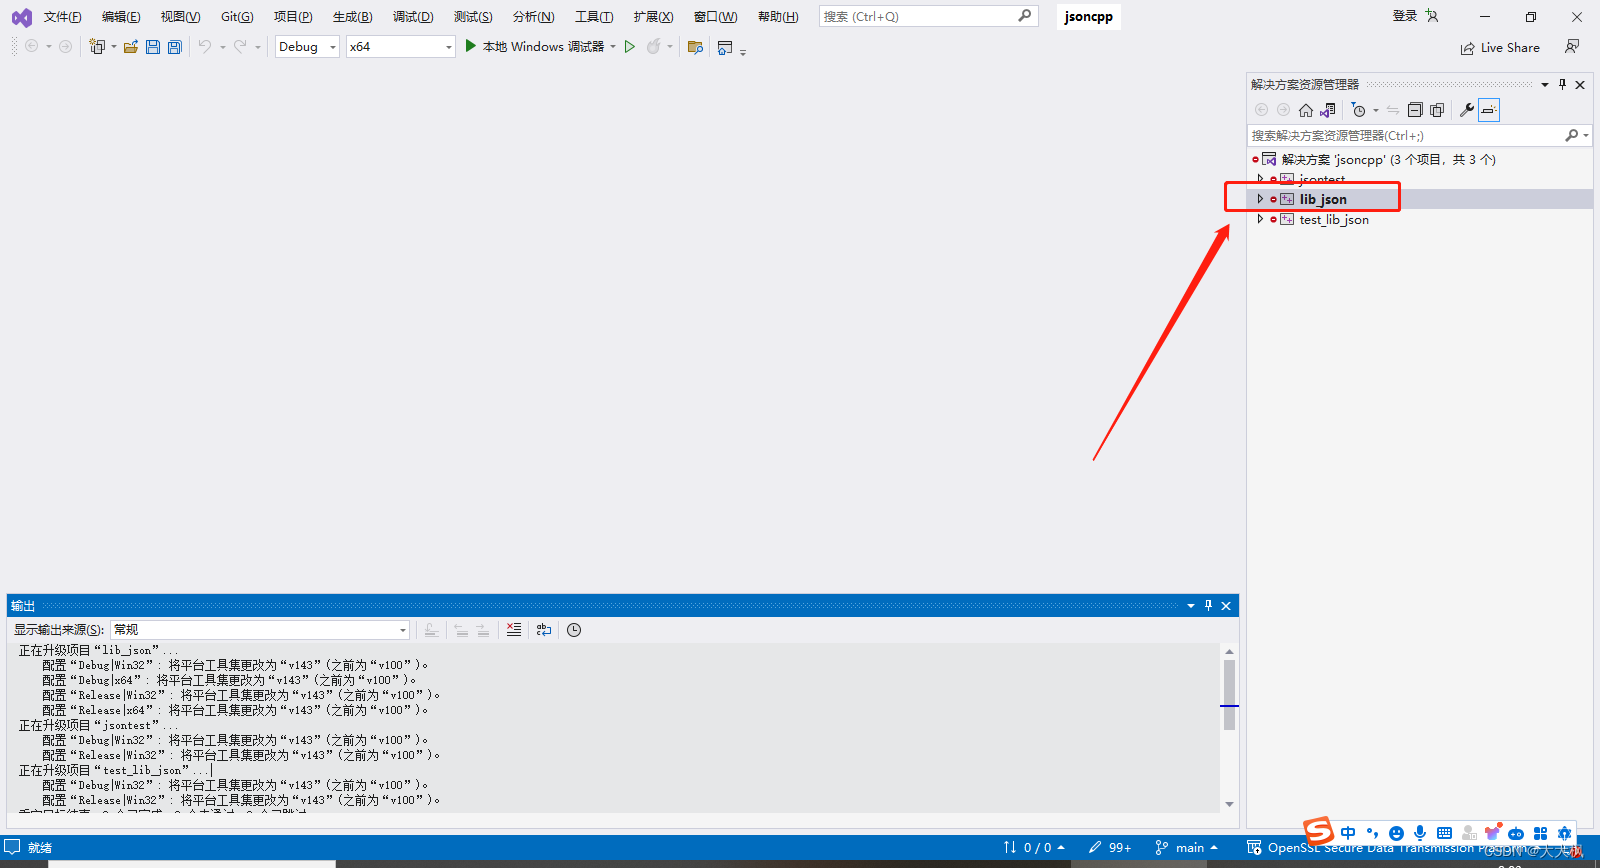
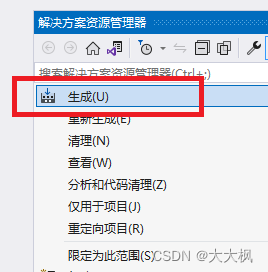
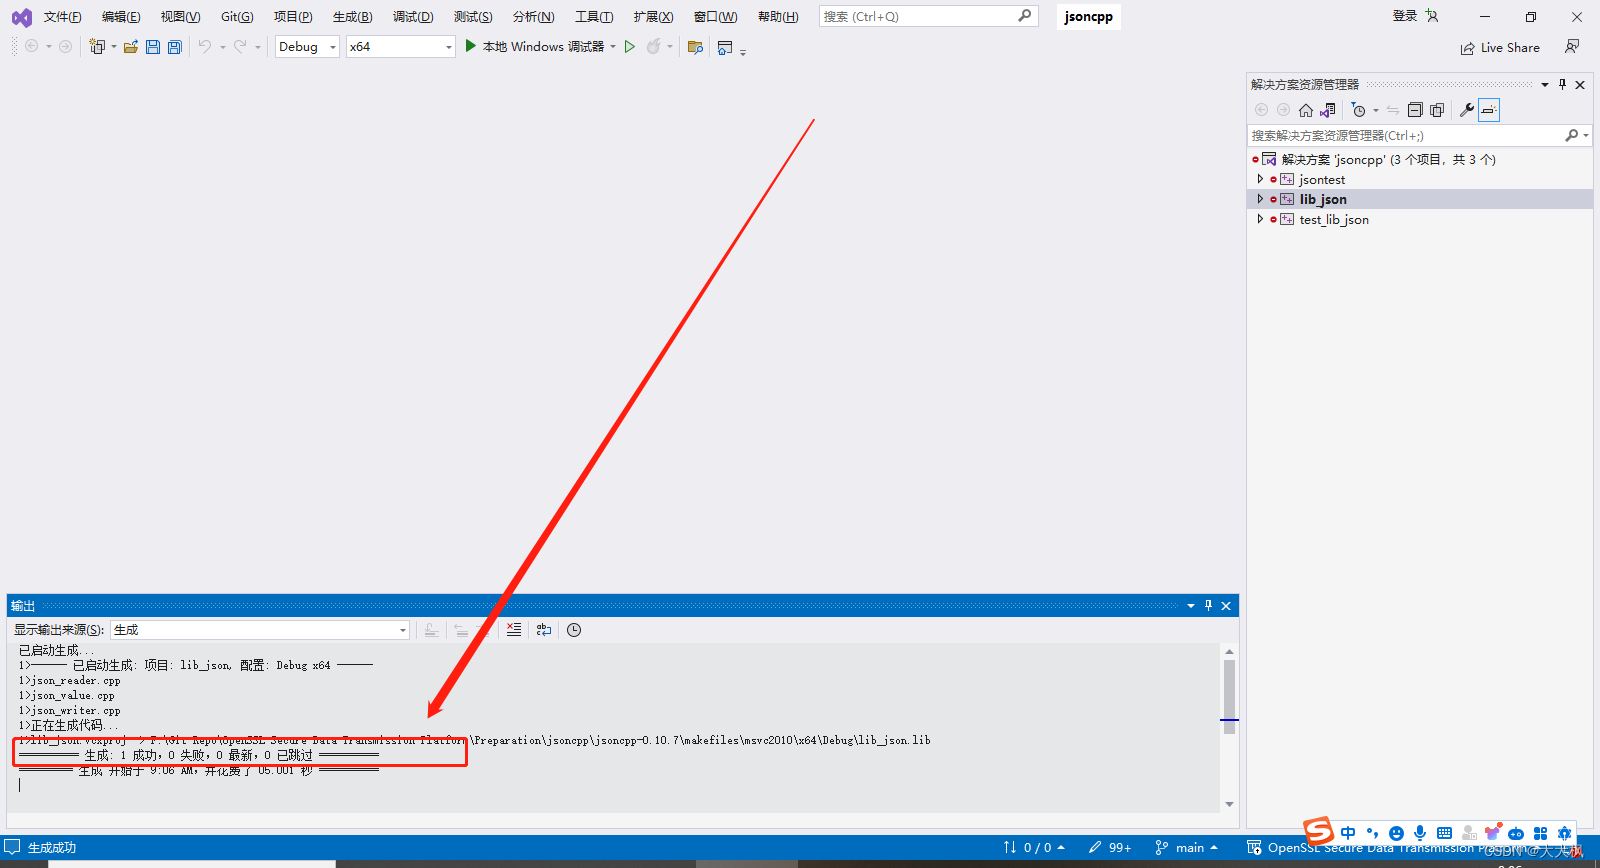
-
生成的静态库存储目录
jsoncpp-0.10.7\makefiles\msvc2010\Debug -
生成的静态库文件:
lib_json.lib

-
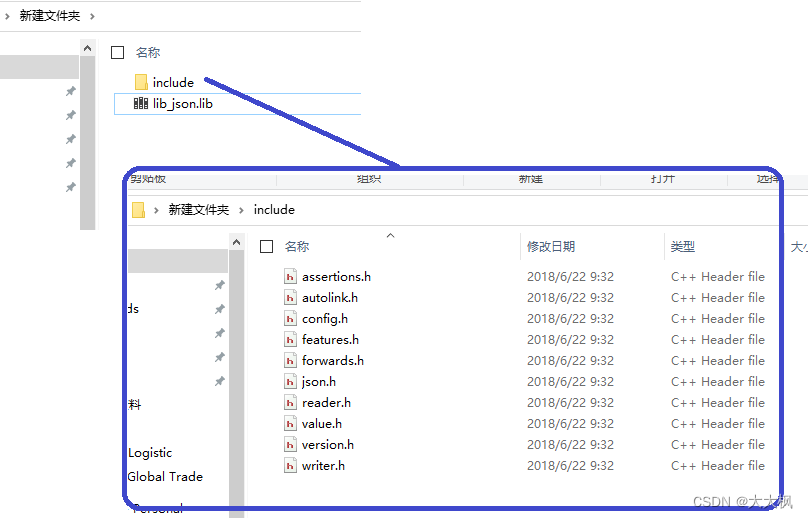
使用的准备工作:
- 将静态库
lib_json.lib拿出备用 - 将库对应的头文件拿出, 头文件目录
jsoncpp-0.10.7\include\json
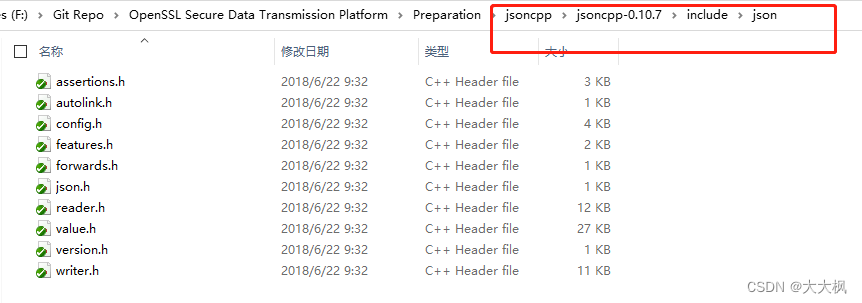
- 将静态库
-
把文件拿出来备用
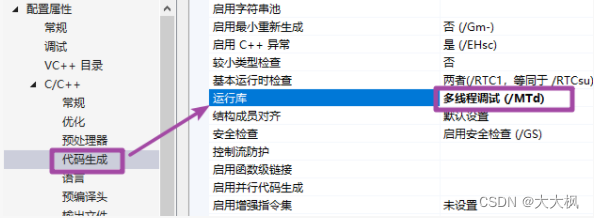
- vs编译过程中, 修改属性
1.2 Linux 下的安装
1.2.1 相关环境配置问题
要安装python2,参考以下文章…哎…我把centos下安装py2搞复杂了,浪费了一上午,竟然还打算自己去编译py2的源码,简直脑子进水…
Centos8: 安装python2, 并设置默认版本
- python与python3
/usr/bin/env: ‘python’: No such file or directory“:Linux中python口令无效,python3有效
- python2和python3 print语句的括号问题
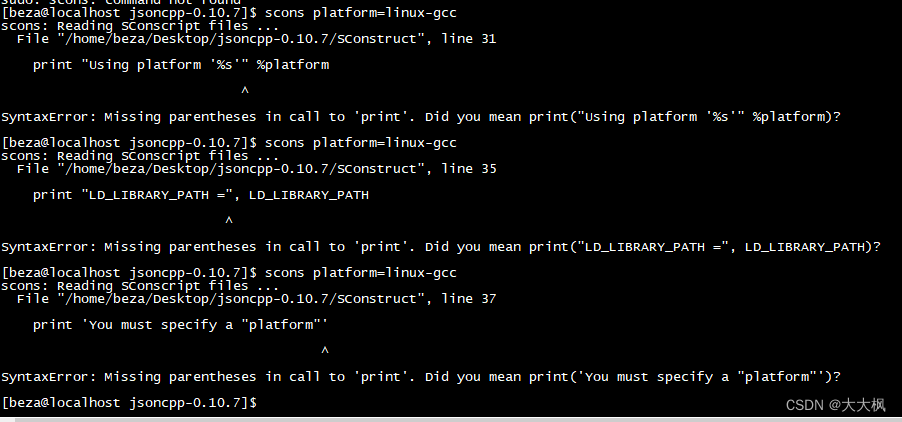
python2中的语句是不用加括号的,但是python3中的print需要加语句。这导致了使用python3配环境时候出现以下错误
1.2.2 准备安装
- `jsoncpp-0.10.7.tar.gz`
- `scons-3.0.5.zip`
-
解压缩
tar zxvf jsoncpp-0.10.7.tar.gz
unzip scons-3.0.5.zip
1.2.2.1 安装scons
-
安装scons -> 进入
scons-3.0.5.zip的解压目录sudo python setup.py install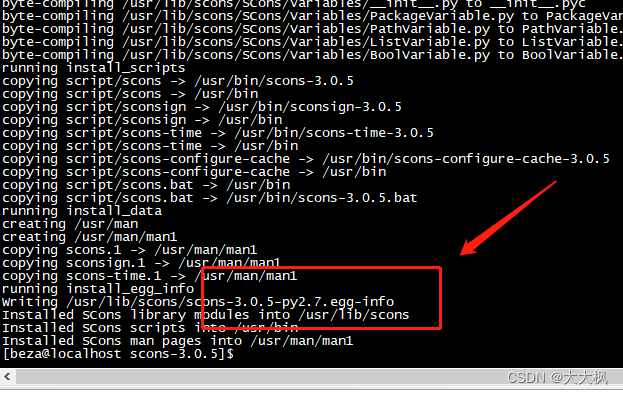
1.2.2.2 安装jsoncpp
- 安装 jsoncpp -> 进入
jsoncpp-0.10.7.tar.gz的解压目录
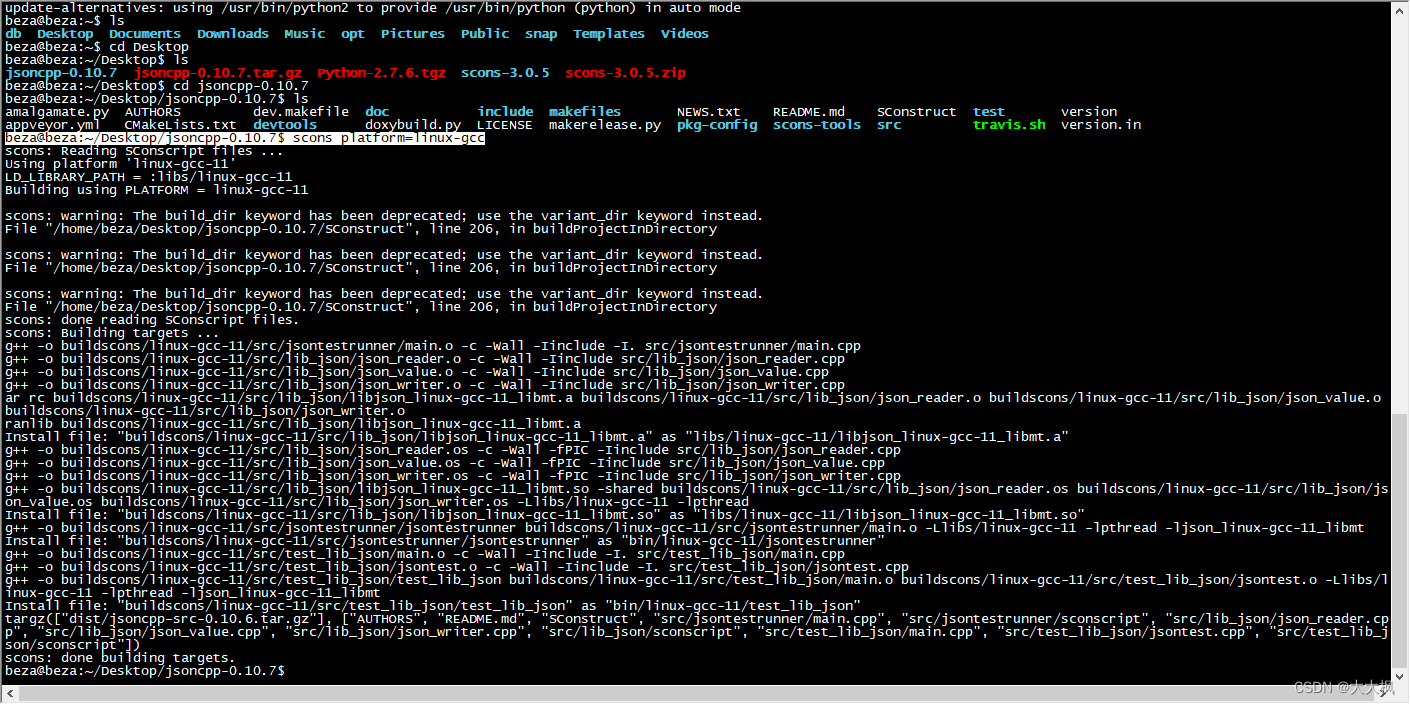
sudo scons platform=linux-gcc
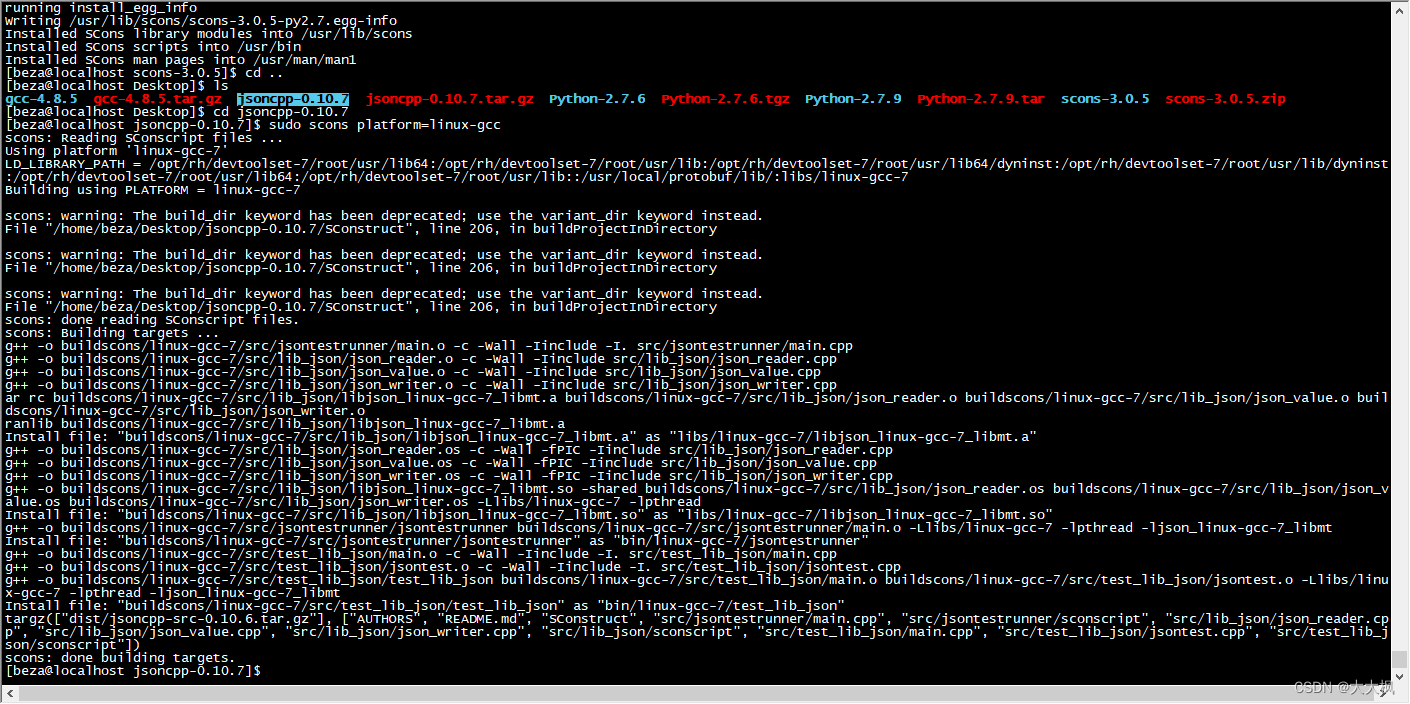
Ubuntu系统下
// 将生成的动态库/静态库拷贝到系统的库目录中, 需要管理员权限,Ubuntu系统下是gcc11/centos是gcc7
sudo cp libs/linux-gcc-11/* /lib

// 拷贝json的头文件到系统目录中, 需要管理员权限
sudo cp include/json/ /usr/include/ -r

// 创建动态库的链接文件, 需要管理员权限
sudo ln -s /lib/libjson_linux-gcc-11_libmt.so /lib/libjson.so

// 更新, 这样才能搜索到动态库 libjson.so。需要管理员权限
sudo ldconfig

// 测试
sudo ./bin/linux-gcc-11/test_lib_json


Testing ValueTest/checkNormalizeFloatingPointStr: OK
Testing ValueTest/memberCount: OK
Testing ValueTest/objects: OK
Testing ValueTest/arrays: OK
..................
Testing BuilderTest/settings: OK
Testing IteratorTest/distance: OK
Testing IteratorTest/names: OK
Testing IteratorTest/indexes: OK
All 53 tests passed

Centos8系统下
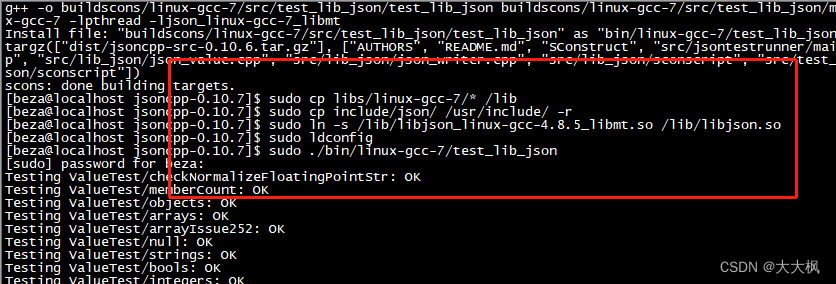
// 将生成的动态库/静态库拷贝到系统的库目录中, 需要管理员权限,centos是gcc7
sudo cp libs/linux-gcc-7/* /lib

// 拷贝json的头文件到系统目录中, 需要管理员权限
sudo cp include/json/ /usr/include/ -r

// 创建动态库的链接文件, 需要管理员权限
sudo ln -s /lib/libjson_linux-gcc-7_libmt.so /lib/libjson.so

// 更新, 这样才能搜索到动态库 libjson.so。需要管理员权限
sudo ldconfig
// 测试
sudo ./bin/linux-gcc-7/test_lib_json
Testing ValueTest/checkNormalizeFloatingPointStr: OK
Testing ValueTest/memberCount: OK
Testing ValueTest/objects: OK
Testing ValueTest/arrays: OK
..................
Testing BuilderTest/settings: OK
Testing IteratorTest/distance: OK
Testing IteratorTest/names: OK
Testing IteratorTest/indexes: OK
All 53 tests passed
2 编译 c++ 测试文件: json-test.cpp
g++ json-test.cpp -ljson -o json
2.1 配置库文件
把备份的库文件拷贝到工程目录下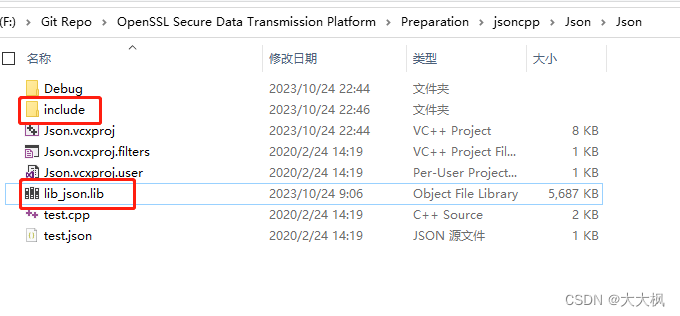
2.2 配置VS
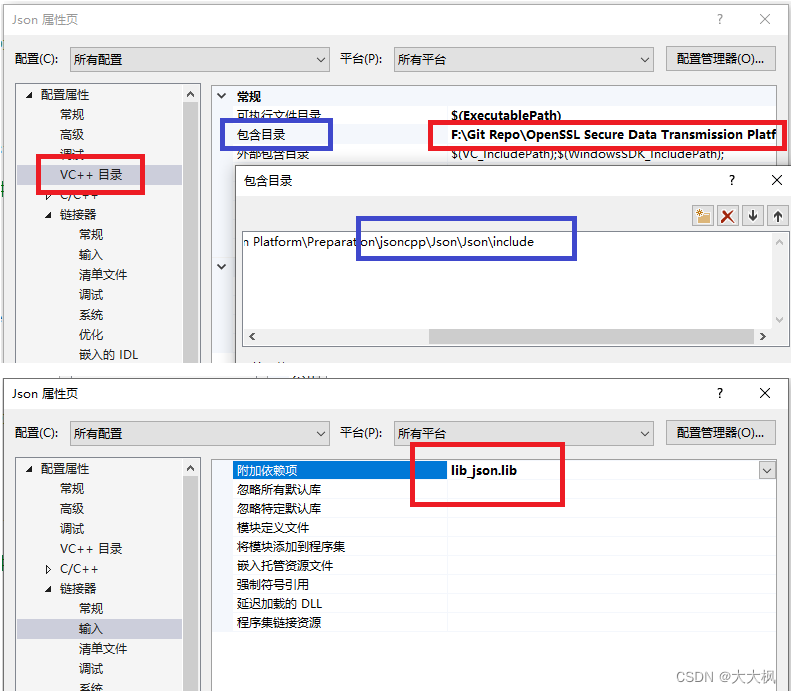
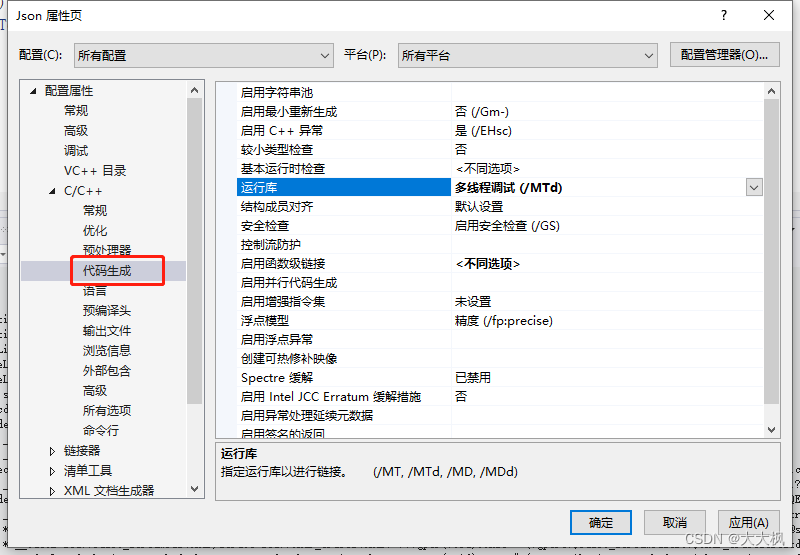
2.3 Winsows系统下cpp文件测试
#include <json.h>
#include <iostream>
#include <fstream>
using namespace Json;	// jsoncpp的命名空间
using namespace std;


void writeJson()
{
	// 组织数据, 并写入到磁盘文件
// [12, 19.8, true, "hello", ["a", "b", "c"], {"name":"xiaoming"}, "age":12]
	Value v;
	v.append(Value(12));
	v.append(19.8);
	v.append(true);
	v.append("hello");

	// 创建一个数组对象 Value
	Value arr;
	arr.append("a");
	arr.append("b");
	arr.append("c");

	// 创建json对象 -> Value
	Value obj;
	obj["name"] = "xiaoming";
	obj["age"] = 12;

	v.append(arr);
	v.append(obj);

	// 将得到Value对象 v 格式化 -> string -> 写磁盘
	string st = v.toStyledString();
	cout << "v style: " << st << endl;
	FastWriter fw;
	string jsonText = fw.write(v);
	cout << "jsonText: " << jsonText << endl;

	// 创建写文件的流对象
	// ofstream of;
	// of.open("test.json");
	ofstream of("test.json");
	of << st;
	of.close();
}

void readJson()
{
	// 1. 将磁盘文件数据读出 -> string
	ifstream ifs("test.json");
	// 2. 将string -> Value 对象中
	Reader rd;
	Value root;
	rd.parse(ifs, root);
	// 3 打印输出
	// 遍历数组
	for (int i = 0; i < root.size(); ++i)
	{
		Value sub = root[i];
		if (sub.isInt())
		{
			cout << sub.asInt() << " ";
		}
		else if (sub.isDouble())
		{
			cout << sub.asDouble() << " ";
		}
		else if (sub.isBool())
		{
			cout << sub.asBool() << " ";
		}
		else if (sub.isString())
		{
			cout << sub.asString() << " ";
		}
		else if (sub.isArray())
		{
			// 继续遍历这个子数组
			for (int j = 0; j < sub.size(); ++j)
			{
				cout << sub[j].asString() << " ";
			}
			cout << endl;
		}
		else if (sub.isObject())
		{
			// 根据对象中的key, 打印value值
			cout << sub["name"].asString() << ", "
				<< sub["age"].asInt() << " ";
		}
	}
}

int main()
{
	writeJson();
//	readJson();
}
2.3.1 写json测试结果
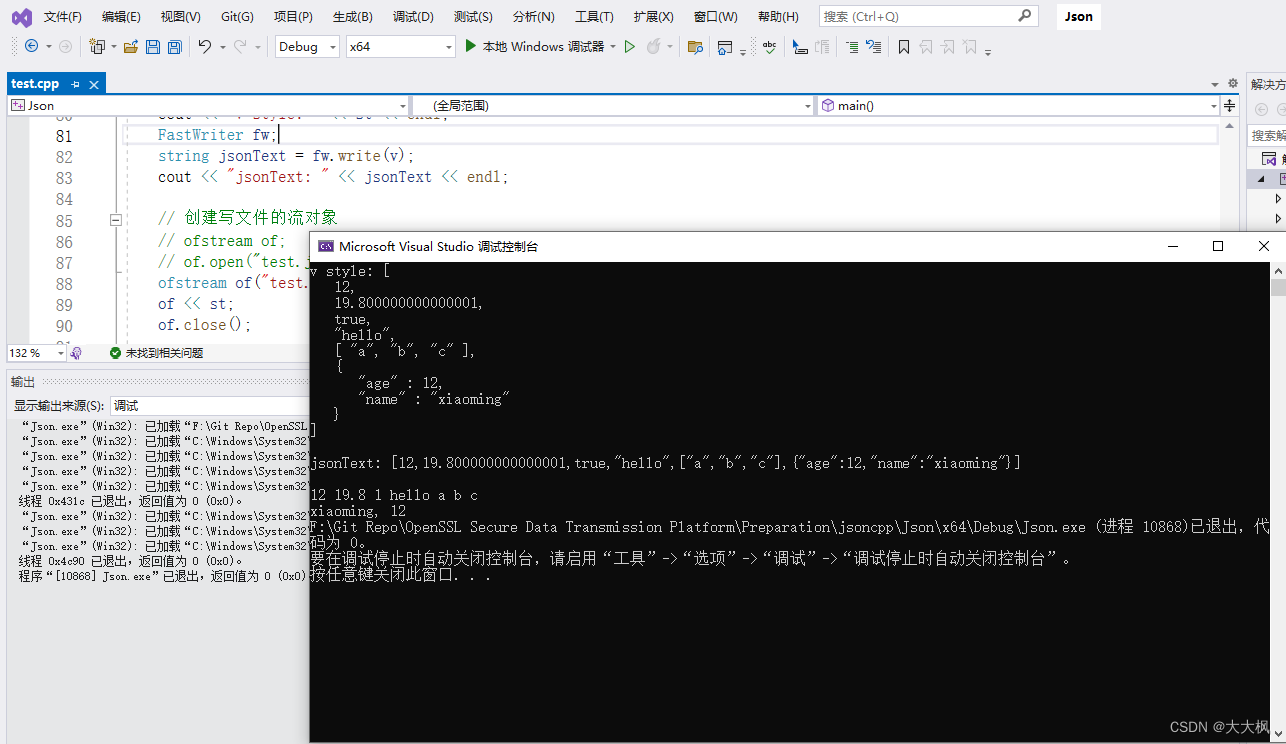
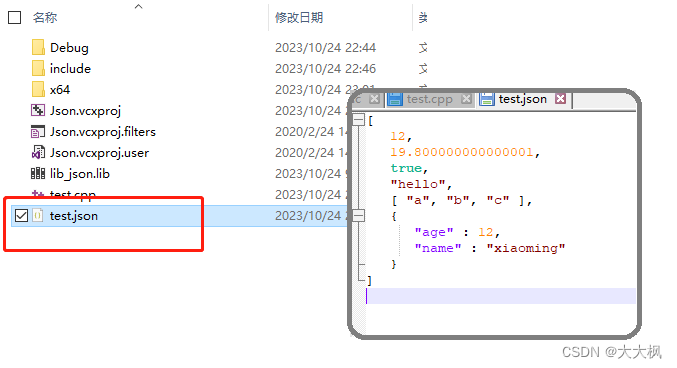
2.3.2 读json测试结果
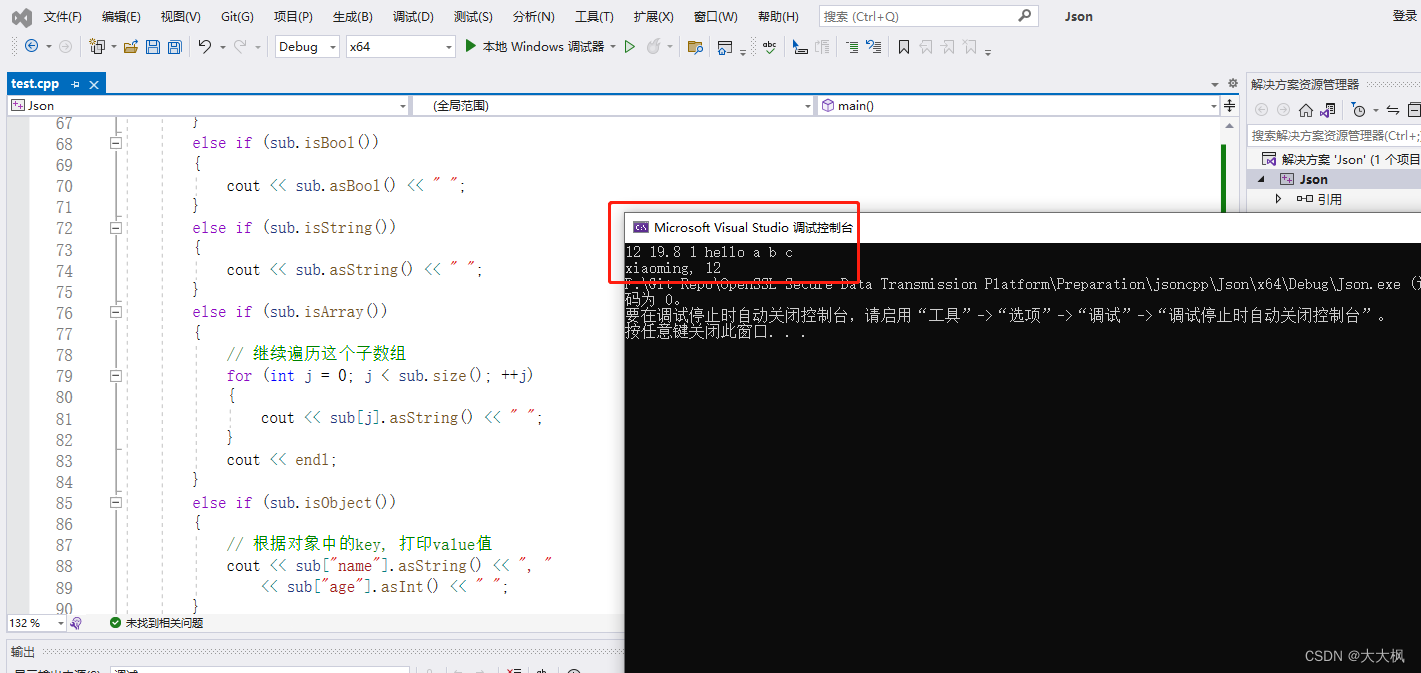
3 jsoncpp常用API
3.1 Value -> 对Json支持的数据类型进行封装/解析
// Json支持的数据类型
Type = {int, double, float, string, char*, bool, JsonArray, JsonObject}
// 构造函数
  Value(ValueType type = nullValue);
  Value(Int value);
  Value(UInt value);
#if defined(JSON_HAS_INT64)
  Value(Int64 value);
  Value(UInt64 value);
#endif // if defined(JSON_HAS_INT64)
  Value(double value);
  Value(const char* value); ///< Copy til first 0. (NULL causes to seg-fault.)
  Value(const char* begin, const char* end);

// 将Value对象转换成对应类型的数据
  Int asInt() const;
  UInt asUInt() const;
#if defined(JSON_HAS_INT64)
  Int64 asInt64() const;
  UInt64 asUInt64() const;
#endif // if defined(JSON_HAS_INT64)
  LargestInt asLargestInt() const;
  LargestUInt asLargestUInt() const;
  float asFloat() const;
  double asDouble() const;
  bool asBool() const;

// 判断Value对象中存储的数据的类型
  bool isNull() const;
  bool isBool() const;
  bool isInt() const;
  bool isInt64() const;
  bool isUInt() const;
  bool isUInt64() const;
  bool isIntegral() const;
  bool isDouble() const;
  bool isNumeric() const;
  bool isString() const;
  bool isArray() const;
  bool isObject() const;

// 取值
// 格式化 -> 将对象转换为字符串
// 适合于查看信息或者写文件
std::string toStyledString() const;
3.2 Reader
// json格式字符串 -> Value对象
// c++
bool parse(const std::string& document, Value& root, bool collectComments = true);
    参数:
        - document: json字符串, 传入参数
        - root: 传出参数, 转换完成之后的Value对象
// c用法
bool parse(const char* beginDoc, const char* endDoc,
           Value& root, bool collectComments = true);
    参数:
        - beginDoc: 字符串起始地址
        - endDoc: 字符串结束地址
        - root: 传出参数, 转换完成之后的Value对象
// c++用法
bool parse(std::istream& is, Value& root, bool collectComments = true);
    参数:
        - is: 文件流对象, 使用这个流对象打开一个磁盘文件
        - root: 传出参数, 转换完成之后的Value对象
3.3 FastWriter
// 将Value对象中的数据格式化 -> 字符串
// 适合于网络数据的发送
// 得到的字符串中没有换行符
std::string write(const Value& root);

// 得到这个返回值:
    - 写磁盘 -> 写到配置文件中
    - 网络传参数


![[ACTF2020 新生赛]Include 1](https://img-blog.csdnimg.cn/img_convert/052ed4e93cd20d8930b2456113bf699e.png)



![[moeCTF 2023] pwn](https://img-blog.csdnimg.cn/4d8be170886d4b7e9aebc68d767c6ae6.png)


