前言
随着社交网络的兴起和移动互联网的普及,人们对于参与和表达意见的需求越来越强烈。在这个背景下,微信小程序投票管理系统应运而生。它为用户提供了一个智能、便捷的投票平台,使用户可以轻松创建和参与各种类型的投票活动。本文将详细介绍微信小程序投票管理系统的设计与功能,并探讨其在实际应用中的优势和耐人寻味之处。
投票管理的实现
实现流程
1.用户进入后显示投票页面
2.用户可以选择自己想投票的选项并进行投票
3.投票完成后显示总的投票结果以及投票数量
4.限制每个用户每天投票只能进行一次
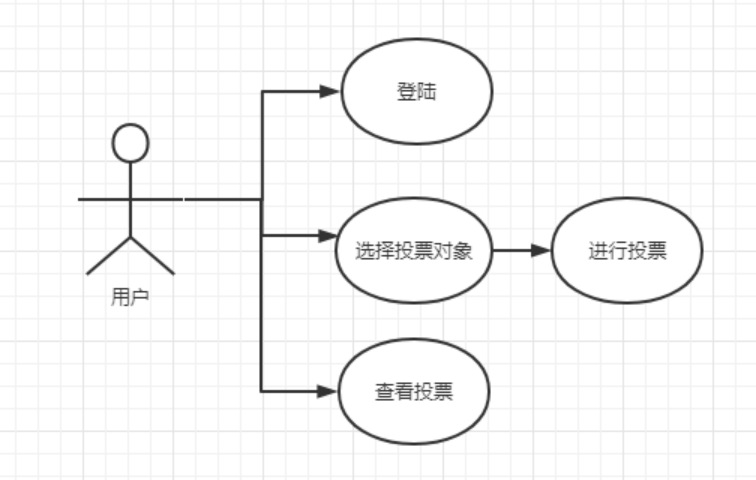
用例图演示
用户在系统内可以登陆,选择投票对象、进行投票、查看投票等等。
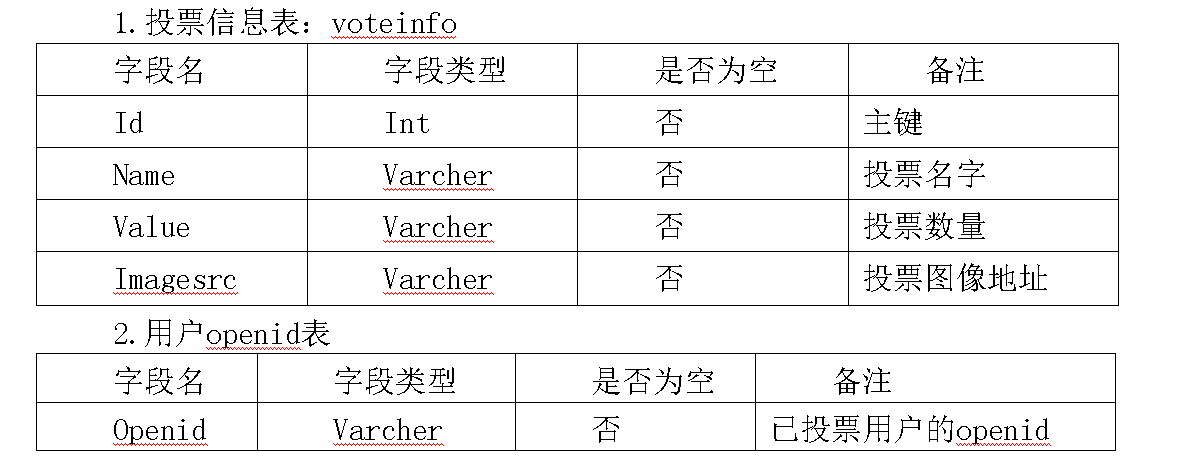
数据表

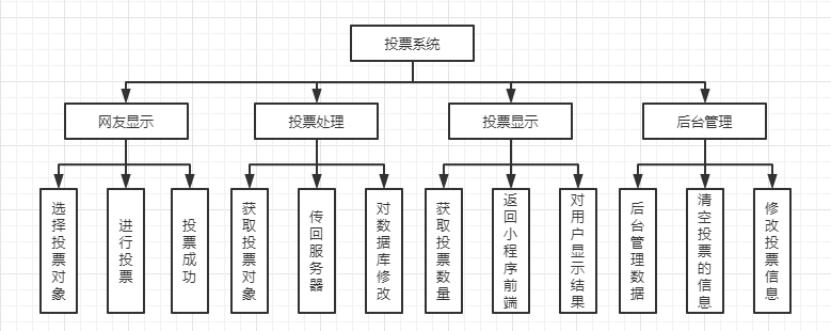
总体设计
投票管理系统后端
mapper
package com.ctb.minoa.mapper;

import com.ctb.minoa.model.Voteinfo;

public interface VoteinfoMapper {
    int deleteByPrimaryKey(int id);

    int insert(Voteinfo record);

    int insertSelective(Voteinfo record);

    Voteinfo selectByPrimaryKey(int id);

    int updateByPrimaryKeySelective(Voteinfo record);

    int updateByPrimaryKey(Voteinfo record);
}
controller
/**
 * @Autho biao
 *
 */
@RestController
@RequestMapping("/wx/vote")
public class VoteinfoController {
    @Autowired
    private VoteinfoMapper voteinfoMapper;
    @RequestMapping("/index")
    public Object index(Voteinfo voteinfo) {
        Voteinfo voteinfo1 = voteinfoMapper.selectByPrimaryKey(3);
        Map<Object, Object> data = new HashMap<Object, Object>();
        data.put("voteinfoList",voteinfo1);
        return ResponseUtil.ok(data);
    }
}
工具类getopenid---获取用户的openid
package util;

import com.alibaba.fastjson.JSON;
import com.alibaba.fastjson.JSONObject;
import java.io.*;
import java.net.URL;
import java.net.URLConnection;
import java.util.List;
import java.util.Map;

/**
 * biao
 *拼接用户信息对官方进行用户的openid进行查询
 *
 */
public class getopenid {

    public static String getOpenid(String url) {
        String result = "";
        BufferedReader in = null;
        try {
            String urlNameString = url;
            URL realUrl = new URL(urlNameString);
            // 打开和URL之间的连接
            URLConnection connection = realUrl.openConnection();
            // 设置通用的请求属性
            connection.setRequestProperty("accept", "*/*");
            connection.setRequestProperty("connection", "Keep-Alive");
            connection.setRequestProperty("user-agent", "Mozilla/4.0 (compatible; MSIE 6.0; Windows NT 5.1;SV1)");
            // 建立实际的连接
            connection.connect();
            // 获取所有响应头字段
            Map<String, List<String>> map = connection.getHeaderFields();
            // 遍历所有的响应头字段

            // 定义 BufferedReader输入流来读取URL的响应
            in = new BufferedReader(new InputStreamReader(
                    connection.getInputStream()));
            String line;
            while ((line = in.readLine()) != null) {
                result += line;
            }
        } catch (Exception e) {
            System.out.println("发送GET请求出现异常!" + e);
            e.printStackTrace();
        }
        // 使用finally块来关闭输入流
        finally {
            try {
                if (in != null) {
                    in.close();
                }
            } catch (Exception e2) {
                e2.printStackTrace();
            }
        }

        return result;
    }

    public static String jointStr(String code) {
        String result = "https://api.weixin.qq.com/sns/jscode2session?appid=wxf55dc8be7c3885ab&secret=05e3ac3badee5c088ff97b5f3cac3974&js_code=";
        String rigth = "&grant_type=authorization_code";
        return result + code + rigth;
    }

    public static String outopenid(String code){
        String json = getOpenid(jointStr(code));
        JSONObject jsonObj = JSON.parseObject(json);
        System.out.println("openid:"+jsonObj.getString("openid"));
        return jsonObj.getString("openid");
    }


}
解释:
- 该类包含三个静态方法:
getOpenid()、jointStr()和outopenid()。
getOpenid(String url)方法:
- 参数:一个字符串类型的URL。
- 返回值:一个字符串类型的结果。
- 功能:通过发送GET请求到指定的URL,并从响应中解析出openid。
- 首先,创建一个
URL对象,表示要连接的URL。- 然后,使用
openConnection()方法打开与URL之间的连接。- 设置通用的请求属性,如"accept"、"connection"和"user-agent"。
- 建立实际的连接。
- 获取所有响应头字段。
- 定义一个
BufferedReader输入流来读取URL的响应。- 逐行读取响应内容,并将其拼接到结果字符串中。
- 关闭输入流。
- 返回结果字符串。
jointStr(String code)方法:
- 参数:一个字符串类型的code。
- 返回值:一个字符串类型的拼接后的URL。
- 功能:根据给定的code和appid和密钥拼接成一个完整的URL,用于向微信服务器发送请求以获取用户的openid。
- 定义一个字符串变量
result,存储拼接后的URL前半部分。- 定义一个字符串变量
rigth,存储拼接后的URL后半部分。- 返回拼接后的完整URL。
outopenid(String code)方法:
- 参数:一个字符串类型的code。
- 返回值:一个字符串类型的openid。
- 功能:调用
getOpenid()方法获取响应中的JSON字符串,然后将其解析为JSON对象,并从中提取出openid。
- 调用
getOpenid()方法,传入拼接后的URL,获取响应中的JSON字符串。- 使用
JSON.parseObject()方法将JSON字符串转换为JSON对象。- 从JSON对象中获取名为"openid"的值,并打印出来。
- 返回提取出的openid。
获取小程序传递的参数
String openid =request.getParameter("openid");
        Writer out = response.getWriter();
        String sqlSel = "SELECT * FROM openid WHERE openid = '"+ openid +"'";
        String sqlIns = "INSERT INTO openid VALUES ('"+ openid +"')";
        System.out.println(sqlIns);
        sqlUtils sqlutils = new sqlUtils();
        if (!openid.equals("")) {
            int count = sqlutils.selectOpenid(sqlSel);
            System.out.println(count);
            if (count == 0) {
                sqlutils.DMLsql(sqlIns);
                System.out.println(sqlIns);
                out.write("false");
                System.out.println("没投票");
            } else {
                out.write("true");//数据库中已有数据
                System.out.println("1投票");
            }
        }
获取参数并修改投票数量
int votevalue = Integer.parseInt(request.getParameter("votevalue"));
        String s="SELECT * FROM voteinfo where id =" + votevalue;
        sqlUtils utils=new sqlUtils();
        List<vote1> selectsql = utils.selectsql11(s);

        int a = 0;
        for(vote1 tl:selectsql)
        {
            a=tl.getValue();
        }
        ++a;
        System.out.println(a);
        String s1="update voteinfo set value =" + a + " where id =" + votevalue;
        int a1 = utils.DMLsql(s1);
        utils.Exceptionsql();
投票管理系统前端
投票页面wxml
<image src="{{indeximage}}" class="indexImage_top"></image>
<view class="text-top">请选择你喜欢的角色</view>
<radio-group bindchange="radioChang" data-id="{{item.id}}">
    <view class="index_class" wx:for="{{voteinfo}}" wx:for-item="item" wx:key="index">
        <view class="voteInfo_class">
            <radio value="{{item.id}}">
                <view>{{item.id}}号选手:{{item.name}}</view>
                <image src="{{item.imagesrc}}" class="voteImage"></image>
            </radio>
        </view>
    </view>
    <button class="btn" type="primary" bindtap="sureVote">确定投票</button>
</radio-group>
<view class="text-bottom">
<view>每人只能投票一次,投票后可以查看每个选项的投票次数</view>

</view>
wxss
/*首页图*/
.indexImage_top {
width: 100%;
height: 300rpx;
}
.text-top{
display: flex;
align-items: center;
justify-content: center;/*对齐方式*/
height: 100rpx;
font-weight: 600;
font-size: large;
}
.text-bottom{
display: flex;
flex-direction: column;/*以列的方式进行排列*/
align-items: center;
justify-content: center;
height: 40rpx;
font-size:smaller;
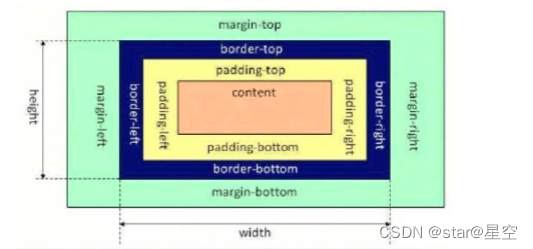
margin-top:40px;/*margin外边距 上右下左 padding内边距*/
margin-bottom: 60rpx;
}
/*投票view的边距*/
.voteInfo_class{
padding: 20px 10px 20px 10px;
}
/*投票的图片大小*/
.voteImage {
width: 250rpx;
height: 250rpx;
}
/*首页排版*/
.index_class {
display: flex;
flex-direction: row;
flex-wrap: wrap;
justify-content:space-around;
display:inline-block
}
.btn{
margin-top: 30rpx;
width: 300rpx;
}js
Page({
  data: {
    indeximage:"/pages/images/index.png",
    voteinfo:[],
    radioValue: '', //当前用户选中的投票值
    userinfo: {}, //当前用户的微信信息
    openid: '', //当前用户的openid
    islogin: false, //判断用户是否已经登陆
    isopenid: false, //判断用户是否已经投票
    a: 1 ,//判断是否对数据库查询用户是否投票
  },
  onLoad: function () {
    let islogin = wx.getStorageSync('islogin') || false //判断是否登陆
    let userinfo = wx.getStorageSync('userinfo') //取登陆后的信息
    //console.log(islogin)
    if (islogin) {
      this.setData({
        islogin: true,
        userinfo: userinfo,
      })
    }
    //判断本获取投票名字和图片
    this.getvoteinfo()
    //微信登录获取openid
    this.wxlogin()
  },
  //首页确定投票事件
  sureVote: function () {
    this.setData({
      a: 1
    })
    //let openid = wx.getStorageSync('openid')
    console.log(this.data.openid)
    //微信登录获取个人信息
    if (!this.data.islogin) {
      //登陆及获取用户信息
      this.wxgeiuserinfo()
      //console.log(this.data.islogin)
      //console.log(this.data.userinfo)
    } else {
      //console.log(this.data.islogin)
      //console.log(this.data.userinfo)
      if (this.radioValue == undefined) {
        wx.showToast({
          title: '请选择你的投票对象',
          icon: 'none'
        })
      } else {
        this.data.isopenid = wx.getStorageSync('isopenid') //判断用户是否投票
        console.log(this.data.isopenid)
        if (this.data.isopenid) { //如果投过票  就直接跳转
          wx.setStorageSync('votevalue', this.radioValue)
          wx.redirectTo({
            url: '/pages/result/result'
          })
        } else {
          wx.request({
            url: 'http://localhost:8080/vote/voteupdate',
            data: {
              votevalue: this.radioValue
            },
            method: 'get',
            header: {
              'content-type': 'application/json'
            },
          })
          wx.setStorageSync('votevalue', this.radioValue)
          wx.redirectTo({
            url: '/pages/result/result'
          })
        }
      }
    }
  },
  //单选框组选中事件
  radioChang: function (e) {
    console.log("选择的值为" + e.detail.value)
    this.radioValue = e.detail.value
    console.log(this.radioValue)
    if (this.data.a == 1) {
      //判断该用户是否投票
      this.isopenid()
      this.setData({
        a: 0
      })
    }
  },
  //获取openid
  wxlogin: function () {
    console.log("我是获取openid")
    var that = this
    wx.login({
      success(res) {
        if (res.code) {
          //console.log(res.data)
          //发起请求
          wx.request({
            url: 'http://localhost:8080/vote/openid',
            data: {
              code: res.code
            },
            header: {
              'content-type': 'application/json'
            },
            success: function (res) {
              console.log(res);
              let openid = res.data
              that.setData({
                openid: openid
              })
              //console.log(that.data.openid);
              wx.setStorageSync('openid', that.data.openid)
            },
            fail: function (res) {
              console.log("失败");
            }
          })
        } else {
          console.log('登录失败!' + res.errMsg)
        }
      }
    })
  },
  //登陆及获取用户信息
  wxgeiuserinfo: function () {
    console.log("我是登陆及获取用户信息")
    let that = this;
    wx.getUserProfile({
      desc: '获取个人信息以便于您的投票',
      success(res) {
        let userinfo = res.userInfo
        that.setData({
          islogin: true,
          userinfo: userinfo
        })
        wx.setStorageSync('islogin', true)
        wx.setStorageSync('userinfo', userinfo)
        console.log(that.islogin)
      },
      fail() {
        wx.showToast({
          title: '请求信息失败',
          icon: 'error'
        })
      }
    })
  },
  //判断该用户是否投票
  isopenid: function () {
    console.log("我是判断该用户是否投票")
    let that = this
    wx.request({
      url: 'http://localhost:8080/vote/isopenid',
      data: {
        openid: this.data.openid
      },
      method: 'get',
      header: {
        'content-type': 'application/json'
      },
      success(res) {
        console.log(res.data)
        let isopenid = res.data
        wx.setStorageSync('isopenid', isopenid)
      },
      fail() {
        wx.showToast({
          title: '网络连接失败!',
          icon: 'error'
        })
        console.log("失败");
      },
    })
  },
    //获取投票信息
    getvoteinfo: function () {
      console.log("我是获取投票图片")
      var that = this
      wx.request({
        url: 'http://localhost:8080/vote/voteinfo',
        success: function (res) {
          console.log(res);
          that.setData({
            voteinfo: res.data
          })
          console.log(that.data.voteinfo);
          wx.setStorageSync('voteinfo', res.data)
          wx.setStorageSync('isinfo', true)
        },
        fail: function (res) {
          wx.showToast({
            title: '网络连接失败!',
            icon: 'error'
          })
          console.log("失败");
        }
      })
    },
    onRefresh(){
      this.getvoteinfo()
    },
  //分享
  onShareAppMessage: function (res) {
    var that = this;
    //console.log(JSON.stringify(that.data.array))
    return {
      title: "快来和我一起投票吧",
      path: '/pages/index/index',
      imageUrl: "/pages/images/index.png"
    }
  },
//下拉刷新
onPullDownRefresh: function () {
    //调用刷新时将执行的方法
  this.onRefresh();
}
})
json
下拉刷新,当用户在页面顶部向下滑动时,可以触发下拉刷新操作,从而更新页面内容,在上述js中并需定义方法
{
    "enablePullDownRefresh": true
}
投票结果wxml
<view class="center">
  <image class="image_user" src="{{userImage}}"></image>
  <view class="text_user">{{userName}},你好</view>
  <view wx:if="{{isopenid}}"class="text_tip">你今天已经参加过本投票</view>
  <view wx:if="{{!isopenid}}" class="view_text">你的投票结果为:{{votevalue}}号选手:{{voteinfo[votevalue-1].name}}</view>
  <view class="view_text2">截止到{{date}}的投票结果为:</view>
  <view wx:for="{{voteinfo}}" wx:for-item="item" wx:key="index">
  <view class="view_text1">{{item.id}}号选手:{{item.name}},票数为:{{item.value}}票</view>
  <view class="index_class">
    <progress class="progress_box" percent="{{item.value/num*100}}" active stroke-width="20"
      border-radius="50"/>
  </view>
  </view>
</view>
wxss
.view_text2{
    font-weight: 300;
    font-size:small;
    margin-bottom:30px;
}
.view_text{
    height: 100rpx;
    font-weight: 600;
    font-size: large;
}
/*首页排版*/
.index_class {
    display: flex;
}

/*进度条排版*/
.progress_box{
    width: 500rpx;
    margin-bottom:50px;
}

.center{
    display: flex;
    flex-direction: column;
    align-items: center;
    justify-content: center;
}

.image_user{
    height: 100px;
    width: 100px;
    border-radius: 50px;
    margin-top:30px;
    margin-bottom:10px;
}
.text_user{
    font-weight: 600;
    font-size: large;
    margin-bottom:10px;
}
.text_tip{
    font-weight: 600;
    font-size: large;
    color: red;
    margin-bottom:10px;
}
js
Page({
  data: {
    date: new Date().toLocaleString(),
    votevalue: '',
    voteinfo: [],
    userName: '',
    userImage: '',
    isopenid: true,
    num:0
  },
  onLoad: function (options) {
     //获取投票信息
     this.getvoteinfo()
    let userinfo = wx.getStorageSync('userinfo') //取用户的头像 名字
    this.setData({
      userName: userinfo.nickName,
      userImage: userinfo.avatarUrl
    })
    let isopenid = wx.getStorageSync('isopenid') //判断用户是否已经进行过投票
    this.setData({
      isopenid: isopenid
    })
    console.log(this.data.isopenid)
    var that = this
    var votevalue = wx.getStorageSync('votevalue') //取用户的投票的对象
    this.setData({
      votevalue: votevalue
    })
    console.log(votevalue)

  },
  onShareAppMessage: function (res) {
    var that = this;
    //console.log(JSON.stringify(that.data.array))
    return {
      title: "快来和我一起投票吧",
      path: '/pages/index/index',
      imageUrl: "/pages/images/index.png"
    }
  },
  getvoteinfo: function () {
    console.log("我是获取投票图片")
    var that = this
    wx.request({
      url: 'http://localhost:8080/vote/voteinfo',
      /*method: 'get',
      header: {
        'content-type': 'application/json'
      },*/
      success: function (res) {
        //console.log(res);
        that.setData({
          voteinfo: res.data
        })
        var num = 0
        var i = 0
        console.log(that.data.voteinfo);
        for(i = 0;i<that.data.voteinfo.length;i++){
          num = num + that.data.voteinfo[i].value
        }
        that.setData({
          num: num
        })
        console.log(that.data.num);
      },
      fail: function (res) {
        wx.showToast({
          title: '网络连接失败!',
          icon: 'error'
        })
        console.log("失败");
      }
    })
  }

})
效果演示
当我们登录不同账号时都将有唯一标识,进行判断是否可以参与投票,这里也是注册了两个账号测试
一开始需要进行登录之后通过openid拿到个人用户信息去判断该用户是否参与投票

登录之后可以直接投票并每天只能参与一次投票