概念
本文在上一文之上,针对管理员,经理,普通员工身份的用户操作订单管理模块功能。
功能实现
该功能也是业务功能模块,管理员不具备操作权限,普通员工需要对超市所合作的供应商进行进货,因此普通员工可以添加订单信息,并且只能查看员工自己的订单信息列表,不能查看其他人的订单信息,而经理具备查看所有普通员工的订单信息,并可以修改订单,删除订单以及支付订单金额等。
管理员操作订单管理模块
管理员不能操作业务功能,因此不允许操作订单管理模块。

普通员工操作订单管理模块
普通员工操作订单管理模块时,只能查看自己的订单信息,发送请求地址 /getBillsByUserId/
服务器需要接收该地址请求
# 接收普通员工查看自己的订单信息地址
    path('getBillsByUserId/',views.getBillsByUserId),
views.py
# 创建方法,根据当前登录的普通员工查询该员工自己的订单信息
def getBillsByUserId(request):
    # 根据当前登录的员工的id作为查询条件,查询该员工自己的订单信息
    bList=Bill.objects.filter(createdBy=user[0].id).values()
    # 判断当前员工是否有自己的订单
    if bList:
        # 循环遍历每一个订单,通过订单中的供应商id查询供应表,获得供应商名称
        # 添加至当前订单字典中
        for b in bList:
            # 根据当前订单中的供应商id作为条件,查询到该供应商信息
            p=Provider.objects.get(id=b["providerId"])
            # 将该供应商名称存储至当前订单字典中
            b["proName"]=p.proName
    return render(request,"pBillList.html",{"bList":bList,"user":user[0]})
需要显示订单信息涉及多张表的数据,因此这里完成了多表联查的操作,并将查询的数据发送给pBillList.html页面进行显示
<!DOCTYPE html>
<html>
<head>
<meta charset="UTF-8">
<title>超市订单管理系统--订单列表</title>
<style type="text/css">
tr {
height: 40px;
}
</style>
</head>
<body>
<div style="width: 1800px;height: 1000px;margin: auto;">
<div style="width: 100%;height: 160px;background-color:skyblue;">
<div style="width: 100%;height: 20px;">
<div align="left" style="width: 20%;height: 100%;float: left;" >
<a href="/login/?username={{ user.userName }}&password={{ user.userPassword }}"
style="text-decoration: none;">返回首页</a>
</div>
<div align="right" style="width: 80%;height: 100%;float: right;">
<a>欢迎,<span style="color: red;">{{user.userName}}</span></a>
<a href="/" style="text-decoration: none;">注销</a>
</div>
</div>
<div align="center" style="width: 100%;height: 140px;line-height: 140px;"><h1>超市订单管理系统</h1></div>
</div>
<div align="center" style="width: 100%;height: 840px;background-color: pink;overflow: scroll;">
<div align="left" style="height: 40px;" >
<a href="/toAddBill/" style="text-decoration: none;
text-align:center; width: 50px;
height: 20px;
color: white;font-weight: bold;
margin-top:20px;margin-left:10px;
border-radius: 5px;">添加订单</a>
</div>
<!-- 当前普通员工是否有谈下过订单信息,如果没有,显示暂无信息,如果有,展示该员工的所有订单 -->
{% if bList %}
<table border="1" style="width: 98%;text-align: center;border-collapse: collapse;">
<tr>
<td>主键Id</td>
<td>账单编码</td>
<td>商品名称</td>
<td>商品描述</td>
<td>商品数量</td>
<td>商品单位</td>
<td>商品总额</td>
<td>是否支付</td>
<td>供应商名称</td>
<td>创建时间</td>
</tr>
{% for foo in bList %}
<tr>
<td >{{ foo.id }}</td>
<td>{{ foo.billCode }}</td>
<td>{{ foo.productName }}</td>
<td>{{ foo.productDesc }}</td>
<td>{{ foo.productCount }}</td>
<td>{{ foo.productUnit }}</td>
<td>{{ foo.totalPrice }}元</td>
{% if foo.isPayment == 1 %}
{# <td ><a href="">#}
{# <input type="button" value="未支付" style="color: white;#}
{# border: none;background-color: red;border-radius: 5px;font-weight: bold;"></a></td>#}
<td style="color:red;">未支付</td>
{% elif foo.isPayment == 2%}
<td style="color:green;">已支付</td>
{% endif %}
<td>{{ foo.proName }}</td>
<td>{{ foo.creationDate }}</td>
</tr>
{% endfor %}
</table>
{% else %}
<div style="width: 98%;text-align: center;height: 800px;">
当前暂无订单信息
</div>
{% endif %}
</div>
</div>
</body>
</html>其页面效果如下:

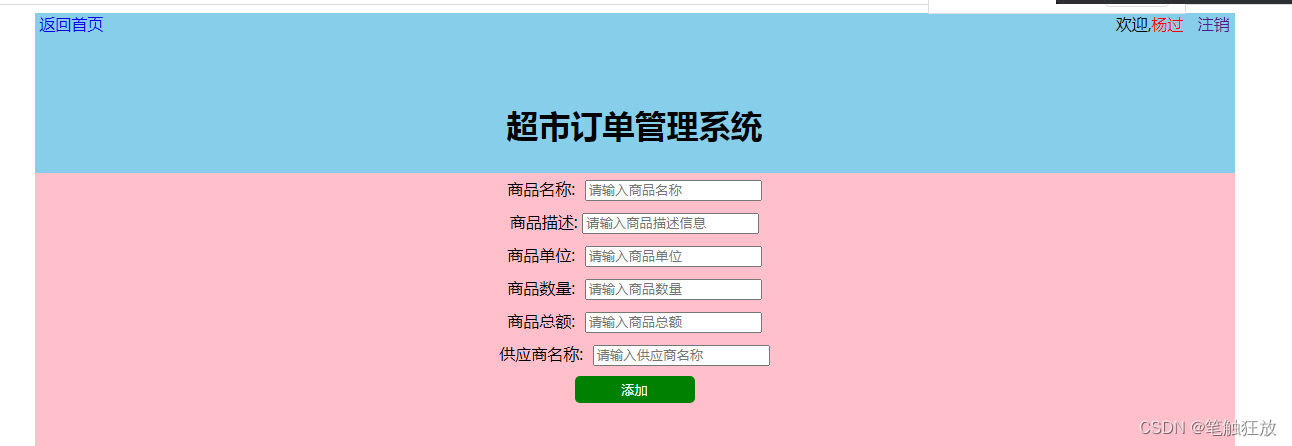
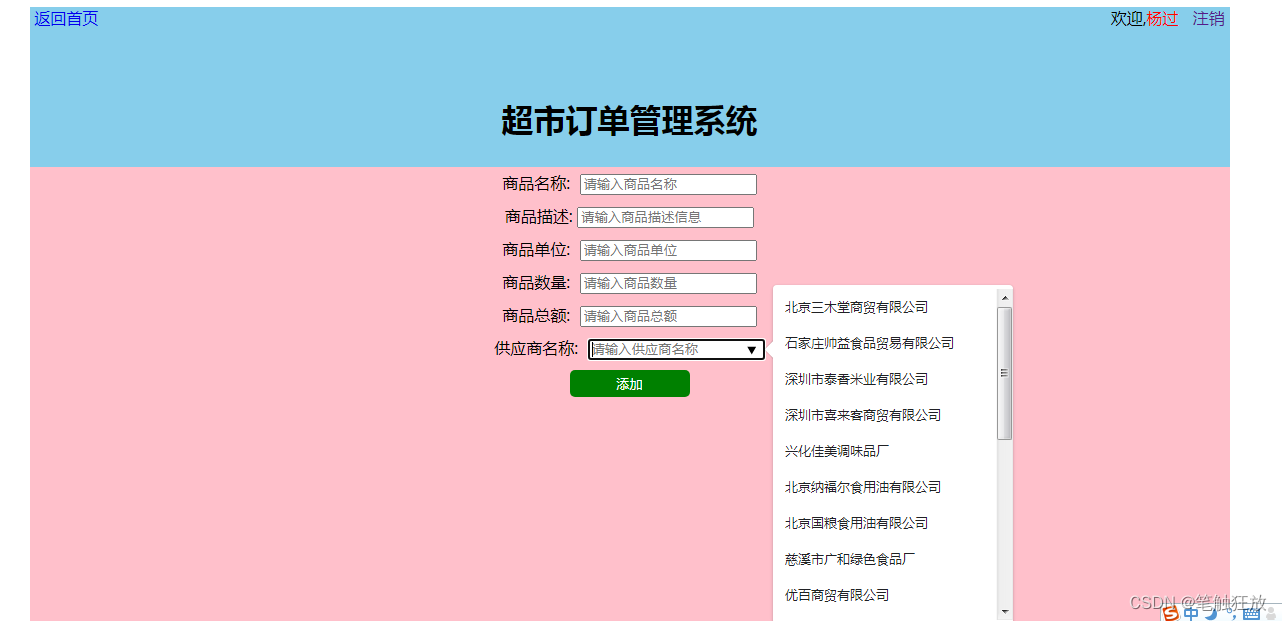
普通员工可以根据超市的进货需要,和以合作的供应商进行签订订单进货合同,等待供应商发货,将订单信息添加至系统中,发送请求地址为 /toAddBill/
服务器定义地址接收该请求
# 接收普通员工添加订单地址
    path('toAddBill/',views.toAddBill),
views.py
# 创建方法,跳转至添加订单页面之前,需要查询出所有当前供应商名称
def toAddBill(request):
    # 将所有供应商查询出来
    providers=Provider.objects.all().values("id","proName")
    return render(request,"AddBill.html",{"providers":providers,"user":user[0]})
其添加订单界面代码如下
<!DOCTYPE html>
<html>
<head>
<meta charset="UTF-8">
<title>超市订单管理系统--添加订单</title>
</head>
<body>
<div style="width: 1200px;height: 800px;margin: auto;">
<div style="width: 100%;height: 160px;background-color:skyblue;">
<div style="width: 100%;height: 20px;">
<div align="left" style="width: 20%;height: 100%;float: left;" >
<a href="/login/?username={{ user.userName }}&password={{ user.userPassword }}"
style="text-decoration: none;">返回首页</a>
</div>
<div align="right" style="width: 80%;height: 100%;float: right;">
<a>欢迎,<span style="color: red;">{{user.userName}}</span></a>
<a href="/" style="text-decoration: none;">注销</a>
</div>
</div>
<div align="center" style="width: 100%;height: 140px;line-height: 140px;"><h1>超市订单管理系统</h1></div>
</div>
<div align="center" style="width: 100%;height: 640px;background-color: pink;">
<form action="/addBill/" method="post">
{% csrf_token %}
<div style="padding: 5px 0px">
<label for="productName">商品名称:</label>
<input id="productName" name="productName" type="text" placeholder="请输入商品名称" />
</div>
<div style="padding: 5px 0px">
<label >商品描述:</label>
<input type="text" name="productDesc" placeholder="请输入商品描述信息"></input>
</div>
<div style="padding: 5px 0px">
<label >商品单位:</label>
<input type="text" name="productUnit" placeholder="请输入商品单位">
</div>
<div style="padding: 5px 0px">
<label >商品数量:</label>
<input type="number" name="productCount" placeholder="请输入商品数量" >
</div>
<div style="padding: 5px 0px">
<label >商品总额:</label>
<input type="number" name="totalPrice" placeholder="请输入商品总额" >
</div>
<div style="padding: 5px 0px">
<label >供应商名称:</label>
<!-- Html5 新增的表单的新用法 -->
<input type="search" name="proName" placeholder="请输入供应商名称" list="list">
<datalist id="list">
{% for provider in providers %}
<option>{{ provider.proName }}</option>
{% endfor %}
</datalist>
{% comment %}<select name="proName">
{% for provider in providers %}
<option>{{ provider.proName }}</option>
{% endfor %}
</select>{% endcomment %}
</div>
<div style="padding: 5px 0px">
<input type="submit"
value="添加"
style="width: 120px;background-color: green;
border: none;padding: 5px;border-radius: 5px;
color: white;"/>
</div>
</form>
</div>
</div>
</body>
</html>其界面效果图如下:
当普通员工添加订单后,将数据信息发送给服务器,地址为 /addBill/
服务器接收该地址的订单数据
# 接收普通员工添加订单的数据地址
    path('addBill/',views.addBill),
views.py,服务器在添加该订单的时候,需要完成对该订单进行自动生成订单编号,因此需要读者仔细理解该添加订单的逻辑思路。
# 创建方法,接收普通员工添加新订单的数据信息
def addBill(request):
    # 商品名称
    productName=request.POST["productName"]
    # 商品描述
    productDesc=request.POST["productDesc"]
    # 商品单位
    productUnit=request.POST["productUnit"]
    # 商品数量
    productCount=request.POST["productCount"]
    # 商品的总金额
    totalPrice=request.POST["totalPrice"]
    # 合作的供应商名称
    proName=request.POST["proName"]
    # 自动生成订单编号
    # 第一种,数据库中不存在今年的任何订单------ BILL+今年的年份+_001
    # 第二种,数据库中存在今年的订单---找到今年的所有订单中最后一个下的订单编号,
    #           下划线分割,加一,就可以生成我们这个订单编号
    # 解题思路:
    # 将数据库中所有订单按订单编号进行降序排列(从大到小排序)
    # BILL2022_004
    new_billCode=Bill.objects.order_by("-billCode").values("billCode")[0]["billCode"]
    # 将获得的最新的订单编号进行下划线分割 BILL2022  004
    infos=str(new_billCode).split("_")
    # 获得当前实时年份
    year = time.strftime("%Y", time.localtime())
    # 判断最新的订单是否是今年的订单
    if year == infos[0][4:]:
        # 最新的订单编号是今年的
        number=int(infos[1])+1
        s=""
        # 小于10,补两个0
        if number<10:
            s="00"+str(number)
        elif number<100:
            # 补一个0
            s = "0" + str(number)
        elif number<1000:
            s = str(number)
        billCode=infos[0]+"_"+s
    else:
        # 最新的订单编号不是今年的,也就是说今年没有产生任何的订单
        billCode="BILL"+year+"_001"
    # 默认未支付
    isPayment=1
    # 普通员工的id
    createdBy=user[0].id
    # 订单的签订的实时时间
    creationDate = time.strftime("%Y-%m-%d %H:%M:%S", time.localtime())
    # 不涉及修改功能
    modifyBy = 0
    modifyDate = ""
    # 根据普通员工选择的供应商名称查询供应商表,获得该供应商的id
    providerId=Provider.objects.get(proName=proName).id
    # 将新订单数据信息添加至订单表
    Bill.objects.create(productName=productName,productDesc=productDesc,productUnit=productUnit,
                        productCount=productCount,totalPrice=totalPrice,billCode=billCode,
                        isPayment=isPayment,createdBy=createdBy,creationDate=creationDate,
                        modifyBy=modifyBy,modifyDate=modifyDate,providerId=providerId)
    return redirect(getBillsByUserId)
当添加成功后,刷新该员工的订单列表页面
经理操作订单管理模块
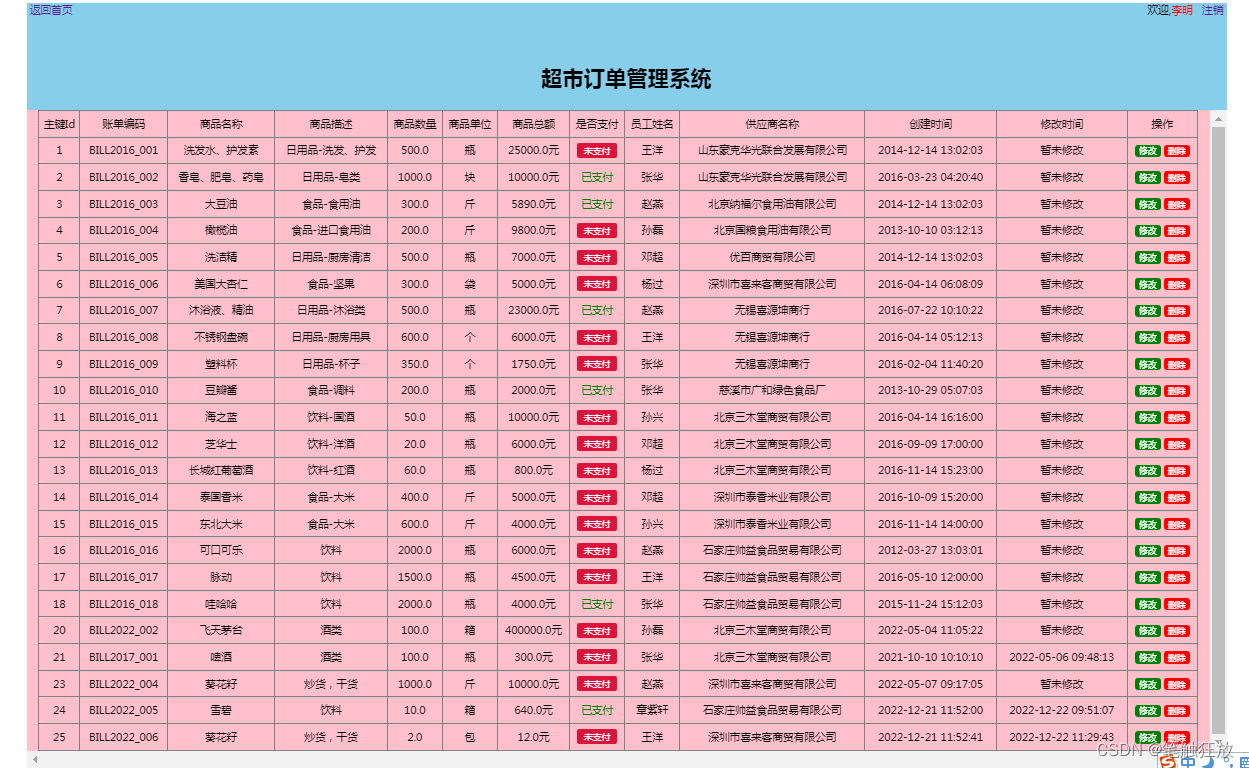
经理作为领导职责,管理普通员工的工作,因此经理具备查看所有普通员工添加的订单,对于无误的订单进行支付进货金额,对于有误的订单信息进行修改,对于无效订单进行删除等权限。
经理点击订单管理模块时,发出地址请求为: /getBills/
服务器定义地址接收请求
# 接收经理查看所有订单信息的地址
    path('getBills/',views.getBills),
views.py,进行查询订单表,用户表,供应商表将需要展示的订单详情信息显示
# 创建方法,从数据库的订单表查询所有订单
def getBills(request):
    # 从订单表查询所有订单信息
    bList=Bill.objects.all().values()
    # 判断是否存在订单信息,如果存在,循环遍历每一个订单信息
    if bList:
        for b in bList:
            # 通过订单信息中员工id查询员工表的对应的姓名
            userName=User.objects.get(id=b["createdBy"]).userName
            # 通过订单信息中供应商id查询供应商表对应的供应商名称
            proName=Provider.objects.get(id=b["providerId"]).proName
            b["userName"]=userName
            b["proName"]=proName
            b["updateDateLen"]=len(str(b["modifyDate"]))

    return render(request,"jBillList.html",{"bList":bList,"user":user[0]})
将查询出来的所有订单信息显示在页面上
<!DOCTYPE html>
<html>
<head>
<meta charset="UTF-8">
<title>超市订单管理系统--订单列表</title>
<style type="text/css">
tr {
height: 40px;
}
</style>
<script type="text/javascript">
function btn_pay(id) {
var info=window.confirm("您是否确定要支付这笔费用?");
if (info){
location.href="/updatePayment/?id="+id;
}
}
</script>
</head>
<body>
<div style="width: 1800px;height: 1000px;margin: auto;">
<div style="width: 100%;height: 160px;background-color:skyblue;">
<div style="width: 100%;height: 20px;">
<div align="left" style="width: 20%;height: 100%;float: left;" >
<a href="/login/?username={{ user.userName }}&password={{ user.userPassword }}"
style="text-decoration: none;">返回首页</a>
</div>
<div align="right" style="width: 80%;height: 100%;float: right;">
<a>欢迎,<span style="color: red;">{{user.userName}}</span></a>
<a href="/" style="text-decoration: none;">注销</a>
</div>
</div>
<div align="center" style="width: 100%;height: 140px;line-height: 140px;"><h1>超市订单管理系统</h1></div>
</div>
<div align="center" style="width: 100%;height: 840px;background-color: pink;overflow: scroll;">
<!-- 当前普通员工是否有谈下过订单信息,如果没有,显示暂无信息,如果有,展示该员工的所有订单 -->
{% if bList %}
<table border="1" style="width: 98%;text-align: center;border-collapse: collapse;">
<tr>
<td>主键Id</td>
<td>账单编码</td>
<td>商品名称</td>
<td>商品描述</td>
<td>商品数量</td>
<td>商品单位</td>
<td>商品总额</td>
<td>是否支付</td>
<td>员工姓名</td>
<td>供应商名称</td>
<td>创建时间</td>
<td>修改时间</td>
<td>操作</td>
</tr>
{% for foo in bList %}
<tr>
<td >{{ foo.id }}</td>
<td>{{ foo.billCode }}</td>
<td>{{ foo.productName }}</td>
<td>{{ foo.productDesc }}</td>
<td>{{ foo.productCount }}</td>
<td>{{ foo.productUnit }}</td>
<td>{{ foo.totalPrice }}元</td>
{% if foo.isPayment == 1 %}
<td><input type="button" value="未支付" onclick="btn_pay({{ foo.id }})" style="border-width: 0px;
background-color: crimson;color: white;padding: 3px;width: 60px;border-radius: 3px;"></td>
{% elif foo.isPayment == 2 %}
<td style="color:green;">已支付</td>
{% endif %}
<td>{{ foo.userName }}</td>
<td>{{ foo.proName }}</td>
<td>{{ foo.creationDate }}</td>
{% if foo.updateDateLen == 0 %}
<td>暂未修改</td>
{% elif foo.updateDateLen > 0 %}
<td>{{ foo.modifyDate }}</td>
{% endif %}
<td>
<a href="/getBillByIndex/?id={{ foo.id }}"><input type="button" value="修改"
style="background-color: green;
border: none;border-radius: 5px;
color: white;"></a>
<a href="/deleteBill/?id={{ foo.id }}"><input type="button" value="删除"
style="background-color: red;
border: none;border-radius: 5px;
color: white;"></a>
</td>
</tr>
{% endfor %}
</table>
{% else %}
<!-- 当前没有任何的订单信息 -->
<div style="width: 98%;text-align: center;height: 800px;">
当前暂无订单信息
</div>
{% endif %}
<!-- 分页页码导航栏 -->
{% comment %}<br>
<div align="center">
<!-- 判断当前页是否存在上一页,不存在则不显示上一页的按钮 -->
<%if(pi.getPrePage()>0){ %>
<a href="GetBills.do?ym=<%=pi.getPrePage()%>"><input type="button" value="上一页"/></a>
<%} %>
<% for(int i:pi.getNavigatepageNums()){ %>
<a href="GetBills.do?ym=<%=i%>"><%=i %></a>
<%} %>
<!-- 判断当前页是否存在下一页,不存在则不显示下一页的按钮 -->
<% if(pi.getPageNum()<pi.getLastPage()){ %>
<a href="GetBills.do?ym=<%=pi.getNextPage()%>"><input type="button" value="下一页"/></a>
<%} %>
</div>{% endcomment %}
</div>
</div>
</body>
</html>其界面效果图如下:
当经理检查某一个订单信息无误时,进行点击支付订单金额,请求地址为
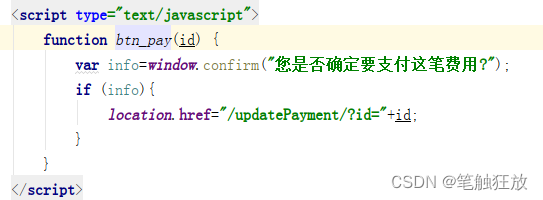
其界面效果如下
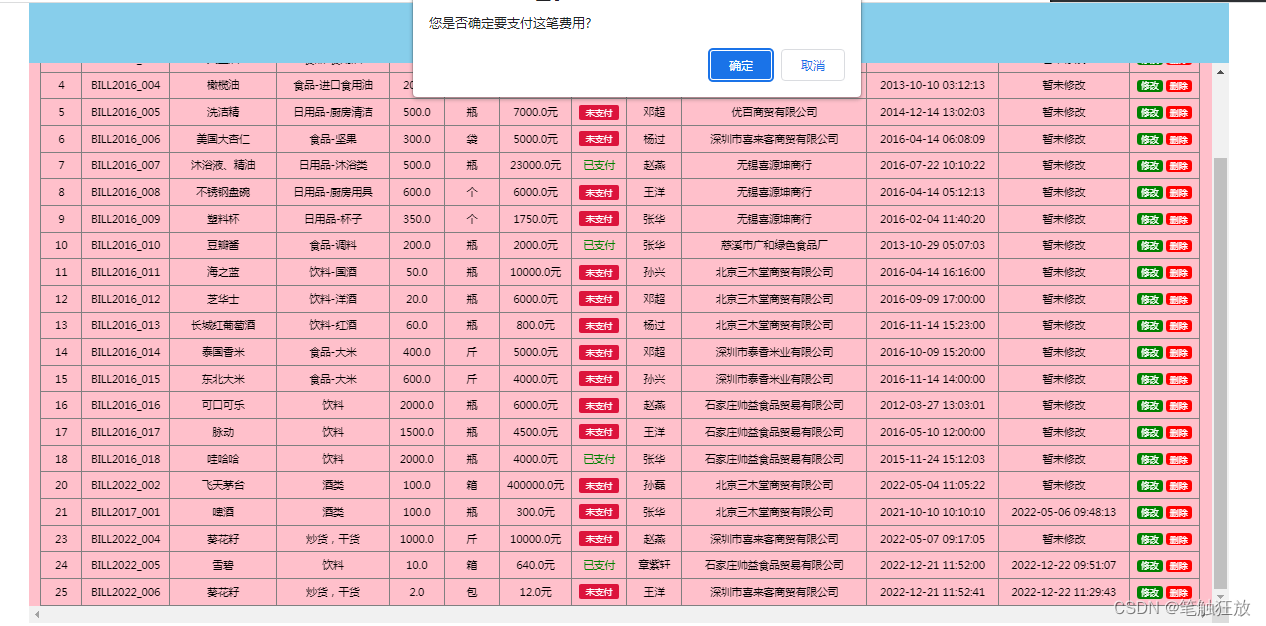 当经理确认后,将该订单的主键id发送给服务器
# 接收经理支付订单费用地址
    path('updatePayment/',views.updatePayment),
views.py
# 创建方法,获得订单id,支付该订单的费用
def updatePayment(request):
    id=request.GET["id"]
    # 当前支付该费用的经理的id
    modifyBy=user[0].id
    # 当前支付该费用的实时时间
    modifyDate=time.strftime("%Y-%m-%d %H:%M:%S", time.localtime())

    # 根据当前订单id查询订单信息
    b=Bill.objects.filter(id=id)
    # 修改当前订单的支付状态
    b.update(isPayment=2,modifyBy=modifyBy,modifyDate=modifyDate)
    return redirect(getBills)
当支付成功后,刷新订单列表页面
经理可以修改有误的订单信息,点击某个订单的修改按钮将该订单的主键id发送给服务器,地址为 /getBillByIndex/
服务器接收该请求
# 接收经理修改订单信息的地址
    path('getBillByIndex/',views.getBillByIndex),
views.py 根据订单id查询出该订单信息
# 创建方法,根据订单id查询该订单信息,展示在修改页面上
def getBillByIndex(request):
    id=request.GET["id"]
    # 根据id查询订单表 [{"key":value}]
    bill=Bill.objects.filter(id=id).values()
    # 根据订单表中的普通员工的id查询用户表获得用户姓名
    username=User.objects.get(id=bill[0]["createdBy"]).userName
    # 根据订单表中供应商id查询供应商表获得供应商名称
    proName=Provider.objects.get(id=bill[0]["providerId"]).proName
    bb=bill[0]
    bb["userName"]=username
    bb["proName"]=proName
    # 查询所有供应商名称,供经理修改的时候选择
    providers=Provider.objects.all().values("proName")
    # 查询所有普通员工,供经理修改的时候选择
    users=User.objects.filter(userRole=3).values("userName")
    return render(request,"updateBill.html",{"bill":bb,"user":user[0],"providers":providers,"users":users})
并将数据显示在页面上
<!DOCTYPE html>
<html>
<head>
<meta charset="UTF-8">
<title>超市订单管理系统--修改订单</title>
</head>
<body>
<div style="width: 1200px;height: 800px;margin: auto;">
<div style="width: 100%;height: 160px;background-color:skyblue;">
<div style="width: 100%;height: 20px;">
<div align="left" style="width: 20%;height: 100%;float: left;" >
<a href="/login/?username={{ user.userName }}&password={{ user.userPassword }}"
style="text-decoration: none;">返回首页</a>
</div>
<div align="right" style="width: 80%;height: 100%;float: right;">
<a>欢迎,<span style="color: red;">{{user.userName}}</span></a>
<a href="/" style="text-decoration: none;">注销</a>
</div>
</div>
<div align="center" style="width: 100%;height: 140px;line-height: 140px;"><h1>超市订单管理系统</h1></div>
</div>
<div align="center" style="width: 100%;height: 640px;background-color: pink;">
<form action="/updateBill/" method="post">
{% csrf_token %}
<input type="hidden" name="id" value="{{ bill.id }}">
<div style="padding: 5px 0px">
<label for="productName">商品名称:</label>
<input id="productName" name="productName" value="{{ bill.productName }}" type="text" placeholder="请输入商品名称" />
</div>
<div style="padding: 5px 0px">
<label >商品描述:</label>
<input type="text" name="productDesc" value="{{ bill.productDesc }}" placeholder="请输入商品描述信息"></input>
</div>
<div style="padding: 5px 0px">
<label >商品单位:</label>
<input type="text" name="productUnit" value="{{ bill.productUnit }}" placeholder="请输入商品单位">
</div>
<div style="padding: 5px 0px">
<label >商品数量:</label>
<input type="number" name="productCount" value="{{ bill.productCount }}" placeholder="请输入商品数量" >
</div>
<div style="padding: 5px 0px">
<label >商品总额:</label>
<input type="number" name="totalPrice" value="{{ bill.totalPrice }}" placeholder="请输入商品总额" >
</div>
<div style="padding: 5px 0px">
<label >员工姓名:</label>
<input type="search" name="userName" value="{{ bill.userName }}" placeholder="请输入普通员工姓名" list="userList">
<datalist id="userList">
{% for u in users %}
<option>{{ u.userName }}</option>
{% endfor %}
</datalist>
</div>
<div style="padding: 5px 0px">
<label >供应商名称:</label>
<!-- Html5 新增的表单的新用法 -->
<input type="search" name="proName" value="{{ bill.proName }}" placeholder="请输入供应商名称" list="list">
<datalist id="list">
{% for provider in providers %}
<option>{{ provider.proName }}</option>
{% endfor %}
</datalist>
</div>
<div style="padding: 5px 0px">
<input type="submit"
value="修改"
style="width: 120px;background-color: green;
border: none;padding: 5px;border-radius: 5px;
color: white;"/>
</div>
</form>
</div>
</div>
</body>
</html>当经理更新后,将更新后的数据提交给服务器,请求地址为 /updateBill/
服务器接收该请求,并获得所有更新的订单信息
# 接收经理修改更新订单后的数据信息地址
    path('updateBill/',views.updateBill),
views.py
# 创建方法,接收经理更新订单信息的数据
def updateBill(request):
    # 主键id
    id=request.POST["id"]
    # 商品名称
    productName = request.POST["productName"]
    # 商品描述
    productDesc = request.POST["productDesc"]
    # 商品单位
    productUnit = request.POST["productUnit"]
    # 商品数量
    productCount = request.POST["productCount"]
    # 商品的总金额
    totalPrice = request.POST["totalPrice"]
    # 合作的供应商名称
    proName = request.POST["proName"]
    # 员工姓名
    userName=request.POST["userName"]
    # 根据员工姓名查询该员工的主键id
    userId=User.objects.get(userName=userName).id
    # 根据供应商的名称查询该供应商id
    providerId=Provider.objects.get(proName=proName).id
    # 修改该订单的经理的id
    modifyBy=user[0].id
    # 修改该订单的实时时间
    modifyDate=time.strftime("%Y-%m-%d %H:%M:%S", time.localtime())
    # 先通过订单id将要修改的订单信息查询出来
    bill=Bill.objects.filter(id=id)
    # 将更新后的订单信息替换旧的订单信息
    bill.update(productName=productName,productDesc=productDesc,productUnit=productUnit,
                productCount=productCount,totalPrice=totalPrice,createdBy=userId,
                providerId=providerId,modifyBy=modifyBy,modifyDate=modifyDate)
    return redirect(getBills)
修改成功后,刷新订单信息列表页面
经理通过点击删除按钮进行删除某一条无效的订单信息,将订单id发送给服务器,请求地址为 /deleteBill/
服务器接收该请求和id参数
# 接收经理删除订单的地址
    path('deleteBill/',views.deleteBill),
views.py
# 创建方法,获得经理要删除的订单的id
def deleteBill(request):
    id=request.GET["id"]
    # 根据订单id删除该订单信息
    bill=Bill.objects.filter(id=id)
    bill.delete()
    return redirect(getBills)
删除成功后刷新订单列表页面
总结
该项目到这里结束了,读者可根据自身的需要进行增加或者修改其中的功能和需求


