前言:
👏作者简介:我是笑霸final,一名热爱技术的在校学生。
📝个人主页:个人主页1 || 笑霸final的主页2
📕系列专栏:项目专栏
📧如果文章知识点有错误的地方,请指正!和大家一起学习,一起进步👀
🔥如果感觉博主的文章还不错的话,👍点赞👍 + 👀关注👀 + 🤏收藏🤏
java实现多线程下载器目录
- 一、实现单线程下载器
- 1.1环境准备
- 1.2文件的下载
- 1.3 主类Main 的实现
- 1.4 Downloader和一些工具类的实现
- 1.5 结果
- 二、加上进度条
- 2.1 DownloaderInfo实现
- 2.2修改Downloader类
- 2.3更新后的完整Downloader类
- 三、多线程下载器
- 3.1下载思路
- 3.2 更新HttpUtils类
- 3.3更新后的常量类Constant
- 3.4下载任务DownloaderTask的实现
- 3.5更新Downloader
- 3.6Downloader中的download()方法
一、实现单线程下载器
1.1环境准备
开发工具:IDEA
JDK版本:8
编码:utf-8
下载的资源:https://profile-avatar.csdnimg.cn/2fe9f00ded33433385db6b55fc7a4195_weixin_52062043.jpg
我们以我的头像为例
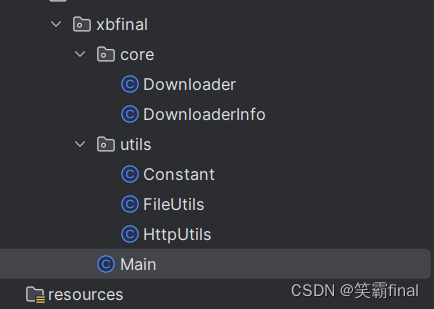
项目目录
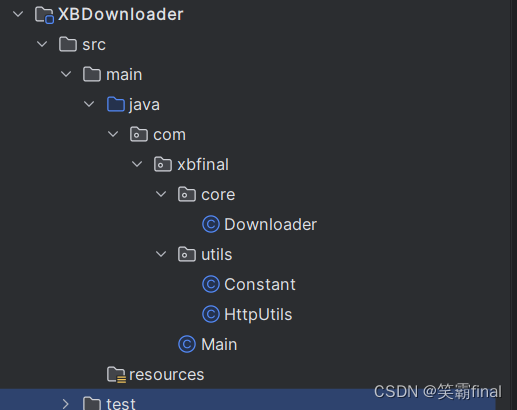
Constant:存放常量的类
HttpUtils:http工具包
Downloader:下载器
Main:主类
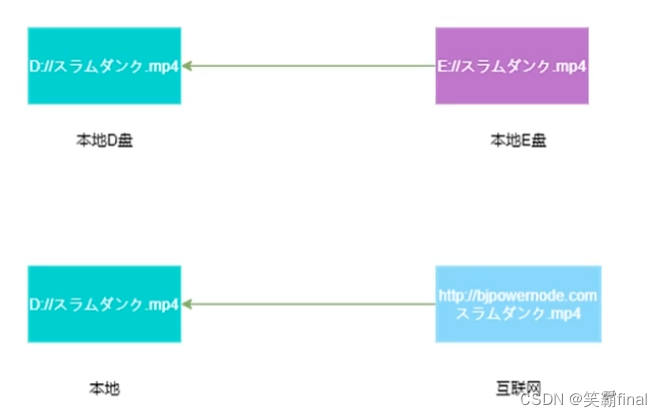
1.2文件的下载
类似于我们本地文件 从一个磁盘复制到另外一个磁盘。
对于互联网的下载,我们需要将本地和下载服务器建立链接
1.3 主类Main 的实现
public class Main {
public static void main(String[] args) {
String url = null;
Scanner scanner = new Scanner(System.in);
if (args == null || args.length<1){
while (url==null || " ".equals(url)){
url = scanner.nextLine();
}
}else{
url = args[0];
}
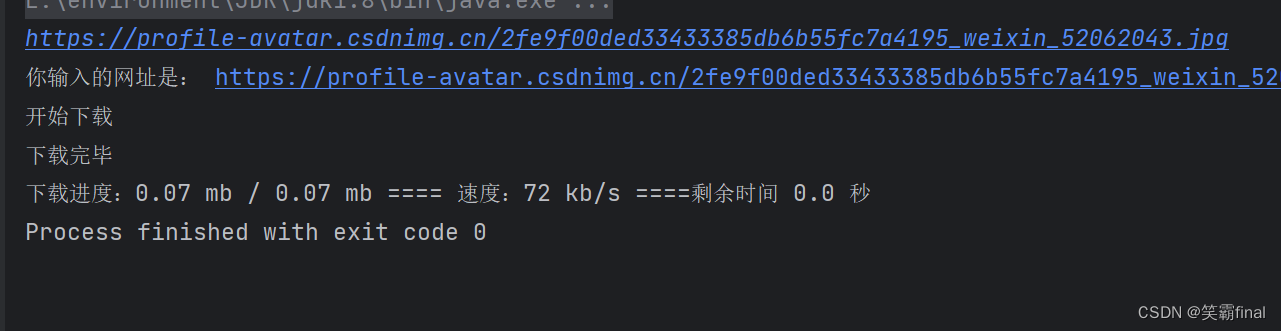
System.out.println("你输入的网址是: "+url);
System.out.println("开始下载");
Downloader downloader = new Downloader();
downloader.download(url);
System.out.println("下载完毕");
}
}
这里的代码应该就没有多说的了 都很简单,接下来我们就应该去写Downloader的代码了
1.4 Downloader和一些工具类的实现
1、我们来看看Downloader 类的定义。
接下来我们就在download(String url)里写逻辑了
public class Downloader {
    public void download(String url) {
    }
}
2、首先我们要获取文件名和 文件的保存路径,然后和服务器建立链接
得到链接对象httpUrlConnection
public void download(String url) {
 //获取文件名
        String httpFileName = HttpUtils.getHttpFileName(url);
        //文件的下载路径
        httpFileName = Constant.PATH+"\\"+httpFileName;

        //获取链接对象
        HttpURLConnection httpUrlConnection = null;
        try {
            httpUrlConnection = HttpUtils.getHttpUrlConnection(url);
        } catch (IOException e) {
            throw new RuntimeException(e);
        }
    }
这里我们用到了 HttpUtils工具类和Constant常量我们去看看怎么实现的吧
HttpUtils
public class HttpUtils {

    /**
     * 获取 HttpURLConnection 链接对象
     * @param url
     * @return
     * @throws IOException
     */
    public static HttpURLConnection getHttpUrlConnection(String url) throws IOException {
        URL httpUrl = new URL(url);
        //获取链接
        URLConnection urlConnection = httpUrl.openConnection();
        //向网站所在的服务器发送标识信息
        urlConnection.setRequestProperty("User-Agent","Mozilla/5.0 (Windows NT 10.0; Win64; x64) AppleWebKit/537.36 (KHTML, like Gecko) Chrome/118.0.0.0 Safari/537.36 Edg/118.0.2088.46");

        return (HttpURLConnection)urlConnection;
    }

    /**
     * 获取文件名
     * @param url
     * @return
     */
    public static String getHttpFileName(String url){
        int index = url.lastIndexOf("/");
        return url.substring(index+1);
    }
}
这里指的注意了:
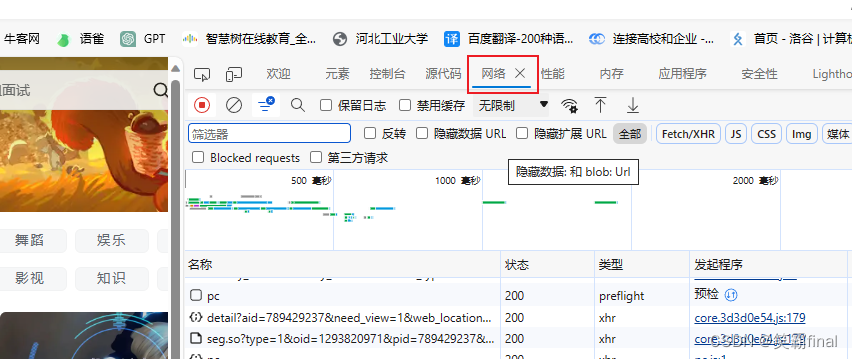
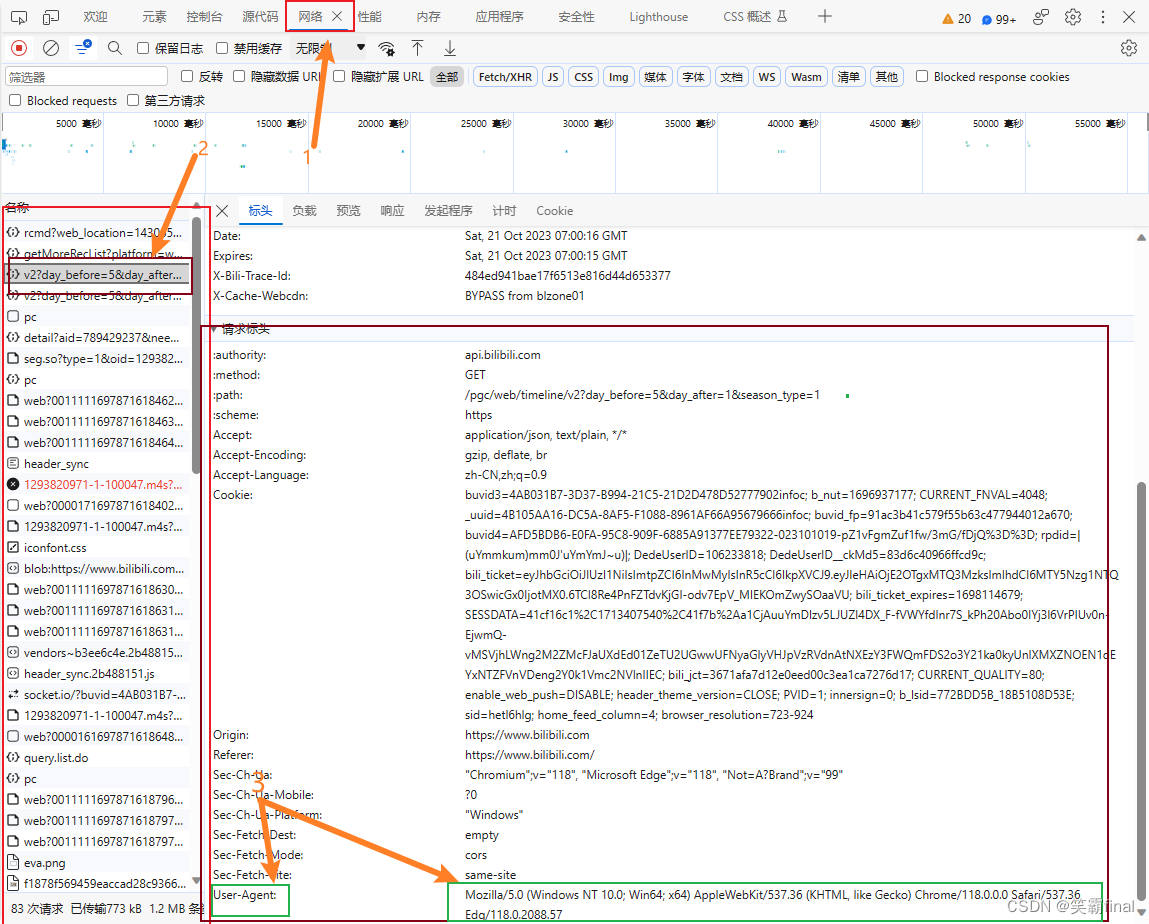
urlConnection.setRequestProperty("User-Agent","Mozilla/5.0 (Windows NT 10.0; Win64; x64) AppleWebKit/537.36 (KHTML, like Gecko) Chrome/118.0.0.0 Safari/537.36 Edg/118.0.2088.46");这行代码是模仿浏览器对服务器发的请求。怎么知道这个的呢?
1、先打开浏览器 按f12打开开发者工具,找到网络的选项
然后打开一个网络请求就能看到很多内容了
Constant
public class Constant {
    public static final  String PATH = "E:\\XBDownloader";
}
3、我们有了要保存的位置,就因该看看有没有该文件夹,没有就应该创建
		//判断文件甲是否存在
        // 创建File对象
        File path = new File(Constant.PATH);
        if(!path.exists()){
            //不存在就创建文件夹
            boolean mkdirs = path.mkdirs();
            if(!mkdirs){
                System.out.println("创建失败");
            }

        }
4、根据链接对象
httpUrlConnection来下载文件到本地
try(
                //获得输入流
                InputStream inputStream = httpUrlConnection.getInputStream();
                //缓冲流
                BufferedInputStream bufferedInputStream = new BufferedInputStream(inputStream);
                //输出流 把文件缓存到磁盘
                FileOutputStream fileOutputStream = new FileOutputStream(httpFileName);
                BufferedOutputStream bufferedOutputStream = new BufferedOutputStream(fileOutputStream);
        ){
            int len = -1;
            while ( (len =bufferedInputStream.read()) != -1){
                bufferedOutputStream.write(len);
            }


        } catch (IOException e) {
            System.out.println("文件下载失败");
            throw new RuntimeException(e);
        } finally {
            //关闭链接对象
            httpUrlConnection.disconnect();

        }
解释
1、InputStream inputStream = httpUrlConnection.getInputStream();:这行代码通过调用httpUrlConnection对象的getInputStream()方法来获取输入流,该输入流包含了从网络URL下载的文件数据。
2、BufferedInputStream bufferedInputStream = new BufferedInputStream(inputStream);:这行代码创建了一个缓冲输入流对象bufferedInputStream,它包装了之前获取的输入流。缓冲输入流可以提高读取文件的性能,因为它可以减少实际的磁盘I/O操作次数。
3、FileOutputStream fileOutputStream = new FileOutputStream(httpFileName);:这行代码创建了一个文件输出流对象fileOutputStream,它将用于将文件数据写入到本地磁盘上的指定文件名(httpFileName)中。
4、BufferedOutputStream bufferedOutputStream = new BufferedOutputStream(fileOutputStream);:这行代码创建了一个缓冲输出流对象bufferedOutputStream,它包装了之前创建的文件输出流。缓冲输出流可以提高写入文件的性能,因为它可以减少实际的磁盘I/O操作次数。
1.5 结果
输入我上面提供的资源地址就能下载了

二、加上进度条
文件目录
新增加了
DownloaderInfo类
2.1 DownloaderInfo实现
根据进度条可知 这我们应该开的另外一个线程,让它不断的去读取文件大小来统计下载速度
所以我们实现一个Runnable接口并重写run()方法
public class DownloaderInfo implements Runnable{

    @Override
    public void run() {

    }
}
定义成员变量
public class DownloaderInfo implements Runnable{
 //下载文件总大小
    private long httpFileContentLength;

    //本地已经下载的大小
    public Double finishedSize;

    //前一次下载大小
    public  double proDownSize;

    //本次下载大小
    public volatile double downSize;

    public DownloaderInfo() {}
    public DownloaderInfo(long httpFileContentLength) {
        this.httpFileContentLength = httpFileContentLength;
    }
}
这里需要注意
public volatile double downSize;这里加volatile关键字。让内存时刻保持最新值,因为这里有两个线程来操作的。
第一个线程 是下载线程 每次都会更新当前值
第二线程就是监控线程,每次读取它来监控下载进度
重写 @Override run()方法
@Override
    public void run() {

        //计算文件总大小 单位是M
        String downFileSize = String.format("%.2f",httpFileContentLength/ Constant.MB);

        //计算每秒下载速度KB
        int speed = (int)((downSize-proDownSize) / 1024d);

        proDownSize= downSize;

        //剩余文件大小
        double remainSize = httpFileContentLength - finishedSize - downSize;

        //计算剩余时间
        double rTime = remainSize / 1024 / speed;
        String remainTime = String.format("%.1f", rTime);
        if("Infinity".equals(remainTime)){
            remainTime = "————";
        }
        //已经下载大小
        String currentFileSize = String.format("%.2f", ((downSize - finishedSize) / Constant.MB));
        String downInfo = String.format("下载进度:%s mb / %s mb ==== 速度:%s kb/s ====剩余时间 %s 秒",
                currentFileSize, downFileSize, speed, remainTime);
        System.out.print("\r");
        System.out.print(downInfo);


    }
2.2修改Downloader类
既然我们需要时刻监控这个类的下载情况那么我们就需要创建线程
这里我用的是ScheduledThreadPool 线程池 用于创建一个定时任务执行器
添加成员变量 定时任务执行器
private ScheduledExecutorService scheduled = Executors.newScheduledThreadPool(1);
然后在download()方法里添加监控线程
//创建获取下载信息的对象
downloaderInfo = new DownloaderInfo(contentLength);
downloaderInfo.finishedSize=Double.longBitsToDouble(localFileLength) ;
//监控线程
scheduled.scheduleAtFixedRate(downloaderInfo,0,1, TimeUnit.SECONDS);
最后不要忘记释放资源
 } finally {
            //关闭链接对象
            httpUrlConnection.disconnect();
            scheduled.shutdownNow();
        }
2.3更新后的完整Downloader类
package com.xbfinal.core;

import com.xbfinal.utils.Constant;
import com.xbfinal.utils.FileUtils;
import com.xbfinal.utils.HttpUtils;

import java.io.*;
import java.net.HttpURLConnection;
import java.util.concurrent.Executors;
import java.util.concurrent.ScheduledExecutorService;
import java.util.concurrent.ScheduledThreadPoolExecutor;
import java.util.concurrent.TimeUnit;

/**
 * @version 1.0
 * @Author 笑霸final
 * @Date 2023/10/18 18:46
 * @注释 下载器类
 */
public class Downloader {

//    private ScheduledExecutorService  scheduled = new ScheduledThreadPoolExecutor(1);
//    private ScheduledExecutorService scheduled = Executors.newScheduledThreadPool(1);
    private ScheduledExecutorService scheduled = Executors.newScheduledThreadPool(1);

    public void download(String url) {
        //获取文件名
        String httpFileName = HttpUtils.getHttpFileName(url);
        //文件的下载路径
        httpFileName = Constant.PATH+"\\"+httpFileName;

        //获取本地文件大小
        long localFileLength = FileUtils.getFileSize(httpFileName);

        //获取链接对象
        HttpURLConnection httpUrlConnection = null;
        DownloaderInfo downloaderInfo = null;
        try {
            httpUrlConnection = HttpUtils.getHttpUrlConnection(url);
            //获取下载文件的总大小
            int contentLength = httpUrlConnection.getContentLength();
            //判断文件是否已经下载过?
            if(localFileLength >= contentLength){
                try{
                    System.out.println("已经下载过无须在下载~~~");
                    return;
                }finally {
                    //关闭链接对象
                    httpUrlConnection.disconnect();
                }
            }

            //创建获取下载信息的对象
            downloaderInfo = new DownloaderInfo(contentLength);
            downloaderInfo.finishedSize=Double.longBitsToDouble(localFileLength) ;
            //监控线程
            scheduled.scheduleAtFixedRate(downloaderInfo,0,1, TimeUnit.SECONDS);


        } catch (IOException e) {
            throw new RuntimeException(e);
        }

        //判断文件甲是否存在
        // 创建File对象
        File path = new File(Constant.PATH);
        if(!path.exists()){
            //不存在就创建文件夹
            boolean mkdirs = path.mkdirs();
            if(!mkdirs){
                System.out.println("创建失败");
            }

        }

        try(
                //获得输入流
                InputStream inputStream = httpUrlConnection.getInputStream();
                //缓冲流
                BufferedInputStream bufferedInputStream = new BufferedInputStream(inputStream);
                //输出流 把文件缓存到磁盘
                FileOutputStream fileOutputStream = new FileOutputStream(httpFileName);
                BufferedOutputStream bufferedOutputStream = new BufferedOutputStream(fileOutputStream);
        ){
            int len = -1;
            byte[] bytes = new byte[Constant.BYTE_SIZE];
            while ( (len =bufferedInputStream.read(bytes)) != -1){
                downloaderInfo.downSize+=len;
                bufferedOutputStream.write(bytes,0,len);

            }


        } catch (IOException e) {
            System.out.println("文件下载失败");
            throw new RuntimeException(e);
        } finally {
            //关闭链接对象
            httpUrlConnection.disconnect();
            scheduled.shutdownNow();
        }

    }
}
三、多线程下载器
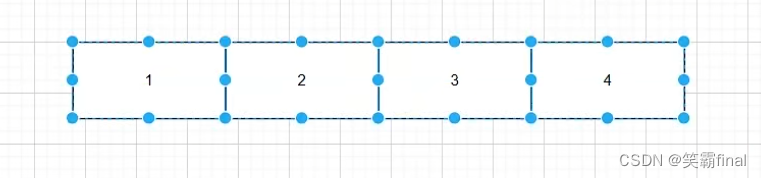
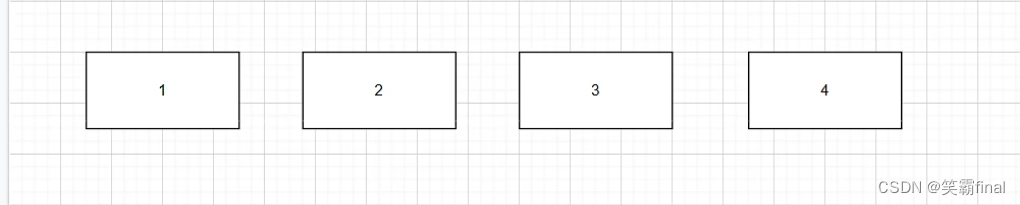
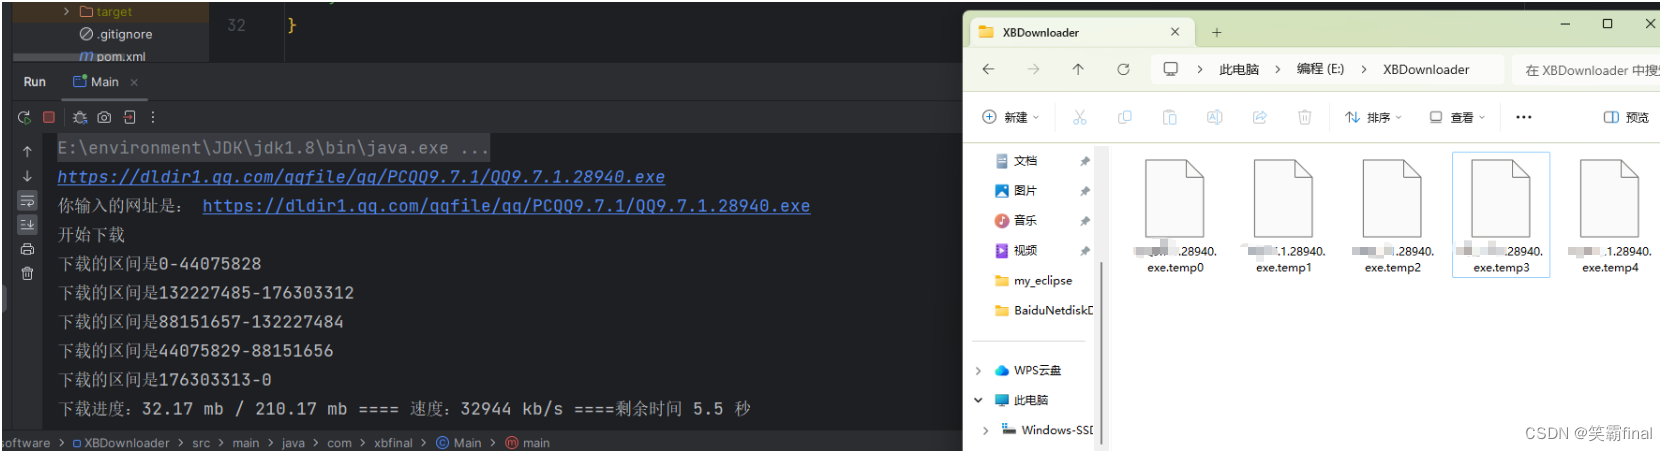
3.1下载思路
最开始 我们是一个线程负责下,如果我们多个线程下载是不是就需要把资源文件分块?然后不同的线程负责下不同的块!最后拼接起来对吧
每次发送请求给服务器说 下载具体的那一块就行了http协议也支持
目录

3.2 更新HttpUtils类
我们添加新的方法
/**
     * 分块下载的获取链接
     * @param url       下载地址
     * @param startPost 块的起始位置
     * @param startEnd  块的结束位置
     * @return
     */
    public static HttpURLConnection getHttpUrlConnection(String url,long startPost,long startEnd) throws IOException {
        HttpURLConnection httpUrlConnection = getHttpUrlConnection(url);
        System.out.println("下载的区间是"+startPost+"-"+startEnd );
        if(startEnd != 0){
            //第一块+中间数据块
            httpUrlConnection.setRequestProperty("RANGE","bytes="+startPost+"-"+startEnd);
        }else{
            //最后一块的数据
            httpUrlConnection.setRequestProperty("RANGE","bytes="+startPost+"-");
        }
        return httpUrlConnection;
    }
("RANGE","bytes="+startPost+"-"+startEnd) 这里也是固定的
/**
     * 获取文件名
     * @param url
     * @return
     */
    public static String getHttpFileName(String url){
        int index = url.lastIndexOf("/");
        return url.substring(index+1);
    }
/**
     *获取下载文件的大小
     * @param url
     * @return
     * @throws IOException
     */
    public static long getHttpFileLength(String url) throws IOException {
        HttpURLConnection httpUrlConnection= null;
        try{
             httpUrlConnection = getHttpUrlConnection(url);
             return httpUrlConnection.getContentLengthLong();
        }finally {
            assert httpUrlConnection != null;
            httpUrlConnection.disconnect();
        }

    }
3.3更新后的常量类Constant
public class Constant {
    public static final  String PATH = "E:\\XBDownloader\\";

    public static final Double MB = 1024d * 1024d;

    public static final int BYTE_SIZE = 1024 * 100;

    public static final int THREAD_NOW = 5;
}
3.4下载任务DownloaderTask的实现
这个类就是我们以后多线的一个线程内,将来开很多线程都是实例化这个类,因为要合并分块,要等所有的分块下载完成后,才能合并,所以需要返回值.
所以我们要实现Callable接口
@Data
@AllArgsConstructor
@NoArgsConstructor
public class DownloaderTask implements Callable<Boolean> {
@Override
    public Boolean call() throws Exception {
	}
}
给它添加成员变量
@Data
@AllArgsConstructor
@NoArgsConstructor
public class DownloaderTask implements Callable<Boolean> {
	//url
 	private String url;
  	//块的起始地址
    private long startPost;
	//块的结束地址
    private long startEnd;
	//块的编号
    private int part;
@Override
    public Boolean call() throws Exception {

	}
}
接下来我吗就重写call方法
 @Override
    public Boolean call() throws Exception {

        //获取文件名
        String httpFileName = HttpUtils.getHttpFileName(url);
        //分块的文件名
        httpFileName +=".temp"+part;
        //下载路径
        httpFileName = Constant.PATH+httpFileName;

        //分块下载的链接
        HttpURLConnection httpUrlConnection = HttpUtils.getHttpUrlConnection(url, startPost, startEnd);


        try(
                InputStream inputStream = httpUrlConnection.getInputStream();
                BufferedInputStream bis = new BufferedInputStream(inputStream);
                RandomAccessFile randomAccess = new RandomAccessFile(httpFileName,"rw")
        ){

            byte[] buffer = new byte[Constant.BYTE_SIZE];
            int len=-1;
            //循环读取数据
            while ((len =bis.read(buffer)) !=-1){
                //1秒内下载数据之和  (原子类)
                DownloaderInfo.downSize.add(len);
                randomAccess.write(buffer,0,len);
            }

        }catch (FileNotFoundException e){
            System.out.println("文件未找到");
            return false;
        }catch (Exception e){
            System.out.println("未知问题");
            return false;
        }finally {
        //释放链接
            httpUrlConnection.disconnect();
        }
        return true;
    }
3.5更新Downloader
添线程池成员变量(负责多线程下载)
 //任务线程池对象
  private ThreadPoolExecutor poolExecutor = new ThreadPoolExecutor(
    Constant.THREAD_NOW, // 核心线程数
    Constant.THREAD_NOW, // 最大线程数
    0, TimeUnit.SECONDS, // 空闲线程存活时间,这里设置为0,表示线程不会自动终止
    new ArrayBlockingQueue<>(Constant.THREAD_NOW) // 任务队列,用于存储待执行的任务
);
添加文件切分的方法
 /**
     * 文件切分
     * @param url
     * @param futureList
     */
    public void split(String url , ArrayList<Future> futureList){

        try {
            //获取下载文件大小
            long httpFileLength = HttpUtils.getHttpFileLength(url);
            //计算切分后文件的大小
            long size= httpFileLength/Constant.THREAD_NOW;
            //计算分块个数
            for (int i = 0; i < Constant.THREAD_NOW; i++) {
                //下载起始位置
                long startPost = i*size;
                //计算结束位置
                long startEnd;
                if(i==Constant.THREAD_NOW-1){
                    startEnd=0;
                }else{
                    startEnd=startPost+size;
                }
                if(startPost!=0){
                    startPost++;
                }
                //创建任务
                DownloaderTask downloaderTask = new DownloaderTask(url, startPost, startEnd,i);
                //将任务提交到线程池中
                Future<Boolean> submit = poolExecutor.submit(downloaderTask);
                futureList.add(submit);
            }


        } catch (IOException e) {
            throw new RuntimeException(e);
        }
    }
合并文件的方法
/**
* 合并文件的方法
* @param fileName
* @return
*/
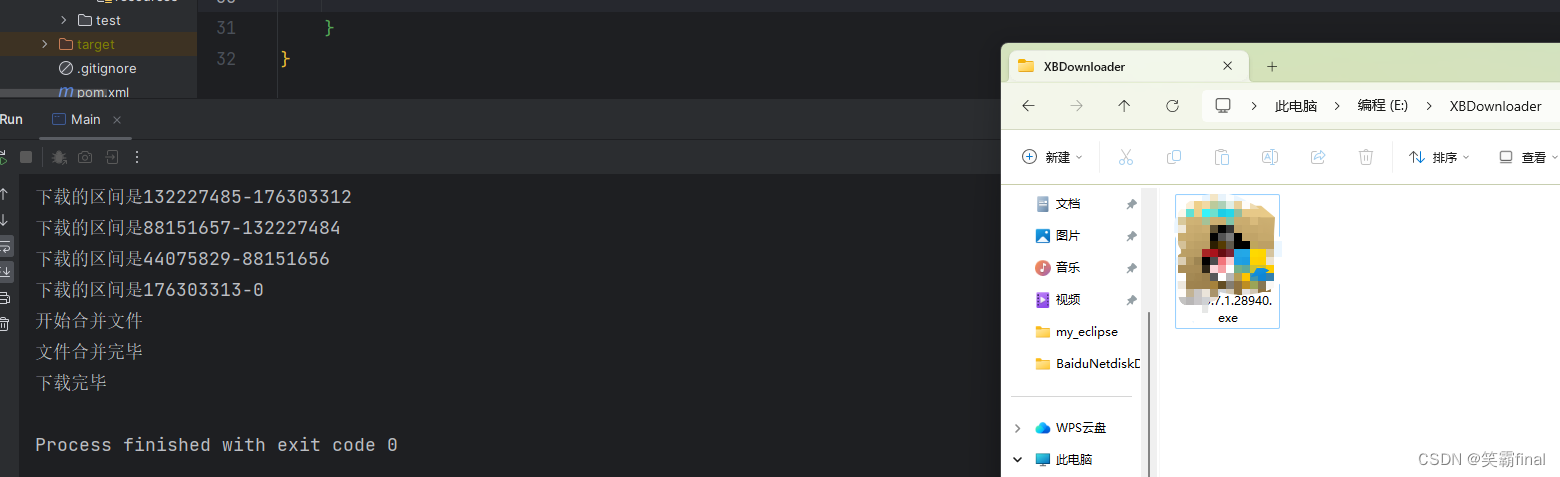
public boolean merge(String fileName){
System.out.print("\r");
System.out.println("开始合并文件");
byte[] buffer = new byte[Constant.BYTE_SIZE];
int len = -1;
try( RandomAccessFile accessFile = new RandomAccessFile(fileName,"rw")){
for (int i = 0; i < Constant.THREAD_NOW; i++) {
try( FileInputStream fileInputStream = new FileInputStream(fileName+".temp"+i);
BufferedInputStream bis = new BufferedInputStream(fileInputStream)
){
while ((len = bis.read(buffer)) != -1){
accessFile.write(buffer,0,len);
}
}
}
System.out.print("\r");
System.out.println("文件合并完毕");
} catch (FileNotFoundException e) {
System.out.println("文件未找到");
return false;
} catch (IOException e) {
System.out.println("未知错误");
return false;
}
return true;
}
最后清空临时文件
  /**
     * 清空临时文件
     * @param fileName
     * @return
     */
    public boolean clearTemp(String fileName){
        for (int i = 0; i < Constant.THREAD_NOW; i++) {
            File file = new File(fileName + ".temp" + i);
            file.delete();
        }
        return true;
    }
3.6Downloader中的download()方法
public void download(String url) {
        //获取文件名
        String httpFileName = HttpUtils.getHttpFileName(url);
        //文件的下载路径
        httpFileName = Constant.PATH+httpFileName;

        //获取本地文件大小
        long localFileLength = FileUtils.getFileSize(httpFileName);

        //获取链接对象
        HttpURLConnection httpUrlConnection = null;
        DownloaderInfo downloaderInfo = null;
        try {
            httpUrlConnection = HttpUtils.getHttpUrlConnection(url);
            //获取下载文件的总大小
            int contentLength = httpUrlConnection.getContentLength();
            //判断文件是否已经下载过?
            if(localFileLength >= contentLength){
                try{
                    System.out.println("已经下载过无须在下载~~~");
                    return;
                }finally {
                    //关闭链接对象
                    httpUrlConnection.disconnect();
                }
            }
            //创建获取下载信息的对象
            downloaderInfo = new DownloaderInfo(contentLength);
//            downloaderInfo.finishedSize=Double.longBitsToDouble(localFileLength) ;
            //监控线程 每1秒执行一次
            scheduled.scheduleAtFixedRate(downloaderInfo,1,1, TimeUnit.SECONDS);
            //切分任务
            ArrayList<Future> list = new ArrayList<>();
            split(url,list);
            //获取集合中的数据
            list.forEach(future -> {
                try {
                    future.get();//方便后续合并文件 所有文件下载未完成会阻塞
                } catch (InterruptedException e) {
                    throw new RuntimeException(e);
                } catch (ExecutionException e) {
                    throw new RuntimeException(e);
                }
            } );
            //合并文件
            merge(httpFileName);
            //删除临时文件
            clearTemp(httpFileName);


        } catch (IOException e) {
            throw new RuntimeException(e);
        } finally {
            //关闭链接对象
            httpUrlConnection.disconnect();
            scheduled.shutdownNow();
            poolExecutor.shutdownNow();
        }

    }
最后运行的结果


![正则表达式[总结]](https://img-blog.csdnimg.cn/img_convert/7a6d55f743104e1232fe8916a1f09246.png)
