前面我们学习了YOLOV7的训练过程,今天我们学习其推理过程,即模型预测:其包含损失函数计算,输出值解码,非极大值抑制,mAP计算等过程。
同时还介绍原始图像上绘制目标框等功能。
我们从predict.py文件开始,这里博主将原本的单张图像预测修改为多张图像,只是加了个list循环而已。
我们先来看一下predict的流程,其还是很容易理解的
生成模型:yolo = YOLO() yolo.py 此时只初始化
初始化参数 :模型权重文件目录等
检测图像:r_image = yolo.detect_image(image, crop = crop, count=count)
接下来便是在detect_image函数中层层调用
灰度转化:image = cvtColor(image)
图像大小调整:image_data = resize_image()
由于是预测过程,是不存在梯度变化的,故接下来的操作是在无梯度变化下进行的,即:with torch.no_grad():
将图像送入网络:outputs = self.net(images)
将输出解码:outputs = self.bbox_util.decode_box(outputs)
非极大值抑制:results = self.bbox_util.non_max_suppression()
在图像中绘制预测框
将输出解码
输出解码是指将yolo三个预测头的输出转换为图片中目标的类型,位置参数(边框中心坐标和长宽),目标置信度等,其功能定义在util_box,py文件中。
首先是类的定义及初始化
class DecodeBox():
    def __init__(self, anchors, num_classes, input_shape, anchors_mask = [[6,7,8], [3,4,5], [0,1,2]]):
        super(DecodeBox, self).__init__()
        self.anchors        = anchors
        self.num_classes    = num_classes
        self.bbox_attrs     = 5 + num_classes
        self.input_shape    = input_shape
        #-----------------------------------------------------------#
        #   20x20的特征层对应的anchor是[142, 110],[192, 243],[459, 401]特征图感受野大,使用大的anchor
        #   40x40的特征层对应的anchor是[36, 75],[76, 55],[72, 146]
        #   80x80的特征层对应的anchor是[12, 16],[19, 36],[40, 28]
        #-----------------------------------------------------------#
        self.anchors_mask   = anchors_mask
执行解码过程:
def decode_box(self, inputs):
    outputs = []
    for i, input in enumerate(inputs):
        #-----------------------------------------------#
        #   输入的input一共有三个,他们的shape分别是
        #   batch_size = 1
        #   batch_size, 3 * (4 + 1 + 80), 20, 20
        #   batch_size, 255, 40, 40
        #   batch_size, 255, 80, 80
        #-----------------------------------------------#
        batch_size      = input.size(0)
        input_height    = input.size(2)
        input_width     = input.size(3)

        #-----------------------------------------------#
        #   输入为640x640时
        #   stride_h = stride_w = 32、16、8
        #-----------------------------------------------#
        stride_h = self.input_shape[0] / input_height
        stride_w = self.input_shape[1] / input_width
        #-------------------------------------------------#
        #   此时获得的scaled_anchors大小是相对于特征层的
        #-------------------------------------------------#
        scaled_anchors = [(anchor_width / stride_w, anchor_height / stride_h) for anchor_width, anchor_height in self.anchors[self.anchors_mask[i]]]

        #-----------------------------------------------#
        #   输入的input一共有三个,他们的shape分别是
        #   batch_size, 3, 20, 20, 85
        #   batch_size, 3, 40, 40, 85
        #   batch_size, 3, 80, 80, 85
        #-----------------------------------------------#
        prediction = input.view(batch_size, len(self.anchors_mask[i]),
                                self.bbox_attrs, input_height, input_width).permute(0, 1, 3, 4, 2).contiguous()

        #-----------------------------------------------#
        #   先验框的中心位置的调整参数
        #-----------------------------------------------#
        x = torch.sigmoid(prediction[..., 0])
        y = torch.sigmoid(prediction[..., 1])
        #-----------------------------------------------#
        #   先验框的宽高调整参数
        #-----------------------------------------------#
        w = torch.sigmoid(prediction[..., 2])
        h = torch.sigmoid(prediction[..., 3])
        #-----------------------------------------------#
        #   获得置信度,是否有物体
        #-----------------------------------------------#
        conf        = torch.sigmoid(prediction[..., 4])
        #-----------------------------------------------#
        #   种类置信度
        #-----------------------------------------------#
        pred_cls    = torch.sigmoid(prediction[..., 5:])

        FloatTensor = torch.cuda.FloatTensor if x.is_cuda else torch.FloatTensor
        LongTensor  = torch.cuda.LongTensor if x.is_cuda else torch.LongTensor

        #----------------------------------------------------------#
        #   生成网格,先验框中心,网格左上角
        #   batch_size,3,20,20
        #----------------------------------------------------------#
        grid_x = torch.linspace(0, input_width - 1, input_width).repeat(input_height, 1).repeat(
            batch_size * len(self.anchors_mask[i]), 1, 1).view(x.shape).type(FloatTensor)
        grid_y = torch.linspace(0, input_height - 1, input_height).repeat(input_width, 1).t().repeat(
            batch_size * len(self.anchors_mask[i]), 1, 1).view(y.shape).type(FloatTensor)

        #----------------------------------------------------------#
        #   按照网格格式生成先验框的宽高
        #   batch_size,3,20,20
        #----------------------------------------------------------#
        anchor_w = FloatTensor(scaled_anchors).index_select(1, LongTensor([0]))
        anchor_h = FloatTensor(scaled_anchors).index_select(1, LongTensor([1]))
        anchor_w = anchor_w.repeat(batch_size, 1).repeat(1, 1, input_height * input_width).view(w.shape)
        anchor_h = anchor_h.repeat(batch_size, 1).repeat(1, 1, input_height * input_width).view(h.shape)

        #----------------------------------------------------------#
        #   利用预测结果对先验框进行调整
        #   首先调整先验框的中心,从先验框中心向右下角偏移
        #   再调整先验框的宽高。
        #   x 0 ~ 1 => 0 ~ 2 => -0.5, 1.5 => 负责一定范围的目标的预测
        #   y 0 ~ 1 => 0 ~ 2 => -0.5, 1.5 => 负责一定范围的目标的预测
        #   w 0 ~ 1 => 0 ~ 2 => 0 ~ 4 => 先验框的宽高调节范围为0~4倍
        #   h 0 ~ 1 => 0 ~ 2 => 0 ~ 4 => 先验框的宽高调节范围为0~4倍
        #----------------------------------------------------------#
        pred_boxes          = FloatTensor(prediction[..., :4].shape)
        pred_boxes[..., 0]  = x.data * 2. - 0.5 + grid_x
        pred_boxes[..., 1]  = y.data * 2. - 0.5 + grid_y
        pred_boxes[..., 2]  = (w.data * 2) ** 2 * anchor_w
        pred_boxes[..., 3]  = (h.data * 2) ** 2 * anchor_h

        #----------------------------------------------------------#
        #   将输出结果归一化成小数的形式
        #----------------------------------------------------------#
        _scale = torch.Tensor([input_width, input_height, input_width, input_height]).type(FloatTensor)
        output = torch.cat((pred_boxes.view(batch_size, -1, 4) / _scale,
                            conf.view(batch_size, -1, 1), pred_cls.view(batch_size, -1, self.num_classes)), -1)
        outputs.append(output.data)
    return outputs
对预测框进行筛选(置信度过滤和非极大值抑制)
一张640x640的图片输入到模型,会有8400个预测框,图片中不可能有那么目标,即便有,也无法绘制出来,我们需要对预测框进行筛选。筛选共分为两轮,第一轮是把置信度(目标置信度)低的预测框给过滤掉,第二轮是NMS,由于第一轮比较简单,并且两轮都需要遍历图片,所以我们把两轮写到同一个函数中。
def non_max_suppression(self, prediction, num_classes, input_shape, image_shape, letterbox_image, conf_thres=0.5, nms_thres=0.4):
    #----------------------------------------------------------#
    #   将预测结果的格式转换成左上角右下角的格式。
    #   prediction  [batch_size, num_anchors, 85]
    #----------------------------------------------------------#
    box_corner          = prediction.new(prediction.shape)
    box_corner[:, :, 0] = prediction[:, :, 0] - prediction[:, :, 2] / 2
    box_corner[:, :, 1] = prediction[:, :, 1] - prediction[:, :, 3] / 2
    box_corner[:, :, 2] = prediction[:, :, 0] + prediction[:, :, 2] / 2
    box_corner[:, :, 3] = prediction[:, :, 1] + prediction[:, :, 3] / 2
    prediction[:, :, :4] = box_corner[:, :, :4]

    output = [None for _ in range(len(prediction))]
    for i, image_pred in enumerate(prediction):
        #----------------------------------------------------------#
        #   对种类预测部分取max。
        #   class_conf  [num_anchors, 1]    种类置信度
        #   class_pred  [num_anchors, 1]    种类
        #----------------------------------------------------------#
        class_conf, class_pred = torch.max(image_pred[:, 5:5 + num_classes], 1, keepdim=True)

        #----------------------------------------------------------#
        #   利用置信度进行第一轮筛选
        #----------------------------------------------------------#
        conf_mask = (image_pred[:, 4] * class_conf[:, 0] >= conf_thres).squeeze()

        #----------------------------------------------------------#
        #   根据置信度进行预测结果的筛选
        #----------------------------------------------------------#
        image_pred = image_pred[conf_mask]
        class_conf = class_conf[conf_mask]
        class_pred = class_pred[conf_mask]
        if not image_pred.size(0):
            continue
        #-------------------------------------------------------------------------#
        #   detections  [num_anchors, 7]
        #   7的内容为:x1, y1, x2, y2, obj_conf, class_conf, class_pred
        #-------------------------------------------------------------------------#
        detections = torch.cat((image_pred[:, :5], class_conf.float(), class_pred.float()), 1)

        #------------------------------------------#
        #   获得预测结果中包含的所有种类
        #------------------------------------------#
        unique_labels = detections[:, -1].cpu().unique()

        if prediction.is_cuda:
            unique_labels = unique_labels.cuda()
            detections = detections.cuda()

        for c in unique_labels:
            #------------------------------------------#
            #   获得某一类得分筛选后全部的预测结果
            #------------------------------------------#
            detections_class = detections[detections[:, -1] == c]

            #------------------------------------------#
            #   使用官方自带的非极大抑制会速度更快一些!
            #   筛选出一定区域内,属于同一种类得分最大的框
            #------------------------------------------#
            keep = nms(
                detections_class[:, :4],
                detections_class[:, 4] * detections_class[:, 5],
                nms_thres
            )
            max_detections = detections_class[keep]

            # # 按照存在物体的置信度排序
            # _, conf_sort_index = torch.sort(detections_class[:, 4]*detections_class[:, 5], descending=True)
            # detections_class = detections_class[conf_sort_index]
            # # 进行非极大抑制
            # max_detections = []
            # while detections_class.size(0):
            #     # 取出这一类置信度最高的,一步一步往下判断,判断重合程度是否大于nms_thres,如果是则去除掉
            #     max_detections.append(detections_class[0].unsqueeze(0))
            #     if len(detections_class) == 1:
            #         break
            #     ious = bbox_iou(max_detections[-1], detections_class[1:])
            #     detections_class = detections_class[1:][ious < nms_thres]
            # # 堆叠
            # max_detections = torch.cat(max_detections).data

            # Add max detections to outputs
            output[i] = max_detections if output[i] is None else torch.cat((output[i], max_detections))

        if output[i] is not None:
            output[i]           = output[i].cpu().numpy()
            box_xy, box_wh      = (output[i][:, 0:2] + output[i][:, 2:4])/2, output[i][:, 2:4] - output[i][:, 0:2]
            output[i][:, :4]    = self.yolo_correct_boxes(box_xy, box_wh, input_shape, image_shape, letterbox_image)
    return output
其中使用了一个名为bbox_iou的函数,它是用来求边框之间的IOU,位于util.py中
在图像中绘制预测框
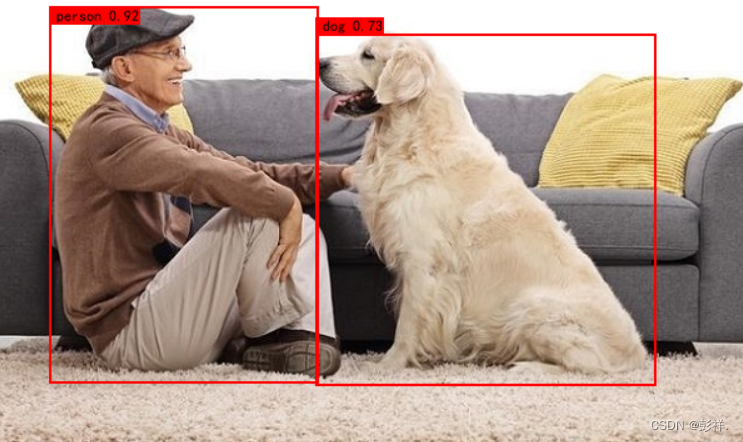
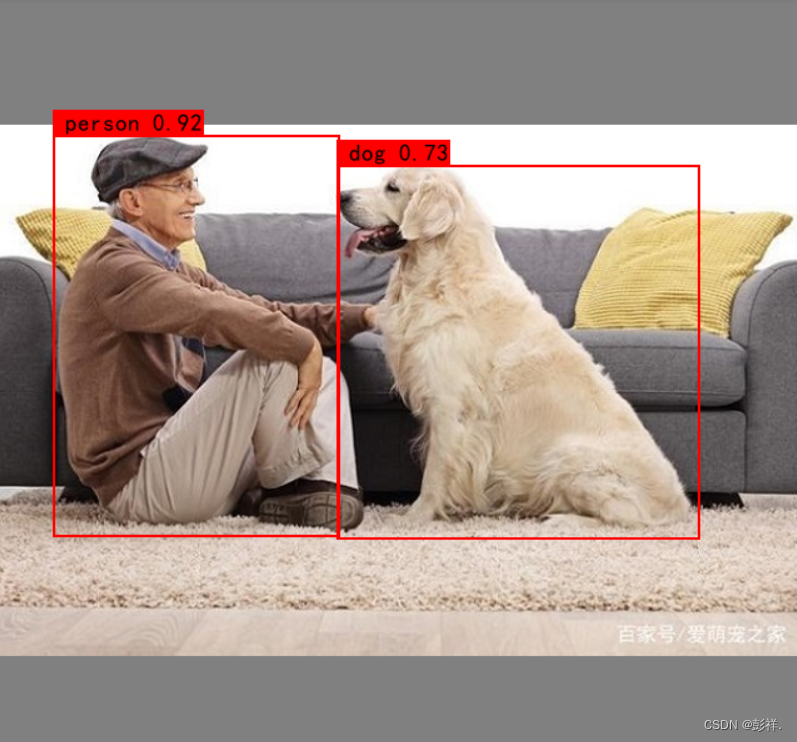
先前的实验中我们一直使用模拟数据,而在现实中我们使用真实数据时不见得会符合标准,如我们这里要求图像是正方形且为32的倍数,而下方的图像很明显不符合要求

对输入图片进行调整(letterbox及缩放)
这里调整到指定大小,不是直接暴力缩放,而是要高宽等比缩放,那么需要先使用letterbox算法,即在上下或者左右添加灰条,添加上灰条后再进行缩放。
def resize_image(image, size, letterbox_image):
    iw, ih  = image.size
    w, h    = size
    if letterbox_image:
        scale   = min(w/iw, h/ih)
        nw      = int(iw*scale)
        nh      = int(ih*scale)

        image   = image.resize((nw,nh), Image.BICUBIC)
        new_image = Image.new('RGB', size, (128,128,128))
        new_image.paste(image, ((w-nw)//2, (h-nh)//2))
    else:
        new_image = image.resize((w, h), Image.BICUBIC)
    return new_image
将边框绘制在图片中
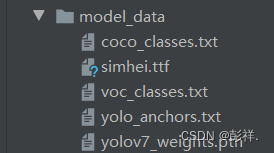
先将字体文件simhei.ttf和coco类名文件下载下来,复制到yolox_from_scratch/model_data中,结果如下:
下面这段代码是绘制边框的代码,其集成在了detect_image函数中了
font        = ImageFont.truetype(font='model_data/simhei.ttf', size=np.floor(3e-2 * image.size[1] + 0.5).astype('int32'))
thickness   = int(max((image.size[0] + image.size[1]) // np.mean(self.input_shape), 1))
#---------------------------------------------------------#
#   计数
#---------------------------------------------------------#
if count:
    print("top_label:", top_label)
    classes_nums    = np.zeros([self.num_classes])
    for i in range(self.num_classes):
        num = np.sum(top_label == i)
        if num > 0:
            print(self.class_names[i], " : ", num)
        classes_nums[i] = num
    print("classes_nums:", classes_nums)
#---------------------------------------------------------#
#   是否进行目标的裁剪
#---------------------------------------------------------#
if crop:
    for i, c in list(enumerate(top_boxes)):
        top, left, bottom, right = top_boxes[i]
        top     = max(0, np.floor(top).astype('int32'))
        left    = max(0, np.floor(left).astype('int32'))
        bottom  = min(image.size[1], np.floor(bottom).astype('int32'))
        right   = min(image.size[0], np.floor(right).astype('int32'))

        dir_save_path = "img_crop"
        if not os.path.exists(dir_save_path):
            os.makedirs(dir_save_path)
        crop_image = image.crop([left, top, right, bottom])
        crop_image.save(os.path.join(dir_save_path, "crop_" + str(i) + ".png"), quality=95, subsampling=0)
        print("save crop_" + str(i) + ".png to " + dir_save_path)
#---------------------------------------------------------#
#   图像绘制
#---------------------------------------------------------#
for i, c in list(enumerate(top_label)):
    predicted_class = self.class_names[int(c)]
    box             = top_boxes[i]
    score           = top_conf[i]

    top, left, bottom, right = box

    top     = max(0, np.floor(top).astype('int32'))
    left    = max(0, np.floor(left).astype('int32'))
    bottom  = min(image.size[1], np.floor(bottom).astype('int32'))
    right   = min(image.size[0], np.floor(right).astype('int32'))

    label = '{} {:.2f}'.format(predicted_class, score)
    draw = ImageDraw.Draw(image)
    label_size = draw.textsize(label, font)
    label = label.encode('utf-8')
    print(label, top, left, bottom, right)

    if top - label_size[1] >= 0:
        text_origin = np.array([left, top - label_size[1]])
    else:
        text_origin = np.array([left, top + 1])

    for i in range(thickness):
        draw.rectangle([left + i, top + i, right - i, bottom - i], outline=self.colors[c])
    draw.rectangle([tuple(text_origin), tuple(text_origin + label_size)], fill=self.colors[c])
    draw.text(text_origin, str(label,'UTF-8'), fill=(0, 0, 0), font=font)
    del draw
所得效果:
对输出边框进行调整
我们刚刚是在letterbox后的图片中画框的,如果我们想在原图中画框,只需要把上下角点坐标转化一下即可。
util_box.py
def yolo_correct_boxes(self, box_xy, box_wh, input_shape, image_shape, letterbox_image):
    #-----------------------------------------------------------------#
    #   把y轴放前面是因为方便预测框和图像的宽高进行相乘
    #-----------------------------------------------------------------#
    box_yx = box_xy[..., ::-1]
    box_hw = box_wh[..., ::-1]
    input_shape = np.array(input_shape)
    image_shape = np.array(image_shape)

    if letterbox_image:
        #-----------------------------------------------------------------#
        #   这里求出来的offset是图像有效区域相对于图像左上角的偏移情况
        #   new_shape指的是宽高缩放情况
        #-----------------------------------------------------------------#
        new_shape = np.round(image_shape * np.min(input_shape/image_shape))
        offset  = (input_shape - new_shape)/2./input_shape
        scale   = input_shape/new_shape

        box_yx  = (box_yx - offset) * scale
        box_hw *= scale

    box_mins    = box_yx - (box_hw / 2.)
    box_maxes   = box_yx + (box_hw / 2.)
    boxes  = np.concatenate([box_mins[..., 0:1], box_mins[..., 1:2], box_maxes[..., 0:1], box_maxes[..., 1:2]], axis=-1)
    boxes *= np.concatenate([image_shape, image_shape], axis=-1)
    return boxes
效果如下:
