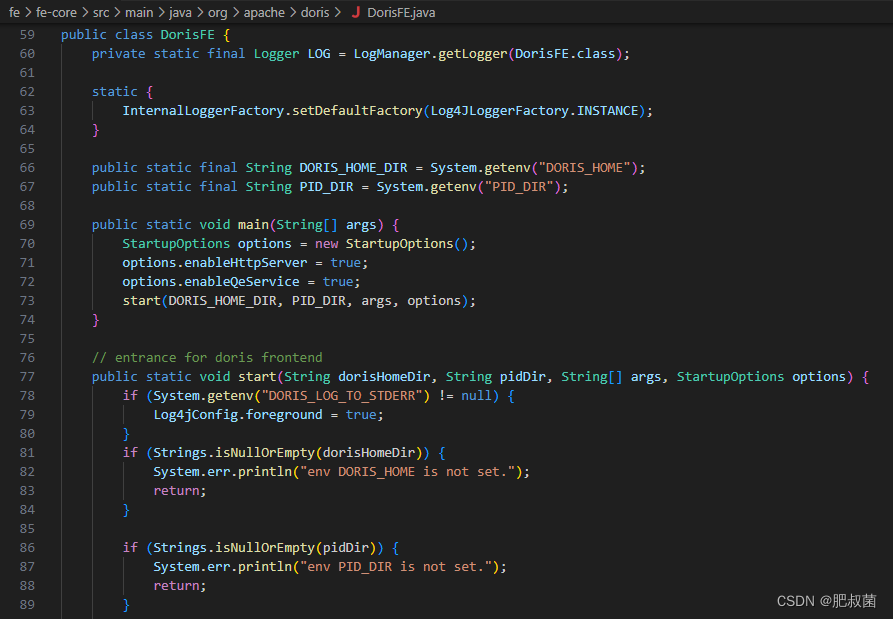
Doris中FE主要负责接收和返回客户端请求、元数据以及集群管理、查询计划生成等工作。代码路径:doris/fe/fe-core/src/main/java/org/apache/doris/DorisFE.java
环境检查
在启动FE的时候,主要做环境检查。检查一些启动时必要的环境变量以及初始化配置文件,比如DORIS_HOME_DIR如果没有人为配置 DORIS_HOME_DIR,则该变量的值就是doris的解压安装目录;PID_DIR是为了判断FE进程是第一次启动还是之前启动过,并创建pid文件fe.pid。解析命令行参数。初始化fe.conf、fe_custom.conf、ldap.conf。检测JDK版本是否匹配,主要是检测compile的JDK和runtime的jdk版本,需要要求runtimeVersion > compileVersion。
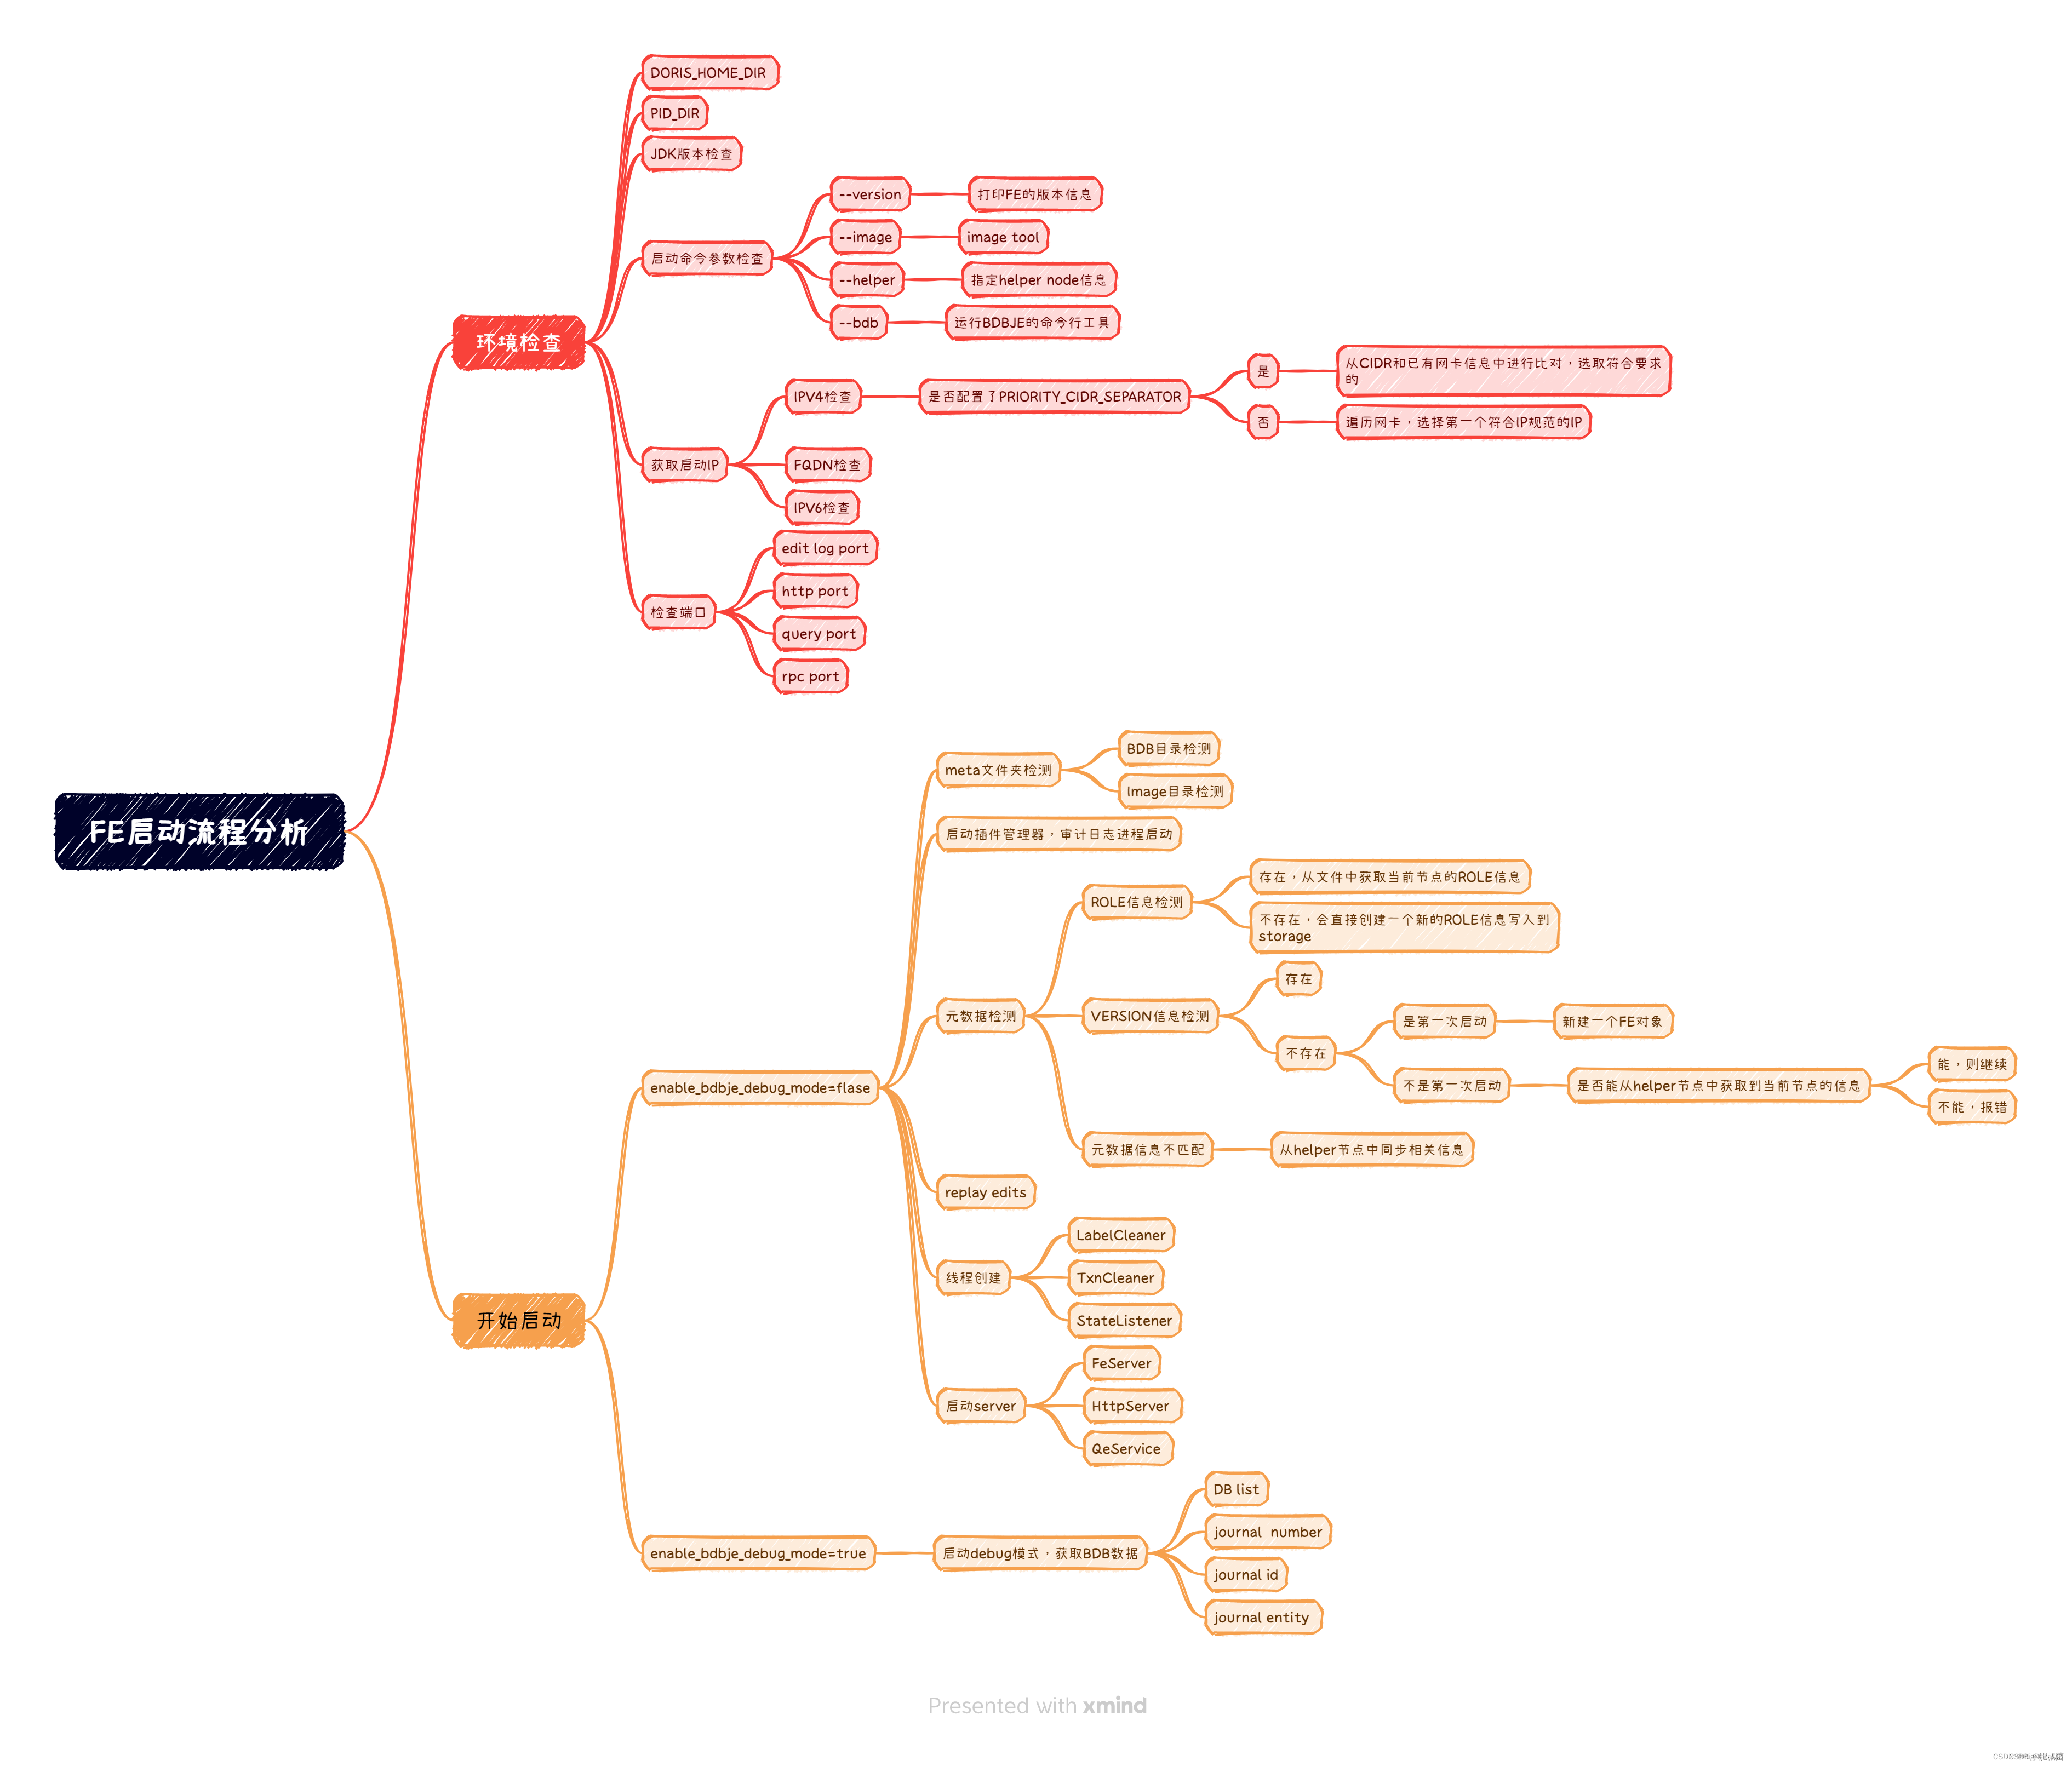
检查 解析启动FE时输入的命令行参数,以便进行不同的操作,主要会包含这几类:–version或者执行 -v ,主要是打印FE的版本;–helper或 -h ,主要是指定 helper node 然后加入FE的 bdb je的副本组;–image:或-i,主要是检查image文件;–bdb或-b,主要是用以运行bdbje的命令行工具,具体解析逻辑如下(bdbje tool的代码逻辑过长,有兴趣的可以自己去看一下 parseArgs的实现):
    private static void checkCommandLineOptions(CommandLineOptions cmdLineOpts) {
        if (cmdLineOpts.isVersion()) {
            System.out.println("Build version: " + Version.DORIS_BUILD_VERSION);
            System.out.println("Build time: " + Version.DORIS_BUILD_TIME);
            System.out.println("Build info: " + Version.DORIS_BUILD_INFO);
            System.out.println("Build hash: " + Version.DORIS_BUILD_HASH);
            System.out.println("Java compile version: " + Version.DORIS_JAVA_COMPILE_VERSION);
            System.exit(0);
        } else if (cmdLineOpts.runBdbTools()) {
            BDBTool bdbTool = new BDBTool(Env.getCurrentEnv().getBdbDir(), cmdLineOpts.getBdbToolOpts());
            if (bdbTool.run()) { System.exit(0);
            } else { System.exit(-1);
            }
        } else if (cmdLineOpts.runImageTool()) {
            File imageFile = new File(cmdLineOpts.getImagePath());
            if (!imageFile.exists()) {
                System.out.println("image does not exist: " + imageFile.getAbsolutePath() + " . Please put an absolute path instead"); System.exit(-1);
            } else {
                System.out.println("Start to load image: ");
                try {
                    MetaReader.read(imageFile, Env.getCurrentEnv());
                    System.out.println("Load image success. Image file " + cmdLineOpts.getImagePath() + " is valid");
                } catch (Exception e) {
                    System.out.println("Load image failed. Image file " + cmdLineOpts.getImagePath() + " is invalid");
                    LOG.warn("", e);
                } finally {
                    System.exit(0);
                }
            }
        }

        // go on
    }
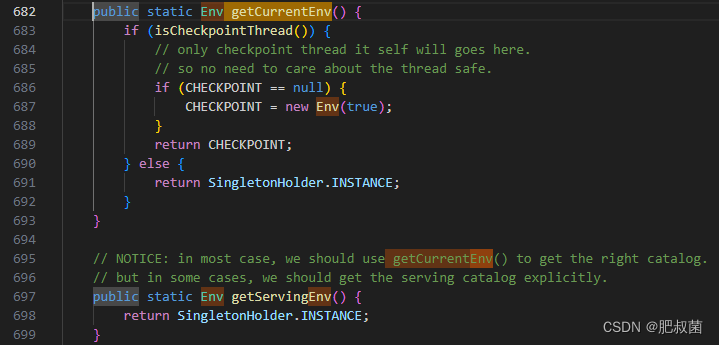
提前介绍以下fe/fe-core/src/main/java/org/apache/doris/catalog/Env.java的getCurrentEnv函数,用于返回ENV单例。该类用于A singleton class can also be seen as an entry point of Doris. All manager classes can be obtained through this class. 类似于存放全局可见数据的全局变量,比如CatalogMgr、LoadManager等。
根据输入的参数,如果不是运行image tool、bdbje tool或者打印FE的version信息,就继续往下执行,这个时候就要准备开始启动FE了。同样,启动FE时,需要初始化一些操作。初始化的时候,主要是检查了FE的启动IP,是不是一个合法的IP。这里需要注意的就是,我们在配置文件中配置的CIDR或者FQDN的配置,在初始化的时候会检测。很多小伙伴在启动FE的时候,没有正确配置IP的时候,最后用了localhost或者本地回环IP启动,导致没有使用我们想要的IP启动,具体的判断逻辑就是在这:
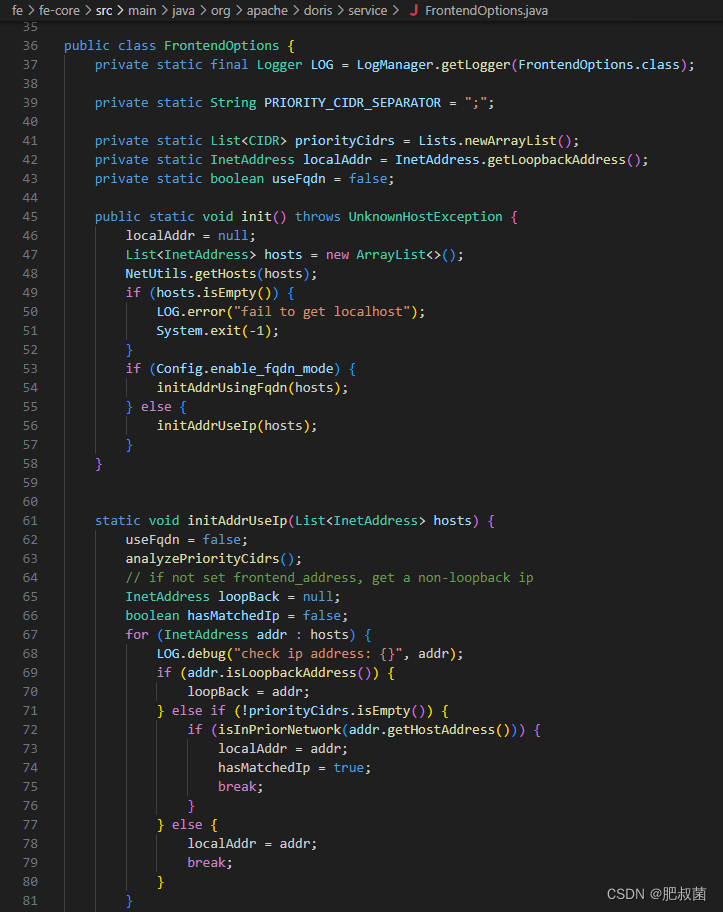
上面的逻辑看,初始化的时候会遍历网卡信息,拿遍历的IP地址和填写的PRIORITY_CIDR_SEPARATOR的值做匹配,匹配上了,就会用处于填写的CIDR范围中的ip启动,匹配不上的时候会从网卡IP中拿出一个合法的IP作为FE的启动IP,这个就不一定是我们想要的那个启动IP。特别是当前机器上有很多虚拟网卡的IP信息,就会很大概率用排在前面的虚拟IP启动。当然,这里还会根据配置文件中的信息,去检查是不是FQDN,是不是IPV6,有兴趣的的同学都可以看一下具体的代码逻辑。Init操作其实就是获取了当前FE的启动IP,获取完IP后,就需要检测端口,看FE的启动的需要的这些端口是否是正常的。
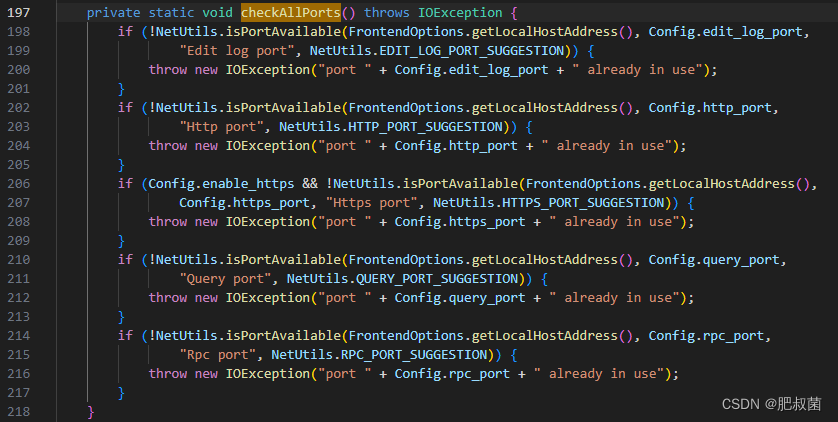
如上图所示Doris主要提供四个端口:Edit log port、Http port、Https port、Query port和Rpc port。
开始启动
还有一个比较重要的检测,就是需要根据fe.conf中的 enable_bdbje_debug_mode参数的值,来决定怎么启动。这个值主要是某些时候,我们的FE的leader选举出现一定问题,做元数据运维的时候,会走运维模式逻辑。如果是正常情况下,这个值默认是FALSE,就会走后续的正常启动FE的流程。
元数据环境初始化
            // init catalog and wait it be ready
            Env.getCurrentEnv().initialize(args);
            Env.getCurrentEnv().waitForReady();

0 元数据目录,如果不存在,需要手动创建,这里主要是需要手动创建最外层的metaDir,内层的bdb的目录和image的目录会自己创建。获取本节点host port、获取helper节点 host port【fe/fe-core/src/main/java/org/apache/doris/deploy/DeployManager.java AmbariDeployManager.java K8sDeployManager.java LocalFileDeployManager.java】1 初始化插件管理器,启动审计日志进程。2 根据当前的元数据信息获取集群ID和节点角色信息(ROLE和VERSION文件的判断) 代码较长,只节选了关键代码。具体逻辑可以看一下getClusterIdAndRole 的具体实现,这里主要就是根据指定的helper的节点的元数据信息或者本地存在的元数据信息,获取到集群的ROLE信息和VERSION信息。如果集群是非helper节点且第一次启动,ROLE文件实没有,这个时候需要创建这个文件。同时赋予相关值(ROLE=FOLLOWER),将节点信息写入到元数据文件中。如果当前阶段存在这些元数据文件,则会去元数据文件中获取当前节点的角色信息。
            // ATTN:
            // If the version file and role file does not exist and the helper node is itself, this should be the very beginning startup of the cluster, so we create ROLE and VERSION file, set isFirstTimeStartUp to true, and add itself to frontends list. If ROLE and VERSION file is deleted for some reason, we may arbitrarily start this node as FOLLOWER, which may cause UNDEFINED behavior. Everything may be OK if the origin role is exactly FOLLOWER, but if not, FE process will exit somehow.
            Storage storage = new Storage(this.imageDir);
            if (!roleFile.exists()) { // The very first time to start the first node of the cluster. It should became a Master node (Master node's role is also FOLLOWER, which means electable) For compatibility. Because this is the very first time to start, so we arbitrarily choose a new name for this node
                role = FrontendNodeType.FOLLOWER; nodeName = genFeNodeName(selfNode.getIdent(), selfNode.getPort(), false /* new style */);
                storage.writeFrontendRoleAndNodeName(role, nodeName);
                LOG.info("very first time to start this node. role: {}, node name: {}", role.name(), nodeName);
            } else {
                role = storage.getRole();
                if (role == FrontendNodeType.REPLICA) { // for compatibility
                    role = FrontendNodeType.FOLLOWER;
                }
                nodeName = storage.getNodeName();
                if (Strings.isNullOrEmpty(nodeName)) {
                    // In normal case, if ROLE file exist, role and nodeName should both exist.
                    // But we will get a empty nodeName after upgrading.
                    // So for forward compatibility, we use the "old-style" way of naming: "ip_port",
                    // and update the ROLE file.
                    nodeName = genFeNodeName(selfNode.getHost(), selfNode.getPort(), true/* old style */);
                    storage.writeFrontendRoleAndNodeName(role, nodeName);
                    LOG.info("forward compatibility. role: {}, node name: {}", role.name(), nodeName);
                }
                // Notice:
                // With the introduction of FQDN, the nodeName is no longer bound to an IP address,
                // so consistency is no longer checked here. Otherwise, the startup will fail.
            }
如果我们启动了一个FE,无法从给出的helper节点信息中,同helper节点建立连接,就会出现:current node is not added to the group. please add it first. " + “sleep 5 seconds and retry, current helper nodes: {}”, helperNodes。的日志信息,这个异常原因就是由于当前节点无法和指定的helper节点建立正常的连接信息导致的。当和helper节点构建正常连接后,就会从helper节点同步 VERSION信息。如果本身节点存在VERSIN文件的信息,说明不是第一次启动,这个时候就会用本地的这个文件的元数据信息同HELPER节点的VERSION信息进行比对。主要是比较clusterID。如果不一致,说明两个节点不是同一个集群的节点,启动进程就直接退出了。
            // try to get role and node name from helper node, this loop will not end until we get certain role type and name
            while (true) {
                if (!getFeNodeTypeAndNameFromHelpers()) {
                    LOG.warn("current node is not added to the group. please add it first. sleep 5 seconds and retry, current helper nodes: {}", helperNodes);
                    try { Thread.sleep(5000);
                        continue;
                    } catch (InterruptedException e) {
                        LOG.warn("", e); System.exit(-1);
                    }
                }
                if (role == FrontendNodeType.REPLICA)  // for compatibility
                    role = FrontendNodeType.FOLLOWER;
                break;
            }

            HostInfo rightHelperNode = helperNodes.get(0);
            Storage storage = new Storage(this.imageDir);
            if (roleFile.exists() && (role != storage.getRole() || !nodeName.equals(storage.getNodeName()))  || !roleFile.exists()) {
                storage.writeFrontendRoleAndNodeName(role, nodeName);
            }
            if (!versionFile.exists()) {
                // If the version file doesn't exist, download it from helper node
                if (!getVersionFileFromHelper(rightHelperNode)) {
                    throw new IOException("fail to download version file from " + rightHelperNode.getHost() + " will exit.");
                }

                // NOTE: cluster_id will be init when Storage object is constructed,
                //       so we new one.
                storage = new Storage(this.imageDir);
                clusterId = storage.getClusterID();
                token = storage.getToken();
                if (Strings.isNullOrEmpty(token)) {  token = Config.auth_token;
                }
            } else {
                // If the version file exist, read the cluster id and check the
                // id with helper node to make sure they are identical
                clusterId = storage.getClusterID();
                token = storage.getToken();
                try {
                    String url = "http://" + NetUtils.getHostPortInAccessibleFormat(rightHelperNode.getHost(), Config.http_port) + "/check";
                    HttpURLConnection conn = HttpURLUtil.getConnectionWithNodeIdent(url);
                    conn.setConnectTimeout(2 * 1000);
                    conn.setReadTimeout(2 * 1000);
                    String clusterIdString = conn.getHeaderField(MetaBaseAction.CLUSTER_ID);
                    int remoteClusterId = Integer.parseInt(clusterIdString);
                    if (remoteClusterId != clusterId) {
                        LOG.error("cluster id is not equal with helper node {}. will exit.",
                                rightHelperNode.getHost());
                        throw new IOException(
                                "cluster id is not equal with helper node "
                                        + rightHelperNode.getHost() + ". will exit.");
                    }
                    String remoteToken = conn.getHeaderField(MetaBaseAction.TOKEN);
                    if (token == null && remoteToken != null) {
                        LOG.info("get token from helper node. token={}.", remoteToken);
                        token = remoteToken;
                        storage.writeClusterIdAndToken();
                        storage.reload();
                    }
                    if (Config.enable_token_check) {
                        Preconditions.checkNotNull(token);
                        Preconditions.checkNotNull(remoteToken);
                        if (!token.equals(remoteToken)) {
                            throw new IOException(
                                    "token is not equal with helper node "
                                            + rightHelperNode.getHost() + ". will exit.");
                        }
                    }
                } catch (Exception e) {
                    throw new IOException("fail to check cluster_id and token with helper node.", e);
                }
            }

            getNewImage(rightHelperNode);
3 经过这一步 VERSION和ROLE的元数据信息比对后,确定是同一个集群内的节点,也确定了这个FE的ROLE信息了,就需要从image中同步editlog。editLog为bdbje[Oracle Berkeley DB Java Edition (opens new window)],在 Doris 中,我们使用 bdbje 完成元数据操作日志的持久化、FE 高可用等功能。【就相当于ETCD的Raft共识模块+WAL日志模块的组合】。image file就是内存checkpoint到磁盘上的文件。globalTransactionMgr是全局事务管理器。
        // 3. Load image first and replay edits
        this.editLog = new EditLog(nodeName);
        loadImage(this.imageDir); // load image file
        editLog.open(); // open bdb env
        this.globalTransactionMgr.setEditLog(editLog);
        this.idGenerator.setEditLog(editLog);
456 创建一系列的cleaner 线程和监听线程:
        // 4. create load and export job label cleaner thread
        createLabelCleaner();
        // 5. create txn cleaner thread
        createTxnCleaner();
        // 6. start state listener thread
        createStateListener(); listener.start();
        if (!Config.edit_log_type.equalsIgnoreCase("bdb")) {
            // If not using bdb, we need to notify the FE type transfer manually.
            notifyNewFETypeTransfer(FrontendNodeType.MASTER);
        }
        if (statisticsCleaner != null) {
            statisticsCleaner.start();
        }
        if (statisticsAutoAnalyzer != null) {
            statisticsAutoAnalyzer.start();
        }
此时启动前初始化工作就做完了。等待catalog信息的同步完成即可进行下一步。
    // wait until FE is ready.
    public void waitForReady() throws InterruptedException {
        long counter = 0;
        while (true) {
            if (isReady()) {
                LOG.info("catalog is ready. FE type: {}", feType);
                break;
            }

            Thread.sleep(100);
            if (counter++ % 20 == 0) {
                LOG.info("wait catalog to be ready. FE type: {}. is ready: {}, counter: {}", feType, isReady.get(),
                        counter);
            }
        }
    }
启动FE的SERVER
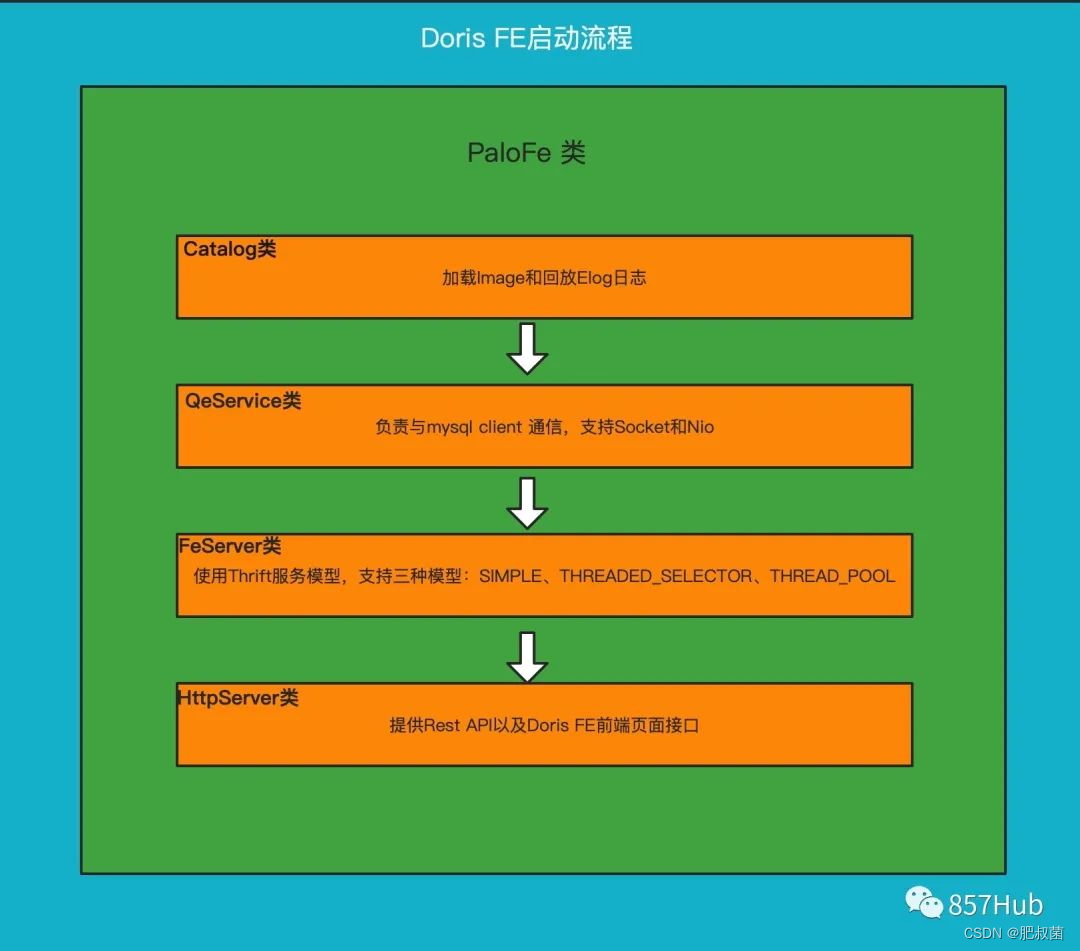
创建 QeServer ,负责与mysql client 通信;创建 FeServer ,由Thrift Server组成,负责 FE 和 BE 通信;创建 HttpServer ,负责提供Rest API以及Doris FE前端页面接口。
            // init and start:
            // 1. HttpServer for HTTP Server
            // 2. FeServer for Thrift Server
            // 3. QeService for MySQL Server
            FeServer feServer = new FeServer(Config.rpc_port);
            feServer.start();

            if (options.enableHttpServer) {
                HttpServer httpServer = new HttpServer();
                httpServer.setPort(Config.http_port);
                httpServer.setHttpsPort(Config.https_port);
                httpServer.setMaxHttpPostSize(Config.jetty_server_max_http_post_size);
                httpServer.setAcceptors(Config.jetty_server_acceptors);
                httpServer.setSelectors(Config.jetty_server_selectors);
                httpServer.setWorkers(Config.jetty_server_workers);
                httpServer.setKeyStorePath(Config.key_store_path);
                httpServer.setKeyStorePassword(Config.key_store_password);
                httpServer.setKeyStoreType(Config.key_store_type);
                httpServer.setKeyStoreAlias(Config.key_store_alias);
                httpServer.setEnableHttps(Config.enable_https);
                httpServer.setMaxThreads(Config.jetty_threadPool_maxThreads);
                httpServer.setMinThreads(Config.jetty_threadPool_minThreads);
                httpServer.setMaxHttpHeaderSize(Config.jetty_server_max_http_header_size);
                httpServer.start();
                Env.getCurrentEnv().setHttpReady(true);
            }

            if (options.enableQeService) {
                QeService qeService = new QeService(Config.query_port, ExecuteEnv.getInstance().getScheduler());
                qeService.start();
            }

            ThreadPoolManager.registerAllThreadPoolMetric();
Doris 的元数据主要存储4类数据:
用户数据信息。包括数据库、表的 Schema、分片信息等。
各类作业信息。如导入作业,Clone 作业、SchemaChange 作业等。
用户及权限信息。
集群及节点信息
元数据的数据流具体过程如下:
只有 leader FE 可以对元数据进行写操作。写操作在修改 leader 的内存后,会序列化为一条log,按照 key-value 的形式写入 bdbje。其中 key 为连续的整型,作为 log id,value 即为序列化后的操作日志。
日志写入 bdbje 后,bdbje 会根据策略(写多数/全写),将日志复制到其他 non-leader 的 FE 节点。non-leader FE 节点通过对日志回放,修改自身的元数据内存镜像,完成与 leader 节点的元数据同步。
leader 节点的日志条数达到阈值后(默认 10w 条),会启动 checkpoint 线程。checkpoint 会读取已有的 image 文件,和其之后的日志,重新在内存中回放出一份新的元数据镜像副本。然后将该副本写入到磁盘,形成一个新的 image。之所以是重新生成一份镜像副本,而不是将已有镜像写成 image,主要是考虑写 image 加读锁期间,会阻塞写操作。所以每次 checkpoint 会占用双倍内存空间。
image 文件生成后,leader 节点会通知其他 non-leader 节点新的 image 已生成。non-leader 主动通过 http 拉取最新的 image 文件,来更换本地的旧文件。
bdbje 中的日志,在 image 做完后,会定期删除旧的
源码解析
Doris FE启动步骤(只说核心的几个部分):
Doris启动的时候首先去初始化Catalog,并等待Catalog完成
启动QeServer 这个是mysql client连接用的,端口是9030
启动FeServer这个是Thrift Server,主要是FE和BE之间通讯用的
启动HttpServer ,各种rest api接口及前端web界面
这里我们分析的是元数据这块只看Catalog初始化过程中做了什么事情
PaloFe ——> start()
// 初始化Catalog并等待初始化完成
Catalog.getCurrentCatalog().initialize(args);
Catalog.getCurrentCatalog().waitForReady();
Catalog -->initialize()
第一步:获取本节点和Helper节点
getSelfHostPort();
getHelperNodes(args);
第二步:检查和创建元数据目录及文件
第三步:获取集群ID及角色(Observer和Follower)
getClusterIdAndRole();
第四步:首先加载image并回访editlog
this.editLog = new EditLog(nodeName);
loadImage(this.imageDir); // load image file
editLog.open(); // open bdb env
this.globalTransactionMgr.setEditLog(editLog);
this.idGenerator.setEditLog(editLog);
第五步:创建load和导出作业标签清理线程(这是一个MasterDaemon守护线程)
createLabelCleaner()
第六步:创建tnx清理线程
createTxnCleaner();
第七步:启动状态监听线程,这个线程主要是监听Master,Observer、Follower状态转换,及Observer和Follower元数据同步,Leader选举
createStateListener();
listener.start();
Load Job Label清理:createLabelCleaner
//每个label_keep_max_second(默认三天),从idToLoadJob, dbToLoadJobs and dbLabelToLoadJobs删除旧的job,
//包括从ExportMgr删除exportjob, exportJob 默认七天清理一次,控制参数history_job_keep_max_second
//这个线程每个四个小时运行一次,是由label_clean_interval_second参数来控制
public void createLabelCleaner() {
labelCleaner = new MasterDaemon(“LoadLabelCleaner”, Config.label_clean_interval_second * 1000L) {
@Override
protected void runAfterCatalogReady() {
load.removeOldLoadJobs();
loadManager.removeOldLoadJob();
exportMgr.removeOldExportJobs();
}
};
}
事务(tnx)清理线程:createTxnCleaner()
//定期清理过期的事务,默认30秒清理一次,控制参数:transaction_clean_interval_second
//这里清理的是tnx状态是:
//1.已过期:VISIBLE(可见) 或者 ABORTED(终止), 并且 expired(已过期)
//2.已超时:事务状态是:PREPARE, 但是 timeout
//事务状态是:COMMITTED和 VISIBLE状态的不能被清除,只能成功
public void createTxnCleaner() {
txnCleaner = new MasterDaemon(“txnCleaner”, Config.transaction_clean_interval_second) {
@Override
protected void runAfterCatalogReady() {
globalTransactionMgr.removeExpiredAndTimeoutTxns();
}
};
}
FE状态监听器线程 createStateListener()
这个线程主要是监听Master,Observer、Follower状态转换,及Observer和Follower元数据同步,Leader选举
定期检查,默认是100毫秒,参数:STATE_CHANGE_CHECK_INTERVAL_MS
public void createStateListener() {
listener = new Daemon(“stateListener”, STATE_CHANGE_CHECK_INTERVAL_MS) {
@Override
protected synchronized void runOneCycle() {
while (true) {
FrontendNodeType newType = null;
try {
newType = typeTransferQueue.take();
} catch (InterruptedException e) {
LOG.error(“got exception when take FE type from queue”, e);
Util.stdoutWithTime("got exception when take FE type from queue. " + e.getMessage());
System.exit(-1);
}
Preconditions.checkNotNull(newType);
LOG.info(“begin to transfer FE type from {} to {}”, feType, newType);
if (feType == newType) {
return;
}
/*
* INIT -> MASTER: transferToMaster
* INIT -> FOLLOWER/OBSERVER: transferToNonMaster
* UNKNOWN -> MASTER: transferToMaster
* UNKNOWN -> FOLLOWER/OBSERVER: transferToNonMaster
* FOLLOWER -> MASTER: transferToMaster
* FOLLOWER/OBSERVER -> INIT/UNKNOWN: set isReady to false
*/
switch (feType) {
case INIT: {
switch (newType) {
case MASTER: {
transferToMaster();
break;
}
case FOLLOWER:
case OBSERVER: {
transferToNonMaster(newType);
break;
}
case UNKNOWN:
break;
default:
break;
}
break;
}
case UNKNOWN: {
switch (newType) {
case MASTER: {
transferToMaster();
break;
}
case FOLLOWER:
case OBSERVER: {
transferToNonMaster(newType);
break;
}
default:
break;
}
break;
}
case FOLLOWER: {
switch (newType) {
case MASTER: {
transferToMaster();
break;
}
case UNKNOWN: {
transferToNonMaster(newType);
break;
}
default:
break;
}
break;
}
case OBSERVER: {
switch (newType) {
case UNKNOWN: {
transferToNonMaster(newType);
break;
}
default:
break;
}
break;
}
case MASTER: {
// exit if master changed to any other type
String msg = "transfer FE type from MASTER to " + newType.name() + “. exit”;
LOG.error(msg);
Util.stdoutWithTime(msg);
System.exit(-1);
}
default:
break;
} // end switch formerFeType
feType = newType;
LOG.info(“finished to transfer FE type to {}”, feType);
}
} // end runOneCycle
};
listener.setMetaContext(metaContext);
}
Leader的选举通过:
transferToNonMaster和transferToMaster
元数据同步方法: startMasterOnlyDaemonThreads,这个方法是启动Checkpoint守护线程,由Master定期朝各个Follower和Observer推送image,然后在有节点本地做Image回放,更新自己本节点的元数据,这个线程只在Master节点启动 startNonMasterDaemonThreads 启动其他守护线程在所有FE节点启动,这里包括TabletStatMgr、LabelCleaner、EsRepository、DomainResolver
private void transferToNonMaster(FrontendNodeType newType) {
isReady.set(false);
if (feType == FrontendNodeType.OBSERVER || feType == FrontendNodeType.FOLLOWER) {
Preconditions.checkState(newType == FrontendNodeType.UNKNOWN);
LOG.warn(“{} to UNKNOWN, still offer read service”, feType.name());
// not set canRead here, leave canRead as what is was.
// if meta out of date, canRead will be set to false in replayer thread.
metaReplayState.setTransferToUnknown();
return;
}
// transfer from INIT/UNKNOWN to OBSERVER/FOLLOWER
// add helper sockets
if (Config.edit_log_type.equalsIgnoreCase(“BDB”)) {
for (Frontend fe : frontends.values()) {
if (fe.getRole() == FrontendNodeType.FOLLOWER || fe.getRole() == FrontendNodeType.REPLICA) {
((BDBHA) getHaProtocol()).addHelperSocket(fe.getHost(), fe.getEditLogPort());
}
}
}
if (replayer == null) {
//创建回放线程
createReplayer();
replayer.start();
}
// ‘isReady’ will be set to true in ‘setCanRead()’ method
fixBugAfterMetadataReplayed(true);
startNonMasterDaemonThreads();
MetricRepo.init();
}
创建editlog回放守护线程,这里主要是将Master推送的Image日志信息在本地进行回访,写到editlog中
public void createReplayer() {
replayer = new Daemon(“replayer”, REPLAY_INTERVAL_MS) {
@Override
protected void runOneCycle() {
boolean err = false;
boolean hasLog = false;
try {
//进行image回放,重写本地editlog
hasLog = replayJournal(-1);
metaReplayState.setOk();
} catch (InsufficientLogException insufficientLogEx) {
// 从以下成员中复制丢失的日志文件:拥有文件的复制组
LOG.error(“catch insufficient log exception. please restart.”, insufficientLogEx);
NetworkRestore restore = new NetworkRestore();
NetworkRestoreConfig config = new NetworkRestoreConfig();
config.setRetainLogFiles(false);
restore.execute(insufficientLogEx, config);
System.exit(-1);
} catch (Throwable e) {
LOG.error(“replayer thread catch an exception when replay journal.”, e);
metaReplayState.setException(e);
try {
Thread.sleep(5000);
} catch (InterruptedException e1) {
LOG.error("sleep got exception. ", e);
}
err = true;
}
setCanRead(hasLog, err);
}
};
replayer.setMetaContext(metaContext);
}
日志回放,重写本地editlog
public synchronized boolean replayJournal(long toJournalId) {
long newToJournalId = toJournalId;
if (newToJournalId == -1) {
newToJournalId = getMaxJournalId();
}
if (newToJournalId <= replayedJournalId.get()) {
return false;
}
LOG.info(“replayed journal id is {}, replay to journal id is {}”, replayedJournalId, newToJournalId);
JournalCursor cursor = editLog.read(replayedJournalId.get() + 1, newToJournalId);
if (cursor == null) {
LOG.warn(“failed to get cursor from {} to {}”, replayedJournalId.get() + 1, newToJournalId);
return false;
}
long startTime = System.currentTimeMillis();
boolean hasLog = false;
while (true) {
JournalEntity entity = cursor.next();
if (entity == null) {
break;
}
hasLog = true;
//生成新的editlog
EditLog.loadJournal(this, entity);
replayedJournalId.incrementAndGet();
LOG.debug(“journal {} replayed.”, replayedJournalId);
if (feType != FrontendNodeType.MASTER) {
journalObservable.notifyObservers(replayedJournalId.get());
}
if (MetricRepo.isInit) {
// Metric repo may not init after this replay thread start
MetricRepo.COUNTER_EDIT_LOG_READ.increase(1L);
}
}
long cost = System.currentTimeMillis() - startTime;
if (cost >= 1000) {
LOG.warn(“replay journal cost too much time: {} replayedJournalId: {}”, cost, replayedJournalId);
}
return hasLog;
}
只有角色为 Master 的 FE 才会主动定期生成 image 文件。每次生成完后,都会推送给其他非 Master 角色的 FE。当确认其他所有 FE 都收到这个 image 后,Master FE 会删除 bdbje 中旧的元数据 journal。所以,如果 image 生成失败,或者 image 推送给其他 FE 失败时,都会导致 bdbje 中的数据不断累积。
在Master节点日志中搜索你可以看到下面这个日志,一分钟一次
2021-04-16 08:34:34,554 INFO (leaderCheckpointer|72) [BDBJEJournal.getFinalizedJournalId():410] database names: 52491702
2021-04-16 08:34:34,554 INFO (leaderCheckpointer|72) [Checkpoint.runAfterCatalogReady():81] checkpoint imageVersion 52491701, checkPointVersion 0
CheckPoint线程的启动只在Master Fe节点,在Catalog.startMasterOnlyDaemonThreads方法里启动的
在这里startMasterOnlyDaemonThreads方法里会在Master Fe 节点启动一个 TimePrinter 线程。该线程会定期向 bdbje 中写入一个当前时间的 key-value 条目。其余 non-leader 节点通过回放这条日志,读取日志中记录的时间,和本地时间进行比较,如果发现和本地时间的落后大于指定的阈值(配置项:meta_delay_toleration_second。写入间隔为该配置项的一半),则该节点会处于不可读的状态,当查询或者load等任务落到这节点的时候会报:failed to call frontend service异常。此机制解决了 non-leader 节点在长时间和 leader 失联后,仍然提供过期的元数据服务的问题。
所以这里整个集群是需要做NTP时间同步,保持各个节点时间一致,避免因为时间差异造成的服务不可用
// start all daemon threads only running on Master
private void startMasterOnlyDaemonThreads() {
// start checkpoint thread
checkpointer = new Checkpoint(editLog);
checkpointer.setMetaContext(metaContext);
// set “checkpointThreadId” before the checkpoint thread start, because the thread
// need to check the “checkpointThreadId” when running.
checkpointThreadId = checkpointer.getId();
checkpointer.start();
…
// time printer
createTimePrinter();
timePrinter.start();
…
updateDbUsedDataQuotaDaemon.start();
}
CheckPoint线程启动以后会定期向非Master FE推送Image日志信息,默认是一分钟,配置参数:checkpoint_interval_second
具体方法:runAfterCatalogReady
Master FE定期向非Master FE推送image日志信息
删除旧的journals:获取每个非Master节点的当前journal ID。 删除bdb数据库时,不能删除比任何非Master节点的当前journal ID 更新的的db。 否则此滞后节点将永远无法获取已删除的journal。
最后删除旧的image文件
     // push image file to all the other non master nodes
     // DO NOT get other nodes from HaProtocol, because node may not in bdbje replication group yet.
     List<Frontend> allFrontends = Catalog.getServingCatalog().getFrontends(null);
     int successPushed = 0;
     int otherNodesCount = 0;
     if (!allFrontends.isEmpty()) {
         otherNodesCount = allFrontends.size() - 1; // skip master itself
         for (Frontend fe : allFrontends) {
             String host = fe.getHost();
             if (host.equals(Catalog.getServingCatalog().getMasterIp())) {
                 // skip master itself
                 continue;
             }
             int port = Config.http_port;

             String url = "http://" + host + ":" + port + "/put?version=" + replayedJournalId
                     + "&port=" + port;
             LOG.info("Put image:{}", url);
try {
MetaHelper.getRemoteFile(url, PUT_TIMEOUT_SECOND * 1000, new NullOutputStream());
successPushed++;
} catch (IOException e) {
LOG.error(“Exception when pushing image file. url = {}”, url, e);
}
}
         LOG.info("push image.{} to other nodes. totally {} nodes, push succeed {} nodes",
                  replayedJournalId, otherNodesCount, successPushed);
     }

     // Delete old journals
     if (successPushed == otherNodesCount) {
         long minOtherNodesJournalId = Long.MAX_VALUE;
         long deleteVersion = checkPointVersion;
         if (successPushed > 0) {
             for (Frontend fe : allFrontends) {
                 String host = fe.getHost();
                 if (host.equals(Catalog.getServingCatalog().getMasterIp())) {
                     // skip master itself
                     continue;
                 }
                 int port = Config.http_port;
                 URL idURL;
                 HttpURLConnection conn = null;
                 try {
                     /*
                      * get current replayed journal id of each non-master nodes.
                      * when we delete bdb database, we cannot delete db newer than
                      * any non-master node's current replayed journal id. otherwise,
                      * this lagging node can never get the deleted journal.
                      */
                     idURL = new URL("http://" + host + ":" + port + "/journal_id");
                     conn = (HttpURLConnection) idURL.openConnection();
                     conn.setConnectTimeout(CONNECT_TIMEOUT_SECOND * 1000);
                     conn.setReadTimeout(READ_TIMEOUT_SECOND * 1000);
                     String idString = conn.getHeaderField("id");
                     long id = Long.parseLong(idString);
                     if (minOtherNodesJournalId > id) {
                         minOtherNodesJournalId = id;
                     }
                 } catch (IOException e) {
                     LOG.error("Exception when getting current replayed journal id. host={}, port={}",
                             host, port, e);
                     minOtherNodesJournalId = 0;
                     break;
                 } finally {
                     if (conn != null) {
                         conn.disconnect();
                     }
                 }
             }
             deleteVersion = Math.min(minOtherNodesJournalId, checkPointVersion);
         }
         //删除旧的Journal
         editLog.deleteJournals(deleteVersion + 1);
         if (MetricRepo.isInit) {
             MetricRepo.COUNTER_IMAGE_PUSH.increase(1L);
         }
         LOG.info("journals <= {} are deleted. image version {}, other nodes min version {}",
                  deleteVersion, checkPointVersion, minOtherNodesJournalId);
     }

     //删除旧的image文件
     MetaCleaner cleaner = new MetaCleaner(Config.meta_dir + "/image");
     try {
         cleaner.clean();
     } catch (IOException e) {
         LOG.error("Master delete old image file fail.", e);
     }
https://new-developer.aliyun.com/article/1124025
https://blog.csdn.net/flyinthesky111/article/details/131281581
https://blog.csdn.net/qq_42200605/article/details/124232478
https://blog.csdn.net/hf200012/article/details/117825649
https://www.jianshu.com/p/de2896715e02


