Vue中前端导出word文件

news2024/11/24 16:30:47

很多时候在工作中会碰到完全由前端导出word文件的需求,因此特地记录一下比较常用的几种方式。

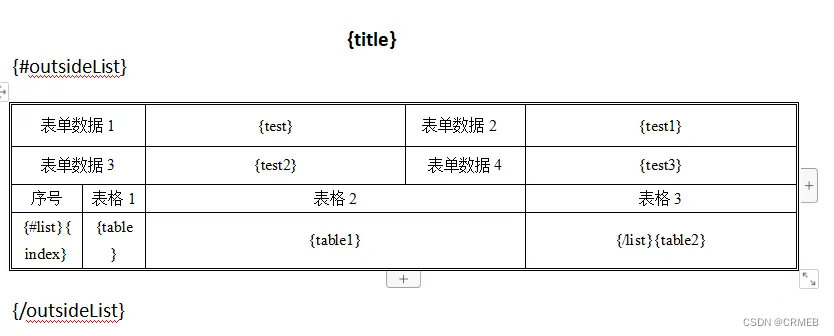
一、提供一个word模板

该方法提供一个word模板文件,数据通过参数替换的方式传入word文件中,灵活性较差,适用于简单的文件导出。需要依赖:docxtemplater、file-saver、jszip-utils、pizzip

在这里插入图片描述

javascript
复制代码
import Docxtemplater from "docxtemplater";
import { saveAs } from "file-saver";
import JSZipUtils from "jszip-utils";
import PizZip from "pizzip";

export function downloadWithTemplate(path, data, fileName) {
  JSZipUtils.getBinaryContent(path, (error, content) => {
    if (error) throw error;

    const zip = new PizZip(content);
    const doc = new Docxtemplater().loadZip(zip);
    doc.setData({
      ...data.form,
      // 循环项参数
      list: data.list,
      outsideList: data.outsideList,
    });

    try {
      doc.render();
    } catch (error) {
      const e = {
        message: error.message,
        name: error.name,
        stack: error.stack,
        properties: error.properties,
      };
      ElMessage.error("文件格式有误!");
      throw error;
    }
    const out = doc.getZip().generate({
      type: "blob",
      mimeType:
        "application/vnd.openxmlformats-officedocument.wordprocessingml.document",
    });
    saveAs(out, fileName);
  });
}

let data = {
    form: {
      title: "这是word标题",
      test: "这是表单1的数据",
      test1: "111",
      test2: 222,
      test3: 333,
    },
    outsideList: [
      {
        list: [
          {
            index: 0,
            table: "表格第一项",
            table1: "表格第二项",
            table2: "表格第三项",
          },
          {
            index: 1,
            table: "表格第一项",
            table1: "表格第二项",
            table2: "表格第三项",
          },
        ],
      },
    ],
  };
  
  downloadWithTemplate("template.docx", data, "模板word.docx")
  

调用downloadWithTemplate方法即可导出如下文件: 在这里插入图片描述
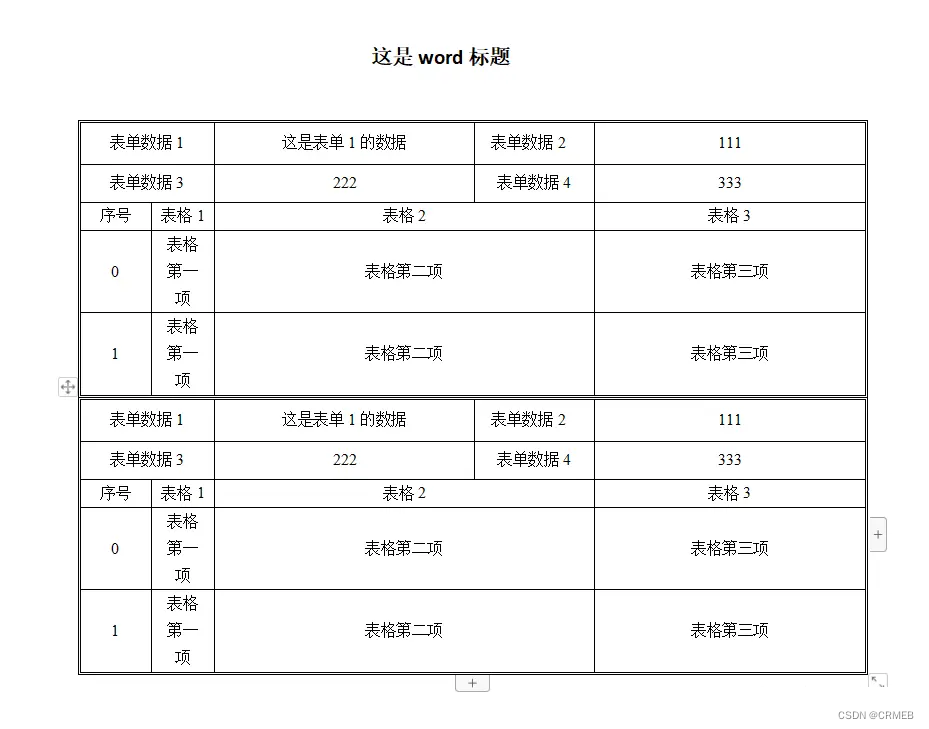
注: 上述方法中的path参数为你在vue项目中存放公共文件的位置,在vue2中为static文件夹下,在vue3中为public文件夹下。

二、根据html代码转换为word文件(推荐)

顾名思义,这个方法就是将我们在页面上书写的html代码直接转换成word文件,这也是我最推荐的一种方法,因为大部分的样式可控,且毕竟是我们较为熟悉的方式。需要插件: html-docx-js-typescript、file-saver。

xml
复制代码
import { saveAs } from "file-saver";
import { asBlob } from "html-docx-js-typescript";

 export function downloadWordWithHtmlString(html, name) {
  let htmlString = `
  <!DOCTYPE html>
  <html lang="en">
  <head>
    <meta charset="UTF-8">
    <title>Document</title>
  </head>
  <body>
    ${html}
  </body>
  </html>
  `;
  asBlob(htmlString).then((data) => {
    saveAs(data, `${name}.docx`);
  });
}
  `

使用案例:

ini
复制代码
<div ref="word">
  <h3 style="text-align: center">word标题</h3>
  <table
    border="1"
    cellspacing="0"
    width="600"
    style="font-size: 12px; color: #000; text-align: center"
  >
    <tr height="50">
      <td width="100">1111</td>
      <td widt="200" colspan="2">合并单元格</td>
      <td width="300">最长的一项</td>
    </tr>
    <tr height="100">
      <td width="100">222</td>
      <td width="100">222</td>
      <td width="100">222</td>
      <td width="100">222</td>
    </tr>
  </table>
  <table width="600" border="1" cellspacing="0">
    <tr height="50">
      <td width="100">1111</td>
      <td rowspan="3">合并包括此行在内的下面三行</td>
    </tr>
    <tr height="100">
      <td>222</td>
    </tr>
    <tr height="300">
      <td>3333</td>
    </tr>
    <tr>
      <td>50</td>
    </tr>
  </table>
</div>

let word = ref(null);
downloadWordWithHtmlString(word.value.innerHTML, 'html字符串word.docx');

生成的word文件可以看到效果和在网页中的html代码一样:
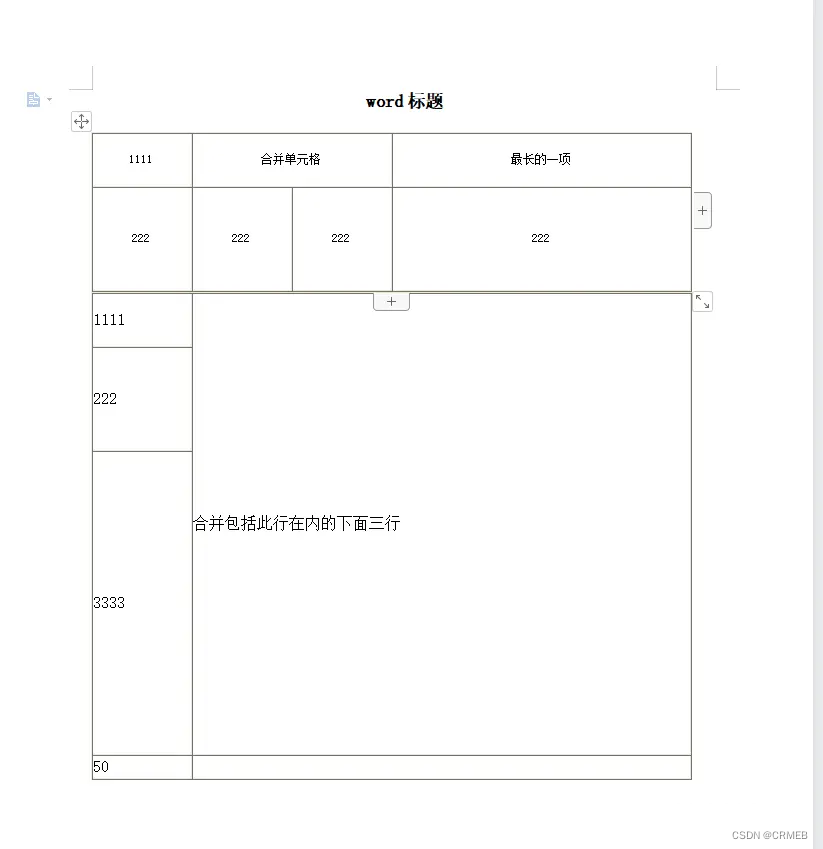
在这里插入图片描述
另外需要注意的是,若是需要在word中添加分页符,在需要分页的内容处添加CSS属性page-break-before即可。此时在浏览器上打印出innerHTML值会发现:

在这里插入图片描述

mdn上介绍page-break-before属性已经被break-before属性替代,但是经过我实际测试发现当html字符串是page-break: always时生成的word文件没有分页效果,反而是将其替换回page-break-before后实现了分页效果。若有大神知道这是什么问题还望不吝赐教。 因此需要在downloadWordWithHtmlString方法中添加一句正则: htmlString = htmlString.replace( /break-(after|before): page/g, "page-break-$1: always;" );,此时就能实现分页效果。

三、使用docx插件

第二种方法有个很致命的问题就是它无法在生成的word文件中添加图片页眉,我搜遍了npm也只找到一个能添加文字页眉的插件: html-docx-ts要想实现这个需求,就需要用到docx插件。 docx官网的介绍是"Easily generate and modify .docx files with JS/TS. Works for Node and on the Browser.",意味着是一个专门用于生成word和修改word的文件。该插件就需要一个一个去配置你要生成的项,然后组合成一个word。一个简单的案例是:

css
复制代码
import {
  Document,
  Paragraph,
  Header,
  TextRun,
  Table,
  TableRow,
  TableCell,
  WidthType,
  Packer,
} from "docx";
import { saveAs } from "file-saver";

const document = new Document({
    sections: [
      {
        headers: {
          default: new Header({
            children: [new Paragraph("我是页眉")],
          }),
        },
        children: [
          new Paragraph({
            children: [
              new TextRun({
                text: "我是文字内容",
                size: 16,
                bold: true,
              }),
            ],
          }),
          new Table({
            columnWidths: [1500, 7500],
            rows: [
              new TableRow({
                children: [
                  new TableCell({
                    width: {
                      size: 1500,
                      type: WidthType.DXA,
                    },
                    children: [
                      new Paragraph({
                        alignment: "center",
                        children: [
                          new TextRun({
                            text: "测试",
                            size: 24,
                            font: {
                              name: "楷体",
                            },
                          }),
                        ],
                      }),
                    ],
                  }),
                ],
              }),
            ],
          }),
        ],
      },
    ],
  });
  
  Packer.toBlob(document).then((blob) => {
    saveAs(blob, "test.docx");
  });

导出的word文件形式为:
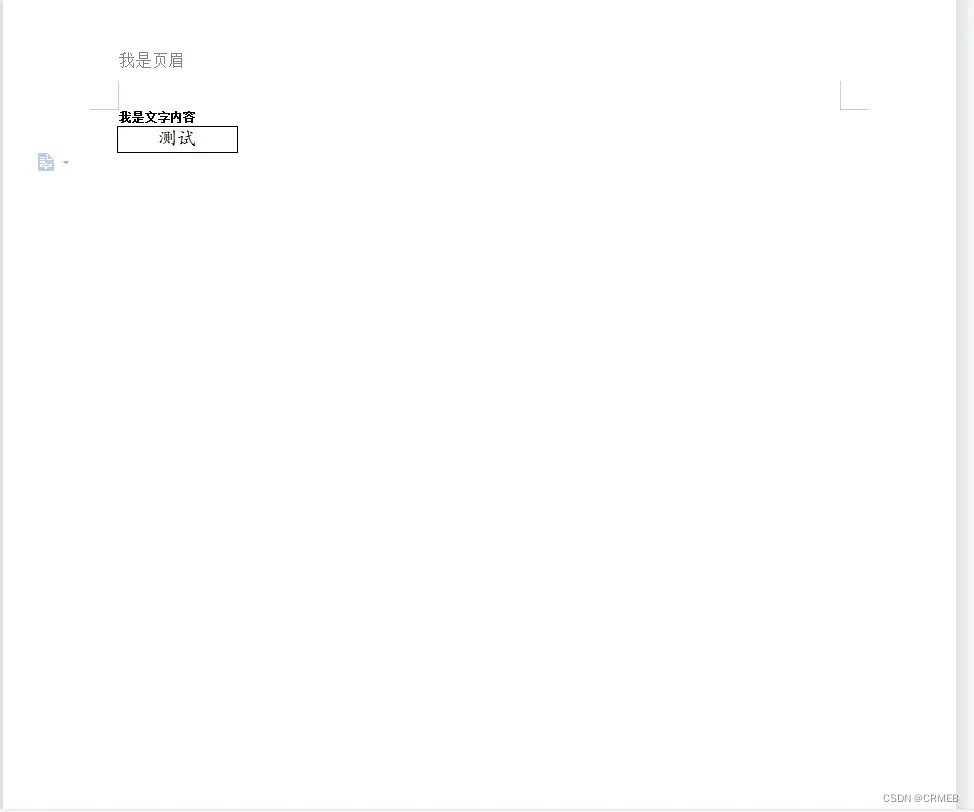
在这里插入图片描述
下面是我个人总结的比较常见能用到的功能和配置项:

css
复制代码
// 导出文字
1.new Paragraph(text) -> 默认字体样式: 宋体,五号字
2.new Paragraph({
    children: [
      new TextRun({
        text: "我是文字内容",
        size: 16, // 对应word中的字体大小8
        bold: true, // 是否加粗
        underline: {
          type: UnderlineType.SINGLE,
          color: "#2e32ee",
        }, // 下划线类型及颜色
        font: {
          name: "仿宋", // 只要是word中有的字体类型都可以生效
        },
      }),
    ],
    indent: {
      left: 100,
    }, // 离左边距离 类似于margin-left
    spacing: {
      before: 150,
      after: 200,
    }, // 离上边和下边的距离 类似于margin-top/bottom
    alignment: "center", // 对齐方式
    pageBreakBefore: true, // 是否在这段文字前加入分页符
  })
  
 // 导出表格
new Table({
  columnWidths: [1500, 7500], // 表示单行有几项,总宽度是9000,对应宽度;
  rows: [
    new TableRow({
      children: [
        new TableCell({
          width: {
            size: 1500, // 需与columnWidths的第一项对应
            type: WidthType.DXA, // 官网的介绍是Value is in twentieths of a point
            // 因为表格的总宽度是以twips(每英寸的1/20)为单位进行计算的
          },
          children: [
            new Paragraph({
              alignment: "center",
              children: [
                new TextRun({
                  text: "测试",
                  size: 24,
                  font: {
                    name: "楷体",
                  },
                }),
              ],
            }),
          ],
        }),
        new TableCell({
          width: {
            size: 7500,
            type: WidthType.DXA,
          },
          children: [
            new Paragraph('ccc'),
          ],
          margins: {
            top: 500,
            bottom: 500,
            left: 500
          } // 类似于单元格内容的padding
        }),
      ],
    }),
  ],
})

// 导出图片
new Paragraph({
  children: [
    new ImageRun({
      data: "base64", // 图片需转成base64的形式
      transformation: {
        width: 100,
        height: 30,
      }, // 图片宽高
    }),
  ],
})

// 设置页眉页脚
headers: {
  default: new Header({
    children: [new Paragraph("我是页眉")],
  }),
},
footers: {
  default: new Footer({
    children: [new Paragraph("我是页脚")],
  }),
}

下面是一个完整的使用案例:

css
复制代码
const document = new Document({
  sections: [
    {
      headers: {
        default: new Header({
          children: [
            new Paragraph({
              children: [
                new ImageRun({
                  data: "data:image/jpeg;base64,...",
                  transformation: {
                    width: 150,
                    height: 150,
                  },
                }),
              ],
            }),
          ],
        }),
      },
      footers: {
        default: new Footer({
          children: [new Paragraph("我是页脚")],
        }),
      },
      children: [
         new Paragraph("第一行直接默认形式"),
         new Paragraph({
           children: [
             new TextRun({
               text: "下一页",
             }),
           ],
           pageBreakBefore: true,
         }),
         new Table({
           columnWidths: [1500, 7500],
           rows: [
             new TableRow({
               children: [
                 new TableCell({
                   width: {
                     size: 1500,
                     type: WidthType.DXA,
                   },
                   children: [
                     new Paragraph({
                       alignment: "center",
                       children: [
                         new TextRun({
                           text: "测试",
                           size: 24,
                           font: {
                             name: "楷体",
                           },
                         }),
                       ],
                     }),
                   ],
                 }),
                 new TableCell({
                   width: {
                     size: 7500,
                     type: WidthType.DXA,
                   },
                   children: [
                     new Paragraph({
                       children: [
                         new ImageRun({
                           data: "data:image/jpeg;base64,...",
                           transformation: {
                             width: 150,
                             height: 150,
                           },
                         }),
                       ],
                     }),
                   ],
                   margins: {
                     top: 500,
                     bottom: 500,
                    left: 500,
                  },
                }),
              ],
            }),
          ],
        }),
      ],
    },
  ],
});

Packer.toBlob(document).then((blob) => {
  saveAs(blob, "test.docx");
});

此时导出的word文件如下:
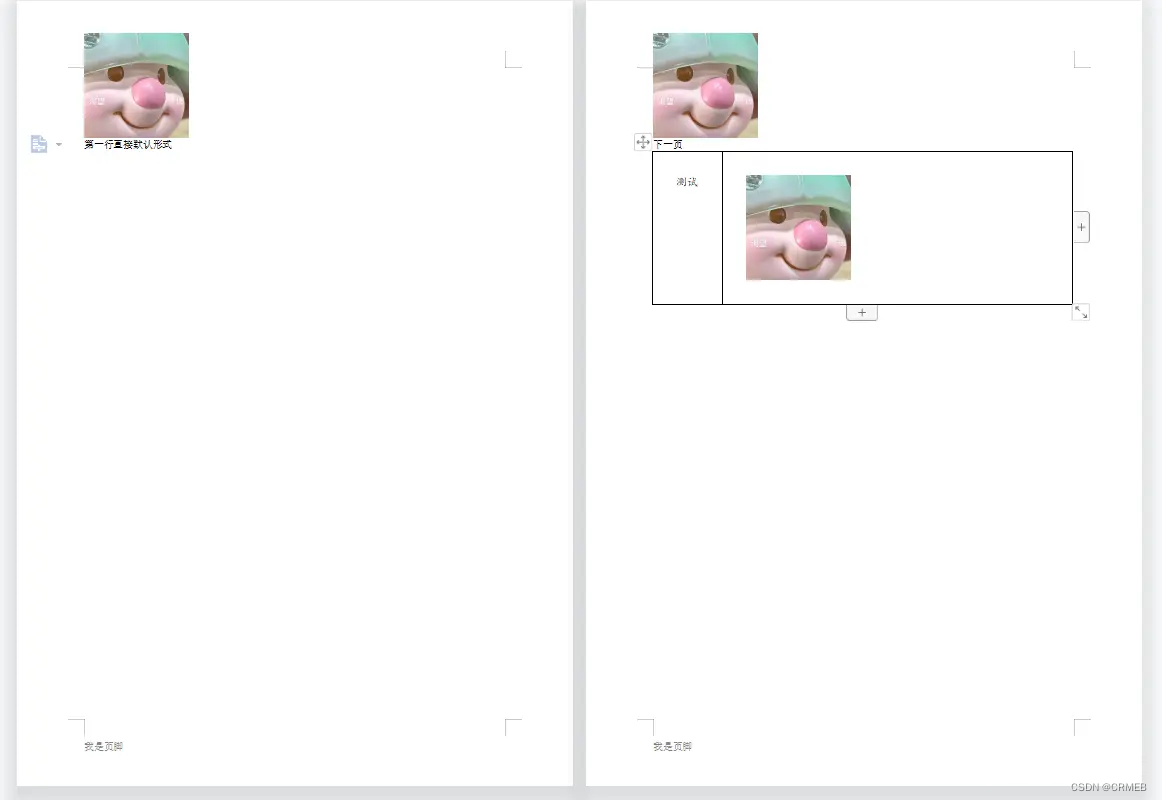
在这里插入图片描述
学习更多vue开发知识请下载​​CRMEB开源商城​​附件学习

本文来自互联网用户投稿,该文观点仅代表作者本人,不代表本站立场。本站仅提供信息存储空间服务,不拥有所有权,不承担相关法律责任。如若转载,请注明出处:http://www.coloradmin.cn/o/1040830.html

如若内容造成侵权/违法违规/事实不符,请联系多彩编程网进行投诉反馈,一经查实,立即删除!

相关文章

Postgresql源码(113)表达式JIT计算简单分析

相关 《Postgresql源码&#xff08;85&#xff09;查询执行——表达式解析器分析&#xff08;select 11如何执行&#xff09;》 《Postgresql源码&#xff08;113&#xff09;表达式JIT计算简单分析》 1 普通表达式计算 普通表达式计算发生在优化器preprocess_expression中&am…

uni-app 使用 scss 实现推荐标签区域显示效果

效果图 <view class"tag-box"><view class"tag-tip"><view>店家</view><view>推荐</view></view> </view> 方法一 只需修改 $tagFontSize(字体大小) 即可 /* 推荐标签区域 */ .tag-box {$tagFontSize:…

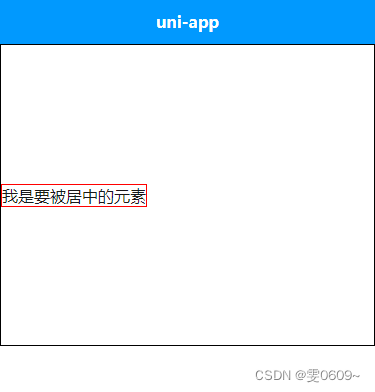
uni-app:实现元素中实现竖直居中

效果展示 前&#xff1a; 后&#xff1a; 未实现前代码 <template><view class"container"><view class"centered-element">我是要被居中的元素</view></view> </template><script>export default {data() {r…

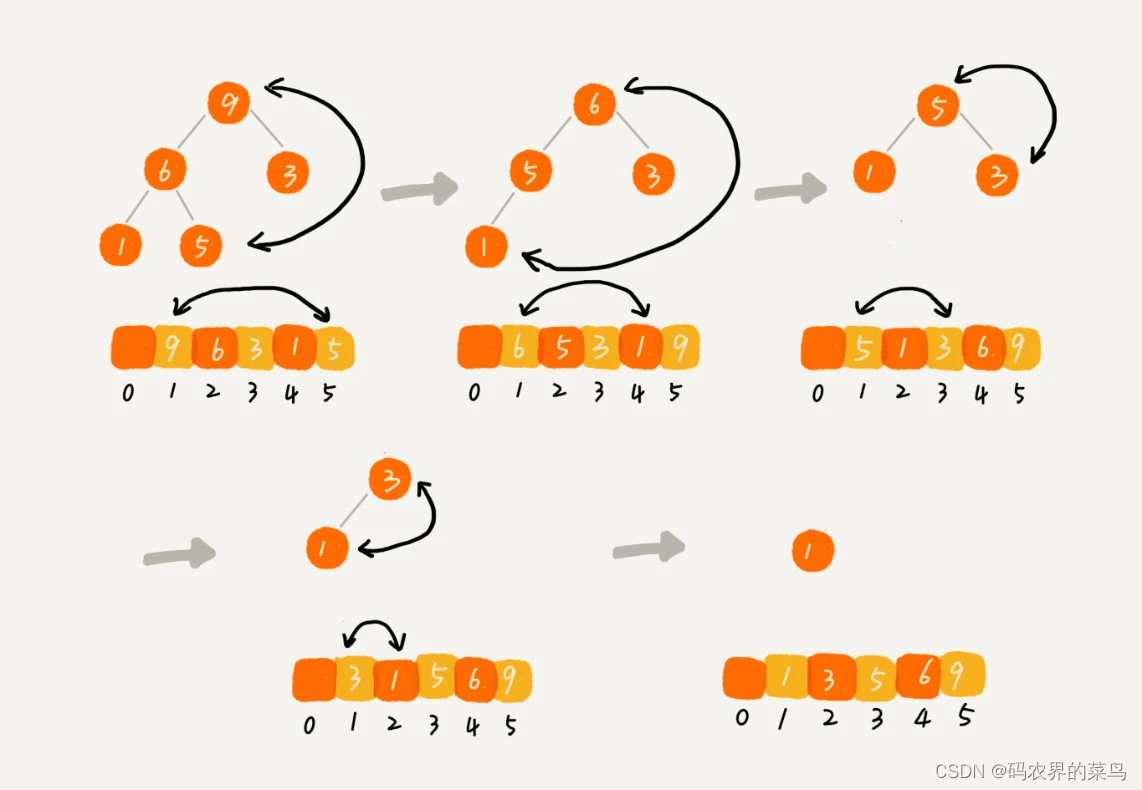
算法与数据结构-堆

文章目录 什么是堆如何实现一个堆&#xff1f;如何基于堆实现排序&#xff1f;1. 建堆2. 排序 什么是堆 堆是一种特殊的树&#xff0c;特殊点有二&#xff0c;如下&#xff1a; 堆是一个完全二叉树&#xff1b;堆中每一个节点的值都必须大于等于&#xff08;或小于等于&#…

【Vue】Mock.js介绍和使用与首页导航栏左侧菜单搭建

目录 一、Mock.js 1.1 mockjs介绍 1.2 mock.js安装与配置 1.2.1 安装mock.js 1.2.2 引入mock.js 1.3 mock.js的使用 1.3.1 准备模拟数据 1.3.2 定义拦截路由 1.3.3 测试 二、首页导航栏左侧菜单搭建 2.1 自定义界面组件 (完整代码) 2.2 配置路由 2.3 组件显示折叠和…

uniapp ui安装

安装 ui uni-app官网 (dcloud.net.cn) 安装 pages.js配置 使用 <template><view class"bg"><div class"title"><uni-data-selectv-model"value":localdata"range"change"change">asa</uni-da…

GiliSoft USB Lock v10.5.0 电脑USB设备管控软件

网盘下载 软件功能特性 禁止USB / SD驱动器 禁用从USB / SD磁盘读取&#xff0c;禁用写入USB / SD磁盘&#xff0c;阻止非系统分区。它不允许任何类型的USB / SD驱动器访问您的计算机&#xff0c;除非您授权它或它已在可信设备白名单。 CD锁&#xff0c;块媒体和蓝光光盘 禁用…

代码阅读分析神器-Scitools Understand

这里写目录标题 前言概要功能介绍1.代码统计2.图形化分析3.代码检查 使用方法下载及使用 前言 作为一名程序员&#xff0c;阅读代码是一个必须要拥有的能力&#xff0c;但无奈很多代码逻辑嵌套非常多&#xff0c;看起来非常吃力&#xff0c;看了那段逻辑就忘记了刚才的逻辑&am…

Spring实例化源码解析之ComponentScanAnnotationParser(四)

上一章我们分析了ConfigurationClassParser&#xff0c;配置类的解析源码分析。在ComponentScans和ComponentScan注解修饰的候选配置类的解析过程中&#xff0c;我们需要深入的了解一下ComponentScanAnnotationParser的parse执行流程&#xff0c;SpringBoot启动类为什么这么写&…

01 MIT线性代数-方程组的几何解释

一, 线性方程的几何图像 The geometry of linear equations 线性代数的基本问题就是解n元一次方程组 eg&#xff1a;二元一次方程组 矩阵形式: 系数矩阵(coefficient matrix): 未知数向量: 线性方程组简记为Axb 二, 行图像 Row Picture 行图像遵从解析几何的描述&#xff0…

李宏毅hw-10 ——adversarial attack

一、查漏补缺&#xff1a; 1.关于glob.glob的用法&#xff0c;返回一个文件路径的 列表&#xff1a; 当然&#xff0c;再套用1个sort&#xff0c;就是将所有的文件路径按照字母进行排序了 2.relpath relative_path返回相对于基准路径的相对路径的函数 二、代码剖析&#xff…

Pytorch之AlexNet花朵分类

&#x1f482; 个人主页:风间琉璃&#x1f91f; 版权: 本文由【风间琉璃】原创、在CSDN首发、需要转载请联系博主&#x1f4ac; 如果文章对你有帮助、欢迎关注、点赞、收藏(一键三连)和订阅专栏哦 目录 一、AlexNet 1.卷积模块 2.全连接模块 3.AlexNet创新点 1.更深的神经…

深度学习技巧应用28-强化学习的原理介绍与运用技巧实践

大家好,我是微学AI,今天给大家介绍一下深度学习技巧应用28-强化学习的原理介绍与运用技巧实践, 强化学习是一种机器学习的子领域,它使得一个智能体在与环境的交互中学习如何行动以最大化某种数值奖励信号。强化学习模型的关键特性是它的试错搜索和延迟奖励。 一、强化学习…

React 全栈体系(十四)

第七章 redux 六、react-redux 7. 代码 - react-redux 数据共享版 7.1 效果 7.2 App /* src/App.jsx */ import React, { Component } from "react"; import Count from "./containers/Count"; import Person from "./containers/Person";ex…

opencv dnn模块 示例(17) 目标检测 object_detection 之 yolo v5

在前文【opencv dnn模块 示例(16) 目标检测 object_detection 之 yolov4】介绍的yolo v4后的2个月&#xff0c;Ultralytics发布了YOLOV5 的第一个正式版本&#xff0c;其性能与YOLO V4不相伯仲。 文章目录 1、Yolo v5 和 Yolo v4 的区别说明1.1、Data Augmentation - 数据增强1…

Shader中的渲染路径LightMode

文章目录 前言一、在Shader中如何区分不同的渲染路径1、Pass Tag2、LightMode的不同类型 二、在Frame Debug下查看渲染路径之间的区别1、在摄像机可以切换渲染路径2、前向渲染路径3、延迟渲染路径4、顶点照明渲染路径&#xff08;可以看出效果很差&#xff09; 前言 Shader中的…

网络竞品分析:用爬虫技术洞悉竞争对手

概述 网络竞品分析是指通过互联网收集、分析和比较竞争对手的信息&#xff0c;以了解他们的优势和劣势&#xff0c;找出自己的差距和机会&#xff0c;制定有效的竞争策略。网络竞品分析涉及的信息包括竞争对手的产品、价格、渠道、营销、用户反馈等方面。爬虫技术是一种自动化…

电子商务交易产品质量监测实施指南

声明 本文是学习GB-T 42893-2023 电子商务交易产品质量监测实施指南. 而整理的学习笔记,分享出来希望更多人受益,如果存在侵权请及时联系我们 1 范围 本文件提供了开展电子商务交易的有形产品质量监测的总则&#xff0c;监测准备、监测实施、监测效果评价 与反馈等过程指导…

git的ssh协议走代理拉取代码

1.首先要自己搭建一个代理 https://blog.csdn.net/Jessica_hhh/article/details/133276101https://blog.csdn.net/Jessica_hhh/article/details/133276101 2. 确认机器装过nc&#xff0c;若没有&#xff0c;用yum install -y nc安装 centos 6使用yum安装软件_duang_huang的博…

Machine Learning(study notes)

There is no studying without going crazy Studying alwats drives us crazy 文章目录 DefineMachine LearningSupervised Learning&#xff08;监督学习&#xff09;Regression problemClassidication Unspervised LearningClustering StudyModel representation&#xff08…