在前文【opencv dnn模块 示例(16) 目标检测 object_detection 之 yolov4】介绍的yolo v4后的2个月,Ultralytics发布了YOLOV5 的第一个正式版本,其性能与YOLO V4不相伯仲。
文章目录
- 1、Yolo v5 和 Yolo v4 的区别说明
- 1.1、Data Augmentation - 数据增强
- 1.2、Auto Learning Bounding Box Anchors - 自适应锚定框
- 1.3、Backbone-跨阶段局部网络(CSP)
- 1.4、Neck-路径聚合网络(PANET)
- 1.5、Head-YOLO 通用检测层
- 1.5、Activation Function - 激活函数
- 1.6、Optimization Function - 优化函数
- 1.7、Benchmarks- YOLO V5 VS YOLO V4
- 1.7.1、官方性能评估
- 1.7.2、训练时间
- 1.7.3、模型大小
- 1.7.4、推理时间
- 1.8、对比总结
- 2、yolo v5测试
- 2.1、python测试
- 2.1.1、安装
- 2.1.2、推理
- 2.1.3、测试输出
- 2.2、c++测试
- 2.2.1、模型导出
- 2.2.2、opencv dnn c++代码测试
- 2.2.3、测试结果
- 3、自定义数据集训练
- 3.1、数据集准备
- 3.2、配置文件
- 3.3、训练
Yolo v5 实际和 Yolo v4 并无继承关系,都是基于yolo v3 改进而来,但因其未发表对应文章、开源协议等问题,被质疑不能算作新一代的YOLO。不过,对于我们学习和使用来说,只要能抓到老鼠,白猫或者黑猫都是好猫。
1、Yolo v5 和 Yolo v4 的区别说明
从下面几个方面对比YOLO V5和V4,并简要阐述它们各自新技术的特点,对比两者的区别和相似之处。
1.1、Data Augmentation - 数据增强
YOLO V4 对于单一图片使用了多种数据增强技术的组合,除了经典的几何畸变与光照畸变外,还创新地使用了图像遮挡(Random Erase,Cutout,Hide and Seek,Grid Mask ,MixUp)技术,对于多图组合,作者混合使用了CutMix与Mosaic 技术。除此之外,作者还使用了Self-Adversarial Training (SAT)来进行数据增强。
YOLO V5的作者现在并没有发表论文,因此只能从代码的角度理解它的数据增强管道。
YOLOV5都会通过数据加载器传递每一批训练数据,并同时增强训练数据。
数据加载器进行三种数据增强:缩放,色彩空间调整和马赛克增强。
有意思的是,有媒体报道,YOLO V5的作者Glen Jocher正是Mosaic Augmentation的创造者,他认为YOLO V4性能巨大提升很大程度是马赛克数据增强的功劳,
也许是不服,他在YOLO V4出来后的仅仅两个月便推出YOLO V5,当然未来是否继续使用YOLO V5的名字或者采用其他名字,首先得看YOLO V5的最终研究成果是否能够真正意义上领先YOLO V4。
但是不可否认的是马赛克数据增强确实能有效解决模型训练中最头疼的“小对象问题”,即小对象不如大对象那样准确地被检测到。
1.2、Auto Learning Bounding Box Anchors - 自适应锚定框
在之前YOLO V3中采用 k 均值和遗传学习算法对自定义数据集进行分析,获得适合自定义数据集中对象边界框预测的预设锚定框。

在YOLO V5 中锚定框是基于训练数据自动学习的,YOLO V4并没有自适应锚定框。
对于COCO数据集来说,YOLO V5 的配置文件*.yaml 中已经预设了640×640图像大小下锚定框的尺寸:
anchors:
  - [10,13, 16,30, 33,23]  		# P3/8
  - [30,61, 62,45, 59,119]  	# P4/16
  - [116,90, 156,198, 373,326]  # P5/32
对于自定义数据集来说,由于目标识别框架往往需要缩放原始图片尺寸,并且数据集中目标对象的大小可能也与COCO数据集不同,因此YOLO V5会重新自动学习锚定框的尺寸。

在上图中, YOLO V5在进行学习自动锚定框的尺寸。对于BDD100K数据集,模型中的图片缩放到512后,最佳锚定框为:

1.3、Backbone-跨阶段局部网络(CSP)
YOLO V5和V4都使用CSPDarknet作为Backbone,CSPNet全称是Cross Stage Partial Networks,也就是跨阶段局部网络。CSPNet解决了其他大型卷积神经网络框架Backbone中网络优化的梯度信息重复问题,将梯度的变化从头到尾地集成到特征图中,因此减少了模型的参数量和FLOPS数值,既保证了推理速度和准确率,又减小了模型尺寸。
1.4、Neck-路径聚合网络(PANET)
Neck主要用于生成特征金字塔。特征金字塔会增强模型对于不同缩放尺度对象的检测,从而能够识别不同大小和尺度的同一个物体。
在PANET出来之前,FPN一直是对象检测框架特征聚合层的State of the art,直到PANET的出现。
在YOLO V4的研究中,PANET被认为是最适合YOLO的特征融合网络,因此YOLO V5和V4都使用PANET作为Neck来聚合特征。
1.5、Head-YOLO 通用检测层
模型Head主要用于最终检测部分。它在特征图上应用锚定框,并生成带有类概率、对象得分和包围框的最终输出向量。
在 YOLO V5模型中,模型Head与之前的 YOLO V3和 V4版本相同。

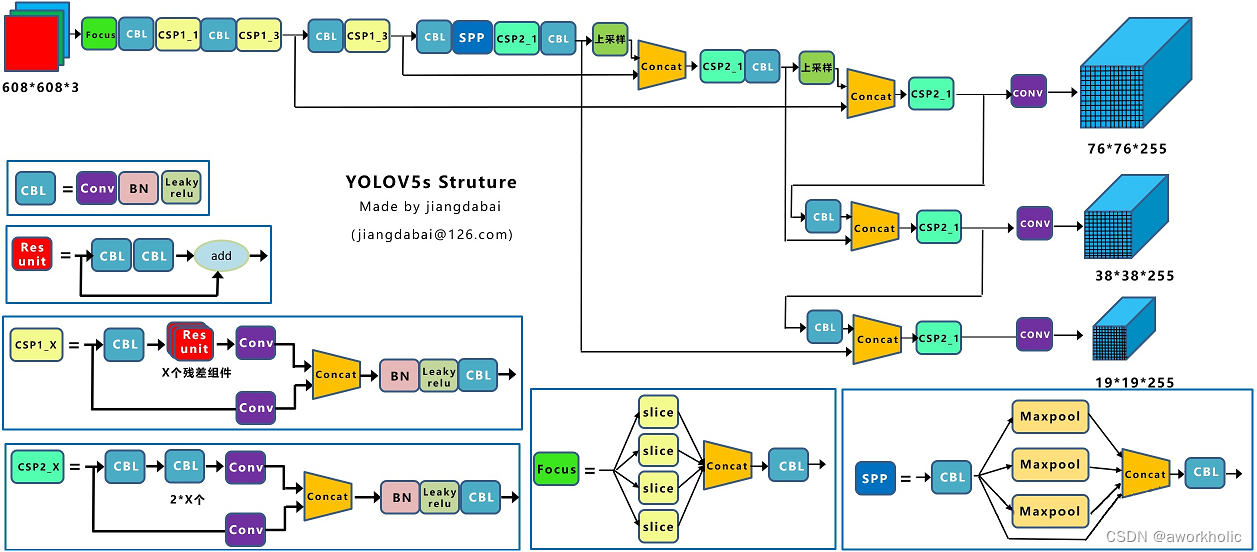
这些不同缩放尺度的Head被用来检测不同大小的物体(输入608,最后输出时下采样5次),每个Head一共(80个类 + 1个概率 + 4坐标) * 3锚定框,一共255个channels。
1.5、Activation Function - 激活函数
激活函数的选择对于深度学习网络是至关重要的。YOLO V5的作者使用了 Leaky ReLU 和 Sigmoid 激活函数。
在 YOLO V5中,中间/隐藏层使用了 Leaky ReLU 激活函数,最后的检测层使用了 Sigmoid 形激活函数。而YOLO V4使用Mish激活函数。
Mish在39个基准测试中击败了Swish,在40个基准测试中击败了ReLU,一些结果显示基准精度提高了3–5%。但是要注意的是,与ReLU和Swish相比,Mish激活在计算上更加昂贵。

1.6、Optimization Function - 优化函数
YOLO V5的作者为我们提供了两个优化函数Adam和SGD,并都预设了与之匹配的训练超参数。默认为SGD。
YOLO V4使用SGD。
YOLO V5的作者建议是,如果需要训练较小的自定义数据集,Adam是更合适的选择,尽管Adam的学习率通常比SGD低。
但是如果训练大型数据集,对于YOLOV5来说SGD效果比Adam好。
实际上学术界上对于SGD和Adam哪个更好,一直没有统一的定论,取决于实际项目情况。
Cost Function
YOLO 系列的损失计算是基于 objectness score, class probability score,和 bounding box regression score.
YOLO V5使用 GIOU Loss作为bounding box的损失,使用二进制交叉熵和 Logits 损失函数计算类概率和目标得分的损失。同时我们也可以使用fl_gamma参数来激活Focal loss计算损失函数。
YOLO V4使用 CIOU Loss作为bounding box的损失,与其他提到的方法相比,CIOU带来了更快的收敛和更好的性能。

上图结果基于Faster R-CNN,可以看出,实际上CIoU 的表现比 GIoU 好。
1.7、Benchmarks- YOLO V5 VS YOLO V4
在没有论文的详细论述之前,我们只能通过查看作者放出的COCO指标并结合大佬们后续的实例评估来比较两者的性能。
1.7.1、官方性能评估


在上面的两个图中,FPS与ms/img的关系是反转的,经过单位转换后我们可以发现,在V100GPU上YOLO V5可以达到250FPS,同时具有较高的mAP。
由于YOLO V4的原始训练是在1080TI上的,远低于V100的性能,并且AP_50与AP_val的对标不同,因此仅凭上述的表格是无法得出两者的Benchmarks。
好在YOLO V4的第二作者WongKinYiu使用V100的GPU提供了可以对比的Benchmarks

从图表中可以看出,两者性能其实很接近,但是从数据上看YOLO V4仍然是最佳对象检测框架。YOLO V4的可定制化程度很高,如果不惧怕更多自定义配置,那么基于Darknet的YOLO V4仍然是最准确的。
值得注意的是YOLO V4其实使用了大量Ultralytics YOLOv3代码库中的数据增强技术,这些技术在YOLO V5中也被运行,数据增强技术对于结果的影响到底有多大,还得等作者的论文分析。
1.7.2、训练时间
根据Roboflow的研究表明,YOLO V5的训练非常迅速,在训练速度上远超YOLO V4。对于Roboflow的自定义数据集,YOLO V4达到最大验证评估花了14个小时,而YOLO V5仅仅花了3.5个小时。

1.7.3、模型大小
图中不同模型的大小分别为:V5x: 367MB,V5l: 192MB,V5m: 84MB,V5s: 27MB,YOLOV4: 245 MB
YOLO V5s 模型尺寸非常小,降低部署成本,有利于模型的快速部署。

1.7.4、推理时间

在单个图像(批大小为1)上,YOLOV4推断在22毫秒内,YOLOV5s推断在20毫秒内。
而YOLOV5实现默认为批处理推理(批大小36),并将批处理时间除以批处理中的图像数量,单一图片的推理时间能够达到7ms,也就是140FPS,这是目前对象检测领域的State-of-the-art。
我使用我训练的模型对10000张测试图片进行实时推理,YOLOV5s 的推理速度非常惊艳,每张图只需要7ms的推理时间,再加上20多兆的模型大小,在灵活性上堪称无敌。
但是其实这对于YOLO V4并不公平,由于YOLO V4没有实现默认批处理推理,因此在对比上呈现劣势,接下来应该会有很多关于这两个对象检测框架在同一基准下的测试。
其次YOLO V4最新推出了tiny版本,YOLO V5s 与V4 tiny 的性能速度对比还需要更多实例分析
1.8、对比总结
总的来说,YOLO V4 在性能上优于YOLO V5,但是在灵活性与速度上弱于YOLO V5。
由于YOLO V5仍然在快速更新,因此YOLO V5的最终研究成果如何,还有待分析。
我个人觉得对于这些对象检测框架,特征融合层的性能非常重要,目前两者都是使用PANET,但是根据谷歌大脑的研究,BiFPN才是特征融合层的最佳选择。谁能整合这项技术,很有可能取得性能大幅超越。

尽管YOLO V5目前仍然计逊一筹,但是YOLO V5仍然具有以下显著的优点:
-
使用Pytorch框架,对用户非常友好,能够方便地训练自己的数据集,相对于YOLO V4采用的Darknet框架,Pytorch框架更容易投入生产
-
代码易读,整合了大量的计算机视觉技术,非常有利于学习和借鉴
-
不仅易于配置环境,模型训练也非常快速,并且批处理推理产生实时结果
-
能够直接对单个图像,批处理图像,视频甚至网络摄像头端口输入进行有效推理
-
能够轻松的将Pytorch权重文件转化为安卓使用的ONXX格式,然后可以转换为OPENCV的使用格式,或者通过CoreML转化为IOS格式,直接部署到手机应用端
-
最后YOLO V5s高达140FPS的对象识别速度令人印象非常深刻,使用体验非常棒
2、yolo v5测试
目前 yolo v5 项目地址为 https://github.com/ultralytics/yolov,版本更新到了 v7.0。
2.1、python测试
2.1.1、安装
git clone https://github.com/ultralytics/yolov5  # clone
cd yolov5
pip install -r requirements.txt  # install
2.1.2、推理
-
使用 yolov5 hub推理,最新 模型 将自动的从 YOLOv5 release 中下载。
import torch # Model model = torch.hub.load("ultralytics/yolov5", "yolov5s") # or yolov5n - yolov5x6, custom # Images img = "https://ultralytics.com/images/zidane.jpg" # or file, Path, PIL, OpenCV, numpy, list # Inference results = model(img) # Results results.print() # or .show(), .save(), .crop(), .pandas(), etc. ``` -
使用 detect.py 推理
detect.py 在各种来源上运行推理, 模型 自动从 最新的YOLOv5 release 中下载,并将结果保存到 runs/detect 。python detect.py --weights yolov5s.pt --source 0 # webcam img.jpg # image vid.mp4 # video screen # screenshot path/ # directory list.txt # list of images list.streams # list of streams 'path/*.jpg' # glob 'https://youtu.be/LNwODJXcvt4' # YouTube 'rtsp://example.com/media.mp4' # RTSP, RTMP, HTTP stream
2.1.3、测试输出
注意参数 --dnn 和 --half 的使用和运行效率比较,主要关注 pre-process、inference、nms三个指标时间数据。
(yolo_pytorch) E:\DeepLearning\yolov5>python detect.py --weights yolov5n.pt --source data/images/bus.jpg
detect: weights=['yolov5n.pt'], source=data/images/bus.jpg, data=data\coco128.yaml, imgsz=[640, 640], conf_thres=0.25, iou_thres=0.45, max_det=1000, device=, view_img=False, save_txt=False, save_conf=False, save_crop=False, nosave=False, classes=None, agnostic_nms=False, augment=False, visualize=False, update=False, project=runs\detect, name=exp, exist_ok=False, line_thickness=3, hide_labels=False, hide_conf=False, half=False, dnn=False, vid_stride=1
YOLOv5  v7.0-167-g5deff14 Python-3.9.16 torch-1.13.1+cu117 CUDA:0 (NVIDIA GeForce GTX 1080 Ti, 11264MiB)

Fusing layers...
YOLOv5n summary: 213 layers, 1867405 parameters, 0 gradients
image 1/1 E:\DeepLearning\yolov5\data\images\bus.jpg: 640x480 4 persons, 1 bus, 121.0ms
Speed: 1.0ms pre-process, 121.0ms inference, 38.0ms NMS per image at shape (1, 3, 640, 640)
Results saved to runs\detect\exp2


(yolo_pytorch) E:\DeepLearning\yolov5>python detect.py --weights yolov5n.pt --source data/images/bus.jpg --device 0
detect: weights=['yolov5n.pt'], source=data/images/bus.jpg, data=data\coco128.yaml, imgsz=[640, 640], conf_thres=0.25, iou_thres=0.45, max_det=1000, device=0, view_img=False, save_txt=False, save_conf=False, save_crop=False, nosave=False, classes=None, agnostic_nms=False, augment=False, visualize=False, update=False, project=runs\detect, name=exp, exist_ok=False, line_thickness=3, hide_labels=False, hide_conf=False, half=False, dnn=True, vid_stride=1
YOLOv5  v7.0-167-g5deff14 Python-3.9.16 torch-1.13.1+cu117 CUDA:0 (NVIDIA GeForce GTX 1080 Ti, 11264MiB)

Fusing layers...
YOLOv5n summary: 213 layers, 1867405 parameters, 0 gradients
image 1/1 E:\DeepLearning\yolov5\data\images\bus.jpg: 640x480 4 persons, 1 bus, 11.0ms
Speed: 0.0ms pre-process, 11.0ms inference, 7.0ms NMS per image at shape (1, 3, 640, 640)
Results saved to runs\detect\exp2


(yolo_pytorch) E:\DeepLearning\yolov5>python detect.py --weights yolov5n.pt --source data/images/bus.jpg --dnn
detect: weights=['yolov5n.pt'], source=data/images/bus.jpg, data=data\coco128.yaml, imgsz=[640, 640], conf_thres=0.25, iou_thres=0.45, max_det=1000, device=, view_img=False, save_txt=False, save_conf=False, save_crop=False, nosave=False, classes=None, agnostic_nms=False, augment=False, visualize=False, update=False, project=runs\detect, name=exp, exist_ok=False, line_thickness=3, hide_labels=False, hide_conf=False, half=False, dnn=True, vid_stride=1
YOLOv5  v7.0-167-g5deff14 Python-3.9.16 torch-1.13.1+cu117 CUDA:0 (NVIDIA GeForce GTX 1080 Ti, 11264MiB)

Fusing layers...
YOLOv5n summary: 213 layers, 1867405 parameters, 0 gradients
image 1/1 E:\DeepLearning\yolov5\data\images\bus.jpg: 640x480 4 persons, 1 bus, 10.0ms
Speed: 0.0ms pre-process, 10.0ms inference, 4.0ms NMS per image at shape (1, 3, 640, 640)
Results saved to runs\detect\exp3
其他测试对比
        pre-process、 inference、   nms
cpu:        1           121       38
gpu:        0           11         7
dnn:        0		     10         4
gpu-half:    0           10         4
dnn-half:    1           11         4
2.2、c++测试
这里使用opencv dnn模块加载yolov5导出的onnx格式模型,进行测试。
2.2.1、模型导出
官方提实际提供各版本模型的onnx格式导出文件,但是都是半精度模型,不能直接在opencv dnn中使用。
这里以yolov5x为例,导出onnx模型,初次使用可以查看py文件参数或者通过命令行查看,如下。注意导出时,选择合适的onnx opset版本以适配opencv dnn版本。
(yolo_pytorch) E:\DeepLearning\yolov5>python export.py --weights yolov5x.pt --include onnx --opset 12
export: data=E:\DeepLearning\yolov5\data\coco128.yaml, weights=['yolov5x.pt'], imgsz=[640, 640], batch_size=1, device=cpu, half=False, inplace=False, keras=False, optimize=False, int8=False, dynamic=False, simplify=False, opset=12, verbose=False, workspace=4, nms=False, agnostic_nms=False, topk_per_class=100, topk_all=100, iou_thres=0.45, conf_thres=0.25, include=['onnx']
YOLOv5  v7.0-167-g5deff14 Python-3.9.16 torch-1.13.1+cu117 CPU

Fusing layers...
YOLOv5x summary: 444 layers, 86705005 parameters, 0 gradients

PyTorch: starting from yolov5x.pt with output shape (1, 25200, 85) (166.0 MB)

ONNX: starting export with onnx 1.14.0...
ONNX: export success  10.0s, saved as yolov5x.onnx (331.2 MB)

Export complete (15.0s)
Results saved to E:\DeepLearning\yolov5
Detect:          python detect.py --weights yolov5x.onnx
Validate:        python val.py --weights yolov5x.onnx
PyTorch Hub:     model = torch.hub.load('ultralytics/yolov5', 'custom', 'yolov5x.onnx')
Visualize:       https://netron.app
2.2.2、opencv dnn c++代码测试
主题代码和yolov4中一致,主要区别:
- 预处理可以根据情况是否进行缩放填充,保证和网络输入大小一致,见
formatToSquare()函数。 - 后处理代码中对网络输出的数据处理有些微调整。
完整代码如下
#pragma once

#include "opencv2/opencv.hpp"

#include <fstream>
#include <sstream>
#include <random>

using namespace cv;
using namespace dnn;

 float inpWidth;
 float inpHeight;
 float confThreshold, scoreThreshold, nmsThreshold;
 std::vector<std::string> classes;
 std::vector<cv::Scalar> colors;

 bool letterBoxForSquare = true;

 cv::Mat formatToSquare(const cv::Mat &source);

 void postprocess(Mat& frame, cv::Size inputSz, const std::vector<Mat>& out, Net& net);

 void drawPred(int classId, float conf, int left, int top, int right, int bottom, Mat& frame);

std::random_device rd;
std::mt19937 gen(rd());
std::uniform_int_distribution<int> dis(100, 255);

int main()
{
    // 根据选择的检测模型文件进行配置
    confThreshold = 0.25;
    scoreThreshold = 0.45;
    nmsThreshold = 0.5;
    float scale = 1/255.0;  //0.00392
    Scalar mean = {0,0,0};
    bool swapRB = true;
    inpWidth = 640;
    inpHeight = 640;

    String model_dir = R"(E:\DeepLearning\yolov5)";
    String modelPath = model_dir + R"(\yolov5n.onnx)";
    String configPath;

    String framework = "";
    int backendId = cv::dnn::DNN_BACKEND_CUDA;
    int targetId = cv::dnn::DNN_TARGET_CUDA;

    String classesFile = R"(model\object_detection_classes_yolov3.txt)";

    // Open file with classes names.
    if(!classesFile.empty()) {
        const std::string& file = classesFile;
        std::ifstream ifs(file.c_str());
        if(!ifs.is_open())
            CV_Error(Error::StsError, "File " + file + " not found");
        std::string line;
        while(std::getline(ifs, line)) {
            classes.push_back(line);
            colors.push_back(cv::Scalar(dis(gen), dis(gen), dis(gen)));
        }
    }
    // Load a model.
    Net net = readNet(modelPath, configPath, framework);
    net.setPreferableBackend(backendId);
    net.setPreferableTarget(targetId);

    std::vector<String> outNames = net.getUnconnectedOutLayersNames();
    {
        int dims[] = {1,3,inpHeight,inpWidth};
        cv::Mat tmp = cv::Mat::zeros(4, dims, CV_32F);
        std::vector<cv::Mat> outs;

        net.setInput(tmp);
        for(int i = 0; i<10; i++)
            net.forward(outs, outNames); // warmup
    }

    // Create a window
    static const std::string kWinName = "Deep learning object detection in OpenCV";

    cv::namedWindow(kWinName, 0);

    // Open a video file or an image file or a camera stream.
    VideoCapture cap;
    //cap.open(0);
    cap.open(R"(E:\DeepLearning\yolov5\data\images\bus.jpg)");

    cv::TickMeter tk;
    // Process frames.
    Mat frame, blob;

    while(waitKey(1) < 0) {
        //tk.reset();
        //tk.start();

        cap >> frame;
        if(frame.empty()) {
            waitKey();
            break;
        }

        // Create a 4D blob from a frame.
        cv::Mat modelInput = frame;
        if(letterBoxForSquare && inpWidth == inpHeight)
            modelInput = formatToSquare(modelInput);

        blobFromImage(modelInput, blob, scale, cv::Size2f(inpWidth, inpHeight), mean, swapRB, false);

        // Run a model.
        net.setInput(blob);

        std::vector<Mat> outs;
        //tk.reset();
        //tk.start();

        auto tt1 = cv::getTickCount();
        net.forward(outs, outNames);
        auto tt2 = cv::getTickCount();

        tk.stop();
        postprocess(frame, modelInput.size(), outs, net);
        //tk.stop();

        // Put efficiency information.
        std::vector<double> layersTimes;
        double freq = getTickFrequency() / 1000;
        double t = net.getPerfProfile(layersTimes) / freq;
        std::string label = format("Inference time: %.2f ms  (%.2f ms)", t, /*tk.getTimeMilli()*/ (tt2 - tt1) / cv::getTickFrequency() * 1000);
        cv::putText(frame, label, Point(0, 15), FONT_HERSHEY_SIMPLEX, 0.5, Scalar(0, 255, 0));

        cv::imshow(kWinName, frame);
    }
    return 0;
}

cv::Mat formatToSquare(const cv::Mat &source)
{
    int col = source.cols;
    int row = source.rows;
    int _max = MAX(col, row);
    cv::Mat result = cv::Mat::zeros(_max, _max, CV_8UC3);
    source.copyTo(result(cv::Rect(0, 0, col, row)));
    return result;
}

void postprocess(Mat& frame, cv::Size inputSz, const std::vector<Mat>& outs, Net& net)
{
    // yolov5 has an output of shape (batchSize, 25200, 85) (Num classes + box[x,y,w,h] + confidence[c])

    auto tt1 = cv::getTickCount();

    //float x_factor = frame.cols / inpWidth;
    //float y_factor = frame.rows / inpHeight;
    float x_factor = inputSz.width / inpWidth;
    float y_factor = inputSz.height / inpHeight;

    std::vector<int> class_ids;
    std::vector<float> confidences;
    std::vector<cv::Rect> boxes;

    int rows = outs[0].size[1];
    int dimensions = outs[0].size[2];

    float *data = (float *)outs[0].data;

    for(int i = 0; i < rows; ++i) {
        float confidence = data[4];

        if(confidence >= confThreshold) {
            float *classes_scores = data + 5;

            cv::Mat scores(1, classes.size(), CV_32FC1, classes_scores);
            cv::Point class_id;
            double max_class_score;

            minMaxLoc(scores, 0, &max_class_score, 0, &class_id);

            if(max_class_score > scoreThreshold) {
                confidences.push_back(confidence);
                class_ids.push_back(class_id.x);

                float x = data[0];
                float y = data[1];
                float w = data[2];
                float h = data[3];

                int left = int((x - 0.5 * w) * x_factor);
                int top = int((y - 0.5 * h) * y_factor);
                int width = int(w * x_factor);
                int height = int(h * y_factor);

                boxes.push_back(cv::Rect(left, top, width, height));
            }
        }

        data += dimensions;
    }

    std::vector<int> indices;
    NMSBoxes(boxes, confidences, scoreThreshold, nmsThreshold, indices);

    auto tt2 = cv::getTickCount();
    std::string label = format("NMS time: %.2f ms",  (tt2 - tt1) / cv::getTickFrequency() * 1000);
    cv::putText(frame, label, Point(0, 30), FONT_HERSHEY_SIMPLEX, 0.5, Scalar(0, 255, 0));

    for(size_t i = 0; i < indices.size(); ++i) {
        int idx = indices[i];
        Rect box = boxes[idx];
        drawPred(class_ids[idx], confidences[idx], box.x, box.y,
                 box.x + box.width, box.y + box.height, frame);
    }
}

void drawPred(int classId, float conf, int left, int top, int right, int bottom, Mat& frame)
{
    rectangle(frame, Point(left, top), Point(right, bottom), Scalar(0, 255, 0));

    std::string label = format("%.2f", conf);
    Scalar color = Scalar::all(255);
    if(!classes.empty()) {
        CV_Assert(classId < (int)classes.size());
        label = classes[classId] + ": " + label;
        color = colors[classId];
    }

    int baseLine;
    Size labelSize = getTextSize(label, FONT_HERSHEY_SIMPLEX, 0.5, 1, &baseLine);

    top = max(top, labelSize.height);
    rectangle(frame, Point(left, top - labelSize.height),
              Point(left + labelSize.width, top + baseLine), color, FILLED);
    cv::putText(frame, label, Point(left, top), FONT_HERSHEY_SIMPLEX, 0.5, Scalar());
}
2.2.3、测试结果
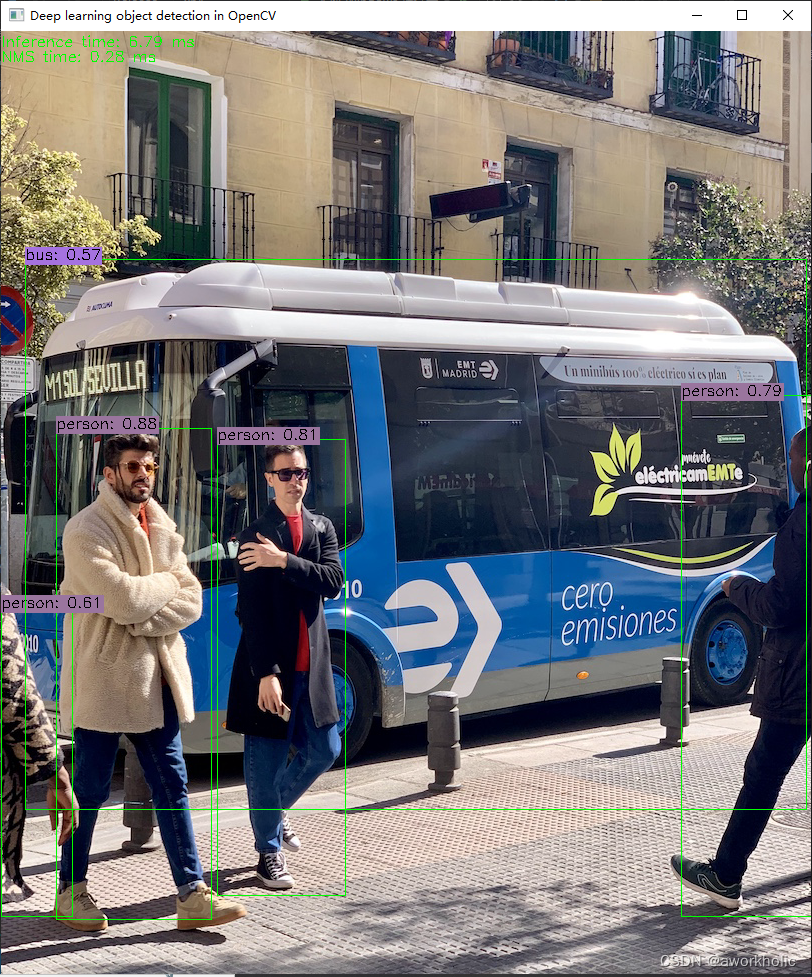
前面python测试使用gpu时,前向推理耗时10ms,NMS耗时4ms;这里使用opencv dnn开启dnn时,前向推理耗时 ~7ms,NMS耗时 ~0.3ms。
3、自定义数据集训练
这里以 yolov5s 作为预训练模型,训练包含4类vehicle类型的目标检测模型。
3.1、数据集准备
先自己标注图片,例如以voc格式为例,使用labelImg工具标进行标注,coco默认标注文件格式为xml,需要通过脚本转换为txt(另外,可以直接使用labelme工具直接保存为yolo需要的txt格式)。
这里仅关注文件夹 JPEGImages 和 labels。标注结束后将图片和生成的标注文件放在任意目录,例如E:\DeepLearning\yolov5\custom-data\vehicle,之后将图片、标注文件分别放入images和labels文件夹中(yolov5默认路径,否则需要修改 yolov5/utils/dataloaders.py 中 img2label_paths 函数中两个参数)。
vehicle
├── images
│   ├── 20151127_114556.jpg
│   ├── 20151127_114946.jpg
│   └── 20151127_115133.jpg
├── labels
│   ├── 20151127_114556.txt
│   ├── 20151127_114946.txt
│   └── 20151127_115133.txt
之后就是准备 训练集、验证集、测试集(可选) 的列表文件 train.txt、val.txt、test.txt, 三个文件中存放使用图片绝对路径,随机选择比例如7:2:1。
3.2、配置文件
拷贝 data/coco.yaml 和 model/yolov5s.yaml 文件到数据集目录并做修改。
例如,数据集描述说明文件 myvoc.yaml
train: E:/DeepLearning/yolov5/custom-data/vehicle/train.txt
val: E:/DeepLearning/yolov5/custom-data/vehicle/val.txt

# number of classes
nc: 4

# class names
names: ["car", "huoche", "guache", "keche"]
网络模型配置文件 yolov5s.yaml 仅修改参数nc为实际目标检测类别数
# Parameters
nc: 4  # number of classes
depth_multiple: 0.33  # model depth multiple
width_multiple: 0.50  # layer channel multiple
anchors:
  - [10,13, 16,30, 33,23]  # P3/8
  - [30,61, 62,45, 59,119]  # P4/16
  - [116,90, 156,198, 373,326]  # P5/32
3.3、训练
前面说有准备工作完成后,目录结构如下
 之后我们训练 20个epoc,单gpu训练的脚本如下:
python train.py
	 --weights yolov5s.pt
	 --cfg custom-data\vehicle\yolov5s.yaml
	 --data custom-data\vehicle\myvoc.yaml
	 --epoch 20
	 --batch-size=32
	 --img 640
	 --device 0
训练输出内容为
E:\DeepLearning\yolov5>python train.py --weights yolov5s.pt --cfg custom-data\vehicle\yolov5s.yaml --data custom-data\vehicle\myvoc.yaml --epoch 20 --batch-size=32 --img 640 --device 0
train: weights=yolov5s.pt, cfg=custom-data\vehicle\yolov5s.yaml, data=custom-data\vehicle\myvoc.yaml, hyp=data\hyps\hyp.scratch-low.yaml, epochs=20, batch_size=32, imgsz=640, rect=False, resume=False, nosave=False, noval=False, noautoanchor=False, noplots=False, evolve=None, bucket=, cache=None, image_weights=False, device=0, multi_scale=False, single_cls=False, optimizer=SGD, sync_bn=False, workers=8, project=runs\train, name=exp, exist_ok=False, quad=False, cos_lr=False, label_smoothing=0.0, patience=100, freeze=[0], save_period=-1, seed=0, local_rank=-1, entity=None, upload_dataset=False, bbox_interval=-1, artifact_alias=latest
fatal: unable to access 'http://github.com/ultralytics/yolov5.git/': Recv failure: Connection was reset
Command 'git fetch origin' timed out after 5 seconds
YOLOv5  v7.0-167-g5deff14 Python-3.9.16 torch-1.13.1+cu117 CUDA:0 (NVIDIA GeForce GTX 1080 Ti, 11264MiB)

hyperparameters: lr0=0.01, lrf=0.01, momentum=0.937, weight_decay=0.0005, warmup_epochs=3.0, warmup_momentum=0.8, warmup_bias_lr=0.1, box=0.05, cls=0.5, cls_pw=1.0, obj=1.0, obj_pw=1.0, iou_t=0.2, anchor_t=4.0, fl_gamma=0.0, hsv_h=0.015, hsv_s=0.7, hsv_v=0.4, degrees=0.0, translate=0.1, scale=0.5, shear=0.0, perspective=0.0, flipud=0.0, fliplr=0.5, mosaic=1.0, mixup=0.0, copy_paste=0.0
Comet: run 'pip install comet_ml' to automatically track and visualize YOLOv5  runs in Comet
TensorBoard: Start with 'tensorboard --logdir runs\train', view at http://localhost:6006/

                 from  n    params  module                                  arguments
  0                -1  1      3520  models.common.Conv                      [3, 32, 6, 2, 2]
  1                -1  1     18560  models.common.Conv                      [32, 64, 3, 2]
  2                -1  1     18816  models.common.C3                        [64, 64, 1]
  3                -1  1     73984  models.common.Conv                      [64, 128, 3, 2]
  4                -1  2    115712  models.common.C3                        [128, 128, 2]
  5                -1  1    295424  models.common.Conv                      [128, 256, 3, 2]
  6                -1  3    625152  models.common.C3                        [256, 256, 3]
  7                -1  1   1180672  models.common.Conv                      [256, 512, 3, 2]
  8                -1  1   1182720  models.common.C3                        [512, 512, 1]
  9                -1  1    656896  models.common.SPPF                      [512, 512, 5]
 10                -1  1    131584  models.common.Conv                      [512, 256, 1, 1]
 11                -1  1         0  torch.nn.modules.upsampling.Upsample    [None, 2, 'nearest']
 12           [-1, 6]  1         0  models.common.Concat                    [1]
 13                -1  1    361984  models.common.C3                        [512, 256, 1, False]
 14                -1  1     33024  models.common.Conv                      [256, 128, 1, 1]
 15                -1  1         0  torch.nn.modules.upsampling.Upsample    [None, 2, 'nearest']
 16           [-1, 4]  1         0  models.common.Concat                    [1]
 17                -1  1     90880  models.common.C3                        [256, 128, 1, False]
 18                -1  1    147712  models.common.Conv                      [128, 128, 3, 2]
 19          [-1, 14]  1         0  models.common.Concat                    [1]
 20                -1  1    296448  models.common.C3                        [256, 256, 1, False]
 21                -1  1    590336  models.common.Conv                      [256, 256, 3, 2]
 22          [-1, 10]  1         0  models.common.Concat                    [1]
 23                -1  1   1182720  models.common.C3                        [512, 512, 1, False]
 24      [17, 20, 23]  1     24273  models.yolo.Detect                      [4, [[10, 13, 16, 30, 33, 23], [30, 61, 62, 45, 59, 119], [116, 90, 156, 198, 373, 326]], [128, 256, 512]]
YOLOv5s summary: 214 layers, 7030417 parameters, 7030417 gradients, 16.0 GFLOPs

Transferred 342/349 items from yolov5s.pt
AMP: checks passed
optimizer: SGD(lr=0.01) with parameter groups 57 weight(decay=0.0), 60 weight(decay=0.0005), 60 bias
train: Scanning E:\DeepLearning\yolov5\custom-data\vehicle\train... 998 images, 0 backgrounds, 0 corrupt: 100%|██████████| 998/998 [00:07<00:00, 141.97it/s]
train: New cache created: E:\DeepLearning\yolov5\custom-data\vehicle\train.cache
val: Scanning E:\DeepLearning\yolov5\custom-data\vehicle\val... 998 images, 0 backgrounds, 0 corrupt: 100%|██████████| 998/998 [00:13<00:00, 72.66it/s]
val: New cache created: E:\DeepLearning\yolov5\custom-data\vehicle\val.cache

AutoAnchor: 4.36 anchors/target, 1.000 Best Possible Recall (BPR). Current anchors are a good fit to dataset
Plotting labels to runs\train\exp13\labels.jpg...
Image sizes 640 train, 640 val
Using 8 dataloader workers
Logging results to runs\train\exp13
Starting training for 20 epochs...

      Epoch    GPU_mem   box_loss   obj_loss   cls_loss  Instances       Size
       0/19      6.36G    0.09633      0.038    0.03865         34        640: 100%|██████████| 32/32 [00:19<00:00,  1.66it/s]
                 Class     Images  Instances          P          R      mAP50   mAP50-95: 100%|██████████| 16/16 [00:11<00:00,  1.45it/s]
                   all        998       2353      0.884      0.174      0.248     0.0749

      Epoch    GPU_mem   box_loss   obj_loss   cls_loss  Instances       Size
       1/19       9.9G    0.06125    0.03181    0.02363         26        640: 100%|██████████| 32/32 [00:14<00:00,  2.18it/s]
                 Class     Images  Instances          P          R      mAP50   mAP50-95: 100%|██████████| 16/16 [00:10<00:00,  1.50it/s]
                   all        998       2353      0.462      0.374       0.33      0.105

      Epoch    GPU_mem   box_loss   obj_loss   cls_loss  Instances       Size
       2/19       9.9G    0.06124    0.02353    0.02014         18        640: 100%|██████████| 32/32 [00:14<00:00,  2.22it/s]
                 Class     Images  Instances          P          R      mAP50   mAP50-95: 100%|██████████| 16/16 [00:10<00:00,  1.58it/s]
                   all        998       2353      0.469      0.472      0.277      0.129

      Epoch    GPU_mem   box_loss   obj_loss   cls_loss  Instances       Size
       3/19       9.9G    0.05214    0.02038     0.0175         27        640: 100%|██████████| 32/32 [00:14<00:00,  2.22it/s]
                 Class     Images  Instances          P          R      mAP50   mAP50-95: 100%|██████████| 16/16 [00:10<00:00,  1.56it/s]
                   all        998       2353       0.62       0.64      0.605      0.279

      Epoch    GPU_mem   box_loss   obj_loss   cls_loss  Instances       Size
       4/19       9.9G    0.04481    0.01777    0.01598         23        640: 100%|██████████| 32/32 [00:14<00:00,  2.17it/s]
                 Class     Images  Instances          P          R      mAP50   mAP50-95: 100%|██████████| 16/16 [00:10<00:00,  1.60it/s]
                   all        998       2353      0.803      0.706      0.848      0.403

      Epoch    GPU_mem   box_loss   obj_loss   cls_loss  Instances       Size
       5/19       9.9G     0.0381    0.01624    0.01335         19        640: 100%|██████████| 32/32 [00:14<00:00,  2.16it/s]
                 Class     Images  Instances          P          R      mAP50   mAP50-95: 100%|██████████| 16/16 [00:10<00:00,  1.55it/s]
                   all        998       2353      0.651      0.872        0.8      0.414

      Epoch    GPU_mem   box_loss   obj_loss   cls_loss  Instances       Size
       6/19       9.9G    0.03379    0.01534    0.01134         28        640: 100%|██████████| 32/32 [00:14<00:00,  2.18it/s]
                 Class     Images  Instances          P          R      mAP50   mAP50-95: 100%|██████████| 16/16 [00:10<00:00,  1.58it/s]
                   all        998       2353       0.94      0.932      0.978      0.608

      Epoch    GPU_mem   box_loss   obj_loss   cls_loss  Instances       Size
       7/19       9.9G    0.03228    0.01523    0.00837         10        640: 100%|██████████| 32/32 [00:14<00:00,  2.21it/s]
                 Class     Images  Instances          P          R      mAP50   mAP50-95: 100%|██████████| 16/16 [00:09<00:00,  1.67it/s]
                   all        998       2353      0.862      0.932      0.956      0.591

      Epoch    GPU_mem   box_loss   obj_loss   cls_loss  Instances       Size
       8/19       9.9G     0.0292    0.01458   0.007451         20        640: 100%|██████████| 32/32 [00:14<00:00,  2.21it/s]
                 Class     Images  Instances          P          R      mAP50   mAP50-95: 100%|██████████| 16/16 [00:10<00:00,  1.56it/s]
                   all        998       2353       0.97      0.954      0.986      0.658

      Epoch    GPU_mem   box_loss   obj_loss   cls_loss  Instances       Size
       9/19       9.9G    0.02739    0.01407   0.006553         29        640: 100%|██████████| 32/32 [00:15<00:00,  2.12it/s]
                 Class     Images  Instances          P          R      mAP50   mAP50-95: 100%|██████████| 16/16 [00:10<00:00,  1.58it/s]
                   all        998       2353      0.982      0.975      0.993       0.74

      Epoch    GPU_mem   box_loss   obj_loss   cls_loss  Instances       Size
      10/19       9.9G     0.0248    0.01362   0.005524         30        640: 100%|██████████| 32/32 [00:14<00:00,  2.14it/s]
                 Class     Images  Instances          P          R      mAP50   mAP50-95: 100%|██████████| 16/16 [00:10<00:00,  1.55it/s]
                   all        998       2353      0.985      0.973      0.993      0.757

      Epoch    GPU_mem   box_loss   obj_loss   cls_loss  Instances       Size
      11/19       9.9G    0.02377    0.01271   0.005606         27        640: 100%|██████████| 32/32 [00:15<00:00,  2.13it/s]
                 Class     Images  Instances          P          R      mAP50   mAP50-95: 100%|██████████| 16/16 [00:10<00:00,  1.52it/s]
                   all        998       2353      0.964      0.975      0.989      0.725

      Epoch    GPU_mem   box_loss   obj_loss   cls_loss  Instances       Size
      12/19       9.9G    0.02201    0.01247   0.005372         33        640: 100%|██████████| 32/32 [00:14<00:00,  2.19it/s]
                 Class     Images  Instances          P          R      mAP50   mAP50-95: 100%|██████████| 16/16 [00:10<00:00,  1.57it/s]
                   all        998       2353      0.988      0.988      0.994       0.83

      Epoch    GPU_mem   box_loss   obj_loss   cls_loss  Instances       Size
      13/19       9.9G    0.02103    0.01193   0.004843         22        640: 100%|██████████| 32/32 [00:14<00:00,  2.14it/s]
                 Class     Images  Instances          P          R      mAP50   mAP50-95: 100%|██████████| 16/16 [00:10<00:00,  1.57it/s]
                   all        998       2353      0.981      0.987      0.994      0.817

      Epoch    GPU_mem   box_loss   obj_loss   cls_loss  Instances       Size
      14/19       9.9G    0.02017    0.01167    0.00431         22        640: 100%|██████████| 32/32 [00:14<00:00,  2.20it/s]
                 Class     Images  Instances          P          R      mAP50   mAP50-95: 100%|██████████| 16/16 [00:09<00:00,  1.60it/s]
                   all        998       2353       0.96      0.952      0.987      0.782

      Epoch    GPU_mem   box_loss   obj_loss   cls_loss  Instances       Size
      15/19       9.9G    0.01847    0.01158   0.004043         32        640: 100%|██████████| 32/32 [00:14<00:00,  2.20it/s]
                 Class     Images  Instances          P          R      mAP50   mAP50-95: 100%|██████████| 16/16 [00:10<00:00,  1.56it/s]
                   all        998       2353      0.988      0.992      0.994      0.819

      Epoch    GPU_mem   box_loss   obj_loss   cls_loss  Instances       Size
      16/19       9.9G    0.01771     0.0114   0.003859         24        640: 100%|██████████| 32/32 [00:14<00:00,  2.20it/s]
                 Class     Images  Instances          P          R      mAP50   mAP50-95: 100%|██████████| 16/16 [00:10<00:00,  1.55it/s]
                   all        998       2353      0.967       0.96       0.99      0.832

      Epoch    GPU_mem   box_loss   obj_loss   cls_loss  Instances       Size
      17/19       9.9G    0.01665    0.01077   0.003739         32        640: 100%|██████████| 32/32 [00:14<00:00,  2.22it/s]
                 Class     Images  Instances          P          R      mAP50   mAP50-95: 100%|██████████| 16/16 [00:10<00:00,  1.59it/s]
                   all        998       2353      0.992      0.995      0.994       0.87

      Epoch    GPU_mem   box_loss   obj_loss   cls_loss  Instances       Size
      18/19       9.9G    0.01559    0.01067   0.003549         45        640: 100%|██████████| 32/32 [00:14<00:00,  2.21it/s]
                 Class     Images  Instances          P          R      mAP50   mAP50-95: 100%|██████████| 16/16 [00:10<00:00,  1.53it/s]
                   all        998       2353      0.991      0.995      0.995      0.867

      Epoch    GPU_mem   box_loss   obj_loss   cls_loss  Instances       Size
      19/19       9.9G    0.01459    0.01009   0.003031         31        640: 100%|██████████| 32/32 [00:14<00:00,  2.18it/s]
                 Class     Images  Instances          P          R      mAP50   mAP50-95: 100%|██████████| 16/16 [00:11<00:00,  1.42it/s]
                   all        998       2353      0.994      0.995      0.994      0.885

20 epochs completed in 0.143 hours.
Optimizer stripped from runs\train\exp13\weights\last.pt, 14.4MB
Optimizer stripped from runs\train\exp13\weights\best.pt, 14.4MB

Validating runs\train\exp13\weights\best.pt...
Fusing layers...
YOLOv5s summary: 157 layers, 7020913 parameters, 0 gradients, 15.8 GFLOPs
                 Class     Images  Instances          P          R      mAP50   mAP50-95: 100%|██████████| 16/16 [00:11<00:00,  1.37it/s]
                   all        998       2353      0.994      0.995      0.994      0.885
                   car        998       1309      0.995      0.999      0.995      0.902
                huoche        998        507      0.993      0.988      0.994      0.895
                guache        998        340      0.988      0.993      0.994      0.877
                 keche        998        197      0.999          1      0.995      0.866
Results saved to runs\train\exp13
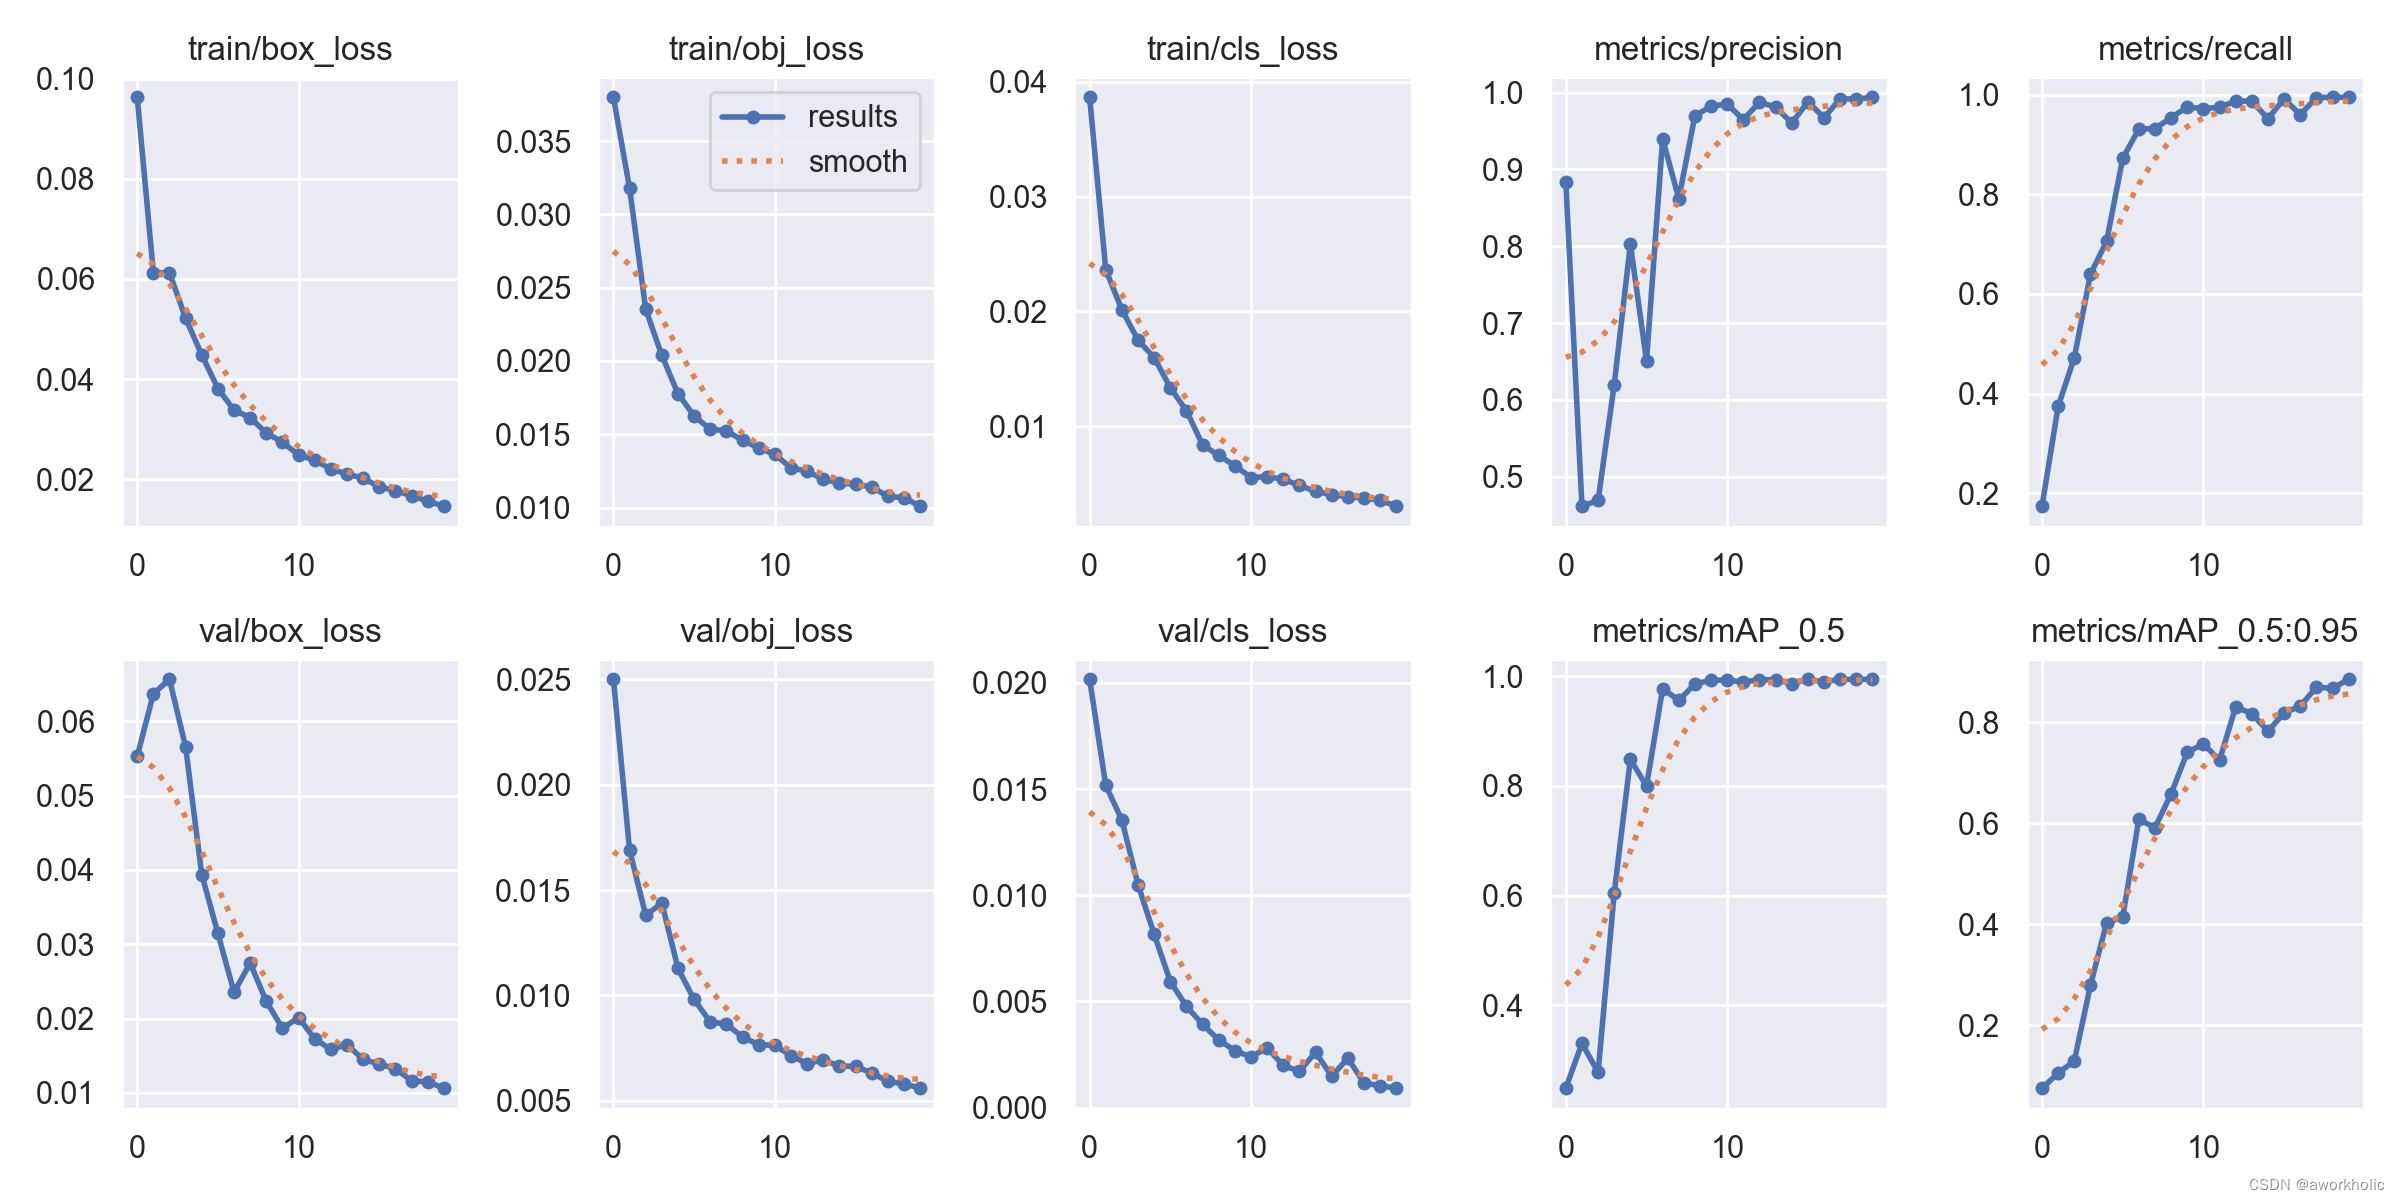
训练过程中可以使用 tensorboard 可视化查看训练曲线。在yolov5目录下启动 tensorboard --logdir runs\train,之后通过http://localhost:6006/ 访问查看:
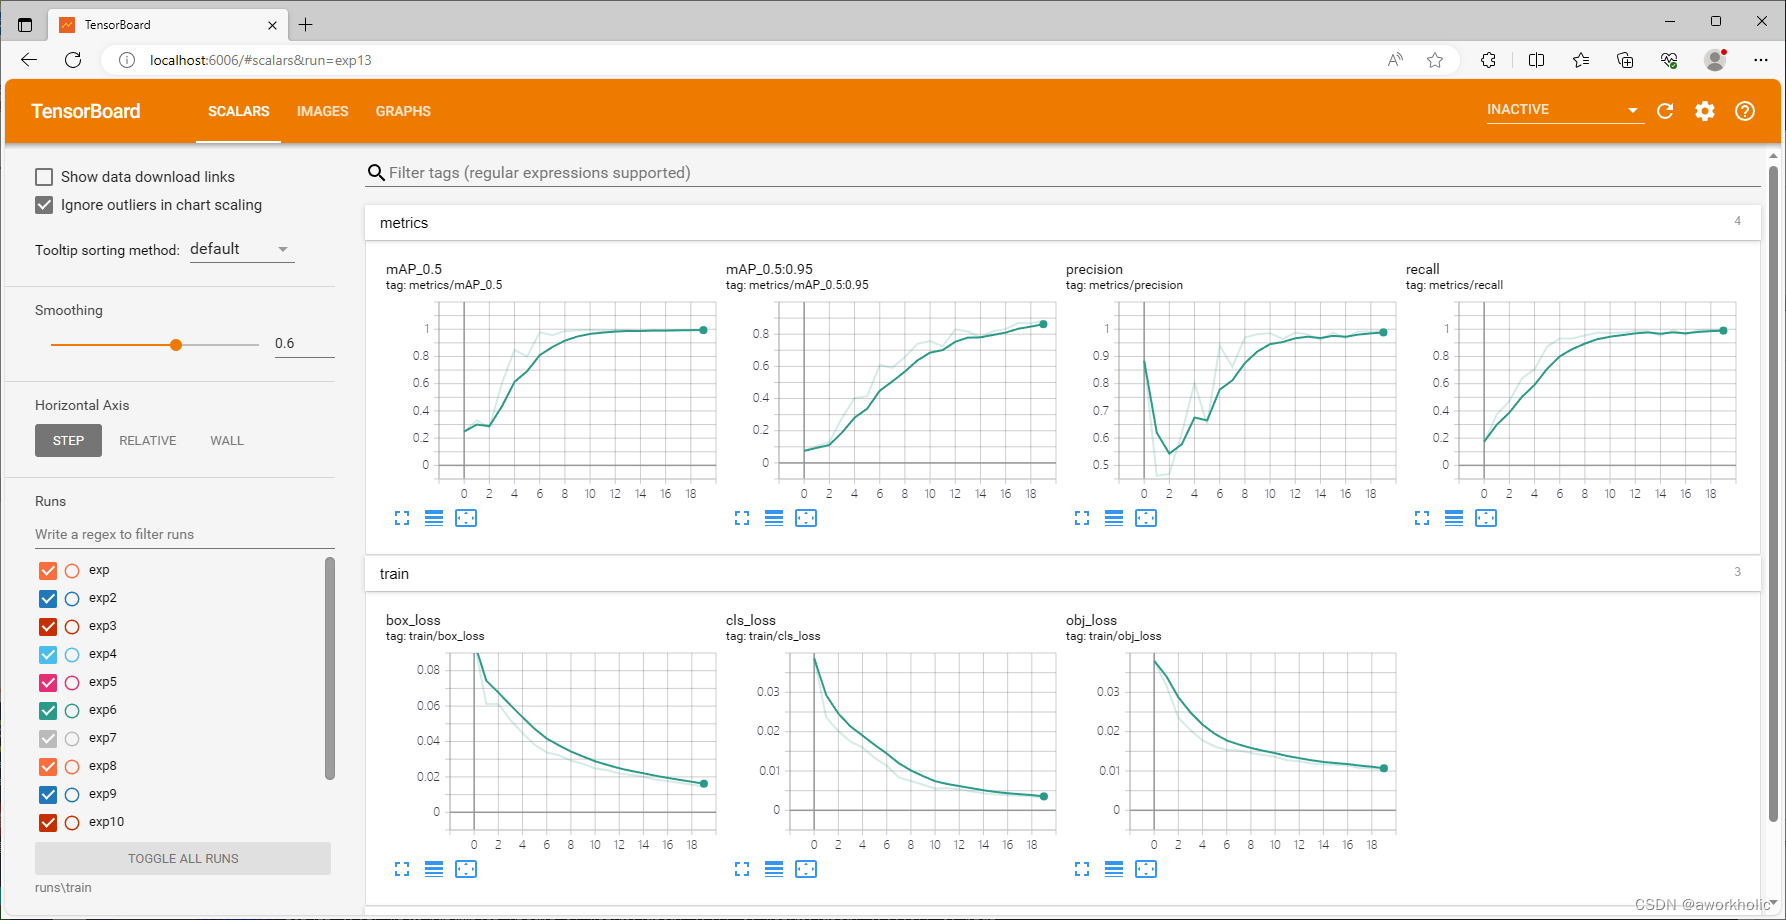
训练速度很快,998张图,训练20epoc仅8分钟左右。训练保存模型存放在 runs\train\exp13 目录下。
其他有关截图

使用脚本 python detect.py --weights runs\train\exp13\weights\best.pt --source custom-data\vehicle\images\11.jpg 测试如下

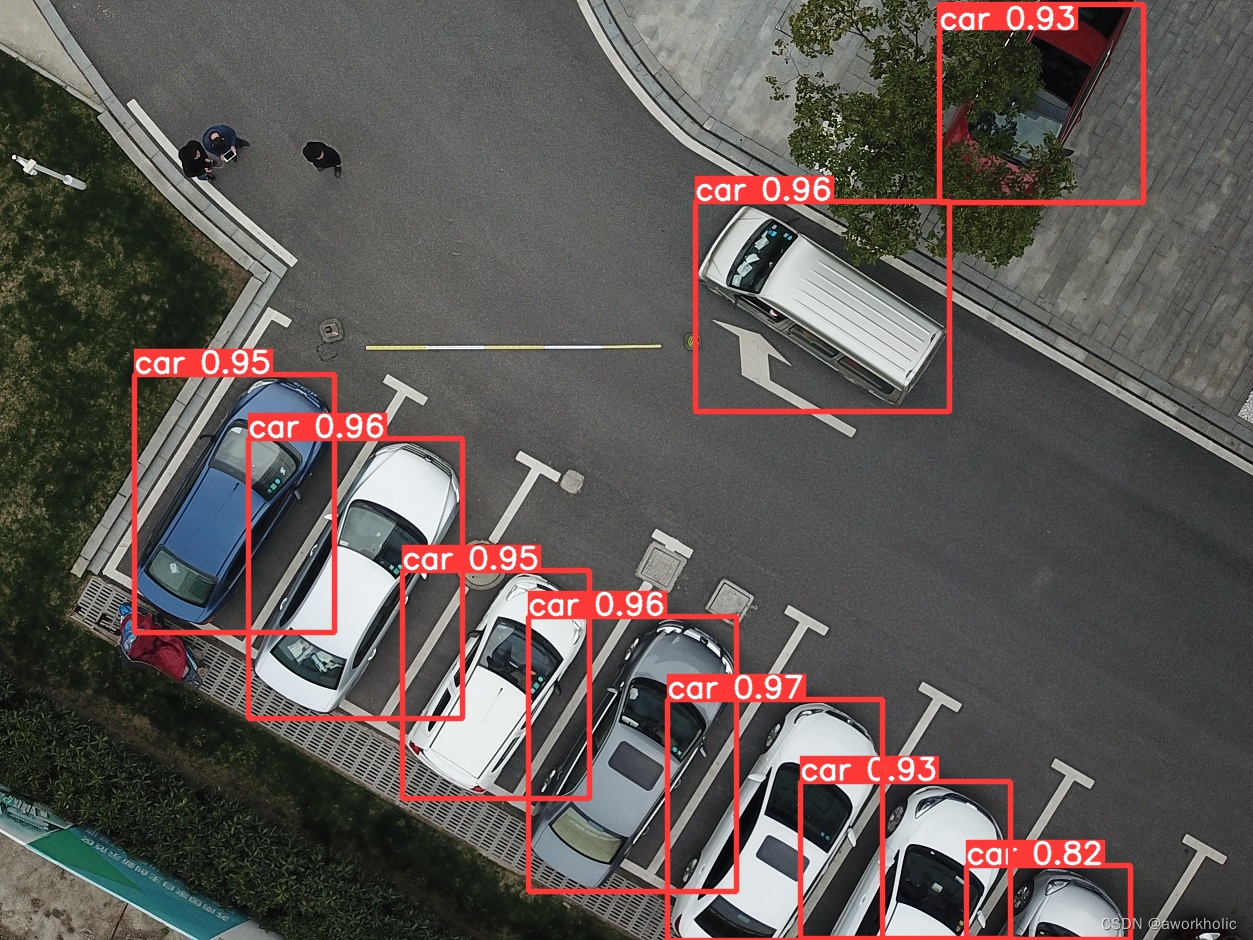
结果图
