前言
如果仅需要脚本的小伙伴可以下拉至后面,我这里一步一步交大家发布项目
学习之前我们要先会搭建一个项目
可以去看这篇文章:搭建一个SpringBoot项目
一、首先我们配置多环境
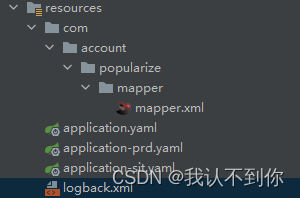
0、resources文件如下
1、配置pom.xml文件
    <build>
        <!--打包后的文件名-->
        <finalName>popularize</finalName>
        <!--需要开启 resource 过滤,才能进行占位符使用 @profiles.active@-->
        <resources>
            <resource>
                <directory>src/main/resources</directory>
                <includes>
                    <include>**/*.xml</include>
                    <include>**/*.properties</include>
                    <include>**/*.yaml</include>
                    <include>**/*.yml</include>
                </includes>
                <!-- 启用过滤 -->
                <filtering>true</filtering>
            </resource>
        </resources>
        <plugins>
            <!--打包工具-->
            <plugin>
                <groupId>org.springframework.boot</groupId>
                <artifactId>spring-boot-maven-plugin</artifactId>
                <configuration>
                    <excludes>
                        <exclude>
                            <groupId>org.projectlombok</groupId>
                            <artifactId>lombok</artifactId>
                        </exclude>
                    </excludes>
                </configuration>
            </plugin>
        </plugins>
    </build>
    <profiles>
        <!--开发环境-->
        <profile>
            <id>sit</id>
            <properties>
                <profiles.active>sit</profiles.active>
            </properties>
            <!-- 设置为默认环境 -->
            <activation>
                <activeByDefault>true</activeByDefault>
            </activation>
        </profile>
        <!--生产环境-->
        <profile>
            <id>prd</id>
            <properties>
                <profiles.active>prd</profiles.active>
            </properties>
        </profile>
    </profiles>
2、配置application.yaml文件(对应pom.xml中的不同环境)
spring:
  profiles:
    active: @profiles.active@
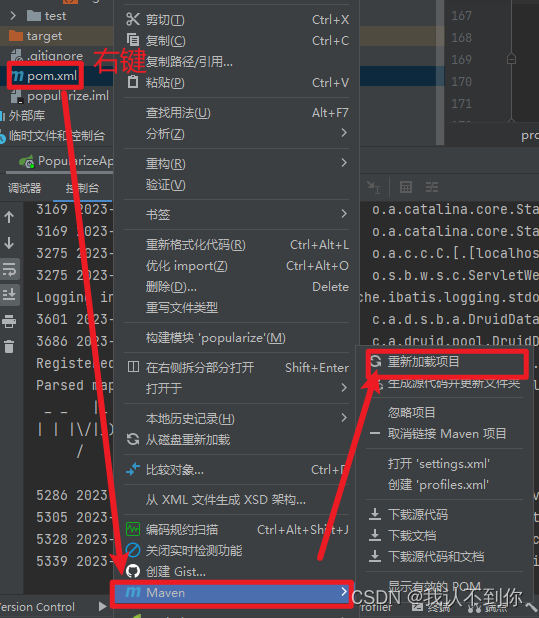
3、右键刷新
**
**
4、idea(maven)打包
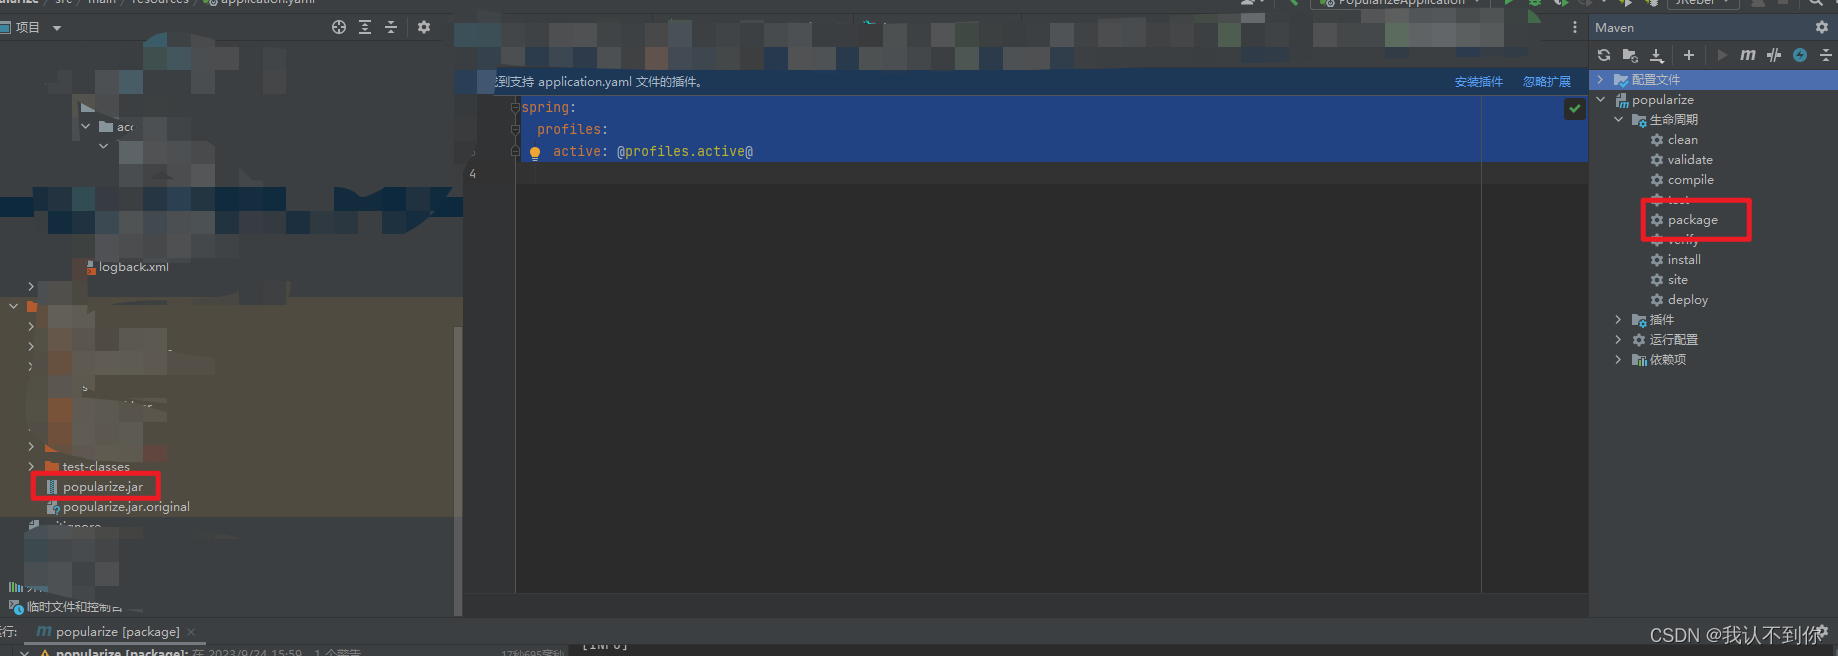
二、打包之后我们放到指定的Linux文件夹中

三、编写脚本
1、文件名随便取(我的就叫jar.sh)
#!/bin/bash
#这里可替换为你自己的执行程序,其他代码无需更改
#jar包的名字
APP_NAME=popularize.jar
#项目路径
PROJECT_PATH=/popularize
#项目环境,比如我的是开发环境是sit,生成环境是prd
ENV=prd

#使用说明,用来提示输入参数
usage() {
    echo "使用方法: ./脚本名.sh [start|stop|restart|status]"
    echo "使用方法: ./脚本名.sh start 是启动"
    echo "使用方法: ./脚本名.sh stop 是停止"
    echo "使用方法: ./脚本名.sh status 是查看输出运行状态"
    echo "使用方法: ./脚本名.sh restart 是重启"
    exit 1
}

#检查程序是否在运行
is_exist(){
  pid=`ps -ef|grep $APP_NAME|grep -v grep|awk '{print $2}' `
  #如果不存在返回1,存在返回0
  if [ -z "${pid}" ]; then
   return 1
  else
    return 0
  fi
}

#启动方法
start(){
  is_exist
  if [ $? -eq "0" ]; then
    # echo "${APP_NAME} is already running. pid=${pid} ."
  else
    nohup java -jar $PROJECT_PATH/$APP_NAME –-spring.profiles.active=$ENV > /dev/null 2>&1 &
    echo "${APP_NAME} start success"
  fi
}

#停止方法
stop(){
  is_exist
  if [ $? -eq "0" ]; then
    kill -9 $pid
  else
    echo "${APP_NAME} is not running"
  fi
}

#输出运行状态
status(){
  is_exist
  if [ $? -eq "0" ]; then
    echo "${APP_NAME} is running. Pid is ${pid}"
  else
    echo "${APP_NAME} is NOT running."
  fi
}

#重启
restart(){
  stop
  start
}

#根据输入参数,选择执行对应方法,不输入则执行使用说明
case "$1" in
  "start")
    start
    ;;
  "stop")
    stop
    ;;
  "status")
    status
    ;;
  "restart")
    restart
    ;;
  *)
    usage
    ;;
esac
2、随便放到哪个文件夹下面,在当前目录下授权文件
chmod 744 springjar.sh
3、使用
- 启动服务,在当前目录下执行:
./jar.sh start - 关闭服务,在当前目录下执行:
./jar.sh stop - 重启服务,在当前目录下执行:
./jar.sh restart - 查看服务状态,在当前目录下执行:
./jar.sh status
四、讲解脚本
0、输入参数,就是 ./jar.sh 后面的参数,根据参数不同进入不同的方法
# 根据输入参数,选择执行对应方法,不输入则执行使用说明
case "$1" in
  "start")
    start
    ;;
  "stop")
    stop
    ;;
  "status")
    status
    ;;
  "restart")
    restart
    ;;
  *)
    usage
    ;;
esac
1、usage 方法(使用说明)
如果在当前目录下执行:./jar.sh 后面不带参数,或者不是 start|stop|restart|status 的任意值
#使用说明,用来提示输入参数
usage() {
    echo "使用方法: ./脚本名.sh [start|stop|restart|status]"
    echo "使用方法: ./脚本名.sh start 是启动"
    echo "使用方法: ./脚本名.sh stop 是停止"
    echo "使用方法: ./脚本名.sh status 是查看输出运行状态"
    echo "使用方法: ./脚本名.sh restart 是重启"
    exit 1
}
会执行usage方法,在控制台打印,如下
使用方法: ./脚本名.sh [start|stop|restart|status]
使用方法: ./脚本名.sh start 是启动
使用方法: ./脚本名.sh stop 是停止
使用方法: ./脚本名.sh status 是查看输出运行状态
使用方法: ./脚本名.sh restart 是重启
2、is_exist 方法(检查程序是否在运行)
检查程序是否在运行,每个方法都会调用此方法
项目启动了,会把项目的进程号赋给pid变量,返回0,项目没启动pid为空,返回1
#检查程序是否在运行
is_exist(){
  pid=`ps -ef|grep $APP_NAME|grep -v grep|awk '{print $2}' `
  #如果不存在返回1,存在返回0
  if [ -z "${pid}" ]; then
   return 1
  else
    return 0
  fi
}
3、start 方法(启动)
先查看is_exist方法返回是0吗,如果是就啥也不操作,如果不是0,则后台启动java项目
#启动方法
start(){
  is_exist
  if [ $? -eq "0" ]; then
    # echo "${APP_NAME} is already running. pid=${pid} ."
  else
    nohup java -jar $PROJECT_PATH/$APP_NAME –-spring.profiles.active=$ENV > /dev/null 2>&1 &
    echo "${APP_NAME} start success"
  fi
}
3.1、nohup java -jar $PROJECT_PATH/$APP_NAME –-spring.profiles.active=$ENV
nohup java -jar $PROJECT_PATH/$APP_NAME –-spring.profiles.active=$ENV
根据文件最上面的项目地址、项目名和项目环境,后台(nohup)启动 jar包,并且环境配置为prd(–-spring.profiles.active=$ENV ),
3.2、> /dev/null 2>&1
> /dev/null 2>&1 &

# 最基本后台启动的jar包启动可以这样启动,现在就是把 > log.log & 变成了 > /dev/null 2>&1 &
nohup java -jar xxx.jar > log.log &
最基础的启动,jar包会把日志加载到当前目录下的log.log文件中,而> /dev/null 2>&1就是说把正确或是错误的日志全扔掉,我们的项目中有logback.xml文件,他会自己把普通或错误的日志都输出到指定的文件中,我们不需要管
这里也就是将所有产生的日志都丢弃,因为我们项目中logback.xml已经指定了日志的格式和输出位置。
主要讲讲
> /dev/null 2>&1通常情况下,总是有三个文件会被打开。它们各自对应的流:
0:标准输入流 stdin
1:标准输出流 stdout
2:标准错误流 stderr>:将流输出到文件
同:1 >,默认情况下就是1,即标准输出,一般都省略。
/dev/null:这个文件是一个无底洞,无法打开,相当于是一个垃圾站。
也就是将所有产生的日志都丢弃,因为我们项目中logback.xml已经指定了日志的格式和输出位置。
2>&1:代表将标准错误2重定向到标准输出1
标准输出和标准错误都输出到/dev/null。如果是2>1的话,代表将标准错误输出到文件1,而不是重定向到标准输出流。
4、stop 方法(停止)
根据is_exist方法拿到项目的进程号后,结束掉就好了
#停止方法
stop(){
  is_exist
  if [ $? -eq "0" ]; then
    kill -9 $pid
  else
    echo "${APP_NAME} is not running"
  fi
}
5、status 方法(输出运行状态)
根据is_exist方法,看是否存在,存在输出 ”项目名 is running. Pid is 进程号 “ ,不存在输出 “项目名 is NOT running.”
#输出运行状态
status(){
  is_exist
  if [ $? -eq "0" ]; then
    echo "${APP_NAME} is running. Pid is ${pid}"
  else
    echo "${APP_NAME} is NOT running."
  fi
}
6、restart 方法(重启)
就是先停止,后启用
#重启
restart(){
  stop
  start
}
参考
Linux shell脚本启动、停止SpringBoot的jar包_
参数“> /dev/null 2>1“的含义。

