目录:
一:dlib的shape_predictor_68_face_landmarks模型
二、眨眼检测
三、张口检测
四、眨眼检测+张口检测
五、人脸识别
六、人脸识别+活体检测
七、人脸识别破解方法
八、参考资料及下载
一:dlib的shape_predictor_68_face_landmarks模型
该模型能够检测人脸的68个特征点(facial landmarks),定位图像中的眼睛,眉毛,鼻子,嘴巴,下颌线(ROI,Region of Interest)
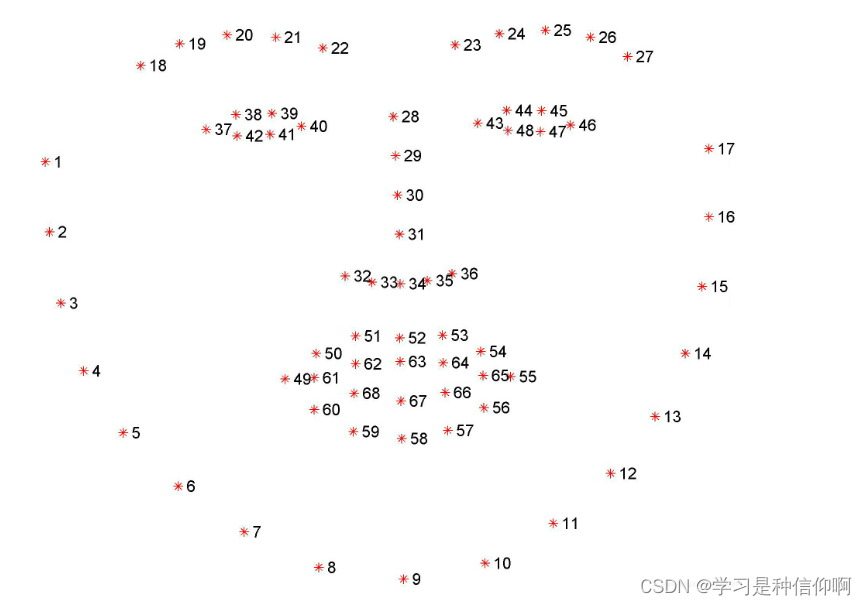
下颌线[1,17]
左眼眉毛[18,22]
右眼眉毛[23,27]
鼻梁[28,31]
鼻子[32,36]
左眼[37,42]
右眼[43,48]
上嘴唇外边缘[49,55]
上嘴唇内边缘[66,68]
下嘴唇外边缘[56,60]
下嘴唇内边缘[61,65]
在使用的过程中对应的下标要减1,像数组的下标是从0开始。
模型链接:
https://blog.csdn.net/Lee_01/article/details/89140668
https://blog.csdn.net/Lee_01/article/details/89145740
二、眨眼检测
基本原理:计算眼睛长宽比 Eye Aspect Ratio,EAR.当人眼睁开时,EAR在某个值上下波动,当人眼闭合时,EAR迅速下降,理论上会接近于零,当时人脸检测模型还没有这么精确。所以我们认为当EAR低于某个阈值时,眼睛处于闭合状态。为检测眨眼次数,需要设置同一次眨眼的连续帧数。眨眼速度比较快,一般1~3帧就完成了眨眼动作。两个阈值都要根据实际情况设置。

原文链接:https://blog.csdn.net/Lee_01/article/details/89151044
from imutils.video import FileVideoStream
from imutils.video import VideoStream
from imutils import face_utils
import numpy as np
import imutils
import dlib
import cv2
import sys


def _help():
    print("Usage:")
    print("     python blink_detect.py")
    print("     python blink_detect.py <path of a video>")
    print("For example:")
    print("     python blink_detect.py video/lee.mp4")
    print("If the path of a video is not provided, the camera will be used as the input.Press q to quit.")


def eye_aspect_ratio(eye):
    A = np.linalg.norm(eye[1] - eye[5])
    B = np.linalg.norm(eye[2] - eye[4])
    C = np.linalg.norm(eye[0] - eye[3])
    ear = (A + B) / (2.0 * C)

    return ear


def blink_detection(vs, file_stream):
    # define three constants, one for the eye aspect ratio to indicate
    # blink and then the other constants for the min/max number of consecutive
    # frames the eye must be below the threshold
    EAR_THRESH = 0.2
    EAR_CONSEC_FRAMES_MIN = 1
    EAR_CONSEC_FRAMES_MAX = 2

    # initialize the frame counters and the total number of blinks
    blink_counter = [0, 0]  # left eye and right eye
    blink_total = [0, 0]  # left eye and right eye

    print("[INFO] loading facial landmark predictor...")
    detector = dlib.get_frontal_face_detector()
    predictor = dlib.shape_predictor("model/shape_predictor_68_face_landmarks.dat")

    # grab the indexes of the facial landmarks for the left and
    # right eye, respectively
    (lStart, lEnd) = face_utils.FACIAL_LANDMARKS_IDXS["left_eye"]
    (rStart, rEnd) = face_utils.FACIAL_LANDMARKS_IDXS["right_eye"]

    print("[INFO] starting video stream thread...")
    while True:
        # if this is a file video stream, then we need to check if
        # there any more frames left in the buffer to process
        if file_stream and not vs.more():
            break

        frame = vs.read()
        if frame is not None:
            frame = imutils.resize(frame)
            gray = cv2.cvtColor(frame, cv2.COLOR_BGR2GRAY)
            rects = detector(gray, 0)

            if len(rects) == 1:
                rect = rects[0]
                shape = predictor(gray, rect)
                shape = face_utils.shape_to_np(shape)

                left_eye = shape[lStart:lEnd]
                right_eye = shape[rStart:rEnd]
                left_ear = eye_aspect_ratio(left_eye)
                right_ear = eye_aspect_ratio(right_eye)

                # compute the convex hull for the left and right eye, then
                # visualize each of the eyes
                left_eye_hull = cv2.convexHull(left_eye)
                right_eye_hull = cv2.convexHull(right_eye)
                cv2.drawContours(frame, [left_eye_hull], -1, (0, 255, 0), 1)
                cv2.drawContours(frame, [right_eye_hull], -1, (0, 255, 0), 1)

                # check to see if the eye aspect ratio is below the blink
                # threshold, and if so, increment the blink frame counter
                if left_ear < EAR_THRESH:
                    blink_counter[0] += 1

                # otherwise, the eye aspect ratio is not below the blink
                # threshold
                else:
                    # if the eyes were closed for a sufficient number of
                    # then increment the total number of blinks
                    if EAR_CONSEC_FRAMES_MIN <= blink_counter[0] and blink_counter[0] <= EAR_CONSEC_FRAMES_MAX:
                        blink_total[0] += 1

                    blink_counter[0] = 0

                # draw the total number of blinks on the frame along with
                # the computed eye aspect ratio for the frame
                cv2.putText(frame, "LBlinks: {}".format(blink_total[0]), (10, 30),
                            cv2.FONT_HERSHEY_SIMPLEX, 0.7, (0, 0, 255), 2)
                cv2.putText(frame, "LEAR: {:.2f}".format(left_ear), (10, 60),
                            cv2.FONT_HERSHEY_SIMPLEX, 0.7, (0, 0, 255), 2)

                # check to see if the eye aspect ratio is below the blink
                # threshold, and if so, increment the blink frame counter
                if right_ear < EAR_THRESH:
                    blink_counter[1] += 1

                # otherwise, the eye aspect ratio is not below the blink
                # threshold
                else:
                    # if the eyes were closed for a sufficient number of
                    # then increment the total number of blinks
                    if EAR_CONSEC_FRAMES_MIN <= blink_counter[1] and blink_counter[1] <= EAR_CONSEC_FRAMES_MAX:
                        blink_total[1] += 1

                    blink_counter[1] = 0

                # draw the total number of blinks on the frame along with
                # the computed eye aspect ratio for the frame
                cv2.putText(frame, "RBlinks: {}".format(blink_total[1]), (200, 30),
                            cv2.FONT_HERSHEY_SIMPLEX, 0.7, (0, 0, 255), 2)
                cv2.putText(frame, "REAR: {:.2f}".format(right_ear), (200, 60),
                            cv2.FONT_HERSHEY_SIMPLEX, 0.7, (0, 0, 255), 2)
            elif len(rects) == 0:
                cv2.putText(frame, "No face!", (10, 30),
                            cv2.FONT_HERSHEY_SIMPLEX, 0.7, (0, 0, 255), 2)
            else:
                cv2.putText(frame, "More than one face!", (10, 30),
                            cv2.FONT_HERSHEY_SIMPLEX, 0.7, (0, 0, 255), 2)
            cv2.namedWindow("Frame", cv2.WINDOW_NORMAL)
            cv2.imshow("Frame", frame)

            # if the `q` key was pressed, break from the loop
            if cv2.waitKey(1) & 0xFF == ord('q'):
                break

    cv2.destroyAllWindows()
    vs.stop()


if len(sys.argv) > 2 or "-h" in sys.argv or "--help" in sys.argv:
    _help()
elif len(sys.argv) == 2:
    vs = FileVideoStream(sys.argv[1]).start()
    file_stream = True
    blink_detection(vs, file_stream)
else:
    vs = VideoStream(src=0).start()
    file_stream = False
    blink_detection(vs, file_stream)
dlib模型官网下载地址:http://dlib.net/files/shape_predictor_68_face_landmarks.dat.bz2
三、张口检测
检测原理:类似眨眼检测,计算Mouth Aspect Ratio,MAR.当MAR大于设定的阈值时,认为张开了嘴巴。
from imutils.video import FileVideoStream
from imutils.video import VideoStream
from imutils import face_utils
import numpy as np
import imutils
import dlib
import cv2
import sys


def _help():
    print("Usage:")
    print("     python mouth_open_detect.py")
    print("     python mouth_open_detect.py <path of a video>")
    print("For example:")
    print("     python mouth_open_detect.py video/lee.mp4")
    print("If the path of a video is not provided, the camera will be used as the input.Press q to quit.")


def mouth_aspect_ratio(mouth):
    A = np.linalg.norm(mouth[2] - mouth[9])  # 51, 59
    B = np.linalg.norm(mouth[4] - mouth[7])  # 53, 57
    C = np.linalg.norm(mouth[0] - mouth[6])  # 49, 55
    mar = (A + B) / (2.0 * C)

    return mar


def mouth_open_detection(vs, file_stream):
    MAR_THRESH = 0.5

    print("[INFO] loading facial landmark predictor...")
    detector = dlib.get_frontal_face_detector()
    predictor = dlib.shape_predictor("model/shape_predictor_68_face_landmarks.dat")

    (mStart, mEnd) = face_utils.FACIAL_LANDMARKS_IDXS["mouth"]

    print("[INFO] starting video stream thread...")
    while True:
        if file_stream and not vs.more():
            break
        frame = vs.read()
        if frame is not None:
            frame = imutils.resize(frame, width=450)
            gray = cv2.cvtColor(frame, cv2.COLOR_BGR2GRAY)
            rects = detector(gray, 0)

            for rect in rects:
                shape = predictor(gray, rect)
                shape = face_utils.shape_to_np(shape)

                mouth = shape[mStart:mEnd]
                mar = mouth_aspect_ratio(mouth)

                mouth_hull = cv2.convexHull(mouth)
                cv2.drawContours(frame, [mouth_hull], -1, (0, 255, 0), 1)

                if mar > MAR_THRESH:
                    cv2.putText(frame, "Mouth is open!", (10, 30),
                                cv2.FONT_HERSHEY_SIMPLEX, 0.7, (0, 0, 255), 2)

                cv2.putText(frame, "MAR: {:.2f}".format(mar), (300, 30),
                            cv2.FONT_HERSHEY_SIMPLEX, 0.7, (0, 0, 255), 2)

            cv2.imshow("Frame", frame)
            key = cv2.waitKey(1) & 0xFF

            if key == ord("q"):
                break

    cv2.destroyAllWindows()
    vs.stop()


if len(sys.argv) > 2 or "-h" in sys.argv or "--help" in sys.argv:
    _help()
elif len(sys.argv) == 2:
    vs = FileVideoStream(sys.argv[1]).start()
    file_stream = True
    mouth_open_detection(vs, file_stream)
else:
    vs = VideoStream(src=0).start()
    file_stream = False
    mouth_open_detection(vs, file_stream)
四、眨眼检测+张口检测
from imutils.video import FileVideoStream
from imutils.video import VideoStream
from imutils import face_utils
import numpy as np
import dlib
import cv2
import sys


def _help():
    print("Usage:")
    print("     python liveness_detect.py")
    print("     python liveness_detect.py <path of a video>")
    print("For example:")
    print("     python liveness_detect.py video/lee.mp4")
    print("If the path of a video is not provided, the camera will be used as the input.Press q to quit.")


def eye_aspect_ratio(eye):
    # (|e1-e5|+|e2-e4|) / (2|e0-e3|)
    A = np.linalg.norm(eye[1] - eye[5])
    B = np.linalg.norm(eye[2] - eye[4])
    C = np.linalg.norm(eye[0] - eye[3])
    ear = (A + B) / (2.0 * C)
    return ear


def mouth_aspect_ratio(mouth):
    # (|m2-m9|+|m4-m7|)/(2|m0-m6|)
    A = np.linalg.norm(mouth[2] - mouth[9])  # 51, 59
    B = np.linalg.norm(mouth[4] - mouth[7])  # 53, 57
    C = np.linalg.norm(mouth[0] - mouth[6])  # 49, 55
    mar = (A + B) / (2.0 * C)
    return mar


def liveness_detection(vs, file_stream):
    EAR_THRESH = 0.15
    EAR_CONSEC_FRAMES_MIN = 1
    EAR_CONSEC_FRAMES_MAX = 2
    MAR_THRESH = 0.5

    # 初始化眨眼的连续帧数以及总的眨眼次数
    blink_counter = 0
    blink_total = 0

    print("[INFO] loading facial landmark predictor...")
    detector = dlib.get_frontal_face_detector()
    predictor = dlib.shape_predictor("model/shape_predictor_68_face_landmarks.dat")

    (lStart, lEnd) = face_utils.FACIAL_LANDMARKS_IDXS["left_eye"]
    (rStart, rEnd) = face_utils.FACIAL_LANDMARKS_IDXS["right_eye"]
    (mStart, mEnd) = face_utils.FACIAL_LANDMARKS_IDXS["mouth"]

    print("[INFO] starting video stream thread...")
    while True:
        # if this is a file video stream, then we need to check if
        # there any more frames left in the buffer to process
        if file_stream and not vs.more():
            break

        frame = vs.read()
        if frame is not None:
            gray = cv2.cvtColor(frame, cv2.COLOR_BGR2GRAY)
            rects = detector(gray, 0)
            # 只能处理一张人脸
            if len(rects) == 1:
                shape = predictor(gray, rects[0])   # 保存68个特征点坐标的<class 'dlib.dlib.full_object_detection'>对象
                shape = face_utils.shape_to_np(shape)   # 将shape转换为numpy数组,数组中每个元素为特征点坐标

                left_eye = shape[lStart:lEnd]
                right_eye = shape[rStart:rEnd]
                left_ear = eye_aspect_ratio(left_eye)
                right_ear = eye_aspect_ratio(right_eye)
                ear = (left_ear + right_ear) / 2.0

                mouth = shape[mStart:mEnd]
                mar = mouth_aspect_ratio(mouth)

                left_eye_hull = cv2.convexHull(left_eye)
                right_eye_hull = cv2.convexHull(right_eye)
                mouth_hull = cv2.convexHull(mouth)
                cv2.drawContours(frame, [left_eye_hull], -1, (0, 255, 0), 1)
                cv2.drawContours(frame, [right_eye_hull], -1, (0, 255, 0), 1)
                cv2.drawContours(frame, [mouth_hull], -1, (0, 255, 0), 1)

                # EAR低于阈值,有可能发生眨眼,眨眼连续帧数加一次
                if ear < EAR_THRESH:
                    blink_counter += 1

                # EAR高于阈值,判断前面连续闭眼帧数,如果在合理范围内,说明发生眨眼
                else:
                    # if the eyes were closed for a sufficient number of
                    # then increment the total number of blinks
                    if EAR_CONSEC_FRAMES_MIN <= blink_counter and blink_counter <= EAR_CONSEC_FRAMES_MAX:
                        blink_total += 1

                    blink_counter = 0

                cv2.putText(frame, "Blinks: {}".format(blink_total), (0, 30),
                            cv2.FONT_HERSHEY_SIMPLEX, 0.7, (0, 0, 255), 2)
                cv2.putText(frame, "Mouth: {}".format("open" if mar > MAR_THRESH else "closed"),
                            (130, 30), cv2.FONT_HERSHEY_SIMPLEX, 0.7, (0, 0, 255), 2)
                cv2.putText(frame, "EAR: {:.2f}".format(ear), (300, 30),
                            cv2.FONT_HERSHEY_SIMPLEX, 0.7, (0, 0, 255), 2)
                cv2.putText(frame, "MAR: {:.2f}".format(mar), (450, 30),
                            cv2.FONT_HERSHEY_SIMPLEX, 0.7, (0, 0, 255), 2)
            elif len(rects) == 0:
                cv2.putText(frame, "No face!", (0, 30),
                            cv2.FONT_HERSHEY_SIMPLEX, 0.7, (0, 0, 255), 2)
            else:
                cv2.putText(frame, "More than one face!", (0, 30),
                            cv2.FONT_HERSHEY_SIMPLEX, 0.7, (0, 0, 255), 2)
            cv2.namedWindow("Frame", cv2.WINDOW_NORMAL)
            cv2.imshow("Frame", frame)
            # 按下q键退出循环(鼠标要点击一下图片使图片获得焦点)
            if cv2.waitKey(1) & 0xFF == ord('q'):
                break
    cv2.destroyAllWindows()
    vs.stop()


if len(sys.argv) > 2 or "-h" in sys.argv or "--help" in sys.argv:
    _help()
elif len(sys.argv) == 2:
    video_stream = FileVideoStream(sys.argv[1]).start()
    file_stream = True
    liveness_detection(video_stream, file_stream)
else:
    video_stream = VideoStream(src=0).start()
    file_stream = False
    liveness_detection(video_stream, file_stream)
五、人脸识别
# -*-coding:GBK -*-
import face_recognition
import os
import cv2
from PIL import Image, ImageFont, ImageDraw
import numpy as np
import datetime
import threading

class Recorder:
    pass

record_dic = {}
unknown_pic = []

flag_over = 0  # 定义一个是否进行来访记录的标记
# 定时去保存对比图像信息,并且将位置人员的图像保存下来
def save_recorder(name, frame):
    global record_dic
    global flag_over
    global unknown_pic

    if flag_over == 1: return
    try:
        record = record_dic[name]
        seconds_diff = (datetime.datetime.now() - record.times[-1]).total_seconds()

        if seconds_diff < 60 * 10:
            return
        record.times.append(datetime.datetime.now())
        print('更新记录', record_dic, record.times)
    except KeyError:
        newRec = Recorder()
        newRec.times = [datetime.datetime.now()]
        record_dic[name] = newRec
        print('添加记录', record_dic, newRec.times)

    if name == '未知头像':
        s = str(record_dic[name].times[-1])
        # print(s)
        # 未知人员的图片名称
        filename = s[:10]+s[-6:] + '.jpg'
        cv2.imwrite(filename, frame)
        unknown_pic.append(filename)


# 解析已有人员的所有照片并得到照片名和人物面部编码信息
def load_img(path):
    print('正在加载已知人员的图片...')

    for dirpath, dirnames, filenames in os.walk(path):
        print(filenames)
        facelib = []

        for filename in filenames:
            filepath = os.sep.join([dirpath, filename])
            # 把对应每张图片加载进来
            face_image = face_recognition.load_image_file(filepath)
            face_encoding = face_recognition.face_encodings(face_image)[0]
            facelib.append(face_encoding)

        return facelib,filenames


facelib, facenames = load_img('facelib')
# print(facenames)

video_capture = cv2.VideoCapture(0)

while True:
    ret, frame = video_capture.read()
    # 通过缩小图片(缩小为1/4),提高对比效率
    small_frame = cv2.resize(frame, (0,0), fx=0.25, fy=0.25)
    rgb_small_frame = small_frame[:,:,::-1]  # 将opencv的BGR格式转换为RGB格式

    face_locations = face_recognition.face_locations(rgb_small_frame)
    face_encodings = face_recognition.face_encodings(rgb_small_frame, face_locations)

    face_names = []
    # 循环多张人脸
    for face_encoding in face_encodings:
        matches = face_recognition.compare_faces(facelib, face_encoding, tolerance=0.39)
        name = '未知头像'
        if True in matches:
            # 如果摄像头里面的头像匹配了已知人物头像,则取出第一个True的位置
            first_match_index = matches.index(True)
            name = facenames[first_match_index][:-4]   # 取出文件上对应的人名
        face_names.append(name)

    for (top, right, bottom, left), name in zip(face_locations, face_names):

        # 还原原图片大小
        top *= 4
        right *= 4
        bottom *= 4
        left *= 4

        cv2.rectangle(frame, (left, top), (right, bottom), (0,0,255), thickness=2)  # 标注人脸信息
        img_PIL = Image.fromarray(cv2.cvtColor(frame, cv2.COLOR_BGR2RGB))
        font = ImageFont.truetype('simhei.ttf', 40)
        draw = ImageDraw.Draw(img_PIL)
        draw.text((left+6, bottom-6), name, font=font, fill=(255,255,255))
        frame = cv2.cvtColor(np.asarray(img_PIL),cv2.COLOR_RGB2BGR)
        save_recorder(name, frame)

    cv2.imshow('capture', frame)

    if cv2.waitKey(1) & 0xFF == ord('q'):
        break

video_capture.release()
六、人脸识别+活体检测
import face_recognition
from imutils import face_utils
from PIL import Image, ImageDraw,ImageFont
import numpy as np
import threading						#导入threading模块
import yagmail
import dlib
import datetime
import time
import cv2
import os
import sys

# 初始化眨眼次数
blink_total = 0
# 初始化张嘴次数
mouth_total = 0
# 设置图片存储路径
# pic_path = './dataset'
# 图片数量
pic_total = 0
# 初始化眨眼的连续帧数以及总的眨眼次数
blink_counter = 0
# 初始化张嘴状态为闭嘴
mouth_status_open = 0

# 眼长宽比例值
EAR_THRESH = 0.15
EAR_CONSEC_FRAMES_MIN = 1
EAR_CONSEC_FRAMES_MAX = 5  # 当EAR小于阈值时,接连多少帧一定发生眨眼动作
# 嘴长宽比例值
MAR_THRESH = 0.15


# 人脸检测器
detector = dlib.get_frontal_face_detector()
# 特征点检测器
predictor = dlib.shape_predictor("modles/shape_predictor_68_face_landmarks.dat")

# 获取左眼的特征点
(lStart, lEnd) = face_utils.FACIAL_LANDMARKS_IDXS["left_eye"]
# 获取右眼的特征点
(rStart, rEnd) = face_utils.FACIAL_LANDMARKS_IDXS["right_eye"]
# 获取嘴巴特征点
(mStart, mEnd) = face_utils.FACIAL_LANDMARKS_IDXS["inner_mouth"]


class Recorder:
    pass

red_dict = {}
unknownjpg = []

def sendemail(title,contents,fileslist):#将照片和访问记录上传云端
    # yag = yagmail.SMTP("发件人邮箱",'密码' ,'smtp.qq.com', 465)
    # yag.send(['收件人邮箱1','收件人邮箱2'],title,contents,fileslist)
    yag=yagmail.SMTP("xxx@qq.com",'mbiwgdukvqaadfei','smtp.qq.com',465)#发件人邮箱
    yag.send(['xxx@163.com','xxx@163.com'],title,contents,fileslist)#收件人邮箱(注意和上面邮箱不同)

def dicttostr():#生成来访记录列表
    strlist = []
    listkey =list(sorted(red_dict.keys()))#取字典的key
    for item in listkey:#通过循环,合成每一条来访记录
        strlist.extend([item + ','+str(onetime) for onetime in red_dict[item].times])
    return strlist

flagover = 0#全局标志,用来控制是否保持来访记录
def saveRecorder(name, frame):#保存和添加来访记录
    global red_dict
    global flagover
    global unknownjpg
    if flagover == 1:#响应全局标志,如果为1时,关闭来访记录
        return
    try:
        red = red_dict[name]#如果多次识别,比较时间
        secondsDiff = (datetime.datetime.now() - red.times[-1]).total_seconds()

        if secondsDiff < 5*60:  # 如果两次识别在5分钟内,将被过滤掉
            return
        red.times.append(datetime.datetime.now())
        print('更新记录', red_dict, red.times)
    except (KeyError):
        newRed = Recorder()
        newRed.times = [datetime.datetime.now()]
        red_dict[name] = newRed
        print('添加记录', red_dict, newRed.times)

    if name == 'Unknown':
        s = str(red_dict[name].times[-1])
        print('写入', s[:10] + s[-6:])
        filename = s[:10] + s[-6:] + '.jpg'
        cv2.imwrite(filename, frame)
        unknownjpg.append(filename)


def loop_timer_headle():  # 定时器循环触发函数
    print('————————Timer headle!————————', str(datetime.datetime.now()))
    global timer2
    global flagover
    global red_dict
    global unknownjpg
    flagover = 1
    timer2 = threading.Timer(60 * 5, loop_timer_headle)  # 创建定时器 5分钟
    timer2.start()

    # 发送邮件
    sendemail("来访统计记录", '\n'.join(dicttostr()), unknownjpg)

    red_dict.clear()
    unknownjpg.clear()
    print("清空")

    time.sleep(10)
    print("重新开始")
    flagover = 0


timer2 = threading.Timer(2, loop_timer_headle)
timer2.start()


def load_img(sample_dir):#导入数据库照片
    print('loading sample  face..')

    for (dirpath, dirnames, filenames) in os.walk(sample_dir):  # 一级一级的文件夹递归
        print(dirpath, dirnames, filenames)
        facelib = []
        for filename in filenames:
            filename_path = os.sep.join([dirpath, filename])
            print(filename_path)
            faceimage = face_recognition.load_image_file(filename_path)
            # 由于我们每个图像只有一个脸,我只关心每个图像中的第一个编码,所以我取索引0
            face_encoding = face_recognition.face_encodings(faceimage)[0]
            facelib.append(face_encoding)
        return facelib, filenames

# def getFaceEncoding(src):#获取人脸编码
#     image = face_recognition.load_image_file(src)  # 加载人脸图片
#     # 获取图片人脸定位[(top,right,bottom,left )]
#     face_locations = face_recognition.face_locations(image)
#     img_ = image[face_locations[0][0]:face_locations[0][2], face_locations[0][3]:face_locations[0][1]]
#     img_ = cv2.cvtColor(img_, cv2.COLOR_BGR2RGB)
#     # display(img_)
#     face_encoding = face_recognition.face_encodings(image, face_locations)[0]  # 默认人脸数为1,对人脸图片进行编码
#     return face_encoding

#对比两张照片距离
# def simcos(a, b):
#     a = np.array(a)
#     b = np.array(b)
#     dist = np.linalg.norm(a - b)  # 二范数
#     sim = 1.0 / (1.0 + dist)  #
#     return sim


# 提供对外比对的接口 返回比对的相似度
# def comparison(face_src1, face_src2):
#     xl1 = getFaceEncoding(face_src1)
#     xl2 = getFaceEncoding(face_src2)
#     value = simcos(xl1, xl2)
#     print(value)


# 眼长宽比例
def eye_aspect_ratio(eye):
    # (|e1-e5|+|e2-e4|) / (2|e0-e3|)
    A = np.linalg.norm(eye[1] - eye[5])
    B = np.linalg.norm(eye[2] - eye[4])
    C = np.linalg.norm(eye[0] - eye[3])
    ear = (A + B) / (2.0 * C)
    return ear


# 嘴长宽比例
def mouth_aspect_ratio(mouth):
    A = np.linalg.norm(mouth[1] - mouth[7])  # 61, 67
    B = np.linalg.norm(mouth[3] - mouth[5])  # 63, 65
    C = np.linalg.norm(mouth[0] - mouth[4])  # 60, 64
    mar = (A + B) / (2.0 * C)
    return mar

def main():
    global blink_total  # 使用global声明blink_total,在函数中就可以修改全局变量的值
    global mouth_total
    global pic_total
    global blink_counter
    global mouth_status_open

    # video_path, src = sys.argv[1], sys.argv[2]
    facelib, facename = load_img('dataset')
    vs = cv2.VideoCapture(0)
    face_locations = []  # 定义列表存放人脸位置
    face_encodings = []  # 定义列表存放人脸特征编码
    process_this_frame = True  # 定义信号量
    while True:
        ret, frame = vs.read()  # 捕获一帧图片
        small_frame = cv2.resize(frame, (0, 0), fx=0.25, fy=0.25)  # 将图片缩小1/4,为人脸识别提速
        rgb_small_frame = small_frame[:, :, ::-1]  # 将opencv的BGR格式转为RGB格式

        if process_this_frame:  # 使用信号量对当前的处理进行保护
            # 找到人脸位置,并生成特征码
            face_locations = face_recognition.face_locations(rgb_small_frame)
            face_encodings = face_recognition.face_encodings(rgb_small_frame, face_locations)
            face_names = []  # 定义列表,放置识别结果
            for face_encoding in face_encodings:  # 循环多张人脸
                matches = face_recognition.compare_faces(facelib, face_encoding)  # 人脸识别
                name = "Unknown"  # 定义默认的识别结果为Unknown
                if True in matches:  # 如果识别出来,就将名称取出
                    first_match_index = matches.index(True)
                    name = facename[first_match_index][:-4]
                face_names.append(name)  # 保存识别结果

        process_this_frame = not process_this_frame  # 信号量保护结束

        # 显示结果
        for (top, right, bottom, left), name in zip(face_locations, face_names):
            top *= 4  # 还原人脸的原始尺寸
            right *= 4
            bottom *= 4
            left *= 4

            cv2.rectangle(frame, (left, top), (right, bottom), (0, 0, 255), 2)  # 标注人脸

            img_PIL = Image.fromarray(cv2.cvtColor(frame, cv2.COLOR_BGR2RGB))  # 转换图片格式
            font = ImageFont.truetype('simhei.ttf', 40)  # 加载字体
            position = (left + 6, bottom - 6)  # 指定文字输出位置
            draw = ImageDraw.Draw(img_PIL)  # 绘制照片
            draw.text(position, name, font=font, fill=(255, 255, 255))  # 绘制文字
            frame = cv2.cvtColor(np.asarray(img_PIL), cv2.COLOR_RGB2BGR)  # 将图片转回OpenCV格式
            saveRecorder(name, frame)  # 过滤并保存记录
        gray = cv2.cvtColor(frame, cv2.COLOR_BGR2RGB)
        rects = detector(gray, 0)  # 人脸检测
        # 只能处理一张人脸
        if len(rects) == 1:
            shape = predictor(gray, rects[0])  # 保存68个特征点坐标的<class 'dlib.dlib.full_object_detection'>对象
            shape = face_utils.shape_to_np(shape)  # 将shape转换为numpy数组,数组中每个元素为特征点坐标

            left_eye = shape[lStart:lEnd]  # 取出左眼对应的特征点
            right_eye = shape[rStart:rEnd]  # 取出右眼对应的特征点
            left_ear = eye_aspect_ratio(left_eye)  # 计算左眼EAR
            right_ear = eye_aspect_ratio(right_eye)  # 计算右眼EAR
            ear = (left_ear + right_ear) / 2.0  # 求左右眼EAR的均值

            inner_mouth = shape[mStart:mEnd]  # 取出嘴巴对应的特征点
            mar = mouth_aspect_ratio(inner_mouth)  # 求嘴巴mar的均值
            # left_eye_hull = cv2.convexHull(left_eye)  # 寻找左眼轮廓
            # right_eye_hull = cv2.convexHull(right_eye)  # 寻找右眼轮廓
            # mouth_hull = cv2.convexHull(inner_mouth)  # 寻找内嘴巴轮廓
            # cv2.drawContours(frame, [left_eye_hull], -1, (0, 255, 0), 1)  # 绘制左眼轮廓
            # cv2.drawContours(frame, [right_eye_hull], -1, (0, 255, 0), 1)  # 绘制右眼轮廓
            # cv2.drawContours(frame, [mouth_hull], -1, (0, 255, 0), 1)  # 绘制嘴巴轮廓

            # EAR低于阈值,有可能发生眨眼,眨眼连续帧数加一次
            if ear < EAR_THRESH:
                blink_counter += 1

            # EAR高于阈值,判断前面连续闭眼帧数,如果在合理范围内,说明发生眨眼
            else:
                # if the eyes were closed for a sufficient number of
                # then increment the total number of blinks
                if EAR_CONSEC_FRAMES_MIN <= blink_counter <= EAR_CONSEC_FRAMES_MAX:
                    blink_total += 1
                blink_counter = 0
            # 通过张、闭来判断一次张嘴动作
            if mar > MAR_THRESH:
                mouth_status_open = 1
            else:
                if mouth_status_open:
                    mouth_total += 1
                mouth_status_open = 0

            cv2.putText(frame, "Blinks: {}".format(blink_total), (0, 30),
                        cv2.FONT_HERSHEY_SIMPLEX, 0.7, (0, 0, 255), 2)
            cv2.putText(frame, "Mouth: {}".format(mouth_total),
                        (130, 30), cv2.FONT_HERSHEY_SIMPLEX, 0.7, (0, 0, 255), 2)
            cv2.putText(frame, "EAR: {:.2f}".format(ear), (300, 30),
                        cv2.FONT_HERSHEY_SIMPLEX, 0.7, (0, 0, 255), 2)
            cv2.putText(frame, "MAR: {:.2f}".format(mar), (450, 30),
                        cv2.FONT_HERSHEY_SIMPLEX, 0.7, (0, 0, 255), 2)
        elif len(rects) == 0:
            cv2.putText(frame, "No face!", (0, 30),
                        cv2.FONT_HERSHEY_SIMPLEX, 0.7, (0, 0, 255), 2)
        else:
            cv2.putText(frame, "More than one face!", (0, 30),
                        cv2.FONT_HERSHEY_SIMPLEX, 0.7, (0, 0, 255), 2)

        # cv2.namedWindow("Frame", cv2.WINDOW_NORMAL)
        # cv2.imshow('Frame', frame)  # 将图片显示出来

        # liveness_detection(vs)
        if blink_total >= 1 and mouth_total >= 1:
            cv2.putText(frame, "True", (200, 200),
                        cv2.FONT_HERSHEY_SIMPLEX, 0.7, (0, 0, 255), 2)
            blink_total = 0
            mouth_total = 0
        cv2.namedWindow("Frame", cv2.WINDOW_NORMAL)
        cv2.imshow('Frame', frame)  # 将图片显示出来

        k = cv2.waitKey(1) & 0xFF  # 按键判断
        if k == ord(' '):
            break;

    # comparison(pic_path, src)
    vs.release()
    time.sleep(2)  # 休眠2秒
if __name__ == '__main__':
    main()
七、人脸识别破解方法
注入应用攻击:在程序中设置断点,通过不断演示人脸识别流程来触发该断点,然后分析并修改程序存储的值,最终使得静态照片也能通过活体检测
照片攻击:利用合法用户的照片进行验证
视频攻击:利用视频合成软件将合法用户的照片合成为视频
3D建模攻击:制作合法用户的脸部3D模型
脸部模具攻击
利用接口防护不当和设计缺陷
防攻击方式:
多重验证
识别伪造痕迹
提高验证速度
八、参考资料及下载
CSDN下载:后续补上
参考:人脸活体检测人脸识别:眨眼+张口
参考:使用dlib人脸检测模型进行人脸活体检测:眨眼+张口
参考:Python开发系统实战项目:人脸识别门禁监控系统








![[附源码]计算机毕业设计Python第三方游戏零售平台(程序+源码+LW文档)](https://img-blog.csdnimg.cn/ddc3e6ce45714a0998add4c465841949.png)


