pytest接口自动化测试框架入门(pytest+yaml)
文章目录
- 自动化测试需要包含的内容
- pytest的安装
- 使用pytest默认的测试用例的规则和基础使用:
- pytest测试用例的运行方式
- pytest执行测试用例的顺序
- 分组执行
- pytest跳过测试用例
- pytest框架前后置处理解(固件/夹具)
- **使用@pytest.fixture()装饰器来实现部分用例的前后置**
- scope参数值
- params参数化使用:
- ids参数的使用
- ids和name参数的使用
- 通过conftest.py和@pytest.fixture()结合使用来实现全局的前置应用
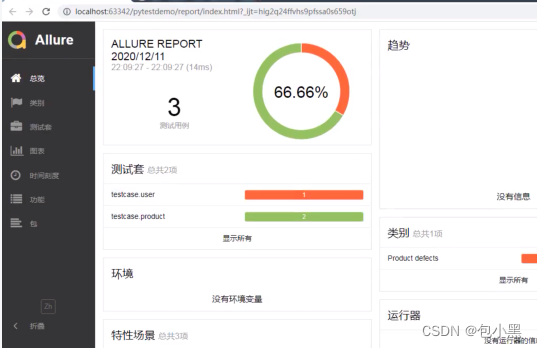
- 结合allure-pytest生成allure测试报告
- @pytest.mark.parametrize()基本用法
- pytest 断言
- yaml文件实现接口自动化
- yaml的使用
- 小练习实战:使用yaml测试查询天气接口
- 学习源:
自动化测试需要包含的内容
-
pytest单元测试框架只是自动化测试框架的部分之一。
-
pom:只是自动化测试框架的部分之一
-
数据驱动:
-
关键字驱动:
-
全局配置文件的封装
-
日志监控:
-
seleinumr、equests二次封装
-
断言
-
测试报告
-
邮件
pytest的安装
pytest有非常多的强大的插件,并且这些插件可以实现很多实用的操作。
pytest
pytest-html (生成html格式的报告)
pytest-xdist (测试用例分布执行,多CPU分发)
pytest-ordering (用于改变测试用例的执行顺序)
pytest-rerunfailures (用于失败用例重试)
allure-pytest(用于生成美观的测试报告)
批量下载插件
放到requirements.txt文件中,执行 pip install -r requirements.txt 这个命令
使用pytest默认的测试用例的规则和基础使用:
1、pytest的使用规则
-
模块名必须以test_开头或者_test结尾
-
测试类必须以Test开头,并且不能有init方法
-
测试方法必须以test开头
2、通过读取pytest.ini配置文件运行
pytest测试用例的运行方式
1、主函数模式
(1)运行所有:pytest.main()
(2)指定模块:pytest.main([“-vs”, “test_login.py”])
(3)指定目录: pytest.main([“-vs”, “./interface_testCase”])
(4)通过nodeid指定用例运行,nodeid由模块名,分隔符,类名和方法名组成
pytest.main([“-vs”, “./interface_testCase/test_interface.py::test_04_func”])
pytest.main([“-vs”, “./interface_testCase/test_interface.py::TestInterface::test_03_shaheshang”])
2、命令行模式
(1)运行所有:pytest
(2)执行模块:cd web_testCase 切换到指定模块所在的目录
pytest -vs test_login.py
(3)指定目录: pytest -vs ./interface_testCase
(4)通过nodeid指定用例运行: pytest -vs ./interface_testCase/test_interface.py::test_04_func
3、通过读取pytest.ini配置文件运行
pytest.ini 这个文件它是pytest单元测试框架的核心配置文件。
位置:一般放在项目的根目录下。
编码:必须是ANSI
作用: 改变pytest默认的行为规则
运行的规则:不管是主函数的模式运行,还是命令行模式运行,都会去读取这个配置文件。
[pytest]
addopts = -vs   # 命令行参数,用空格分隔
# 测试用例路径
testpaths = './web_testCase'
# 模块名规则
python_files = 'test*.py'
# 类名的规则
python_classes = Test*
# 方法名的规则
python_functions = test
参数详解:
-s: 表示输出调试信息,包括print打印的信息
-v: 显示更详细的信息,包括用例所在的模块名和类名
-vs: 这两个参数可以一起使用
--reruns 2: 失败用例重跑
-x :表示只要有一个用例报错,那么测试停止
–maxfail=2: 表示出现两个用例失败就停止
-k: 根据测试用例的部分字符串指定测试用例
def test_01_sunwukong def test_02_xiaohong
eg: pytest -vs ./web_testCase -k ‘on’
–html ./report/report.html 生成html格式的测试报告
-m : 执行指定标记的用例 eg: -m ’smoke‘ 标志只执行smoke用例
-n:支持多线程或者分布式运行测试用例
- 主函数模式
pytest.main([“-vs”, “./web_testCase/test_login”, “-n=2”])
- 命令行模式书写
pytest -vs ./web_testCase/test_login -n 2
`如果有5个用例,分配两个线程来执行的话,那么第一个线程会执行1 3 5 用例,第二个线程会执行2 4 用例
失败用例重试:
失败用例重试使用的参数是:–reruns==2
test_login中有5个用例,模拟让第二个用例执行失败
import pytest

if __name__ == '__main__':
    pytest.main(["-vs", "./web_testCase", '--reruns=2'])
pytest -vs ./web_testCase --reruns 2
pytest执行测试用例的顺序
pytest: 默认从上到下
安装:pytest-ordering 这个插件
该插件作用:用于改变测试用例的执行顺序
可以通过mark 标记来指定用例执行的顺序
@pytest.mark.run(order=1)
    def test_07_xiaohong(self):
        print("测试小红")
分组执行
分组
分组执行使用场景
冒烟、分模块执行、分接口和web执行
smoke:冒烟用例,分布在各个模块里面
在pytest.ini 配置文件中添加
...
markers =
    smoke: 冒烟用例
    usermanage: 用户管理模块
    productmanage:商品管理模块
在用例中添加标记@pytest.mark.XXX
    @pytest.mark.smoke
    @pytest.mark.usermanager
    def test_07_xiaohong(self):
        print("测试小红")
执行
pytest -vs -m ‘smoke’
pytest -vs -m ‘somke or usermanager’
或主函数方式执行
import pytest
if __name__ == '__main__':
    pytest.main(["-vs", "./web_testCase"])
pytest跳过测试用例
使用场景:只执行正向用例,不执行反向用例,异常用例
在用例上添加skip标记
无条件跳过:
@pytest.mark.skip(reason=“不执行用例”)
有条件跳过:
@pytest.mark.skipif(age >= 18, “成年”)
#条件满足就跳过
pytest框架前后置处理解(固件/夹具)
常用三种:
-
setup、teardown/setup_class、teardown_class,它是作用于所有的用例/类
-
@pytest.fixture() 它即可以全局前后置,也可以部分前后置
-
conftest.py 和@pytest.fixture()结合使用,作用于全局的前后置。
使用@pytest.fixture()装饰器来实现部分用例的前后置
写法
@pytest.fixture(scope=,params=,autouse=,ids=,name=)
参数说明:
scope :表示的是被@pytest.fixture标记的方法的作用域。 【function:默认(函数),class(类),module(模块),package/session】
params:参数化(支持:列表,元祖,字典列表[{},{},{}],字典元祖[(),(),()])
autouse=True:自动执行,默认False
ids:当 使用params参数化时,给每一个值设置一个变量名,意义不大
name:给表示的是被pytest.fixture标记的方法取一个别名
import pytest


@pytest.fixture(scope="function")
def my_fixture():
    print("这是前置方法")
    yield
    print("这是后置方法")


class TestDemo01:

    def test_01_sunwukong(self):
        print("\n测试孙悟空")
     # 如果只让test_02  执行前后置,那么就只给这个方法设置my_fixture
    def test_02_tangseng(self, my_fixture):
        print("\n测试唐僧")
scope参数值
①function 函数级别,既每个函数执行,前后置方法也都会被执行
import pytest

#  autouse=True 自动使用
@pytest.fixture(scope="function", autouse=True)
def my_fixture():
    print("这是前置方法")
    yield
    print("这是后置方法")


class TestDemo01:

    def test_01_sunwukong(self):
        print("\n测试孙悟空")

    def test_02_tangseng(self):
        print("\n测试唐僧")

测试结果

web_testCase/test_demo01.py::TestDemo01::test_01_sunwukong 这是前置方法

测试孙悟空
PASSED这是后置方法

web_testCase/test_demo01.py::TestDemo01::test_02_tangseng 这是前置方法

测试唐僧
PASSED这是后置方法
②class 类级别,既 前后置方法只执行一次
③modle:模块级别,每个模块前后执行一次
params参数化使用:
import pytest


@pytest.fixture(scope="function", params=['成龙', '吴京', '易烊千玺'])
def test_fixture(request):
    print("这是前置方法")
    yield request.param  # return和yeild的区别: 都是表示返回值的意思,但是return的后面不能有代码,yeild很后面可以有代码
    print("这是后置方法")
    # return


class TestDemo01:

    def test_01(self):
        print("\n测试用例1")

    # 如果只让test_02  执行前后置,那么就只给这个方法设置test_fixture

    def test_02(self, test_fixture):
        print("\n测试用例2")
        print(test_fixture)


if __name__ == '__main__':
    pytest.main(['-vs'])

 测试结果:
 test_demo01.py::TestDemo01::test_01
测试用例1
PASSED
test_demo01.py::TestDemo01::test_02[\u6210\u9f99] 这是前置方法

测试用例2
成龙
PASSED这是后置方法

test_demo01.py::TestDemo01::test_02[\u5434\u4eac] 这是前置方法

测试用例2
吴京
PASSED这是后置方法

test_demo01.py::TestDemo01::test_02[\u6613\u70ca\u5343\u73ba] 这是前置方法

测试用例2
易烊千玺
PASSED这是后置方法
ids参数的使用
import pytest


@pytest.fixture(scope="function", params=['成龙', '吴京', '易烊千玺'], ids=['cl', 'wj', 'yyqx'])
def test_fixture(request):
    print("这是前置方法")
    yield request.param  # return和yeild的区别: 都是表示返回值的意思,但是return的后面不能有代码,yeild很后面可以有代码
    print("这是后置方法")
    # return


class TestDemo01:

    def test_01(self):
        print("\n测试用例1")

    # 如果只让test_02  执行前后置,那么就只给这个方法设置test_fixture

    def test_02(self, test_fixture):
        print("\n测试用例2")
        print(test_fixture)


if __name__ == '__main__':
    pytest.main(['-vs'])
 测试结果:
 test_demo01.py::TestDemo01::test_01
测试用例1
PASSED
test_demo01.py::TestDemo01::test_02[\u6210\u9f99] 这是前置方法

测试用例2
成龙
PASSED这是后置方法

test_demo01.py::TestDemo01::test_02[\u5434\u4eac] 这是前置方法

测试用例2
吴京
PASSED这是后置方法

test_demo01.py::TestDemo01::test_02[\u6613\u70ca\u5343\u73ba] 这是前置方法

测试用例2
易烊千玺
PASSED这是后置方法
ids和name参数的使用
当使用了别名之后,原来的名称就使用不了了。
import pytest


@pytest.fixture(scope="function", params=['成龙', '吴京', '易烊千玺'], ids=['cl', 'wj', 'yyqx'], name='fixture01')
def test_fixture(request):
    print("这是前置方法")
    yield request.param  # return和yeild的区别: 都是表示返回值的意思,但是return的后面不能有代码,yeild很后面可以有代码
    print("这是后置方法")
    # return


class TestDemo01:

    def test_01(self):
        print("\n测试用例1")

    # 如果只让test_02  执行前后置,那么就只给这个方法设置test_fixture

    def test_02(self, fixture01):
        print("\n测试用例2")
        print(fixture01)


if __name__ == '__main__':
    pytest.main(['-vs'])
通过conftest.py和@pytest.fixture()结合使用来实现全局的前置应用
实际项目中使用
应用场景:
比如:项目的全局登录,模块的全局处理
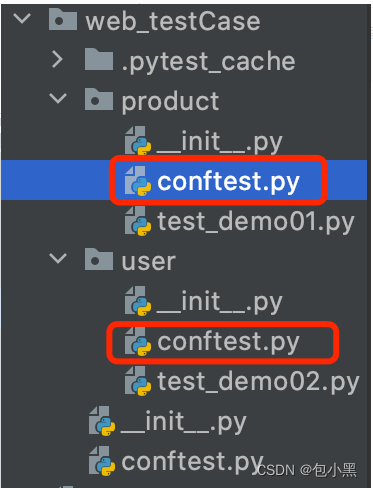
conftest.py的特点
①conftest.py文件是单独存放的一个夹具配置文件,名称是不能更改的。
②可以在不同的py文件中使用同一个fixture函数
③原则上conftest.py需要和运行的用例放到同一个目录下,并且不需要做任何的import导入操作。
每个模块设置单独的前后置,也可以使用外部公共的前后置。
product模块:
conftest.py
import pytest


@pytest.fixture(scope="function")
def product_fixture(request):
    print("商品管理前置方法")
    yield
    print("商品管理后置方法")
test_demo01.py
class TestDemo01:

    def test_01(self):
        print("\n测试用例1")

    # 如果只让test_02  执行前后置,那么就只给这个方法设置product_fixture

    def test_02(self, product_fixture):
        print("\n测试用例2")
        print(product_fixture)

 测试结果:
 web_testCase/product/test_demo01.py::TestDemo01::test_01
测试用例1
PASSED
web_testCase/product/test_demo01.py::TestDemo01::test_02 商品管理前置方法

测试用例2
None
PASSED商品管理后置方法
在商品模块的用例中,也可以使用外部的前后置
import pytest


@pytest.fixture(scope="function")
def all_fixture(request):
    print("全局前置方法")
    yield
    print("全局后置方法")
test_demo01.py
class TestDemo01:

    def test_01(self):
        print("\n测试用例1")

    # 如果只让test_02  执行前后置,那么就只给这个方法设置product_fixture

    def test_02(self, all_fixture, product_fixture):
        print("\n测试用例2")
        print(all_fixture)
        print(product_fixture)

测试结果:
web_testCase/product/test_demo01.py::TestDemo01::test_01
测试用例1
PASSED
web_testCase/product/test_demo01.py::TestDemo01::test_02 全局前置方法
商品管理前置方法

测试用例2
None
None
PASSED商品管理后置方法
全局后置方法
all.py
import pytest

if __name__ == '__main__':
    pytest.main(["-vs"])
结合allure-pytest生成allure测试报告
第一步安装allure
1、下载zip包,解压到任意目录:https://repo.maven.apache.org/maven2/io/qameta/allure/allure-commandline/2.20.1/
2、配置环境变量(解压后bin目录)
如:path路径配置:E:\allure-2.20.1\bin
3、验证是否成功配置:allure --version
注意:安装好allure后需要重启pycharm
第二步:生成allure能解析的测试结果文件(一堆文件)
1、安装插件:pip install allure-pytest
2、生成报告
方式一:
删除报告文件在执行,避免测试用例执行数量不一致
pytest.main([’-vs’,’–clean -allureddir’,’–alluredir=reports/allurefile’])
方式二:
(1)生成json格式的临时文件:
pytest.ini
[pytest]
addopts = -vs --alluredir ./temp   # 命令行参数,用空格分隔
# 测试用例路径
testpaths = './web_testCase'
# 模块名规则
python_files = 'test*.py'
# 类名的规则
python_classes = Test*
# 方法名的规则
python_functions = test
(2) 生成allure报告
all.py
import os
import pytest

if __name__ == '__main__':
    pytest.main(["-vs"])
    os.system('allure generate ./temp -o ./report --clean') #找到/temp目录下的临时报告,清空./report原有的报告,输出报告
@pytest.mark.parametrize()基本用法
公司实际上使用的参数化
@pytest.mark.parametrize(args_name,args_value)
args_name:参数名,字符串,多个参数中间用逗号隔开
args_value:参数值(列表,元组,字典列表,字典元组),有多个值用例就会执行多少次,是list,多组数据用元祖类型;传三个或更多参数也是这样传。list的每个元素都是一个元组,元组里的每个元素和按参数顺序一一对应
用法一:
import pytest

class TestApi:
    @pytest.mark.parametrize('args', ['张三', '李四', '王五'])
    def test_02_name(self, args):
      print(args)

if __name__ == '__main__':
    pytest.main()
用法二:跟unittest的ddt里边的@unpack解包一样
import pytest

class TestApi:
    @pytest.mark.parametrize('name.age', ['张三','20'], ['李四','21'], ['王五','22'])
    def test_02_name(self, name,age):
      print(name,age)

if __name__ == '__main__':
    pytest.main()
pytest 断言
pytest 里面断言实际上就是 python 里面的 assert 断言方法,常用的有以下几种
assert xx :判断 xx 为真
assert not xx :判断 xx 不为真
assert a in b :判断 b 包含 a
assert a == b :判断 a 等于 b
assert a != b :判断 a 不等于 b
yaml文件实现接口自动化
用途:
1、用于全局的配置文件 ini/yaml
2、用于写测试用例(接口测试用例)
简介:
yaml是一种数据格式,常用于全局配置文件 或 接口测试用例中
语法规则:
1、区分大小写
2、使用缩进表示层级。不能使用tab键缩进,只能用空格
3、缩进没有空格数量限制,只要前面对齐即可
4、# 表示注释
数据组成:
1、Map对象 键值对 格式:键(空格)值
写法一
user :
 name : 小红
 age : 18
写法二
user : {name : 小红,age : 18}
2、数组 -
# 写法一
-
  user :
   - name : 小红
   - age : 18

#写法二
-
 user : [{name : 小红},{age : 18}]
3、列表、字典、列表嵌套字典
#注意:以下例子需要分开写(一个空行一个例子),方便编辑所以放到一起了
# 列表
['张三','李四']

- 张三
- 李四

# 字典
{'user':'123456','passwd':'123456'}

user: test1
passwd: 123456

# 列表包含字典
 [{'user':'123456','passwd':'123456'},{'user':'111111'}]

- user: test1
  passwd: 123456
- user: 111111
yaml校验网站:https://www.bejson.com/validators/yaml_editor/
yaml的使用
1、安装pyyaml
pip install pyyaml
2、在conf目录下创建conf.yaml文件
['张三','李四']
3、在util目录下创建yaml_util.py 文件
import yaml

class Yaml_Util:
    def __init__(self, yaml_path):
        '''
        初始化时 传入yaml文件路径
        :param yaml_file:
        '''
        self.yaml_path = yaml_path

    def yaml_read(self):
        '''
        yaml文件的读取
        :return:
        '''
        with open(self.yaml_path, 'r', encoding='utf-8') as f:
            ym = yaml.load(f, Loader=yaml.FullLoader)
        return ym

if __name__ == '__main__':
    Yaml_Util('./conf/conf.yaml').yaml_read()
小练习实战:使用yaml测试查询天气接口
简单的接口请求:
test_queryweather.py
import pytest
import requests

class TestApi:

    def test_01_quertweather(self):
        url="https://qqlykm.cn/api/free/weather/get"
        params={"city":"重庆"}
        res = requests.get(url,params=params)
        print(res.text)

if __name__ == '__main__':
    pytest.main(["-vs"])
2、在conf目录下编辑yaml数据
conf.yaml
# 用例一:
-
 name : 获取城市天气接口-正例
 request :
  url : https://qqlykm.cn/api/free/weather/get
  method : get
  headers :
   Content-Type : application/json
  params :
   city : "重庆"
 validate :
  - eq : {success : ture}
  - eq : {msg : 查询成功}

# 用例二:
-
 name : 获取城市天气接口-反例(缺少参数)
 request :
  url : https://qqlykm.cn/api/free/weather/get
  method : get
  headers :
   Content-Type : application/json
  params :
 validate :
  - eq : {success : false}
  - eq : {msg : 请输入查询地区名称。不支持区县级。查询如:济南}
3、在util目录下创建yaml_util.py 文件
import yaml

class Yaml_Util:
    def __init__(self, yaml_path):
        '''
        初始化时 传入yaml文件路径
        :param yaml_file:
        '''
        self.yaml_path = yaml_path

    def yaml_read(self):
        '''
        yaml文件的读取
        :return:
        '''
        with open(self.yaml_path, 'r', encoding='utf-8') as f:
            ym = yaml.load(f, Loader=yaml.FullLoader)
        return ym

if __name__ == '__main__':
    print(Yaml_Util('../conf/conf.yaml').yaml_read())
4、在util目录下创建assert_util.py 文件实现断言的封装
import jsonpath


class Assert_Util:
    # 断言
    def assert_result(self, yq_result, sj_result, return_code):
        all_flag = 0
        for yq in yq_result:
            for key, value in yq.items():
                print(key, value)
                if key == "equals":
                    flag = self.equals_assert(value, return_code, sj_result)
                    all_flag = all_flag + flag
                elif key == 'contains':
                    flag = self.contains_assert(value, sj_result)
                    all_flag = all_flag + flag
                else:
                    print("框架暂不支持此段断言方式")
        assert all_flag == 0

    # 相等断言
    def equals_assert(self, value, return_code, sj_result):
        flag = 0
        for assert_key, assert_value in value.items():
            print(assert_key, assert_value)
            if assert_key == "status_code":  # 状态断言
                assert_value == return_code
                if assert_value != return_code:
                    flag = flag + 1
                    print("断言失败,返回的状态码不等于%s" % assert_value)
            else:
                lists = jsonpath.jsonpath(sj_result, '$..%s' % assert_key)
                if lists:
                    if assert_value not in lists:
                        flag = flag + 1
                        print("断言失败:" + assert_key + "不等于" + str(assert_value))
                else:
                    flag = flag + 1
                    print("断言失败:返回的结果不存在:" + assert_key)
        return flag

    # 包含断言
    def contains_assert(self, value, sj_result):
        flag = 0
        if value not in str(sj_result):
            flag = flag + 1
            print("断言失败:返回的结果中不包含:" + value)
        return flag
5、修改test_queryweather.py,使用yaml
import pytest
import requests

from util.yaml_util import Yaml_Util
from util.assert_util import Assert_Util

class TestApi:

    @pytest.mark.parametrize('args',Yaml_Util('../conf/conf.yaml').yaml_read())
    def test_01_quertweather(self,args):
        url=args['request']['url']
        params=args['request']['params']
        res = requests.get(url,params=params)
        print(res.text)
        return_code = res.status_code
        # 断言
        # for arrest_validate in args['validate']:
        #     print(type(arrest_validate))
        Assert_Util().assert_result(args['validate'],res.json(), return_code)


if __name__ == '__main__':
    pytest.main(["-vs"])
学习源:
自动化测试框架_BuLingLings的博客-CSDN博客
pytest接口自动化测试框架 | 接口自动化至yaml数据驱动_COCOgsta的博客-CSDN博客
【python做接口测试的学习记录day8——pytest自动化测试框架之热加载和断言封装】_小丫么小二郎~的博客-CSDN博客_pytest断言封装
