前言:Hello大家好,我是小哥谈。Swin Transformer是一种基于Transformer的深度学习模型,它在视觉任务中表现出色。与之前的Vision Transformer(ViT)不同,Swin Transformer具有高效和精确的特性,并被广泛用作当今许多视觉模型架构的主干。Swin Transformer采用了分层特征图和移动窗口MSA的方法,解决了原始ViT所面临的问题。它已经成为广泛应用于图像分类和对象检测等各种视觉任务的主要架构之一。🌈
 前期回顾:
前期回顾:
YOLOv5算法改进(1)— 如何去改进YOLOv5算法
YOLOv5算法改进(2)— 添加SE注意力机制
YOLOv5算法改进(3)— 添加CBAM注意力机制
YOLOv5算法改进(4)— 添加CA注意力机制
YOLOv5算法改进(5)— 添加ECA注意力机制
YOLOv5算法改进(6)— 添加SOCA注意力机制
YOLOv5算法改进(7)— 添加SimAM注意力机制
YOLOv5算法改进(8)— 替换主干网络之MobileNetV3
YOLOv5算法改进(9)— 替换主干网络之ShuffleNetV2
YOLOv5算法改进(10)— 替换主干网络之GhostNet
YOLOv5算法改进(11)— 替换主干网络之EfficientNetv2
目录
🚀1.论文
🚀2.Swin Transformer网络架构及原理
🚀3.YOLOv5结合swin Transformer
💥💥步骤1:在common.py中添加swin Transformer模块
💥💥步骤2:在yolo.py文件中加入类名
💥💥步骤3:创建自定义yaml文件
💥💥步骤4:验证是否加入成功
💥💥步骤5:修改train.py中的'--cfg'默认参数

🚀1.论文
Swin Transformer是2021年微软研究院发表在ICCV上的一篇文章,并且已经获得ICCV 2021 best paper的荣誉称号。Swin Transformer网络是Transformer模型在视觉领域的又一次碰撞,该论文一经发表就已在多项视觉任务中霸榜。Swim Transformer是特为视觉领域设计的一种分层Transformer结构,其两大特性是滑动窗口和分层表示。滑动窗口在局部不重叠的窗口中计算自注意力,并允许跨窗口连接,分层结构允许模型适配不同尺度的图片,并且计算复杂度与图像大小呈线性关系,也因此被人成为披着Transformer皮的CNN。🍃
Swin Transformer借鉴了CNN的分层结构,可以用于图像分类、图像分割、目标检测等一系列视觉任务。它以VIT作为起点,设计思想吸取了resnet的精华,从局部到全局,将Transformer设计成逐步扩大感受野的工具,它的成功背后绝不是偶然,而是厚厚的积累与沉淀。🍃
Swin Transformer是一种基于Transformer架构的视觉注意力模型,它在图像处理任务中取得了很好的效果。Swin Transformer的核心思想是通过分解图像特征图为不同的小块,并在这些小块上进行局部的注意力计算,然后再通过全局的注意力机制来整合不同小块的信息。🍃
Swin Transformer的整体结构可以分为四个主要部分:Patch Embedding、Stage、Transformer Encoder和Head。
🍀(1)Patch Embedding:将输入的图像分割为多个固定大小的图像块,然后使用一个线性投影层将每个图像块映射到一个固定维度的向量表示。
🍀(2)Stage:Swin Transformer采用了多个Stage的结构,每个Stage由若干个基本块(Basic Block)组成。每个基本块由一个局部注意力层(Local Window Attention)和一个全局注意力层(Global Attention)组成。局部注意力层用于对每个图像块内的特征进行局部关联计算,而全局注意力层则用于整合不同图像块之间的信息。
🍀(3)Transformer Encoder:每个Stage中的基本块都是Transformer Encoder结构,由多个层叠的Transformer Block组成。每个Transformer Block由一个多头自注意力层(Multi-Head Self-Attention)和一个前馈神经网络(Feed-Forward Network)组成。
🍀(4)Head:最后一个Stage后接一个输出层,用于将Transformer Encoder的输出特征映射到最终的预测结果。具体的输出层结构会根据任务的不同而变化,比如分类任务可以使用一个全连接层,目标检测任务可以使用一个卷积层。
总体来说,Swin Transformer通过局部和全局的注意力机制,实现了对图像特征的全局建模和局部关联计算,从而在视觉任务中取得了较好的性能。🌴

论文题目:《Swin Transformer: Hierarchical Vision Transformer using Shifted Windows》
论文地址: https://arxiv.org/pdf/2103.14030.pdf
代码实现: mirrors / microsoft / Swin-Transformer · GitCode
🚀2.Swin Transformer网络架构及原理
在开始改进之前,先来简单对比下 Swin Transformer 和之前的 Vision Transformer。🌱
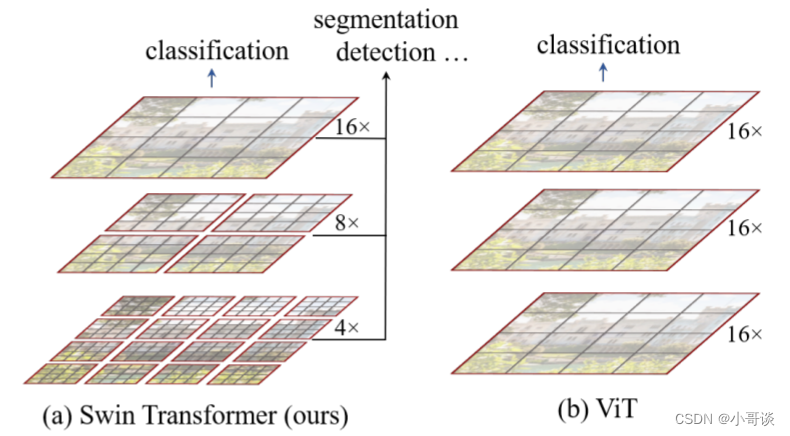
下图是Swin Transformer文章中给出的图,左边是本文要讲的Swin Transformer,右边是的Vision Transformer。通过对比至少可以看出两点不同:👇
🍀(1)Swin Transformer使用了类似卷积神经网络中的层次化构建方法(Hierarchical feature maps),比如特征图尺寸中有对图像下采样4倍的、8倍的以及16倍的,这样的backbone有助于在此基础上构建目标检测、实例分割等任务。而在之前的Vision Transformer中是一开始就直接下采样16倍,后面的特征图也是维持这个下采样率不变。
🍀(2)在Swin Transformer中使用了Windows Multi-Head Self-Attention(W-MSA)的概念,比如在下图的4倍下采样和8倍下采样中,将特征图划分成了多个不相交的区域(Window),并且Multi-Head Self-Attention只在每个窗口(Window)内进行。相对于Vision Transformer中直接对整个(Global)特征图进行Multi-Head Self-Attention,这样做的目的是能够减少计算量的,尤其是在浅层特征图很大的时候。这样做虽然减少了计算量但也会隔绝不同窗口之间的信息传递,所以在论文中作者又提出了 Shifted Windows Multi-Head Self-Attention(SW-MSA)的概念,通过此方法能够让信息在相邻的窗口中进行传递。
接下来,简单看下原论文中给出的关于Swin Transformer(Swin-T)网络的架构图。通过图(a)可以看出整个框架的基本流程如下:👇

🍀(1)首先将图片输入到Patch Partition模块中进行分块,即每4x4相邻的像素为一个Patch,然后在channel方向展平(flatten)。假设输入的是RGB三通道图片,那么每个patch就有4x4=16个像素,然后每个像素有R、G、B三个值,所以展平后是16x3=48,通过Patch Partition后图像shape由 [H, W, 3]变成了 [H/4, W/4, 48]。再然后在通过Linear Embeding层对每个像素的channel数据做线性变换,由48变成C,即图像shape再由 [H/4, W/4, 48]变成了 [H/4, W/4, C]。其实在源码中Patch Partition和Linear Embeding就是直接通过一个卷积层实现的,和之前Vision Transformer中讲的 Embedding层结构一模一样。
🍀(2)接着就是通过四个Stage构建不同大小的特征图,除了Stage1中先通过一个Linear Embeding层外,剩下三个stage都是先通过一个Patch Merging层进行下采样。然后都是重复堆叠Swin Transformer Block,注意这里的Block其实有两种结构,如图(b)中所示,这两种结构的不同之处仅在于一个使用了W-MSA结构,一个使用了SW-MSA结构,而且这两个结构是成对使用的,先使用一个W-MSA结构再使用一个SW-MSA结构。所以你会发现堆叠Swin Transformer Block的次数都是偶数(因为成对使用)。
🍀(3)最后对于分类网络,后面还会接上一个Layer Norm层、全局池化层以及全连接层得到最终输出。图中没有画,但源码中是这样做的。
优点:
- 提出了一种层级式网络结构,解决视觉图像的多尺度问题,提供各个尺度的维度信息;
- 提出Shifted Windows移动窗口,带来了更大的效率,移动操作让相邻窗口得到交互,极大降低了Transformer的计算复杂度;
- 计算复杂度是线性增长而不是平方式增长,可以广泛应用到所有计算机视觉领域;
效果:
- 在ImageNet上并非SOTA,仅与EfficientNet的性能差不多;
- swin Transformer的优点不是在于分类,在分类上的提升不是太多,而在检测、分割等下游任务中,有巨大的提升;
🚀3.YOLOv5结合swin Transformer
💥💥步骤1:在common.py中添加swin Transformer模块
将下面swin Transformer模块的代码复制粘贴到common.py文件的末尾。
""" Swin Transformer
A PyTorch impl of : `Swin Transformer: Hierarchical Vision Transformer using Shifted Windows`
    - https://arxiv.org/pdf/2103.14030

Code/weights from https://github.com/microsoft/Swin-Transformer

"""

import torch
import torch.nn as nn
import torch.nn.functional as F
import torch.utils.checkpoint as checkpoint
import numpy as np
from typing import Optional


def drop_path_f(x, drop_prob: float = 0., training: bool = False):
    """Drop paths (Stochastic Depth) per sample (when applied in main path of residual blocks).

    This is the same as the DropConnect impl I created for EfficientNet, etc networks, however,
    the original name is misleading as 'Drop Connect' is a different form of dropout in a separate paper...
    See discussion: https://github.com/tensorflow/tpu/issues/494#issuecomment-532968956 ... I've opted for
    changing the layer and argument names to 'drop path' rather than mix DropConnect as a layer name and use
    'survival rate' as the argument.

    """
    if drop_prob == 0. or not training:
        return x
    keep_prob = 1 - drop_prob
    shape = (x.shape[0],) + (1,) * (x.ndim - 1)  # work with diff dim tensors, not just 2D ConvNets
    random_tensor = keep_prob + torch.rand(shape, dtype=x.dtype, device=x.device)
    random_tensor.floor_()  # binarize
    output = x.div(keep_prob) * random_tensor
    return output


class DropPath(nn.Module):
    """Drop paths (Stochastic Depth) per sample  (when applied in main path of residual blocks).
    """

    def __init__(self, drop_prob=None):
        super(DropPath, self).__init__()
        self.drop_prob = drop_prob

    def forward(self, x):
        return drop_path_f(x, self.drop_prob, self.training)


def window_partition(x, window_size: int):
    """
    将feature map按照window_size划分成一个个没有重叠的window
    Args:
        x: (B, H, W, C)
        window_size (int): window size(M)

    Returns:
        windows: (num_windows*B, window_size, window_size, C)
    """
    B, H, W, C = x.shape
    x = x.view(B, H // window_size, window_size, W // window_size, window_size, C)
    # permute: [B, H//Mh, Mh, W//Mw, Mw, C] -> [B, H//Mh, W//Mh, Mw, Mw, C]
    # view: [B, H//Mh, W//Mw, Mh, Mw, C] -> [B*num_windows, Mh, Mw, C]
    windows = x.permute(0, 1, 3, 2, 4, 5).contiguous().view(-1, window_size, window_size, C)
    return windows


def window_reverse(windows, window_size: int, H: int, W: int):
    """
    将一个个window还原成一个feature map
    Args:
        windows: (num_windows*B, window_size, window_size, C)
        window_size (int): Window size(M)
        H (int): Height of image
        W (int): Width of image

    Returns:
        x: (B, H, W, C)
    """
    B = int(windows.shape[0] / (H * W / window_size / window_size))
    # view: [B*num_windows, Mh, Mw, C] -> [B, H//Mh, W//Mw, Mh, Mw, C]
    x = windows.view(B, H // window_size, W // window_size, window_size, window_size, -1)
    # permute: [B, H//Mh, W//Mw, Mh, Mw, C] -> [B, H//Mh, Mh, W//Mw, Mw, C]
    # view: [B, H//Mh, Mh, W//Mw, Mw, C] -> [B, H, W, C]
    x = x.permute(0, 1, 3, 2, 4, 5).contiguous().view(B, H, W, -1)
    return x


class Mlp(nn.Module):
    """ MLP as used in Vision Transformer, MLP-Mixer and related networks
    """

    def __init__(self, in_features, hidden_features=None, out_features=None, act_layer=nn.GELU, drop=0.):
        super().__init__()
        out_features = out_features or in_features
        hidden_features = hidden_features or in_features

        self.fc1 = nn.Linear(in_features, hidden_features)
        self.act = act_layer()
        self.drop1 = nn.Dropout(drop)
        self.fc2 = nn.Linear(hidden_features, out_features)
        self.drop2 = nn.Dropout(drop)

    def forward(self, x):
        x = self.fc1(x)
        x = self.act(x)
        x = self.drop1(x)
        x = self.fc2(x)
        x = self.drop2(x)
        return x


class WindowAttention(nn.Module):
    r""" Window based multi-head self attention (W-MSA) module with relative position bias.
    It supports both of shifted and non-shifted window.

    Args:
        dim (int): Number of input channels.
        window_size (tuple[int]): The height and width of the window.
        num_heads (int): Number of attention heads.
        qkv_bias (bool, optional):  If True, add a learnable bias to query, key, value. Default: True
        attn_drop (float, optional): Dropout ratio of attention weight. Default: 0.0
        proj_drop (float, optional): Dropout ratio of output. Default: 0.0
    """

    def __init__(self, dim, window_size, num_heads, qkv_bias=True, attn_drop=0., proj_drop=0.):

        super().__init__()
        self.dim = dim
        self.window_size = window_size  # [Mh, Mw]
        self.num_heads = num_heads
        head_dim = dim // num_heads
        self.scale = head_dim ** -0.5

        # define a parameter table of relative position bias
        self.relative_position_bias_table = nn.Parameter(
            torch.zeros((2 * window_size[0] - 1) * (2 * window_size[1] - 1), num_heads))  # [2*Mh-1 * 2*Mw-1, nH]

        # get pair-wise relative position index for each token inside the window
        coords_h = torch.arange(self.window_size[0])
        coords_w = torch.arange(self.window_size[1])
        coords = torch.stack(torch.meshgrid([coords_h, coords_w], indexing="ij"))  # [2, Mh, Mw]
        coords_flatten = torch.flatten(coords, 1)  # [2, Mh*Mw]
        # [2, Mh*Mw, 1] - [2, 1, Mh*Mw]
        relative_coords = coords_flatten[:, :, None] - coords_flatten[:, None, :]  # [2, Mh*Mw, Mh*Mw]
        relative_coords = relative_coords.permute(1, 2, 0).contiguous()  # [Mh*Mw, Mh*Mw, 2]
        relative_coords[:, :, 0] += self.window_size[0] - 1  # shift to start from 0
        relative_coords[:, :, 1] += self.window_size[1] - 1
        relative_coords[:, :, 0] *= 2 * self.window_size[1] - 1
        relative_position_index = relative_coords.sum(-1)  # [Mh*Mw, Mh*Mw]
        self.register_buffer("relative_position_index", relative_position_index)

        self.qkv = nn.Linear(dim, dim * 3, bias=qkv_bias)
        self.attn_drop = nn.Dropout(attn_drop)
        self.proj = nn.Linear(dim, dim)
        self.proj_drop = nn.Dropout(proj_drop)

        nn.init.trunc_normal_(self.relative_position_bias_table, std=.02)
        self.softmax = nn.Softmax(dim=-1)

    def forward(self, x, mask: Optional[torch.Tensor] = None):
        """
        Args:
            x: input features with shape of (num_windows*B, Mh*Mw, C)
            mask: (0/-inf) mask with shape of (num_windows, Wh*Ww, Wh*Ww) or None
        """
        # [batch_size*num_windows, Mh*Mw, total_embed_dim]
        B_, N, C = x.shape
        # qkv(): -> [batch_size*num_windows, Mh*Mw, 3 * total_embed_dim]
        # reshape: -> [batch_size*num_windows, Mh*Mw, 3, num_heads, embed_dim_per_head]
        # permute: -> [3, batch_size*num_windows, num_heads, Mh*Mw, embed_dim_per_head]
        qkv = self.qkv(x).reshape(B_, N, 3, self.num_heads, C // self.num_heads).permute(2, 0, 3, 1, 4).contiguous()
        # [batch_size*num_windows, num_heads, Mh*Mw, embed_dim_per_head]
        q, k, v = qkv.unbind(0)  # make torchscript happy (cannot use tensor as tuple)

        # transpose: -> [batch_size*num_windows, num_heads, embed_dim_per_head, Mh*Mw]
        # @: multiply -> [batch_size*num_windows, num_heads, Mh*Mw, Mh*Mw]
        q = q * self.scale
        attn = (q @ k.transpose(-2, -1))

        # relative_position_bias_table.view: [Mh*Mw*Mh*Mw,nH] -> [Mh*Mw,Mh*Mw,nH]
        relative_position_bias = self.relative_position_bias_table[self.relative_position_index.view(-1)].view(
            self.window_size[0] * self.window_size[1], self.window_size[0] * self.window_size[1], -1)
        relative_position_bias = relative_position_bias.permute(2, 0, 1).contiguous()  # [nH, Mh*Mw, Mh*Mw]
        attn = attn + relative_position_bias.unsqueeze(0)

        if mask is not None:
            # mask: [nW, Mh*Mw, Mh*Mw]
            nW = mask.shape[0]  # num_windows
            # attn.view: [batch_size, num_windows, num_heads, Mh*Mw, Mh*Mw]
            # mask.unsqueeze: [1, nW, 1, Mh*Mw, Mh*Mw]
            attn = attn.view(B_ // nW, nW, self.num_heads, N, N) + mask.unsqueeze(1).unsqueeze(0)
            attn = attn.view(-1, self.num_heads, N, N)
            attn = self.softmax(attn)
        else:
            attn = self.softmax(attn)

        attn = self.attn_drop(attn)

        # @: multiply -> [batch_size*num_windows, num_heads, Mh*Mw, embed_dim_per_head]
        # transpose: -> [batch_size*num_windows, Mh*Mw, num_heads, embed_dim_per_head]
        # reshape: -> [batch_size*num_windows, Mh*Mw, total_embed_dim]
        #x = (attn @ v).transpose(1, 2).reshape(B_, N, C)
        x = (attn.to(v.dtype) @ v).transpose(1, 2).reshape(B_, N, C)
        x = self.proj(x)
        x = self.proj_drop(x)
        return x


class SwinTransformerBlock(nn.Module):
    r""" Swin Transformer Block.

    Args:
        dim (int): Number of input channels.
        num_heads (int): Number of attention heads.
        window_size (int): Window size.
        shift_size (int): Shift size for SW-MSA.
        mlp_ratio (float): Ratio of mlp hidden dim to embedding dim.
        qkv_bias (bool, optional): If True, add a learnable bias to query, key, value. Default: True
        drop (float, optional): Dropout rate. Default: 0.0
        attn_drop (float, optional): Attention dropout rate. Default: 0.0
        drop_path (float, optional): Stochastic depth rate. Default: 0.0
        act_layer (nn.Module, optional): Activation layer. Default: nn.GELU
        norm_layer (nn.Module, optional): Normalization layer.  Default: nn.LayerNorm
    """

    def __init__(self, dim, num_heads, window_size=7, shift_size=0,
                 mlp_ratio=4., qkv_bias=True, drop=0., attn_drop=0., drop_path=0.,
                 act_layer=nn.GELU, norm_layer=nn.LayerNorm):
        super().__init__()
        self.dim = dim
        self.num_heads = num_heads
        self.window_size = window_size
        self.shift_size = shift_size
        self.mlp_ratio = mlp_ratio
        assert 0 <= self.shift_size < self.window_size, "shift_size must in 0-window_size"

        self.norm1 = norm_layer(dim)
        self.attn = WindowAttention(
            dim, window_size=(self.window_size, self.window_size), num_heads=num_heads, qkv_bias=qkv_bias,
            attn_drop=attn_drop, proj_drop=drop)

        self.drop_path = DropPath(drop_path) if drop_path > 0. else nn.Identity()
        self.norm2 = norm_layer(dim)
        mlp_hidden_dim = int(dim * mlp_ratio)
        self.mlp = Mlp(in_features=dim, hidden_features=mlp_hidden_dim, act_layer=act_layer, drop=drop)

    def forward(self, x, attn_mask):
        H, W = self.H, self.W
        B, L, C = x.shape
        assert L == H * W, "input feature has wrong size"

        shortcut = x
        x = self.norm1(x)
        x = x.view(B, H, W, C)

        # pad feature maps to multiples of window size
        # 把 feature map 给 pad 到 window size 的整数倍
        pad_l = pad_t = 0
        pad_r = (self.window_size - W % self.window_size) % self.window_size
        pad_b = (self.window_size - H % self.window_size) % self.window_size
        x = F.pad(x, (0, 0, pad_l, pad_r, pad_t, pad_b))
        _, Hp, Wp, _ = x.shape

        # cyclic shift
        if self.shift_size > 0:
            shifted_x = torch.roll(x, shifts=(-self.shift_size, -self.shift_size), dims=(1, 2))
        else:
            shifted_x = x
            attn_mask = None

        # partition windows
        x_windows = window_partition(shifted_x, self.window_size)  # [nW*B, Mh, Mw, C]
        x_windows = x_windows.view(-1, self.window_size * self.window_size, C)  # [nW*B, Mh*Mw, C]

        # W-MSA/SW-MSA
        attn_windows = self.attn(x_windows, mask=attn_mask)  # [nW*B, Mh*Mw, C]

        # merge windows
        attn_windows = attn_windows.view(-1, self.window_size, self.window_size, C)  # [nW*B, Mh, Mw, C]
        shifted_x = window_reverse(attn_windows, self.window_size, Hp, Wp)  # [B, H', W', C]

        # reverse cyclic shift
        if self.shift_size > 0:
            x = torch.roll(shifted_x, shifts=(self.shift_size, self.shift_size), dims=(1, 2))
        else:
            x = shifted_x

        if pad_r > 0 or pad_b > 0:
            # 把前面pad的数据移除掉
            x = x[:, :H, :W, :].contiguous()

        x = x.view(B, H * W, C)

        # FFN
        x = shortcut + self.drop_path(x)
        x = x + self.drop_path(self.mlp(self.norm2(x)))

        return x


class SwinStage(nn.Module):
    """
    A basic Swin Transformer layer for one stage.

    Args:
        dim (int): Number of input channels.
        depth (int): Number of blocks.
        num_heads (int): Number of attention heads.
        window_size (int): Local window size.
        mlp_ratio (float): Ratio of mlp hidden dim to embedding dim.
        qkv_bias (bool, optional): If True, add a learnable bias to query, key, value. Default: True
        drop (float, optional): Dropout rate. Default: 0.0
        attn_drop (float, optional): Attention dropout rate. Default: 0.0
        drop_path (float | tuple[float], optional): Stochastic depth rate. Default: 0.0
        norm_layer (nn.Module, optional): Normalization layer. Default: nn.LayerNorm
        downsample (nn.Module | None, optional): Downsample layer at the end of the layer. Default: None
        use_checkpoint (bool): Whether to use checkpointing to save memory. Default: False.
    """

    def __init__(self, dim, c2, depth, num_heads, window_size,
                 mlp_ratio=4., qkv_bias=True, drop=0., attn_drop=0.,
                 drop_path=0., norm_layer=nn.LayerNorm, use_checkpoint=False):
        super().__init__()
        assert dim == c2, r"no. in/out channel should be same"
        self.dim = dim
        self.depth = depth
        self.window_size = window_size
        self.use_checkpoint = use_checkpoint
        self.shift_size = window_size // 2

        # build blocks
        self.blocks = nn.ModuleList([
            SwinTransformerBlock(
                dim=dim,
                num_heads=num_heads,
                window_size=window_size,
                shift_size=0 if (i % 2 == 0) else self.shift_size,
                mlp_ratio=mlp_ratio,
                qkv_bias=qkv_bias,
                drop=drop,
                attn_drop=attn_drop,
                drop_path=drop_path[i] if isinstance(drop_path, list) else drop_path,
                norm_layer=norm_layer)
            for i in range(depth)])

    def create_mask(self, x, H, W):
        # calculate attention mask for SW-MSA
        # 保证Hp和Wp是window_size的整数倍
        Hp = int(np.ceil(H / self.window_size)) * self.window_size
        Wp = int(np.ceil(W / self.window_size)) * self.window_size
        # 拥有和feature map一样的通道排列顺序,方便后续window_partition
        img_mask = torch.zeros((1, Hp, Wp, 1), device=x.device)  # [1, Hp, Wp, 1]
        h_slices = (slice(0, -self.window_size),
                    slice(-self.window_size, -self.shift_size),
                    slice(-self.shift_size, None))
        w_slices = (slice(0, -self.window_size),
                    slice(-self.window_size, -self.shift_size),
                    slice(-self.shift_size, None))
        cnt = 0
        for h in h_slices:
            for w in w_slices:
                img_mask[:, h, w, :] = cnt
                cnt += 1

        mask_windows = window_partition(img_mask, self.window_size)  # [nW, Mh, Mw, 1]
        mask_windows = mask_windows.view(-1, self.window_size * self.window_size)  # [nW, Mh*Mw]
        attn_mask = mask_windows.unsqueeze(1) - mask_windows.unsqueeze(2)  # [nW, 1, Mh*Mw] - [nW, Mh*Mw, 1]
        # [nW, Mh*Mw, Mh*Mw]
        attn_mask = attn_mask.masked_fill(attn_mask != 0, float(-100.0)).masked_fill(attn_mask == 0, float(0.0))
        return attn_mask

    def forward(self, x):
        B, C, H, W = x.shape
        x = x.permute(0, 2, 3, 1).contiguous().view(B, H * W, C)
        attn_mask = self.create_mask(x, H, W)  # [nW, Mh*Mw, Mh*Mw]
        for blk in self.blocks:
            blk.H, blk.W = H, W
            if not torch.jit.is_scripting() and self.use_checkpoint:
                x = checkpoint.checkpoint(blk, x, attn_mask)
            else:
                x = blk(x, attn_mask)

        x = x.view(B, H, W, C)
        x = x.permute(0, 3, 1, 2).contiguous()

        return x


class PatchEmbed(nn.Module):
    """
    2D Image to Patch Embedding
    """

    def __init__(self, in_c=3, embed_dim=96, patch_size=4, norm_layer=None):
        super().__init__()
        patch_size = (patch_size, patch_size)
        self.patch_size = patch_size
        self.in_chans = in_c
        self.embed_dim = embed_dim
        self.proj = nn.Conv2d(in_c, embed_dim, kernel_size=patch_size, stride=patch_size)
        self.norm = norm_layer(embed_dim) if norm_layer else nn.Identity()

    def forward(self, x):
        _, _, H, W = x.shape

        # padding
        # 如果输入图片的H,W不是patch_size的整数倍,需要进行padding
        pad_input = (H % self.patch_size[0] != 0) or (W % self.patch_size[1] != 0)
        if pad_input:
            # to pad the last 3 dimensions,
            # (W_left, W_right, H_top,H_bottom, C_front, C_back)
            x = F.pad(x, (0, self.patch_size[1] - W % self.patch_size[1],
                          0, self.patch_size[0] - H % self.patch_size[0],
                          0, 0))

        # 下采样patch_size倍
        x = self.proj(x)
        B, C, H, W = x.shape
        # flatten: [B, C, H, W] -> [B, C, HW]
        # transpose: [B, C, HW] -> [B, HW, C]
        x = x.flatten(2).transpose(1, 2)
        x = self.norm(x)
        # view: [B, HW, C] -> [B, H, W, C]
        # permute: [B, H, W, C] -> [B, C, H, W]
        x = x.view(B, H, W, C)
        x = x.permute(0, 3, 1, 2).contiguous()
        return x


class PatchMerging(nn.Module):
    r""" Patch Merging Layer.

    Args:
        dim (int): Number of input channels.
        norm_layer (nn.Module, optional): Normalization layer.  Default: nn.LayerNorm
    """

    def __init__(self, dim, c2, norm_layer=nn.LayerNorm):
        super().__init__()
        assert c2 == (2 * dim), r"no. out channel should be 2 * no. in channel "
        self.dim = dim
        self.reduction = nn.Linear(4 * dim, 2 * dim, bias=False)
        self.norm = norm_layer(4 * dim)

    def forward(self, x):
        """
        x: B, C, H, W
        """
        B, C, H, W = x.shape
        # assert L == H * W, "input feature has wrong size"
        x = x.permute(0, 2, 3, 1).contiguous()
        # x = x.view(B, H*W, C)

        # padding
        # 如果输入feature map的H,W不是2的整数倍,需要进行padding
        pad_input = (H % 2 == 1) or (W % 2 == 1)
        if pad_input:
            # to pad the last 3 dimensions, starting from the last dimension and moving forward.
            # (C_front, C_back, W_left, W_right, H_top, H_bottom)
            # 注意这里的Tensor通道是[B, H, W, C],所以会和官方文档有些不同
            x = F.pad(x, (0, 0, 0, W % 2, 0, H % 2))

        x0 = x[:, 0::2, 0::2, :]  # [B, H/2, W/2, C]
        x1 = x[:, 1::2, 0::2, :]  # [B, H/2, W/2, C]
        x2 = x[:, 0::2, 1::2, :]  # [B, H/2, W/2, C]
        x3 = x[:, 1::2, 1::2, :]  # [B, H/2, W/2, C]
        x = torch.cat([x0, x1, x2, x3], -1)  # [B, H/2, W/2, 4*C]
        x = x.view(B, -1, 4 * C)  # [B, H/2*W/2, 4*C]

        x = self.norm(x)
        x = self.reduction(x)  # [B, H/2*W/2, 2*C]
        x = x.view(B, int(H / 2), int(W / 2), C * 2)
        x = x.permute(0, 3, 1, 2).contiguous()
        return x
💥💥步骤2:在yolo.py文件中加入类名
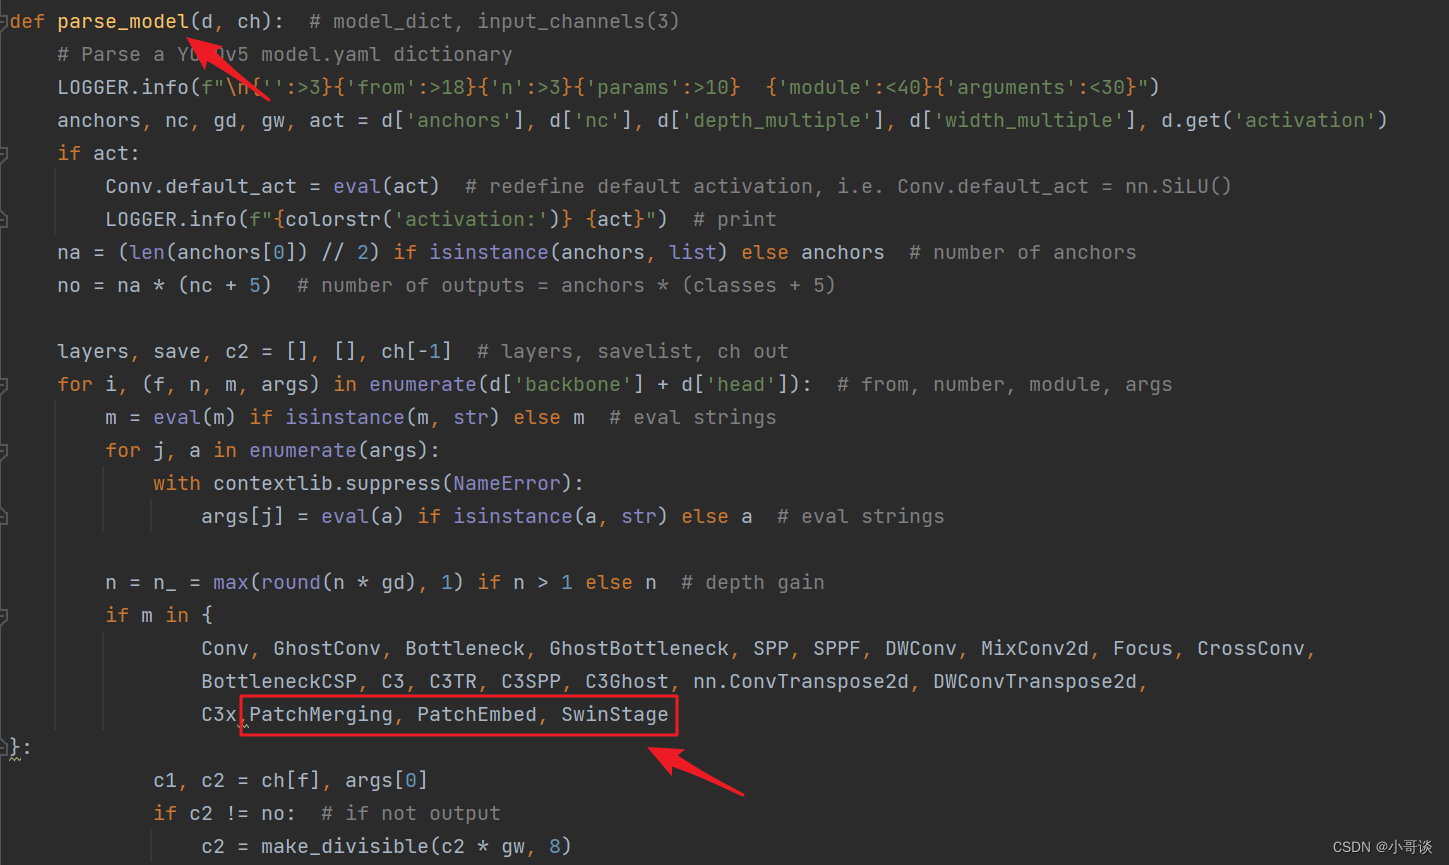
首先在yolo.py文件中找到parse_model函数这一行,加入PatchMerging、PatchEmbed 和 SwinStage这三个模块。
💥💥步骤3:创建自定义yaml文件
在models文件夹中复制yolov5s.yaml,粘贴并重命名为yolov5s_swinTransformer.yaml。

yolov5s_swinTransformer.yaml文件修改后的完整代码如下:
# YOLOv5 🚀 by Ultralytics, GPL-3.0 license

# Parameters
nc: 80  # number of classes

depth_multiple: 0.33  # model depth multiple
width_multiple: 0.25  # layer channel multiple
anchors:
  - [10,13, 16,30, 33,23]  # P3/8
  - [30,61, 62,45, 59,119]  # P4/16
  - [116,90, 156,198, 373,326]  # P5/32

# YOLOv5 v6.0 backbone
backbone:
  # [from, number, module, args]
  # input [b, 1, 640, 640]
  [[-1, 1, Conv, [64, 6, 2, 2]],  # 0-P1/2 [b, 64, 320, 320]
   [-1, 1, Conv, [128, 3, 2]],  # 1-P2/4 [b, 128, 160, 160]
   [-1, 3, C3, [128]],
   [-1, 1, Conv, [256, 3, 2]],  # 3-P3/8 [b, 256, 80, 80]
   [-1, 6, C3, [256]],
   [-1, 1, Conv, [512, 3, 2]],  # 5-P4/16 [b, 512, 40, 40]
   [-1, 9, C3, [512]],
   [-1, 1, Conv, [1024, 3, 2]],  # 7-P5/32 [b, 1024, 20, 20]
   [-1, 3, C3, [1024]],
   [-1, 1, SwinStage, [1024, 2, 8, 4]], # [outputChannel, blockDepth, numHeaders, windowSize]
   [-1, 1, SPPF, [1024, 5]],  # 10
  ]

# YOLOv5 v6.0 head
head:
  [[-1, 1, Conv, [512, 1, 1]],
   [-1, 1, nn.Upsample, [None, 2, 'nearest']],
   [[-1, 6], 1, Concat, [1]],  # cat backbone P4
   [-1, 3, C3, [512, False]],  # 14

   [-1, 1, Conv, [256, 1, 1]],
   [-1, 1, nn.Upsample, [None, 2, 'nearest']],
   [[-1, 4], 1, Concat, [1]],  # cat backbone P3
   [-1, 3, C3, [256, False]],  # 18 (P3/8-small)

   [-1, 1, Conv, [256, 3, 2]],
   [[-1, 15], 1, Concat, [1]],  # cat head P4
   [-1, 3, C3, [512, False]],  # 21 (P4/16-medium)

   [-1, 1, Conv, [512, 3, 2]],
   [[-1, 11], 1, Concat, [1]],  # cat head P5
   [-1, 3, C3, [1024, False]],  # 24 (P5/32-large)

   [[18, 21, 24], 1, Detect, [nc, anchors]],  # Detect(P3, P4, P5)
  ]
💥💥步骤4:验证是否加入成功
在yolo.py文件里,配置我们刚才自定义的yolov5s_swinTransformer.yaml。


然后运行yolo.py,得到结果。
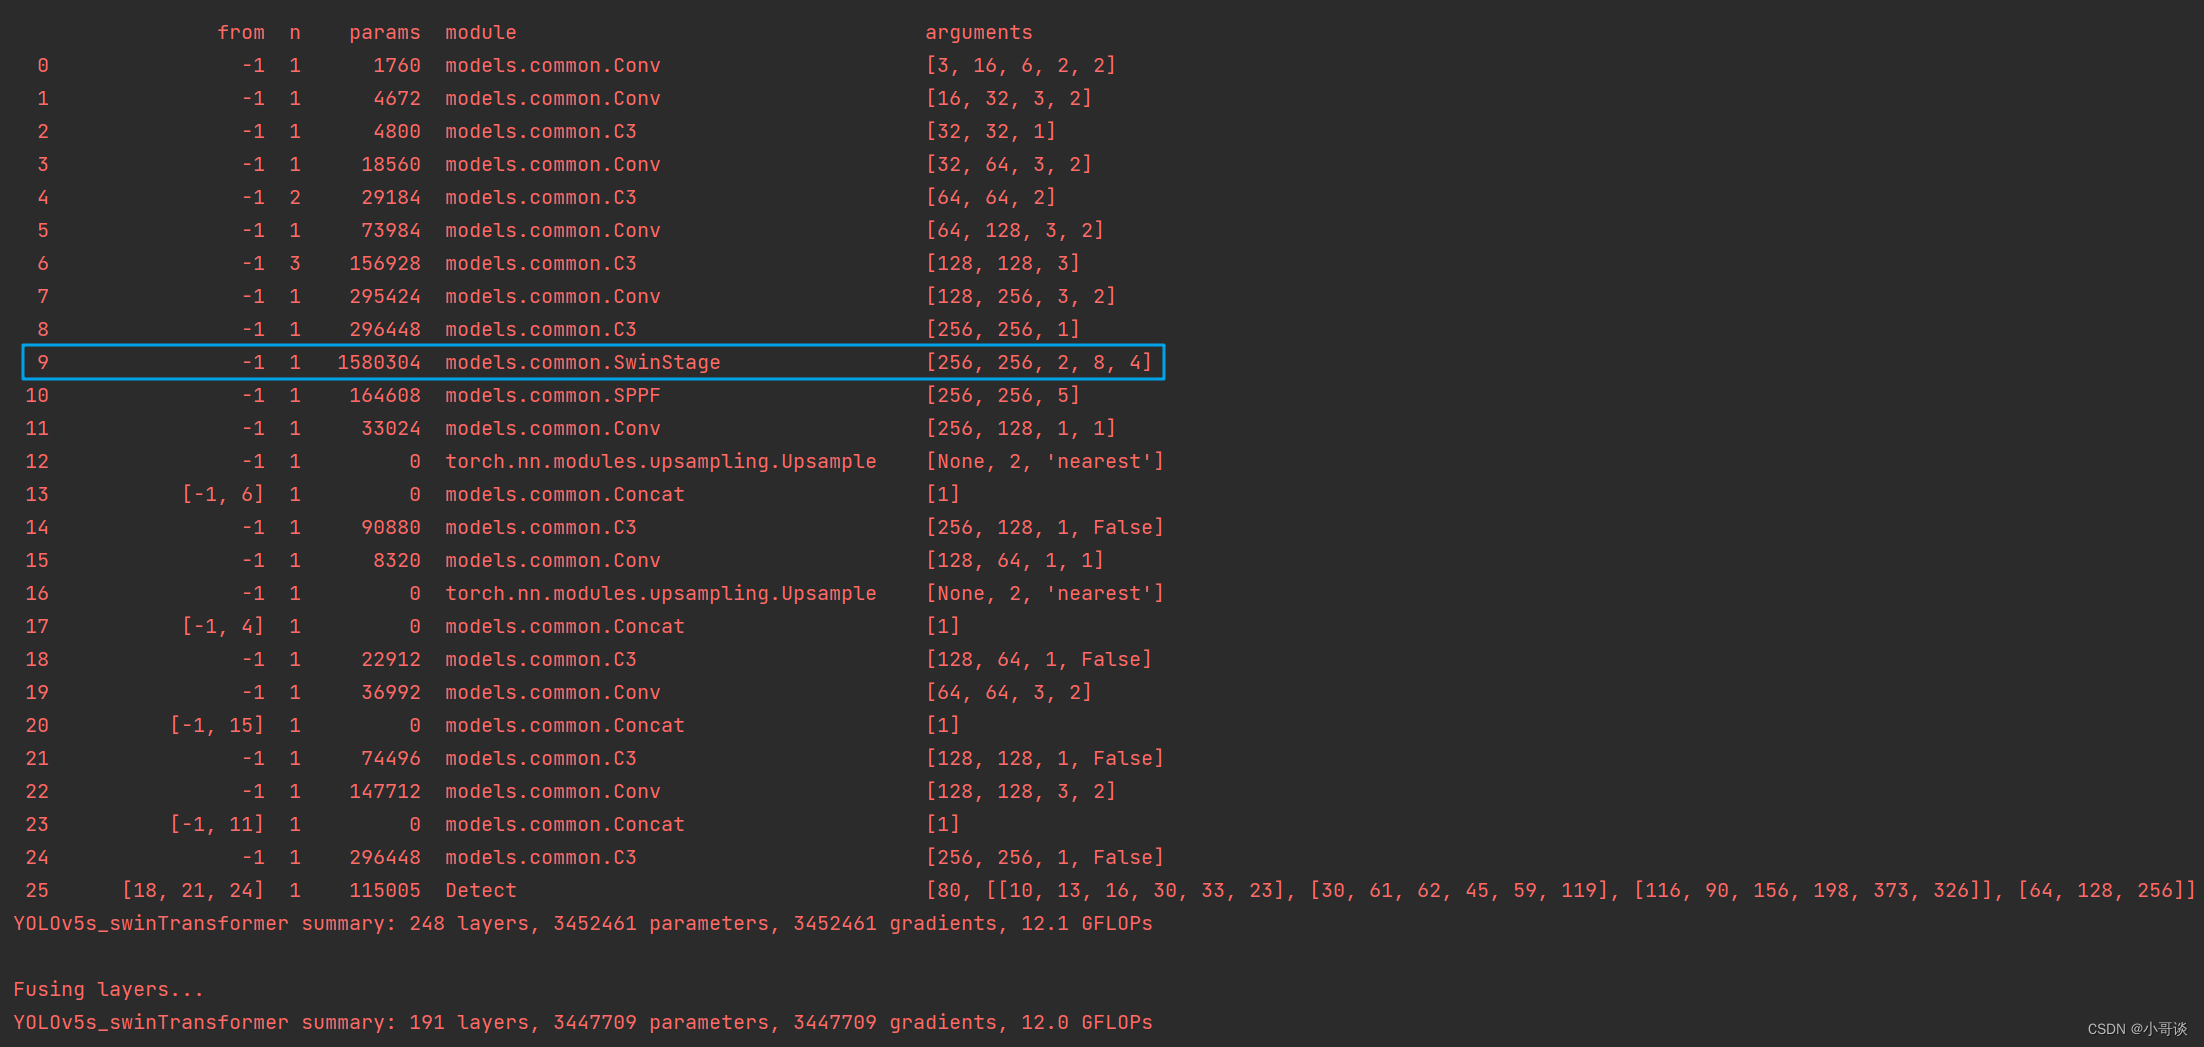
这样就算添加成功了。🎉🎉🎉
💥💥步骤5:修改train.py中的'--cfg'默认参数
在train.py文件中找到 parse_opt函数,然后将第二行 '--cfg' 的 default 改为 'models/yolov5s_swinTransformer.yaml',然后就可以开始进行训练了。🎈🎈🎈


