python+TensorFlow实现人脸识别智能小程序的项目(包含TensorFlow版本与Pytorch版本)(二)
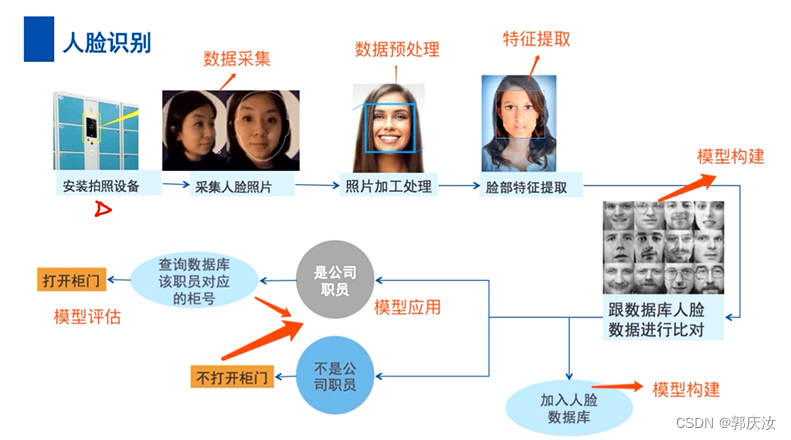
- 1、人脸业务流程
- 1、人脸检测(Face Detection)问题
- 2、人脸对齐(Face Alignment)问题
- 3、人脸属性(Face Attribute)问题
- 4、人脸比对(Face Compare)问题
- 2、人脸识别相关数据集
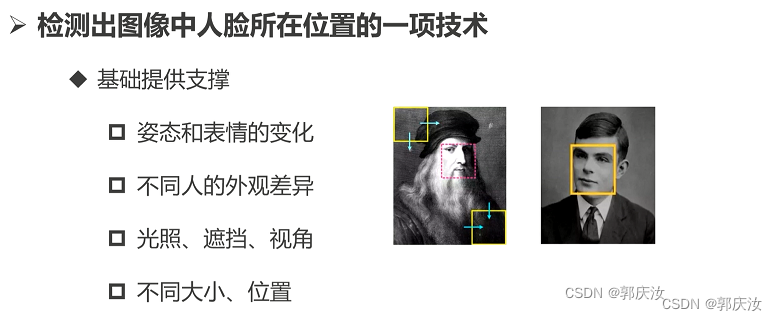
- 3、人脸检测
- 1、人脸检测需要解决的问题
- 2、小人脸检测问题
- 4、人脸目标检测算法
- 5、TensorFlow+SSD环境搭建
- 1、官网下载需要的项目
- 2、安装基础包
- 3、安装重要包protobuf与protoc这两个包的版本必须一致否则会报错
- 4、人脸检测数据集
- 1、数据集结构
- 2、标注文件解析:
- 3、Passcal VOC数据格式
- 4、将标注txt文件转xml格式代码
- 5、查看人脸图像标注效果代码:
- 6、将VOC数据集打包成TF-Record的格式
- 5、训练模型(ssd_resnet50_v1_fpn)
- 6、模型优化注意事项
- 7、训练好的模型转成pb文件
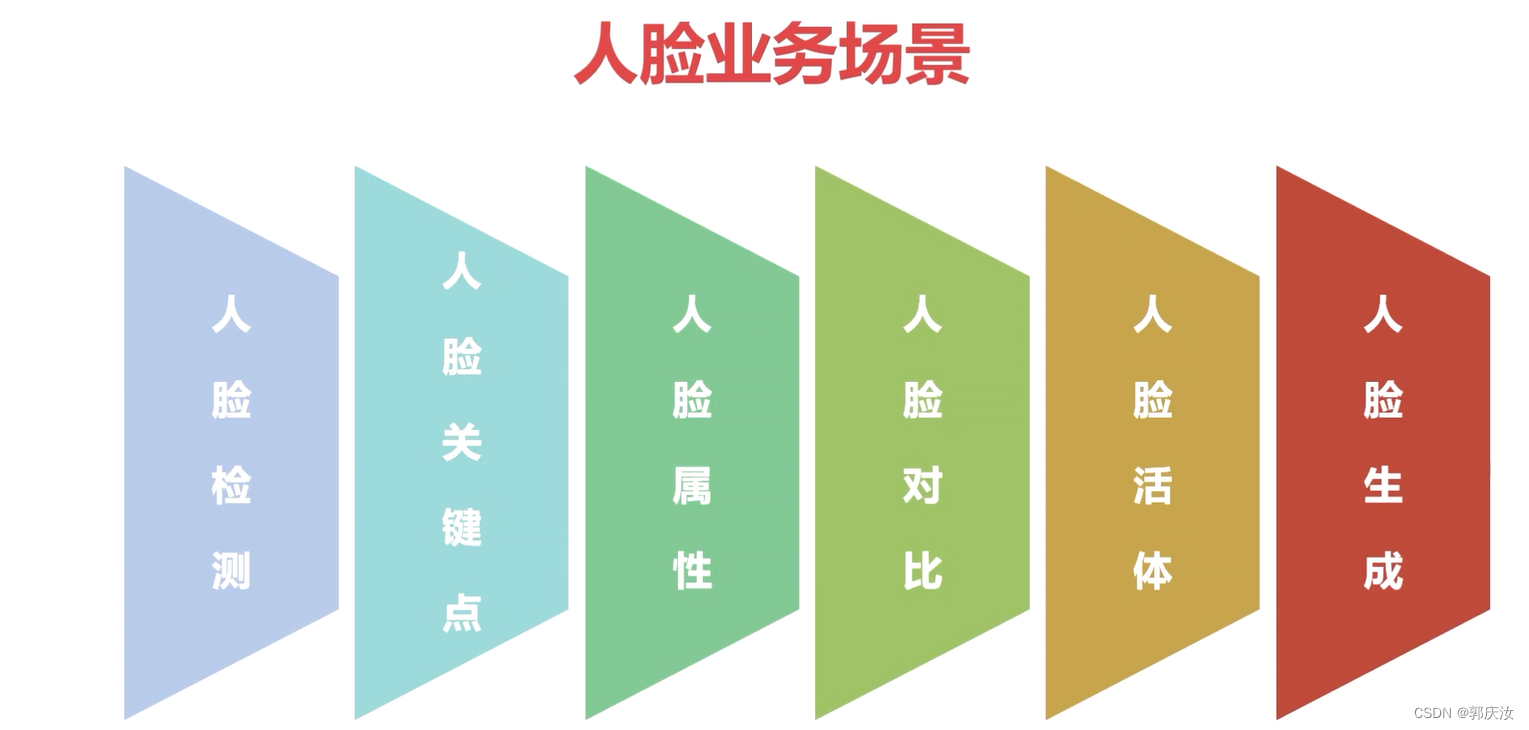
1、人脸业务流程
1、人脸检测(Face Detection)问题
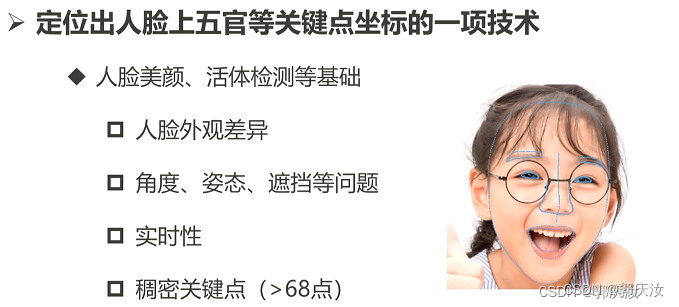
2、人脸对齐(Face Alignment)问题
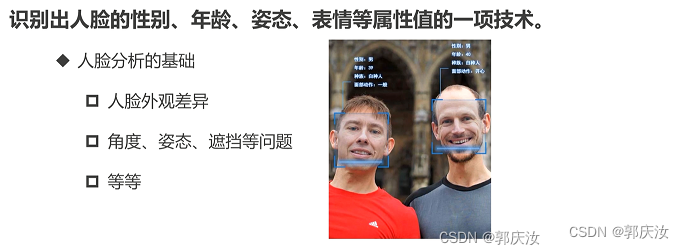
3、人脸属性(Face Attribute)问题
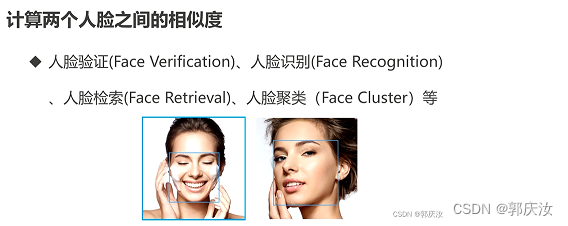
4、人脸比对(Face Compare)问题
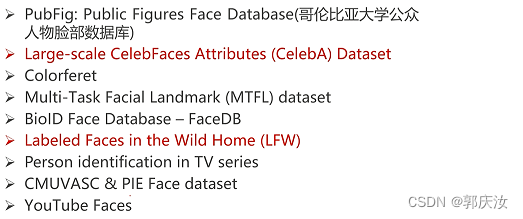
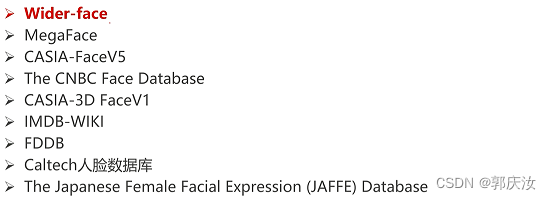
2、人脸识别相关数据集
3、人脸检测
1、人脸检测需要解决的问题
1、人脸可能出现在图像中的任何一个位置
2、人脸可能有不同的尺度
3、人脸在图像中可能有不同的视角和姿态
4、人脸可能部分被遮挡
2、小人脸检测问题
1、下采样倍率很大时,人脸区域基本消失
2、相比于感受野和anchor的尺寸来说,人脸的尺寸太小
3、anchor匹配策略(IOU小且变化敏感)
4、正负样本比例失衡
解决方案:
1、多尺度策略
2、调整优化anchor策略
3、在线的难例挖掘
3、IOU计算方式
4、人脸目标检测算法
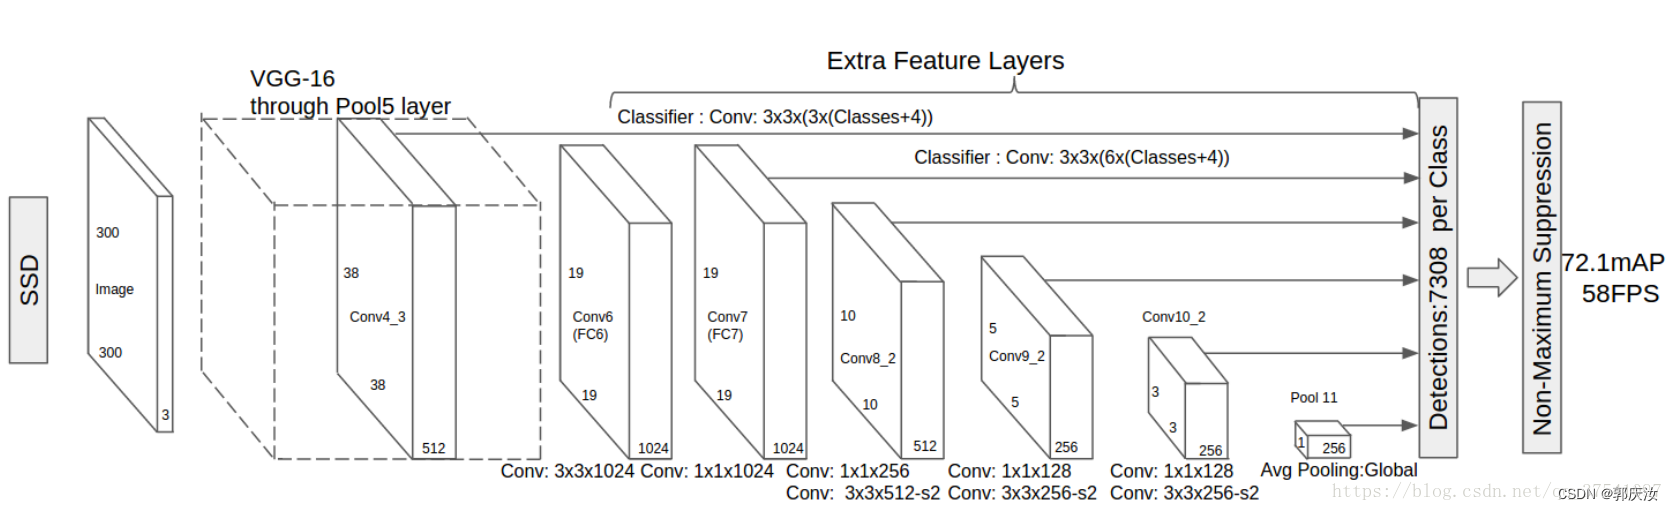
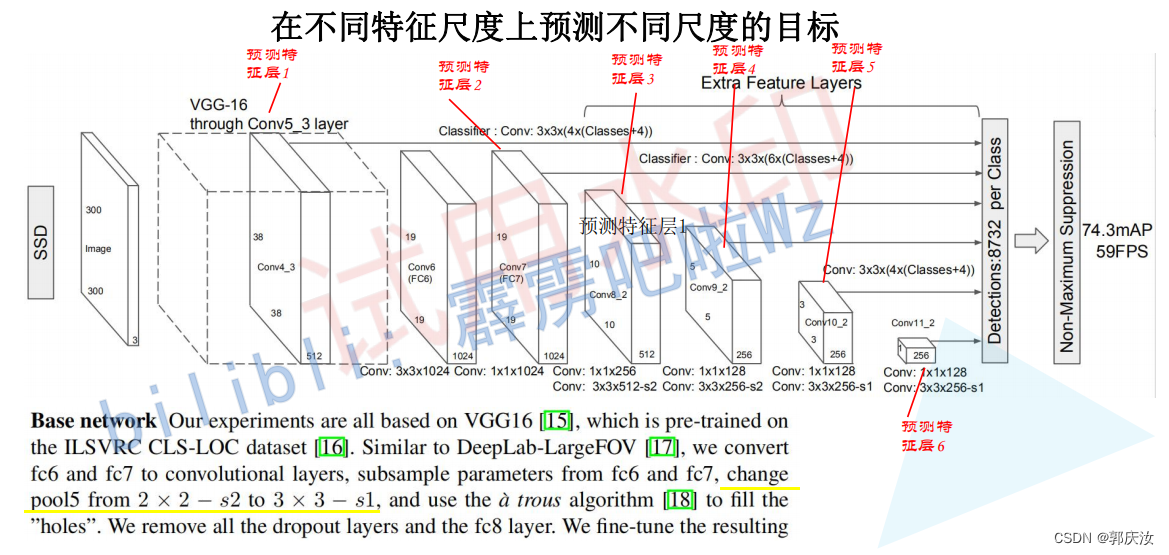
使用SSD检测模型(后期使用效果更优的yolov5目标检测算法进行优化)
SSD作为人脸检测器的有点如下:
1、端到端的训练
2、直接回归目标类别和位置
3、不同尺度的特征图上进行预测
SSD网络模型结构:(以VGG16为特征提取网络)
关于SSD详细的讲解,请参考我的另一篇博文
https://blog.csdn.net/guoqingru0311/article/details/130320681
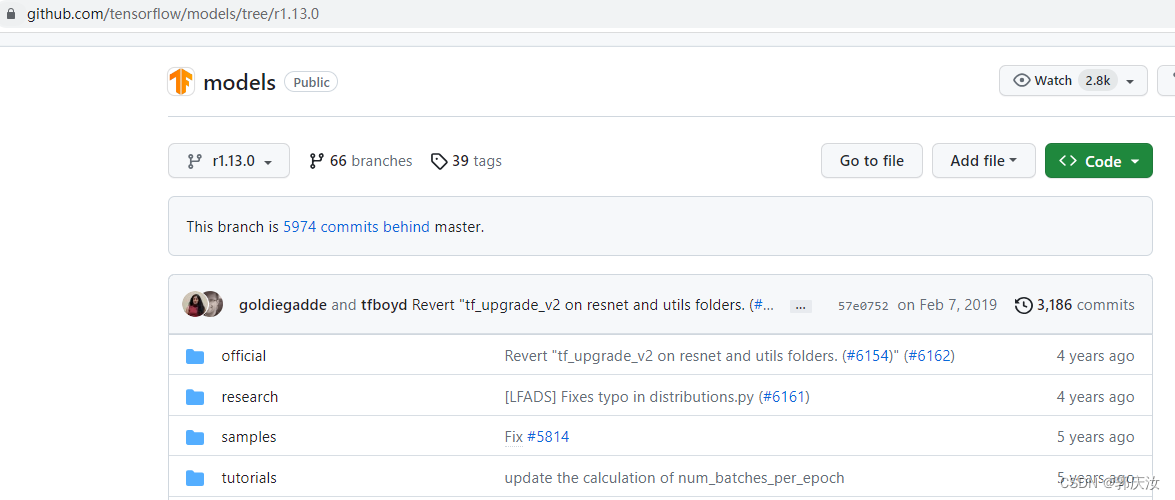
5、TensorFlow+SSD环境搭建
TensorFlow-gpu版本为1.13.0
项目路径:
https://github.com/tensorflow/models/tree/r1.13.0/research/object_detection
安装教程:
https://github.com/tensorflow/models/blob/r1.13.0/research/object_detection/g3doc/installation.md
环境搭建:
1、官网下载需要的项目
https://github.com/tensorflow/models/tree/r1.13.0
2、安装基础包
pip install pillow lxml Cython jupyter matplotlib pandas opencv-python  --default-timeout=100 -i https://pypi.tuna.tsinghua.edu.cn/simple

# 安装tensorflow-gpu版,此次项目使用的是1.13.0
pip install tensorflow-gpu==1.13.0 --default-timeout=100 -i https://pypi.tuna.tsinghua.edu.cn/simple
3、安装重要包protobuf与protoc这两个包的版本必须一致否则会报错
(1)安装protobuf
# 安装protobuf(Note:protobuf默认安装的是2.6.1版,安装时需要安装版本大于3)
pip install protobuf==3.15.0
(2)安装 protoc
与protobuf对应的版本是protoc-3.0.0-linux-x86_64.zip
先查看是否安装过protoc
1、首先查看本机的protoc的版本
protoc --version
2、本人机器在安装之前输出的是2.6.1版本的protoc,是通过如下的命令安装的:
sudo apt install protobuf-compiler
(如果已经安装可能会因为版本不匹配出现以下报错问题)
开始正儿八经的安装教程了哈::
# 1、下载对应版本的安装包文件
wget  https://github.com/google/protobuf/releases/download/v3.0.0/protoc-3.0.0-linux-x86_64.zip

# 2、解压压缩包
apt-get install unzip
unzip protoc-3.0.0-linux-x86_64.zip -d protoc-3.0.0-linux-x86_64
# 3、将解压后的文件目录移动到/opt目录下,方便写入环境变量
mv protoc-3.0.0-linux-x86_64/ /opt
cd /opt/protoc-3.0.0-linux-x86_64/bin
chmod +x protoc #这一步很必要,否则执行的还是2.6.1版本的
export PATH=/opt/protoc-3.0.0-linux-x86_64/bin:$PATH   # 写入环境变量
source ~/.bashrc

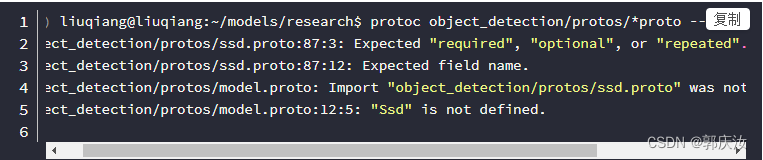
Note:此处需要保证protobuf与protoc版本保持一致,否则会报以下错误

3、编译proto文件
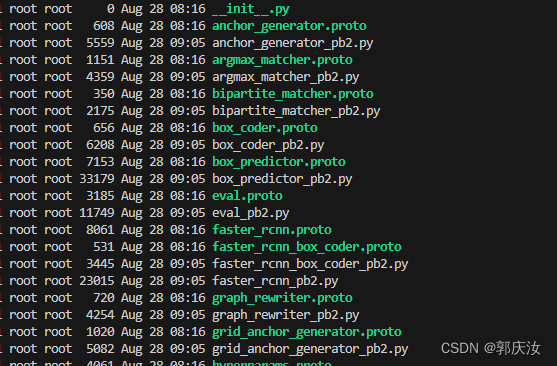
在research文件下执行以下命令,如果object_detection/protos/文件夹中每个proto文件都生成了对应以.py格式的代码文件,就说明编译成功了。
# From tensorflow/models/research/
protoc object_detection/protos/*.proto --python_out=.
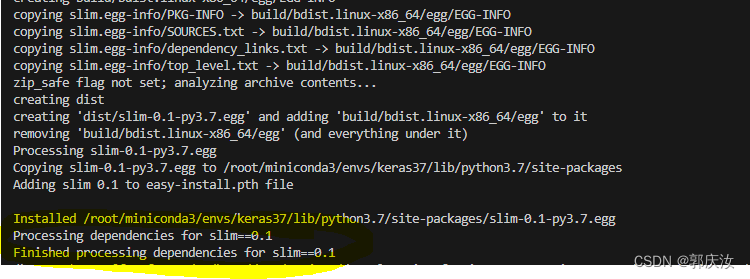
(3)将安装Slim加入PYTHONPATH
#1、 安装slim包必须保证与tensorflow、object项目同版本,否则会报错
# 需要cd到 */research/slim 目录下,执行以下语句
python setup.py install
#2、因为要用到slim,所以得将slim加入python使用的path才能正常运行。还是在research文件下,执行以下命令:
export PYTHONPATH=$PYTHONPATH:`pwd`:`pwd`/slim
(4)安装完成测试
python object_detection/builders/model_builder_test.py
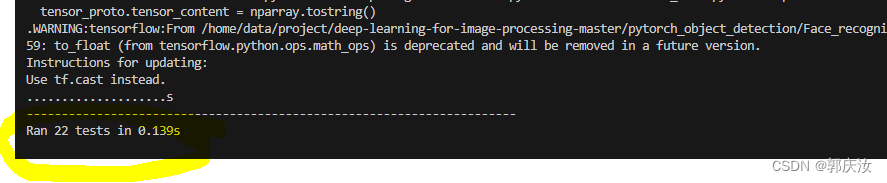
截止到以上,环境搭建已经完成,步骤确实复杂~~~~
4、人脸检测数据集
WIDER FACE数据集http://shuoyang1213.me/WIDERFACE/
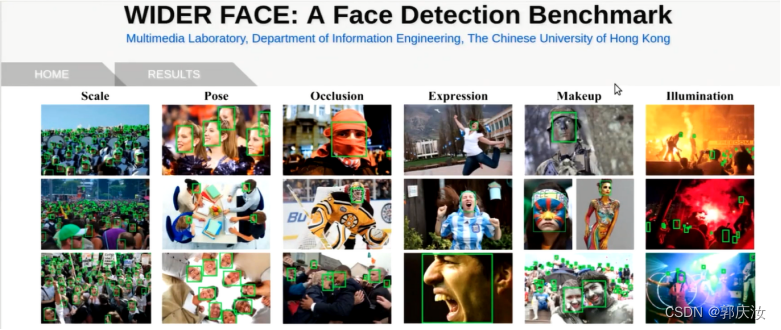
Wider Face数据集最早是在2015年公开的(v1.0版本)。该数据集的图片来源是WIDER数据集,从中挑选出了32,203图片并进行了人脸标注,总共标注了393,703个人脸数据。并且对于每张人脸都附带有更加详细的信息,包扩blur(模糊程度), expression(表情), illumination(光照), occlusion(遮挡), pose(姿态)
1、数据集结构
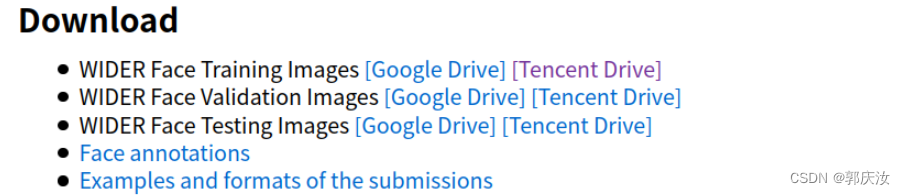
接着,下载数据集,这里只下载训练集(Training Images),验证集(Validation Images)以及标注文件(Face annotations)
下载好后进行解压,并按照如下结构摆放文件:
├── wider_face:  存放数据集根目录
      ├── WIDER_train: 训练集解压后的文件目录
      │          └──  images:
      │                   ├──  0--Parade:         对应该类别的所有图片
      │                   ├──  ........
      │                   └──  61--Street_Battle: 对应该类别的所有图片
      │
      ├── WIDER_val: 验证集解压后的文件目录
      │          └──  images:
      │                   ├──  0--Parade:         对应该类别的所有图片
      │                   ├──  ........
      │                   └──  61--Street_Battle: 对应该类别的所有图片
      │
      └── wider_face_split: 标注文件解压后的文件目录
                  ├──  wider_face_train.mat:         训练集的标注文件,MATLAB存储格式
                  ├──  wider_face_train_bbx_gt.txt:  训练集的标注文件,txt格式
                  ├──  wider_face_val.mat:           验证集的标注文件,MATLAB存储格式
                  ├──  wider_face_val_bbx_gt.txt:    验证的标注文件,txt格式
                  ├──  wider_face_test.mat:          测试集的标注文件,MATLAB存储格式
                  ├──  wider_face_test_filelist.txt: 测试的标注文件,txt格式
                  └──  readme.txt:                   标注文件说明

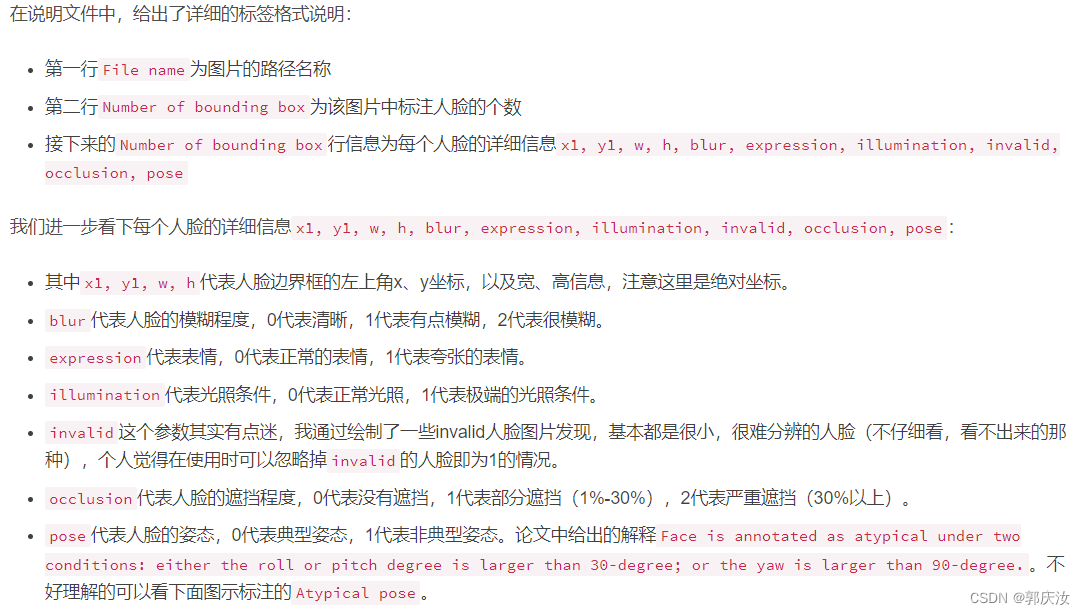
2、标注文件解析:
首先看下readme.txt文件里的说明
Attached the mappings between attribute names and label values.

blur:
  clear->0
  normal blur->1
  heavy blur->2

expression:
  typical expression->0
  exaggerate expression->1

illumination:
  normal illumination->0
  extreme illumination->1

occlusion:
  no occlusion->0
  partial occlusion->1
  heavy occlusion->2

pose:
  typical pose->0
  atypical pose->1

invalid:
  false->0(valid image)
  true->1(invalid image)

The format of txt ground truth.
File name
Number of bounding box
x1, y1, w, h, blur, expression, illumination, invalid, occlusion, pose
x1, y1, w, h, blur, expression, illumination, invalid, occlusion, pose
0--Parade/0_Parade_marchingband_1_849.jpg
1
449 330 122 149 0 0 0 0 0 0
0--Parade/0_Parade_Parade_0_904.jpg
1
361 98 263 339 0 0 0 0 0 0
0--Parade/0_Parade_marchingband_1_799.jpg
21
78 221 7 8 2 0 0 0 0 0
78 238 14 17 2 0 0 0 0 0
113 212 11 15 2 0 0 0 0 0
134 260 15 15 2 0 0 0 0 0
163 250 14 17 2 0 0 0 0 0
201 218 10 12 2 0 0 0 0 0
182 266 15 17 2 0 0 0 0 0
245 279 18 15 2 0 0 0 0 0
304 265 16 17 2 0 0 0 2 1
328 295 16 20 2 0 0 0 0 0
389 281 17 19 2 0 0 0 2 0
406 293 21 21 2 0 1 0 0 0
436 290 22 17 2 0 0 0 0 0
522 328 21 18 2 0 1 0 0 0
643 320 23 22 2 0 0 0 0 0
653 224 17 25 2 0 0 0 0 0
793 337 23 30 2 0 0 0 0 0
535 311 16 17 2 0 0 0 1 0
29 220 11 15 2 0 0 0 0 0
3 232 11 15 2 0 0 0 2 0
20 215 12 16 2 0 0 0 2 0
通过个人分析统计,发现在训练集中总共有12,880张图片,其中有4张是没有人脸信息的。
train中没有人脸目标的样本:
0--Parade/0_Parade_Parade_0_452.jpg
2--Demonstration/2_Demonstration_Political_Rally_2_444.jpg
39--Ice_Skating/39_Ice_Skating_iceskiing_39_380.jpg
46--Jockey/46_Jockey_Jockey_46_576.jpg
验证集中总共有3,226张图片,其中有4张没有人脸信息。
val中没有人脸目标的样本:
0--Parade/0_Parade_Parade_0_275.jpg
7--Cheering/7_Cheering_Cheering_7_426.jpg
37--Soccer/37_Soccer_soccer_ball_37_281.jpg
50--Celebration_Or_Party/50_Celebration_Or_Party_houseparty_50_715.jpg
3、Passcal VOC数据格式

4、将标注txt文件转xml格式代码

import os,cv2,sys,shutil,numpy

from xml.dom.minidom import Document
import os


"""
    将wider face数据集的txt格式的标签转换成xml格式

"""

def writexml(filename, saveimg, bboxes, xmlpath):
    doc = Document()

    annotation = doc.createElement('annotation')

    doc.appendChild(annotation)

    folder = doc.createElement('folder')

    folder_name = doc.createTextNode('widerface')
    folder.appendChild(folder_name)
    annotation.appendChild(folder)
    filenamenode = doc.createElement('filename')
    filename_name = doc.createTextNode(filename)
    filenamenode.appendChild(filename_name)
    annotation.appendChild(filenamenode)
    source = doc.createElement('source')
    annotation.appendChild(source)
    database = doc.createElement('database')
    database.appendChild(doc.createTextNode('wider face Database'))
    source.appendChild(database)
    annotation_s = doc.createElement('annotation')
    annotation_s.appendChild(doc.createTextNode('PASCAL VOC2007'))
    source.appendChild(annotation_s)
    image = doc.createElement('image')
    image.appendChild(doc.createTextNode('flickr'))
    source.appendChild(image)
    flickrid = doc.createElement('flickrid')
    flickrid.appendChild(doc.createTextNode('-1'))
    source.appendChild(flickrid)
    owner = doc.createElement('owner')
    annotation.appendChild(owner)
    flickrid_o = doc.createElement('flickrid')
    flickrid_o.appendChild(doc.createTextNode('muke'))
    owner.appendChild(flickrid_o)
    name_o = doc.createElement('name')
    name_o.appendChild(doc.createTextNode('muke'))
    owner.appendChild(name_o)

    size = doc.createElement('size')
    annotation.appendChild(size)

    width = doc.createElement('width')
    width.appendChild(doc.createTextNode(str(saveimg.shape[1])))
    height = doc.createElement('height')
    height.appendChild(doc.createTextNode(str(saveimg.shape[0])))
    depth = doc.createElement('depth')
    depth.appendChild(doc.createTextNode(str(saveimg.shape[2])))

    size.appendChild(width)

    size.appendChild(height)
    size.appendChild(depth)
    segmented = doc.createElement('segmented')
    segmented.appendChild(doc.createTextNode('0'))
    annotation.appendChild(segmented)
    for i in range(len(bboxes)):
        bbox = bboxes[i]
        objects = doc.createElement('object')
        annotation.appendChild(objects)
        object_name = doc.createElement('name')
        object_name.appendChild(doc.createTextNode('face'))
        objects.appendChild(object_name)
        pose = doc.createElement('pose')
        pose.appendChild(doc.createTextNode('Unspecified'))
        objects.appendChild(pose)
        truncated = doc.createElement('truncated')
        truncated.appendChild(doc.createTextNode('0'))
        objects.appendChild(truncated)
        difficult = doc.createElement('difficult')
        difficult.appendChild(doc.createTextNode('0'))
        objects.appendChild(difficult)
        bndbox = doc.createElement('bndbox')
        objects.appendChild(bndbox)
        xmin = doc.createElement('xmin')
        xmin.appendChild(doc.createTextNode(str(bbox[0])))
        bndbox.appendChild(xmin)
        ymin = doc.createElement('ymin')
        ymin.appendChild(doc.createTextNode(str(bbox[1])))
        bndbox.appendChild(ymin)
        xmax = doc.createElement('xmax')
        xmax.appendChild(doc.createTextNode(str(bbox[0] + bbox[2])))
        bndbox.appendChild(xmax)
        ymax = doc.createElement('ymax')
        ymax.appendChild(doc.createTextNode(str(bbox[1] + bbox[3])))
        bndbox.appendChild(ymax)
    f = open(xmlpath, "w")
    f.write(doc.toprettyxml(indent=''))
    f.close()


rootdir = "/home/aiserver/muke/dataset/widerface"

gtfile = "/home/aiserver/muke/dataset/widerface/data/wider_face_split/" \
         "wider_face_train_bbx_gt.txt";

im_folder = "/home/aiserver/muke/dataset/widerface/data/WIDER_train/images";

##这里可以是test也可以是val
fwrite = open("/home/aiserver/muke/dataset/widerface/ImageSets/Main/train.txt", "w")


with open(gtfile, "r") as gt:
    while(True):
        gt_con = gt.readline()[:-1]
        if gt_con is None or gt_con == "":
            break
        im_path = im_folder + "/" + gt_con;
        print(im_path)
        im_data = cv2.imread(im_path)
        if im_data is None:
            continue

        ##需要注意的一点是,图片直接经过resize之后,会存在更多的长宽比例,所以我们直接加pad
        sc = max(im_data.shape)
        im_data_tmp = numpy.zeros([sc, sc, 3], dtype=numpy.uint8)
        off_w = (sc - im_data.shape[1]) // 2
        off_h = (sc - im_data.shape[0]) // 2

        ##对图片进行周围填充,填充为正方形
        im_data_tmp[off_h:im_data.shape[0]+off_h, off_w:im_data.shape[1]+off_w, ...] = im_data
        im_data = im_data_tmp
        #
        # cv2.imshow("1", im_data)
        # cv2.waitKey(0)
        numbox = int(gt.readline())
        #numbox = 0
        bboxes = []
        for i in range(numbox):
            line = gt.readline()
            infos = line.split(" ")
            #x y w h ---
            #去掉最后一个(\n)
            for j in range(infos.__len__() - 1):
                infos[j] = int(infos[j])

            ##注意这里加入了数据清洗
            ##保留resize到640×640 尺寸在8×8以上的人脸
            if infos[2] * 80 < im_data.shape[1] or infos[3] * 80 < im_data.shape[0]:
                continue

            bbox = (infos[0] + off_w, infos[1] + off_h, infos[2], infos[3])
            # cv2.rectangle(im_data, (int(infos[0]) + off_w, int(infos[1]) + off_h),
            #               (int(infos[0]) + off_w + int(infos[2]), int(infos[1]) + off_h + int(infos[3])),
            #               color=(0, 0, 255), thickness=1)
            bboxes.append(bbox)

        # cv2.imshow("1", im_data)
        # cv2.waitKey(0)

        filename = gt_con.replace("/", "_")
        fwrite.write(filename.split(".")[0] + "\n")

        cv2.imwrite("{}/JPEGImages/{}".format(rootdir, filename), im_data)

        xmlpath = "{}/Annotations/{}.xml".format(rootdir, filename.split(".")[0])
        writexml(filename, im_data, bboxes, xmlpath)

fwrite.close()
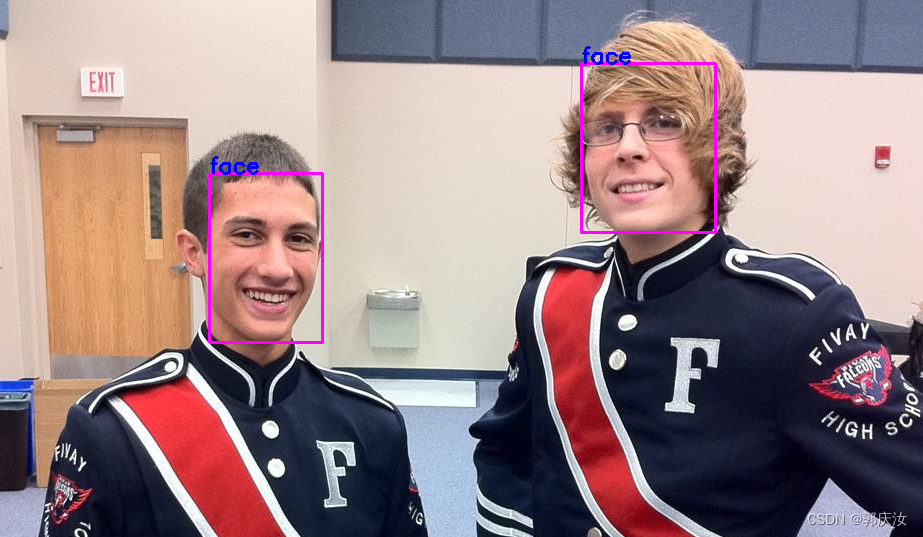
5、查看人脸图像标注效果代码:
import os,glob,cv2
import xml.etree.ElementTree as ET
import numpy as np


dir_path='/home/data/project/deep-learning-for-image-processing-master/pytorch_object_detection/Face_recognition/VOC2007/val'


def get_bboxes(xml_path):
    tree = ET.parse(open(xml_path, 'rb'))
    root = tree.getroot()
    bboxes, cls = [], []
    for obj in root.iter('object'):
        obj_cls = obj.find('name').text
        xmlbox = obj.find('bndbox')
        xmin = float(xmlbox.find('xmin').text)
        xmax = float(xmlbox.find('xmax').text)
        ymin = float(xmlbox.find('ymin').text)
        ymax = float(xmlbox.find('ymax').text)
        bboxes.append([xmin, ymin, xmax, ymax])
        cls.append(obj_cls)
    bboxes = np.asarray(bboxes, np.int)
    return bboxes, cls

img_dir=os.path.join(dir_path,'JPEGImages')
xml_dir=os.path.join(dir_path,'Annotations')
image_path_list=glob.glob(img_dir+'/*')
for image_path in image_path_list:


    image_,image_name=os.path.split(image_path)    # 返回文件路径与文件名
    xml_path=os.path.join(xml_dir,os.path.splitext(image_name)[0]+'.xml')
    image_data=cv2.imread(image_path)

    # 读取xml文件
    bboxes, cls=get_bboxes(xml_path)
    for num in range(bboxes.__len__()):
        print(bboxes[num],cls[num])
        cv2.rectangle(image_data, (bboxes[num][0],bboxes[num][1]), (bboxes[num][2],bboxes[num][3]), (255, 0, 255), 2)
        # print([bboxes[num][0],bboxes[num][1]])
        cv2.putText(image_data, cls[num], (bboxes[num][0],bboxes[num][1]), cv2.FONT_HERSHEY_SIMPLEX, 0.75, (255, 0, 0), 2)

    cv2.imshow("image",image_data)
    cv2.waitKey(0)
cv2.destroyAllWindows()
6、将VOC数据集打包成TF-Record的格式
(1)将利用wideface.py处理过后整理得到的图像数据与xml数据存放目录结构如下所示:
ImageSets:用于存放图像数据
Annotations:存放xml标签文件
ImageSets/Main:用于存放图像名称索引
-- widerface
    |-- train
    |   |-- Annotations
    |   |-- ImageSets
    |   |   `-- Main
    |   |       `-- train.txt
    |   `-- JPEGImages
    `-- val
        |-- Annotations
        |-- ImageSets
        |   `-- Main
        |       `-- train.txt
        `-- JPEGImages
(2)制作类比标签文件

在上图目录位置创建face_label_map.pbtxt文件,内容如下:
item {
  name: "face"
  id: 1
  display_name: "face"
}
(3)打包成TF-recorder格式文件
将以下代码复制到models-1.13.0/research/object_detection/dataset_tools目录下,命名为:create_pascal_tf_record.py
# Copyright 2017 The TensorFlow Authors. All Rights Reserved.
#
# Licensed under the Apache License, Version 2.0 (the "License");
# you may not use this file except in compliance with the License.
# You may obtain a copy of the License at
#
#     http://www.apache.org/licenses/LICENSE-2.0
#
# Unless required by applicable law or agreed to in writing, software
# distributed under the License is distributed on an "AS IS" BASIS,
# WITHOUT WARRANTIES OR CONDITIONS OF ANY KIND, either express or implied.
# See the License for the specific language governing permissions and
# limitations under the License.
# ==============================================================================

r"""Convert raw PASCAL dataset to TFRecord for object_detection.

Example usage:
    python object_detection/dataset_tools/create_pascal_tf_record.py \
        --data_dir=/home/user/VOCdevkit \
        --year=VOC2012 \
        --output_path=/home/user/pascal.record
"""
from __future__ import absolute_import
from __future__ import division
from __future__ import print_function

import hashlib
import io
import logging
import os

from lxml import etree
import PIL.Image
import tensorflow as tf

from object_detection.utils import dataset_util
from object_detection.utils import label_map_util


flags = tf.app.flags
flags.DEFINE_string('data_dir', '', 'Root directory to raw PASCAL VOC dataset.')    # gqr:此路径应该执行wider face上一层文件夹
flags.DEFINE_string('set', 'train', 'Convert training set, validation set or '
                    'merged set.')
flags.DEFINE_string('annotations_dir', 'Annotations',
                    '(Relative) path to annotations directory.')
flags.DEFINE_string('year', 'VOC2007', 'Desired challenge year.')
flags.DEFINE_string('output_path', '', 'Path to output TFRecord')    # gqr:打包好数据存放路径
flags.DEFINE_string('label_map_path', 'data/pascal_label_map.pbtxt',
                    'Path to label map proto')                        # gqr:类别id存放地址
flags.DEFINE_boolean('ignore_difficult_instances', False, 'Whether to ignore '
                     'difficult instances')
FLAGS = flags.FLAGS

SETS = ['train', 'val', 'trainval', 'test']    # gqr:修改
YEARS = ['VOC2007', 'VOC2012', 'widerface']       # gqr:修改


def dict_to_tf_example(data,
                       dataset_directory,
                       label_map_dict,
                       ignore_difficult_instances=False,
                       image_subdirectory='JPEGImages'):
  """Convert XML derived dict to tf.Example proto.

  Notice that this function normalizes the bounding box coordinates provided
  by the raw data.

  Args:
    data: dict holding PASCAL XML fields for a single image (obtained by
      running dataset_util.recursive_parse_xml_to_dict)
    dataset_directory: Path to root directory holding PASCAL dataset
    label_map_dict: A map from string label names to integers ids.
    ignore_difficult_instances: Whether to skip difficult instances in the
      dataset  (default: False).
    image_subdirectory: String specifying subdirectory within the
      PASCAL dataset directory holding the actual image data.

  Returns:
    example: The converted tf.Example.

  Raises:
    ValueError: if the image pointed to by data['filename'] is not a valid JPEG
  """
  img_path = os.path.join(data['folder'],FLAGS.set, image_subdirectory, data['filename'])
  # print('*******************',img_path)
  full_path = os.path.join(dataset_directory, img_path)
  # print('*******************',full_path)
  with tf.gfile.GFile(full_path, 'rb') as fid:
    encoded_jpg = fid.read()
  encoded_jpg_io = io.BytesIO(encoded_jpg)
  image = PIL.Image.open(encoded_jpg_io)
  if image.format != 'JPEG':
    raise ValueError('Image format not JPEG')
  key = hashlib.sha256(encoded_jpg).hexdigest()

  width = int(data['size']['width'])
  height = int(data['size']['height'])

  xmin = []
  ymin = []
  xmax = []
  ymax = []
  classes = []
  classes_text = []
  truncated = []
  poses = []
  difficult_obj = []
  if 'object' in data:
    for obj in data['object']:
      difficult = bool(int(obj['difficult']))
      if ignore_difficult_instances and difficult:
        continue

      difficult_obj.append(int(difficult))

      xmin.append(float(obj['bndbox']['xmin']) / width)
      ymin.append(float(obj['bndbox']['ymin']) / height)
      xmax.append(float(obj['bndbox']['xmax']) / width)
      ymax.append(float(obj['bndbox']['ymax']) / height)
      classes_text.append(obj['name'].encode('utf8'))
      classes.append(label_map_dict[obj['name']])
      truncated.append(int(obj['truncated']))
      poses.append(obj['pose'].encode('utf8'))

  example = tf.train.Example(features=tf.train.Features(feature={
      'image/height': dataset_util.int64_feature(height),
      'image/width': dataset_util.int64_feature(width),
      'image/filename': dataset_util.bytes_feature(
          data['filename'].encode('utf8')),
      'image/source_id': dataset_util.bytes_feature(
          data['filename'].encode('utf8')),
      'image/key/sha256': dataset_util.bytes_feature(key.encode('utf8')),
      'image/encoded': dataset_util.bytes_feature(encoded_jpg),
      'image/format': dataset_util.bytes_feature('jpeg'.encode('utf8')),
      'image/object/bbox/xmin': dataset_util.float_list_feature(xmin),
      'image/object/bbox/xmax': dataset_util.float_list_feature(xmax),
      'image/object/bbox/ymin': dataset_util.float_list_feature(ymin),
      'image/object/bbox/ymax': dataset_util.float_list_feature(ymax),
      'image/object/class/text': dataset_util.bytes_list_feature(classes_text),
      'image/object/class/label': dataset_util.int64_list_feature(classes),
      'image/object/difficult': dataset_util.int64_list_feature(difficult_obj),
      'image/object/truncated': dataset_util.int64_list_feature(truncated),
      'image/object/view': dataset_util.bytes_list_feature(poses),
  }))
  return example


def main(_):
  if FLAGS.set not in SETS:
    raise ValueError('set must be in : {}'.format(SETS))
  if FLAGS.year not in YEARS:
    raise ValueError('year must be in : {}'.format(YEARS))

  data_dir = FLAGS.data_dir
  years = ['fddb', 'widerface']    # gqr:修改
  if FLAGS.year != 'merged':
    years = [FLAGS.year]

  writer = tf.python_io.TFRecordWriter(FLAGS.output_path)   # gqr:定义Tf-record的写入的实例

  label_map_dict = label_map_util.get_label_map_dict(FLAGS.label_map_path)

  for year in years:
    logging.info('Reading from PASCAL %s dataset.', year)
    examples_path = os.path.join(data_dir, year,FLAGS.set, 'ImageSets', 'Main',FLAGS.set + '.txt')   # gqr:修改
    annotations_dir = os.path.join(data_dir, year,FLAGS.set,FLAGS.annotations_dir)
    examples_list = dataset_util.read_examples_list(examples_path)
    for idx, example in enumerate(examples_list):
      if idx % 100 == 0:
        logging.info('On image %d of %d', idx, len(examples_list))
      path = os.path.join(annotations_dir, example + '.xml')
      print('---------------------',path)
      with tf.gfile.GFile(path, 'r') as fid:
        xml_str = fid.read()
      xml = etree.fromstring(xml_str)
      data = dataset_util.recursive_parse_xml_to_dict(xml)['annotation']

      tf_example = dict_to_tf_example(data, FLAGS.data_dir, label_map_dict,
                                      FLAGS.ignore_difficult_instances)
      writer.write(tf_example.SerializeToString())

  writer.close()


if __name__ == '__main__':
  tf.app.run()
python ./object_detection/dataset_tools/create_pascal_tf_record.py  \
	--data_dir=/home/data/project/deep-learning-for-image-processing-master/pytorch_object_detection/Face_recognition  \
	--year=widerface  \
	--output_path=../TF-recorder-data/face_val.record   \
	--set=train  \
	--label_map_path=object_detection/data/face_label_map.pbtxt
在models-1.13.0/research/目录下执行上述语句,训练集与验证集数据需要修改分别打包
–data_dir:为存放数据集的目录,widerface上一级目录
–year:数据集文件夹名称
–output_path:生成的TF-record文件的路径
–set:打包训练集是为train,验证集时为val
–label_map_path:标签键值存放路径
在执行上述命令时可能会出现以下报错:
ModuleNotFoundError: No module named ‘object_detection’
解决方案:
需在models-1.13.0/research/目录下执行:
python setup.py install
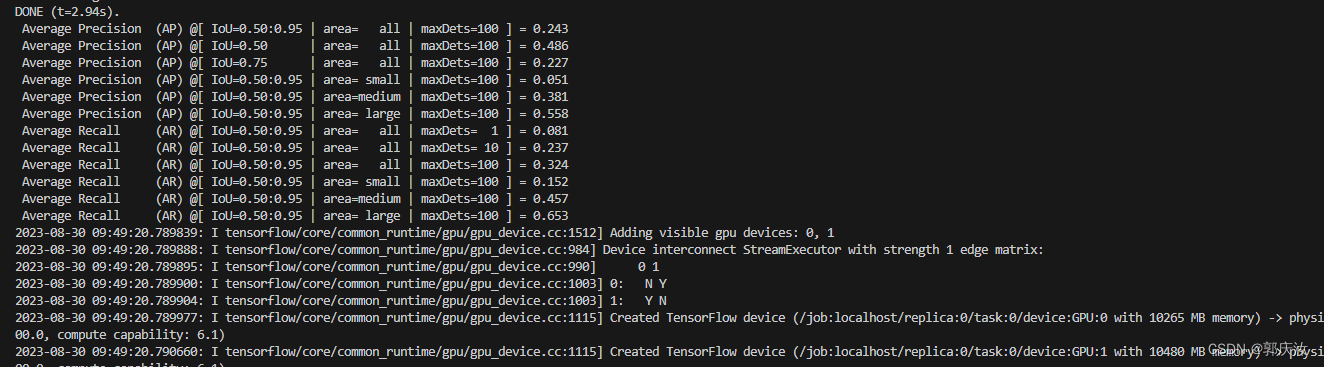
5、训练模型(ssd_resnet50_v1_fpn)

class SSDResnet50V1FpnFeatureExtractor(_SSDResnetV1FpnFeatureExtractor):
  """SSD Resnet50 V1 FPN feature extractor."""

  def __init__(self,
               is_training,
               depth_multiplier,
               min_depth,
               pad_to_multiple,
               conv_hyperparams_fn,
               fpn_min_level=3,
               fpn_max_level=7,
               additional_layer_depth=256,
               reuse_weights=None,
               use_explicit_padding=False,
               use_depthwise=False,
               override_base_feature_extractor_hyperparams=False):
    """SSD Resnet50 V1 FPN feature extractor based on Resnet v1 architecture.

    Args:
      is_training: whether the network is in training mode.
      depth_multiplier: float depth multiplier for feature extractor.
        UNUSED currently.
      min_depth: minimum feature extractor depth. UNUSED Currently.
      pad_to_multiple: the nearest multiple to zero pad the input height and
        width dimensions to.
      conv_hyperparams_fn: A function to construct tf slim arg_scope for conv2d
        and separable_conv2d ops in the layers that are added on top of the
        base feature extractor.
      fpn_min_level: the minimum level in feature pyramid networks.
      fpn_max_level: the maximum level in feature pyramid networks.
      additional_layer_depth: additional feature map layer channel depth.
      reuse_weights: Whether to reuse variables. Default is None.
      use_explicit_padding: Whether to use explicit padding when extracting
        features. Default is False. UNUSED currently.
      use_depthwise: Whether to use depthwise convolutions. UNUSED currently.
      override_base_feature_extractor_hyperparams: Whether to override
        hyperparameters of the base feature extractor with the one from
        `conv_hyperparams_fn`.
    """
    super(SSDResnet50V1FpnFeatureExtractor, self).__init__(
        is_training,
        depth_multiplier,
        min_depth,
        pad_to_multiple,
        conv_hyperparams_fn,
        resnet_v1.resnet_v1_50,
        'resnet_v1_50',
        'fpn',
        fpn_min_level,
        fpn_max_level,
        additional_layer_depth,
        reuse_weights=reuse_weights,
        use_explicit_padding=use_explicit_padding,
        use_depthwise=use_depthwise,
        override_base_feature_extractor_hyperparams=
        override_base_feature_extractor_hyperparams)
(1)修改网络配置文件
找到目录models-1.13.0/research/object_detection/samples/configs下的ssd_resnet50_v1_fpn_shared_box_predictor_640x640_coco14_sync.config文件并复制重命名为ssd_resnet50_v1_fpn_shared_box_predictor_640x640_face_sync.config并进行如下修改:
修改第15行的num_classes:1
(因为为人脸检测,类别为1)
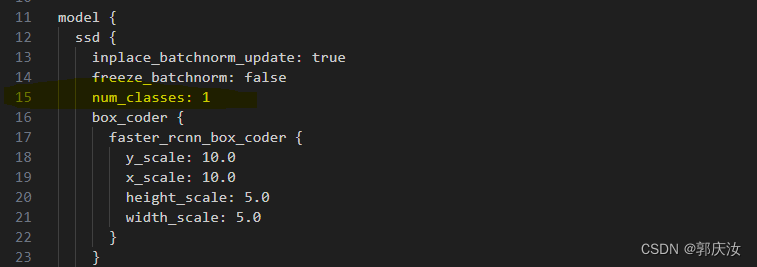
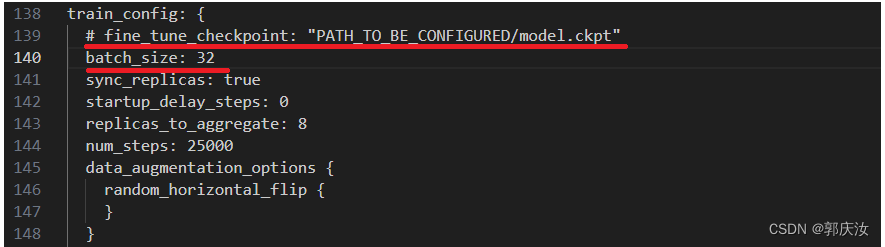
因为此次训练我不打算使用预训练权重,所以将第139行注释掉,并根据显卡显存大小设置合适的batch_size
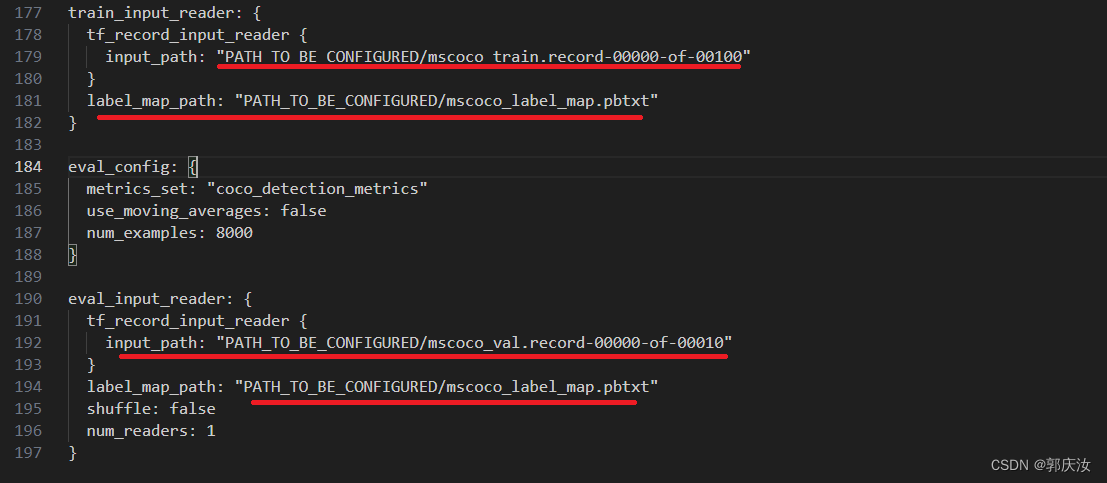
将第179行与192行分别改成自己训练集与验证集TF-record文件的存放地址,将第181行与第194改成自己标签类别文件的路径
(2)开始训练
在**models-1.13.0/research/object_detection/**目录下的model_main.py文件
训练时需要传入的参数如下:
flags.DEFINE_string(
    'model_dir', None, 'Path to output model directory '
    'where event and checkpoint files will be written.')
flags.DEFINE_string('pipeline_config_path', None, 'Path to pipeline config '
                    'file.')
flags.DEFINE_integer('num_train_steps', None, 'Number of train steps.')
flags.DEFINE_boolean('eval_training_data', False,
                     'If training data should be evaluated for this job. Note '
                     'that one call only use this in eval-only mode, and '
                     '`checkpoint_dir` must be supplied.')
flags.DEFINE_integer('sample_1_of_n_eval_examples', 1, 'Will sample one of '
                     'every n eval input examples, where n is provided.')
flags.DEFINE_integer('sample_1_of_n_eval_on_train_examples', 5, 'Will sample '
                     'one of every n train input examples for evaluation, '
                     'where n is provided. This is only used if '
                     '`eval_training_data` is True.')
flags.DEFINE_string(
    'hparams_overrides', None, 'Hyperparameter overrides, '
    'represented as a string containing comma-separated '
    'hparam_name=value pairs.')
flags.DEFINE_string(
    'checkpoint_dir', None, 'Path to directory holding a checkpoint.  If '
    '`checkpoint_dir` is provided, this binary operates in eval-only mode, '
    'writing resulting metrics to `model_dir`.')
flags.DEFINE_boolean(
    'run_once', False, 'If running in eval-only mode, whether to run just '
    'one round of eval vs running continuously (default).'
)
FLAGS = flags.FLAGS
在**models-1.13.0/research/**目录下执行以下语句:
python object_detection/model_main.py --pipeline_config_path=object_detection/samples/configs/ssd_resnet50_v1_fpn_shared_box_predictor_640x640_face_sync.config \
	--model_dir=../result_model \
	--num_train_steps=100000 \
	--alsologtostder
–pipeline_config_path:模型配置文件存放路径
–model_dir:模型与日志文件存放路径
–alsologtostder:显示训练信息
6、模型优化注意事项
与优化参数相关的文件是models-1.13.0/research/object_detection/samples/configs目录下的ssd_resnet50_v1_fpn_shared_box_predictor_640x640_face_sync.config配置文件

上图中:人脸框的长宽比例一般为aspect_ratios:[1.0,2.0,0.5]三个比例参数
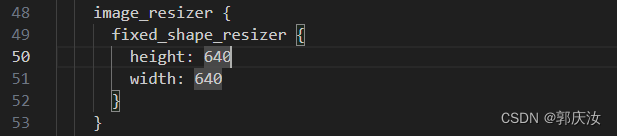
输入的图像大小会被reshape到(640,640)大小的尺寸,图像缩放的越小,会损失掉原图像中的图像信息。
640x640,384x384,512x512
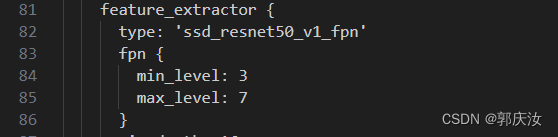
特征提取主干网络使用ssd_resnet50_v1_fpn结构,采集3~7层的特征图
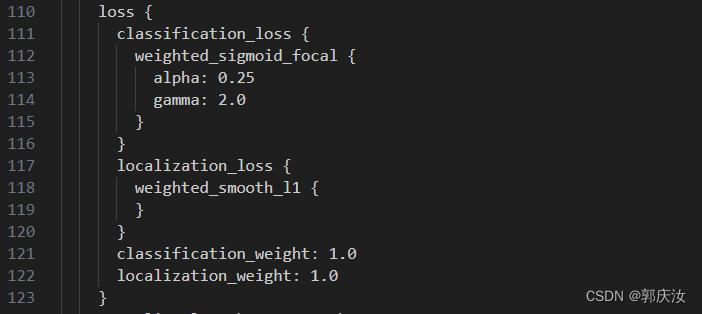
上图中分类的loss使用focal loss(考虑到了样本不平衡的问题),bbox回归loss使用smooth_l1
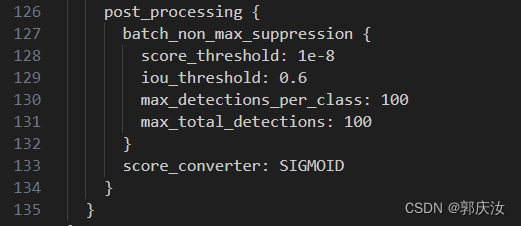
上图中为关于NMS的部分,由于图像中的人脸一般为小目标,所以建议IOU的阈值(iou_threshold)设置的不要过大
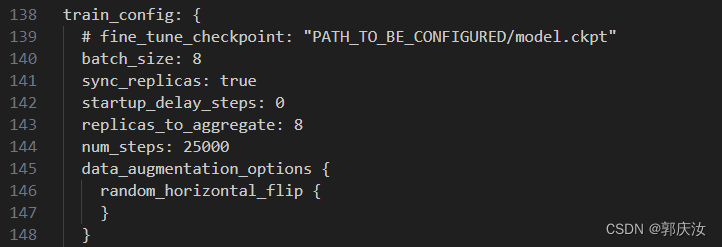
上图中:
fine_tune_checkpoint:为预训练权重路径,本次不使用,所以注解掉
batch_size:结合自身显存大小设置
num_steps:为训练迭代次数,本次设置100000 次
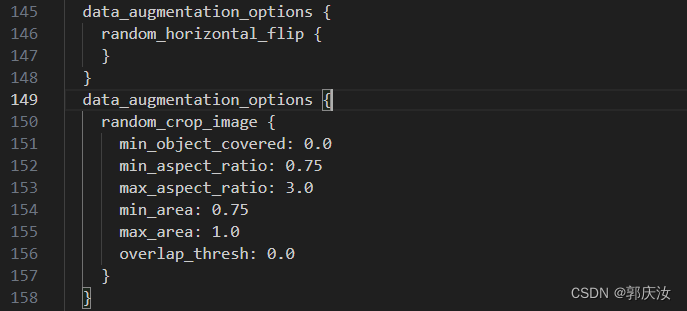
上图中为数据增强方式
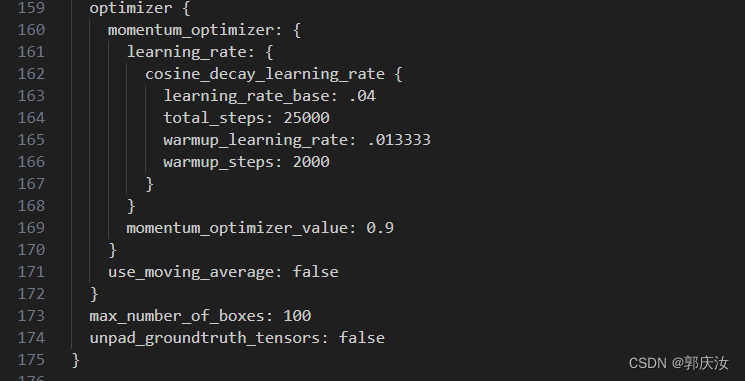
上图中为优化器设置相关参数
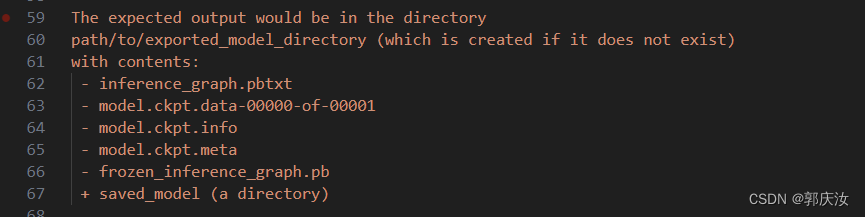
7、训练好的模型转成pb文件

在上图中的目录下:↑↑↑
在models-1.13.0/research/目录下执行:
python object_detection/export_inference_graph \
    --input_type image_tensor \
    --pipeline_config_path path/to/ssd_inception_v2.config \
    --trained_checkpoint_prefix path/to/model.ckpt-xxxxx \  # xxxxx 为迭代次数
    --output_directory path/to/exported_model_directory
参数说明:
–input_type:传入数据类型:image_tensor
–pipeline_config_path:模型配置文件存放路径
–trained_checkpoint_prefix:训练模型存放路径:model.ckpt-xxxxx \ # xxxxx 为迭代次数
–output_directory:转化得到的pb文件存放路径
转换成功后,在指定的路径下,生成以下文件:
注意:可将将上述指令写入到sh脚本脚本中:echo xxxxxxxxx >> pd.sh 方便今后调用。