笔记来源于 动力节点springboot
Javaconfig
xml方式
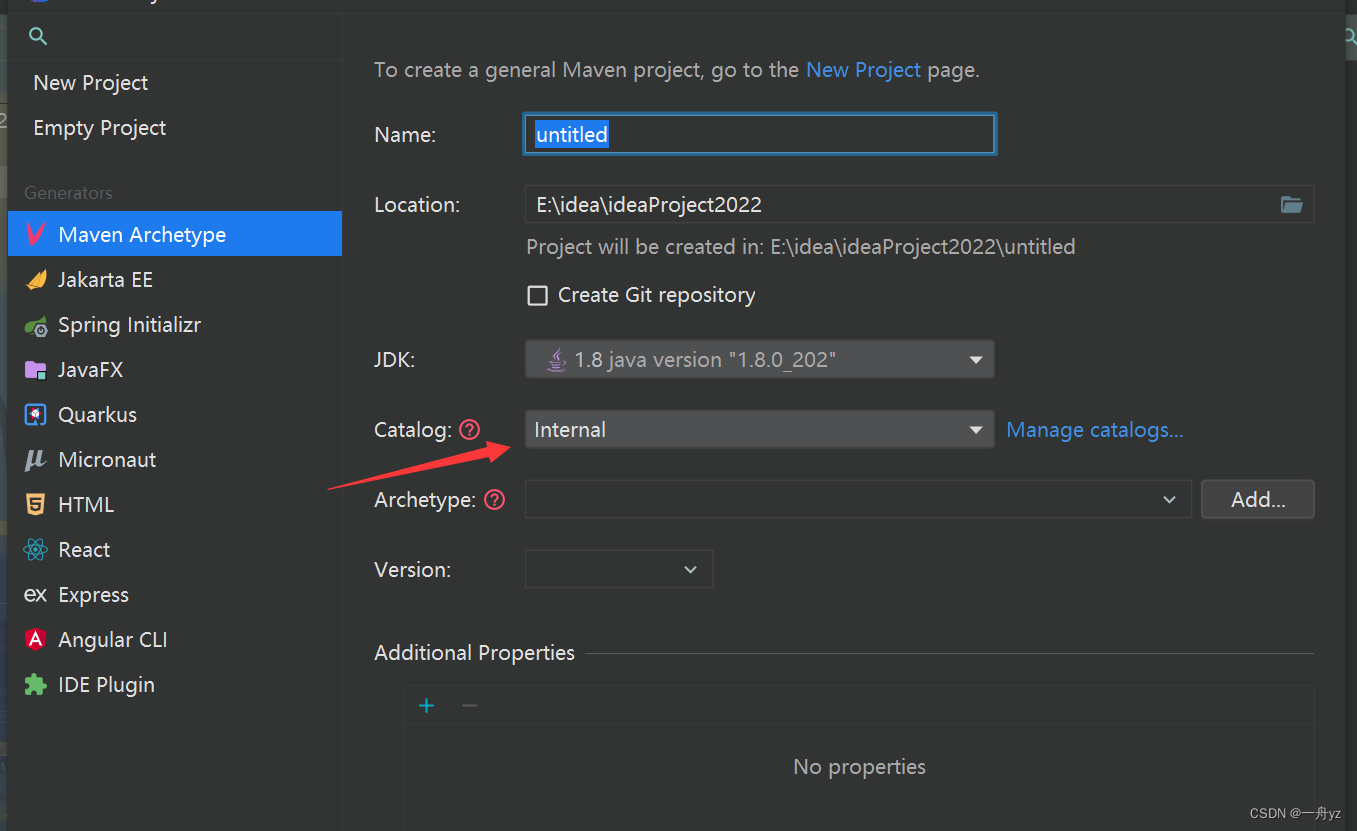
在创建模块时,idea2022新版选择internal即可:
pom.xml文件
<project xmlns="http://maven.apache.org/POM/4.0.0" xmlns:xsi="http://www.w3.org/2001/XMLSchema-instance"
         xsi:schemaLocation="http://maven.apache.org/POM/4.0.0 http://maven.apache.org/xsd/maven-4.0.0.xsd">
    <modelVersion>4.0.0</modelVersion>

    <groupId>cn.ysk</groupId>
    <artifactId>springboot-pre</artifactId>
    <version>1.0-SNAPSHOT</version>
    <packaging>jar</packaging>

    <name>springboot-pre</name>
    <url>http://maven.apache.org</url>

    <properties>
        <project.build.sourceEncoding>UTF-8</project.build.sourceEncoding>
    </properties>

    <dependencies>
        <dependency>
            <groupId>junit</groupId>
            <artifactId>junit</artifactId>
            <version>4.13.2</version>
            <scope>test</scope>
        </dependency>

        <dependency>
            <groupId>org.springframework</groupId>
            <artifactId>spring-context</artifactId>
            <version>5.3.19</version>
        </dependency>

    </dependencies>

    <build>
        <plugins>
            <!-- 编译插件 -->
            <plugin>
                <artifactId>maven-compiler-plugin</artifactId>
                <!-- 插件的版本 -->
                <version>3.5.1</version>
                <!-- 编译级别 -->
                <configuration>
                    <source>1.8</source>
                    <target>1.8</target>
                    <!-- 编码格式 -->
                    <encoding>UTF-8</encoding>
                </configuration>
            </plugin>
        </plugins>
    </build>

</project>
创建学生类:
public class Student {

    private Integer id;
    private String name;
    private Integer age;
    ……
resource目录下创建beans.xml文件:
<?xml version="1.0" encoding="UTF-8"?>
    <beans xmlns="http://www.springframework.org/schema/beans"
    xmlns:xsi="http://www.w3.org/2001/XMLSchema-instance"
        xsi:schemaLocation="http://www.springframework.org/schema/beans http://www.springframework.org/schema/beans/spring-beans.xsd">


            <bean id="myStudent" class="cn.ysk.vo.Student">
                <property name="id" value="1001" />
                <property name="name" value="李强国" />
                <property name="age" value="20" />
                </bean>

                </beans>
测试:
@Test
public void test01() {
    String config = "ba01/applicationContext.xml";
    ApplicationContext ac = new ClassPathXmlApplicationContext(config);
    Student student = (Student) ac.getBean("student");
    System.out.println(student);
}
//Student{name='zhangsan', age=22, school=School{name='清华', address='北京'}}
JavaConfig 配置容器
JavaConfig: 使用java类作为xml配置文件的替代, 是配置spring容器的纯java的方式。 在这个java 类这可以创建java对象,把对象放入spring容器中
使用两个注解:
- @Configuration : 放在一个类的上面,表示这个类是作为配置文件使用的。(这个类就相当于之前的xml了,从而好多注解也是在这个类上面添加)
- @Bean:声明对象,把对象注入到容器中。
创建配置类(等同于 xml 配置文件)
/**
 * Configuration:表示当前类是作为配置文件使用的。 就是用来配置容器的
 * 位置:在类的上面
 * <p>
 * SpringConfig这个类就相当于beans.xml
 */
@Configuration
public class SpringConfig {
    /**
     * 创建方法,方法的返回值是对象。 在方法的上面加入@Bean
     * 方法的返回值对象就注入到容器中。
     * <p>
     * 1.2 @ImporResource
     *
     * @ImportResource 作用导入其他的xml配置文件, 等于 在xml
     * 例如:
     * @Bean: 把对象注入到spring容器中。 作用相当于<bean>
     * <p>
     * 位置:方法的上面
     * <p>
     * 说明:@Bean,不指定对象的名称,默认是方法名是 id
     */
    @Bean
    public Student createStudent() {
        Student s1 = new Student();
        s1.setName("张三");
        s1.setAge(26);
        s1.setId(111);
        return s1;
    }

    /***
     * 指定对象在容器中的名称(指定<bean>的id属性)
     * @Bean的name属性,指定对象的名称(id)
     */
    @Bean(name = "lisiStudent")
    public Student makeStudent() {
        Student s2 = new Student();
        s2.setName("李四");
        s2.setAge(22);
        s2.setId(222);
        return s2;
    }
测试:
@Test
public void test02(){
    //没有 xml 配置文件,使用 java 类代替 xml 配置文件 的作用
    ApplicationContext ctx = new
        AnnotationConfigApplicationContext(SpringConfig.class);
    Student student = (Student) ctx.getBean("createStudent");
    System.out.println("student==="+student);
}
@ImporResource
@ImportResource 作用导入其他的xml配置文件, 等于 在xml中:
<import resources="其他配置文件"/>
例如:
@Configuration
@ImportResource(value ={
"classpath:applicationContext.xml","classpath:beans.xml"})
public class SpringConfig {
}
@PropertyResource
@PropertyResource 是读取 properties 属性配置文件
在 resources 目录下创建 config.properties:
tiger.name=东北老虎
tiger.age=6
创建数据类 Tiger:
@Component("tiger")
public class Tiger {
    @Value("${tiger.name}")
    private String name;
    @Value("${tiger.age}")
    private Integer age;
    @Override
    public String toString() {
        return "Tiger{" +
            "name='" + name + '\'' +
            ", age=" + age +
            '}';
    }
}
修改config类:
@Configuration
@PropertySource(value = "classpath:config.properties")
@ComponentScan(value = "cn.ysk.vo")
public class SystemConfig {
 //使用@Bean 声明 bean
}
SpringBoot
特性
SpringBoot 相当于 不需要配置文件的Spring+SpringMVC。 常用的框架和第三方库都已经 配置好了。
- 简化 Spring 应用程序的创建和开发过程
- 提供了starter起步依赖,简化应用的配置。
- 直接使用 java main 方法启动内嵌的 Tomcat 服务器运行 Spring Boot 程序,无需部署 war 包文件
- 提供了健康检查, 统计,外部化配置
- 不用生成代码, 不用使用xml做配置
四大核心:
1)自动配置 -Auto Configuration
2)起步依赖-Starter Dependency
3)命令行界面-Spring Boot CLI
4)运行监控-Actuator
创建springboot项目
第一种方式
第1、2种方式都需要联网!
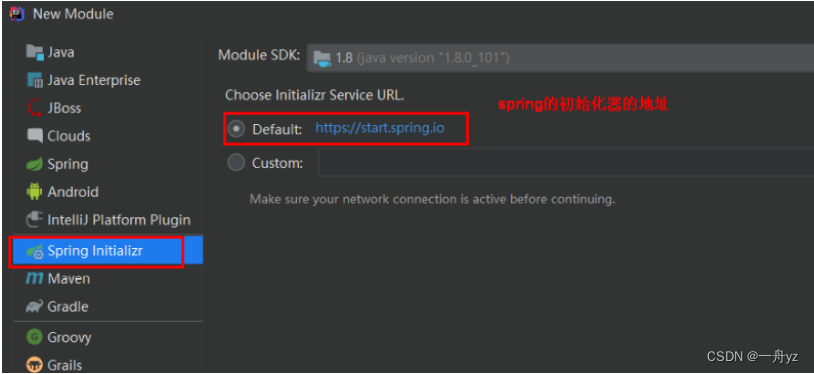
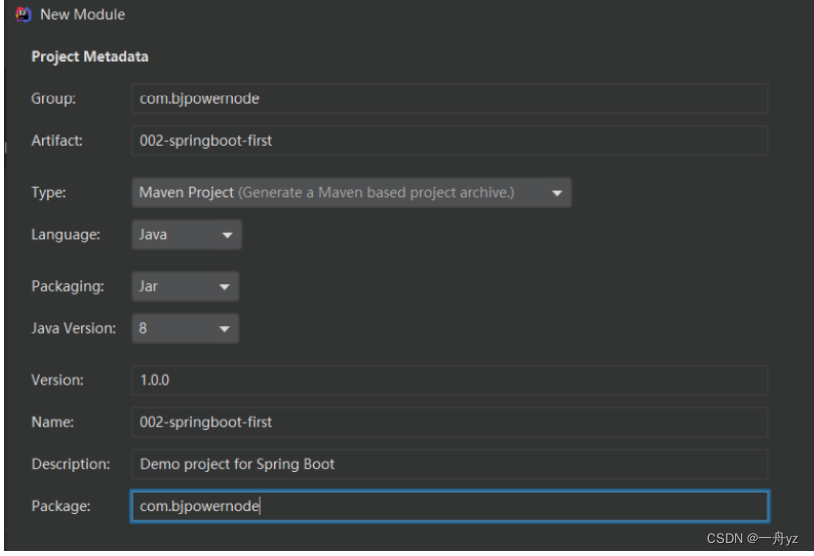
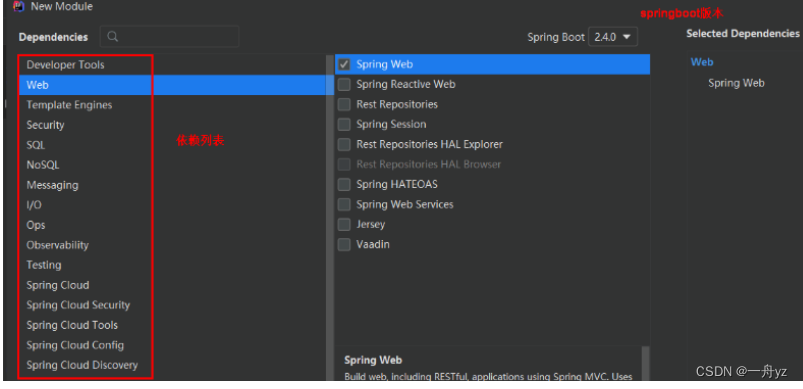
使用 spring boot 提供的初始化器。 向导的方式,完成 spring boot 项目的创建: 使用 方便。
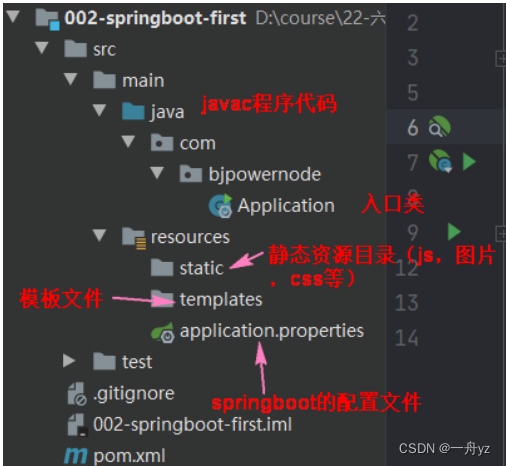
目录结构:
起步依赖:

第二种方式
国内地址: https://start.springboot.io
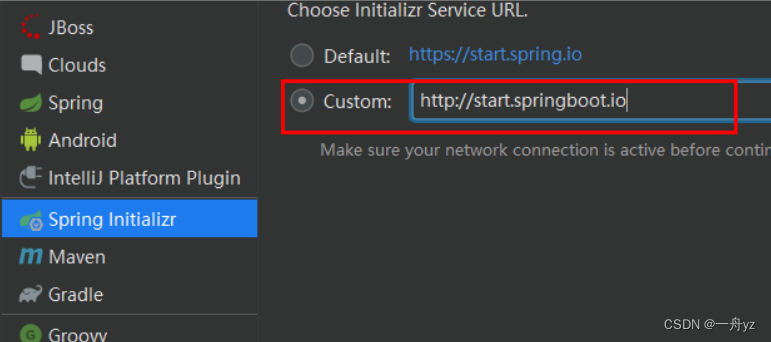
其余同上……
第三种方式-maven
直接创建maven项目
pom.xml文件:
加入:
<parent>
    <groupId>org.springframework.boot</groupId>
    <artifactId>spring-boot-starter-parent</artifactId>
    <version>2.4.2</version>
    <relativePath/> <!-- lookup parent from repository -->
</parent>
<dependencies>
    <dependency>
        <groupId>org.springframework.boot</groupId>
        <artifactId>spring-boot-starter-web</artifactId>
    </dependency>

    <dependency>
        <groupId>org.springframework.boot</groupId>
        <artifactId>spring-boot-starter-test</artifactId>
        <scope>test</scope>
    </dependency>
</dependencies>

<build>
    <plugins>
        <plugin>
            <groupId>org.springframework.boot</groupId>
            <artifactId>spring-boot-maven-plugin</artifactId>
        </plugin>
    </plugins>
</build>
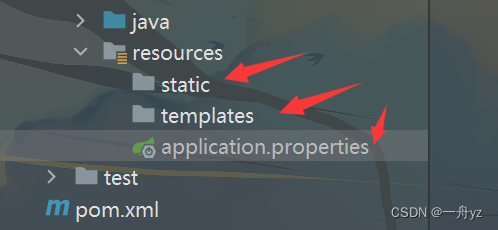
手动创建:
案例
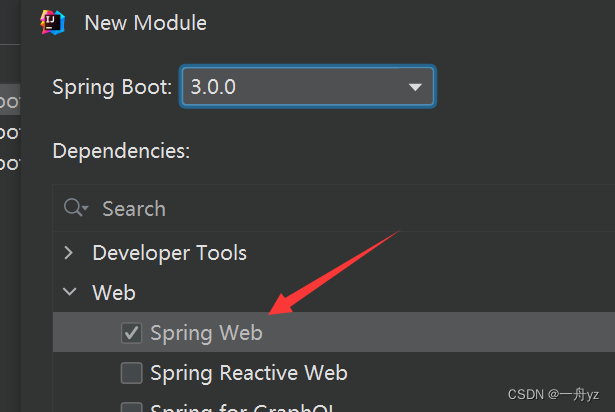
采用第二种方式创建项目:
@Controller
public class HelloSpringBoot {

    @RequestMapping("/hello")
    @ResponseBody
    public String helloSpringBoot(){
        return "欢迎使用SpringBoot框架";
    }
}
通过main方法启动:
@SpringBootApplication
public class SpringbootWebApplication {
    public static void main(String[] args) {
        SpringApplication.run(SpringbootWebApplication.class, args);
    }
}
浏览器中输入:http://localhost:8080/hello

注解
@SpringBootApplication
符合注解:由
@SpringBootConfiguration
@EnableAutoConfiguration
@ComponentScan


1.@SpringBootConfiguration

@Configuration
public @interface SpringBootConfiguration {
    @AliasFor(
        annotation = Configuration.class
    )
    boolean proxyBeanMethods() default true;
}

说明:使用了@SpringBootConfiguration注解标注的类,可以作为配置文件使用的,
    可以使用Bean声明对象,注入到容器
2.@EnableAutoConfiguration

启用自动配置, 把java对象配置好,注入到spring容器中。例如可以把mybatis的对象创建好,放入到容器中


3.@ComponentScan
    @ComponentScan 扫描器,找到注解,根据注解的功能创建对象,给属性赋值等等。
默认扫描的包: @ComponentScan所在的类(就是main方法所在的类,主类)所在的包和子包。
核心配置文件
Spring Boot 的核心配置文件用于配置 Spring Boot 程序,名字必须以 application 开始
.properties 文件(默认采用该文件)
正常情况:
Tomcat started on port(s): 8080 (http) with context path ''
进行修改:
application.properties设置 端口和上下文
#设置端口号
server.port=8082
#设置访问应用上下文路径, contextpath
server.servlet.context-path=/myBoot

.yml 文件
推荐使用这种方式!
值与前面的冒号配置项必须要有一个空格
server:
 port: 9091
 servlet:
 	context-path: /boot
层级结构按照python来理解
多环境配置
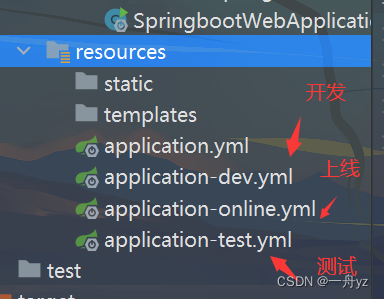
有开发环境, 测试环境, 上线的环境。 每个环境有不同的配置信息, 例如端口, 上下文件, 数据库url,用户名,密码等等。使用多环境配置文件,可以方便的切换不同的配置。
使用方式: 创建多个配置文件 命名必须以 application-环境标识.properties|yml
创建开发环境的配置文件: application-dev.properties( application-dev.yml ) 创建测试者使用的配置: application-test.properties
application.yml
#激活使用的test环境
spring:
  profiles:
    active: test
text-path: /boot
层级结构按照python来理解


###  多环境配置

有开发环境, 测试环境, 上线的环境。 每个环境有不同的配置信息, 例如端口, 上下文件, 数据库url,用户名,密码等等。使用多环境配置文件,可以方便的切换不同的配置。

使用方式: 创建多个配置文件  **命名必须以 application-环境标识.properties|yml**

创建开发环境的配置文件: application-dev.properties( application-dev.yml ) 创建测试者使用的配置: application-test.properties

<img src="image-20221216213647082.png" alt="image-20221216213647082" style="zoom:80%;" />

application.yml

```yaml
#激活使用的test环境
spring:
  profiles:
    active: test
