集群配置
集群的三台服务器分别部署了fate-10000, fate-9999, fate-9998命名空间,集群的具体部署情况请转:link查看。
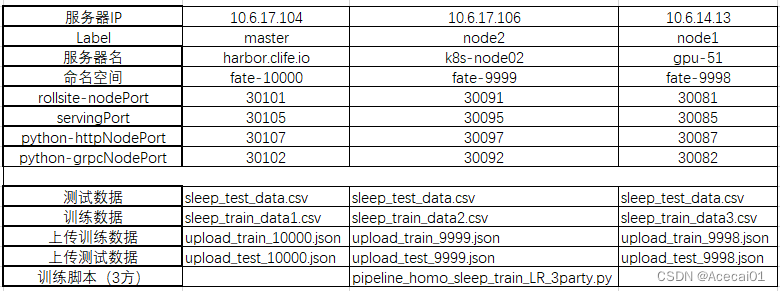
文章后面以命名空间名来区分操作所在的节点(注意节点的实际名字不等于命名空间名)。集群的配置信息如下:
1、数据制作
本次实战是要通过fate集群实现横向联邦训练一个睡/醒的二分类模型,训练数据含有40个特征,1个标签列,用0和1分别表示醒和睡着状态。
数据制作规格:
数据有‘id’、‘y’、‘x0’~‘x39’列,‘id’列是索引编号(整数),'y’列是标签列,‘x0’-‘x39’是不同的特征列。注意列名一定要和上述一致(特征列数量可以不同),且列的放置顺序也要一致。由于是准备做逻辑回归模型,所以特征列都做了标准化。测试训练数据和测试数据包含的列都是一样,测试数据特征列基于train_data的方差和均值做了标准化。
本人将train_data分成了3份:命名为sleep_train_data1.csv,sleep_train_data2.csv,sleep_train_data3.csv,测试数据命名为sleep_test_data.csv。数据放置的服务器请看文章开头的表格,下面是一些个人在实验阶段摸索得出的一些注意点:
注意1:关于‘id’列的数值
由于是做横向联邦学习,不需要各方的样本有共同的‘id’,所以3方训练数据sleep_train_data1.csv,sleep_train_data2.csv,sleep_train_data3.csv的‘id’列最好是无重复的整数,比如数据1方是0-100,数据2方是101-300, 数据3方是301-700,但这个并不是必须的(训练时各方数据并不能有交互,纯属个人强迫症)。各方训练数据的‘id’列数值可以有重复,但同一方的训练数据和测试数据‘id’就不能有重复了,否则在评估阶段,会将训练数据和测试数据的‘id’求一个并集,去除重复的‘id’数据,有重叠部分的‘id’可能标为训练数据,也可能标为测试数据,这样给出的训练集或测试集预测指标就会不准确,和线下单独测试的数据量和结果不一致,所以如果数据1方的训练数据‘id’是0-100,那么其测试数据的‘id’就要是大于100的整数,其他数据方以此类推。本人的4份数据‘id’设置大致是(数量只做参考):

注意2:关于训练和测试数据的数量
传输数据的配置参数里有个partition参数,即分区,同时训练模型时有batchsize参数,如果partition=1,batchsize=-1,即数据不需要分区放置,训练时每次梯度下降都用完整的数据,那么可以不用管数据的量;不过建议数据大时(盲猜大于1000条),还是要设置partition和batchsize,比如partition=4,batchsize=256(越大训练时间越短),此时要将每个训练数据的量和测试数据的量处理成partitionbatchsize的整数倍,这样才不容易报错,特别是在进行加密训练的情况。
强烈建议配置partition >1, 且数据量做成partitionbatchsize的整数倍,这个设置可能给我解决了以下加密训练过程中问题:
...
[ERROR] [2022-12-13 10:01:25,313] [202212130926415047440] [35619:140507320919872] - [task_executor._run_] [line:243]: unsupported operand type(s) for /=: 'NoneType' and 'int'
Traceback (most recent call last):
  File "./fate/fateflow/python/fate_flow/worker/task_executor.py", line 195, in _run_
    cpn_output = run_object.run(cpn_input)
  File "./fate/fate/python/federatedml/model_base.py", line 209, in run
    method(cpn_input)
  File "./fate/fate/python/federatedml/model_base.py", line 247, in _run
    this_data_output = func(*params)
  File "./fate/fate/python/federatedml/linear_model/logistic_regression/homo_logistic_regression/homo_lr_host.py", line 137, in fit
    grad /= n
TypeError: unsupported operand type(s) for /=: 'NoneType' and 'int'
因为没有复现,只是猜测上述数据量的配置解决了该问题。
注意3:在数据使用过程中,fateboard查看到报错日志:
...
label = int(label)\nValueError: invalid literal for int() with base 10: '0.0'
...
以上报错说明标签’y’列有字符型数据无法转换成整型,经过本地强制转换成整形再上传到容器后使用就没有该问题了。
通过以下命令,进入命名空间fate-10000的python容器中:
kubectl exec -it svc/fateflow -c python -n fate-10000 -- bash
或者查找到python pod的id,用以下命令进入:
kubectl exec -it pod/python-f4b7fff6-jl2vn -c python -n fate-10000 -- bash
2、上传数据文件到容器
先进入容器创建放数据的目录:
[root@harbor ~]# kubectl exec -it svc/fateflow -c python -n fate-10000 -- bash
(app-root) bash-4.2# cd ..
(app-root) bash-4.2# mkdir my_test
(app-root) bash-4.2# cd my_test
(app-root) bash-4.2# mkdir  sleep_homo
(app-root) bash-4.2# cd sleep_homo
(app-root) bash-4.2# pwd
/data/projects/my_test/sleep_homo
将宿主机的数据文件拷贝到容器的指定目录:
[root@harbor kubefate]# kubectl get pods -n fate-10000 -o wide   # 先查看pod的id
NAME                              READY   STATUS    RESTARTS   AGE   IP            NODE              NOMINATED NODE   READINESS GATES
client-6765697776-nzhsh           1/1     Running   0          23h   10.244.0.46   harbor.clife.io   <none>           <none>
clustermanager-7fb64d6778-ldsds   1/1     Running   0          23h   10.244.0.41   harbor.clife.io   <none>           <none>
mysql-655dc6847c-rxvq4            1/1     Running   0          23h   10.244.0.42   harbor.clife.io   <none>           <none>
nodemanager-0-7b4b9b54c6-tr9cm    2/2     Running   0          23h   10.244.0.47   harbor.clife.io   <none>           <none>
nodemanager-1-57b75bd874-bfrns    2/2     Running   0          23h   10.244.0.44   harbor.clife.io   <none>           <none>
nodemanager-2-679b569f56-hz885    2/2     Running   0          23h   10.244.0.45   harbor.clife.io   <none>           <none>
python-f4b7fff6-jl2vn             2/2     Running   0          23h   10.244.0.48   harbor.clife.io   <none>           <none>
rollsite-765465d678-587w4         1/1     Running   0          23h   10.244.0.43   harbor.clife.io   <none>           <none>
[root@harbor ~]# kubectl cp /home/FATE_V172/host_to_fate/sleep_test_data.csv fate-10000/python-f4b7fff6-jl2vn:/data/projects/my_test/sleep_homo/ -c python
[root@harbor ~]# kubectl cp /home/FATE_V172/host_to_fate/sleep_train_data1.csv fate-10000/python-f4b7fff6-jl2vn:/data/projects/my_test/sleep_homo/ -c python
关于宿主机和容器之间拷贝文件的命令格式可以参考:
[root@harbor ~]# kubectl cp --help
fate-9999和fate-9998重复以上操作,得到各自的数据文件,数据分布参考文章最开始的表格。
3、配置上传数据的文件和上传到容器
以fate-10000节点为例,配置上传数据的文件upload_train_10000.json:
{
    "file": "/data/projects/my_test/sleep_homo/sleep_train_data1.csv", //训练集的路径
	"head": 1,
	"partition": 4, //是否要分区,很小数据不用分区
	"work_mode": 1, //0是单机,1是集群,我们要注意
    "table_name": "sleep_homo_10000_train01",
    "namespace": "experiment"    //后面这两个字段一个是数据集的名字和命名空间,这个在后面的配置中要用到。
}
配置上传数据的文件upload_test_10000.json:
{
    "file": "/data/projects/my_test/sleep_homo/sleep_test_data.csv",
	"head": 1,
	"partition": 4,
	"work_mode": 1,
    "table_name": "sleep_homo_10000_test01",
    "namespace": "experiment"
}
将文件upload_train_10000.json和upload_test_10000.json传入到fate-10000的容器python中:
[root@harbor ~]# kubectl cp /home/FATE_V172/host_to_fate/upload_train_10000.json fate-10000/python-f4b7fff6-jl2vn:/data/projects/my_test/sleep_homo/ -c python
[root@harbor ~]# kubectl cp /home/FATE_V172/host_to_fate/upload_test_10000.json fate-10000/python-f4b7fff6-jl2vn:/data/projects/my_test/sleep_homo/ -c python
如果你传错了,或者数据要修改后上传,但并不想改变传输配置文件,以upload_test_10000.json为例,则可以:
[root@harbor ~]# kubectl cp /home/FATE_V172/host_to_fate/upload_test_10000.json fate-10000/python-f4b7fff6-jl2vn:/data/projects/my_test/sleep_homo/ -c python --drop
加个–drop参数即可将已上传的原错误数据覆盖掉。
同样在fate-9999和fate-9998重复以上操作(配置文件名和数据名按各自的节点名区分)。
4、传数据到fate
4.1、flow命令上传容器内数据到fate的方法
关于上传数据到fate的意思
Upload data is uploaded to eggroll and becomes a DTable format executable by subsequent algorithms
参考说明:https://github.com/FederatedAI/FedRec/blob/1270cc1530fa734d84e1068151139bc552fbeaa4/fate_flow/README.rst
步骤
以fate-10000为例子,进入fate-10000的python容器,首先查看fate-10000下fateflow服务的端点IP:
[root@harbor kubefate]# kubectl describe svc fateflow -n fate-10000
Name:              fateflow
Namespace:         fate-10000
Labels:            app.kubernetes.io/managed-by=Helm
                   chart=fate
                   cluster=fate
                   fateMoudle=fateflow
                   heritage=Helm
                   name=fate-10000
                   owner=kubefate
                   partyId=10000
                   release=fate-10000
Annotations:       meta.helm.sh/release-name: fate-10000
                   meta.helm.sh/release-namespace: fate-10000
Selector:          fateMoudle=python,name=fate-10000,partyId=10000
Type:              ClusterIP
IP Family Policy:  SingleStack
IP Families:       IPv4
IP:                None
IPs:               None
Port:              tcp-grpc  9360/TCP
TargetPort:        9360/TCP
Endpoints:         10.244.0.48:9360
Port:              tcp-http  9380/TCP
TargetPort:        9380/TCP
Endpoints:         10.244.0.48:9380
Session Affinity:  None
Events:            <none>
上面信息看到Endpoints:10.244.0.48,于是执行flow初始化:
(app-root) bash-4.2# flow init --ip 10.244.0.48 --port 9380
{
    "retcode": 0,
    "retmsg": "Fate Flow CLI has been initialized successfully."
}
此时可以正常使用flow命令了,用flow上传训练数据:
(app-root) bash-4.2# flow data upload -c /data/projects/my_test/sleep_homo/upload_train_10000.json
{
    "data": {
        "board_url": "http://fateboard:8080/index.html#/dashboard?job_id=202212091209301098120&role=local&party_id=0",
        "code": 0,
        "dsl_path": "/data/projects/fate/fateflow/jobs/202212091209301098120/job_dsl.json",
        "job_id": "202212091209301098120",
        "logs_directory": "/data/projects/fate/fateflow/logs/202212091209301098120",
        "message": "success",
        "model_info": {
            "model_id": "local-0#model",
            "model_version": "202212091209301098120"
        },
        "namespace": "experiment",
        "pipeline_dsl_path": "/data/projects/fate/fateflow/jobs/202212091209301098120/pipeline_dsl.json",
        "runtime_conf_on_party_path": "/data/projects/fate/fateflow/jobs/202212091209301098120/local/0/job_runtime_on_party_conf.json",
        "runtime_conf_path": "/data/projects/fate/fateflow/jobs/202212091209301098120/job_runtime_conf.json",
        "table_name": "sleep_homo_10000_train",
        "train_runtime_conf_path": "/data/projects/fate/fateflow/jobs/202212091209301098120/train_runtime_conf.json"
    },
    "jobId": "202212091209301098120",
    "retcode": 0,
    "retmsg": "success"
}
用flow上传测试数据:
(app-root) bash-4.2# flow data upload -c /data/projects/my_test/sleep_homo/upload_test_10000.json
{
    "data": {
        "board_url": "http://fateboard:8080/index.html#/dashboard?job_id=202212091210010478740&role=local&party_id=0",
        "code": 0,
        "dsl_path": "/data/projects/fate/fateflow/jobs/202212091210010478740/job_dsl.json",
        "job_id": "202212091210010478740",
        "logs_directory": "/data/projects/fate/fateflow/logs/202212091210010478740",
        "message": "success",
        "model_info": {
            "model_id": "local-0#model",
            "model_version": "202212091210010478740"
        },
        "namespace": "experiment",
        "pipeline_dsl_path": "/data/projects/fate/fateflow/jobs/202212091210010478740/pipeline_dsl.json",
        "runtime_conf_on_party_path": "/data/projects/fate/fateflow/jobs/202212091210010478740/local/0/job_runtime_on_party_conf.json",
        "runtime_conf_path": "/data/projects/fate/fateflow/jobs/202212091210010478740/job_runtime_conf.json",
        "table_name": "sleep_homo_10000_test",
        "train_runtime_conf_path": "/data/projects/fate/fateflow/jobs/202212091210010478740/train_runtime_conf.json"
    },
    "jobId": "202212091210010478740",
    "retcode": 0,
    "retmsg": "success"
}
fate-9999和fate-9998重复以上操作。
4.2、pipline上传容器内数据到fate的方法
本节只做方法介绍,非本案例所用步骤。测试是直接用了容器内自带的传数据配置代码pipeline-upload.py。
依照【https://fate.readthedocs.io/en/latest/tutorial/pipeline/pipeline_tutorial_upload/】网址操作:
先安装fate_client :
(app-root) bash-4.2# pip install fate_client -i https://pypi.tuna.tsinghua.edu.cn/simple
这一步可能会因为网络问题无法顺利安装fate_client,此时要去pypi官网下载fate_client-1.9.0安装包和依赖包loguru-0.6.0,传到容器内进行安装,先装loguru,后装fate_client。上传文件到容器的具体方法参考本文第一小节。
然后就可以用pipeline命令了,可以用以下命令查看该命令的使用方法
(app-root) bash-4.2# pipeline --help
Usage: pipeline [OPTIONS] COMMAND [ARGS]...

Options:
  --help  Show this message and exit.

Commands:
  config  pipeline config tool
  init    - DESCRIPTION: Pipeline Config Command.
原教程没有提到的一个重要命令使用就是:
(app-root) bash-4.2# pipeline config --help
Usage: pipeline config [OPTIONS] COMMAND [ARGS]...

  pipeline config tool

Options:
  --help  Show this message and exit.

Commands:
  check  - DESCRIPTION: Check for Flow server status and Flow version.
  show   - DESCRIPTION: Show pipeline config details for Flow server.
可见命令’pipeline config cheak’和’pipeline config show’可以用于查询Flow server配置情况,是否真的成功等(这里有坑)。
按照原教程执行:
(app-root) bash-4.2# pipeline init --ip 127.0.0.1 --port 9380
Pipeline configuration succeeded.
看到配置结果succeeded以为成功了,执行以下上传数据的测试代码:
(app-root) bash-4.2# pwd
/data/projects/fate/examples/pipeline/upload
(app-root) bash-4.2# python pipeline-upload.py
.....
ValueError: job submit failed, err msg: {'retcode': 100, 'retmsg': 'Connection refused, Please check if the fate flow service is started'}
报错了,说fate flow service并没有启动!!,查阅资料,参考如下博客:
https://cloud.tencent.com/developer/article/2026577
得知查看fate flow service是否成功的方法,以及正确的pipeline配置方式:

注意这里的公有IP指的是提供fateflow服务的pod的IP,以fate-10000节点为例,如下方法查看IP:
[root@harbor kubefate]# kubectl describe svc fateflow -n fate-10000
Name:              fateflow
Namespace:         fate-10000
Labels:            app.kubernetes.io/managed-by=Helm
                   chart=fate
                   cluster=fate
                   fateMoudle=fateflow
                   heritage=Helm
                   name=fate-10000
                   owner=kubefate
                   partyId=10000
                   release=fate-10000
Annotations:       meta.helm.sh/release-name: fate-10000
                   meta.helm.sh/release-namespace: fate-10000
Selector:          fateMoudle=python,name=fate-10000,partyId=10000
Type:              ClusterIP
IP Family Policy:  SingleStack
IP Families:       IPv4
IP:                None
IPs:               None
Port:              tcp-grpc  9360/TCP
TargetPort:        9360/TCP
Endpoints:         10.244.0.48:9360
Port:              tcp-http  9380/TCP
TargetPort:        9380/TCP
Endpoints:         10.244.0.48:9380
Session Affinity:  None
Events:            <none>
以上Endpoints的10.244.0.48就是该服务提供者pod的IP,也就是pipeline要初始化配置的IP!!
(app-root) bash-4.2# pipeline config check
Flow server not responsive. Please check flow server ip and port setting.
(app-root) bash-4.2# pipeline init --ip 10.244.0.48 --port 9380
Pipeline configuration succeeded.
(app-root) bash-4.2# pipeline config check
Flow server status normal, Flow version: 1.7.2
(app-root) bash-4.2# python pipeline-upload.py
....success....
5、基于pipeline训练模型
5.1、三方非加密训练
经过4.1小节,3个节点都已经上传了各自的训练数据和测试数据到fate。接着编写基于pipeline的训练代码,本人以fate-9999作为guest方,也就是任务发起方,以fate-10000, fate-9998作为host方,训练参与方,先测试不带加密参数传播的训练方式,代码pipeline_homo_sleep_train_LR_3party.py如下:
# -*-coding:utf-8-*-
import argparse
import json
from pipeline.backend.pipeline import PipeLine
from pipeline.component import DataTransform
from pipeline.interface import Model
from pipeline.component import Evaluation
from pipeline.component import HomoLR
from pipeline.component import Reader
from pipeline.component import FeatureScale
from pipeline.interface import Data
from pipeline.utils.tools import load_job_config

def main(namespace=""):
    guest = 9999     # 训练任务发起者
    host1 = 10000    # 参与方1
    host2 = 9998     # 参与方2
    host = [host1, host2]
    arbiter = host1      # 裁判方,最好不要由任务发起者guest来担当,host2也可以作为arbiter
    # 定义训练数据
    guest_train_data = {"name": "sleep_homo_"+str(guest)+"_train01", "namespace": f"experiment{namespace}"}
    host_train_data1 = {"name": "sleep_homo_"+str(host1)+"_train01", "namespace": f"experiment{namespace}"}
    host_train_data2 = {"name": "sleep_homo_"+str(host2)+"_train01", "namespace": f"experiment{namespace}"}
    # 定义测试数据
    guest_test_data = {"name": "sleep_homo_"+str(guest)+"_test01", "namespace": f"experiment{namespace}"}
    host_test_data1 = {"name": "sleep_homo_"+str(host1)+"_test01", "namespace": f"experiment{namespace}"}
    host_test_data2 = {"name": "sleep_homo_"+str(host2)+"_test01", "namespace": f"experiment{namespace}"}

    # initialize pipeline
    pipeline = PipeLine()
    # set job initiator
    pipeline.set_initiator(role='guest', party_id=guest)
    # set participants information
    pipeline.set_roles(guest=guest, host=host, arbiter=arbiter)

    # 训练数据读取模块
    # define Reader components to read in data
    reader_0 = Reader(name="reader_0")
    # configure Reader for guest
    reader_0.get_party_instance(role='guest', party_id=guest).component_param(table=guest_train_data)
    # configure Reader for host
    reader_0.get_party_instance(role='host', party_id=host1).component_param(table=host_train_data1)
    reader_0.get_party_instance(role='host', party_id=host2).component_param(table=host_train_data2)
    # 测试数据读取模块
    reader_1 = Reader(name="reader_1")
    reader_1.get_party_instance(role='guest', party_id=guest).component_param(table=guest_test_data)
    reader_1.get_party_instance(role='host', party_id=host1).component_param(table=host_test_data1)
    reader_1.get_party_instance(role='host', party_id=host2).component_param(table=host_test_data2)

    # define DataTransform components
    data_transform_0 = DataTransform(
        name="data_transform_0",
        with_label=True,
        output_format="dense")  # start component numbering at 0

    data_transform_1 = DataTransform(name="data_transform_1")

    scale_0 = FeatureScale(name='scale_0')
    scale_1 = FeatureScale(name='scale_1')

    # 逻辑回归参数参考网址
    # "https://github.com/FederatedAI/FATE/blob/3ee02ea81c62d60353b2df40e141529b151d7c67/python/fate_client/pipeline/param/logistic_regression_param.py"
    # github路径:"FATE/python/fate_client/pipeline/param/logistic_regression_param.py"
    param = {
        "penalty": "L2",
        "optimizer": "sgd",
        "tol": 1e-05,
        "alpha": 0.01,    # 惩罚系数
        "max_iter": 100,
        "early_stop": "abs", # ['diff','weight_diff', 'abs']
         #batch_size=-1表示全部数据作为一次迭代的输入, 带Paillier加密时,设置为32大概3分钟一个epoch, 设置为256大概1分钟一个epoch,越大越快
        "batch_size": -1,
        "learning_rate": 0.15,
        "decay": 1,
        "decay_sqrt": True,
        "init_param": {
            "init_method": "zeros"
        },
        "encrypt_param": {
            "method": None          # 无加密
            # "method": "Paillier"  # 该加密不支持L1正则,只支持L2正则 # 还有iterativeAffine同态加密方法,secureBoost
        },
        # "cv_param": {    # 交叉验证
        #     "n_splits": 4,
        #     "shuffle": True,
        #     "random_seed": 33,
        #     "need_cv": False
        # },
        # "callback_param": {   # 实时保存模型,提前终止训练
        #     "callbacks": ["ModelCheckpoint", "EarlyStopping"]
        # }
    }

    homo_lr_0 = HomoLR(name='homo_lr_0', **param)

    # add components to pipeline, in order of task execution
    pipeline.add_component(reader_0)
    pipeline.add_component(reader_1)

    pipeline.add_component(data_transform_0, data=Data(data=reader_0.output.data))
    pipeline.add_component(data_transform_1, data=Data(data=reader_1.output.data),
                           model=Model(data_transform_0.output.model))

    # set data input sources of intersection components
    pipeline.add_component(scale_0, data=Data(data=data_transform_0.output.data))
    pipeline.add_component(scale_1, data=Data(data=data_transform_1.output.data),
                           model=Model(scale_0.output.model))

    pipeline.add_component(homo_lr_0, data=Data(train_data=scale_0.output.data, validate_data=scale_1.output.data))

    evaluation_0 = Evaluation(name="evaluation_0", eval_type="binary")
    # 因为3方的测试数据都一样,就设置host方不用测试,只在guest上测试即可
    evaluation_0.get_party_instance(role='host', party_id=host).component_param(need_run=False)
    pipeline.add_component(evaluation_0, data=Data(data=homo_lr_0.output.data))

    # compile pipeline once finished adding modules, this step will form conf and dsl files for running job
    pipeline.compile()

    # fit model
    pipeline.fit()
    # query component summary
     # 以下打印的结果在fateboard上查看更具体
    print(json.dumps(pipeline.get_component("homo_lr_0").get_summary(), indent=4, ensure_ascii=False))
    print(json.dumps(pipeline.get_component("evaluation_0").get_summary(), indent=4, ensure_ascii=False))

if __name__ == "__main__":
    main(namespace="")
将该代码上传到fate-9999容器内(无需传到fate-10000,fate-9998)执行:
[root@harbor kubefate]# kubectl cp /home/FATE_V172/host_to_fate/pipeline_homo_sleep_train_LR_3party.py fate-9999/python-6995b487b4-z2v87:/data/projects/my_test/sleep_homo/ -c python
进入fate-9999的python容器内,切换到代码所在路径,执行代码即可提交任务
[root@harbor ~]# kubectl exec -it svc/fateflow -c python -n fate-9999 -- bash
(app-root) bash-4.2# cd /data/projects/my_test/sleep_homo/
(app-root) bash-4.2# python pipeline_homo_sleep_train_LR_3party.py
2022-12-15 05:30:29.987 | INFO     | pipeline.utils.invoker.job_submitter:monitor_job_status:123 - Job id is 202212150530225975640
                   Job is still waiting, time elapse: 0:00:01
2022-12-15 05:30:32Running component reader_0, time elapse: 0:01:11
2022-12-15 05:31:55Running component reader_1, time elapse: 0:01:35
2022-12-15 05:32:20Running component data_transform_0, time elapse: 0:02:11
2022-12-15 05:32:52Running component data_transform_1, time elapse: 0:02:34
训练开始,此时可以访问fate-10000,fate-9999,fate-99998各自的fateboard面板,查看任务运行情况:


如上三图可见不同方的任务状态信息不一样,对于发起方fate-9999,其角色显示为guest,它有两partner;而参与方fate-10000的角色有host和arbiter,它的partner却只有发起方fate-9999,看不见另一个参与方fate-9998;参与方fate-9998的角色只有host,同样它的的partner也只有发起方fate-9999,看不见另一个参与方fate-10000。
点击任务的id号,可以进入任务的详情页面,如:
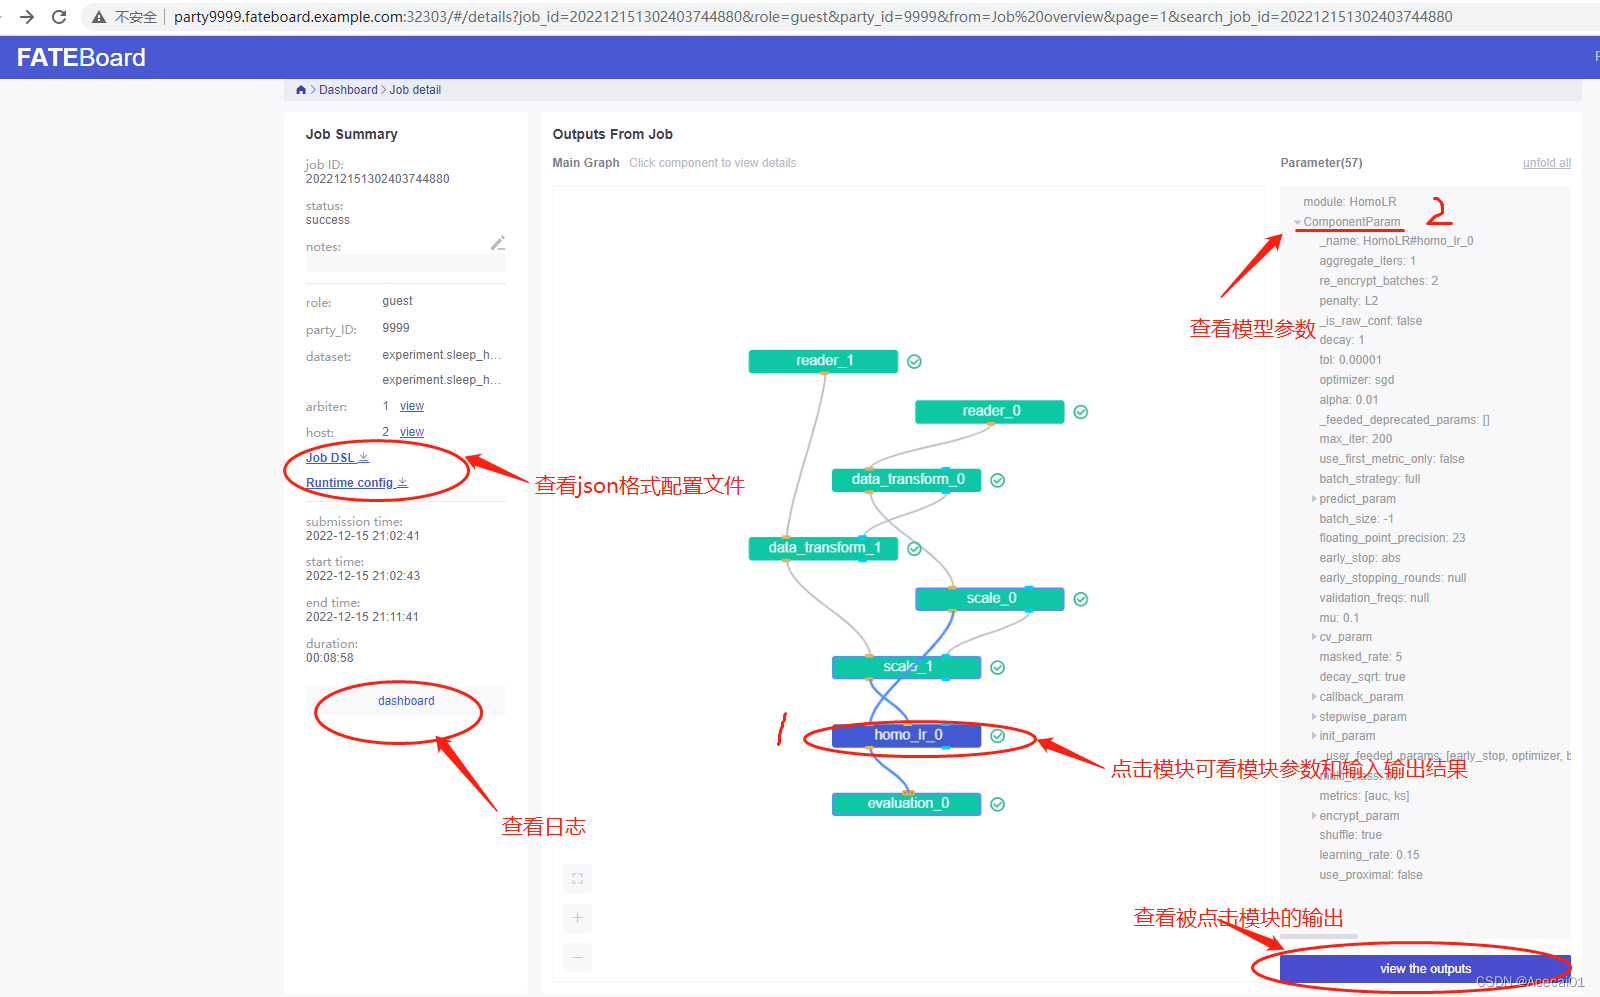
页面主要的功能在上图中已标出,其中点击查看日志的页面是:
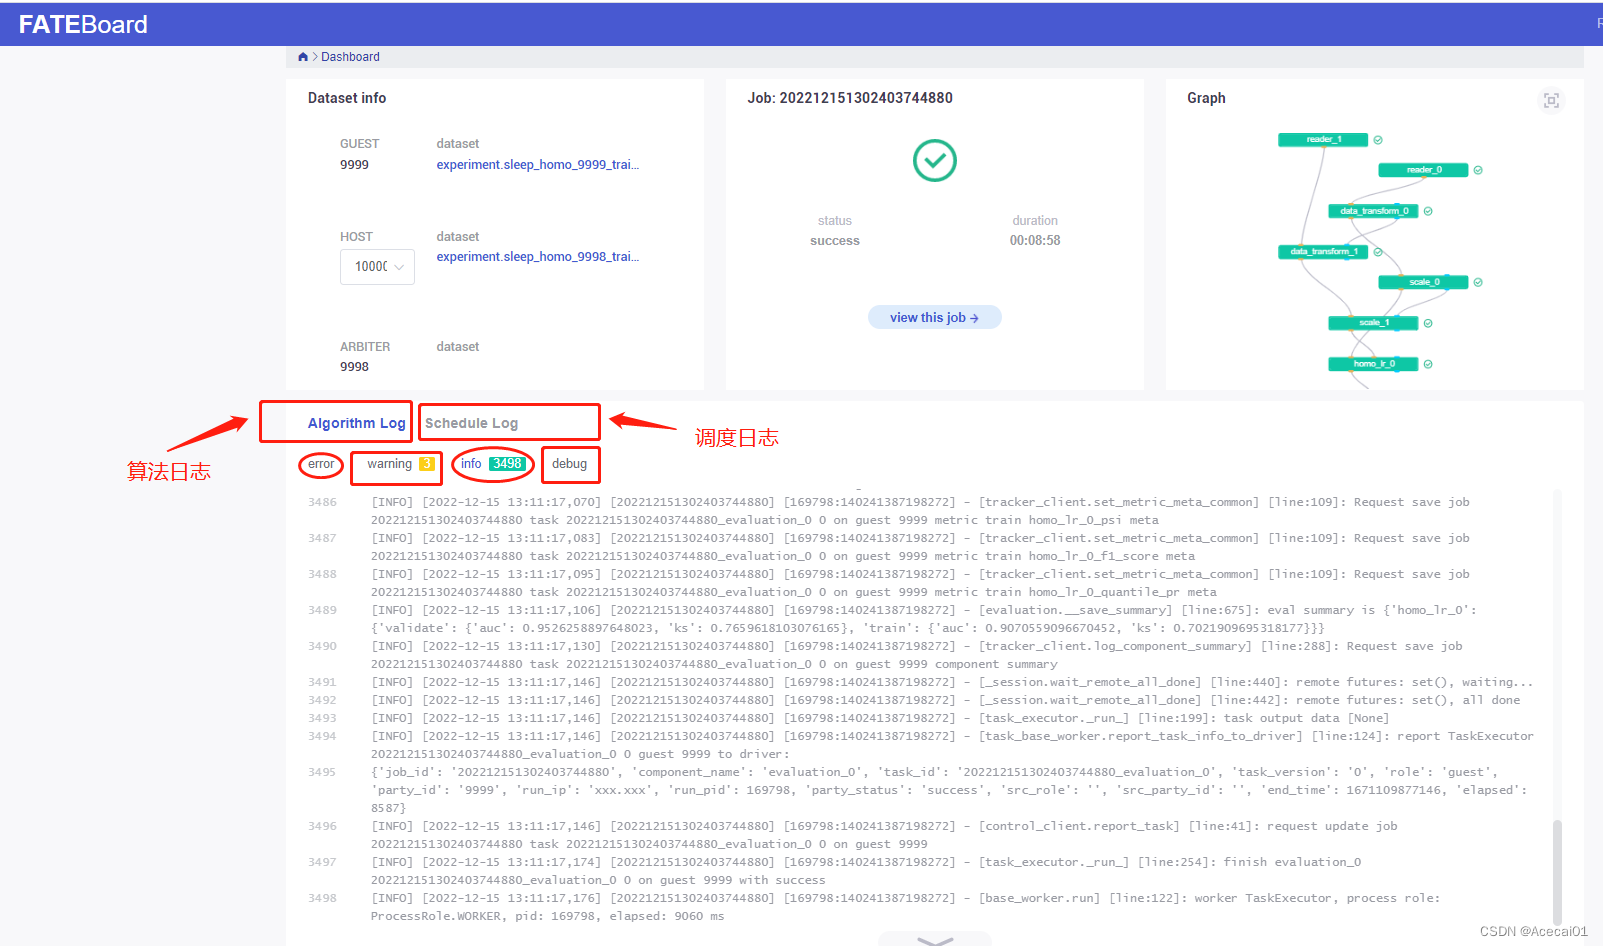
日志页面要看的是Algorithm Log 和Schedule Log面板,有错误发生时,这两个面板的内容都需要参考。
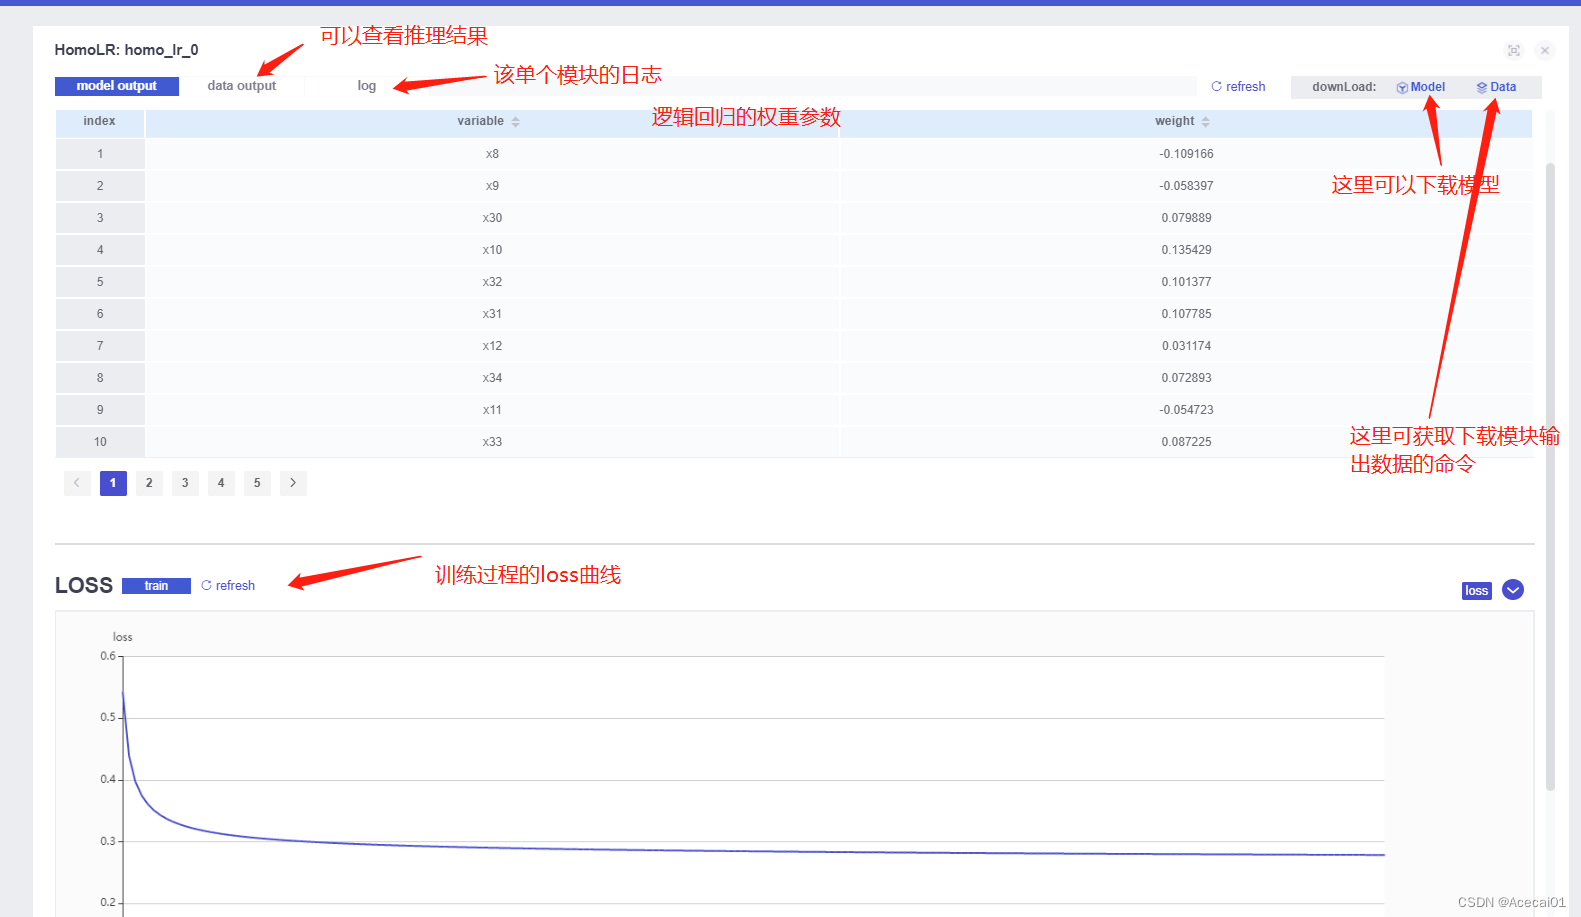
点击homo_lr_0模块,查看输出,跳转到类似如下页面:
最后点击evaluation_0模块, 查看其输出,看到训练数据和测试数据的推理结果如下:
job ID:
202212160844446970870
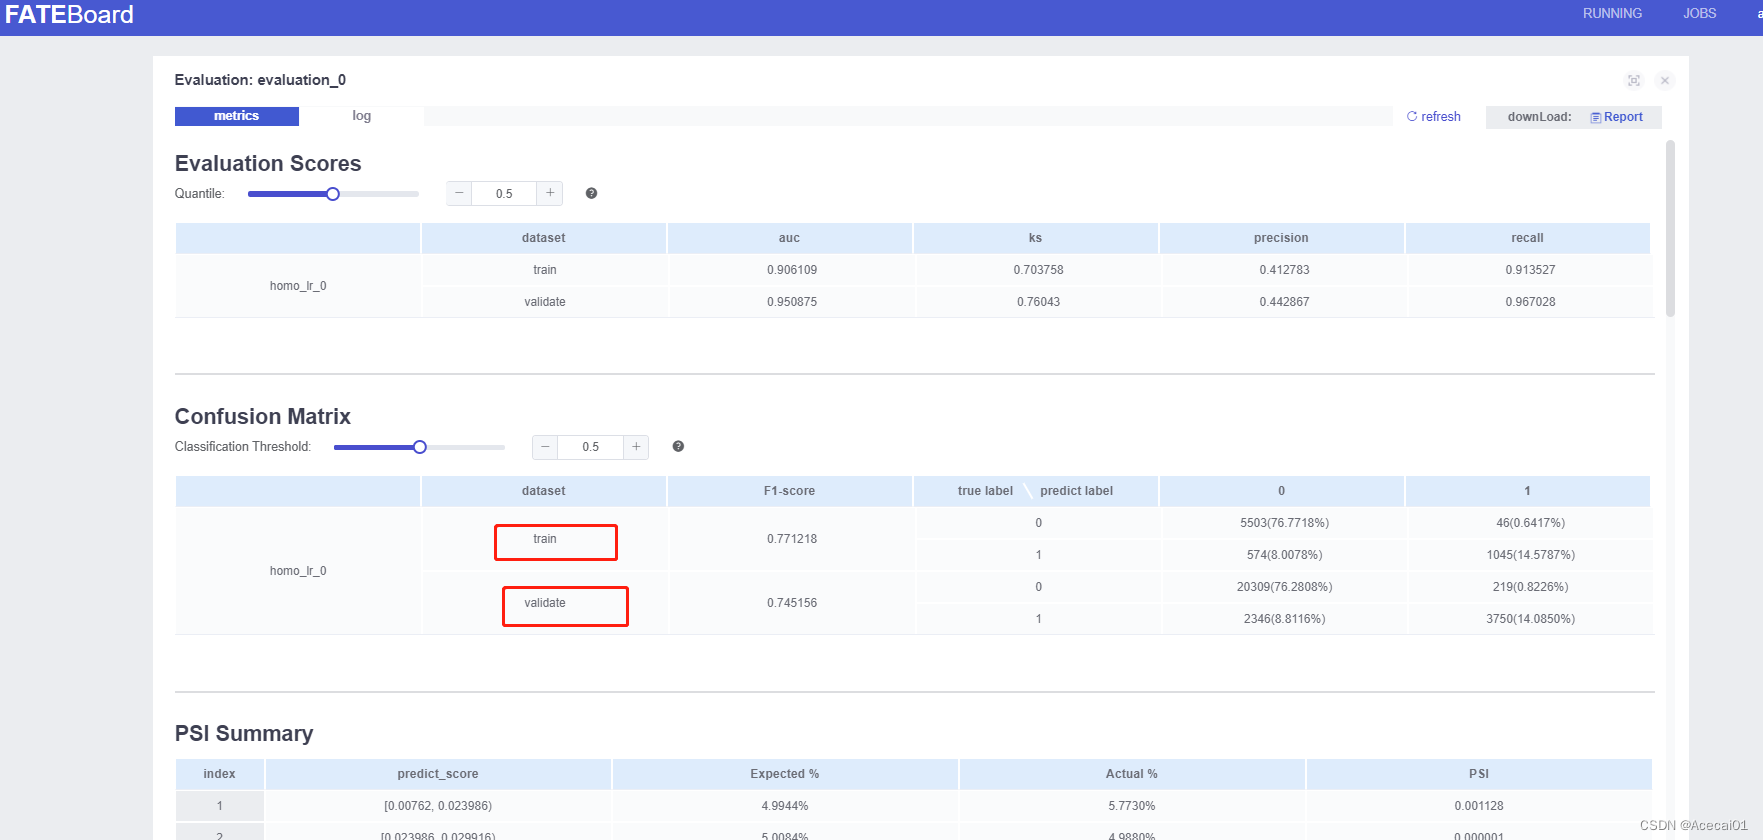
不用加密的训练任务比较快,
5.2、加密训练
5.2.1 主节点作为参与方兼裁判方((3方-失败)
将5.1小节pipeline_homo_sleep_train_LR_3party.py中的参数"encrypt_param"改为 { “method”: “Paillier” },即用同态加密的方式训练模型,当设置主节点fate-10000作为参与方(host)兼裁判方(arbiter),进行三方训练时,设置较大的训练轮数,比如本人设置的100个epoch,fate-10000老是会在homo_lr_0模块不定轮数出问题,如下图,有时候训练到10几轮,有时候能到40多轮,但总会因报错而终止训练,且通过查看fate-9998和fate-9999的fateboard,却未发现报错,官网没有相关问题的解决办法。。
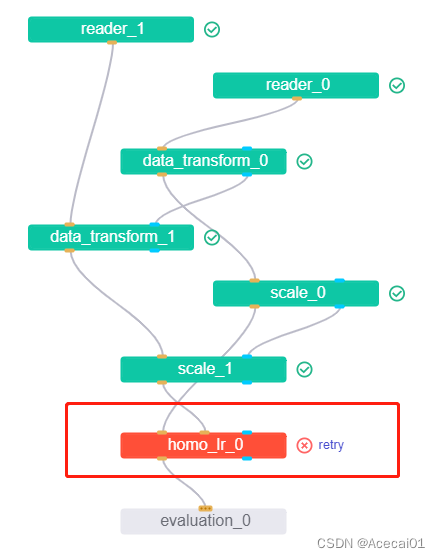
报错内容为:
...
eggroll.core.client.CommandCallError: ('Failed to call command: CommandURI(_uri=v1/egg-pair/runTask) to endpoint: nodemanager-0:46028, caused by: ', <_Rendezvous of RPC that terminated with:
	status = StatusCode.UNAVAILABLE
	details = "Socket closed"
	debug_error_string = "{"created":"@1671076862.128892862","description":"Error received from peer ipv4:xxx.xxx:46028","file":"src/core/lib/surface/call.cc","file_line":1055,"grpc_message":"Socket closed","grpc_status":14}"
任务id: 202212160634510565690
5.2.2 主节点不参与训练(2方-成功)
由于多次用不同batch_size测试加密训练,报错的总是fate-10000,本人猜测可能是fate-10000服务器本身的问题,它是集群的主节点,于是本人舍弃了fate-10000这个host方,先测试两方加密训练,即用fate-9999作为guest方,fate-9998作为唯一host方,代码如下:
import argparse
import json
from pipeline.backend.pipeline import PipeLine
from pipeline.component import DataTransform
from pipeline.interface import Model
from pipeline.component import Evaluation
from pipeline.component import HomoLR
from pipeline.component import Reader
from pipeline.component import FeatureScale
from pipeline.interface import Data
from pipeline.utils.tools import load_job_config


def main(namespace=""):
    guest = 9999     # 训练任务发起者
    host2 = 9998     # 参与方
    host = [ host2]
    arbiter = host2   # 裁判最好不要由任务发起者guest来担当

    # 定义训练数据
    guest_train_data = {"name": "sleep_homo_"+str(guest)+"_train01", "namespace": f"experiment{namespace}"}
    host_train_data2 = {"name": "sleep_homo_"+str(host2)+"_train01", "namespace": f"experiment{namespace}"}
    # 定义测试数据
    guest_test_data = {"name": "sleep_homo_"+str(guest)+"_test01", "namespace": f"experiment{namespace}"}
    host_test_data2 = {"name": "sleep_homo_"+str(host2)+"_test01", "namespace": f"experiment{namespace}"}

    # initialize pipeline
    pipeline = PipeLine()
    # set job initiator
    pipeline.set_initiator(role='guest', party_id=guest)
    # set participants information
    pipeline.set_roles(guest=guest, host=host, arbiter=arbiter)

    # 训练数据读取模块
    # define Reader components to read in data
    reader_0 = Reader(name="reader_0")
    # configure Reader for guest
    reader_0.get_party_instance(role='guest', party_id=guest).component_param(table=guest_train_data)
    # configure Reader for host
    reader_0.get_party_instance(role='host', party_id=host2).component_param(table=host_train_data2)
    # 测试数据读取模块
    reader_1 = Reader(name="reader_1")
    reader_1.get_party_instance(role='guest', party_id=guest).component_param(table=guest_test_data)
    reader_1.get_party_instance(role='host', party_id=host2).component_param(table=host_test_data2)

    # define DataTransform components
    data_transform_0 = DataTransform(
        name="data_transform_0",
        with_label=True,
        output_format="dense")  # start component numbering at 0

    data_transform_1 = DataTransform(name="data_transform_1")

    scale_0 = FeatureScale(name='scale_0')
    scale_1 = FeatureScale(name='scale_1')

    # 逻辑回归参数参考网址
    # "https://github.com/FederatedAI/FATE/blob/3ee02ea81c62d60353b2df40e141529b151d7c67/python/fate_client/pipeline/param/logistic_regression_param.py"
    # github路径:"FATE/python/fate_client/pipeline/param/logistic_regression_param.py"
    param = {
        "penalty": "L2",
        "optimizer": "sgd",
        "tol": 1e-05,
        "alpha": 0.5,    # 惩罚系数
        "max_iter": 100,
        "early_stop": "abs", # ['diff','weight_diff', 'abs']
        "batch_size": -1,    # 带Paillier加密时,设置为32大概3分钟一个epoch, 设置为256大概1分钟一个epoch,越大越快
        "learning_rate": 0.15,
        "decay": 1,
        "decay_sqrt": True,
        "init_param": {
            "init_method": "zeros"
        },
        "encrypt_param": {
            "method": "Paillier"  # 该加密不支持L1正则,只支持L2正则 # 还有iterativeAffine同态加密方法,secureBoost
        }
    }

    homo_lr_0 = HomoLR(name='homo_lr_0', **param)

    # add components to pipeline, in order of task execution
    pipeline.add_component(reader_0)
    pipeline.add_component(reader_1)

    pipeline.add_component(data_transform_0, data=Data(data=reader_0.output.data))
    pipeline.add_component(data_transform_1, data=Data(data=reader_1.output.data),
                           model=Model(data_transform_0.output.model))

    # set data input sources of intersection components
    pipeline.add_component(scale_0, data=Data(data=data_transform_0.output.data))
    pipeline.add_component(scale_1, data=Data(data=data_transform_1.output.data),
                           model=Model(scale_0.output.model))

    pipeline.add_component(homo_lr_0, data=Data(train_data=scale_0.output.data, validate_data=scale_1.output.data))

    evaluation_0 = Evaluation(name="evaluation_0", eval_type="binary")
    # evaluation_0.get_party_instance(role='host', party_id=host).component_param(need_run=False)  # 注释掉这句,意思是都两方都要eval
    pipeline.add_component(evaluation_0, data=Data(data=homo_lr_0.output.data))

    # compile pipeline once finished adding modules, this step will form conf and dsl files for running job
    pipeline.compile()

    # fit model
    pipeline.fit()
    # query component summary
    print(json.dumps(pipeline.get_component("homo_lr_0").get_summary(), indent=4, ensure_ascii=False))
    print(json.dumps(pipeline.get_component("evaluation_0").get_summary(), indent=4, ensure_ascii=False))


if __name__ == "__main__":
    main(namespace="")
同样的将代码拷贝到fate-9999的python容器内,进入该容器执行代码即可开始训练。这次训练模块成功了,但是最后的评估模块又出了问题,查看fate-9999的日志,没有报错,但是查看fate-9998却报错了,报错如下:
...
File "/opt/app-root/lib/python3.6/site-packages/sklearn/utils/validation.py", line 106, in _assert_all_finite
    msg_dtype if msg_dtype is not None else X.dtype)
ValueError: Input contains NaN, infinity or a value too large for dtype('float64').
...
评估模块的输入是预测概率和真实标签,上述报错说评估模块的输入包含空值,无法计算指标,于是将上一个模块的结果拷贝出来查看一番,取上一模块结果数据的方法如下两图步骤序号所示:
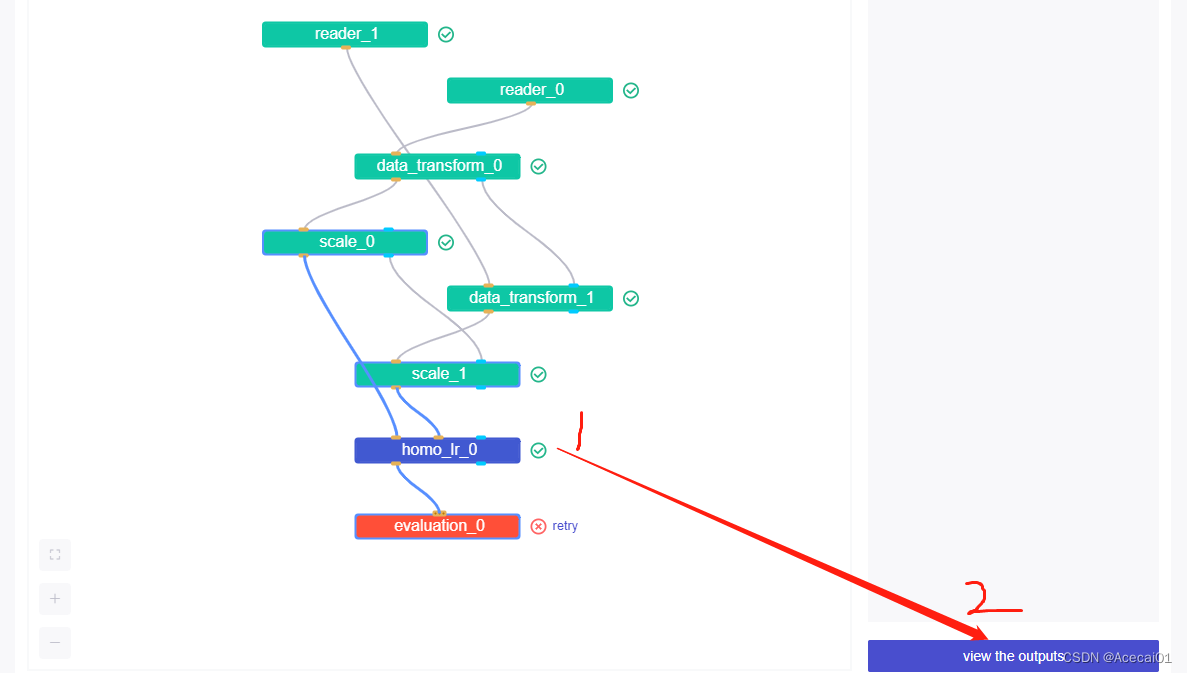

分别进入fate-9999和fate-9998的python容器内,使用上图第4步骤的命令将数据下载到容器当前目录,然后通过kubectl cp命令将容器内的数据拷贝到服务器本地,再将数据从服务器转到本地PC,对比查看两份结果数据如下图:


对比发现fate-9998的预测概率列确实为空,而fate-9999的预测概率列却是有值的,这解释了发起方fate-9999未报错,而参与方fate-9998报错的原因,这个问题本人无法解决,而因为本次实验所有参与方的测试数据都一样,所以只要fate-9999能顺利进行eval也可以接受,于是想到,关闭参与方fate-9998的评估就可,修改本小节的代码部分如下:
...
# 将这句的注释去掉,恢复执行,意思是都host方不用eval
evaluation_0.get_party_instance(role='host', party_id=host).component_param(need_run=False)
...
个人猜测这个版本不支持在加密训练情况下,对host方的测试数据进行eval。在非加密训练情况下,是可以对host方的测试数据进行eval的。
经修改后,再次进行两方的加密训练任务,最终训练成功,并eval成功。
任务id : 202212150850330628930
5.2.3 主节点作为发起方(3方-成功)
前面提到主节点fate-10000作为参与方时,总是会因为连接bug导致训练中断,而通过2个子节点进行加密训练却可以畅通无阻,证明了2个点:
1、加密训练可以跑通;
2、主节点作为参与方兼裁判方,进行3方训练时,会出现bug导致中断;
于是测试fate-10000主节点作为发起方,其余fate-9999和fate-9998两台子节点作为参与方进行3方训练,代码如下:
import json
from pipeline.backend.pipeline import PipeLine
from pipeline.component import DataTransform
from pipeline.interface import Model
from pipeline.component import Evaluation
from pipeline.component import HomoLR
from pipeline.component import Reader
from pipeline.component import FeatureScale
from pipeline.interface import Data
from pipeline.utils.tools import load_job_config

def main(namespace=""):
    guest = 9999     # 训练任务发起者
    host1 = 10000    # 参与方
    host2 = 9998     # 参与方
    host = [host1, host2]
    arbiter = host1   # 裁判最好不要由任务发起者guest来担当,host2也可以作为arbiter
    # 定义训练数据
    guest_train_data = {"name": "sleep_homo_"+str(guest)+"_train01", "namespace": f"experiment{namespace}"}
    host_train_data1 = {"name": "sleep_homo_"+str(host1)+"_train01", "namespace": f"experiment{namespace}"}
    host_train_data2 = {"name": "sleep_homo_"+str(host2)+"_train01", "namespace": f"experiment{namespace}"}
    # 定义测试数据
    guest_test_data = {"name": "sleep_homo_"+str(guest)+"_test01", "namespace": f"experiment{namespace}"}
    host_test_data1 = {"name": "sleep_homo_"+str(host1)+"_test01", "namespace": f"experiment{namespace}"}
    host_test_data2 = {"name": "sleep_homo_"+str(host2)+"_test01", "namespace": f"experiment{namespace}"}

    # initialize pipeline
    pipeline = PipeLine()
    # set job initiator
    pipeline.set_initiator(role='guest', party_id=guest)
    # set participants information
    pipeline.set_roles(guest=guest, host=host, arbiter=arbiter)

    # 训练数据读取模块
    # define Reader components to read in data
    reader_0 = Reader(name="reader_0")
    # configure Reader for guest
    reader_0.get_party_instance(role='guest', party_id=guest).component_param(table=guest_train_data)
    # configure Reader for host
    reader_0.get_party_instance(role='host', party_id=host1).component_param(table=host_train_data1)
    reader_0.get_party_instance(role='host', party_id=host2).component_param(table=host_train_data2)
    # 测试数据读取模块
    reader_1 = Reader(name="reader_1")
    reader_1.get_party_instance(role='guest', party_id=guest).component_param(table=guest_test_data)
    reader_1.get_party_instance(role='host', party_id=host1).component_param(table=host_test_data1)
    reader_1.get_party_instance(role='host', party_id=host2).component_param(table=host_test_data2)

    # define DataTransform components
    data_transform_0 = DataTransform(
        name="data_transform_0",
        with_label=True,
        output_format="dense")  # start component numbering at 0
    data_transform_1 = DataTransform(name="data_transform_1")  # start component numbering at 0

    scale_0 = FeatureScale(name='scale_0')
    scale_1 = FeatureScale(name='scale_1')

    param = {
        "penalty": "L2",
        "optimizer": "sgd",
        "tol": 1e-05,
        "alpha": 0.01,    # 惩罚系数
        "max_iter": 100,
        "early_stop": "abs", # ['diff','weight_diff', 'abs']
        "batch_size": -1,    # 带Paillier加密时,设置为32大概3分钟一个epoch, 设置为256大概1分钟一个epoch,越大越快
        "learning_rate": 0.15,
        "decay": 1,
        "decay_sqrt": True,
        "init_param": {
            "init_method": "zeros"
        },
        "encrypt_param": {
            "method": "Paillier"  # 该加密不支持L1正则,只支持L2正则 # 还有iterativeAffine同态加密方法,secureBoost
        }
    }

    homo_lr_0 = HomoLR(name='homo_lr_0', **param)

    # add components to pipeline, in order of task execution
    pipeline.add_component(reader_0)
    pipeline.add_component(reader_1)

    pipeline.add_component(data_transform_0, data=Data(data=reader_0.output.data))
    pipeline.add_component(data_transform_1, data=Data(data=reader_1.output.data),
                           model=Model(data_transform_0.output.model))

    # set data input sources of intersection components
    pipeline.add_component(scale_0, data=Data(data=data_transform_0.output.data))
    pipeline.add_component(scale_1, data=Data(data=data_transform_1.output.data),
                           model=Model(scale_0.output.model))

    pipeline.add_component(homo_lr_0, data=Data(train_data=scale_0.output.data, validate_data=scale_1.output.data))

    evaluation_0 = Evaluation(name="evaluation_0", eval_type="binary")
    evaluation_0.get_party_instance(role='host', party_id=host).component_param(need_run=False)  # 注意加密训练时,host不能eval
    pipeline.add_component(evaluation_0, data=Data(data=homo_lr_0.output.data))

    # compile pipeline once finished adding modules, this step will form conf and dsl files for running job
    pipeline.compile()

    # fit model
    pipeline.fit()
    # query component summary
    print(json.dumps(pipeline.get_component("homo_lr_0").get_summary(), indent=4, ensure_ascii=False))
    print(json.dumps(pipeline.get_component("evaluation_0").get_summary(), indent=4, ensure_ascii=False))


if __name__ == "__main__":
    main(namespace="")
由于发起方由fate-9999变为了fate-10000,故该代码应上传到fate-10000容器内(无需传到fate-9999,fate-9998)执行,提交任务的具体操作请参考5.1,经测试可顺利训练100轮次,得到的eval结果:
job ID:
202212160313015118370

3方加密训练的时长为90分钟,耗时是非加密训练的近20倍。
5.2.4 加密训练可行性总结
除了前面几个实验外,当设置主节点fate-10000为参与方,不做裁判方,由fate-9998做裁判方兼第2个参与方,进行3方加密训练时,能够成功训练!!job ID: 202212160710455574940。
下面用表格展示一下所做一些对比实验:

有上表可见,当进行加密训练时,所有host方是不能够做测试(eval)的,至少本人所使用的版本不行,另外对比上表任务1和5,可推测主节点fate-1000作为参与方兼裁判方时,无法很顺利的跟另一个参与方fate-9998进行通信,而看到任务2,换做fate-9998作为参与方兼裁判方时,却可以正常和另一个参与方fate-10000进行通信,由此可见只有主节点既做参与方又做裁判方时,不允许有其他参与方,否则训练会因通信问题而中断。
5.3、Arbiter节点不参与训练
只有guest和host提供数据并训练模型,而arbiter不参与训练,代码如下:
# -*-coding:utf-8-*-
import argparse
import json
from pipeline.backend.pipeline import PipeLine
from pipeline.component import DataTransform
from pipeline.interface import Model
from pipeline.component import Evaluation
from pipeline.component import HomoLR
from pipeline.component import Reader
from pipeline.component import FeatureScale
from pipeline.interface import Data
from pipeline.utils.tools import load_job_config

def main(namespace=""):
    guest = 9999     # 训练任务发起者
    host1 = 10000    # 参与方
    host2 = 9998      # 裁判方
    host = [host1]    # host2不加入训练
    arbiter = host2   # 裁判最好不要由任务发起者guest来担当,host2作为arbiter

    # 定义训练数据
    guest_train_data = {"name": "sleep_homo_"+str(guest)+"_train01", "namespace": f"experiment{namespace}"}
    host_train_data1 = {"name": "sleep_homo_"+str(host1)+"_train01", "namespace": f"experiment{namespace}"}
    # 定义测试数据
    guest_test_data = {"name": "sleep_homo_"+str(guest)+"_test01", "namespace": f"experiment{namespace}"}
    host_test_data1 = {"name": "sleep_homo_"+str(host1)+"_test01", "namespace": f"experiment{namespace}"}

    # initialize pipeline
    pipeline = PipeLine()
    # set job initiator
    pipeline.set_initiator(role='guest', party_id=guest)
    # set participants information
    pipeline.set_roles(guest=guest, host=host, arbiter=arbiter)

    # 训练数据读取模块
    # define Reader components to read in data
    reader_0 = Reader(name="reader_0")
    # configure Reader for guest
    reader_0.get_party_instance(role='guest', party_id=guest).component_param(table=guest_train_data)
    # configure Reader for host
    reader_0.get_party_instance(role='host', party_id=host1).component_param(table=host_train_data1)
    # 测试数据读取模块
    reader_1 = Reader(name="reader_1")
    reader_1.get_party_instance(role='guest', party_id=guest).component_param(table=guest_test_data)
    reader_1.get_party_instance(role='host', party_id=host1).component_param(table=host_test_data1)

    # define DataTransform components
    data_transform_0 = DataTransform(
        name="data_transform_0",
        with_label=True,
        output_format="dense")  # start component numbering at 0
    data_transform_1 = DataTransform(name="data_transform_1")


    scale_0 = FeatureScale(name='scale_0')
    scale_1 = FeatureScale(name='scale_1')

    param = {
        "penalty": "L2",
        "optimizer": "sgd",
        "tol": 1e-05,
        "alpha": 0.5,    # 惩罚系数
        "max_iter": 100,
        "early_stop": "abs", # ['diff','weight_diff', 'abs']
        "batch_size": -1,    # 带Paillier加密时,设置为32大概3分钟一个epoch, 设置为256大概1分钟一个epoch,越大越快
        "learning_rate": 0.15,
        "decay": 1,
        "decay_sqrt": True,
        "init_param": {
            "init_method": "zeros"
        },
        "encrypt_param": {
            "method": None
        }
    }

    homo_lr_0 = HomoLR(name='homo_lr_0', **param)

    # add components to pipeline, in order of task execution
    pipeline.add_component(reader_0)
    pipeline.add_component(reader_1)

    pipeline.add_component(data_transform_0, data=Data(data=reader_0.output.data))
    pipeline.add_component(data_transform_1, data=Data(data=reader_1.output.data),
                           model=Model(data_transform_0.output.model))

    # set data input sources of intersection components
    pipeline.add_component(scale_0, data=Data(data=data_transform_0.output.data))
    pipeline.add_component(scale_1, data=Data(data=data_transform_1.output.data),
                           model=Model(scale_0.output.model))

    pipeline.add_component(homo_lr_0, data=Data(train_data=scale_0.output.data, validate_data=scale_1.output.data))

    evaluation_0 = Evaluation(name="evaluation_0", eval_type="binary")
    # evaluation_0.get_party_instance(role='host', party_id=host).component_param(need_run=False)
    pipeline.add_component(evaluation_0, data=Data(data=homo_lr_0.output.data))

    # compile pipeline once finished adding modules, this step will form conf and dsl files for running job
    pipeline.compile()

    # fit model
    pipeline.fit()
    # query component summary
    print(json.dumps(pipeline.get_component("homo_lr_0").get_summary(), indent=4, ensure_ascii=False))
    print(json.dumps(pipeline.get_component("evaluation_0").get_summary(), indent=4, ensure_ascii=False))

if __name__ == "__main__":
    main(namespace="")
这个配置方法符合真实场景,即中立方不参与数据提供和模型获取,只负责整合权重或梯度。经测试可以正常运行任务。job ID:202212151302403744880
6、总结
6.1、横向联邦VS中心化训练
实验结果对比如下:
训练样本比例1:0 = 6096: 20528

由上表可见:
1、横向联邦学习场景下,加密训练的效果要差于非加密训练;
2、中心化训练得到的模型指标要比横向联邦学习得到的结果好;
3、横向联邦学习对于3号单独训练的方式,还是有优势的,即3号选择联邦模型会更好;
6.2、关于定位问题
1、当任务执行出错时后,不要只看发起方的fateboard日志,有可能发起方的日志显示都正常,但是参与方的fateboard日志却显示有异常,哪一方的环节出错都会导致整个任务的终止;
2、查看fateboard日志不仅要看Algorithm Log面板,还要看Schedule Log面板;
3、任务中给各节点配置的角色不同,可能会导致不一样的结果,出错后,可以尝试就相同任务目的,更换节点的角色,多次测试,可能能够解决问题。


![[附源码]Nodejs计算机毕业设计基于的校园商城Express(程序+LW)](https://img-blog.csdnimg.cn/339331fa9e154978897b90dcc9c38064.png)


![[附源码]Node.js计算机毕业设计高校学生管理系统Express](https://img-blog.csdnimg.cn/3dd4c1f17bd54afabcd7235cf7d30088.png)
![[附源码]Node.js计算机毕业设计公司疫情健康信息管理系统appExpress](https://img-blog.csdnimg.cn/94e1876888654dabb3b0420165ae52cc.png)


