文章目录
- 嫌墨迹直接看代码
- Q5 Self-Supervised Learning for Image Classification
- compute_train_transform CIFAR10Pair.__getitem__()
- 题面
- 解析
- 代码
- 输出
- simclr_loss_naive
- 题面
- 解析
- 代码
- 输出
- sim_positive_pairs
- 题面
- 解析
- 代码
- 输出
- compute_sim_matrix
- 题面
- 解析
- 代码
- 输出
- simclr_loss_vectorized
- 题面
- 解析
- 代码
- 输出
- train
- 题面
- 解析
- 代码
- 输出
- 结语
嫌墨迹直接看代码
Q5 Self-Supervised Learning for Image Classification
compute_train_transform CIFAR10Pair.getitem()
题面
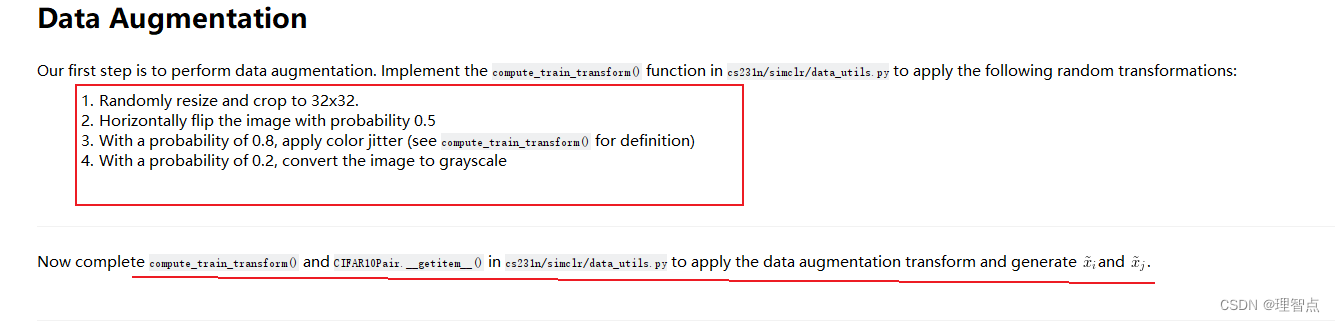


解析
这里就是让我们对图片进行转换,具体的转换步骤在上面都写了,我们只需要查阅相应的api进行调用就好了
代码
def compute_train_transform(seed=123456):
    """
    This function returns a composition of data augmentations to a single training image.
    Complete the following lines. Hint: look at available functions in torchvision.transforms
    """
    random.seed(seed)
    torch.random.manual_seed(seed)

    # Transformation that applies color jitter with brightness=0.4, contrast=0.4, saturation=0.4, and hue=0.1
    color_jitter = transforms.ColorJitter(0.4, 0.4, 0.4, 0.1)

    train_transform = transforms.Compose([
        ##############################################################################
        # TODO: Start of your code.                                                  #
        #                                                                            #
        # Hint: Check out transformation functions defined in torchvision.transforms #
        # The first operation is filled out for you as an example.
        ##############################################################################
        # Step 1: Randomly resize and crop to 32x32.
        transforms.RandomResizedCrop(32),
        # Step 2: Horizontally flip the image with probability 0.5
        transforms.RandomHorizontalFlip(p=0.5),
        # Step 3: With a probability of 0.8, apply color jitter (you can use "color_jitter" defined above.
        transforms.RandomApply(torch.nn.ModuleList([color_jitter]), p=0.8),
        # Step 4: With a probability of 0.2, convert the image to grayscale
        transforms.RandomGrayscale(p=0.2),
        ##############################################################################
        #                               END OF YOUR CODE                             #
        ##############################################################################
        transforms.ToTensor(),
        transforms.Normalize([0.4914, 0.4822, 0.4465], [0.2023, 0.1994, 0.2010])])
    return train_transform


def compute_test_transform():
    test_transform = transforms.Compose([
        transforms.ToTensor(),
        transforms.Normalize([0.4914, 0.4822, 0.4465], [0.2023, 0.1994, 0.2010])])
    return test_transform


class CIFAR10Pair(CIFAR10):
    """CIFAR10 Dataset.
    """

    def __getitem__(self, index):
        img, target = self.data[index], self.targets[index]
        img = Image.fromarray(img)

        x_i = None
        x_j = None

        if self.transform is not None:
            ##############################################################################
            # TODO: Start of your code.                                                  #
            #                                                                            #
            # Apply self.transform to the image to produce x_i and x_j in the paper #
            ##############################################################################

            x_i = self.transform(img)
            x_j = self.transform(img)

            ##############################################################################
            #                               END OF YOUR CODE                             #
            ##############################################################################

        if self.target_transform is not None:
            target = self.target_transform(target)

        return x_i, x_j, target
输出
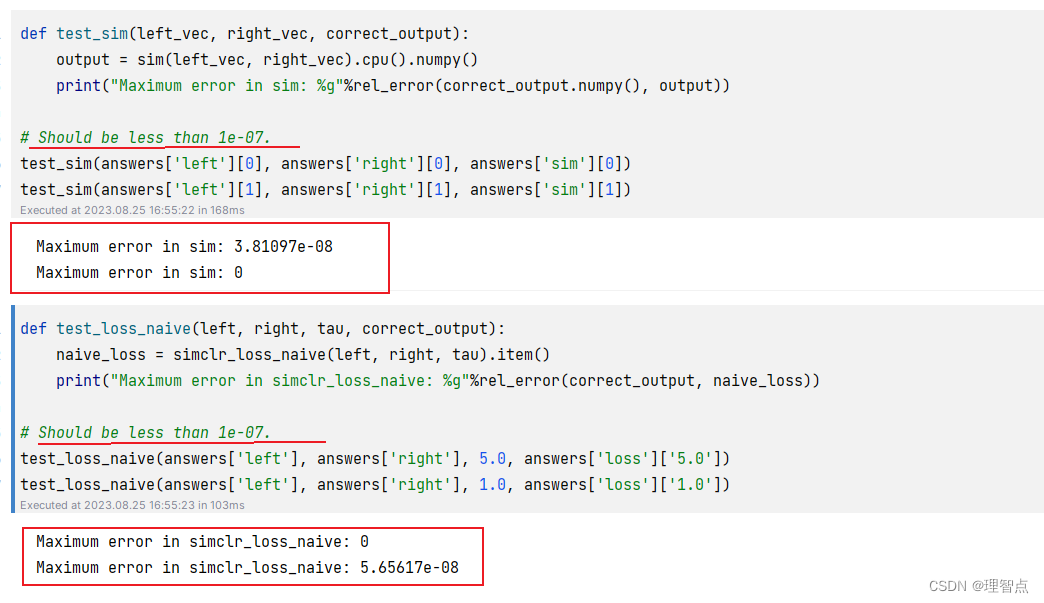
注意这里我不知道为啥本地跑出来的结果是有误差的,但是同样的代码放到colab上跑就没事了,很奇怪我只能说


simclr_loss_naive
题面

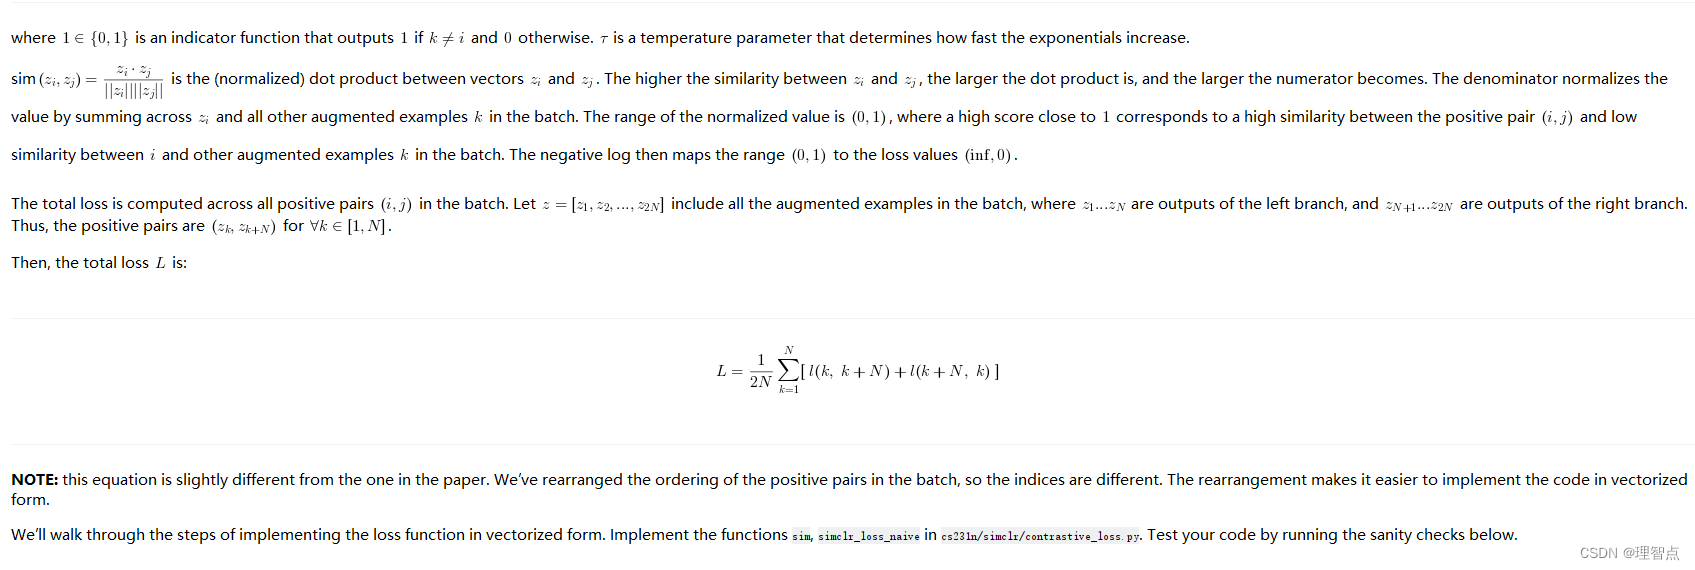


让我们用简单的方法来计算SimCLR的loss
解析
看看上面的题面,一步一步来就好了
代码
def sim(z_i, z_j):
    """Normalized dot product between two vectors.

    Inputs:
    - z_i: 1xD tensor.
    - z_j: 1xD tensor.

    Returns:
    - A scalar value that is the normalized dot product between z_i and z_j.
    """
    norm_dot_product = None
    ##############################################################################
    # TODO: Start of your code.                                                  #
    #                                                                            #
    # HINT: torch.linalg.norm might be helpful.                                  #
    ##############################################################################

    # torch.linalg.norm 相对于对一个向量求范数,返回的是一个标量
    norm_dot_product = torch.dot(z_i, z_j) / (torch.linalg.norm(z_i) * torch.linalg.norm(z_j))

    ##############################################################################
    #                               END OF YOUR CODE                             #
    ##############################################################################

    return norm_dot_product


def simclr_loss_naive(out_left, out_right, tau):
    """Compute the contrastive loss L over a batch (naive loop version).

    Input:
    - out_left: NxD tensor; output of the projection head g(), left branch in SimCLR model.
    - out_right: NxD tensor; output of the projection head g(), right branch in SimCLR model.
    Each row is a z-vector for an augmented sample in the batch. The same row in out_left and out_right form a positive pair.
    In other words, (out_left[k], out_right[k]) form a positive pair for all k=0...N-1.
    - tau: scalar value, temperature parameter that determines how fast the exponential increases.

    Returns:
    - A scalar value; the total loss across all positive pairs in the batch. See notebook for definition.
    """
    N = out_left.shape[0]  # total number of training examples

    # Concatenate out_left and out_right into a 2*N x D tensor.
    out = torch.cat([out_left, out_right], dim=0)  # [2*N, D]

    total_loss = 0
    for k in range(N):  # loop through each positive pair (k, k+N)
        z_k, z_k_N = out[k], out[k + N]

        ##############################################################################
        # TODO: Start of your code.                                                  #
        #                                                                            #
        # Hint: Compute l(k, k+N) and l(k+N, k).                                     #
        ##############################################################################
        # *****START OF YOUR CODE (DO NOT DELETE/MODIFY THIS LINE)*****

        # 计算 l(k, k+N)
        # 计算左边的分子
        left_numerator = (sim(z_k, z_k_N) / tau).exp()
        # 计算左边的分母中需要进行sim运算的元素
        left_need_sim = out[np.arange(2 * N) != k]
        # 计算左边的分母
        left_denominator = torch.tensor([sim(z_k, z_i) / tau for z_i in left_need_sim]).exp().sum()
        # 计算左边的结果
        left = -(left_numerator / left_denominator).log()

        # 计算 l(k+N, k)
        # 计算右边的分子
        right_numerator = (sim(z_k_N, z_k) / tau).exp()
        # 计算右边的分母中需要进行sim运算的元素
        right_need_sim = out[np.arange(2 * N) != k + N]
        # 计算右边的分母
        right_denominator = torch.tensor([sim(z_k_N, z_i) / tau for z_i in right_need_sim]).exp().sum()
        # 计算右边的结果
        right = -(right_numerator / right_denominator).log()

        total_loss += left + right

        # *****END OF YOUR CODE (DO NOT DELETE/MODIFY THIS LINE)*****
        ##############################################################################
        #                               END OF YOUR CODE                             #
        ##############################################################################

    # In the end, we need to divide the total loss by 2N, the number of samples in the batch.
    total_loss = total_loss / (2 * N)
    return total_loss
输出
sim_positive_pairs
题面
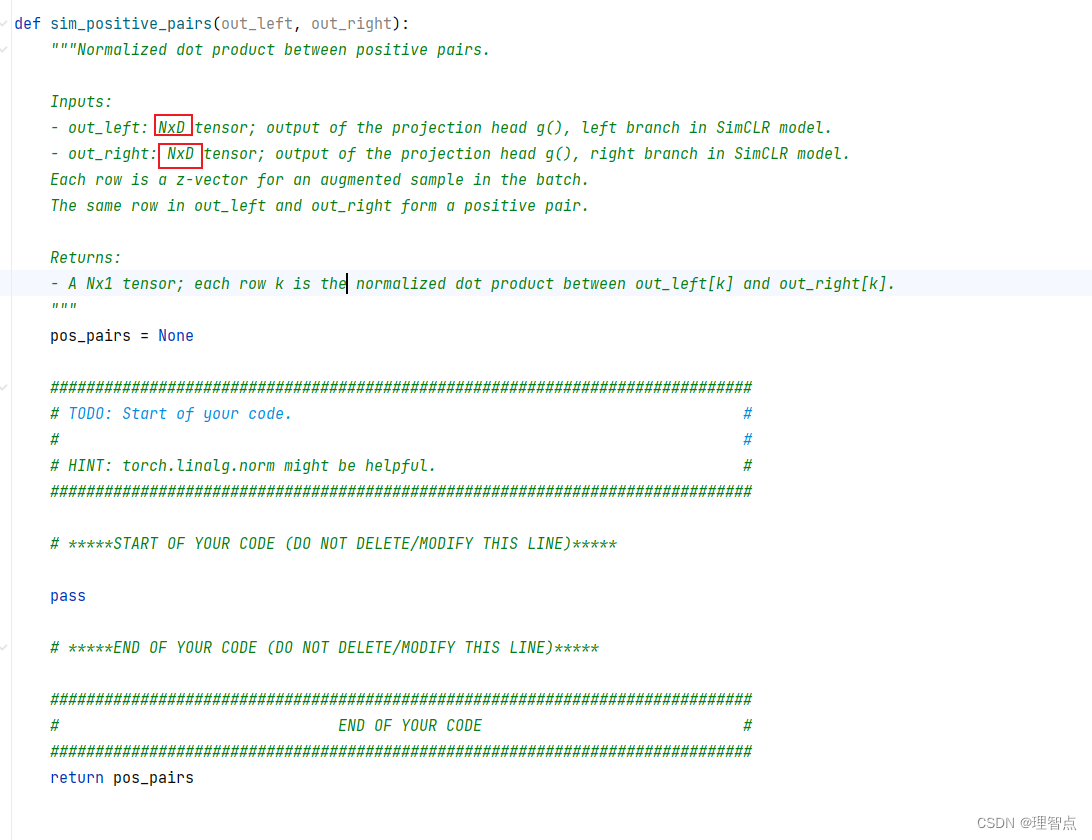
这里跟之前的区别在于之前只需要算两个向量之间的sim,现在算的是两个矩阵之间的sim
解析
看代码注释吧
代码
def sim_positive_pairs(out_left, out_right):
    """Normalized dot product between positive pairs.

    Inputs:
    - out_left: NxD tensor; output of the projection head g(), left branch in SimCLR model.
    - out_right: NxD tensor; output of the projection head g(), right branch in SimCLR model.
    Each row is a z-vector for an augmented sample in the batch.
    The same row in out_left and out_right form a positive pair.

    Returns:
    - A Nx1 tensor; each row k is the normalized dot product between out_left[k] and out_right[k].
    """
    pos_pairs = None

    ##############################################################################
    # TODO: Start of your code.                                                  #
    #                                                                            #
    # HINT: torch.linalg.norm might be helpful.                                  #
    ##############################################################################

    # *****START OF YOUR CODE (DO NOT DELETE/MODIFY THIS LINE)*****

    # 看看公式,sim 是一个除法,但是可以看做两个除法相乘
    norm_left = out_left / torch.linalg.norm(out_left, dim=1, keepdim=True)
    norm_right = out_right / torch.linalg.norm(out_right, dim=1, keepdim=True)

    pos_pairs = torch.sum(norm_left * norm_right, dim=1, keepdim=True)

    # *****END OF YOUR CODE (DO NOT DELETE/MODIFY THIS LINE)*****

    ##############################################################################
    #                               END OF YOUR CODE                             #
    ##############################################################################
    return pos_pairs
输出

compute_sim_matrix
题面
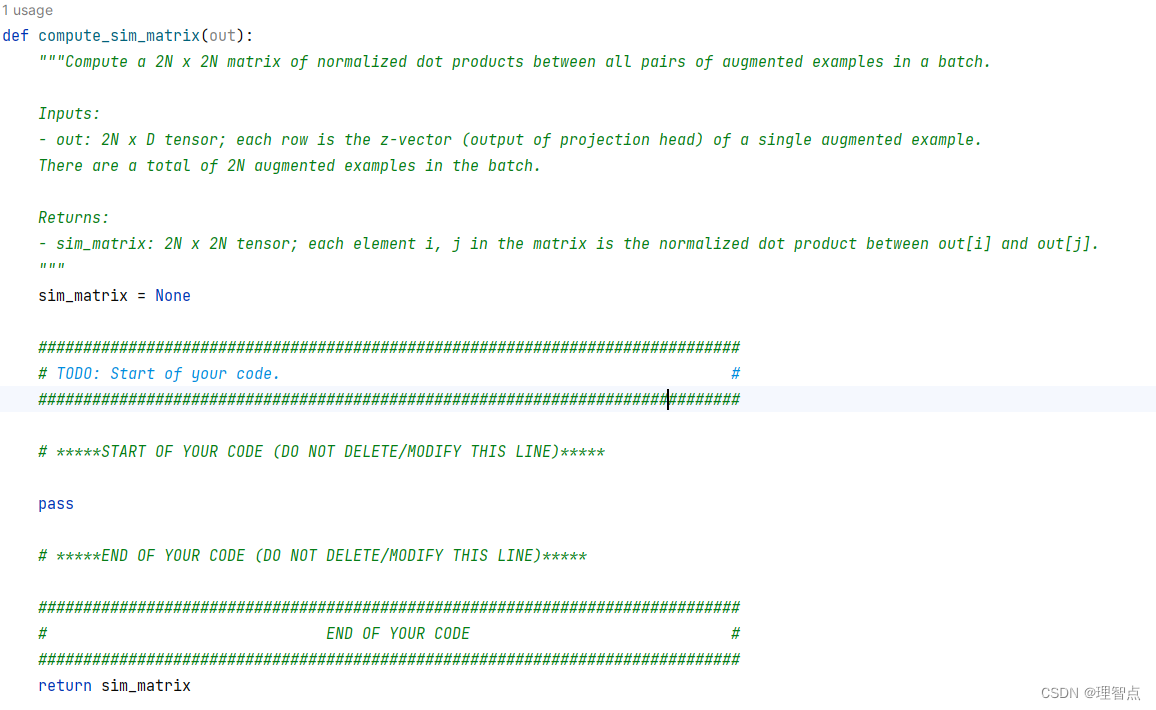
这个任务应该就是让我们输出sim_matrix,matrix是一个2N * 2N的矩阵,matrix[i,j]表示sim(i,j)
所以就处理下直接乘以自己的转置就好了
解析
看上面或者看代码,理解一下
代码
def compute_sim_matrix(out):
    """Compute a 2N x 2N matrix of normalized dot products between all pairs of augmented examples in a batch.

    Inputs:
    - out: 2N x D tensor; each row is the z-vector (output of projection head) of a single augmented example.
    There are a total of 2N augmented examples in the batch.

    Returns:
    - sim_matrix: 2N x 2N tensor; each element i, j in the matrix is the normalized dot product between out[i] and out[j].
    """
    sim_matrix = None

    ##############################################################################
    # TODO: Start of your code.                                                  #
    ##############################################################################

    # *****START OF YOUR CODE (DO NOT DELETE/MODIFY THIS LINE)*****

    out_norm = out / torch.linalg.norm(out, dim=1, keepdim=True)
    sim_matrix = out_norm @ out_norm.T

    # *****END OF YOUR CODE (DO NOT DELETE/MODIFY THIS LINE)*****

    ##############################################################################
    #                               END OF YOUR CODE                             #
    ##############################################################################
    return sim_matrix
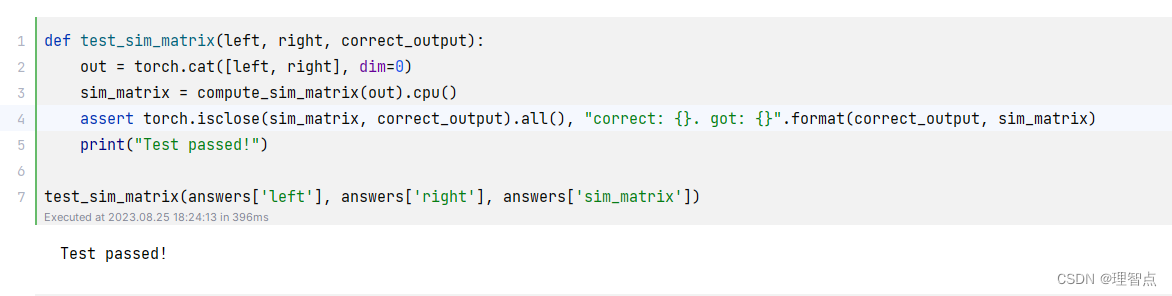
输出
simclr_loss_vectorized
题面
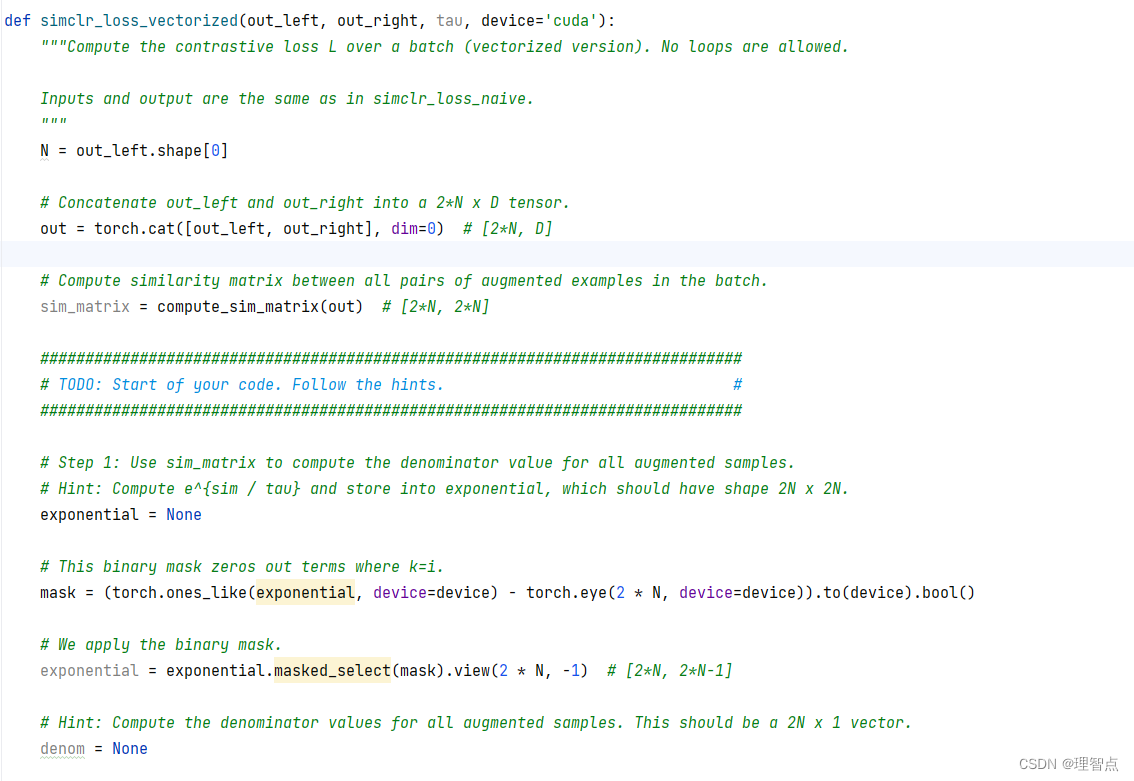

就是让我们实现序列化的计算loss,按照步骤一步一步来就好了
解析
看注释吧
代码
def simclr_loss_vectorized(out_left, out_right, tau, device='cuda'):
    """Compute the contrastive loss L over a batch (vectorized version). No loops are allowed.

    Inputs and output are the same as in simclr_loss_naive.
    """
    N = out_left.shape[0]

    # Concatenate out_left and out_right into a 2*N x D tensor.
    out = torch.cat([out_left, out_right], dim=0)  # [2*N, D]

    # Compute similarity matrix between all pairs of augmented examples in the batch.
    sim_matrix = compute_sim_matrix(out)  # [2*N, 2*N]

    ##############################################################################
    # TODO: Start of your code. Follow the hints.                                #
    ##############################################################################

    # Step 1: Use sim_matrix to compute the denominator value for all augmented samples.
    # Hint: Compute e^{sim / tau} and store into exponential, which should have shape 2N x 2N.
    exponential = (sim_matrix / tau).exp().to(device)

    # This binary mask zeros out terms where k=i.
    mask = (torch.ones_like(exponential, device=device) - torch.eye(2 * N, device=device)).to(device).bool()

    # We apply the binary mask.
    exponential = exponential.masked_select(mask).view(2 * N, -1)  # [2*N, 2*N-1]

    # Hint: Compute the denominator values for all augmented samples. This should be a 2N x 1 vector.
    denom = exponential.sum(dim=1)

    # Step 2: Compute similarity between positive pairs.
    # You can do this in two ways:
    # Option 1: Extract the corresponding indices from sim_matrix.
    # Option 2: Use sim_positive_pairs().
    # *****START OF YOUR CODE (DO NOT DELETE/MODIFY THIS LINE)*****

    # 计算出所有的正样本对的相似度
    sim_pairs = sim_positive_pairs(out_left, out_right).to(device)
    # 拼接矩阵,因为正样本对是对称的,所以拼接两次
    sim_pairs = torch.cat([sim_pairs, sim_pairs], dim=0)

    # *****END OF YOUR CODE (DO NOT DELETE/MODIFY THIS LINE)*****

    # Step 3: Compute the numerator value for all augmented samples.
    numerator = None
    # *****START OF YOUR CODE (DO NOT DELETE/MODIFY THIS LINE)*****

    numerator = (sim_pairs / tau).exp()

    # *****END OF YOUR CODE (DO NOT DELETE/MODIFY THIS LINE)*****

    # Step 4: Now that you have the numerator and denominator for all augmented samples, compute the total loss.
    loss = None
    # *****START OF YOUR CODE (DO NOT DELETE/MODIFY THIS LINE)*****

    loss = torch.mean(-torch.log(numerator / denom))

    # *****END OF YOUR CODE (DO NOT DELETE/MODIFY THIS LINE)*****

    ##############################################################################
    #                               END OF YOUR CODE                             #
    ##############################################################################

    return loss
输出

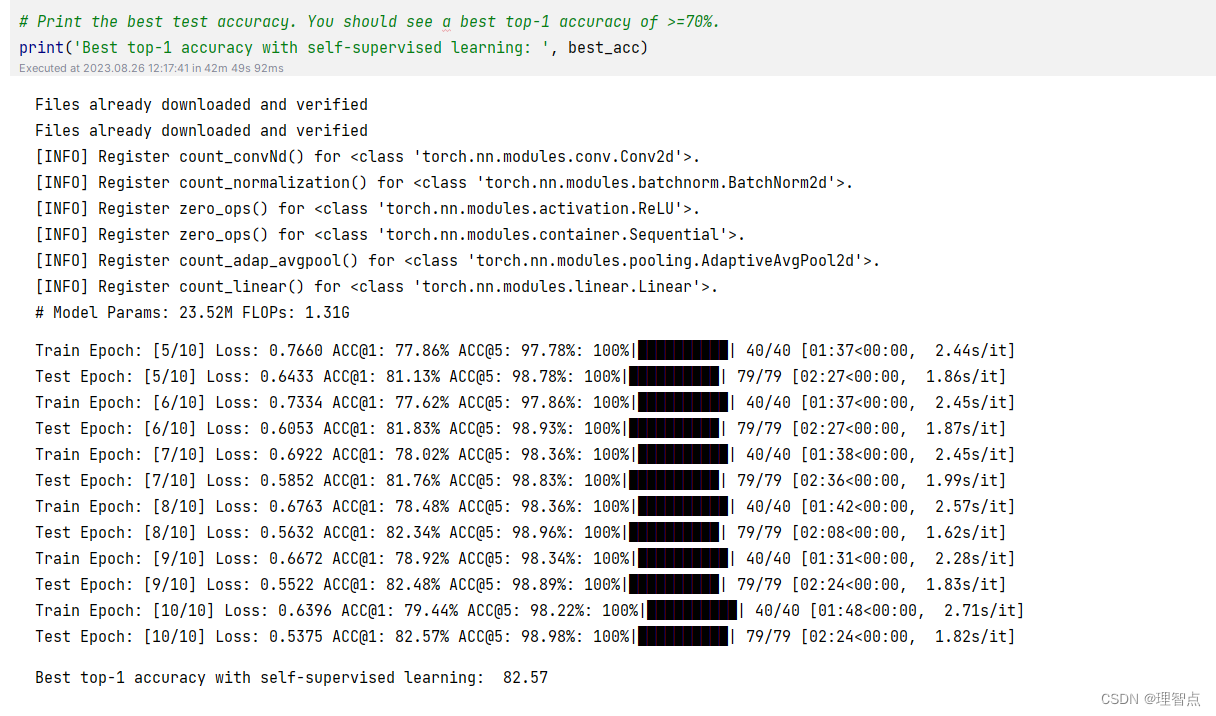
train
题面

解析
这里就是让我们将x_i和x_j变成经过处理的gi 和 gj ,然后计算loss就好了
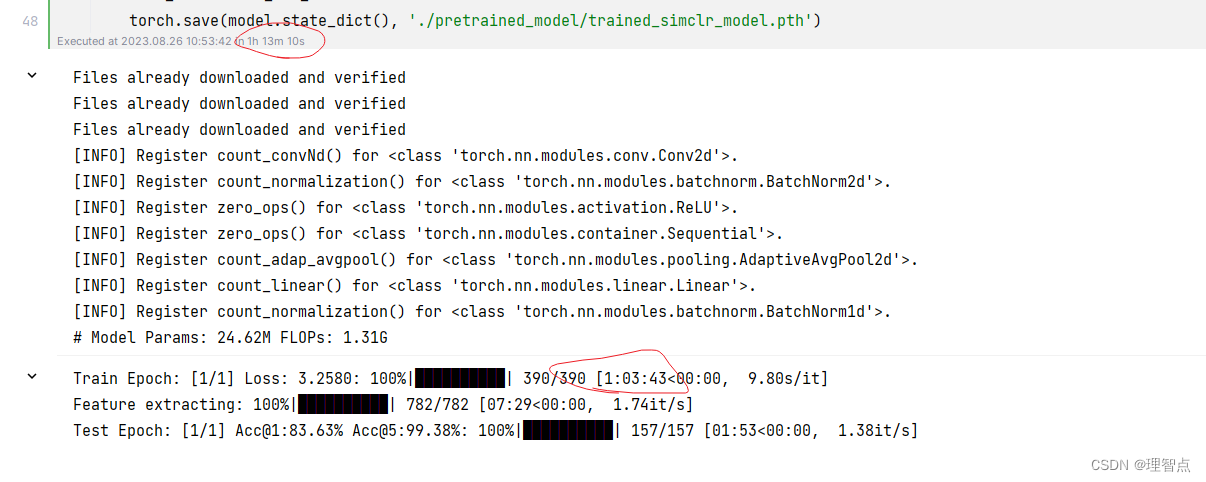
注意一下,这个训练预计要吃5G的显存,如果你的显卡显存不够,量力而行,我的显卡是1060显存3个g,所以为了训练这个模型他额外吃了系统内存,但是降低了训练速度。
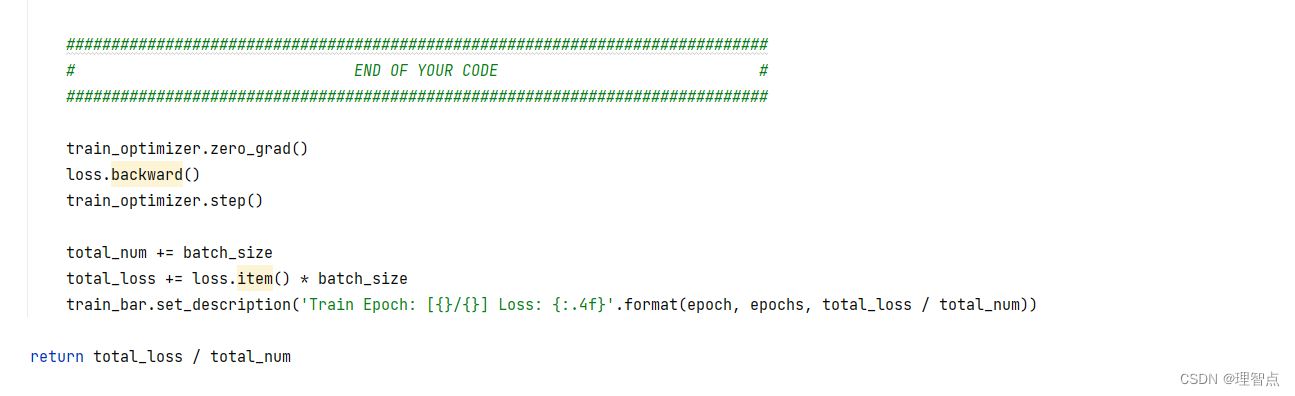
代码
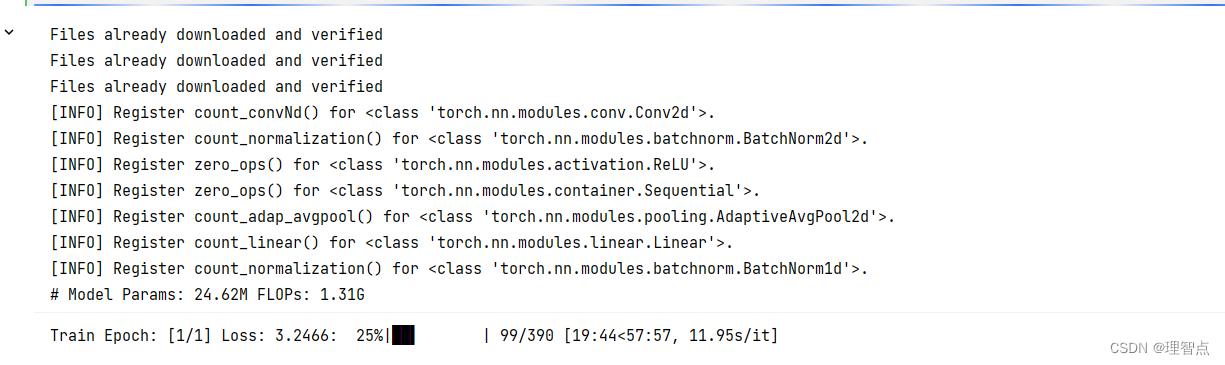
输出
训练了差不多一个小时
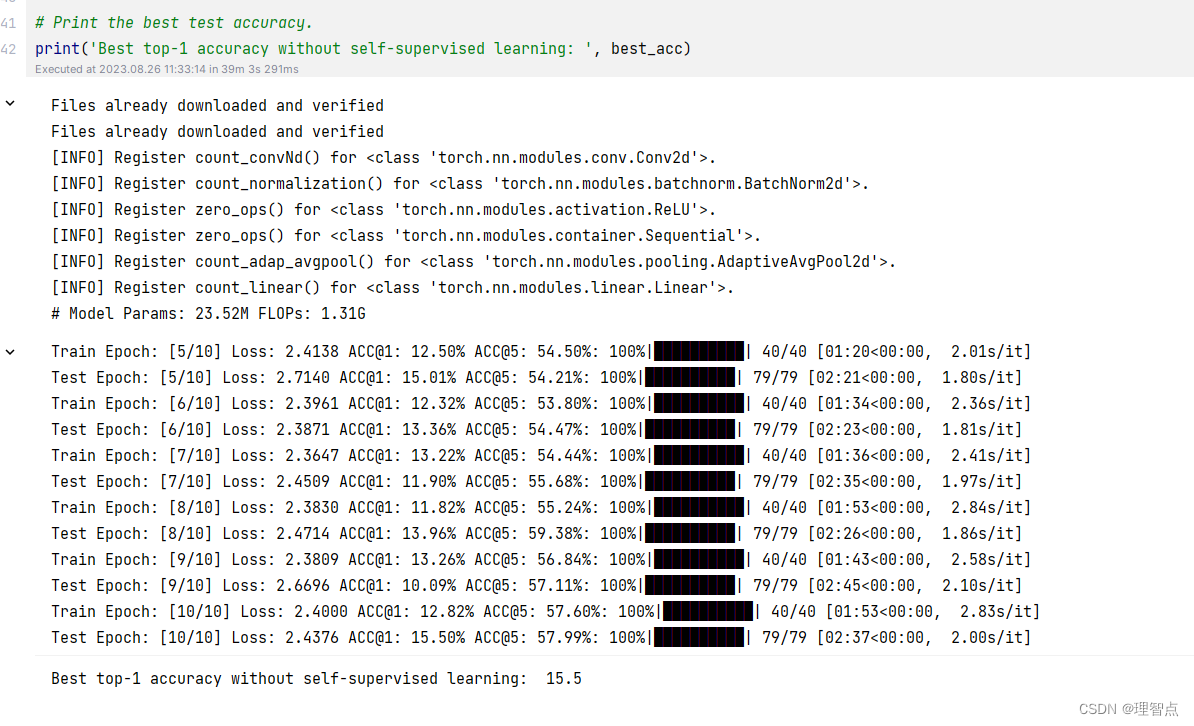
结语
这样这个实验就做完了,虽然自己实现了simSLR,但是感觉对这个模型的总体还不是特别清楚,细节部分倒是清楚了,等到时候所有cs231n作业做完再回过头理解一下吧