一、登录验证器
1.1相关概念
登录验证器是一种用于提高帐户安全性的应用或设备,它可以在你输入用户名和密码后,生成或接收一个一次性的验证码或通知,以进行第二次身份验证。这样,即使你的密码被泄露或破解,其他人也无法轻易登录你的帐户,除非他们也拥有你的登录验证器。登录验证器也称为双重验证、两步验证或多因素验证。
有许多类型的登录验证器,例如:
- 基于时间的一次性密码 (TOTP) 应用,如 Microsoft Authenticator1、Google Authenticator、Authy 等,它们可以在你的手机上生成一个每隔几秒就变化的六位数验证码,你需要在登录时输入该验证码。
- 推送通知应用,如 Microsoft Authenticator1、Duo Mobile 等,它们可以在你的手机上接收一个来自登录网站的通知,你只需点击批准或拒绝按钮来完成登录。
- 硬件令牌设备,如 YubiKey、RSA SecurID 等,它们是一种类似于 U 盘的物理设备,可以插入你的电脑或手机上的 USB 端口或 NFC 读取器,以产生一个唯一的验证码或密钥来验证你的身份。
- 短信 (SMS) 或电话呼叫服务,如 Google Voice、Twilio 等,它们可以向你注册的手机号码发送一个验证码短信或拨打一个电话来确认你的登录。
1.2前端代码
1.2.1登录界面
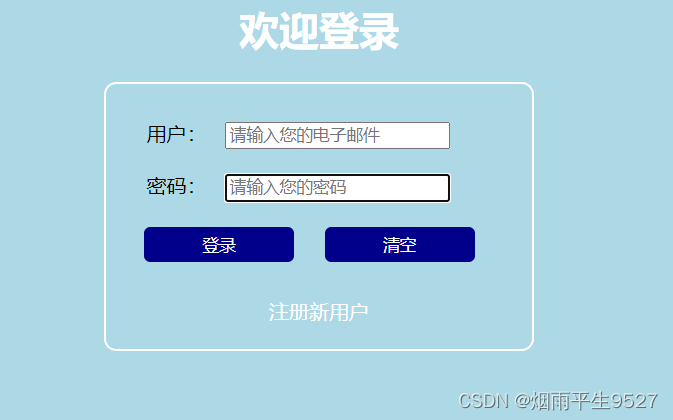
<html>
<head>
  <meta charset="UTF-8">
  <title>登录验证</title>
  <style>
    body {
      background-color: lightblue;
      font-family: Arial, sans-serif;
    }

    h1 {
      text-align: center;
      color: white;
    }

    form {
      width: 300px;
      margin: 0 auto;
      padding: 20px;
      border: 2px solid white;
      border-radius: 10px;
    }

    label {
      display: inline-block;
      width: 20%;
      text-align: right;
    }

    input {
      display: inline-block;
      width: 60%;
      margin: 10px;
    }

    button {
      display: inline-block;
      width: 40%;
      margin: 10px;
      padding: 5px;
      border: none;
      border-radius: 5px;
      color: white;
      background-color: darkblue;
      cursor: pointer;
    }

    a {
      color: white;
      text-decoration: none;
    }
  </style>
</head>
<body>
<h1>欢迎登录</h1>
<form action="validate" name="test"
      method="get">
  <div>
    <label for="uname">用户:</label>
    <input type="text" name="uname" id="uname" placeholder="请输入您的电子邮件"><br>
    <label for="upass">密码:</label>
    <input type="password" name="upass" id="upass" placeholder="请输入您的密码"><br>
    <button type="submit">登录</button>
    <button type="reset">清空</button>
  </div>
  <br>
  <div style="text-align: center;">
    <a href="newuser.html">注册新用户 </a>
  </div>
</form>
</body>
</html>
1.2.2登录失败界面

<html>
<head>
  <meta charset="UTF-8">
  <title>登录验证</title>
  <style>
    body {
      background-color: lightblue;
      font-family: Arial, sans-serif;
    }

    h1 {
      text-align: center;
      color: white;
    }

    p {
      text-align: center;
      font-size: 20px;
      color: red;
    }

    a {
      color: white;
      text-decoration: none;
    }
  </style>
</head>
<body>
<h1>登录失败</h1>
<p>抱歉,您输入的用户名或密码不正确,请重新输入或注册新用户。</p>
<div style="text-align: center;">
  <a href="index.html">返回登录页面 </a>
  <a href="newuser.html">注册新用户 </a>
</div>
</body>
</html>
1.2.3注册界面
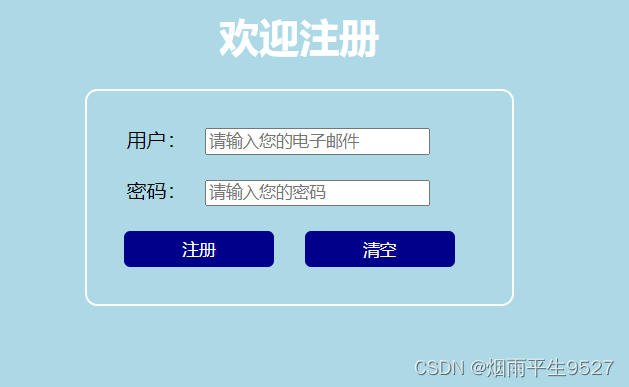
<html>
<head>
  <meta charset="UTF-8">
  <title>登录验证</title>
  <style>
    body {
      background-color: lightblue;
      font-family: Arial, sans-serif;
    }

    h1 {
      text-align: center;
      color: white;
    }

    form {
      width:300px;
      margin: 0 auto;
      padding: 20px;
      border: 2px solid white;
      border-radius: 10px;
    }

    label {
      display: inline-block;
      width: 20%;
      text-align: right;
    }

    input {
      display: inline-block;
      width: 60%;
      margin: 10px;
    }

    button {
      display: inline-block;
      width: 40%;
      margin: 10px;
      padding: 5px;
      border: none;
      border-radius: 5px;
      color: white;
      background-color: darkblue;
      cursor: pointer;
    }

    a {
      color: white;
      text-decoration: none;
    }
  </style>
</head>
<body>
<h1>欢迎注册</h1>
<form action="newuser" name="test"
      method="get">
  <div>
    <label for="uname">用户:</label>
    <input type="text" name="uname" id="uname" placeholder="请输入您的电子邮件"><br>
    <label for="upass">密码:</label>
    <input type="password" name="upass" id="upass" placeholder="请输入您的密码"><br>
    <button type="submit">注册</button>
    <button type="reset">清空</button>
  </div>


</form>
</body>
</html>
1.2.4注册失败界面

<html>
<head>
    <meta charset="UTF-8">
    <title>注册验证</title>
    <style>
        body {
            background-color: lightblue;
            font-family: Arial, sans-serif;
        }

        h1 {
            text-align: center;
            color: white;
        }

        p {
            text-align: center;
            font-size: 20px;
            color: red;
        }

        a {
            color: white;
            text-decoration: none;
        }
    </style>
</head>
<body>
<h1>注册失败</h1>
<p>抱歉,您输入的用户名或电子邮件已经被占用,请重新输入或登录已有账户。</p>
<div style="text-align: center;">
    <a href="newuser.html">返回注册页面 </a>
    <a href="login.html">进入登录页面 </a>
</div>
</body>
</html>
1.2.5注册成功界面
<html>
<head>
    <meta charset="UTF-8">
    <title>注册验证</title>
    <style>
        body {
            background-color: lightblue;
            font-family: Arial, sans-serif;
        }

        h1 {
            text-align: center;
            color: white;
        }

        p {
            text-align: center;
            font-size: 20px;
            color: green;
        }

        a {
            color: white;
            text-decoration: none;
        }
    </style>
</head>
<body>
<h1>注册成功</h1>
<p>恭喜您,您已经成功注册您的账户</p>
<div style="text-align: center;">
    <a href="profile.html">进入个人中心 </a>
    <a href="index.html">返回登录页面 </a>
</div>
</body>
</html>
1.3后端代码
实现一个简单的用户管理系统,基本的Java Web应用程序,用于进行用户注册和登录验证的操作。其中,DBAccess 类处理数据库操作,Newuser 类负责用户注册,Validate 类负责登录验证。
1.3.1数据库代码
package org.example;
import java.sql.*;

// 数据库操作类,用于与数据库进行交互
public class DBAccess {
    private String driver = "com.mysql.jdbc.Driver"; // 数据库驱动
    private String url = "jdbc:mysql://localhost:3306/test"; // 数据库连接URL
    private String user = "root"; // 数据库用户名
    private String password = "b123456"; // 数据库密码
    private Connection conn = null; // 数据库连接
    private Statement stmt = null; // 用于执行SQL语句的Statement对象

    // 初始化数据库连接
    public void init() {
        try {
            Class.forName(driver); // 加载并注册数据库驱动程序
            conn = DriverManager.getConnection(url, user, password); // 建立数据库连接
            stmt = conn.createStatement(); // 创建Statement对象
        } catch (ClassNotFoundException e) {
            System.out.println("找不到驱动程序");
            e.printStackTrace();
        } catch (SQLException e) {
            e.printStackTrace();
        }
    }

    // 向数据库插入用户信息
    public void insert(String uname, String upass) throws SQLException {
        String str = "insert into users values('" + uname + "','" + upass + "')";
        stmt.execute(str);
    }

    // 更新数据库中的用户密码
    public void update(String uname, String upass) throws SQLException {
        String str = "update users set upass='" + upass + "' where uname='" + uname + "'";
        stmt.execute(str);
    }

    // 查询数据库中指定用户名的密码
    public String query1(String uname) throws SQLException {
        String str = "select upass from users where uname='" + uname + "'";
        ResultSet rs = stmt.executeQuery(str);
        rs.next();
        String result = rs.getString("upass");
        return result;
    }

    // 查询数据库中是否存在指定用户名
    public String query2(String uname) throws SQLException {
        String str = "select uname from users where uname='" + uname + "'";
        ResultSet rs = stmt.executeQuery(str);
        rs.next();
        String result = rs.getString("uname");
        return result;
    }

    // 提交并关闭数据库连接
    public void submit() throws SQLException {
        stmt.close();
        conn.close();
    }
}
1.3.2注册代码
package org.example;

import java.sql.*;
import java.io.*;

import jakarta.servlet.ServletException;
import jakarta.servlet.annotation.WebServlet;
import jakarta.servlet.http.HttpServlet;
import jakarta.servlet.http.HttpServletRequest;
import jakarta.servlet.http.HttpServletResponse;

@WebServlet("/newuser")
public class Newuser extends HttpServlet {
    String uname = null; // 待注册的用户名
    String upass = null; // 待注册的密码
    DBAccess dba; // 数据库访问对象

    // 初始化方法,在Servlet启动时调用
    public void init() {
        dba = new DBAccess(); // 创建数据库访问对象
        dba.init(); // 初始化数据库连接
    }

    // 处理HTTP的GET请求
    public void doGet(HttpServletRequest request, HttpServletResponse response)
            throws ServletException, IOException {
        String tempuname = request.getParameter("uname"); // 从请求参数中获取用户名
        upass = request.getParameter("upass"); // 从请求参数中获取密码

        try {
            uname = dba.query2(tempuname).trim(); // 查询数据库,检查是否已存在相同用户名
        } catch (SQLException e) {
            System.out.println(e.getMessage());
        }

        if (uname != null) { // 如果用户名已存在
            response.sendRedirect("newusererror.html"); // 重定向到注册失败页面
            uname = null;
        } else {
            try {
                dba.insert(tempuname, upass); // 插入新用户信息到数据库
                response.sendRedirect("newuserok.html"); // 重定向到注册成功页面
            } catch (IOException e) {
                throw new RuntimeException(e);
            } catch (SQLException e) {
                throw new RuntimeException(e);
            }
        }
    }

    // 处理HTTP的POST请求,委托给doGet方法处理
    public void doPost(HttpServletRequest request, HttpServletResponse response)
            throws ServletException, IOException {
        doGet(request, response);
    }
}
trim() 是一个常见的字符串处理函数,被用来去除字符串两端的空格。
1.3.3登录验证代码
package org.example;

import java.sql.*;
import java.io.*;

import jakarta.servlet.ServletException;
import jakarta.servlet.annotation.WebServlet;
import jakarta.servlet.http.HttpServlet;
import jakarta.servlet.http.HttpServletRequest;
import jakarta.servlet.http.HttpServletResponse;

@WebServlet("/validate")
public class Validate extends HttpServlet {
    String uname = null; // 待验证的用户名
    String upass = null; // 待验证的密码
    DBAccess dba; // 数据库访问对象

    // 初始化方法,在Servlet启动时调用
    public void init() {
        dba = new DBAccess(); // 创建数据库访问对象
        dba.init(); // 初始化数据库连接
    }

    // 处理HTTP的GET请求
    public void doGet(HttpServletRequest request, HttpServletResponse response)
            throws ServletException, IOException {
        uname = request.getParameter("uname"); // 从请求参数中获取用户名
        String temppass = request.getParameter("upass"); // 从请求参数中获取密码

        try {
            upass = dba.query1(uname).trim(); // 查询数据库,获取指定用户名的密码,并去除两端的空格
        } catch (SQLException e) {
            System.out.println(e.getMessage());
        }

        if (!temppass.equals(upass)) { // 如果输入的密码与数据库中的密码不匹配
            response.sendRedirect("error.html"); // 重定向到登录错误页面
        } else {
            response.sendRedirect("index.html"); // 重定向到登录成功页面
        }
    }

    // 处理HTTP的POST请求,委托给doGet方法处理
    public void doPost(HttpServletRequest request, HttpServletResponse response)
            throws ServletException, IOException {
        doGet(request, response);
    }
}
1.4密码加密和验证
在注册代码中,您应该使用密码哈希来存储密码,而不是直接将原始密码存储在数据库中。在验证代码中,您需要将用户输入的密码通过相同的哈希算法进行加密,然后与数据库中存储的哈希密码进行比较。这样,即使数据库泄露,攻击者也无法得到原始密码。
1.4.1加密分类
在用户认证系统中,对密码进行加密是非常重要的,以增加安全性。常见的做法是使用哈希函数来对密码进行加密存储,这样即使数据库泄漏,攻击者也难以还原出用户的明文密码。以下是一种简单的做法:
1.密码哈希化:
在用户注册时,将用户的密码进行哈希化,并将哈希值存储在数据库中。不要直接将明文密码存储在数据库中。
2.使用Salt(盐值)增加安全性:
在密码哈希化过程中,使用一个随机的盐值。盐值是一个随机的字符串,与用户密码合并后再进行哈希。这会增加密码的随机性,提高安全性。
3.延迟哈希:
为了防止暴力破解攻击,可以对哈希函数进行多次迭代。这会增加攻击者破解密码所需的时间。
1.4.2xml配置
<!--        密码加密库-->
        <dependency>
            <groupId>org.mindrot</groupId>
            <artifactId>jbcrypt</artifactId>
            <version>0.4</version> <!-- BCrypt库的版本号 -->
        </dependency>
1.4.3加密代码
package org.example;

import org.mindrot.jbcrypt.BCrypt;

public class PasswordHashing {

    // 生成密码哈希
    public static String hashPassword(String password) {
        String salt = BCrypt.gensalt(12); // 生成盐值,12是工作因子(时间复杂度的对数)
        return BCrypt.hashpw(password, salt); // 使用盐值对密码进行哈希
    }

    // 验证密码
    public static boolean verifyPassword(String password, String hashedPassword) {
        return BCrypt.checkpw(password, hashedPassword); // 检查密码与哈希后的密码是否匹配
    }

    public static void main(String[] args) {
        String password = "user_password";

        // 生成密码哈希
        String hashedPassword = hashPassword(password);
        System.out.println("Hashed Password: " + hashedPassword);

        // 验证密码
        boolean isMatch = verifyPassword("user_password", hashedPassword);
        System.out.println("Password Match: " + isMatch);
    }
}
1.4.4改进的后端代码
数据库代码
import java.sql.*;

/**
 * 这个类用于数据库访问操作,包括插入、更新和查询用户信息。
 */
public class DBAccess {
    private String driver = "com.mysql.jdbc.Driver"; // 数据库驱动程序
    private String url = "jdbc:mysql://localhost:3306/test"; // 数据库连接URL
    private String user = "root"; // 数据库用户名
    private String password = "b123456"; // 数据库密码
    private Connection conn = null;
    private PreparedStatement insertStatement = null;
    private PreparedStatement updateStatement = null;
    private PreparedStatement queryPasswordStatement = null;
    private PreparedStatement queryUsernameStatement = null;

    /**
     * 初始化数据库连接和预编译语句。
     */
    public void init() {
        try {
            Class.forName(driver); // 加载并注册驱动程序
            conn = DriverManager.getConnection(url, user, password); // 建立连接

            // 准备预编译语句
            insertStatement = conn.prepareStatement("INSERT INTO users (uname, upass) VALUES (?, ?)");
            updateStatement = conn.prepareStatement("UPDATE users SET upass = ? WHERE uname = ?");
            queryPasswordStatement = conn.prepareStatement("SELECT upass FROM users WHERE uname = ?");
            queryUsernameStatement = conn.prepareStatement("SELECT uname FROM users WHERE uname = ?");
        } catch (ClassNotFoundException e) {
            System.out.println("找不到驱动程序");
            e.printStackTrace();
        } catch (SQLException e) {
            e.printStackTrace();
        }
    }

    /**
     * 将用户名和哈希后的密码插入到数据库中。
     *
     * @param uname  用户名
     * @param upass  哈希后的密码
     */
    public void insert(String uname, String upass) throws SQLException {
        insertStatement.setString(1, uname);
        insertStatement.setString(2, upass);
        insertStatement.executeUpdate(); // 执行插入操作
    }

    /**
     * 更新数据库中指定用户名的密码。
     *
     * @param uname  用户名
     * @param upass  新的哈希后的密码
     */
    public void update(String uname, String upass) throws SQLException {
        updateStatement.setString(1, upass);
        updateStatement.setString(2, uname);
        updateStatement.executeUpdate(); // 执行更新操作
    }

    /**
     * 查询指定用户名的密码。
     *
     * @param uname  用户名
     * @return 查询到的哈希后的密码
     */
    public String queryPassword(String uname) throws SQLException {
        queryPasswordStatement.setString(1, uname);
        ResultSet rs = queryPasswordStatement.executeQuery(); // 执行查询操作

        if (rs.next()) {
            return rs.getString("upass"); // 获取查询结果中的密码
        }
        return null;
    }

    /**
     * 查询数据库中是否存在指定用户名。
     *
     * @param uname  用户名
     * @return 如果用户名存在返回true,否则返回false
     */
    public boolean queryUsernameExists(String uname) throws SQLException {
        queryUsernameStatement.setString(1, uname);
        ResultSet rs = queryUsernameStatement.executeQuery(); // 执行查询操作
        return rs.next(); // 如果结果集不为空,说明用户名存在
    }

    /**
     * 关闭数据库连接和预编译语句。
     */
    public void submit() throws SQLException {
        if (insertStatement != null) insertStatement.close();
        if (updateStatement != null) updateStatement.close();
        if (queryPasswordStatement != null) queryPasswordStatement.close();
        if (queryUsernameStatement != null) queryUsernameStatement.close();
        if (conn != null) conn.close();
    }
}
使用PreparedStatement:
当您构建SQL查询和更新时,最好使用PreparedStatement而不是直接拼接字符串。这可以防止SQL注入攻击。
注册代码
import java.io.*;
import java.sql.SQLException;
import jakarta.servlet.ServletException;
import jakarta.servlet.annotation.WebServlet;
import jakarta.servlet.http.HttpServlet;
import jakarta.servlet.http.HttpServletRequest;
import jakarta.servlet.http.HttpServletResponse;

@WebServlet("/newuser")
public class Newuser extends HttpServlet {
    String uname = null;
    String upass = null;
    DBAccess dba;

    /**
     * 初始化方法,在Servlet启动时调用。
     */
    public void init() {
        dba = new DBAccess();
        dba.init(); // 初始化数据库连接和预编译语句
    }

    /**
     * 处理GET请求。
     * 当用户访问注册页面时,通过GET请求触发此方法。
     */
    public void doGet(HttpServletRequest request, HttpServletResponse response)
            throws ServletException, IOException {
        String tempuname = request.getParameter("uname"); // 获取提交的用户名
        upass = request.getParameter("upass"); // 获取提交的密码

        try {
            if (dba.queryUsernameExists(tempuname)) { // 查询用户名是否已存在
                response.sendRedirect("newusererror.html"); // 如果用户名已存在,跳转到错误页面
            } else {
                // 对密码进行哈希操作后再存储
                String hashedPassword = PasswordHashing.hashPassword(upass); // 哈希化密码
                dba.insert(tempuname, hashedPassword); // 将用户名和哈希后的密码插入数据库
                response.sendRedirect("newuserok.html"); // 注册成功后跳转到成功页面
            }
        } catch (IOException | SQLException e) {
            throw new RuntimeException(e);
        }
    }

    /**
     * 处理POST请求。
     * 与GET请求处理相同,用于处理从注册页面提交的数据。
     */
    public void doPost(HttpServletRequest request, HttpServletResponse response)
            throws ServletException, IOException {
        doGet(request, response); // 调用与GET请求处理相同的方法
    }
}
登录验证代码
import java.io.*;
import java.sql.SQLException;
import jakarta.servlet.ServletException;
import jakarta.servlet.annotation.WebServlet;
import jakarta.servlet.http.HttpServlet;
import jakarta.servlet.http.HttpServletRequest;
import jakarta.servlet.http.HttpServletResponse;

@WebServlet("/validate")
public class Validate extends HttpServlet {
    String uname = null;
    String upass = null;
    DBAccess dba;

    /**
     * 初始化方法,在Servlet启动时调用。
     */
    public void init() {
        dba = new DBAccess();
        dba.init(); // 初始化数据库连接和预编译语句
    }

    /**
     * 处理GET请求。
     * 当用户尝试登录时,通过GET请求触发此方法。
     */
    public void doGet(HttpServletRequest request, HttpServletResponse response)
            throws ServletException, IOException {
        uname = request.getParameter("uname"); // 获取提交的用户名
        String temppass = request.getParameter("upass"); // 获取提交的密码

        try {
            String hashedPassword = dba.queryPassword(uname); // 查询数据库中的哈希密码

            if (hashedPassword != null && PasswordHashing.verifyPassword(temppass, hashedPassword)) {
                // 验证哈希后的密码与数据库中的是否匹配
                response.sendRedirect("index.html"); // 密码正确,跳转到主页
            } else {
                response.sendRedirect("error.html"); // 密码错误,跳转到错误页面
            }
        } catch (SQLException e) {
            throw new RuntimeException(e);
        }
    }

    /**
     * 处理POST请求。
     * 与GET请求处理相同,用于处理从登录页面提交的数据。
     */
    public void doPost(HttpServletRequest request, HttpServletResponse response)
            throws ServletException, IOException {
        doGet(request, response); // 调用与GET请求处理相同的方法
    }
}
1.5基于连接池的数据库代码
1.5.1配置
   <!-- https://mvnrepository.com/artifact/com.mchange/c3pθ -->
        <dependency>
            <groupId>com.mchange</groupId>
            <artifactId>c3p0</artifactId>
            <version>0.9.5.2</version>
        </dependency>
        <!-- https://mvnrepository.com/artifact/com.alibaba/druid -->
        <dependency>
            <groupId>com.alibaba</groupId>
            <artifactId>druid</artifactId>
            <version>1.1.10</version>
        </dependency>
1.5.2连接类
package org.example;

import com.mchange.v2.c3p0.ComboPooledDataSource;
import java.sql.Connection;

public class C3p0Factory2 {
    private static ComboPooledDataSource dataSource = null;

    public static void init() throws Exception {
        // 创建 ComboPooledDataSource 实例,会自动加载 c3p0-config.xml 文件的配置
        dataSource = new ComboPooledDataSource();
        // 此时 dataSource 是一个完全配置好的可用连接池 DataSource
    }

    public static Connection getConnection() throws Exception {
        if (null == dataSource) {
            init();
        }
        // 返回从连接池获取的数据库连接
        return dataSource.getConnection();
    }
}
1.5.3数据库改进
package org.example;

import java.sql.*;

public class DBAccess {
    private Connection conn = null;
    private PreparedStatement insertStatement = null;
    private PreparedStatement updateStatement = null;
    private PreparedStatement queryPasswordStatement = null;
    private PreparedStatement queryUsernameStatement = null;

    public void init() {
        try {
            conn =C3p0Factory2.getConnection();
            // 准备语句
            insertStatement = conn.prepareStatement("INSERT INTO users (uname, upass) VALUES (?, ?)");
            updateStatement = conn.prepareStatement("UPDATE users SET upass = ? WHERE uname = ?");
            queryPasswordStatement = conn.prepareStatement("SELECT upass FROM users WHERE uname = ?");
            queryUsernameStatement = conn.prepareStatement("SELECT uname FROM users WHERE uname = ?");
        } catch (ClassNotFoundException e) {
            System.out.println("找不到驱动程序");
            e.printStackTrace();
        } catch (SQLException e) {
            e.printStackTrace();
        } catch (Exception e) {
            throw new RuntimeException(e);
        }
    }

    public void insert(String uname, String upass) throws SQLException {
        insertStatement.setString(1, uname);
        insertStatement.setString(2, upass);
        insertStatement.executeUpdate();
    }

    public void update(String uname, String upass) throws SQLException {
        updateStatement.setString(1, upass);
        updateStatement.setString(2, uname);
        updateStatement.executeUpdate();
    }

    public String queryPassword(String uname) throws SQLException {
        queryPasswordStatement.setString(1, uname);
        ResultSet rs = queryPasswordStatement.executeQuery();

        if (rs.next()) {
            return rs.getString("upass");
        }
        return null;
    }

    public boolean queryUsernameExists(String uname) throws SQLException {
        queryUsernameStatement.setString(1, uname);
        ResultSet rs = queryUsernameStatement.executeQuery();
        return rs.next();
    }

    public void submit() throws SQLException {
        if (insertStatement != null) insertStatement.close();
        if (updateStatement != null) updateStatement.close();
        if (queryPasswordStatement != null) queryPasswordStatement.close();
        if (queryUsernameStatement != null) queryUsernameStatement.close();
        if (conn != null) conn.close();
    }
}
1.6登录失败限制代码
1.6.1相关概念
- 实施登录失败次数记录: 在数据库中为每个用户添加一个用于记录登录失败次数的字段。每次登录失败时,将该字段的值加一。
- 实施登录失败时间记录: 在数据库中为每个用户添加一个用于记录最后登录失败的时间戳的字段。每次登录失败时,更新该字段为当前时间。
- 设置登录失败阈值: 定义一个阈值,例如5次,表示用户在一定时间内最多可以尝试登录5次失败。
- 设置登录失败时间限制: 定义一个时间窗口,例如15分钟,表示在该时间窗口内登录失败次数不得超过阈值。
- 在登录验证器中实现限制逻辑: 在登录验证的代码中,对用户的登录失败次数和时间进行检查。如果登录失败次数超过阈值,并且当前时间与最后登录失败时间之间的时间差在时间窗口内,就禁止用户登录。
1.6.2添加前端代码

<%@ page language="java" contentType="text/html; charset=UTF-8" pageEncoding="UTF-8" %>
<!DOCTYPE html>
<html>
<head>
  <meta charset="UTF-8">
  <title>登录验证</title>
  <style>
    body {
      background-color: lightblue;
      font-family: Arial, sans-serif;
    }

    h1 {
      text-align: center;
      color: white;
    }

    p {
      text-align: center;
      font-size: 20px;
      color: red;
    }

    a {
      color: white;
      text-decoration: none;
    }
  </style>
  <script>
    // 获取服务器传递的剩余时间
    var remainingTime = <%= request.getAttribute("remainingTime") %>;

    function updateCountdown() {
      var minutes = Math.floor(remainingTime / 60000); // 将剩余时间转换为分钟
      var seconds = Math.floor((remainingTime % 60000) / 1000); // 将剩余时间转换为秒
      document.getElementById("countdown").innerText = minutes + " 分钟 " + seconds + " 秒"; // 更新倒计时文本
      remainingTime -= 1000; // 每次减去1秒

      if (remainingTime < 0) {
        document.getElementById("countdown").innerText = "已解除限制"; // 倒计时结束时显示已解除限制
        document.getElementById("retryLink").style.display = "inline"; // 显示重新尝试链接
      } else {
        setTimeout(updateCountdown, 1000); // 每秒更新倒计时
      }
    }

    window.onload = function() {
      updateCountdown(); // 初始化页面上的倒计时
    }
  </script>
</head>
<body>
<h1>登录失败</h1>
<p>抱歉,您已被阻止登录。您的账户已在一定时间内多次尝试登录失败。</p>
<p>限制时间还剩:<span id="countdown">计算中...</span></p> <!-- 显示剩余倒计时 -->
<div style="text-align: center;">
  <a href="index.html" id="retryLink" style="display: none;">返回登录页面 </a> <!-- 显示重新尝试链接 -->
  <a href="newuser.html">注册新用户 </a>
</div>
</body>
</html>
1.6.3修改后的代码
数据库
package org.example;

import java.sql.*;

public class DBAccess {
    private Connection conn = null;
    private PreparedStatement insertStatement = null;
    private PreparedStatement updateStatement = null;
    private PreparedStatement queryPasswordStatement = null;
    private PreparedStatement queryUsernameStatement = null;
    private PreparedStatement queryFailedAttemptsStatement = null;
    private PreparedStatement queryLastFailedTimeStatement = null;
    private PreparedStatement clearFailedAttemptsStatement = null;
    private PreparedStatement recordFailedLoginAttemptStatement = null;

    public void init() {
        try {
            conn =C3p0Factory2.getConnection();
            // 准备语句
            insertStatement = conn.prepareStatement("INSERT INTO users (uname, upass) VALUES (?, ?)");
            updateStatement = conn.prepareStatement("UPDATE users SET upass = ? WHERE uname = ?");
            queryPasswordStatement = conn.prepareStatement("SELECT upass FROM users WHERE uname = ?");
            queryUsernameStatement = conn.prepareStatement("SELECT uname FROM users WHERE uname = ?");
            queryFailedAttemptsStatement = conn.prepareStatement("SELECT failed_attempts FROM users WHERE uname = ?");
            queryLastFailedTimeStatement = conn.prepareStatement("SELECT last_failed_time FROM users WHERE uname = ?");
            clearFailedAttemptsStatement = conn.prepareStatement("UPDATE users SET failed_attempts = 0, last_failed_time = NULL WHERE uname = ?");
            recordFailedLoginAttemptStatement = conn.prepareStatement("UPDATE users SET failed_attempts = ?, last_failed_time = ? WHERE uname = ?");


        } catch (ClassNotFoundException e) {
            System.out.println("找不到驱动程序");
            e.printStackTrace();
        } catch (SQLException e) {
            e.printStackTrace();
        } catch (Exception e) {
            throw new RuntimeException(e);
        }
    }
    /**
     * 插入新用户的用户名和加密后的密码到数据库。
     */
    public void insert(String uname, String upass) throws SQLException {
        insertStatement.setString(1, uname);
        insertStatement.setString(2, upass);
        insertStatement.executeUpdate();
    }
    /**
     * 更新用户的加密后的密码。
     */

    public void update(String uname, String upass) throws SQLException {
        updateStatement.setString(1, upass);
        updateStatement.setString(2, uname);
        updateStatement.executeUpdate();
    }
    /**
     * 查询用户的加密后的密码。
     */

    public String queryPassword(String uname) throws SQLException {
        queryPasswordStatement.setString(1, uname);
        ResultSet rs = queryPasswordStatement.executeQuery();

        if (rs.next()) {
            return rs.getString("upass");
        }
        return null;
    }
    /**
     * 查询用户名是否已存在。
     */

    public boolean queryUsernameExists(String uname) throws SQLException {
        queryUsernameStatement.setString(1, uname);
        ResultSet rs = queryUsernameStatement.executeQuery();
        return rs.next();
    }
    /**
     * 查询用户的登录失败次数。
     */
    public int queryFailedLoginAttempts(String uname) throws SQLException {
        queryFailedAttemptsStatement.setString(1, uname);
        ResultSet rs = queryFailedAttemptsStatement.executeQuery();

        if (rs.next()) {
            return rs.getInt("failed_attempts");
        }
        return 0;
    }
    /**
     * 查询用户的最后登录失败时间。
     */
    public Timestamp queryLastFailedLoginTime(String uname) throws SQLException {
        queryLastFailedTimeStatement.setString(1, uname);
        ResultSet rs = queryLastFailedTimeStatement.executeQuery();

        if (rs.next()) {
            return rs.getTimestamp("last_failed_time");
        }
        return null;
    }
    /**
     * 清除用户的登录失败记录。
     */
    public void clearFailedLoginAttempts(String uname) throws SQLException {
        clearFailedAttemptsStatement.setString(1, uname);
        clearFailedAttemptsStatement.executeUpdate();
    }
    /**
     * 记录用户的登录失败尝试。
     */
    public void recordFailedLoginAttempt(String uname, int failedAttempts, Date lastFailedTime) throws SQLException {
        recordFailedLoginAttemptStatement.setInt(1, failedAttempts);
        recordFailedLoginAttemptStatement.setTimestamp(2, new java.sql.Timestamp(lastFailedTime.getTime()));
        recordFailedLoginAttemptStatement.setString(3, uname);
        recordFailedLoginAttemptStatement.executeUpdate();
    }

    /**
     * 关闭数据库连接和预编译语句。
     */
    public void submit() throws SQLException {
        if (insertStatement != null) insertStatement.close();
        if (updateStatement != null) updateStatement.close();
        if (queryPasswordStatement != null) queryPasswordStatement.close();
        if (queryUsernameStatement != null) queryUsernameStatement.close();
        if (queryFailedAttemptsStatement != null) queryFailedAttemptsStatement.close();
        if (queryLastFailedTimeStatement != null) queryLastFailedTimeStatement.close();
        if (clearFailedAttemptsStatement != null) clearFailedAttemptsStatement.close();
        if (recordFailedLoginAttemptStatement != null) recordFailedLoginAttemptStatement.close();
        if (conn != null) conn.close();
    }

}
登录验证
package org.example;

import java.io.*;
import java.sql.SQLException;
import java.util.Date;
import jakarta.servlet.ServletException;
import jakarta.servlet.annotation.WebServlet;
import jakarta.servlet.http.HttpServlet;
import jakarta.servlet.http.HttpServletRequest;
import jakarta.servlet.http.HttpServletResponse;

@WebServlet("/validate")
public class Validate extends HttpServlet {
    String uname = null;
    String upass = null;
    DBAccess dba;

    public void init() {
        dba = new DBAccess();
        dba.init(); // 初始化数据库连接和预编译语句
    }

    /**
     * 处理GET请求。
     * 当用户尝试登录时,通过GET请求触发此方法。
     */
    public void doGet(HttpServletRequest request, HttpServletResponse response)
            throws ServletException, IOException {
        uname = request.getParameter("uname"); // 获取提交的用户名
        String temppass = request.getParameter("upass"); // 获取提交的密码

        try {
            if (isBlocked(uname)) {
                // 计算剩余限制时间并传递到前端
                long timeDifference = new Date().getTime() - dba.queryLastFailedLoginTime(uname).getTime();
                long timeWindowInMillis = 5 * 60 * 1000; // 15分钟
                float remainingTime = timeWindowInMillis - timeDifference;

                request.setAttribute("remainingTime", remainingTime);

                // 转发到 blocked.html
                request.getRequestDispatcher("blocked.jsp").forward(request, response);
            } else {
                String hashedPassword = dba.queryPassword(uname);

                if (hashedPassword != null && PasswordHashing.verifyPassword(temppass, hashedPassword)) {
                    clearFailedLoginAttempts(uname); // 登录成功,清除登录失败记录
                    response.sendRedirect("index.html"); // 跳转到主页
                } else {
                    recordFailedLoginAttempt(uname); // 登录失败,记录失败次数和时间
                    response.sendRedirect("error.html"); // 跳转到错误页面
                }
            }
        } catch (SQLException e) {
            throw new RuntimeException(e);
        }
    }

    /**
     * 处理POST请求。
     * 与GET请求处理相同,用于处理从登录页面提交的数据。
     */
    public void doPost(HttpServletRequest request, HttpServletResponse response)
            throws ServletException, IOException {
        doGet(request, response); // 调用与GET请求处理相同的方法
    }

    /**
     * 检查用户是否被阻止登录。
     * 如果用户的登录失败次数超过阈值,并且在时间窗口内,则返回 true,否则返回 false。
     * 如果时间窗口过期,清除登录失败记录。
     */
    private boolean isBlocked(String uname) throws SQLException {
        int maxAttempts = 5; // 最大尝试次数
        int timeWindowInMinutes = 5; // 时间窗口(以分钟为单位)

        // 获取用户的登录失败次数和最后登录失败时间
        int failedAttempts = dba.queryFailedLoginAttempts(uname);
        Date lastFailedTime = dba.queryLastFailedLoginTime(uname);

        if (failedAttempts >= maxAttempts) {
            long timeDifference = new Date().getTime() - lastFailedTime.getTime();
            long timeWindowInMillis = timeWindowInMinutes * 60 * 1000; // 将分钟转换为毫秒

            if (timeDifference <= timeWindowInMillis) {
                return true; // 用户被阻止登录
            } else {
                clearFailedLoginAttempts(uname); // 清除登录失败记录,因为时间窗口已过
            }
        }

        return false; // 用户未被阻止登录
    }

    /**
     * 记录登录失败尝试。
     * 在数据库中增加用户的登录失败次数,并更新最后登录失败时间为当前时间。
     */
    private void recordFailedLoginAttempt(String uname) throws SQLException {
        int failedAttempts = dba.queryFailedLoginAttempts(uname) + 1; // 增加登录失败次数
        Date now = new Date();
        java.sql.Date sqlDate = new java.sql.Date(now.getTime());
        dba.recordFailedLoginAttempt(uname, failedAttempts, sqlDate); // 在数据库中记录登录失败尝试
    }

    /**
     * 清除登录失败记录。
     * 在登录成功后,清除用户的登录失败次数和最后登录失败时间。
     */
    private void clearFailedLoginAttempts(String uname) throws SQLException {
        dba.clearFailedLoginAttempts(uname); // 在数据库中清除登录失败记录
    }

    }
二、编码过滤器
浏览器默认使用UTF-8编码方式来发送数据。如果整个网站统一使用UTF-8编码,就不会
出现乱码。但如果使用汉字编码(如gbk或gb2312)就涉及编码转换。这时,我们可以使用HTTPServletRequest中的 setCharacterEncoding(String encoding)方法设置为指定的编码。
2.1过滤器基础
2.1.1工作原理
2.1.2应用场合
用户权限的判断
如果一个Web客户端访问Web相关资源时,需要用户符合某些条件,那么可能需要在每个Web资源中添加对用户的权限判断,这是一件重复繁琐的事情,而且也不方便以后的系统维护,使用过滤器则可以简单地解决这个问题。
对请求内容进行统一编码页面表单通常提交的数据编码是“ISO8859-1”,而对于中文系统来说,需要接收页面的中文输入,为了能够正确地获取页面的数据,需要在接收请求的资源中做编码设置与转换,在多个请求资源中都需要相同的操作,使用过滤器可以只需一次设置,整个 Web可用.
其他除此之外,过滤器还有很多其他用途,例如XML转换过滤、数据压缩过滤、图像转换过滤、加密过滤、请求与响应封装等。
2.1.3流程
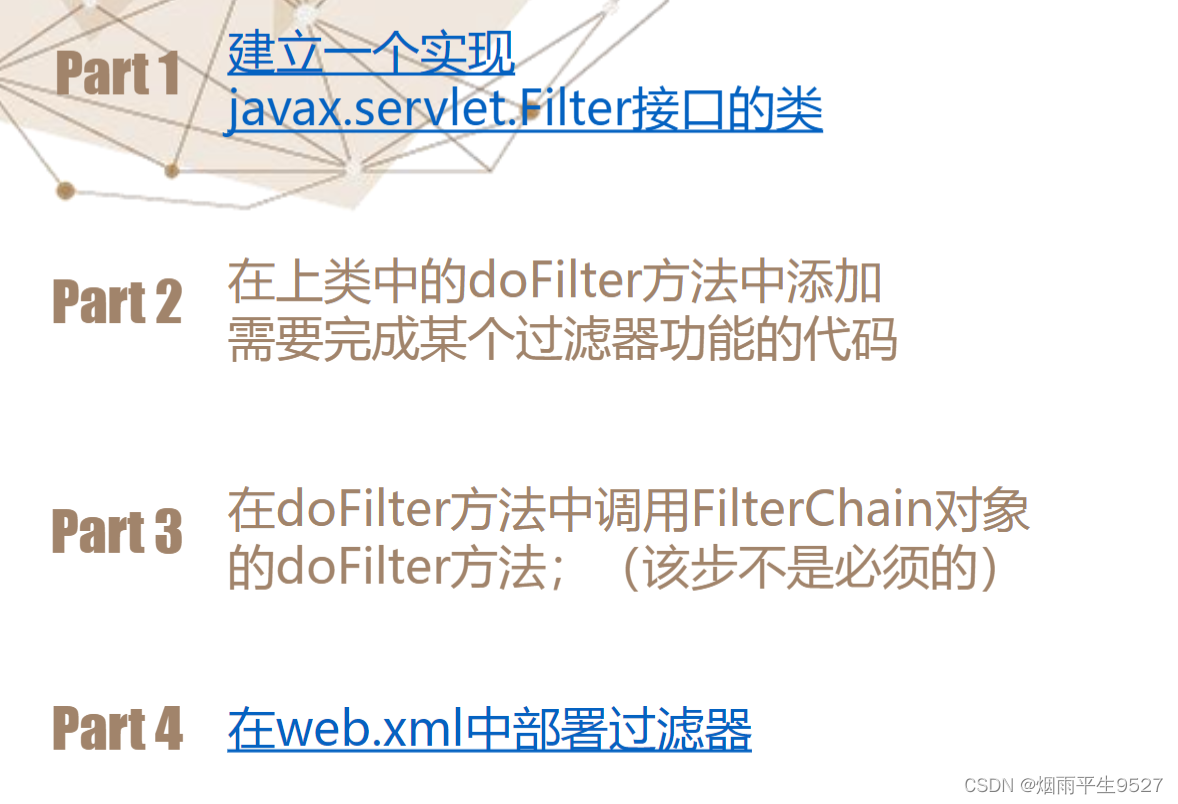
 f
f


