1、QR概述
QR(Quick Response)属于二维条码的一种,意思是快速响应的意思。QR码不仅信息容量大、可靠性高、成本低,还可表示汉字及图像等多种文字信息、其保密防伪性强而且使用非常方便。更重要的是QR码这项技术是开源的,在移动支付、电影票、电子会员卡等场景以及很多的产品上也印刷有这样的二维码,给人们的日常生活带来了很大便利。
QR码中数据值包含很多冗余值。所以即便多达30%的二维码结构被破坏,也不影响二维码的可读性。QR码的存储空间随着版本号越大,存储越多,从V1版本的21个字符到V40版本可以存储4296个字符,包括标点符号和特殊字符,都可以写入QR码中。除了数字和字符之外,还可以对单词和短语(例如网址)进行编码。随着更多的数据被添加到QR码,代码大小增加,代码结构变得更加复杂。当然QR码的存储空间还跟编码方式,误差纠正等因素都有关系,所以在使用时需要考虑这些因素,选择合适的版本和编码方式。
2、QR码生成
2.1、Linux与Windows
安装QRCode相关模块,由于本机是安装了Python2的版本,也可以选用Python3版本来安装
Linux环境安装:python3 -m pip install qrcode
Windows环境安装(JupyterLab):
!pip install qrcode -i http://pypi.douban.com/simple/ --trusted-host pypi.douban.com安装好了之后,来看一个最简的生成QRCode二维码代码,信息是本人的博客网址:myqr.py
import qrcode

img = qrcode.make('https://chyichin.blog.csdn.net/')
img.save('myqr.png')需要注意的是,这里的文件名称不能是关键字:qrcode,如果文件名为qrcode.py,就会报错:
AttributeError: 'module' object has no attribute 'make'
运行:python3 myqr.py 将生成一张QR二维码的图片myqr.png:

使用微信扫码可以进入这个网站,也可以使用内置命令查看该图片:eog myqr.png
2.2、添加logo
还可以在QR码上面添加自定义的logo图,代码如下:
import qrcode
from PIL import Image

def addLogo(img,logo):
    imgW,imgH = img.size
    logo = Image.open(logo)
    logoW,logoH = logo.size
    factor = 5 #缩放因子
    sizeW = int(imgW/factor)
    sizeH = int(imgH/factor)
    if logoW > sizeW:logoW = sizeW
    if logoH > sizeH:logoH = sizeH
    logo = logo.resize((logoW,logoH),Image.Resampling.LANCZOS)
    #将logo粘贴到图片中心位置
    w = int((imgW-logoW)/2)
    h = int((imgH-logoH)/2)
    img.paste(logo,(w,h),mask=None)
    return img

def GenQRCode(data,outname,logo):
    qr = qrcode.QRCode(version=7,
                       error_correction=qrcode.constants.ERROR_CORRECT_H,
                       box_size=10,
                       border=4,)
    #添加与填充数据
    qr.add_data(data)
    qr.make(fit=True)
    img = qr.make_image(fill_color="blue",back_color="white")
    addLogo(img,logo)
    img.save(outname)
    return img

if __name__ == '__main__':
    GenQRCode("https://chyichin.blog.csdn.net/", "myLogoQR.png", "p.jpg")
其中p.jpg就是本人头像,这样就将头像按照比例缩放,添加到了QR二维码中心位置上面,生成的QR二维码如下图,可以看到除了黑白之外,还可以使用自定义颜色来设置前景和背景:

3、QR码分析
对于上面生成的二维码,里面的每个位置所代表的信息是不一样的,我们来详细看一个表格:
 | 定位标识 (Positioning markings)扫码时不需要对准,可以是任意角度,仍然能够准确识别。 |
 | 对齐标记(Alignment markings)如果二维码很大,这些附加元素帮助定位。 |
 | 计算模式(Timing pattern)通过这些线,扫描器可以识别矩阵有多大。 |
 | 版本信息(Version information)版本号,目前有40个不同的版本号(销售行业的的版本号通常为1~7) |
 | 格式信息(Format information)包含关于容错和数据掩码模式的信息,使得扫描更加容易。 |
 | 数据和错误校正值(Data and error correction keys)保存的是实际数据。 |
 | 宁静区域(Quiet zone)这个区域对于扫描器来说非常重要,能够将自身与周边进行分离。 |
其中代码中的qrcode.QRCode函数里面的参数含义如下:
version:版本号,值为1~40的整数,控制二维码的大小(最小值为1,12×12的矩阵)。如果想让程序自动确定,将值设置为 None 并使用 fit 参数即可。
error_correction:控制二维码的错误纠正功能,纠正多少取决于qrcode.constants的设定:
ERROR_CORRECT_L:大约7%或更少的错误能被纠正。
ERROR_CORRECT_M(默认):大约15%或更少的错误能被纠正。
ROR_CORRECT_H:大约30%或更少的错误能被纠正。
box_size:控制二维码中每个小格子包含的像素数。
border:控制边框(二维码与图片边界的距离)包含的格子数(默认为4)
4、QR码识别
上面是生成QR码,接下来就是如何让摄像头去识别QR码,这里将会用到pyzbar库去解析QR码
Linux环境:
python3 -m pip install qrcode pyzbar
sudo apt-get install libzbar-dev
Windows环境(JupyterLab):
!pip install pyzbar -i http://pypi.douban.com/simple/ --trusted-host pypi.douban.com当然如果是在命令行安装就不需要这个叹号"!"
由于本人没有摄像头,所以依然使用无人车上面的CSI摄像头来做测试,识别QR码的代码如下,Recog_myqr.py:
import time
import cv2 as cv
import numpy as np
import pyzbar.pyzbar as pyzbar
from PIL import Image, ImageDraw, ImageFont

def RecogQRCode(image, font_path):
    # 转成灰度图片
    gray = cv.cvtColor(image, cv.COLOR_BGR2GRAY)
    barcodes = pyzbar.decode(gray)
    for barcode in barcodes:
        # 获取QR码边界框位置,画出图像中条形码的边界框
        (x, y, w, h) = barcode.rect
        cv.rectangle(image, (x, y), (x + w, y + h), (225, 0, 0), 5)
        encoding = 'UTF-8'
        barcodeData = barcode.data.decode(encoding)
        barcodeType = barcode.type
        # 绘出图像上数据和类型
        pilimg = Image.fromarray(image)
        # 创建画笔
        draw = ImageDraw.Draw(pilimg)
        # 将识别的信息画在QR码以上25个像素处,指定字体与大小
        fontStyle = ImageFont.truetype(font_path, size=12, encoding=encoding)
        draw.text((x, y - 25), str(barcode.data, encoding), fill=(255, 0, 0), font=fontStyle)
        # 将PIL图转成cv2图
        image = cv.cvtColor(np.array(pilimg), cv.COLOR_RGB2BGR)
        print("Type:{} Data:{}".format(barcodeType, barcodeData))
    return image

# 调节图像质量
#/usr/lib/aarch64-linux-gnu/gstreamer-1.0/libgstnvarguscamerasrc.so
def gstreamer_pipeline(
    capture_width=640,
    capture_height=480,
    display_width=640,
    display_height=480,
    framerate=30,
    flip_method=0,
):
    return (
        "nvarguscamerasrc ! "
        "video/x-raw(memory:NVMM), "
        "width=(int)%d, height=(int)%d, "
        "format=(string)NV12, framerate=(fraction)%d/1 ! "
        "nvvidconv flip-method=%d ! "
        "video/x-raw, width=(int)%d, height=(int)%d, format=(string)BGRx ! "
        "videoconvert ! "
        "video/x-raw, format=(string)BGR ! appsink"
        % (
            capture_width,
            capture_height,
            framerate,
            flip_method,
            display_width,
            display_height,
        )
    )

if __name__ == '__main__':
    # 字体识别中文
    font_path = "../font/Block_Simplified.TTF"
    #font_path = "C:\Windows\Fonts\simsun.ttc"
    capture = cv.VideoCapture(gstreamer_pipeline(flip_method=0), cv.CAP_GSTREAMER)
    cv_edition = cv.__version__
    if cv_edition[0] == '3': capture.set(cv.CAP_PROP_FOURCC, cv.VideoWriter_fourcc(*'XVID'))
    else: capture.set(cv.CAP_PROP_FOURCC, cv.VideoWriter.fourcc('M', 'J', 'P', 'G'))
    capture.set(cv.CAP_PROP_FRAME_WIDTH, 640)
    capture.set(cv.CAP_PROP_FRAME_HEIGHT, 480)
    print("capture get FPS : ", capture.get(cv.CAP_PROP_FPS))
    while capture.isOpened():
        start = time.time()
        ret, frame = capture.read()
        action = cv.waitKey(10) & 0xFF
        frame = RecogQRCode(frame, font_path)
        end = time.time()
        fps = 1 / (end - start)
        text = "FPS : " + str(int(fps))
        cv.putText(frame, text, (30, 30), cv.FONT_HERSHEY_SIMPLEX, 0.6, (100, 200, 200), 1)
        cv.imshow('frame', frame)
        if action == ord('q') or action == 113: break
    capture.release()
cv.destroyAllWindows()其中gstreamer_pipeline方法里面的nvarguscamerasrc是英伟达的Argus Camera的库,我们可以通过GStreamer提供的gst-inspect-1.0指令去查询CSI摄像头可设定的参数有哪些:
Factory Details:
Rank primary (256)
Long-name NvArgusCameraSrc
Klass Video/Capture
Description nVidia ARGUS Camera Source
Author Viranjan Pagar <vpagar@nvidia.com>, Amit Pandya <apandya@nvidia.com>Plugin Details:
Name nvarguscamerasrc
Description nVidia ARGUS Source Component
Filename /usr/lib/aarch64-linux-gnu/gstreamer-1.0/libgstnvarguscamerasrc.so
Version 1.0.0
License Proprietary
Source module nvarguscamerasrc
Binary package NvARGUSCameraSrc
Origin URL http://nvidia.com/GObject
+----GInitiallyUnowned
+----GstObject
+----GstElement
+----GstBaseSrc
+----GstNvArgusCameraSrcPad Templates:
SRC template: 'src'
Availability: Always
Capabilities:
video/x-raw(memory:NVMM)
width: [ 1, 2147483647 ]
height: [ 1, 2147483647 ]
format: { (string)NV12 }
framerate: [ 0/1, 2147483647/1 ]Element has no clocking capabilities.
Element has no URI handling capabilities.Pads:
SRC: 'src'
Pad Template: 'src'Element Properties:
name : The name of the object
flags: readable, writable
String. Default: "nvarguscamerasrc0"
parent : The parent of the object
flags: readable, writable
Object of type "GstObject"
blocksize : Size in bytes to read per buffer (-1 = default)
flags: readable, writable
Unsigned Integer. Range: 0 - 4294967295 Default: 4096
num-buffers : Number of buffers to output before sending EOS (-1 = unlimited)
flags: readable, writable
Integer. Range: -1 - 2147483647 Default: -1
typefind : Run typefind before negotiating (deprecated, non-functional)
flags: readable, writable, deprecated
Boolean. Default: false
do-timestamp : Apply current stream time to buffers
flags: readable, writable
Boolean. Default: true
silent : Produce verbose output ?
flags: readable, writable
Boolean. Default: true
timeout : timeout to capture in seconds (Either specify timeout or num-buffers, not both)
flags: readable, writable
Unsigned Integer. Range: 0 - 2147483647 Default: 0
wbmode : White balance affects the color temperature of the photo
flags: readable, writable
Enum "GstNvArgusCamWBMode" Default: 1, "auto"
(0): off - GST_NVCAM_WB_MODE_OFF
(1): auto - GST_NVCAM_WB_MODE_AUTO
(2): incandescent - GST_NVCAM_WB_MODE_INCANDESCENT
(3): fluorescent - GST_NVCAM_WB_MODE_FLUORESCENT
(4): warm-fluorescent - GST_NVCAM_WB_MODE_WARM_FLUORESCENT
(5): daylight - GST_NVCAM_WB_MODE_DAYLIGHT
(6): cloudy-daylight - GST_NVCAM_WB_MODE_CLOUDY_DAYLIGHT
(7): twilight - GST_NVCAM_WB_MODE_TWILIGHT
(8): shade - GST_NVCAM_WB_MODE_SHADE
(9): manual - GST_NVCAM_WB_MODE_MANUAL
saturation : Property to adjust saturation value
flags: readable, writable
Float. Range: 0 - 2 Default: 1
sensor-id : Set the id of camera sensor to use. Default 0.
flags: readable, writable
Integer. Range: 0 - 255 Default: 0
sensor-mode : Set the camera sensor mode to use. Default -1 (Select the best match)
flags: readable, writable
Integer. Range: -1 - 255 Default: -1
total-sensor-modes : Query the number of sensor modes available. Default 0
flags: readable
Integer. Range: 0 - 255 Default: 0
exposuretimerange : Property to adjust exposure time range in nanoseconds
Use string with values of Exposure Time Range (low, high)
in that order, to set the property.
eg: exposuretimerange="34000 358733000"
flags: readable, writable
String. Default: null
gainrange : Property to adjust gain range
Use string with values of Gain Time Range (low, high)
in that order, to set the property.
eg: gainrange="1 16"
flags: readable, writable
String. Default: null
ispdigitalgainrange : Property to adjust digital gain range
Use string with values of ISP Digital Gain Range (low, high)
in that order, to set the property.
eg: ispdigitalgainrange="1 8"
flags: readable, writable
String. Default: null
tnr-strength : property to adjust temporal noise reduction strength
flags: readable, writable
Float. Range: -1 - 1 Default: -1
tnr-mode : property to select temporal noise reduction mode
flags: readable, writable
Enum "GstNvArgusCamTNRMode" Default: 1, "NoiseReduction_Fast"
(0): NoiseReduction_Off - GST_NVCAM_NR_OFF
(1): NoiseReduction_Fast - GST_NVCAM_NR_FAST
(2): NoiseReduction_HighQuality - GST_NVCAM_NR_HIGHQUALITY
ee-mode : property to select edge enhnacement mode
flags: readable, writable
Enum "GstNvArgusCamEEMode" Default: 1, "EdgeEnhancement_Fast"
(0): EdgeEnhancement_Off - GST_NVCAM_EE_OFF
(1): EdgeEnhancement_Fast - GST_NVCAM_EE_FAST
(2): EdgeEnhancement_HighQuality - GST_NVCAM_EE_HIGHQUALITY
ee-strength : property to adjust edge enhancement strength
flags: readable, writable
Float. Range: -1 - 1 Default: -1
aeantibanding : property to set the auto exposure antibanding mode
flags: readable, writable
Enum "GstNvArgusCamAeAntiBandingMode" Default: 1, "AeAntibandingMode_Auto"
(0): AeAntibandingMode_Off - GST_NVCAM_AEANTIBANDING_OFF
(1): AeAntibandingMode_Auto - GST_NVCAM_AEANTIBANDING_AUTO
(2): AeAntibandingMode_50HZ - GST_NVCAM_AEANTIBANDING_50HZ
(3): AeAntibandingMode_60HZ - GST_NVCAM_AEANTIBANDING_60HZ
exposurecompensation: property to adjust exposure compensation
flags: readable, writable
Float. Range: -2 - 2 Default: 0
aelock : set or unset the auto exposure lock
flags: readable, writable
Boolean. Default: false
awblock : set or unset the auto white balance lock
flags: readable, writable
Boolean. Default: false
bufapi-version : set to use new Buffer API
flags: readable, writable
Boolean. Default: false
然后运行:python3 Recog_myqr.py,将打开摄像头,其识别效果如下:
 可以看到QR码上面显示了内容信息,然后我们也可以来到终端看下其显示:
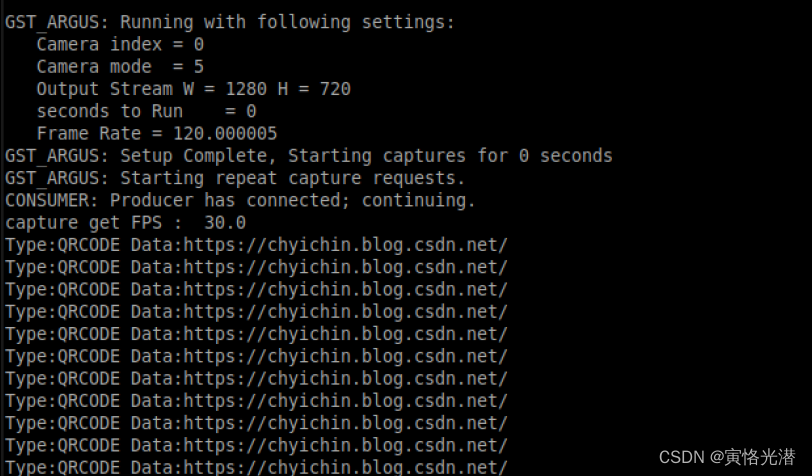
正确显示了识别的类型为QRCode,以及数据,这里就是本人的博客网址。试着识别下微信的付款码和收款码,识别情况如下:
收款码
Type:QRCODE Data:wxp://XXXtQeEHmJp67RHOPVVG-D7oGonAQTxE1p6V9rG898iUklUHgbd5XXXX
付款码Type:QRCODE Data:131568199XXXX


![【蓝桥杯】 [蓝桥杯 2015 省 A] 饮料换购](https://img-blog.csdnimg.cn/220d0aee416f40049adbe4efdc3290d9.png)