Docker安装Oracle
本次使用的系统是centOS7
(文章部分参考:地址)
安装Docker
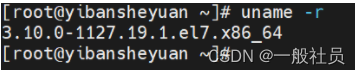
docker安装要求:CentOS内核版本高于3.10,可以通过命令 uname -r查看当前内核版本
下载工具
yum install -y yum-utils
设置阿里云镜像
yum-config-manager \
    --add-repo \http://mirrors.aliyun.com/docker-ce/linux/centos/docker-ce.repo
更新软件索引
yum makecache fast
安装docker
yum install docker-ce docker-ce-cli containerd.io docker-compose-plugin
启动docker
systemctl start docker
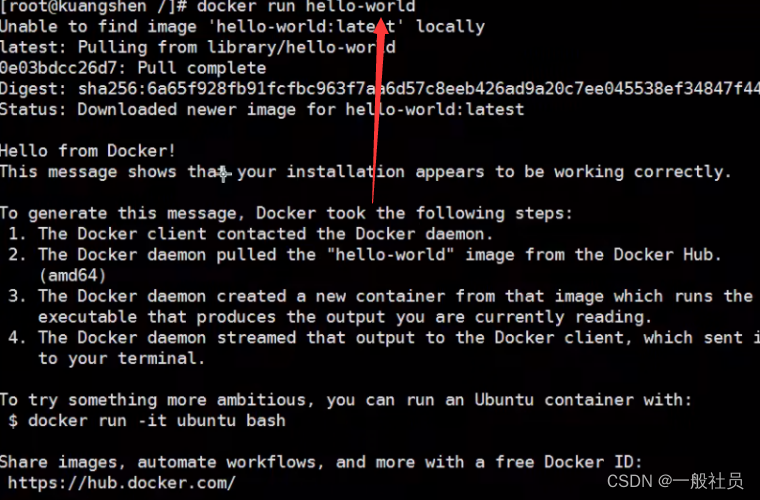
查看是否安装成功
docker run hello-world
或者输入
docker version
有出现版本信息也为成功
使用Docker安装Oracle
本次拉取的是Oracle11g版本的
拉取
docker pull registry.cn-hangzhou.aliyuncs.com/helowin/oracle_11g
查看是否成功
docker images

使用刚刚拉取的镜像创建容器
-d 的意思是后台运行
-p的意思是设置端口(为什么是两个端口,可以自己去百度,不做过多解释)
-name是设置容器名字
docker run -d -p 1521:1521 --name oracle11g registry.cn-hangzhou.aliyuncs.com/helowin/oracle_11g
启动容器
docker start oracle11g
进入镜像进行配置
docker exec -it oracle11g bash
切换到root用户
密码 helowin
su root
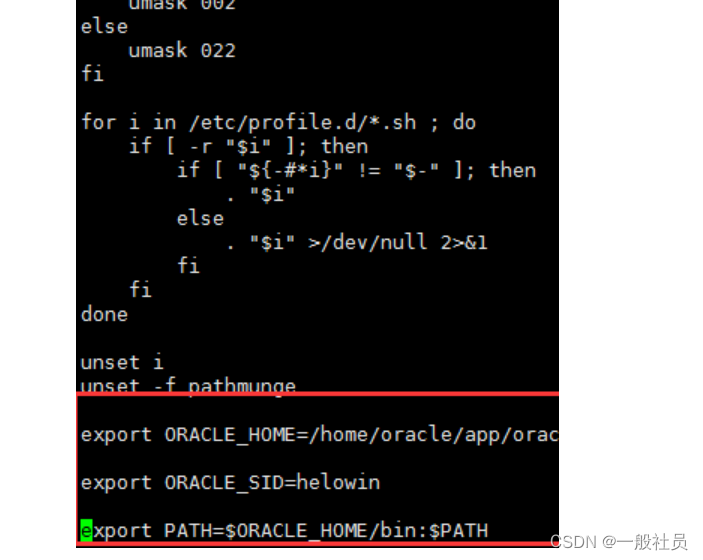
编辑配置文件
vim /etc/profile
在文件最后加上如下内容:
export ORACLE_HOME=/home/oracle/app/oracle/product/11.2.0/dbhome_2
export ORACLE_SID=helowin
export PATH=$ORACLE_HOME/bin:$PATH
保存重加载配置文件
source /etc/profile
创建软连接
ln -s $ORACLE_HOME/bin/sqlplus /usr/bin
切换到oracle用户
注意空格不能去除
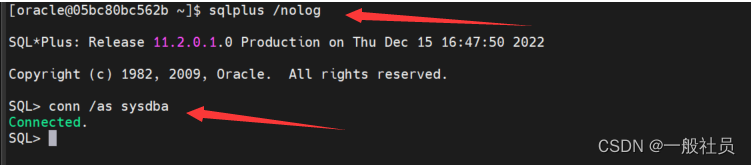
su - oracle
切换成功之后依次执行如下命令
sqlplus /nolog
conn /as sysdba
在依次执行
alter user system identified by system;
alter user sys identified by sys;
ALTER PROFILE DEFAULT LIMIT PASSWORD_LIFE_TIME UNLIMITED;
安装就完成了
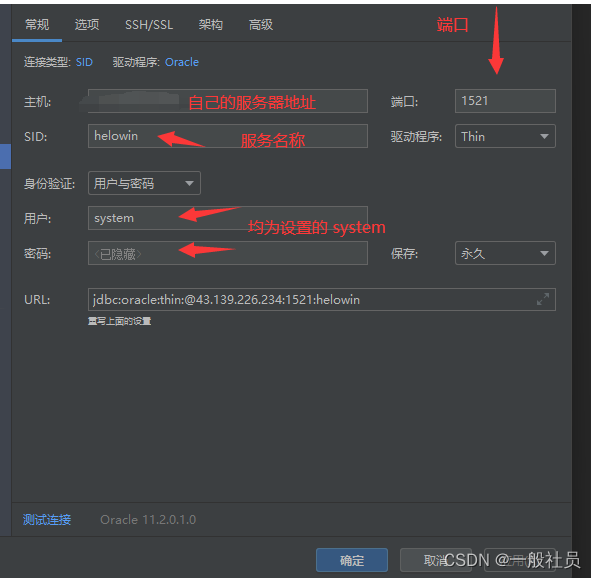
记得把服务器的防火墙1521打开
用户名密码:
用户名:system
密码:system


![[C/C++/初学者]500以内的亲密数对(VS2012)](https://img-blog.csdnimg.cn/f2a700d1545e432681b598878c437759.png)
![[附源码]Python计算机毕业设计高校体育馆管理信息系统Django(程序+LW)](https://img-blog.csdnimg.cn/feb0445aa59b442d84908465cdf1a666.png)