对AI炒股感兴趣的小伙伴可加WX群:

1、引言
在这期内容中,我们将暂时将股票搁置一旁,转而探索人工智能技术如何应用于另一个有趣的领域:预测未来双色球号码。
2、AI与双色球预测的关系
在彩票预测中,AI充当着数据分析和模式识别的角色。虽然无法确保百分之百准确的结果,但它为增加预测的洞察力和理解提供了全新的途径。
3、数据收集与处理
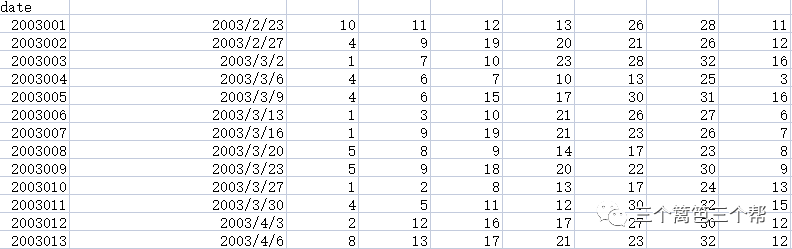
首先,下载2005年至今的所有开奖号码。
预处理之后形成以下数据集,前面6个数是红球而第7个数是蓝球
4、预测模型
我们采用神经网络算法中最先进的Transformer作为模型,但是在输入模型之前,我们需要进行一些预处理,具体如下:
1、数字表示转化为独热编码:我们需要将数字表示转换为独热编码,以便让AI能够更好地学习。我们采用以下方式进行独热编码:

这样,原本每期7个数字的数据将被转换成每期49个独热编码。
2、数据和制作标签:我们的模型应该被设计成:输入过去29天的历史数据,形成的独热编码,来预测未来下一次的独热编码。为实现这个理念,我们对数据进行了滑窗提取,每次滑窗提取过去29天的历史数据,并对应需要预测的未来一天的真实值。具体代码如下:
df = pd.read_csv('./basedata.csv').dropna()
train_df = np.array(df)
samples = []
label = []
for j in range(len(train_df)):
    if j > 27:
        feat = train_df[j - 28:j + 1][:, 2:]
        l = train_df[j - 27:j + 2][-1:, 2:]
        samples.append(feat)
        label.append(l)
DATA = np.array(samples).astype(int)
LABEL = np.array(label).astype(int)
LABEL = np.squeeze(LABEL, axis=(1,))
独热编码处理:
num_classes_first_six = 33
num_classes_last_one = 16
encoded_data = np.zeros((DATA.shape[0], DATA.shape[1], num_classes_first_six + num_classes_last_one), dtype=int)
for i in range(DATA.shape[0]):
    for j in range(DATA.shape[1]):
        for k in range(DATA.shape[2]):
            num = int(DATA[i, j, k])
            if k < 6:
                encoded_data[i, j, num - 1] = 1
            else:
                encoded_data[i, j, num_classes_first_six + num - 1] = 1
train_D = torch.tensor(encoded_data, dtype=torch.float32)
num_classes_first_six = 33
num_classes_last_one = 16
encoded_data = np.zeros((LABEL.shape[0], num_classes_first_six + num_classes_last_one), dtype=int)
for i in range(LABEL.shape[0]):
    for j in range(LABEL.shape[1]):
        num = int(LABEL[i, j])
        if j < 6:
            encoded_data[i, num - 1] = 1
        else:
            encoded_data[i, num_classes_first_six + num - 1] = 1
train_L = torch.tensor(encoded_data, dtype=torch.float32)
3、基于PyTorch框架,由于我们的输入维度是49,我们选择了以下参数:
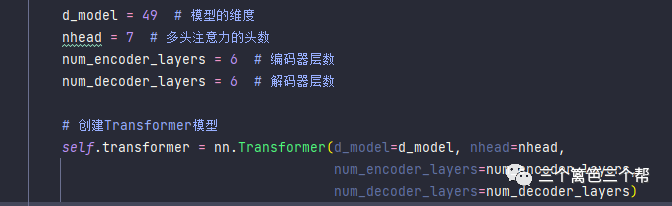
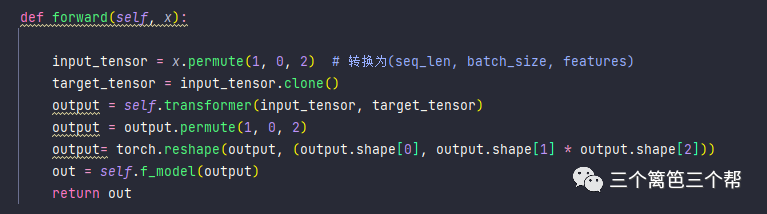
进入Transformer解码之后,我们会对高阶特征进行降维,将特征区间映射到标签区间。我们的标签区间同样是一个49的独热编码。
具体步骤如下:
5、AI学习情况
我们采用前3000期彩票数据进行训练,而将后续的彩票期数用于测试。
测试结果如下所示:
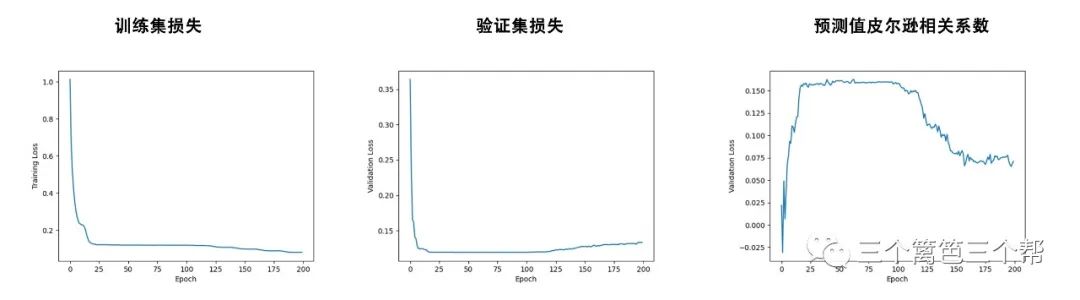
总结:在经过大约100个epoch的训练后,模型达到了约0.15的相关性水平。随后的训练导致了过拟合现象的出现,因此我们建议考虑提前停止训练,以避免过拟合的问题。
6、应用
由于预测值是一个49的独热矩阵,我们要将其转化成数字表示,我爬取最近29天的数据特征,预测2023-08-22的号码为:

大胆试试!!!!期待今天开奖!hahahahahahaha
希望强大的transformer高阶表示能学到双色球的生成规律。
数据在这里下载:百度网盘 请输入提取码
提取码:1234
完整训练代码:
import numpy as np
import pandas as pd
import torch
from sklearn import metrics
import matplotlib.pyplot as plt
import torchvision.transforms as transforms
from torch.utils.data import DataLoader, Dataset
from torchvision.transforms import Normalize
from sklearn.model_selection import KFold
import torch
import torch.nn as nn
from torch.utils.data import DataLoader, TensorDataset, Dataset
from torch.optim import lr_scheduler
from tqdm import tqdm
from sklearn.metrics import precision_recall_curve, auc
from torch.utils.data import TensorDataset, DataLoader, WeightedRandomSampler
import time
from tqdm import tqdm

device = torch.device("cuda:0" if torch.cuda.is_available() else "cpu")

df = pd.read_csv('./basedata.csv').dropna()
train_df = np.array(df.iloc[:-300])
samples = []
label = []
for j in range(len(train_df)):
    if j > 27:
        feat = train_df[j - 28:j + 1][:, 2:]
        l = train_df[j - 27:j + 2][-1:, 2:]
        samples.append(feat)
        label.append(l)
DATA = np.array(samples).astype(int)
LABEL = np.array(label).astype(int)
LABEL = np.squeeze(LABEL, axis=(1,))

num_classes_first_six = 33
num_classes_last_one = 16
encoded_data = np.zeros((DATA.shape[0], DATA.shape[1], num_classes_first_six + num_classes_last_one), dtype=int)
for i in range(DATA.shape[0]):
    for j in range(DATA.shape[1]):
        for k in range(DATA.shape[2]):
            num = int(DATA[i, j, k])
            if k < 6:
                encoded_data[i, j, num - 1] = 1
            else:
                encoded_data[i, j, num_classes_first_six + num - 1] = 1
train_D = torch.tensor(encoded_data, dtype=torch.float32)
num_classes_first_six = 33
num_classes_last_one = 16
encoded_data = np.zeros((LABEL.shape[0], num_classes_first_six + num_classes_last_one), dtype=int)
for i in range(LABEL.shape[0]):
    for j in range(LABEL.shape[1]):
        num = int(LABEL[i, j])
        if j < 6:
            encoded_data[i, num - 1] = 1
        else:
            encoded_data[i, num_classes_first_six + num - 1] = 1
train_L = torch.tensor(encoded_data, dtype=torch.float32)

test_df = np.array(df.iloc[-300:])
samples = []
label = []
for j in range(len(test_df)):
    if j > 27:
        feat = test_df[j - 28:j + 1][:, 2:]
        samples.append(feat)
        label.append(test_df[j - 27:j + 2][-1:, 2:])
DATA = np.array(samples).astype(int)
LABEL = np.array(label).astype(int)
LABEL = np.squeeze(LABEL, axis=(1,))

num_classes_first_six = 33
num_classes_last_one = 16
encoded_data = np.zeros((DATA.shape[0], DATA.shape[1], num_classes_first_six + num_classes_last_one), dtype=int)
for i in range(DATA.shape[0]):
    for j in range(DATA.shape[1]):
        for k in range(DATA.shape[2]):
            num = int(DATA[i, j, k])
            if k < 6:
                encoded_data[i, j, num - 1] = 1
            else:
                encoded_data[i, j, num_classes_first_six + num - 1] = 1

test_D = torch.tensor(encoded_data, dtype=torch.float32)
num_classes_first_six = 33
num_classes_last_one = 16
encoded_data = np.zeros((LABEL.shape[0], num_classes_first_six + num_classes_last_one), dtype=int)
for i in range(LABEL.shape[0]):
    for j in range(LABEL.shape[1]):
        num = int(LABEL[i, j])
        if j < 6:
            encoded_data[i, num - 1] = 1
        else:
            encoded_data[i, num_classes_first_six + num - 1] = 1
test_L = torch.tensor(encoded_data, dtype=torch.float32)


batch_size = 100
learning_rate = 0.001
num_epochs = 200
MODEL = '1.0'

dataset_train = TensorDataset(train_D, train_L)
dataset_val = TensorDataset(test_D, test_L)
# dataset_val = TensorDataset(train_D, train_L)
train_loader = DataLoader(dataset_train, shuffle=True, batch_size=batch_size)
val_loader = DataLoader(dataset_val, shuffle=True, batch_size=batch_size)


class model(nn.Module):

    def __init__(self,
                 fc1_size=400,
                 fc2_size=200,
                 fc3_size=100,
                 fc1_dropout=0.2,
                 fc2_dropout=0.2,
                 fc3_dropout=0.2,
                 num_of_classes=50):
        super(model, self).__init__()

        self.f_model = nn.Sequential(
            nn.Linear(1421, fc1_size),  # 887
            nn.BatchNorm1d(fc1_size),
            nn.ReLU(),
            nn.Dropout(fc1_dropout),
            nn.Linear(fc1_size, fc2_size),
            nn.BatchNorm1d(fc2_size),
            nn.ReLU(),
            nn.Dropout(fc2_dropout),
            nn.Linear(fc2_size, fc3_size),
            nn.BatchNorm1d(fc3_size),
            nn.ReLU(),
            nn.Dropout(fc3_dropout),
            nn.Linear(fc3_size, 49),
        )


        d_model = 49  # 模型的维度
        nhead = 7  # 多头注意力的头数
        num_encoder_layers = 6  # 编码器层数
        num_decoder_layers = 6  # 解码器层数

        # 创建Transformer模型
        self.transformer = nn.Transformer(d_model=d_model, nhead=nhead,
                                          num_encoder_layers=num_encoder_layers,
                                          num_decoder_layers=num_decoder_layers)

        for name, module in self.named_modules():
            if isinstance(module, nn.Linear):
                nn.init.kaiming_normal_(module.weight, mode='fan_in', nonlinearity='relu')
            if isinstance(module, nn.Conv2d):
                nn.init.kaiming_normal_(module.weight, mode='fan_in', nonlinearity='relu')
            if isinstance(module, nn.Conv1d):
                nn.init.kaiming_normal_(module.weight, mode='fan_in', nonlinearity='relu')


    def forward(self, x):

        input_tensor = x.permute(1, 0, 2)  # 转换为(seq_len, batch_size, features)
        target_tensor = input_tensor.clone()
        output = self.transformer(input_tensor, target_tensor)
        output = output.permute(1, 0, 2)
        output= torch.reshape(output, (output.shape[0], output.shape[1] * output.shape[2]))


        out = self.f_model(output)
        return out


model = model()
model.to(device)
criterion = nn.MSELoss()
# optimizer = torch.optim.AdamW(model.parameters(), lr=learning_rate)
optimizer = torch.optim.Adam(model.parameters(), lr=learning_rate, betas=(0.9, 0.98), weight_decay=1e-5)
scheduler = lr_scheduler.CosineAnnealingLR(optimizer, T_max=10)


L_train = []
L_val = []
AUC = []
PRAUC = []
min_validation_loss = 9999
for epoch in range(num_epochs):
    torch.nn.utils.clip_grad_norm_(model.parameters(), 0.5)
    train_running_loss = 0.0
    counter = 0
    model.train()
    for seq, y in tqdm(train_loader):
        counter += 1
        output = model(seq.to(device))
        loss = criterion(output, y.to(device))
        train_running_loss += loss.item()
        optimizer.zero_grad()
        loss.backward()
        optimizer.step()
    scheduler.step()
    TL = train_running_loss / counter
    L_train.append(TL)
    model.eval()
    PREDICT = []
    TRUE = []
    counter = 0
    with torch.no_grad():
        current_test_loss = 0.0
        for SEQ, Z in tqdm(val_loader):
            counter += 1
            output = model(SEQ.to(device))
            loss = criterion(output, Z.to(device))
            current_test_loss += loss.item()
            PREDICT.extend(output.cpu().numpy())
            TRUE.extend(Z.cpu().numpy())
        T_loss = current_test_loss / counter
        L_val.append(T_loss)
        PP = np.array(PREDICT)
        TT = np.array(TRUE)
        flattened_array1 = PP.flatten()
        flattened_array2 = TT.flatten()
        correlation_matrix = np.corrcoef(flattened_array1, flattened_array2)
        pr_auc = correlation_matrix[0, 1]
        print("Train loss: ", TL, "Val loss: ", T_loss, 'correlation_value', pr_auc)
        AUC.append(pr_auc)
        if min_validation_loss > T_loss:
            min_validation_loss = T_loss
            best_epoch = epoch
            print('Max pr_auc ' + str(min_validation_loss) + ' in epoch ' + str(best_epoch))
            torch.save(model.state_dict(), fr"./model_{MODEL}.pt")

fig1, ax1 = plt.subplots()
ax1.plot(L_train)
ax1.set_xlabel('Epoch')
ax1.set_ylabel('Training Loss')

fig2, ax2 = plt.subplots()
ax2.plot(L_val)
ax2.set_xlabel('Epoch')
ax2.set_ylabel('Validation Loss')

fig3, ax3 = plt.subplots()
ax3.plot(AUC)
ax3.set_xlabel('Epoch')
ax3.set_ylabel('Validation Loss')

fig1.savefig(f"./{MODEL}_1.png")
fig2.savefig(f"./{MODEL}_2.png")
fig3.savefig(f"./{MODEL}_3.png")