题目:
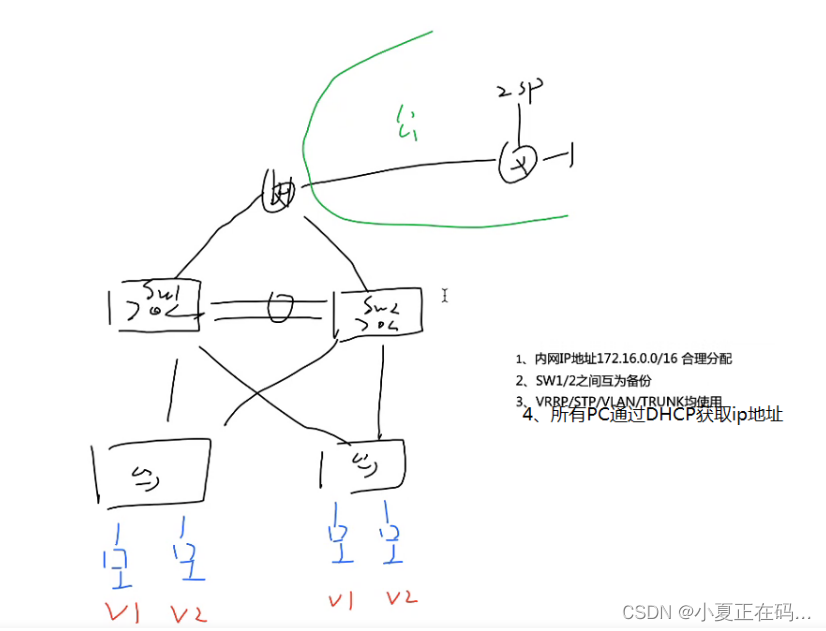
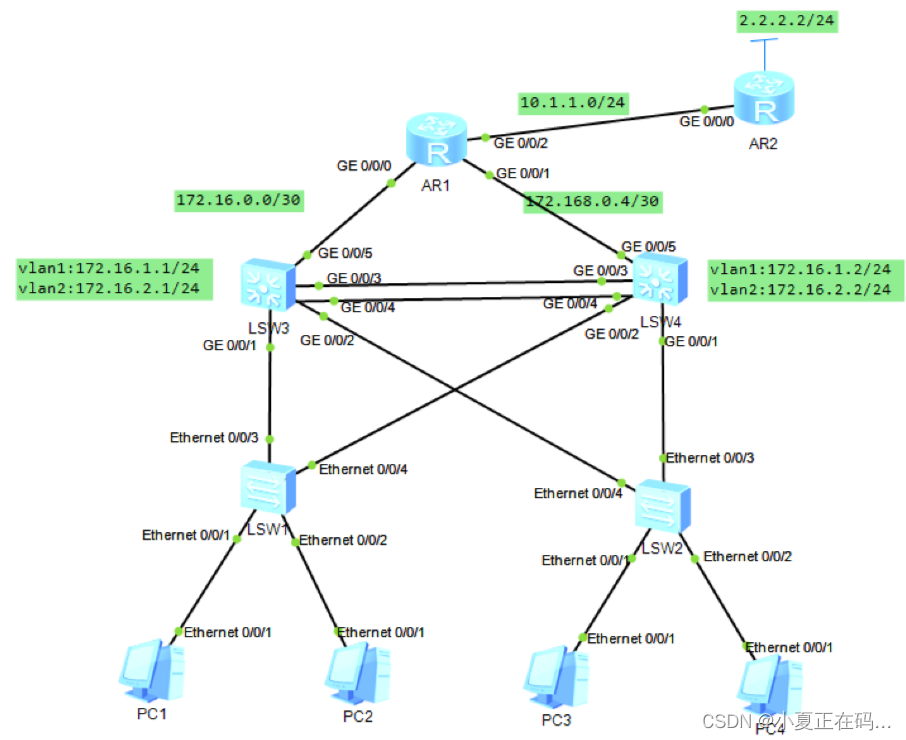
拓扑图
配置
LSW1
//链路聚合
[lsw3]interface Eth-Trunk 1
[lsw3-Eth-Trunk1]trunkport GigabitEthernet 0/0/3 0/0/4
[lsw3-Eth-Trunk1]q
[lsw3]vlan batch 1 2
[lsw3]interface Eth-Trunk 1
[lsw3-Eth-Trunk1]port link-type trunk
[lsw3-Eth-Trunk1]port trunk allow-pass vlan 1 2
[lsw3-Eth-Trunk1]q
[lsw3]int g0/0/1
[lsw3-GigabitEthernet0/0/1]port link-type trunk
[lsw3-GigabitEthernet0/0/1]port trunk allow-pass vlan 1 2
[lsw3-GigabitEthernet0/0/1]int g0/0/2
[lsw3-GigabitEthernet0/0/2]port link-type trunk
[lsw3-GigabitEthernet0/0/2]port trunk allow-pass vlan 1 2//LSW1配置
[lsw1]vlan batch 1 2
[lsw1]int e0/0/3
[lsw1-Ethernet0/0/3]port link-type trunk
[lsw1-Ethernet0/0/3]port trunk allow-pass vlan 1 2
[lsw1-Ethernet0/0/3]int e0/0/4
[lsw1-Ethernet0/0/4]port link-type trunk
[lsw1-Ethernet0/0/4]port trunk allow-pass vlan 1 2
[lsw1-Ethernet0/0/4]int e0/0/1
[lsw1-Ethernet0/0/1]port link-type access
[lsw1-Ethernet0/0/1]port default vlan 1
[lsw1-Ethernet0/0/1]int e0/0/2
[lsw1-Ethernet0/0/2]port link-type access
[lsw1-Ethernet0/0/2]port default vlan 2
LSW2
//链路聚合
[lsw4]interface Eth-Trunk 1
[lsw4-Eth-Trunk1]trunkport GigabitEthernet 0/0/3 0/0/4
[lsw4-Eth-Trunk1]q
[lsw4]vlan batch 1 2
[lsw4]interface Eth-Trunk 1
[lsw4-Eth-Trunk1]port link-type trunk
[lsw4-Eth-Trunk1]port trunk allow-pass vlan 1 2
[lsw4-Eth-Trunk1]q
[lsw4]int g0/0/1
[lsw4-GigabitEthernet0/0/1]port link-type trunk
[lsw4-GigabitEthernet0/0/1]port trunk allow-pass vlan 1 2
[lsw4-GigabitEthernet0/0/1]int g0/0/2
[lsw4-GigabitEthernet0/0/2]port link-type trunk
[lsw4-GigabitEthernet0/0/2]port trunk allow-pass vlan 1 2//LSW2配置
[lsw2]vlan batch 1 2
[lsw2]int e0/0/3
[lsw2-Ethernet0/0/3]port link-type trunk
[lsw2-Ethernet0/0/3]port trunk allow-pass vlan 1 2
[lsw2-Ethernet0/0/3]int e0/0/4
[lsw2-Ethernet0/0/4]port link-type trunk
[lsw2-Ethernet0/0/4]port trunk allow-pass vlan 1 2
[lsw2-Ethernet0/0/4]int e0/0/1
[lsw2-Ethernet0/0/1]port link-type access
[lsw2-Ethernet0/0/1]port default vlan 1
[lsw2-Ethernet0/0/1]int e0/0/2
[lsw2-Ethernet0/0/2]port link-type access
[lsw2-Ethernet0/0/2]port default vlan 2
所有access接口配置为边缘接口,并配置BPDU保护
LSW1
[lsw1]port-group group-member e0/0/1 e0/0/2
[lsw1-port-group]
[lsw1-port-group]stp edged-port enable
[lsw1-Ethernet0/0/1]stp edged-port enable
[lsw1-Ethernet0/0/2]stp edged-port enable
[lsw1-Ethernet0/0/2]q
[lsw1]stp bpdu-protection .
//开启MSTP[lsw1]stp mode mstp
[lsw1]stp mode mstp
[lsw1]stp region-configuration
[lsw1]stp region-configuration
[lsw1-mst-region]region-name HCIP
[lsw1-mst-region]revision-level 10
[lsw1-mst-region]revision-level 10
[lsw1-mst-region]instance 1 vlan 1
[lsw1-mst-region]instance 2 vlan 2
[lsw1-mst-region]active region-configuration
LSW2
[lsw2]port-group group-member e0/0/1 e0/0/2
[lsw2-port-group]stp edged-port enable
[lsw2-Ethernet0/0/1]stp edged-port enable
[lsw2-Ethernet0/0/2]stp edged-port enable
[lsw2-port-group]q
[lsw2]stp bpdu-protection
//开启MSTP
[lsw2]stp mode mstp
[lsw2]stp mode mstp
[lsw2]stp region-configuration
[lsw2]stp region-configuration
[lsw2-mst-region]region-name HCIP
[lsw2-mst-region]revision-level 10
[lsw2-mst-region]revision-level 10
[lsw2-mst-region]instance 1 vlan 1
[lsw2-mst-region]instance 2 vlan 2
[lsw2-mst-region]active region-configuration
LSW3
//开启MSTP
[lsw3]stp mode mstp
[lsw3]stp mode mstp
[lsw3]stp region-configuration
[lsw3]stp region-configuration
[lsw3-mst-region]region-name HCIP
[lsw3-mst-region]revision-level 10
[lsw3-mst-region]revision-level 10
[lsw3-mst-region]instance 1 vlan 1
[lsw3-mst-region]instance 2 vlan 2
[lsw3-mst-region]active region-configuration
//配置主根和备份根[lsw3]stp instance 0 root primary
[lsw3]stp instance 1 root primary
[lsw3]stp instance 2 root secondary//配置VRRP
[lsw3]interface Vlanif 1
[lsw3-Vlanif1]ip address 172.16.1.1 24
[lsw3-Vlanif1]vrrp vrid 1 virtual-ip 172.16.1.254
[lsw3-Vlanif1]vrrp vrid 1 priority 105
[lsw3-Vlanif1]q
[lsw3]interface Vlanif 2
[lsw3-Vlanif2]ip address 172.16.2.1 24
[lsw3-Vlanif2]vrrp vrid 1 virtual-ip 172.16.2.254//配置DHCP,PC端自动获取IP地址
[lsw3]dhcp enable
[lsw3]ip pool v1
[lsw3-ip-pool-v1]network 172.16.1.0 mask 24
[lsw3-ip-pool-v1]gateway-list 172.16.1.254
[lsw3-ip-pool-v1]q
[lsw3]ip pool v2
[lsw3-ip-pool-v2]network 172.16.2.0 mask 24
[lsw3-ip-pool-v2]gateway-list 172.16.2.254
[lsw3-ip-pool-v2]q
[lsw3]interface Vlanif 1
[lsw3-Vlanif1]dhcp select global
[lsw3]interface Vlanif 2
[lsw3-Vlanif2]dhcp select global//配置OSPF
[lsw3]vlan 99
[lsw3]interface Vlanif 99
[lsw3-Vlanif99]ip address 172.16.0.1 30
[lsw3]interface g0/0/5
[lsw3-GigabitEthernet0/0/1]port link-type access
[lsw3-GigabitEthernet0/0/1]port default vlan 99[lsw3]ospf 1 router-id 2.2.2.2
[lsw3-ospf-1]area 0
[lsw3-ospf-1-area-0.0.0.0]network 172.16.0.0 0.0.0.255
[lsw3-ospf-1]area 1
[lsw3-ospf-1-area-0.0.0.1]network 172.16.0.0 0.0.255.255//沉默接口
[lsw3-ospf-1]silent-interface all
[lsw3-ospf-1]undo silent-interface GigabitEthernet 0/0/5
[lsw3-ospf-1]undo silent-interface Eth-Trunk 1
[lsw3-ospf-1]undo silent-interface Vlanif 1
[lsw3-ospf-1]undo silent-interface Vlanif 99
LSW4
//开启MSTP
[lsw4]stp mode mstp
[lsw4]stp mode mstp
[lsw4]stp region-configuration
[lsw4]stp region-configuration
[lsw4-mst-region]region-name HCIP
[lsw4-mst-region]revision-level 10
[lsw4-mst-region]revision-level 10
[lsw4-mst-region]instance 1 vlan 1
[lsw4-mst-region]instance 2 vlan 2
[lsw4-mst-region]active region-configuration//配置主根和备份根
[lsw4]stp instance 0 root secondary
[lsw4]stp instance 1 root secondary
[lsw4]stp instance 2 root primary//配置VRRP
[lsw4]interface Vlanif 1
[lsw4-Vlanif1]ip address 172.16.1.2 24
[lsw4-Vlanif1]vrrp vrid 1 virtual-ip 172.16.1.254
[lsw4-Vlanif1]q
[lsw4]interface Vlanif 2
[lsw4-Vlanif2]ip address 172.16.2.2 24
[lsw4-Vlanif2]vrrp vrid 1 virtual-ip 172.16.2.254
[lsw4-Vlanif2]vrrp vrid 1 priority 105//配置DHCP,PC端自动获取IP地址
[lsw4]dhcp enable
[lsw4]ip pool v1
[lsw4-ip-pool-v1]network 172.16.1.0 mask 24
[lsw4-ip-pool-v1]gateway-list 172.16.1.254
[lsw4-ip-pool-v1]q
[lsw4]ip pool v2
[lsw4-ip-pool-v2]network 172.16.2.0 mask 24
[lsw4-ip-pool-v2]gateway-list 172.16.2.254
[lsw4-ip-pool-v2]q
[lsw4]interface Vlanif 1
[lsw4-Vlanif1]dhcp select global
[lsw4]interface Vlanif 2
[lsw4-Vlanif2]dhcp select global//配置OSPF
[lsw4]vlan 99
[lsw4]interface Vlanif 99
[lsw4-Vlanif99]ip address 172.16.0.5 30
[lsw4]interface g0/0/5
[lsw4-GigabitEthernet0/0/1]port link-type access
[lsw4-GigabitEthernet0/0/1]port default vlan 99[lsw4]ospf 1 router-id 3.3.3.3
[lsw4-ospf-1]area 0
[lsw4-ospf-1-area-0.0.0.0]network 172.16.0.0 0.0.0.255
[lsw4-ospf-1]area 1
[lsw4-ospf-1-area-0.0.0.1]network 172.16.0.0 0.0.255.255//沉默接口
[lsw4-ospf-1]silent-interface all
[lsw4-ospf-1]undo silent-interface GigabitEthernet 0/0/5
[lsw4-ospf-1]undo silent-interface Eth-Trunk 1
[lsw4-ospf-1]undo silent-interface Vlanif 1
[lsw4-ospf-1]undo silent-interface Vlanif 99
R1和R2基础配置
R1
[r1]int g0/0/0
[r1-GigabitEthernet0/0/0]ip add 172.16.0.2 30
[r1-GigabitEthernet0/0/0]int g0/0/1
[r1-GigabitEthernet0/0/1]ip add 172.16.0.6 30
[r1-GigabitEthernet0/0/1]int g0/0/2
[r1-GigabitEthernet0/0/2]ip add 10.1.1.1 24//配置OSPF
[r1]ospf 1 router-id 1.1.1.1
[r1-ospf-1]area 0
[r1-ospf-1-area-0.0.0.0]network 172.16.0.0 0.0.0.255//缺省NAT
[r1]ip route-static 0.0.0.0 0 10.1.1.2
[r1]ospf 1 router-id 1.1.1.1
[r1-ospf-1]default-route-advertise
[r1-ospf-1]q
[r1]acl 2000
[r1-acl-basic-2000]rule 1 permit source any
[r1]int g0/0/2
[r1-GigabitEthernet0/0/0]nat outbound 2000
R2
[r2]int g0/0/0
[r2-GigabitEthernet0/0/0]ip add 10.1.1.2 24
[r2-GigabitEthernet0/0/0]q
[r2]int LoopBack 0
[r2-LoopBack0]ip add 2.2.2.2 24
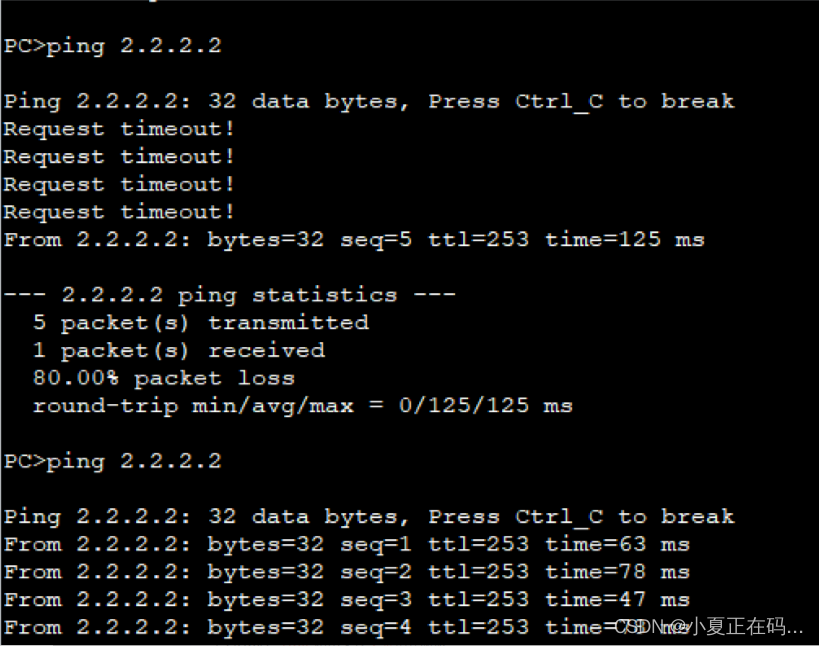
检验
PC1自动获取IP地址,且可以ping通2.2.2.2
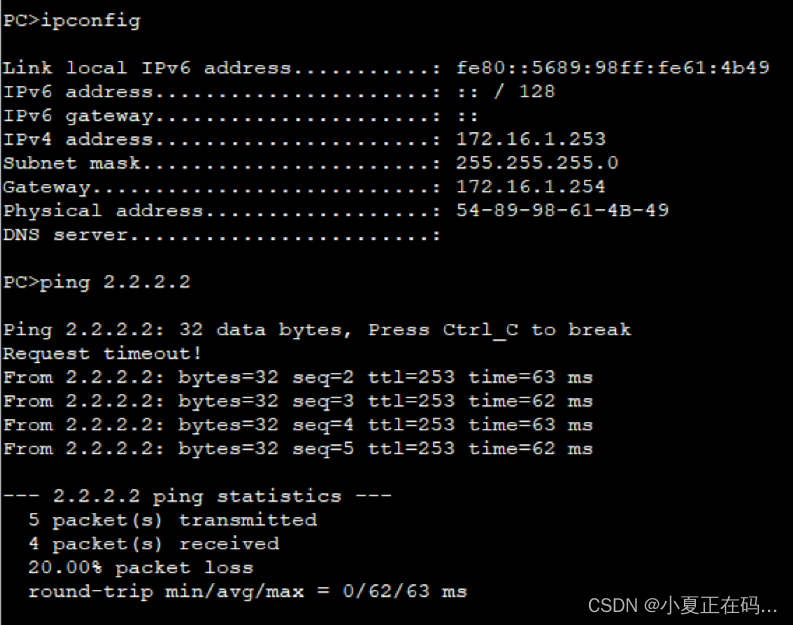
PC2自动获取IP地址,且可以ping通2.2.2.2

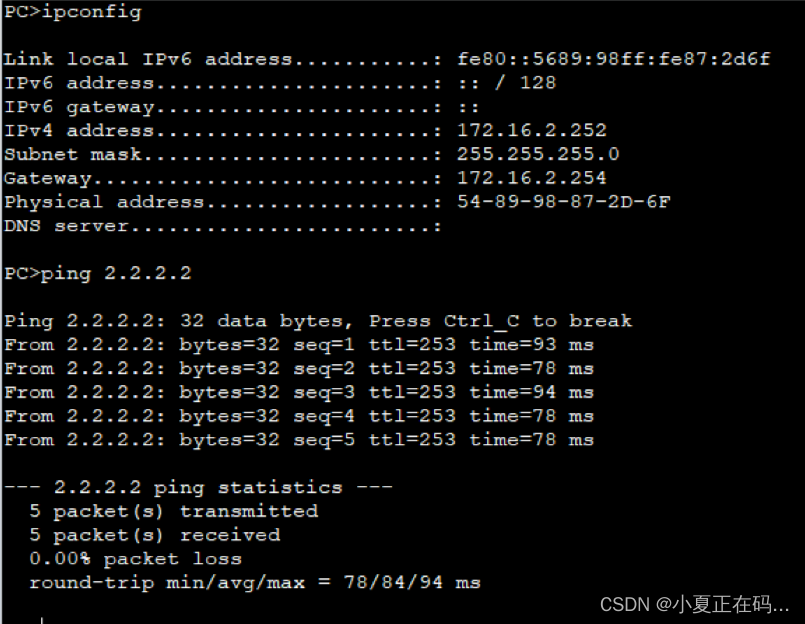
PC3自动获取IP地址,且可以ping通2.2.2.2

PC4自动获取IP地址,且可以ping通2.2.2.2
停止LSW3运行
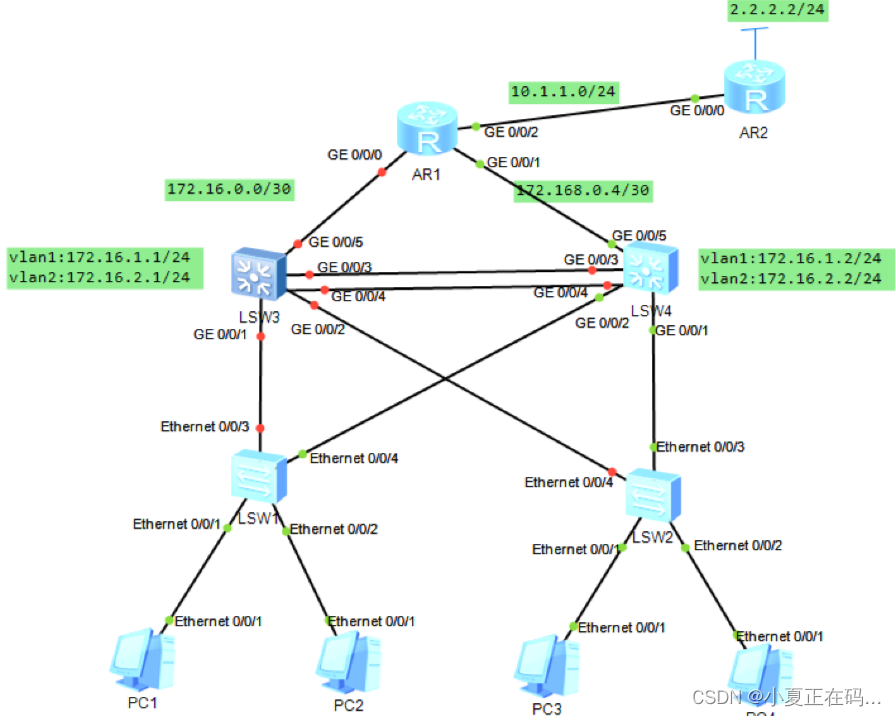
PC1依旧能ping通