GET请求
示例一:
- 服务端代码
@GetMapping("/f11")
public String f11(Integer pageNum, Integer pageSize) {
    return pageNum + " : " + pageSize;
}
- 前端代码
<template>
  <div class="home">
    <button @click="getFun1">发送get请求</button>
  </div>
</template>
<script>
  import axios from 'axios'
  export default {
    name: 'Home',
    methods: {
      getFun1 () {
        axios.get('http://localhost/blog/f11?pageNum=12&pageSize=8').then(res => {
          console.log(res)
        })
      }
    }
  }
</script>
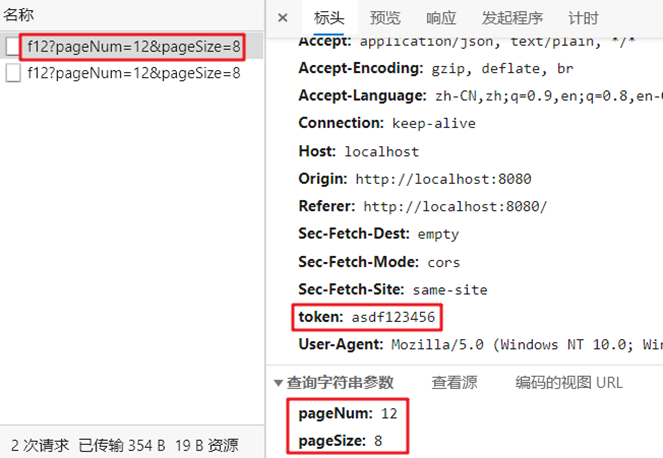
示例二:
- 服务端代码
@GetMapping("/f12")
public String f12(Integer pageNum, Integer pageSize, HttpServletRequest request) {
    String token = request.getHeader("token");
    return pageNum + " : " + pageSize + " : " + token;
}
- 前端代码
<template>
  <div class="home">
    <button @click="getFun2">发送get请求</button>
  </div>
</template>
<script>
  import axios from 'axios'
  export default {
    name: 'Home',
    methods: {
      getFun2 () {
        axios.get('http://localhost/blog/f12', {
          params: {
            pageNum: 12,
            pageSize: 8
          },
          headers: {
            token: 'asdf123456'
          }
        }).then(res => {
          console.log(res)
        })
      }
    }
  }
</script>
GET方式采用接口方式携带参数,比如上面示例最终请求服务器端的url是:
POST请求
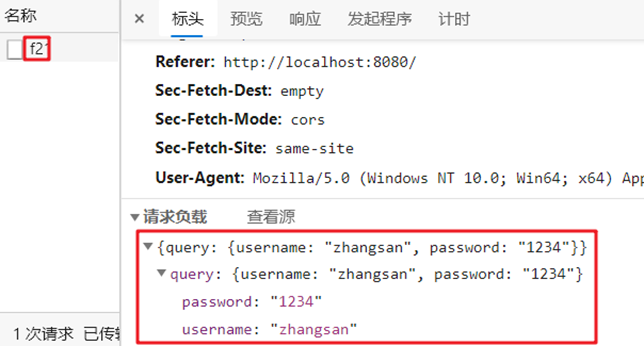
示例一:
- 服务端代码
@PostMapping("/f21")
public String f21(@RequestBody String param) {
    return param;
}
- 前端代码
<template>
  <div class="home">
    <button @click="postFun1">发送post请求</button>
  </div>
</template>
<script>
  import axios from 'axios'
  export default {
    name: 'Home',
    data () {
      return {
        queryInfo1: {
          query: {
            username: 'zhangsan',
            password: '1234'
          }
        }
      }
    },
    methods: {
      postFun1 () {
        let _this = this
        axios.post('http://localhost/blog/f21', _this.queryInfo1).then(res => {
          console.log(res)
        })
      },
    }
  }
</script>
结果:

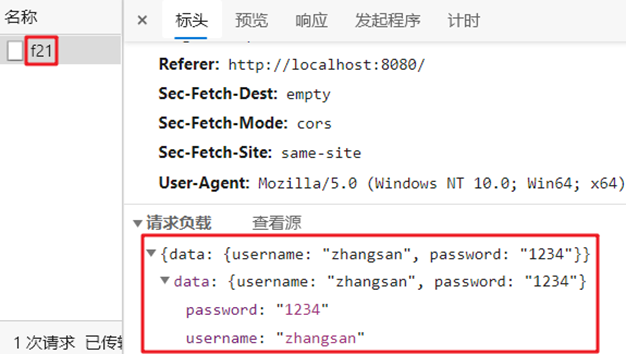
示例二:
- 服务端代码
@PostMapping("/f21")
public String f21(@RequestBody String param) {
    return param;
}
- 前端代码
<template>
  <div class="home">
    <button @click="postFun2">发送post请求</button>
  </div>
</template>
<script>
  import axios from 'axios'
  export default {
    name: 'Home',
    data () {
      return {
        queryInfo2: {
          username: 'zhangsan',
          password: '1234'
        }
      }
    },
    methods: {
      postFun2 () {
        let _this = this
        axios.post('http://localhost/blog/f21', {
          data: _this.queryInfo2
        }).then(res => {
          console.log(res)
        })
      }
    }
  }
</script>
结果:

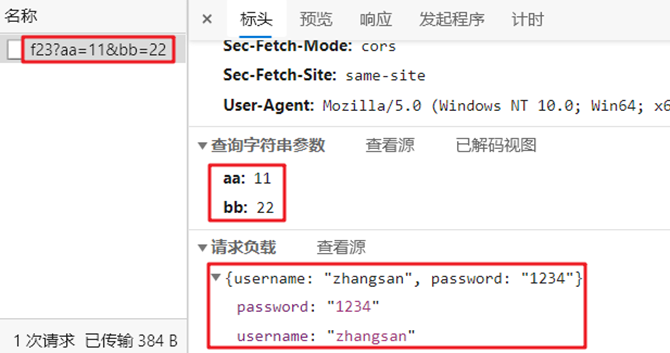
示例三:
- 服务端代码
@PostMapping("/f23")
public String f23(Integer aa, Integer bb,@RequestBody String query) {
    return aa + ": " + bb + ": " + query;
}
- 前端代码
<template>
  <div class="home">
    <button @click="postFun3">发送post请求</button>
  </div>
</template>
<script>
  import axios from 'axios'
  export default {
    name: 'Home',
    data () {
      return {
        queryInfo2: {
          username: 'zhangsan',
          password: '1234'
        }
      }
    },
    methods: {
      postFun3 () {
        let _this = this
        axios.post('http://localhost/blog/f23', _this.queryInfo2, {
          params: { //params表示url中传递的参数,它会拼接在url后面
            aa: 11,
            bb: 22
          }
        }).then(res => {
          console.log(res)
        })
      }
    }
  }
</script>
请求的url为:http://localhost/blog/f23?aa=11&bb=22 ,结果:

注意上面三个示例中传递到后台的username和password参数采用下面方式后台是无法获取到的:
@PostMapping("/f22")
public String f22(String username, String password) {
    return username + " : " + password;
}
原因是axios.post默认情况下传递到后台的数据是JSON格式的,通过设置POST请求头,可以告诉服务器请求主体的数据格式为kv的形式,比如:a=aaaa&b=bbbb。
示例:设置POST请求的格式
- 后台代码
@PostMapping("/f21")
public String f21(@RequestBody String param) {
    return param;
}
- 前端代码
<template>
  <div class="home">
    <button @click="postFun1">发送post请求</button>
    <button @click="postFun2">发送post请求</button>
  </div>
</template>
<script>
  import axios from 'axios'
  axios.defaults.headers.post['Content-Type'] = 'application/x-www-form-urlencoded'
  import qs from 'qs'

  export default {
    name: 'Home',
    methods: {
      postFun1 () {
        let params = new URLSearchParams()
        params.append('username', 'zhangsan')
        params.append('password', '1234')
        axios.post('http://localhost/blog/f22', params).then(res => {
          console.log(res)
        })
      },
      postFun2 () {
        let params = qs.stringify({
          'username': 'zhangsan',
          'password': 1234
        })
        axios.post('http://localhost/blog/f22', params).then(res => {
          console.log(res)
        })
      },
    }
  }
</script>
前端会将参数以kv字符串的形式发送到后台:username=zhangsan&password=1234。上面示例前端网页中请求的也可以用下面控制器接收:
@PostMapping("/f22")
public String f22(String username, String password) {
    return username + " : " + password;
}
Put
示例一:
- 前端
let _this = this
_this.$axios.put(`/user/${user.id}/status`).then(res => {  //注意,此处使用的是反斜杠
  console.log(res)
})
- 后端
@PutMapping("/user/{userId}/status")
public Result changStatus(@PathVariable("userId") Integer userId){

}
示例二:
- 前端
const param = {
  userId:1
}
_this.$axios.put('/user/update',param).then(res=>{
  console.log(res)
})
- 后端
@PutMapping("/user/update")
public Result changStatus(@PathVariable("userId") Integer userId){

}
patch
前端
const param={
  ids:[1,3,5,8]
}
_this.$axios.patch('/user/p',param).then(res=>{
  console.log(res)
}),
Delete
前端
_this.$axios.delete('/user/delete',{
   params:{
     id:1
   }
 }).then(res=>{
   console.log(res)
 })


![MyBatis-Plus快速开始[MyBatis-Plus系列] - 第482篇](https://img-blog.csdnimg.cn/img_convert/bf99bed2d166a8928401fe5662d8c923.png)