pdf 转 word
一、思路
- 直接调用LibreOffice 命令进行文档转换的命令行工具
使用的前系统中必须已经安装了
- libreoffice
- libreoffice已翻译的用户界面语言包: 中文 (简体)
- libreoffice离线帮助文档: 中文 (简体)
- 上传字体
重点:
重点:
重点:
亲测 7.1.8版本pdf 转word后正常 ,
7.4.6版本转出来的样式有问题,都挤在一页,重叠在一起。
二、软件安装下载
1. windows安装
下载 LibreOffice | LibreOffice 简体中文官方网站 - 自由免费的办公套件
a.安装
直接一键默认安装
环境变量:在path前加入libreoffice安装路径(如:D:\Program Files\LibreOffice\program)
进入dos窗口输入soffice 如果弹出libreoffice界面则表示安装成功
b. 中文包
另外再下载安装下以中文包,此处略过
- libreoffice已翻译的用户界面语言包: 中文 (简体)
- libreoffice离线帮助文档: 中文 (简体)
soffice --infilter="writer_pdf_import" --convert-to doc 11种绕过CDN查找真实IP 方法.pdf 2>&1
2 certos7版本安装
-
- CentOS系统环境:
[root@localhost ~]# cat   /etc/redhat-release
CentOS Linux release 7.2.1511 (Core)
-
- 7.1.8包下载地址
Index of /libreoffice/old/7.1.8.1/rpm/x86_64
- 7.1.8包下载地址
## 下载下面三个包
wget https://downloadarchive.documentfoundation.org/libreoffice/old/7.1.8.1/rpm/x86_64/LibreOffice_7.1.8.1_Linux_x86-64_rpm.tar.gz
wget https://downloadarchive.documentfoundation.org/libreoffice/old/7.1.8.1/rpm/x86_64/LibreOffice_7.1.8.1_Linux_x86-64_rpm_helppack_zh-CN.tar.gz
wget https://downloadarchive.documentfoundation.org/libreoffice/old/7.1.8.1/rpm/x86_64/LibreOffice_7.1.8.1_Linux_x86-64_rpm_langpack_zh-CN.tar.gz
-
- 解压并安装
## 主包
tar -xvf LibreOffice_7.1.8.1_Linux_x86-64_rpm.tar.gz
yum install ./LibreOffice_7.1.8.1_Linux_x86-64_rpm/RPMS/*.rpm -y

## 已翻译的用户界面语言包: 中文 (简体)
tar -xvf LibreOffice_7.1.8.1_Linux_x86-64_rpm_langpack_zh-CN.tar.gz
yum install ./LibreOffice_7.1.8.1_Linux_x86-64_rpm_langpack_zh-CN/RPMS/*.rpm -y

## 离线帮助文档: 中文 (简体)
tar -xvf LibreOffice_7.1.8.1_Linux_x86-64_rpm_helppack_zh-CN.tar.gz
yum install ./LibreOffice_7.1.8.1_Linux_x86-64_rpm_helppack_zh-CN/RPMS/*.rpm -y
3. Debian 版本安装
root@4f14d865967a:/# cat /etc/issue
Debian GNU/Linux 11 \n \l
-
- Debian 系统从下面地址下载安装包
Index of /libreoffice/old/7.1.8.1/deb/x86_64
- Debian 系统从下面地址下载安装包
-
- 7.1.8包下载地址
wget https://downloadarchive.documentfoundation.org/libreoffice/old/7.1.8.1/deb/x86_64/LibreOffice_7.1.8.1_Linux_x86-64_deb.tar.gz
wget https://downloadarchive.documentfoundation.org/libreoffice/old/7.1.8.1/deb/x86_64/LibreOffice_7.1.8.1_Linux_x86-64_deb_helppack_zh-CN.tar.gz
wget https://downloadarchive.documentfoundation.org/libreoffice/old/7.1.8.1/deb/x86_64/LibreOffice_7.1.8.1_Linux_x86-64_deb_langpack_zh-CN.tar.gz
-
- 解压并安装
## 主包
tar -xvf LibreOffice_7.1.8.1_Linux_x86-64_deb.tar.gz
dpkg -i LibreOffice_7.1.8.1_Linux_x86-64_deb/DEBS/*.deb

## 离线帮助文档: 中文 (简体)
tar -xvf LibreOffice_7.1.8.1_Linux_x86-64_deb_helppack_zh-CN.tar.gz
dpkg -i  LibreOffice_7.1.8.1_Linux_x86-64_deb_helppack_zh-CN/DEBS/*.deb

## 已翻译的用户界面语言包: 中文 (简体)
tar -xvf LibreOffice_7.1.8.1_Linux_x86-64_deb_langpack_zh-CN.tar.gz
dpkg -i LibreOffice_7.1.8.1_Linux_x86-64_deb_langpack_zh-CN/DEBS/*.deb
-
- 使用帮助
测试是否安装成功:
libreoffice7.1 -help (根据使用的版本自己调整命令版本号) - 使用帮助
-
- 查看版本
[root@localhost testPdf2word]# libreoffice7.1 -version
Warning: -version is deprecated.  Use --version instead.
LibreOffice 7.1.8.1 e1f30c802c3269a1d052614453f260e49458c82c
4. 安装字体
安装字体是为了防止中文乱码问题处理
1:查看fonts目录:cat /etc/fonts/fonts.conf | grep fon
得知字体存放位置:/usr/share/fonts
[root@localhost Fonts]# cat /etc/fonts/fonts.conf | grep fon
<!DOCTYPE fontconfig SYSTEM "fonts.dtd">
<!-- /etc/fonts/fonts.conf file to configure system font access -->
<fontconfig>
        problems to the fontconfig bugzilla system located at fontconfig.org
        Note that the normal 'make install' procedure for fontconfig is to
        replace any existing fonts.conf file with the new version.  Place
        <dir>/usr/share/fonts</dir>
        <dir>/usr/share/X11/fonts/Type1</dir> <dir>/usr/share/X11/fonts/TTF</dir> <dir>/usr/local/share/fonts</dir>
        <dir prefix="xdg">fonts</dir>
        <dir>~/.fonts</dir>
        <cachedir>/usr/lib/fontconfig/cache</cachedir>
        <cachedir prefix="xdg">fontconfig</cachedir>
        <cachedir>~/.fontconfig</cachedir>
</fontconfig>
2: 新建/usr/share/fonts/Fonts文件夹
mkdir /usr/share/fonts/Fonts
3:把Windows下的字体C:\Windows\Fonts下的宋体,即 simsun.ttc上传到linux服务器 /usr/share/fonts/Fonts/ 路径下即可
[root@localhost Fonts]# ll
总用量 17788
-rw-r--r--. 1 root root 18214472 4月  21 09:39 SIMSUN.TTC
4: 查看刚指定的字体
[root@localhost Fonts]# fc-list :lang=zh
/usr/share/fonts/Fonts/SIMSUN.TTC: 新宋体,NSimSun:style=常规,Regular
/usr/share/fonts/Fonts/SIMSUN.TTC: 宋体,SimSun:style=常规,Regular
5:至此安装成功
三、实现PDF转word文档
pdf 转 word 2003
参数说明
## --outdir为 输出目标
## --convert-to 转换格式
libreoffice7.1 --infilter="writer_pdf_import" --convert-to doc ip.pdf --outdir ./ 2>&1
pdf 转 word 2007
libreoffice7.1 --infilter="writer_pdf_import" --convert-to docx ip.pdf --outdir ./ 2>&1
四、制作自己的镜像
-
运行容器 基于
cypress/browsersdocker run --name=browsers -itd cypress/browsers -
进入容器安装
LibreOffice_7.1.8.1软件
进入browsers容器 使用上面的Debian 版本安装方式安装好 -
打包镜像
docker commit 4f14d865967a 10.10.11.145:8082/cypress/browsers_libreoffice7.1:latest -
查看打好镜像
[root@cert-admin-api-service ~]# docker images | grep browsers_libreoffice7.1
10.10.11.145:8082/cypress/browsers_libreoffice7.1                  latest                                                   5d2e6f5dc95b   3 minutes ago   3.34GB
- 登录镜像仓库
sudo docker login 127.0.0.1:8082 -u 用户名 -p 密码
6.推送到镜像仓库
docker push 127.0.0.1:8082/cypress/browsers_libreoffice7.1:latest
五、遇到的坑
1. 版本问题
亲测 7.1.8版本pdf 转word后正常 ,
7.4.6版本转出来的样式有问题,都挤在一页,重叠在一起。
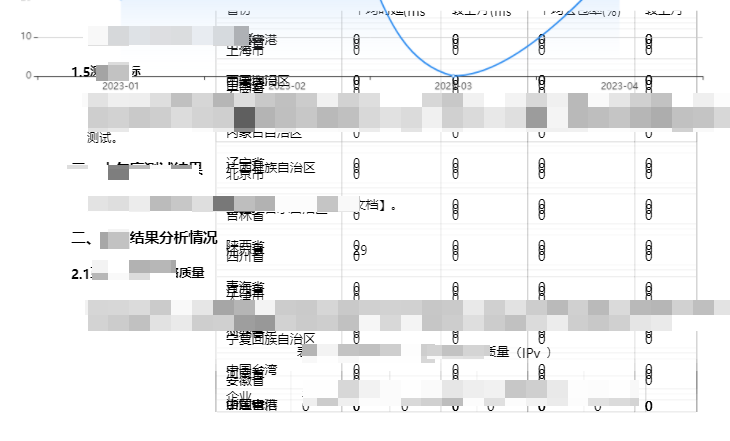
解决方法:
安装7.1.8版本
安装7.1.8版本
安装7.1.8版本
2. 字体重叠问题

解决方法
为因是 html 转的 pdf ,然后再用 pdf 转为 word
出现字体重叠问题,是因为使用粗体导致,所以 html css 样式不要使用font-weight: bold;
六、go代码实现
使用 golang 执行 cmd 命令,调用 libreoffice7,实现 pdf 转 word
/*
  参数说明
  ## --outdir 为 输出目文件夹路径
  ## --convert-to 转换格式 例 doc  / docx  /pdf

  sourcePdfPath pdf源文件路径 例 staitc/download/ip.pdf
  createWordPath 生成的word文件夹路径 例 static/download
  /usr/local/bin/libreoffice7.1 --infilter="writer_pdf_import" --convert-to doc staitc/download/ip.pdf --outdir staitc/download 2>&1
*/
//Pdf2Word pdf 转 word

func Pdf2Word(sourcePdfPath, createWordDirPath string) (filePath string, err error) {
	argStr := fmt.Sprintf(`libreoffice7.1 --infilter="writer_pdf_import" --convert-to doc %s --outdir %s`, sourcePdfPath, createWordDirPath)
	cmd := exec.Command("/bin/sh", "-c", argStr)
	log.Println("cmd:-->", cmd.String())

	// 方法一
	//stderr, err := cmd.StderrPipe()
	//if err != nil {
	//	log.Println("stderr1:-->", err.Error())
	//	return
	//}
	//stdout, err := cmd.StdoutPipe()
	//if err != nil {
	//	log.Println("stderr2:-->", err.Error())
	//	return
	//}
	//if err = cmd.Start(); err != nil {
	//	log.Println("stderr3:-->", err.Error())
	//	return
	//}
	//outErr, err := io.ReadAll(stderr)
	//if err != nil {
	//	log.Println("stderr4:-->", err.Error())
	//	return
	//}
	//out, err := io.ReadAll(stdout)
	//if err != nil {
	//	log.Println("stderr5:-->", err.Error())
	//	return
	//}
	//if err = cmd.Wait(); err != nil {
	//	log.Println("stderr6:-->", err.Error())
	//	return
	//}
	//log.Printf("Result: %s, outErr: %s; /n", out, outErr)

	// 方法二
	var out bytes.Buffer
	var stderr bytes.Buffer
	cmd.Stdout = &out
	cmd.Stderr = &stderr
	err = cmd.Run()
	//log.Println("cmd.Run() failed:", fmt.Sprint(err)+": "+stderr.String())
	if err != nil {
		log.Println("cmd.Run() failed22:", fmt.Sprint(err)+": "+stderr.String())
		return
	}

	log.Println("pdf2Word success . Result: " + out.String())

	//获取文件名带后缀
	filenameWithSuffix := path.Base(sourcePdfPath)
	//获取文件后缀
	fileSuffix := path.Ext(filenameWithSuffix)
	//获取文件名
	filenameOnly := strings.TrimSuffix(filenameWithSuffix, fileSuffix)
	filePath = createWordDirPath + "/" + filenameOnly + ".doc"

	return filePath, nil
}


