实现简单纯Canvas文本输入框,新手适用

news2025/1/4 12:52:23

文章目录

    • 概要
    • 效果
    • 技术细节
    • 代码

概要

Canvas上面提供输入:

一、最简单可能是用dom渲染一个input,覆盖在图形上面进行文本编辑,编辑完再把内容更新到图形.这样简单,但是缺点也明显,就是它不是真正绘制在canvas上面,没有层级。体验感较差

Fabric框架的思路大概是这样的。

二、如果要用自己是完全实现:键盘响应、撤消/重做、文本样式/布局、光标/选中区。那也有点难度。

三、还有一种就是利用contentEditable和textarea元素,在这些元素上面进行一些事件监听和文本内容处理。最重要的是保证canvas的字体样式要与元素的字体样式一样,这样才能利用textarea的兴标和选中区体系。不然的话就自己完完全全实现。

我下面实现纯canvas绘制的,就是利用textarea的键盘响应和光标体系,包括选中块。大楖就是保证canvas与元素之间这种些重要属性,做好同步。

下面看一下效果,因为也是花了二三个小时,弄了一个比较简单的,输入选中,光标指定位置生入,性能也是可以,输入响应很快

效果
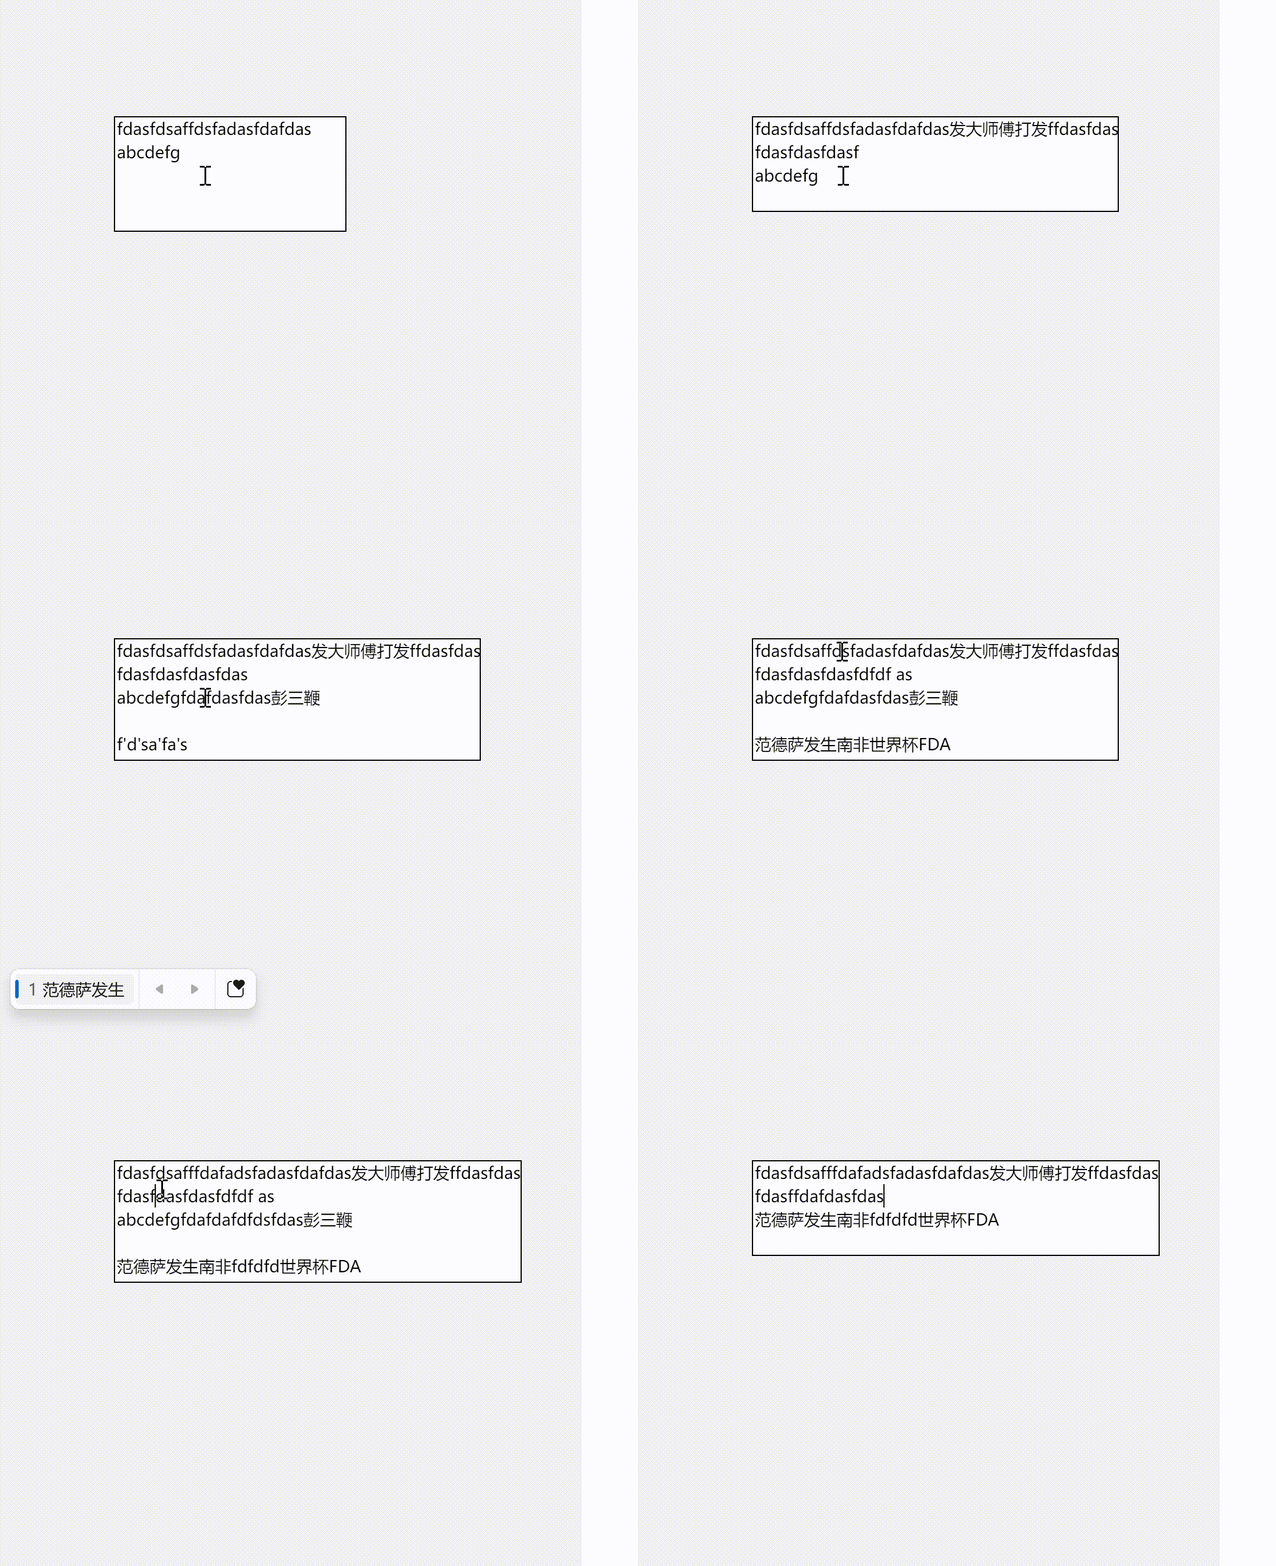
 

技术细节

技术细节有一个地方,我是这样做的。因为我也没有借鉴别人的,就昨天突然闲,随手写了一下。

就是文本选中高亮:检测到selectionStart和selectionEnd不相等的情况下,就证明是选中区。

选中区的文本颜色和背景要高亮,如果做文本计算的话,那有点麻烦,而且性能也不好/。

我是这样做的。

文本先以默认颜色绘制一遍,然后把选中区作为剪切区域。再清空剪切区域的旧文本。再以高亮的颜色背景文本,再绘制一遍。就行了,这样很简单,不需要做额外文本处理了.

其它的:像光标位置,做到以下几点:

输入时:保持textarea的光标位置与canvas的同步

单点canvas文本框的时候:做一下坐标计算,算出光标位置,然后同步给textarea元素。
选中时候也需要同步给textarea元素,并且textarea也要选中这个区域。这样保证选中区删除文本或插入文本,保持一致

代码

不用管 canvasShapeRender这wh ,这是之前写一个类似figma的渐变调节器,小小的封装了一下,没有别的功能

   var renderer = new CanvasShapeRender(container, {
                        width: 500,
                        height: 500,
                        background: '#efefef'
                    })
                    renderer.add(new RichInputEditor({
                        owner: renderer,
                        x: 100,
                        y: 100
                    }))
                    renderer.requestDraw()
  class RichInputEditor2 extends CanvasShape {
            constructor(opts = {}) {
                super({
                    type: 'group',
                    ...opts
                })
                this.minWidth = Math.max(200, this.width)
                this.minHeight = Math.max(30, this.height)
                this.width = this.minWidth
                this.height = this.minHeight
                let scope = this;


                this.selectionStart = 0
                this.selectionEnd = 0;
                this.curLine = 0;// 光标所在行
                this.curX = 0
                //  this.curX=0 // 光标x轴位置
                this.lineHeight = 20
                this._focus = false;

                // 光标x轴位置
                let getCursorX = () => {
                    let texts = this.text.texts;
                    if (this.curLine >= texts.length) {
                        return 0
                    }

                    if (this.selectionStart === this.selectionEnd) {
                        
                        return this.text.getPositionFromOffsetAndLine(this.selectionStart,this.curLine)
                    }
                    return 0
                }
                let getCursorLine = () => {
                    let line = this.text.getLineFromPosition(this.selectionStart)
                    return line
                }
                let run = false;
                let updateCursor = () => {
                    if (run) {
                        return
                    }
                    run = true;
                    Promise.resolve().then(() => {
                        this.selectionStart = this._textarea.selectionStart
                        this.selectionEnd = this._textarea.selectionEnd
                        this.width=this._textarea.scrollWidth
                        this.height=this._textarea.scrollHeight
                        this.curLine = getCursorLine()
                        this.curX = getCursorX()

                        run = false
                    })
                }
                let border = this.border = this.addShape({
                    type: 'rect',
                    x: 0,
                    y: 0,
                    fillStyle: '#fff',
                    strokeStyle: '#000',
                    cursor:'text',
                    beforeUpdate() {
                       // scope.width=Math.max(minWidth,text.getTextMaxWidth())
                        this.width = scope.width
                        this.height = scope.height
                    },
                    mousedown(e) {
                        let [x,y]=this.transformLocalCoord(e.downPoint.x, e.downPoint.y)
                        this.__selectionStart=null
                        setTimeout(() => {
                            scope._textarea.focus()
                            scope._focus = true
                            let selectionStart=scope.text.getSelectionFromPosition(x,y)
                            scope.selectionStart=selectionStart
                            scope.selectionEnd=selectionStart
                            scope._textarea.selectionStart=selectionStart
                            scope._textarea.selectionEnd=selectionStart

                            this._selectionStart=selectionStart
                       
                            updateCursor()
                            this.owner.requestDraw()
                        })
                        e.stop()
                    },
                    drag(e){
                        if(this._selectionStart==null){
                            return
                        }
                        let [x,y]=this.transformLocalCoord(e.point.x, e.point.y)
                        let _selectionEnd=scope.text.getSelectionFromPosition(x,y)
                        let _selectionStart=this._selectionStart
                        let selectionStart=Math.min(_selectionStart,_selectionEnd)
                        let selectionEnd=Math.max(_selectionStart,_selectionEnd)
                        console.log('scope.selectionStart',selectionStart,selectionEnd)
                    
                        scope.selectionStart=selectionStart
                        scope.selectionEnd=selectionEnd
         
                        this.owner.requestDraw()
                    },
                    mouseup(){
                        if(scope.selectionStart!==scope.selectionEnd){
                            scope._textarea.setSelectionRange(scope.selectionStart,scope.selectionEnd)
                        }
                        this.owner.requestDraw()
                    }
                })
            
                let text = this.text = this.addShape({
                    silent:true,
                    type: "text",
                    x: 2,
                    // ignore:true,
                    fillStyle: '#000',
                    textBaseline: 'middle',
                    font: 'normal normal normal normal 14px sans-serif',
                    beforeUpdate() {
                        //this.lineHeight=80
                        this.textOffset=[0,scope.lineHeight * 0.6]

                    },
                })
                let selectionArea=new CanvasShapePath2D({
                    silent:true,
                    visible:false,
                    fillStyle:'#0000ff',
                    beforeUpdate(){
                        this.visible=scope.selectionStart!==scope.selectionEnd&&scope._focus
                        let points=text.getSelectAreaFromSelection(scope.selectionStart,scope.selectionEnd)
                        console.log('selectionArea',this.visible)
                        this.fromMultiPolygon(points)
                    }
                })
                this.add(selectionArea)
                let lightText = this.addShape({
                    type: "text",
                    x: 2,
                    silent:true,
                    visible:false,
                    clipClearCanvas:true,
                    fillStyle: '#fff',
                    textBaseline: 'middle',
                
                    drawClip(ctx){
                        if(this.clipPath){
                            ctx.beginPath()
                            ctx.clip(this.clipPath)
                            ctx.fillStyle=selectionArea.fillStyle
                            ctx.fillRect(0,0,ctx.canvas.width,ctx.canvas.height)
                        }
                    },
                    beforeUpdate() {
                        this.font=text.font
                        //this.lineHeight=80
                        this.textOffset=[0,scope.lineHeight * 0.6]
                        this.texts=text.texts
                        this.setFontProperties(text)
                        if(selectionArea.visible){
                            this.clipPath=selectionArea.path2d
                            this.visible=true;

                        }else{
                            this.clipPath=null
                            lightText.visible=false
                        }
                        // this.height=scope.height
                    },
                })
         

                text.setTextContent('fdasfdsaffdsfadasfdafdas\nabcdefg')
                let cursor = this.cursor = this.addShape({
                    type: "line",
                    x0: 0,
                    y0: 0,
                    x0: 0,
                    y1: 30,
                    x: 2,
                    strokeStyle: '#000',
                    beforeUpdate() {
                        this.visible=scope.selectionStart===scope.selectionEnd&&scope._focus
                       
                        this.x = 2 + scope.curX
                        this.y = scope.curLine * scope.lineHeight
                        this.y1 = scope.lineHeight
                        this.lineHeight = scope.lineHeight
                    },
                })

                this._textarea = document.createElement('textarea')
                this._textarea.style.position = 'absolute'
                this._textarea.style.top = '0px'
                this._textarea.style.left = '-1000px'
                this._textarea.style.boxSizing = 'border-box'
                this._textarea.style.width = this.width + 'px'
                this._textarea.style.height = this.height + 'px'
                this._textarea.style.userSelect='none'
                this._textarea.value=text.getTextContent()
                text.bindDomTextStyle(this._textarea)
                //   this._textarea.style.opacity=0
                this._textarea.addEventListener('input', (e) => {
                    let texts = e.target.value.split(/\n/)
                    this.text.setTextContent(texts)    
                    updateCursor()
                    this.owner.requestDraw()
                })
         
                document.body.appendChild(this._textarea)

            }


            ownerCreate() {
                this.owner.onMousedown = () => {
                    if (this._focus) {
                        this._focus = false
                        this.owner.requestDraw()
                    }
                }
                let loop = () => {
                    if (this._focus) {
                        //  this.syncTextareaToCanvas()
                        this.cursor.ignore = !this.cursor.ignore
                        this.owner.requestDraw()
                    }
                    setTimeout(loop, 800)
                }
                loop()
            }
 
        }
本文来自互联网用户投稿,该文观点仅代表作者本人,不代表本站立场。本站仅提供信息存储空间服务,不拥有所有权,不承担相关法律责任。如若转载,请注明出处:http://www.coloradmin.cn/o/887681.html

如若内容造成侵权/违法违规/事实不符,请联系多彩编程网进行投诉反馈,一经查实,立即删除!

相关文章

爬虫逆向实战(三)--天某云登录

一、数据接口分析 主页地址:天某云 1、抓包 通过抓包可以发现登录接口是account/login 2、判断是否有加密参数 请求参数是否加密? 通过“载荷”模块可以发现password、comParam_signature、comParam_seqCode是加密的 请求头是否加密? 无…

嵌入式学习之字符串

通过今天的学习,我主要提高了对sizeof 和 strlen、puts()、gets()、strcmp 、strncmp、strstr、strtok的理解。重点对sizeof的使用有了更加深刻的理解

【会议征稿信息】第二届信息学,网络与计算技术国际学术会议(ICINC2023)

2023年第二届信息学,网络与计算技术国际学术会议(ICINC2023) 2023 2nd International Conference on Informatics,Networking and Computing (ICINC 2023) 2023年第二届信息学,网络与计算技术国际学术会议(ICINC2023)将于2023年10月27-29日于中国武汉召…

MongoDB:数据库初步应用

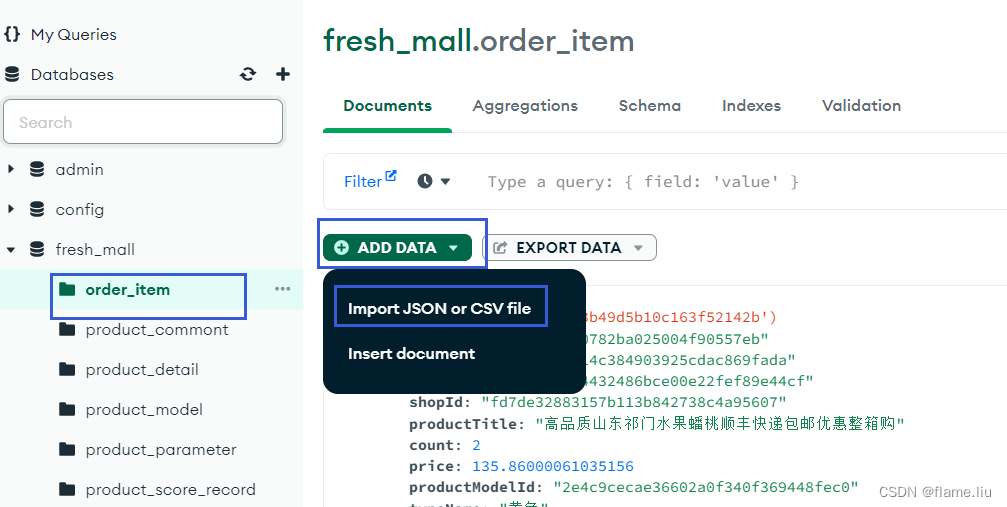
一.连接MongoDB 1.MongoDBCompass连接数据库 连接路径:mongodb://用户名:密码localhost:27017/ 2.创建数据库(集合) MongoDB中数据库被称为集合. MongoDBCompass连接后,点击红色框加号创建集合,点击蓝色框加号创建文档(数据表) 文档中的数据结构(相当于表中的列)设计不用管…

mqtt学习记录

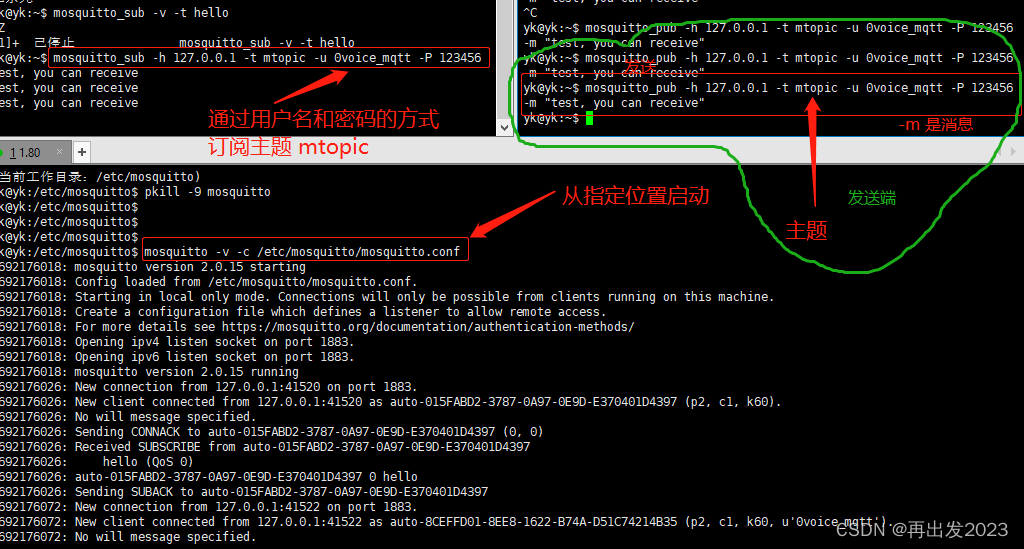
目录 1 匿名登录2 ⽤户名密码登录,配置接收的主题mosquitto 配置文件修改添加⽤户信息添加topic和⽤户的关系登录演示 1 匿名登录 ⾸先打开三个终端, 启动代理服务:mosquitto -v -v 详细模式 打印调试信息 默认占⽤:1883端⼝订阅…

机器学习笔记:线性链条件随机场(CRF)

0 引入:以词性标注为例 比如我们要对如下句子进行标注: “小明一把把把把住了”那么我么可能有很多种词性标注的方法,中间四个“把”,可以是“名词名词动词名词”,可以是“名词动词动词名词”等多种形式。 那么&#…

安装chromedriver 115,对应chrome版本115(经检验,116也可以使用)

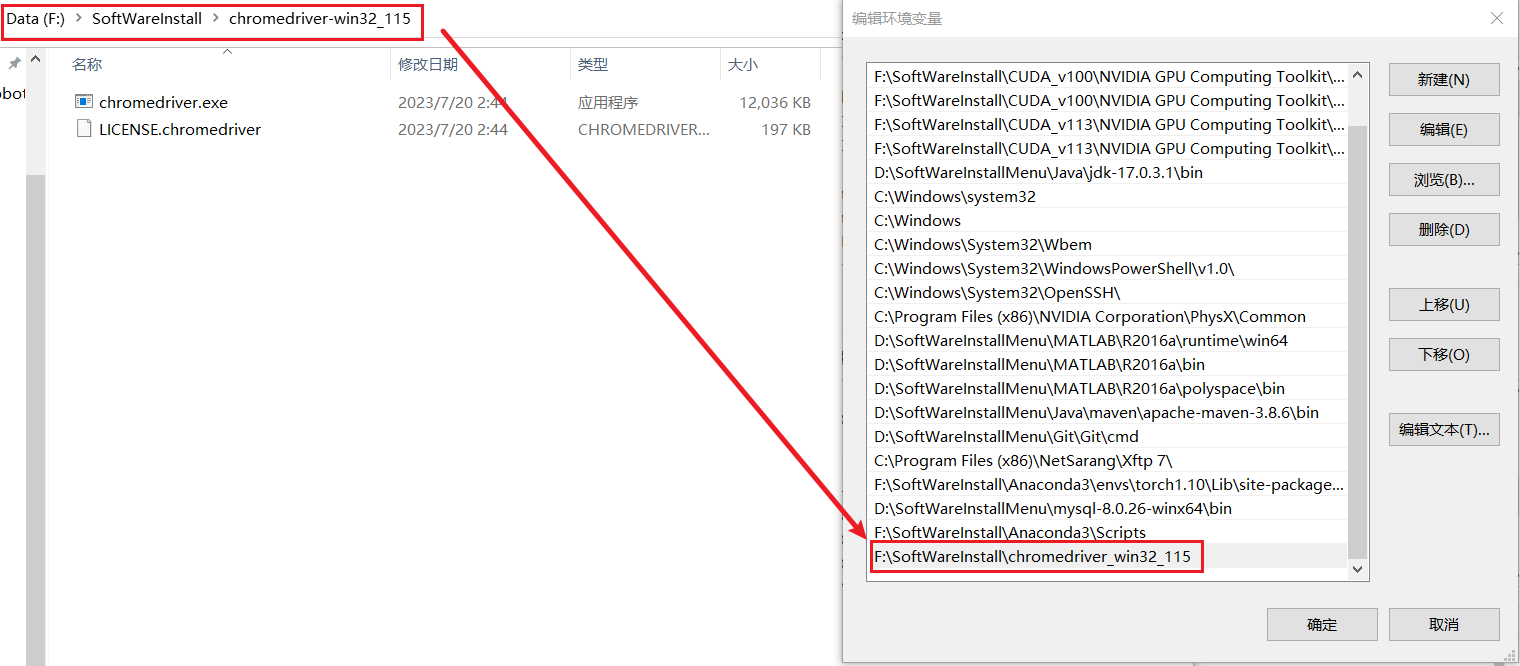
目录 1. 查看Chrome浏览器的版本2. 找到对应的chromedriver3. 安装ChromeDriver 1. 查看Chrome浏览器的版本 点进这个网站查看:chrome://settings/help (真是的,上一秒还是115版本,更新后就是116版本了,好在chromedi…

Python程序设计——列表

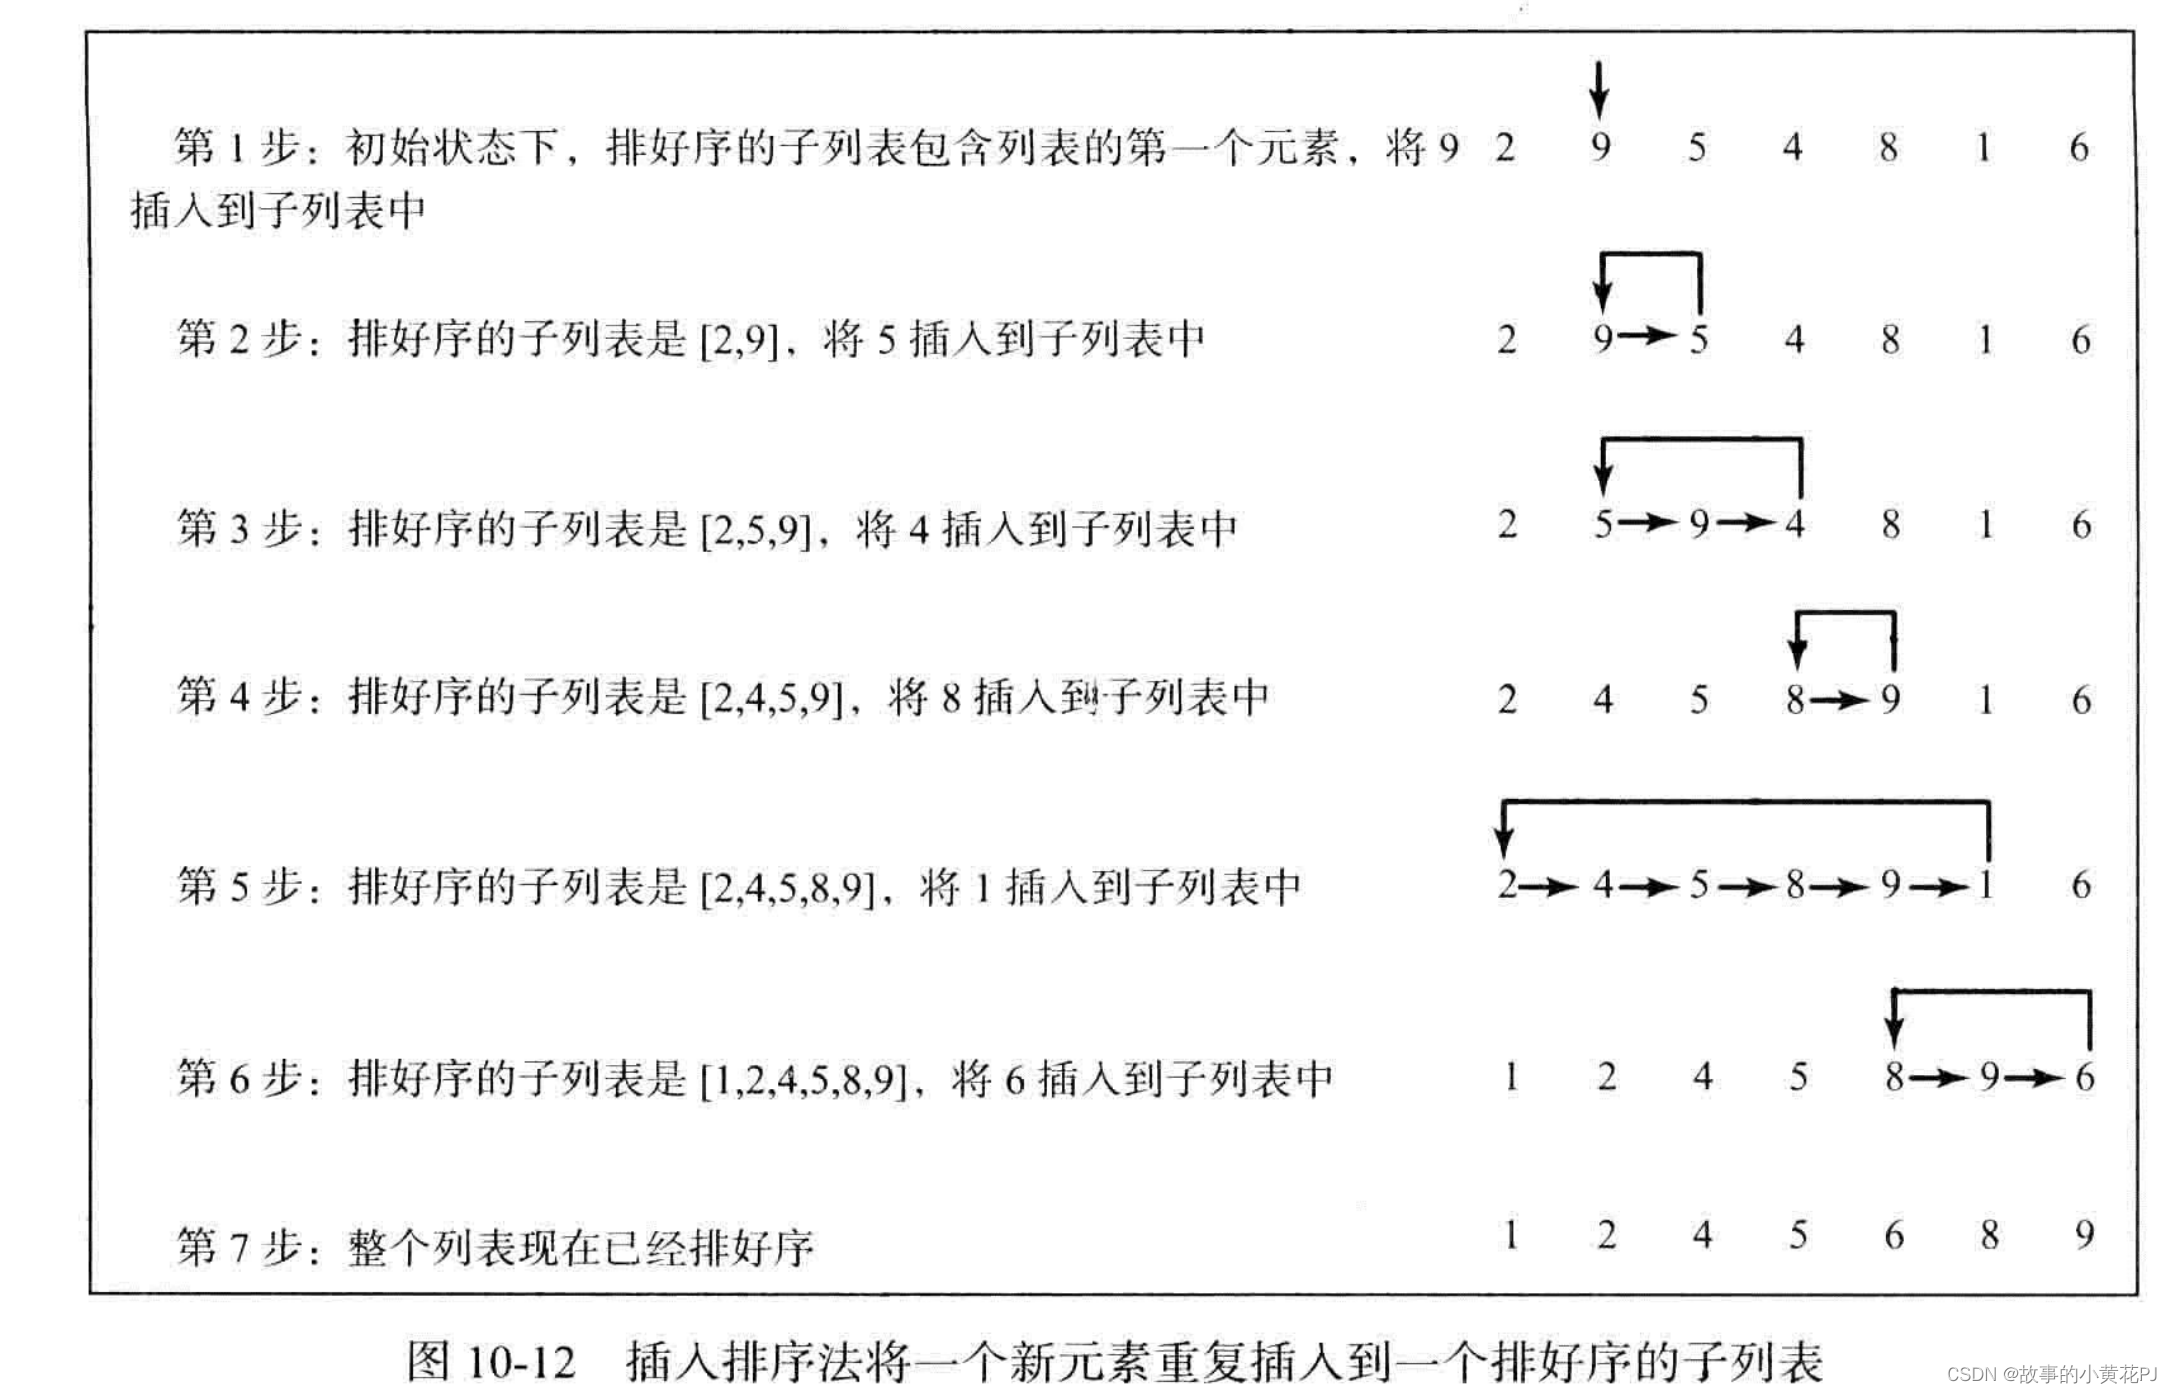
一、引言 关键点:一个列表可以存储任意大小的数据集合。 程序一般都需要存储大量的数值。假设,举个例子,需要读取100个数字,计算出它们的平均值,然后找出多少个数字是高于这个平均值的。程序首先读取100个数字并计算它…

基于 matplotlib module 的物理示意图绘制

基于 matplotlib module 的物理示意图绘制 # 创建画布和子图 fig, ax plt.subplots()# 去除 x 轴和 y 轴的边框线 ax.spines[bottom].set_visible(False) ax.spines[top].set_visible(False) ax.spines[left].set_visible(False) ax.spines[right].set_visible(False)# 隐藏 …

Azure如何调整虚拟机的大小

参考 https://blog.csdn.net/m0_48468018/article/details/132267096 创建虚拟机进入资源,点击大小选项,并对大小进行调整 点击如下图的cloud shell,进入Azure CLI,使用az vm resize 进行大小调整 命令中的g对应资源组,n对应虚拟机名称&am…

巧妙使用js IntersectionObserver实现dom懒加载

效果 源码 <!DOCTYPE html> <html lang"en"><head><meta charset"UTF-8"><title>IntersectionObserver</title></head><body style"text-align: center"><div id"container">…

数据库高性能架构模式

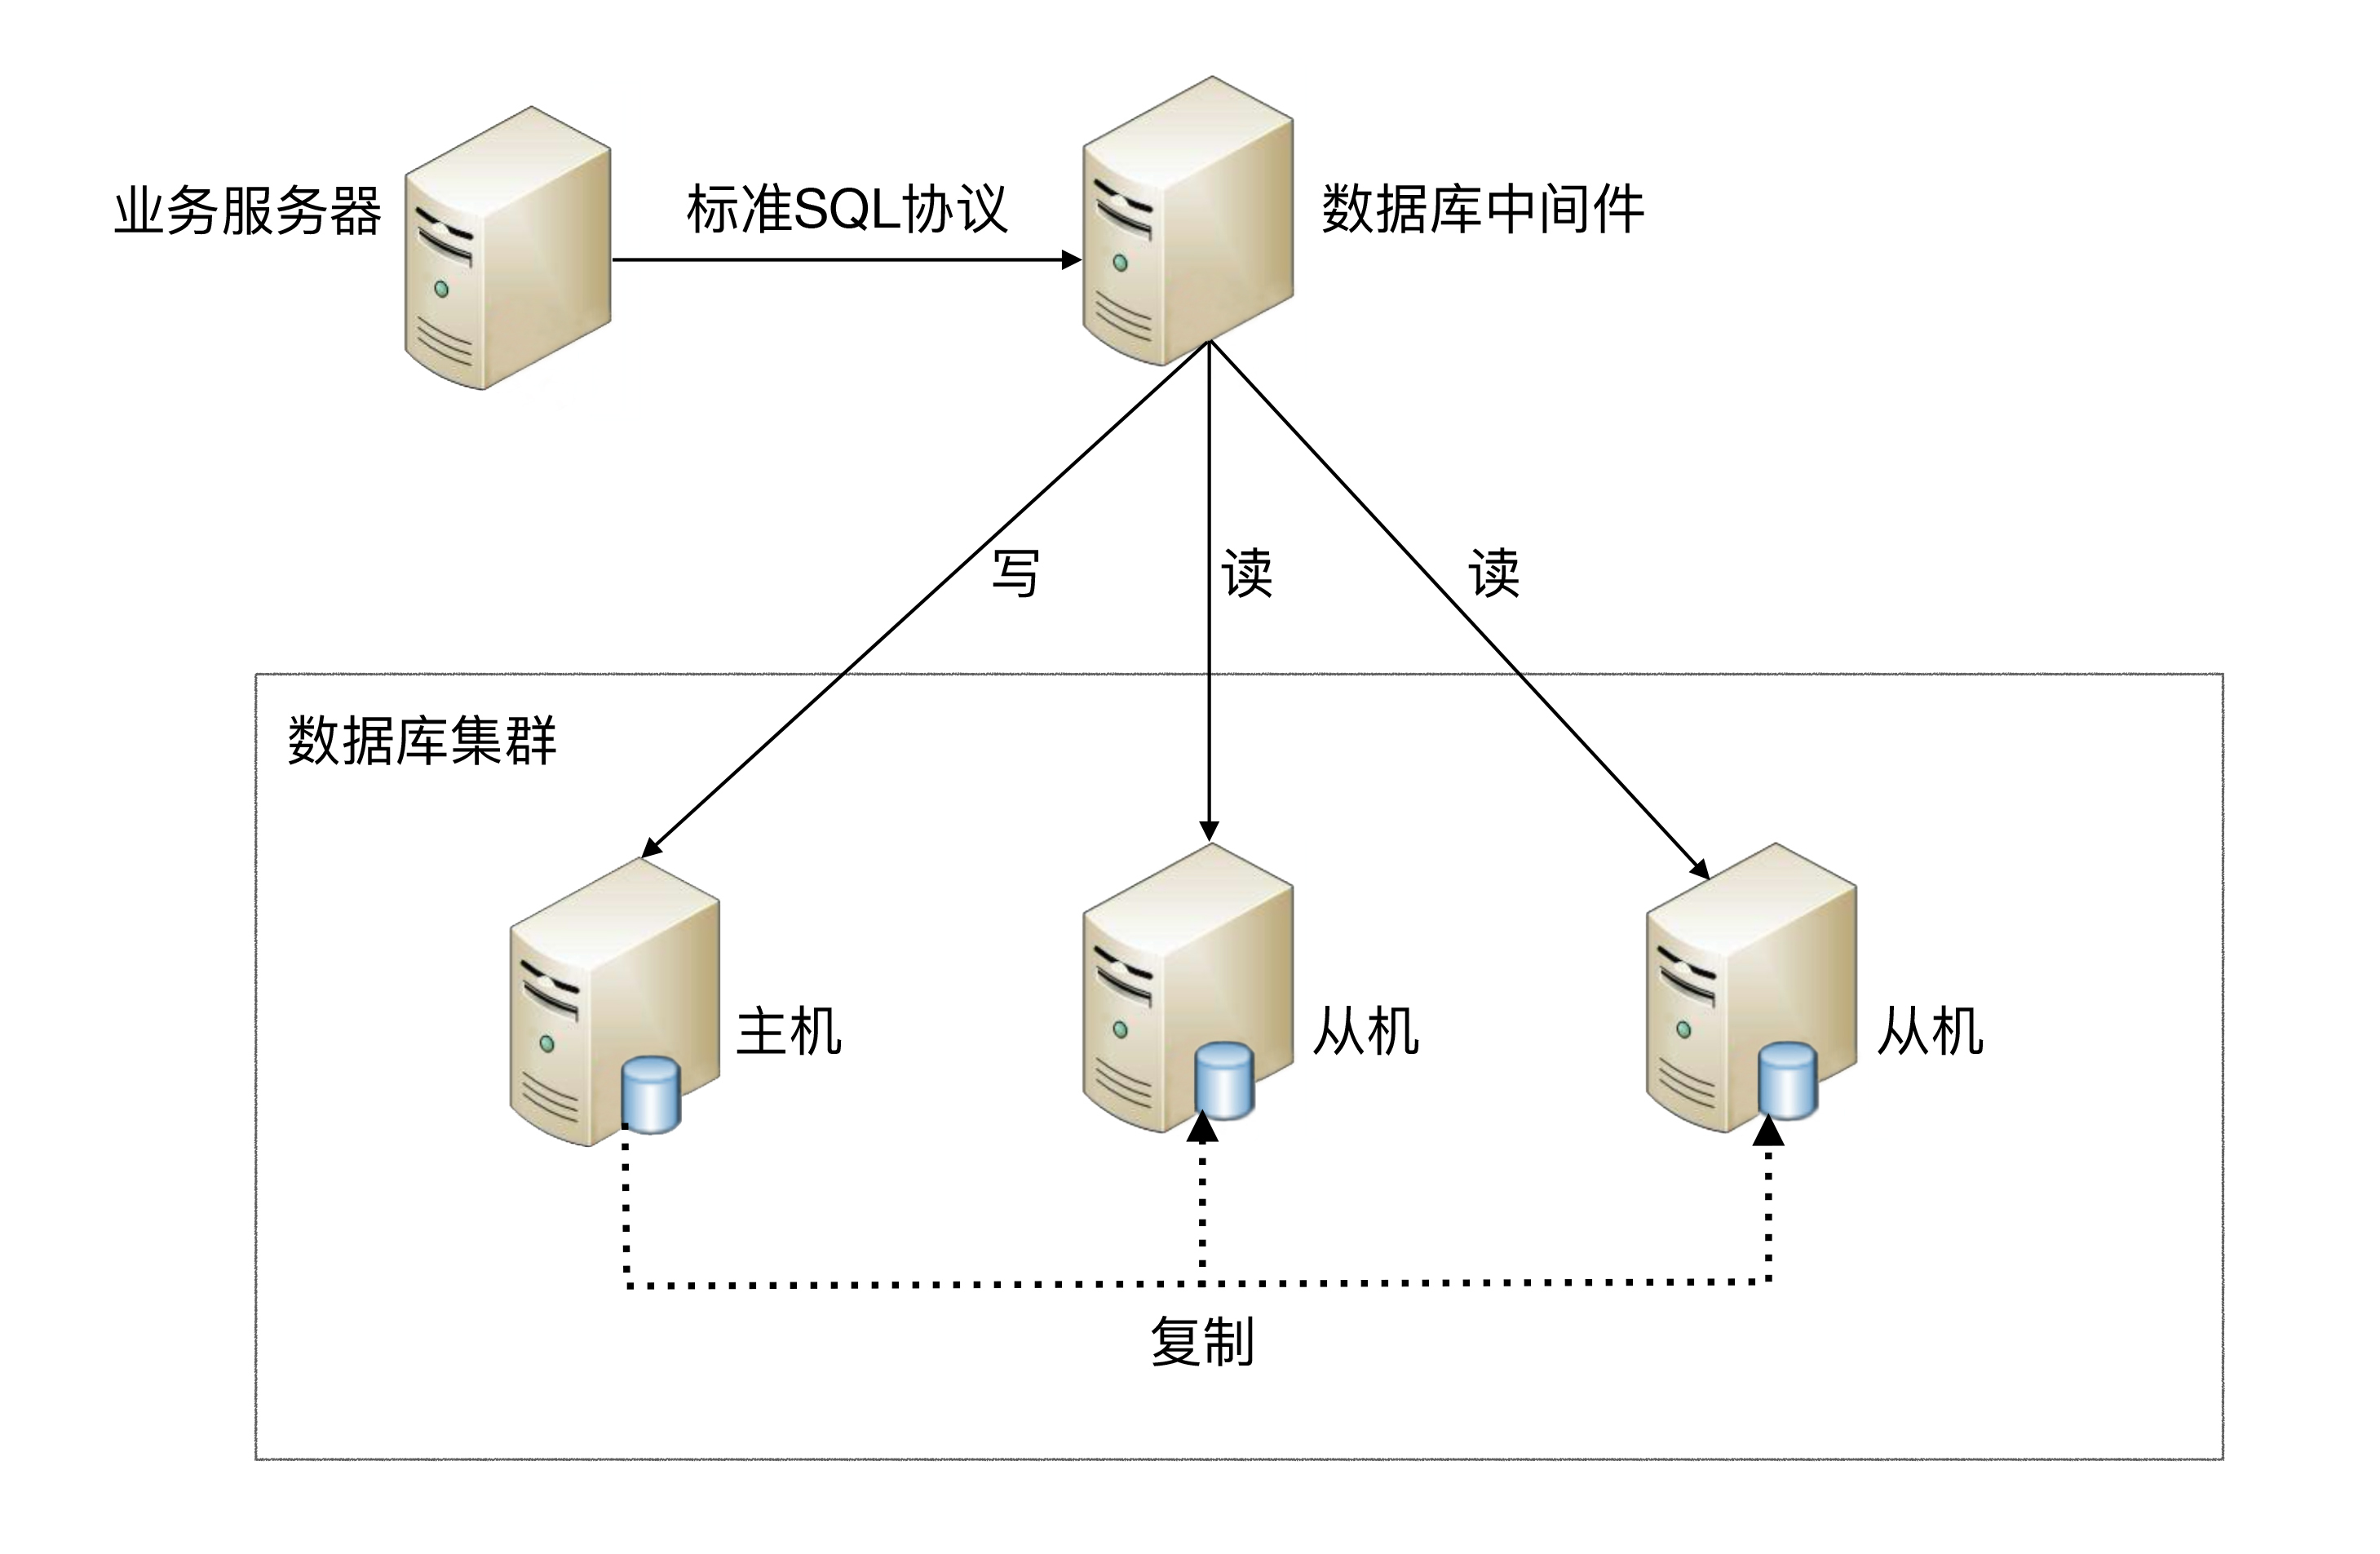
互联网业务兴起之后&#xff0c;海量用户加上海量数据的特点&#xff0c;单个数据库服务器已经难以满足业务需要&#xff0c;必须考虑数据库集群的方式来提升性能。高性能数据库集群的第一种方式是“读写分离”&#xff0c;第二种方式是“数据库分片”。 1、读写分离架构 **读…

Vue父子组件数据双向绑定

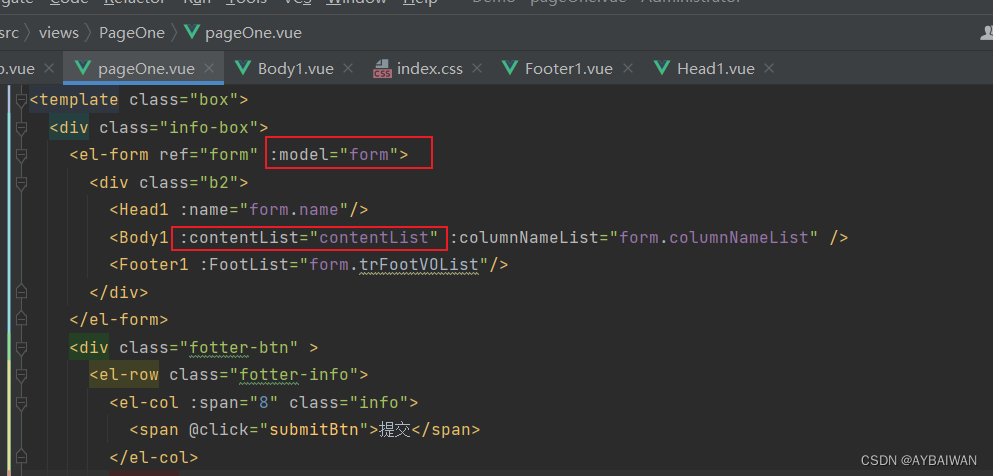
今天写一个功能时&#xff0c;遇到一些问题&#xff1a; 为什么子组件的contentList改变&#xff0c;也会将form中的trContentVOList的值改变&#xff1f; 吓的我立马去补充知识&#xff08;小白一枚&#xff09;,也借鉴了别的大佬的一些文章&#xff0c;这里自己整理一下&…

时序预测 | MATLAB实现基于CNN-GRU卷积门控循环单元的时间序列预测-递归预测未来(多指标评价)

时序预测 | MATLAB实现基于CNN-GRU卷积门控循环单元的时间序列预测-递归预测未来(多指标评价) 目录 时序预测 | MATLAB实现基于CNN-GRU卷积门控循环单元的时间序列预测-递归预测未来(多指标评价)预测结果基本介绍程序设计参考资料 预测结果 基本介绍 MATLAB实现基于CNN-GRU卷积…

华为网络篇 RIP的默认路由-30

难度2复杂度2 目录 一、实验原理 二、实验拓扑 三、实验步骤 四、实验过程 总结 一、实验原理 使用RIP搭建内部网络后&#xff0c;我们还需要在边界路由器进行相应的配置&#xff0c;否则无法与Internet通信。默认情况&#xff0c;内部的RIP路由器是不知道Internet的路由条…

Linux驱动开发之点亮三盏小灯

头文件 #ifndef __HEAD_H__ #define __HEAD_H__//LED1和LED3的硬件地址 #define PHY_LED1_MODER 0x50006000 #define PHY_LED1_ODR 0x50006014 #define PHY_LED1_RCC 0x50000A28 //LED2的硬件地址 #define PHY_LED2_MODER 0x50007000 #define PHY_LED2_ODR 0x50007014 #define…

人工智能驱动的视频分析技术:实时洞察与关键信息提供者

引言&#xff1a;人工智能在视频分析领域的应用为监控视频提供了更加智能化和高效的处理方式。通过实时分析监控视频&#xff0c;人工智能可以自动识别特定的对象、运动模式、区域异常等&#xff0c;并生成相关的报告和统计数据&#xff0c;为用户提供关键信息和洞察。本文将详…

时序预测 | MATLAB实现基于CNN-BiGRU卷积双向门控循环单元的时间序列预测-递归预测未来(多指标评价)

时序预测 | MATLAB实现基于CNN-BiGRU卷积双向门控循环单元的时间序列预测-递归预测未来(多指标评价) 目录 时序预测 | MATLAB实现基于CNN-BiGRU卷积双向门控循环单元的时间序列预测-递归预测未来(多指标评价)预测结果基本介绍程序设计参考资料 预测结果 基本介绍 MATLAB实现基于…

UVM学习知识点

UVM构建 include 和 import pkg区别.sv .svhhdl_top.sv和hvl_top.sv回顾uvm_config&#xff0c;以及自定义uvm_configverilog:parameter、defparam与 localparamtest_basebuild_phaseend_of_elaboration_phasefunction void configure_agentset_seqsend_of_elaboration_phaseuv…

NVIDIA Omniverse与GPT-4结合生成3D内容

全球各行业对 3D 世界和虚拟环境的需求呈指数级增长。3D 工作流程是工业数字化的核心&#xff0c;开发实时模拟来测试和验证自动驾驶车辆和机器人&#xff0c;操作数字孪生来优化工业制造&#xff0c;并为科学发现铺平新的道路。 如今&#xff0c;3D 设计和世界构建仍然是高度…