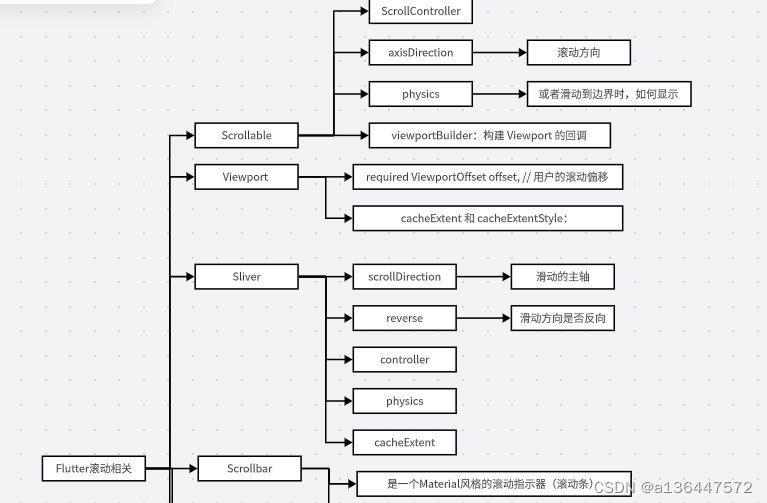
1 ScrollController
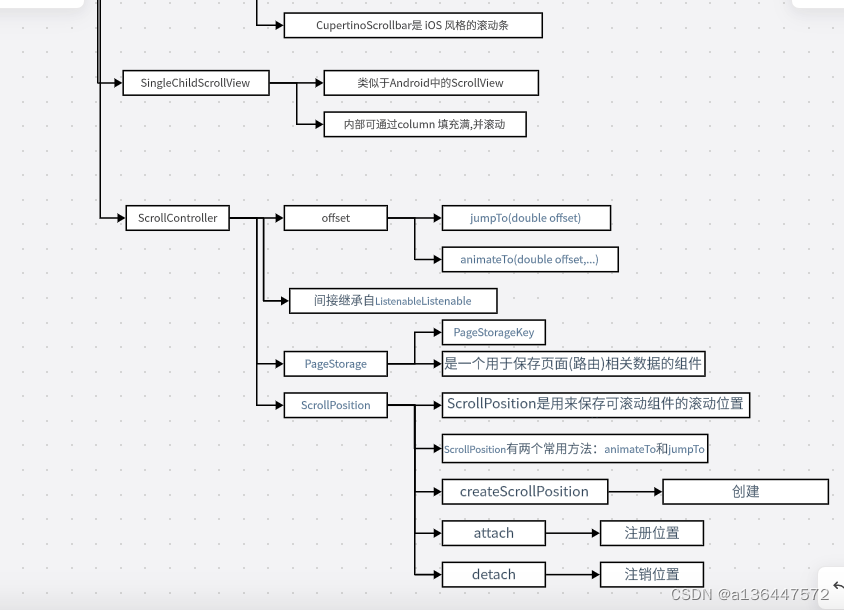
jumpTo(double offset)、animateTo(double offset,…):这两个方法用于跳转到指定的位置,它们不同之处在于,后者在跳转时会执行一个动画,而前者不会。
实例 点击按钮返回顶部 ,且按钮在list滑动一定距离后才会显示
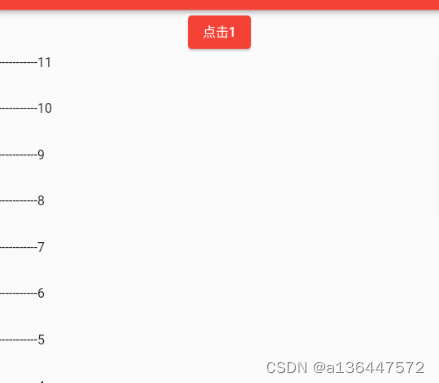
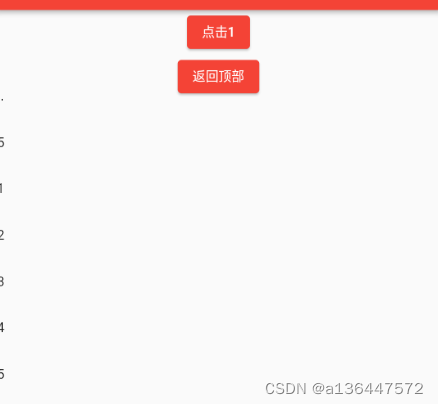
重点1 在state 初始化是 监听_controller.addListener((){});
列表滑动大于1500 之后 显示返回顶部按钮
数据不够是 可点击按钮 "点击1"添加数据
void initState() {
// TODO: implement initState
super.initState();
_controller.addListener(() {
print(_controller.offset);
if(_controller.offset<1500&&isShowTopBtn){
setState(() {
isShowTopBtn = false;
});
}else if(_controller.offset>=1500&&!isShowTopBtn){
setState(() {
isShowTopBtn = true;
});
}
});
}
 	// 返回顶部的调用 _controller.animateTo
					Container(
              child: !isShowTopBtn?null:ElevatedButton(onPressed: (){
                _controller.animateTo(0, duration: Duration(milliseconds: 200), curve: Curves.ease);
              }, child: Text("返回顶部")),
            ),
全部代码
class MyListViewState0 extends StatefulWidget {
const MyListViewState0({Key? key}) : super(key: key);
State<MyListViewState0> createState() => _MyState0();
}
class _MyState0 extends State<MyListViewState0> {
int itemss = 1 ;
List<String> list2 = [
"1","2","3","4","5",
"1","2","3","4","5",
"1","2","3","4","5",
"1","2","3","4","5",
"1","2","3","4","5",
"1","2","3","4","5",
"1","2","3","4","5"];
final ScrollController _controller = ScrollController();
bool isShowTopBtn = false ;
void initState() {
// TODO: implement initState
super.initState();
_controller.addListener(() {
print(_controller.offset);
if(_controller.offset<1000&&isShowTopBtn){
setState(() {
isShowTopBtn = false;
});
}else if(_controller.offset>=1000&&!isShowTopBtn){
setState(() {
isShowTopBtn = true;
});
}
});
}
Widget build(BuildContext context) {
return ConstrainedBox(
constraints: BoxConstraints.tightFor(width: double.infinity),
child: Column(
children: <Widget>[
ElevatedButton(onPressed: (){
setState(() {
print(_controller.offset);
itemss ++ ;
list2.insert(0, "-----------$itemss");
});
}, child: Text("点击1")),
Container(
child: !isShowTopBtn?null:ElevatedButton(onPressed: (){
_controller.animateTo(0, duration: Duration(milliseconds: 200), curve: Curves.ease);
}, child: Text("返回顶部")),
),
Expanded(child: ListViewState2(list2,_controller))
],
)
);
}
}
class ListViewState2 extends StatelessWidget{
List<String> list = [] ;
late ScrollController _controller ;
late bool _isShowTopBtn ;
ListViewState2(List<String> item, ScrollController controller,{Key? key}) : super(key: key){
list = item ;
_controller = controller;
}
Widget build(BuildContext context) {
// TODO: implement build
return Scrollbar(child: ListView.builder(
itemCount: list.length,
itemExtent: 50,
controller: _controller,
itemBuilder: (BuildContext context ,int index){
return Text(list[index]);
}
));
}
}
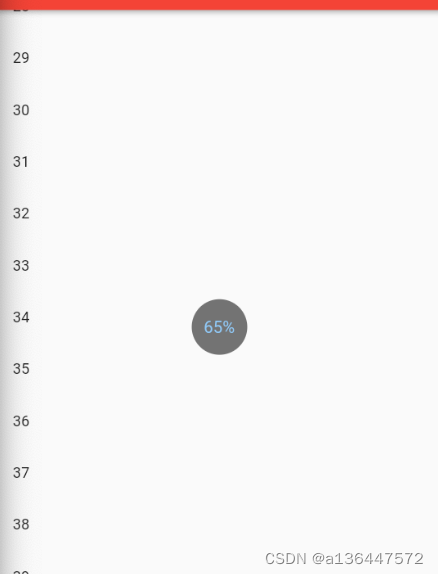
实例2 通过 NotificationListener 监听 可滚动组件的滑动情况
Flutter Widget树中子Widget可以通过发送通知(Notification)与父(包括祖先)Widget通信。父级组件可以通过NotificationListener组件来监听自己关注的通知,这种通信方式类似于Web开发中浏览器的事件冒泡,
可滚动组件在滚动时会发送ScrollNotification类型的通知,ScrollBar正是通过监听滚动通知来实现的。通过NotificationListener监听滚动事件和通过ScrollController有两个主要的不同:
通过NotificationListener可以在从可滚动组件到widget树根之间任意位置都能监听。而ScrollController只能和具体的可滚动组件关联后才可以。
收到滚动事件后获得的信息不同;NotificationListener在收到滚动事件时,通知中会携带当前滚动位置和ViewPort的一些信息,而ScrollController只能获取当前滚动位置。
NotificationListener<ScrollNotification>(
  onNotification: (ScrollNotification scrollNotification){
	}
 child:
)
// 通过   onNotification  监听
// 通过   child 配置子view
scrollNotification.metrics  // 可以获取到滑动的位置信息
scrollNotification.metrics.pixels // 当前位置
scrollNotification.metrics.maxScrollExtent // 总长度
...  // 其余的还需要再看看
class MyNotificationListenerWidget extends StatefulWidget {
const MyNotificationListenerWidget({Key? key}) : super(key: key);
State<MyNotificationListenerWidget> createState() => _MyNotificationListener();
}
class _MyNotificationListener extends State<MyNotificationListenerWidget> {
String _progress = "0%"; //保存进度百分比
Widget build(BuildContext context) {
// TODO: implement build
return NotificationListener<ScrollNotification>(
onNotification: (ScrollNotification scrollNotification){
double pro = scrollNotification.metrics.pixels/scrollNotification.metrics.maxScrollExtent;
setState(() {
_progress = "${(pro*100).toInt()}%";
});
return true ;
},
child: Stack(
alignment: Alignment.center,
children: <Widget>[
ListViewState3(),
Positioned(
child: CircleAvatar(
child:Text(_progress,style: TextStyle(fontSize: 18),),
radius: 30,
backgroundColor: Colors.black54,
foregroundColor: Colors.blue[200],
),)
],
),
);
}
}
class ListViewState3 extends StatelessWidget{
Widget build(BuildContext context) {
// TODO: implement build
return ListView.builder(
prototypeItem: ListTile(title: Text("1")),
itemCount: 56,
itemBuilder: (context, index) {
//LayoutLogPrint是一个自定义组件,在布局时可以打印当前上下文中父组件给子组件的约束信息
return ListTile(title: Text("$index"));
},
);
}
}



![[附源码]Python计算机毕业设计房屋租赁系统Django(程序+LW)](https://img-blog.csdnimg.cn/3f551495df91423e919043919d2f7451.png)
