目录
一、什么是Spring MVC
二、Spring MVC项目的创建和使用
1、实现客户端和服务器端之间的连接
1.1、RequsestMapping注解
1.2、@RequestMapper的简单使用
1.3、使用@GetMapping和@POSTMapping注解来实现HTTP连接
三、获取参数
1、实现获取单个参数
2、实现获取对象
3、后端参数重命名(@RequestParam参数映射)
4、@RequestParam参数必传设置
5、接收JSON对象(@RequestBody)
6、获取URL中参数(@PathVariable)
7、上传文件(@RequestPart)
8、获取Cookie/Session/header
四、返回数据
1、返回一个静态页面
2、返回一个数据
3、返回text/html
4、请求转发和请求重定向
一、什么是Spring MVC
官方的描述为:Spring Web MVC是基于Servlet API的原始Web框架,从一开始就包含在Spring框架中。它的正式名称“Spring Web MVC”来自它的源模块(Spring -webmvc)的名称,但它更常被称为“Spring MVC”。
✨理解Web框架
Web框架(Web framework)是用来进行Web应用开发的一个软件架构。主要用于动态网络开发,Web应用框架提供了一套开发和部署网站的方式。开发者基于框架实现自己的业务逻辑。使用Web框架很多的业务逻辑的功能不需要自己去完善,而是使用框架已有的功能就可以。
✨什么是MVC
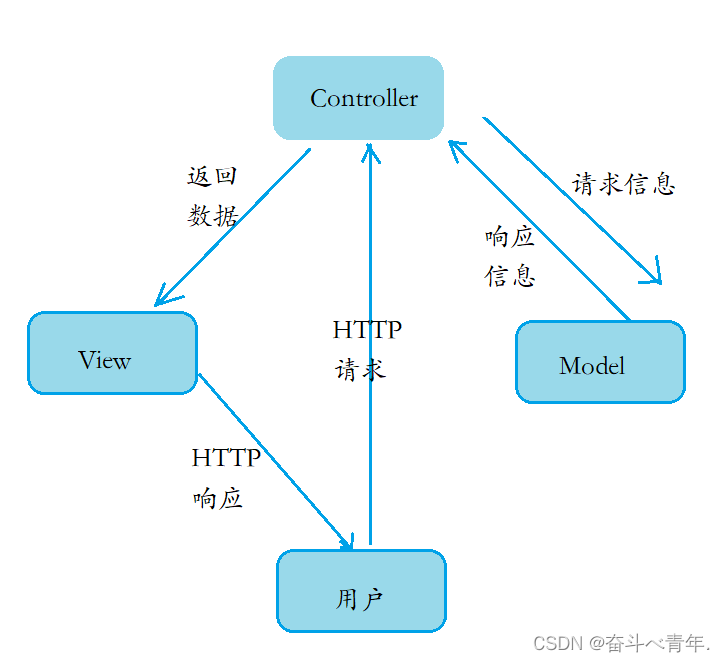
MVC是Model View Controller的缩写,它是软件工程中的一种软件件架构模式,他将一个项目分为三部分:View(试图),Controller(控制器),Model(模型)。MVC是一种思想。
- Model(模型):项目中用于处理程序数据逻辑的部分,负责在数据库中查找和存储数据。
- View(试图):是项目中将得到的数据进行处理之后,显示给用户一个界面的部分。
- Controller(控制器):是项目中处理用户交互的部分,负责读取用户的请求,向模型提价请求,读取模型的响应,将数据交给View部分。
✨MVC和Spring MVC的关系
MVC是一种思想,Spring MVC是对MVC思想的具体实现。
Spring MVC是一个实现了MVC模式,并继承了Servlwt API的Web框架。
二、Spring MVC项目的创建和使用
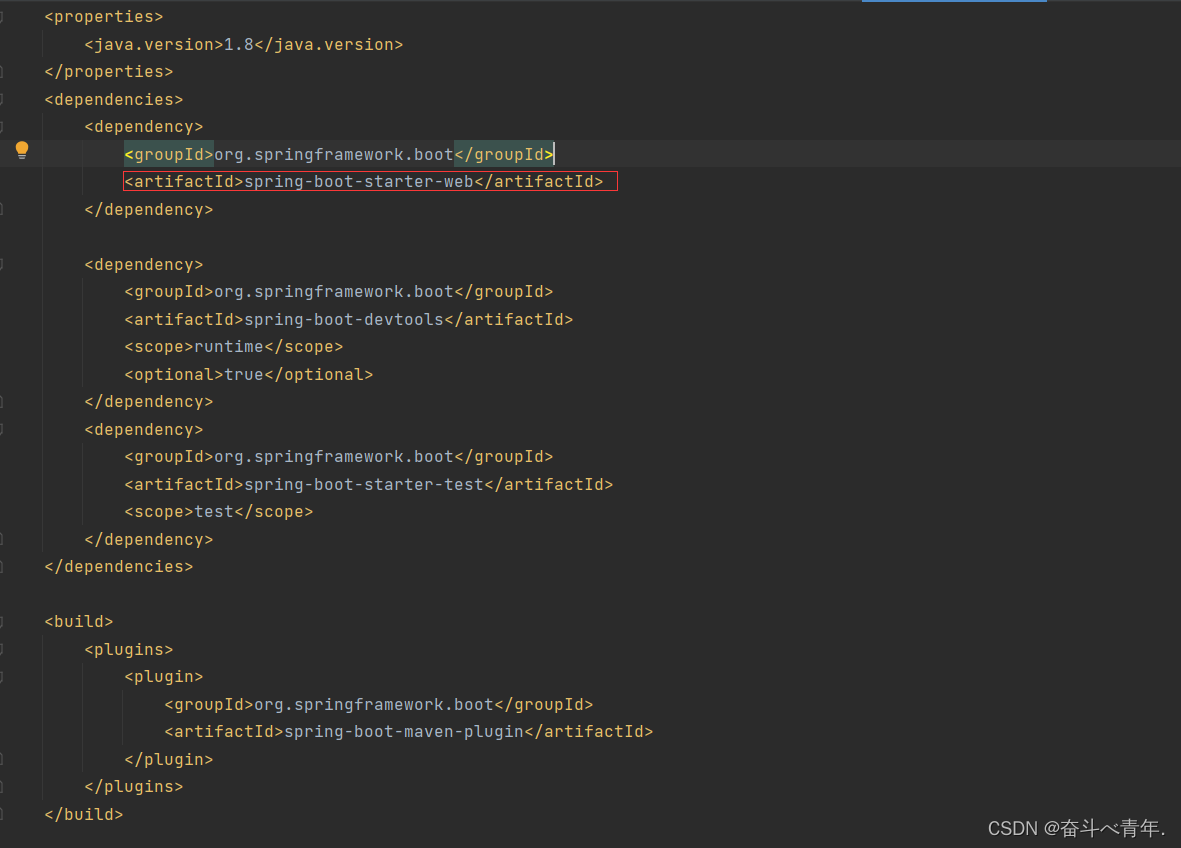
Spring MVC项目的创建步骤和Spring Boot的创建步骤是相同的,我们之前创建的Spring Boot项目就相当于是一个Spring Web项目,我们在添加Spring Boot框架的时候,已经引入了Spring MVC。
下图中spring-boot-starter-web表示的就是Spring MVC框架。
1、实现客户端和服务器端之间的连接
1.1、RequsestMapping注解
@ResquestMapping是Spring Web应用程序中最常用到的注解之一,他是用来注册接口的的路由映射的。
路由映射:所谓的路由隐射指的就是,当用户访问一个URL时,将用户的请求对应到程序中某个类的某个方法的过程就叫做路由映射。
✨ @RequestMapping注解的参数
- value:指定请求的实际访问地址,value属性是@RequestMapping注解的默认属性,如果只有唯一一个属性,则可以省略value字段,如果参数中有多个属性,则必须写上value属性名。
- path:与value同义,他们在源码中相互引用,value和path都是用来作为映射使用的。
- method:用来指定请求的类型,当在一个方法的注解@RequestMapping的参数中写道method = RequestMethod.GET表示这个方法只支持GET请求。
- params:该属性指定,请求中必须包含params属性指定的参数时,才能执行该请求。
- headers:该属性指定,请求中必须包含某些指定的header值,才能够让该方法处理请求。
- consumes:指定处理请求的提交内容类型(Content-Type),才能让该方法处理请求
- produces:指定返回的内容类型,返回的内容类型必须时request请求头中所包含的类型。这个属性还可以指定返回值的编码。
1.2、@RequestMapper的简单使用
- @RequestMapping既可以修饰类,也可以修饰方法,当同时修饰类和方法时,类上的@ResquestMapping注解的参数value/path,表示的是URL中的一级路由,方法上的参数的value/path表示的是URL的二级路由。
- @RequestMapper注解默认情况下支持GET和POST请求。
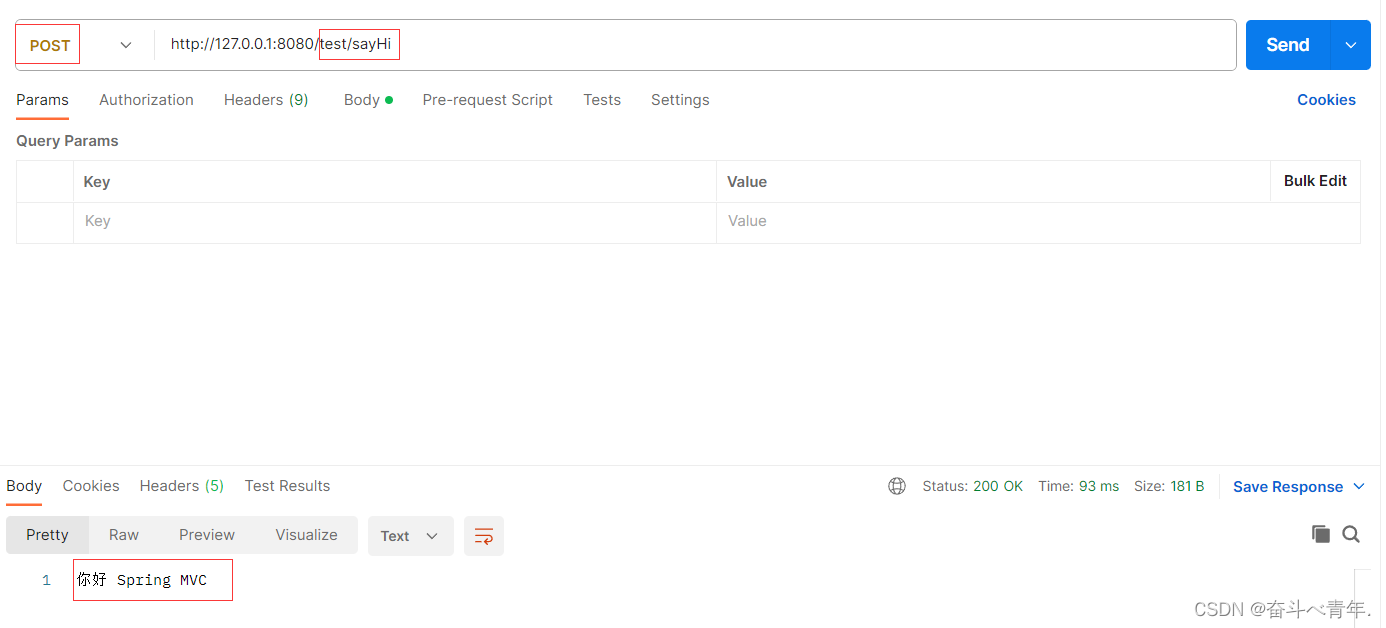
🍂下面我们创建一个类,来实现客户端和Spring程序的连接,使用postman模拟客户端发送请求。验证@RequsetMapper注解既可以修饰类也可以修饰方法和@RequestMapper注解默认支持GET和POST请求。
package com.example.demo.controller;

import org.springframework.web.bind.annotation.RequestMapping;
import org.springframework.web.bind.annotation.RestController;

@RestController
@RequestMapping("/test")
public class TestController {
    @RequestMapping("/sayHi")
    public String sayHi(){
        return "你好 Spring MVC";
    }
}
我们使用URL为127.0.0.1:8080/test/sayHi
1️⃣我们使用POST请求,可以收到响应。
2️⃣我们使用GET方法发送请求,也可以收到响应
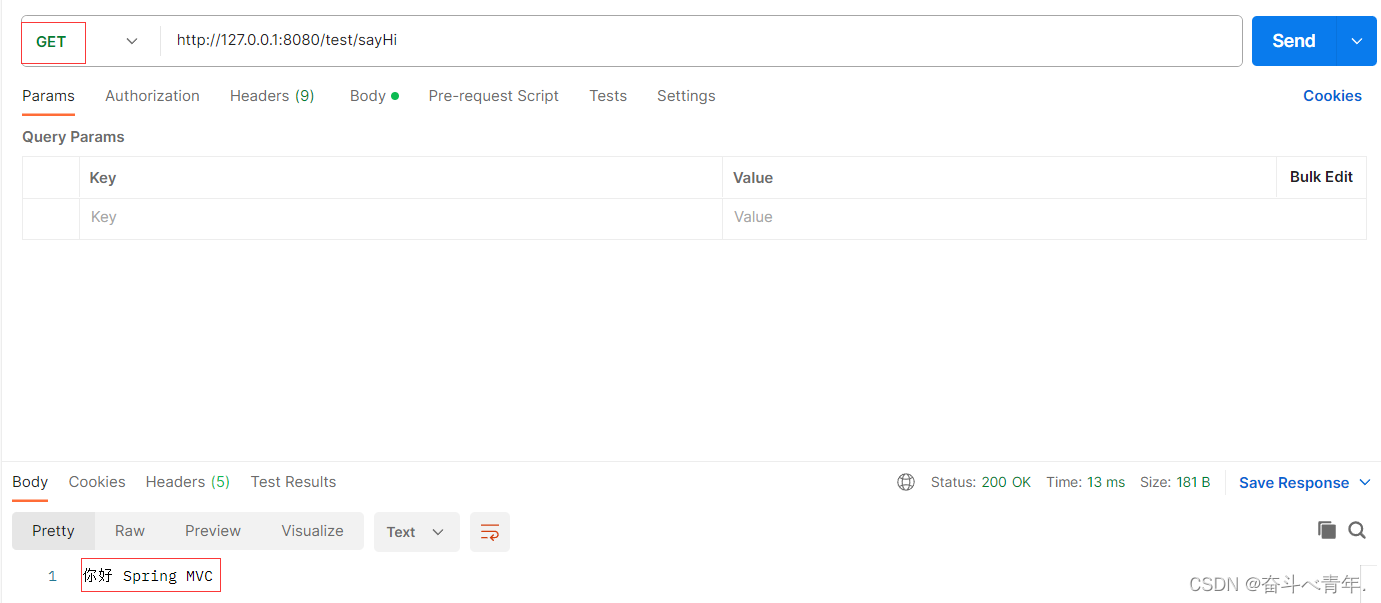
🍂当然我们可以设置@RequestMapping注解的Method属性值为RequeatMethod.POST,表示这个方法只支持POST请求
import org.springframework.web.bind.annotation.RequestMapping;
import org.springframework.web.bind.annotation.RequestMethod;
import org.springframework.web.bind.annotation.RestController;

@RestController
@RequestMapping("/test")
public class TestController {
    //当这个注解中的参数有多个的时候,就需要添加属性名称
    @RequestMapping(value = "/sayHi",method = RequestMethod.POST)
    public String sayHi(){
        return "你好 Spring MVC";
    }
}


🍂@RequestMapper支持设置多级目录
@RequestMapping("/sayHi/mvc")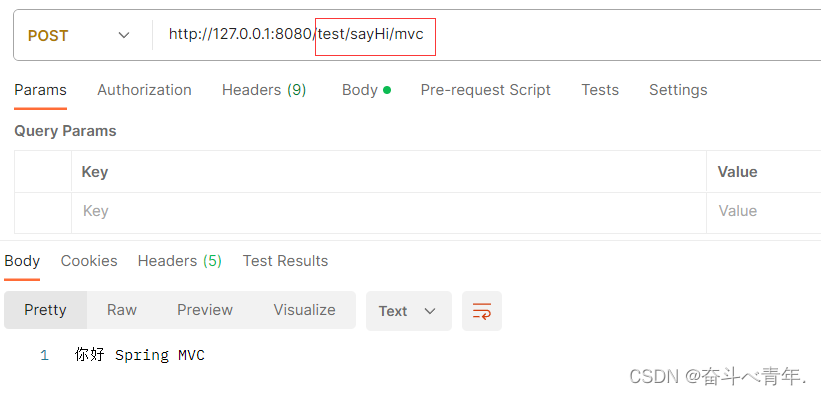
1.3、使用@GetMapping和@POSTMapping注解来实现HTTP连接
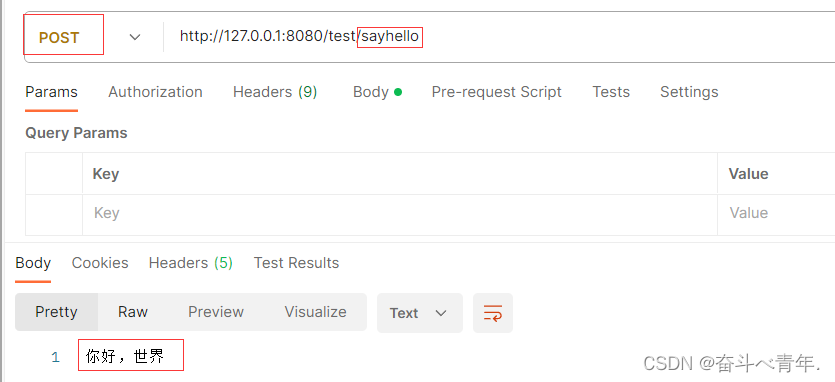
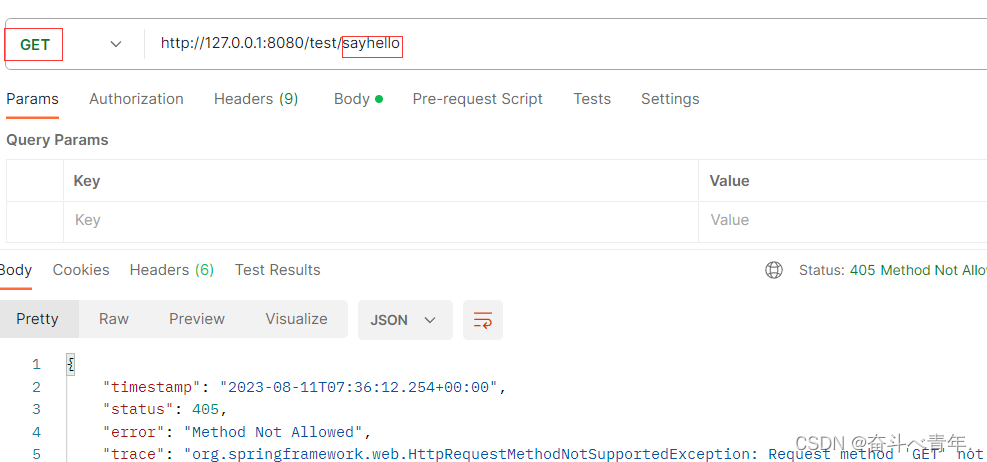
@GetMapping注解只能实现GET请求的连接,@POSTMapping注解只能实现POST请求的连接。
🍂@GetMapping注解
package com.example.demo.controller;

import org.springframework.web.bind.annotation.GetMapping;
import org.springframework.web.bind.annotation.RequestMapping;
import org.springframework.web.bind.annotation.RestController;

@RestController
@RequestMapping("/test")
public class TestController {
    @GetMapping("sayhi2")
    public String sayHi2(){
        return "你好,世界";
    }
}

🍂@PostMapping注解
package com.example.demo.controller;

import org.springframework.web.bind.annotation.PostMapping;
import org.springframework.web.bind.annotation.RequestMapping;
import org.springframework.web.bind.annotation.RestController;

@RestController
@RequestMapping("/test")
public class TestController {
    @PostMapping("sayhello")
    public String sayHi2(){
        return "你好,世界";
    }
}
三、获取参数
1、实现获取单个参数
1️⃣使用servlet的写法(getParameter)来实现获取单个参数
import org.springframework.web.bind.annotation.RequestMapping;
import org.springframework.web.bind.annotation.RestController;

import javax.servlet.http.HttpServletRequest;

@RestController
@RequestMapping("/test2")
public class TestController2 {
    @RequestMapping("/getname")
    public String getName(HttpServletRequest request){
        return "Name:"+ request.getParameter("name");
    }
}

2️⃣使用更简单的获取单个参数的方法
package com.example.demo.controller;

import org.springframework.web.bind.annotation.RequestMapping;
import org.springframework.web.bind.annotation.RestController;

@RestController
@RequestMapping("/test2")
public class TestController2 {

    @RequestMapping("/getname2")
    public String getName2(String name){
        return "Name: "+name;
    }
}

2、实现获取对象
上面获取单个参数的方式,当参数个数固定的时候可以使用,但是如果参数个数不确定,随时都需要添加参数的时候,我们这个时候可以使用获取对象的方式获取参数,前端没有对象的概念,传递的都是对象的属性,后端代码中需要创建一个(用户)类的对象,用来接收前端传过来的属性的值。
package com.example.demo.model;

import lombok.Data;

@Data
public class User {
    private int id;
    private String name;
    private String password;
    private int age;
}


package com.example.demo.controller;

import com.example.demo.model.User;
import org.springframework.web.bind.annotation.RequestMapping;
import org.springframework.web.bind.annotation.RestController;

@RestController
@RequestMapping("/user")
public class UserController {

    @RequestMapping("/add")
    public User add(User user){
        return user;
    }
}

当前端的属性和后端中类的属性对应不全的时候,如果后端没有相应的属性,那么前端的属性赋值不到后端的代码中,如果前端没有相应的后端代码中的属性,那么后端中类的属性的值就是默认值。
3、后端参数重命名(@RequestParam参数映射)
特殊情况下,前端传递的参数key和我们后端接收的key可以不一致,比如前端传递了一个n给后端,而后端使用的时name参数来接收的,这个时候就会出现参数接收不到的问题,我们可以使用@RequestParam注解来重命名前后端的参数。
import com.example.demo.model.User;
import org.springframework.web.bind.annotation.RequestMapping;
import org.springframework.web.bind.annotation.RequestParam;
import org.springframework.web.bind.annotation.RestController;

@RestController
@RequestMapping("/user")
public class UserController {
    @RequestMapping("/name")
    public String name(@RequestParam ("n") String name){
        return name;
    }
}
4、@RequestParam参数必传设置
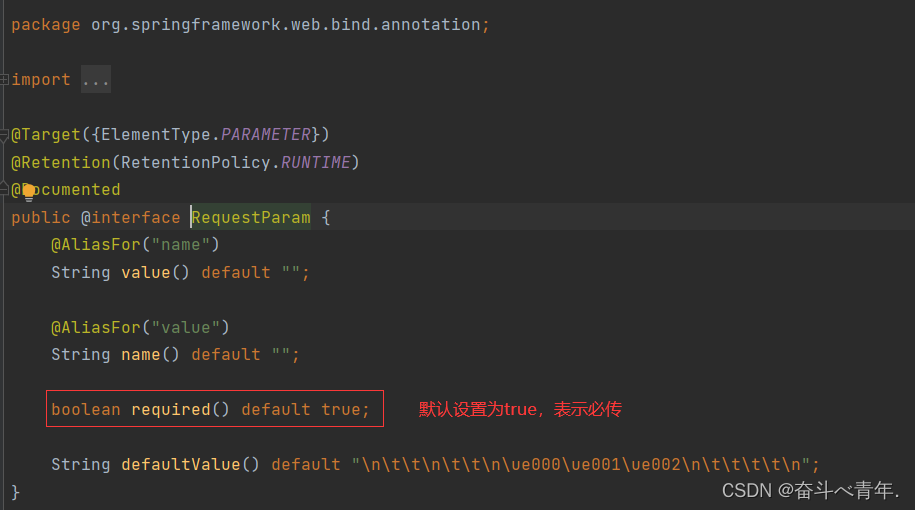
使用@RequestParam注解之后,那么这个属性就变成了必传的参数了,不传这个参数就会报错,原因是因为@RequestParam注解中有一个required属性等于true,表示这个参数为必传的,我们只需要设置这个属性为false即可解决必传的问题。

    @RequestMapping("/name")
    public String name(@RequestParam (value="n",required = false) String name){
        return name;
    }

5、接收JSON对象(@RequestBody)
这里只需要使用@RequestBody就可以拿到前端传递的JSON对象
    @RequestMapping("/add_json")
    public User addByJson(@RequestBody User user){
        return user;
    }

6、获取URL中参数(@PathVariable)
之前我们是通过URL中的查询字符串的部分获取的参数,也就是name="xxx"&id=123的部分。但是有点网站不是通过这样的方式传递参数的,就像掘金一样。访问它的有些页面时URL是这样的https://juejin.cn/user/61228381386487。他没有通过查询字符串的方式传递。
1️⃣从前端获取一个参数
    @RequestMapping("/detial/{id}")
    public Integer detail(@PathVariable("id") Integer id){
        return id;
    }
这里表示前端要传递的参数为id,所以这里需要使用一个{}将这个参数括起来
2️⃣表示从前端获取多参数
    @RequestMapping("/detial/{id}/{name}")
    public String detail(@PathVariable("id") Integer id,@PathVariable("name") String name){
        return "id: "+id+" "+"name: "+name;
    }

7、上传文件(@RequestPart)
@RequestPart用于将multiparty/form-data类型的数据映射到控制器处理方法的参数中。
    @RequestMapping("/upload")
    public String upload(@RequestPart("myfile") MultipartFile file) throws IOException {
        String path = "D:/img.png";
        file.transferTo(new File(path));
        return path;
    }
}
这里@RequestPart("file")表示从请求中获取名为"file"的文件,长传的文件将被存储在file对象中,我们可以是以哦那个file对象的方法类处理上传的文件。
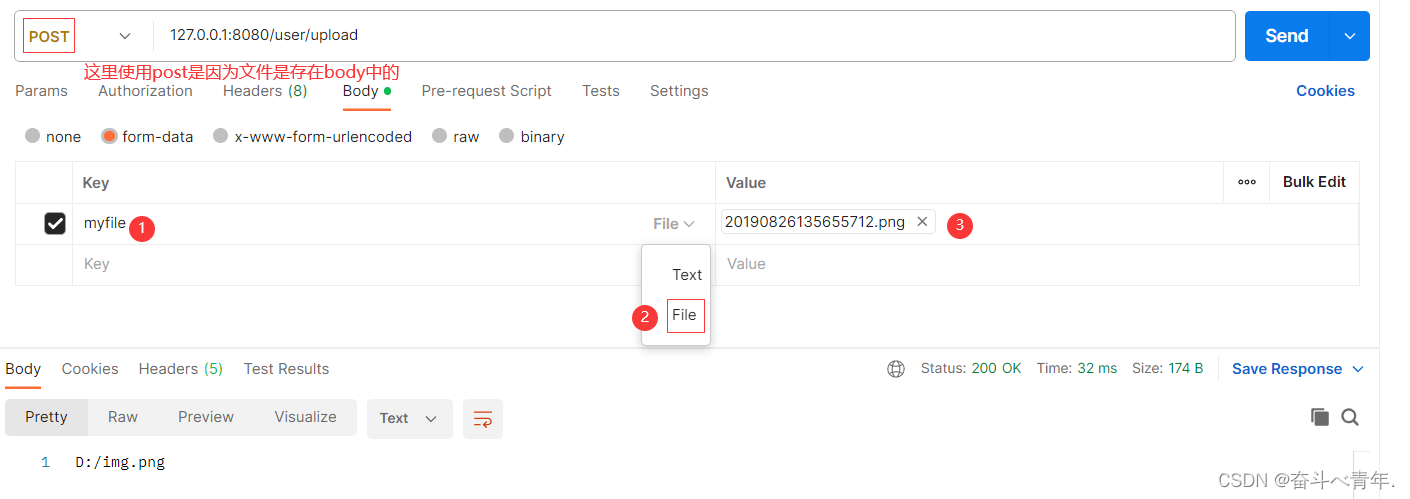
在D盘中获取到了这个图片文件,并将图片名字改为了img

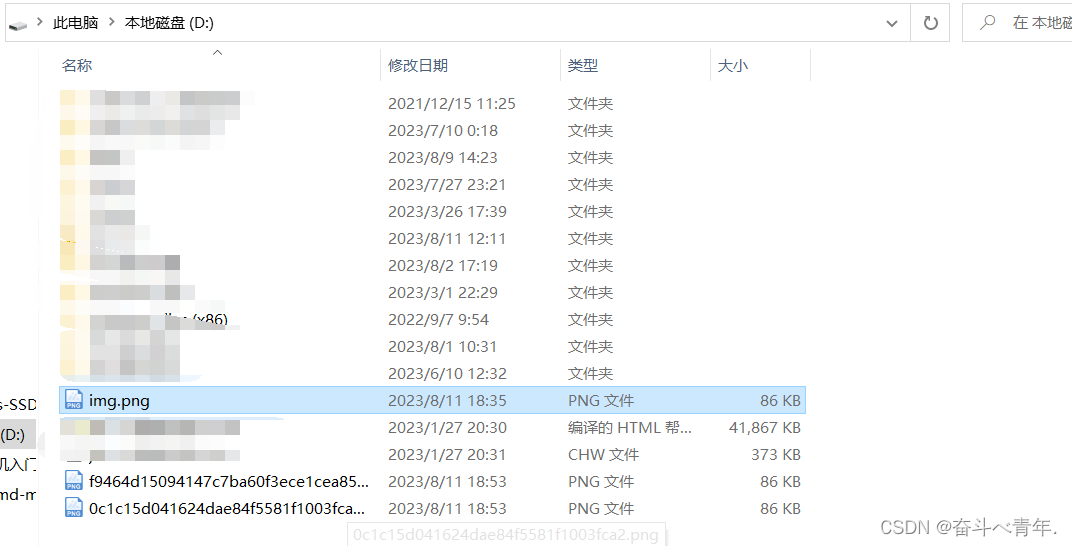
但是这样编写的后端代码存在问题,就是客户端每次访问服务器程序,服务器返回的图片名字都是一样的,那么在D盘中,后面获取的图片会将之前获取的覆盖掉,这是不完善的,如果在客户端点击上传的图片不同,最终服务器将不同的图片名字改成一样的,两张不同的照片只能保存其中一个。
✨下面我们来解决这个问题
这里将路径中的文件名通过生成一个全球唯一id得到的,文件类型是截取原文件的。
    @RequestMapping("/upload")
    public String upload(@RequestPart("myfile") MultipartFile file) throws IOException {
        //1、生成一个唯一的id(UUID就是全球唯一ID,他是由MAC地址+随机数+加密算法组成的,保证生成的id是全球唯一ID)
        String name = UUID.randomUUID().toString().replace("-","");
        //2、得到源文件的后缀名
        name += file.getOriginalFilename().
                substring(file.getOriginalFilename().lastIndexOf("."));
        String path = "D:/"+name;
        //将文件保存在path路径中
        file.transferTo(new File(path));
        return path;
    }
可以看见每次获取的文件名称都是不一样的,也不会将之前获取的文件覆盖掉。
8、获取Cookie/Session/header
通过@CookieValue获取Cookie
    @RequestMapping("/getcookie")
    public String getCookie(@CookieValue("java")String ck){
        return ck;
    }
通过@CookieValue注解类获取Session
    @RequestMapping("/getsess")
    //这里的value指的是session的名字
    public String getSess(@SessionAttribute(value="username",required = false) String username){
        return username;
    }
通过@RequestHeader获取Header
// @RequestHeader 获取 header
@RequestMapping("/header")
public String header(@RequestHeader("User-Agent") String userAgent) {
    return "User-Agent: " + userAgent;
}
四、返回数据
1、返回一个静态页面
在项目中创建一个静态的html页面。使用@Controller注解默认的是返回一个页面。

package com.example.demo.controller;

import org.springframework.stereotype.Controller;
import org.springframework.web.bind.annotation.RequestMapping;

@Controller
public class TestController3 {
    @RequestMapping("/hello")
    public String index(){
        return "hello.html";
    }

}

2、返回一个数据
使用@ResponseBody和@Controller注解搭配使用,让返回的值是一个数据,也可以使用组合注解@RestController注解
package com.example.demo.controller;

import org.springframework.stereotype.Controller;
import org.springframework.web.bind.annotation.RequestMapping;
import org.springframework.web.bind.annotation.ResponseBody;

@Controller
@ResponseBody
public class TestController3 {
    @RequestMapping("/hello")
    public String index(){
        return "hello.html";
    }
}

3、返回text/html
可以使用组合注解@RestController也可以使用@Controller和@ResponseBody搭配使用
@RestController
public class TestController3 {
    @RequestMapping("method")
    public String method(){
        return "<h1>hello,world!</h1>";
    }

4、请求转发和请求重定向
return不仅可以返回一个试图,还可以实现跳转,跳转的方式有两种:
- forward是请求转发;
- redirect是请求重定向。
// 请求重定向
@RequestMapping("/index1")
public String index1() {
    return "redirect:/index.html";
}
// 请求转发
@RequestMapping("/index2")
public String index2() {
    return "forward:/index.html";
}
✨请求重定向和请求转发的区别
- 请求转发是一种服务器行为,客户端只有一次请求,服务器接收到客户端的请求之后,会先将请求转发给目标地址,在将目标地址返回的结果转发给客户端。客户端对这一切毫无感知。这就像A找B借钱,B没有,B向C借到之后,将钱给了A,整个过程A就直借了一次钱。B向C借钱A不知道。
- 请求重定向是指服务器端接收到客户端的请求之后,会给客户端返回一个临时相应头,这个响应头中记录了,客户端需要再次发送请求(重定向)的URL地址,客户端收到地址之后,会将请求发送到新的地址上,这就是请求重定向。就像A找B借钱,B没有,但是B知道C有,B对A说C有,让A 去C哪里借,然后A去找C去借,这个过程就是请求重定向。

