pwm
pwm应用程序开发
访问 PWM 设备API
应用程序通过 RT-Thread 提供的 PWM 设备管理接口来访问 PWM 设备硬件,相关接口如下所示:
| 函数 | 描述 |
|---|---|
| rt_device_find() | 根据 PWM 设备名称查找设备获取设备句柄 |
| rt_pwm_set() | 设置 PWM 周期和脉冲宽度 |
| rt_pwm_enable() | 使能 PWM 设备 |
| rt_pwm_disable() | 关闭 PWM 设备 |
查找 PWM 设备
应用程序根据 PWM 设备名称获取设备句柄,进而可以操作 PWM 设备,查找设备函数如下所示:
rt_device_t rt_device_find(const char* name);
| 参数 | 描述 |
|---|---|
| name | 设备名称 |
| 返回 | —— |
| 设备句柄 | 查找到对应设备将返回相应的设备句柄 |
| RT_NULL | 没有找到设备 |
一般情况下,注册到系统的 PWM 设备名称为 pwm0,pwm1等,使用示例如下所示:
#define PWM_DEV_NAME        "pwm3"  /* PWM 设备名称 */
struct rt_device_pwm *pwm_dev;      /* PWM 设备句柄 */
/* 查找设备 */
pwm_dev = (struct rt_device_pwm *)rt_device_find(PWM_DEV_NAME);
设置 PWM 周期和脉冲宽度
通过如下函数设置 PWM 周期和占空比:
rt_err_t rt_pwm_set(struct rt_device_pwm *device,
                    int channel,
                    rt_uint32_t period,
                    rt_uint32_t pulse);
| 参数 | 描述 |
|---|---|
| device | PWM 设备句柄 |
| channel | PWM 通道 |
| period | PWM 周期时间 (单位纳秒 ns) |
| pulse | PWM 脉冲宽度时间 (单位纳秒 ns) |
| 返回 | —— |
| RT_EOK | 成功 |
| -RT_EIO | device 为空 |
| -RT_ENOSYS | 设备操作方法为空 |
| 其他错误码 | 执行失败 |
PWM 的通道 channel 可为正数或者负数。因为有的芯片的PWM是具有互补输出功能的,即PWM的某一个通道是可以靠两个引脚来发出一对互补的波形。当通道号为正数的时候,代表使用PWM的正常输出波形引脚;为其负数的时候,代表使用PWM的互补输出波形引脚。
使用示例如下所示:
#define PWM_DEV_CHANNEL       1     /* PWM通道的CH1引脚 */
#define PWM_DEV_CHANNEL      -1     /* PWM通道的CH1N引脚 */
PWM 的输出频率由周期时间 period 决定,例如周期时间为 0.5ms (毫秒),则 period 值为 500000ns(纳秒),输出频率为 2KHz,占空比为 pulse / period,pulse 值不能超过 period。
使用示例如下所示:
#define PWM_DEV_NAME        "pwm3"  /* PWM设备名称 */
#define PWM_DEV_CHANNEL     4       /* PWM通道 */
struct rt_device_pwm *pwm_dev;      /* PWM设备句柄 */
rt_uint32_t period, pulse;

period = 500000;    /* 周期为0.5ms,单位为纳秒ns */
pulse = 0;          /* PWM脉冲宽度值,单位为纳秒ns */
/* 查找设备 */
pwm_dev = (struct rt_device_pwm *)rt_device_find(PWM_DEV_NAME);
/* 设置PWM周期和脉冲宽度 */
rt_pwm_set(pwm_dev, PWM_DEV_CHANNEL, period, pulse);
使能 PWM 设备
设置好 PWM 周期和脉冲宽度后就可以通过如下函数使能 PWM 设备:
rt_err_t rt_pwm_enable(struct rt_device_pwm *device, int channel);
| 参数 | 描述 |
|---|---|
| device | PWM 设备句柄 |
| channel | PWM 通道 -channel代表互补通道 |
| 返回 | —— |
| RT_EOK | 设备使能成功 |
| -RT_ENOSYS | 设备操作方法为空 |
| 其他错误码 | 设备使能失败 |
[!NOTE] 注:这个函数并不会使能PWM互补输出的两个引脚,只能使能其中的某一个引脚(CHx或者CHxN)。
使用示例如下所示:
#define PWM_DEV_NAME        "pwm3"  /* PWM设备名称 */
#define PWM_DEV_CHANNEL     4       /* PWM通道 */
struct rt_device_pwm *pwm_dev;      /* PWM设备句柄 */
rt_uint32_t period, pulse;

period = 500000;    /* 周期为0.5ms,单位为纳秒ns */
pulse = 0;          /* PWM脉冲宽度值,单位为纳秒ns */
/* 查找设备 */
pwm_dev = (struct rt_device_pwm *)rt_device_find(PWM_DEV_NAME);
/* 设置PWM周期和脉冲宽度 */
rt_pwm_set(pwm_dev, PWM_DEV_CHANNEL, period, pulse);
/* 使能设备 */
rt_pwm_enable(pwm_dev, PWM_DEV_CHANNEL);
关闭 PWM 设备通道
通过如下函数关闭 PWM 设备对应通道。
rt_err_t rt_pwm_disable(struct rt_device_pwm *device, int channel);
| 参数 | 描述 |
|---|---|
| device | PWM 设备句柄 |
| channel | PWM 通道 |
| 返回 | —— |
| RT_EOK | 设备关闭成功 |
| -RT_EIO | 设备句柄为空 |
| 其他错误码 | 设备关闭失败 |
[!NOTE] 注:这个函数并不会同时失能PWM互补输出的两个引脚,只能失能其中的某一个引脚(CHx或者CHxN)。
使用示例如下所示:
#define PWM_DEV_NAME        "pwm3"  /* PWM设备名称 */
#define PWM_DEV_CHANNEL     4       /* PWM通道 */
struct rt_device_pwm *pwm_dev;      /* PWM设备句柄 */
rt_uint32_t period, pulse;

period = 500000;    /* 周期为0.5ms,单位为纳秒ns */
pulse = 0;          /* PWM脉冲宽度值,单位为纳秒ns */
/* 查找设备 */
pwm_dev = (struct rt_device_pwm *)rt_device_find(PWM_DEV_NAME);
/* 设置PWM周期和脉冲宽度 */
rt_pwm_set(pwm_dev, PWM_DEV_CHANNEL, period, pulse);
/* 使能设备 */
rt_pwm_enable(pwm_dev, PWM_DEV_CHANNEL);
/* 关闭设备通道 */
rt_pwm_disable(pwm_dev,PWM_DEV_CHANNEL);
FinSH 命令
设置 PWM 设备的某个通道的周期和占空比可使用命令pwm_set pwm1 1 500000 5000,第一个参数为命令,第二个参数为 PWM 设备名称,第 3 个参数为 PWM 通道,第 4 个参数为周期(单位纳秒),第 5 个参数为脉冲宽度(单位纳秒)。
msh />pwm_set pwm1 1 500000 5000
msh />
使能 PWM 设备的某个通道可使用命令pwm_enable pwm1 1,第一个参数为命令,第二个参数为 PWM 设备名称,第 3 个参数为 PWM 通道。
msh />pwm_enable pwm1 1
msh />
关闭 PWM 设备的某个通道可使用命令pwm_disable pwm1 1,第一个参数为命令,第二个参数为 PWM 设备名称,第 3 个参数为 PWM 通道。
msh />pwm_disable pwm1 1
msh />
PWM 设备使用示例
PWM 设备的具体使用方式可以参考如下示例代码,示例代码的主要步骤如下:
- 查找 PWM 设备获取设备句柄。
- 设置 PWM 周期和脉冲宽度。
- 使能 PWM 设备。
- while 循环里每 50 毫秒修改一次脉冲宽度。
- 将 PWM通道对应引脚和 LED 对应引脚相连,可以看到 LED 不停的由暗变到亮,然后又从亮变到暗。
/*
 * 程序清单:这是一个 PWM 设备使用例程
 * 例程导出了 pwm_led_sample 命令到控制终端
 * 命令调用格式:pwm_led_sample
 * 程序功能:通过 PWM 设备控制 LED 灯的亮度,可以看到LED不停的由暗变到亮,然后又从亮变到暗。
*/

#include <rtthread.h>
#include <rtdevice.h>

#define PWM_DEV_NAME        "pwm3"  /* PWM设备名称 */
#define PWM_DEV_CHANNEL     4       /* PWM通道 */

struct rt_device_pwm *pwm_dev;      /* PWM设备句柄 */

static int pwm_led_sample(int argc, char *argv[])
{
    rt_uint32_t period, pulse, dir;

    period = 500000;    /* 周期为0.5ms,单位为纳秒ns */
    dir = 1;            /* PWM脉冲宽度值的增减方向 */
    pulse = 0;          /* PWM脉冲宽度值,单位为纳秒ns */

    /* 查找设备 */
    pwm_dev = (struct rt_device_pwm *)rt_device_find(PWM_DEV_NAME);
    if (pwm_dev == RT_NULL)
    {
        rt_kprintf("pwm sample run failed! can't find %s device!\n", PWM_DEV_NAME);
        return RT_ERROR;
    }

    /* 设置PWM周期和脉冲宽度默认值 */
    rt_pwm_set(pwm_dev, PWM_DEV_CHANNEL, period, pulse);
    /* 使能设备 */
    rt_pwm_enable(pwm_dev, PWM_DEV_CHANNEL);

    while (1)
    {
        rt_thread_mdelay(50);
        if (dir)
        {
            pulse += 5000;      /* 从0值开始每次增加5000ns */
        }
        else
        {
            pulse -= 5000;      /* 从最大值开始每次减少5000ns */
        }
        if (pulse >= period)
        {
            dir = 0;
        }
        if (0 == pulse)
        {
            dir = 1;
        }

        /* 设置PWM周期和脉冲宽度 */
        rt_pwm_set(pwm_dev, PWM_DEV_CHANNEL, period, pulse);
    }
}
/* 导出到 msh 命令列表中 */
MSH_CMD_EXPORT(pwm_led_sample, pwm sample);
pwm驱动框架分析
-
pwm 驱动框架仅仅需要注册一个控制函数即可
-
pwm驱动根据命令的类型实现pwm控制
pwm 功能:
1.pwm 开启和关闭
2.设置pwm的周期和占空比
3.设置pwm的死区时间
4.设置pwm的相位
5.pwm互补输出相关
drv_pwm.h分析
/*
 * Copyright (c) 2006-2023, RT-Thread Development Team
 *
 * SPDX-License-Identifier: Apache-2.0
 *
 * Change Logs:
 * Date           Author       Notes
 * 2018-05-07     aozima       the first version
 * 2022-09-24     yuqi         add phase and dead time configuration
 */

#ifndef __DRV_PWM_H_INCLUDE__
#define __DRV_PWM_H_INCLUDE__

#include <rtthread.h>
//pwm 使能和关闭
#define PWM_CMD_ENABLE      (RT_DEVICE_CTRL_BASE(PWM) + 0)
#define PWM_CMD_DISABLE     (RT_DEVICE_CTRL_BASE(PWM) + 1)
//
#define PWM_CMD_SET         (RT_DEVICE_CTRL_BASE(PWM) + 2)
#define PWM_CMD_GET         (RT_DEVICE_CTRL_BASE(PWM) + 3)
//pwm互补使能和关闭
#define PWMN_CMD_ENABLE     (RT_DEVICE_CTRL_BASE(PWM) + 4)
#define PWMN_CMD_DISABLE    (RT_DEVICE_CTRL_BASE(PWM) + 5)
//设置周期和占空比
#define PWM_CMD_SET_PERIOD  (RT_DEVICE_CTRL_BASE(PWM) + 6)
#define PWM_CMD_SET_PULSE   (RT_DEVICE_CTRL_BASE(PWM) + 7)
//设置死区时间
#define PWM_CMD_SET_DEAD_TIME  (RT_DEVICE_CTRL_BASE(PWM) + 8)
//设置相位
#define PWM_CMD_SET_PHASE   (RT_DEVICE_CTRL_BASE(PWM) + 9)
//pwm 中断开启和关闭
#define PWM_CMD_ENABLE_IRQ  (RT_DEVICE_CTRL_BASE(PWM) + 10)
#define PWM_CMD_DISABLE_IRQ  (RT_DEVICE_CTRL_BASE(PWM) + 11)

struct rt_pwm_configuration
{
    rt_uint32_t channel; /* 通道 0 ~ n or 0 ~ -n, which depends on specific MCU requirements */
    rt_uint32_t period;  /* 周期 单位是 unit:ns 1ns~4.29s:1Ghz~0.23hz */
    rt_uint32_t pulse;   /* 占空比 unit:ns (pulse<=period) */
    rt_uint32_t dead_time;  /* 死区时间 unit:ns */
    rt_uint32_t phase;  /*unit:  相位 degree, 0~360, which is the phase of pwm output, */
    /*
     * RT_TRUE  : The channel of pwm is complememtary.
     * RT_FALSE : The channel of pwm is nomal.
    */
    rt_bool_t  complementary;//互补输出使能
};

struct rt_device_pwm;
/*
	cmd 命令类型
	arg 参数
*/
struct rt_pwm_ops
{
    rt_err_t (*control)(struct rt_device_pwm *device, int cmd, void *arg);
};
//pwm 驱动抽象模型
struct rt_device_pwm
{
    struct rt_device parent;
    const struct rt_pwm_ops *ops;
};


//pwm驱动注册函数
rt_err_t rt_device_pwm_register(struct rt_device_pwm *device, const char *name, const struct rt_pwm_ops *ops, const void *user_data);


/*
	pwm 功能:
	1.pwm 开启和关闭
	2.设置pwm的周期和占空比
	3.设置pwm的死区时间
	4.设置pwm的相位
*/

rt_err_t rt_pwm_enable(struct rt_device_pwm *device, int channel);
rt_err_t rt_pwm_disable(struct rt_device_pwm *device, int channel);
rt_err_t rt_pwm_set(struct rt_device_pwm *device, int channel, rt_uint32_t period, rt_uint32_t pulse);
rt_err_t rt_pwm_set_period(struct rt_device_pwm *device, int channel, rt_uint32_t period);
rt_err_t rt_pwm_set_pulse(struct rt_device_pwm *device, int channel, rt_uint32_t pulse);
rt_err_t rt_pwm_set_dead_time(struct rt_device_pwm *device, int channel, rt_uint32_t dead_time);
rt_err_t rt_pwm_set_phase(struct rt_device_pwm *device, int channel, rt_uint32_t phase);

#endif /* __DRV_PWM_H_INCLUDE__ */
pwm 函数调用流程
函数的调用流程就是从上到下的调用

编写pwm驱动
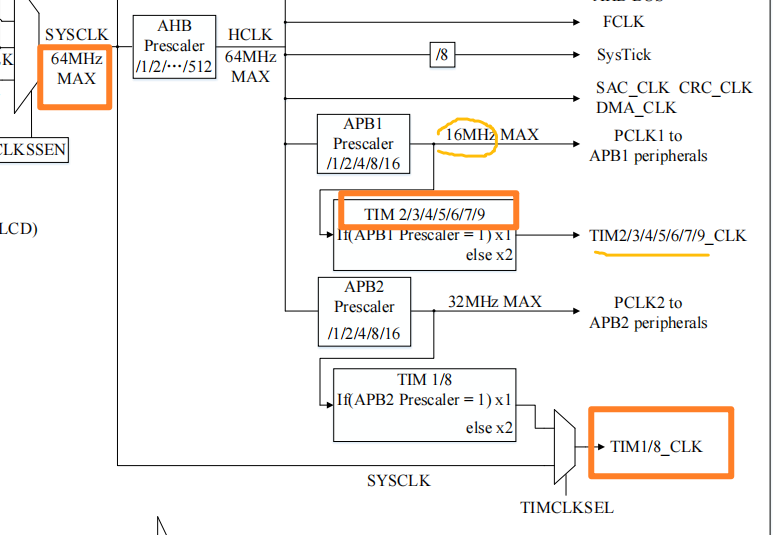
时钟
KCONFIG 配置
board 文件夹下的 KCONFIG 配置
menuconfig BSP_USING_PWM
        bool "Enable PWM BUS"
        default n
        select RT_USING_PWM
        if BSP_USING_PWM
            config BSP_USING_PWM1
                bool "Enable PWM1 BUS"
                default n

            config BSP_USING_PWM2
                bool "Enable PWM2 BUS"
                default n
			config BSP_USING_PWM3
                bool "Enable PWM3 BUS"
                default n
        endif
修改完成以后menuconfig出现pwm配置选项

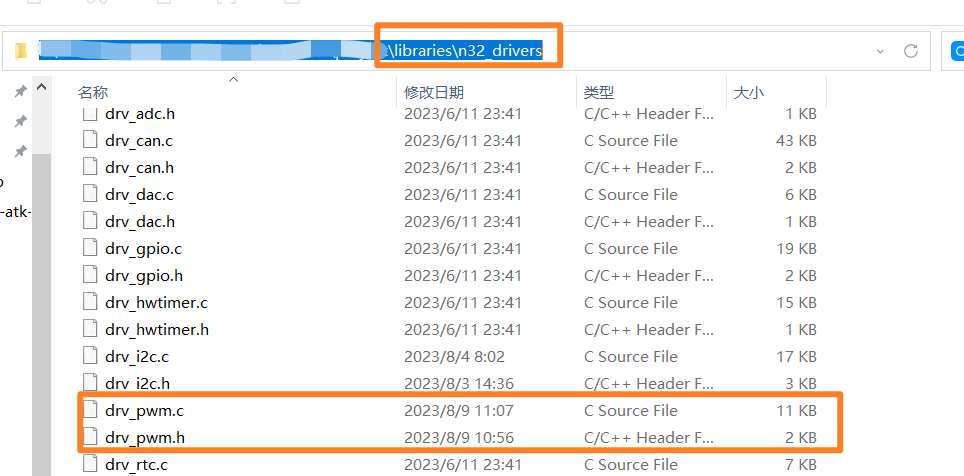
添加drv_pwm.c 和drv_pwm.h
这2个文件参考自stm32的pwm驱动函数
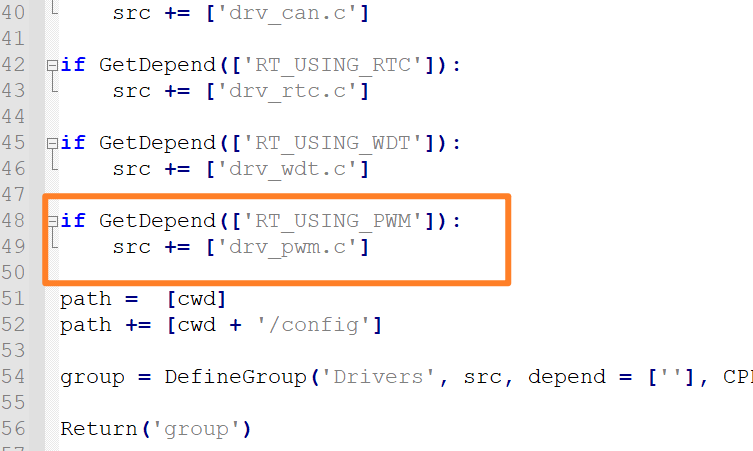
修改libraries\n32_drivers\SConscript文件增加drv_pwm.c的编译
if GetDepend(['RT_USING_PWM']):
    src += ['drv_pwm.c']
自己实现pwm驱动
由于N32L406系列官方的bsp没得陪我们驱动,我就自己实现一个
drv_pwm.h
这个主要是一个配置文件,配置每个pwm通道的变量
/*
 * Copyright (c) 2006-2022, RT-Thread Development Team
 *
 * SPDX-License-Identifier: Apache-2.0
 *
 * Change Logs:
 * Date           Author       Notes
 * 2022-10-19     Nations      first version
 */

#ifndef __DRV_PWM_H__
#define __DRV_PWM_H__

#include <rthw.h>
#include <rtthread.h>
#include "board.h"

#ifdef __cplusplus
extern "C" {
#endif

#ifdef BSP_USING_PWM1
#define PWM1_CONFIG\
			{\
				.tim					=TIM9,\
				.channel				=0,\
				.gpio_grp				=GPIOB,\
				.pin					=GPIO_PIN_12,\
				.prescaler				=32-1,			\
				.gpio_af				=GPIO_AF1_TIM9,	\
				.name					="pwm0",\
			}
#endif

#ifdef BSP_USING_PWM2
#define PWM2_CONFIG                     \
			{							\
		.tim					=TIM9,	\
		.channel				=1, 	\
		.gpio_grp				=GPIOB, \
		.pin					=GPIO_PIN_13,	\
		.prescaler				=32-1,			\
		.gpio_af				=GPIO_AF1_TIM9,	\
		.name					="pwm1",		\
			}
#endif /* BSP_USING_PWM2 */

#ifdef BSP_USING_PWM3
#define PWM2_CONFIG                     \
			{							\
		.tim					=TIM9,	\
		.channel				=2, 	\
		.gpio_grp				=GPIOB, \
		.pin					=GPIO_PIN_14,	\
		.prescaler				=32-1,			\
		.gpio_af				=GPIO_AF1_TIM9,	\
		.name					="pwm2",		\
			}
#endif /* BSP_USING_PWM3 */

#ifdef __cplusplus
}
#endif

#endif /* __DRV_PWM_H__ */
drv_pwm.c
/*
 * Copyright (c) 2006-2023, RT-Thread Development Team
 *
 * SPDX-License-Identifier: Apache-2.0
 *
 * Change Logs:
 * Date           Author       Notes
 * 2018-12-13     zylx         first version
 * 2021-01-23     thread-liu   Fix the timer clock frequency doubling problem
 */

#include <board.h>
#include <rtconfig.h>
#include <rtconfig.h>

#include <drivers/rt_drv_pwm.h>
#include <drv_pwm.h>
#include "n32l40x_tim.h"
#include "n32l40x_rcc.h"

#ifdef BSP_USING_PWM
#ifdef PWM_DEBUG
#define LOG_E rt_kprintf
#define LOG_D LOG_E
#else
int printf_log(const char * fmt,...) {;}
#define LOG_E printf_log
#define LOG_D LOG_E

#endif

struct n32_pwm
{
    struct rt_device_pwm pwm_device;//设备驱动框架的pwm对象
    TIM_Module *tim;//定时器指针
    rt_uint16_t channel;//定时器通道
    GPIO_Module* gpio_grp;//pwm 使用的gpio分组
    uint16_t pin;//pwm 使用的gpio pin
    uint16_t prescaler; //定时器预分频系数
    uint8_t gpio_af;//引脚复用功能
    char *name;//pwm名字也是驱动的名字

};

static struct n32_pwm n32_pwm_obj[] =
{
#ifdef BSP_USING_PWM1
    PWM1_CONFIG,
#endif

#ifdef BSP_USING_PWM2
    PWM2_CONFIG,
#endif

#ifdef BSP_USING_PWM3
    PWM3_CONFIG,
#endif

#ifdef BSP_USING_PWM4
    PWM4_CONFIG,
#endif

#ifdef BSP_USING_PWM5
    PWM5_CONFIG,
#endif

#ifdef BSP_USING_PWM6
    PWM6_CONFIG,
#endif

#ifdef BSP_USING_PWM7
    PWM7_CONFIG,
#endif

#ifdef BSP_USING_PWM8
    PWM8_CONFIG,
#endif

#ifdef BSP_USING_PWM9
    PWM9_CONFIG,
#endif

#ifdef BSP_USING_PWM10
    PWM10_CONFIG,
#endif

#ifdef BSP_USING_PWM11
    PWM11_CONFIG,
#endif

#ifdef BSP_USING_PWM12
    PWM12_CONFIG,
#endif

#ifdef BSP_USING_PWM13
    PWM13_CONFIG,
#endif

#ifdef BSP_USING_PWM14
    PWM14_CONFIG,
#endif

#ifdef BSP_USING_PWM15
    PWM15_CONFIG,
#endif

#ifdef BSP_USING_PWM16
    PWM16_CONFIG,
#endif

#ifdef BSP_USING_PWM17
    PWM17_CONFIG,
#endif
};

static rt_uint64_t tim_clock_get(TIM_Module *htim)
{

    RCC_ClocksType RCC_Clocks;

    RCC_GetClocksFreqValue(&RCC_Clocks);

    LOG_D("%s %d \r\n",__FUNCTION__,__LINE__);
    if(htim==TIM1||htim==TIM8)
    {
        return RCC_Clocks.Pclk2Freq;
    }
    else
    {
        return RCC_Clocks.Pclk1Freq;
    }
    return 0;
}


//输出使能控制
static rt_err_t drv_pwm_enable(TIM_Module *time, struct rt_pwm_configuration *configuration, rt_bool_t enable)
{
    /* Converts the channel number to the channel number of Hal library */
    LOG_D("%s %d ch = %d \r\n",__FUNCTION__,__LINE__,configuration->channel);
    int x=0;

    if(enable)
    {
        x= (0x01<<(4*configuration->channel));
        time->CCEN |=(0x01<<(4*configuration->channel));
    }
    else
    {
        x= ~(0x01<<(4*configuration->channel));
        time->CCEN &= ~(0x01<<(4*configuration->channel));
    }

    LOG_D("%s %d CCEN = %x x = %x\r\n",__FUNCTION__,__LINE__,time->CCEN,x);
    return RT_EOK;
}
//互补输出使能控制
static rt_err_t drv_pwmn_enable(TIM_Module *time, struct rt_pwm_configuration *configuration, rt_bool_t enable)
{
    /* Converts the channel number to the channel number of Hal library */
    (void)enable;
    LOG_D("%s %d ch=%d\r\n",__FUNCTION__,__LINE__,configuration->channel);
    if(TIM1==time || TIM8==time)
    {
        if(enable)
        {
            time->CCEN |=(0x02<<(4*configuration->channel));
        }
        else
        {
            time->CCEN &= !(0x02<<(4*configuration->channel));
        }
    }

    return RT_EOK;
}
static rt_err_t drv_pwm_get(TIM_Module *htim, struct rt_pwm_configuration *configuration)
{

    LOG_D("%s %d \r\n",__FUNCTION__,__LINE__);
    configuration->period = TIM_GetAutoReload(htim);
    switch(configuration->channel)
    {
    case 0:
        configuration->pulse =TIM_GetCap1(htim);
        break;
    case 1:
        configuration->pulse =TIM_GetCap2(htim);
        break;
    case 2:
        configuration->pulse =TIM_GetCap3(htim);
        break;
    case 3:
        configuration->pulse =TIM_GetCap4(htim);
        break;
    default:
        configuration->pulse =0;
        break;


    }

    return RT_EOK;
}

static rt_err_t drv_pwm_set(TIM_Module *htim, struct rt_pwm_configuration *configuration)
{

    LOG_D("%s %d ch=%d\r\n",__FUNCTION__,__LINE__,configuration->channel);
    TIM_SetAutoReload(htim,configuration->period);
    switch(configuration->channel)
    {
    case 0:
        TIM_SetCmp1(htim,configuration->pulse);
        break;
    case 1:
        TIM_SetCmp2(htim,configuration->pulse);
        break;
    case 2:
        TIM_SetCmp3(htim,configuration->pulse);
        break;
    case 3:
        TIM_SetCmp4(htim,configuration->pulse);
        break;
    default:
        configuration->pulse =0;
        break;


    }
    return RT_EOK;
}

static rt_err_t drv_pwm_set_period(TIM_Module *htim, struct rt_pwm_configuration *configuration)
{
    LOG_D("%s %d \r\n",__FUNCTION__,__LINE__);
    TIM_SetAutoReload(htim,configuration->period);

    return RT_EOK;
}

static rt_err_t drv_pwm_set_pulse(TIM_Module *htim, struct rt_pwm_configuration *configuration)
{
    //	LOG_D("%s %d \r\n",__FUNCTION__,__LINE__);
    switch(configuration->channel)
    {
    case 0:
        TIM_SetCmp1(htim,configuration->pulse);
        LOG_D("%s %d TIM_SetCmp1 \r\n",__FUNCTION__,__LINE__);
        break;
    case 1:
        TIM_SetCmp2(htim,configuration->pulse);
        break;
    case 2:
        TIM_SetCmp3(htim,configuration->pulse);
        break;
    case 3:
        TIM_SetCmp4(htim,configuration->pulse);
        break;
    default:
        configuration->pulse =0;
        break;


    }


    return RT_EOK;
}

static rt_err_t drv_pwm_control(struct rt_device_pwm *device, int cmd, void *arg)
{
    struct rt_pwm_configuration *configuration = (struct rt_pwm_configuration *)arg;
    struct n32_pwm *pwm = (struct n32_pwm  *)device->parent.user_data;
    LOG_D("%s %d cmd = %d\r\n",__FUNCTION__,__LINE__,cmd);
    switch (cmd)
    {
    case PWM_CMD_ENABLE:
        return drv_pwm_enable(pwm->tim, configuration, RT_TRUE);
    case PWM_CMD_DISABLE:
        return drv_pwm_enable(pwm->tim, configuration, RT_FALSE);
    case PWM_CMD_SET:
        return drv_pwm_set(pwm->tim, configuration);
    case PWM_CMD_SET_PERIOD:
        return drv_pwm_set_period(pwm->tim, configuration);
    case PWM_CMD_SET_PULSE:
        return drv_pwm_set_pulse(pwm->tim, configuration);
    case PWM_CMD_GET:
        return drv_pwm_get(pwm->tim, configuration);
    default:
        return -RT_EINVAL;
    }
}
/**
 * @brief  配置时钟
 */
static void pwm_time_rcc_config(TIM_Module *htim,GPIO_Module *gpio_grp)
{
    LOG_D("%s %d \r\n",__FUNCTION__,__LINE__);
    if(TIM1==htim)
    {
        RCC_EnableAPB2PeriphClk(RCC_APB2_PERIPH_TIM1, ENABLE);
    }
    else if(TIM2==htim)
    {
        RCC_EnableAPB1PeriphClk(RCC_APB1_PERIPH_TIM2, ENABLE);
    }
    else if(TIM3==htim)
    {
        RCC_EnableAPB1PeriphClk(RCC_APB1_PERIPH_TIM3, ENABLE);
    }
    else if(TIM4==htim)
    {
        RCC_EnableAPB1PeriphClk(RCC_APB1_PERIPH_TIM4, ENABLE);
    }
    else if(TIM5==htim)
    {
        RCC_EnableAPB1PeriphClk(RCC_APB1_PERIPH_TIM5, ENABLE);
    }
    else if(TIM6==htim)
    {
        RCC_EnableAPB1PeriphClk(RCC_APB1_PERIPH_TIM6, ENABLE);
    }
    else if(TIM7==htim)
    {
        RCC_EnableAPB1PeriphClk(RCC_APB1_PERIPH_TIM7, ENABLE);
    }
    else if(TIM8==htim)
    {
        RCC_EnableAPB2PeriphClk(RCC_APB2_PERIPH_TIM8, ENABLE);
    }
    else if(TIM9==htim)
    {
        RCC_EnableAPB1PeriphClk(RCC_APB1_PERIPH_TIM9, ENABLE);
        LOG_D("%s %d RCC_EnableAPB1PeriphClk TIM9 \r\n",__FUNCTION__,__LINE__);
    }

    if(GPIOA==gpio_grp)
    {
        RCC_EnableAPB2PeriphClk(RCC_APB2_PERIPH_GPIOA, ENABLE);
    }
    else if(GPIOB==gpio_grp)
    {
        RCC_EnableAPB2PeriphClk(RCC_APB2_PERIPH_GPIOB, ENABLE);
        LOG_D("%s %d RCC_EnableAPB2PeriphClk GPIOB \r\n",__FUNCTION__,__LINE__);
    }
    else if(GPIOC==gpio_grp)
    {
        RCC_EnableAPB2PeriphClk(RCC_APB2_PERIPH_GPIOC, ENABLE);
    }
    else if(GPIOD==gpio_grp)
    {
        RCC_EnableAPB2PeriphClk(RCC_APB2_PERIPH_GPIOD, ENABLE);
    }

}


/**
 * @brief  配置pwm输出对应的gpio引脚
 */
static void pwm_time_gpio_config(struct n32_pwm *htim)

{
    LOG_D("%s %d \r\n",__FUNCTION__,__LINE__);
    GPIO_InitType GPIO_InitStructure;
    GPIO_InitStruct(&GPIO_InitStructure);
    GPIO_InitStructure.Pin        = htim->pin;
    GPIO_InitStructure.GPIO_Mode  = GPIO_Mode_AF_PP;
    GPIO_InitStructure.GPIO_Current = GPIO_DC_4mA;
    GPIO_InitStructure.GPIO_Alternate = htim->gpio_af;
    GPIO_InitPeripheral(htim->gpio_grp, &GPIO_InitStructure);
}


static rt_err_t n32_hw_pwm_init(struct n32_pwm *device)
{
    LOG_D("%s %d \r\n",__FUNCTION__,__LINE__);
    rt_err_t result = RT_EOK;
    TIM_TimeBaseInitType TIM_TimeBaseStructure;
    OCInitType TIM_OCInitStructure;

    RT_ASSERT(device != RT_NULL);

    pwm_time_rcc_config(device->tim,device->gpio_grp);
    pwm_time_gpio_config(device);

    TIM_TimeBaseStructure.Period	= 100;
    TIM_TimeBaseStructure.Prescaler = device->prescaler;
    TIM_TimeBaseStructure.ClkDiv    = 0;
    TIM_TimeBaseStructure.CntMode   = TIM_CNT_MODE_UP;

    TIM_InitTimeBase(device->tim, &TIM_TimeBaseStructure);


    /* PWM1 Mode configuration: Channel1 */
    TIM_OCInitStructure.OcMode      = TIM_OCMODE_PWM1;
    TIM_OCInitStructure.OutputState = TIM_OUTPUT_STATE_ENABLE;
    TIM_OCInitStructure.Pulse       = 0;
    TIM_OCInitStructure.OcPolarity  = TIM_OC_POLARITY_LOW;

    switch(device->channel)
    {
    case 0:
        TIM_InitOc1(device->tim, &TIM_OCInitStructure);
        TIM_ConfigOc1Preload(device->tim, TIM_OC_PRE_LOAD_ENABLE);
        LOG_D("%s %d PWM CH0 CFG\r\n",__FUNCTION__,__LINE__);
        break;
    case 1:
        TIM_InitOc2(device->tim, &TIM_OCInitStructure);
        TIM_ConfigOc2Preload(device->tim, TIM_OC_PRE_LOAD_ENABLE);
        break;
    case 2:
        TIM_InitOc3(device->tim, &TIM_OCInitStructure);
        TIM_ConfigOc3Preload(device->tim, TIM_OC_PRE_LOAD_ENABLE);
        break;
    case 3:
        TIM_InitOc4(device->tim, &TIM_OCInitStructure);
        TIM_ConfigOc4Preload(device->tim, TIM_OC_PRE_LOAD_ENABLE);
        break;
    default:

        break;


    }


    TIM_ConfigArPreload(device->tim, ENABLE);
    TIM_Enable(device->tim, ENABLE);

    if(	device->tim == TIM1 || device->tim== TIM8 )
    {

        TIM_EnableCtrlPwmOutputs(device->tim, ENABLE);
    }

    LOG_D("%s 32_pwm_init", device->name);

    return result;
}

static rt_err_t drv_pwm_control(struct rt_device_pwm *device, int cmd, void *arg);
static struct rt_pwm_ops drv_ops =
{
    drv_pwm_control
};

static int n32_pwm_init(void)
{
    int i = 0;
    int result = RT_EOK;


    for (i = 0; i < sizeof(n32_pwm_obj) / sizeof(n32_pwm_obj[0]); i++)
    {
        /* pwm init */
        if (n32_hw_pwm_init(&n32_pwm_obj[i]) != RT_EOK)
        {
            LOG_E("%s init failed", n32_pwm_obj[i].name);
            result = -RT_ERROR;
            goto __exit;
        }
        else
        {
            LOG_D("%s init success", n32_pwm_obj[i].name);

            /* register pwm device */
            if (rt_device_pwm_register(&n32_pwm_obj[i].pwm_device, n32_pwm_obj[i].name, &drv_ops, n32_pwm_obj+i) == RT_EOK)
            {
                LOG_D("%s register success", n32_pwm_obj[i].name);
            }
            else
            {
                LOG_E("%s register failed", n32_pwm_obj[i].name);
                result = -RT_ERROR;
            }
        }
    }

__exit:
    return result;
}
INIT_DEVICE_EXPORT(n32_pwm_init);

#endif /* BSP_USING_PWM */
pwm 驱动测试
pwm驱动框架提供了pwm测试函数
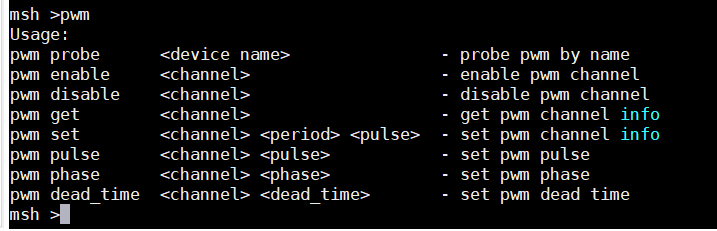
pwm官方的框架测试函数代码
#ifdef RT_USING_FINSH
#include <stdlib.h>
#include <string.h>
#include <finsh.h>

static int pwm(int argc, char **argv)
{
    rt_err_t result = -RT_ERROR;
    char *result_str;
    static struct rt_device_pwm *pwm_device = RT_NULL;
    struct rt_pwm_configuration cfg = {0};

    if(argc > 1)
    {
        if(!strcmp(argv[1], "probe"))
        {
            if(argc == 3)
            {
                pwm_device = (struct rt_device_pwm *)rt_device_find(argv[2]);
                result_str = (pwm_device == RT_NULL) ? "failure" : "success";
                rt_kprintf("probe %s %s\n", argv[2], result_str);
            }
            else
            {
                rt_kprintf("pwm probe <device name>                  - probe pwm by name\n");
            }
        }
        else
        {
            if(pwm_device == RT_NULL)
            {
                rt_kprintf("Please using 'pwm probe <device name>' first.\n");
                return -RT_ERROR;
            }
            if(!strcmp(argv[1], "enable"))
            {
                if(argc == 3)
                {
                    result = rt_pwm_enable(pwm_device, atoi(argv[2]));
                    result_str = (result == RT_EOK) ? "success" : "failure";
                    rt_kprintf("%s channel %d is enabled %s \n", pwm_device->parent.parent.name, atoi(argv[2]), result_str);
                }
                else
                {
                    rt_kprintf("pwm enable <channel>                     - enable pwm channel\n");
                    rt_kprintf("    e.g. MSH >pwm enable  1              - PWM_CH1  nomal\n");
                    rt_kprintf("    e.g. MSH >pwm enable -1              - PWM_CH1N complememtary\n");
                }
            }
            else if(!strcmp(argv[1], "disable"))
            {
                if(argc == 3)
                {
                    result = rt_pwm_disable(pwm_device, atoi(argv[2]));
                }
                else
                {
                    rt_kprintf("pwm disable <channel>                    - disable pwm channel\n");
                }
            }
            else if(!strcmp(argv[1], "get"))
            {
                cfg.channel = atoi(argv[2]);
                result = rt_pwm_get(pwm_device, &cfg);
                if(result == RT_EOK)
                {
                    rt_kprintf("Info of device [%s] channel [%d]:\n",pwm_device, atoi(argv[2]));
                    rt_kprintf("period      : %d\n", cfg.period);
                    rt_kprintf("pulse       : %d\n", cfg.pulse);
                    rt_kprintf("Duty cycle  : %d%%\n",(int)(((double)(cfg.pulse)/(cfg.period)) * 100));
                }
                else
                {
                    rt_kprintf("Get info of device: [%s] error.\n", pwm_device);
                }
            }
            else if (!strcmp(argv[1], "set"))
            {
                if(argc == 5)
                {
                    result = rt_pwm_set(pwm_device, atoi(argv[2]), atoi(argv[3]), atoi(argv[4]));
                    rt_kprintf("pwm info set on %s at channel %d\n",pwm_device,(rt_base_t)atoi(argv[2]));
                }
                else
                {
                    rt_kprintf("Set info of device: [%s] error\n", pwm_device);
                    rt_kprintf("Usage: pwm set <channel> <period> <pulse>\n");
                }
            }
            else if(!strcmp(argv[1], "phase"))
            {
                if(argc == 4)
                {
                    result = rt_pwm_set_phase(pwm_device, atoi(argv[2]),atoi(argv[3]));
                    result_str = (result == RT_EOK) ? "success" : "failure";
                    rt_kprintf("%s phase is set %d \n", pwm_device->parent.parent.name, (rt_base_t)atoi(argv[3]));
                }
            }
			else if(!strcmp(argv[1], "pulse"))
            {
                if(argc == 4)
                {
                    result = rt_pwm_set_pulse(pwm_device, atoi(argv[2]),atoi(argv[3]));
                    result_str = (result == RT_EOK) ? "success" : "failure";
                    rt_kprintf("%s pulse is set %d \n", pwm_device->parent.parent.name, (rt_base_t)atoi(argv[3]));
                }
            }
            else if(!strcmp(argv[1], "dead_time"))
            {
                if(argc == 4)
                {
                    result = rt_pwm_set_dead_time(pwm_device, atoi(argv[2]),atoi(argv[3]));
                    result_str = (result == RT_EOK) ? "success" : "failure";
                    rt_kprintf("%s dead_time is set %d \n", pwm_device->parent.parent.name, (rt_base_t)atoi(argv[3]));
                }
            }
            else
            {
                rt_kprintf("Usage: \n");
                rt_kprintf("pwm probe      <device name>                - probe pwm by name\n");
                rt_kprintf("pwm enable     <channel>                    - enable pwm channel\n");
                rt_kprintf("pwm disable    <channel>                    - disable pwm channel\n");
                rt_kprintf("pwm get        <channel>                    - get pwm channel info\n");
                rt_kprintf("pwm set        <channel> <period> <pulse>   - set pwm channel info\n");
				rt_kprintf("pwm pulse      <channel> <pulse>            - set pwm pulse\n");
                rt_kprintf("pwm phase      <channel> <phase>            - set pwm phase\n");
                rt_kprintf("pwm dead_time  <channel> <dead_time>        - set pwm dead time\n");
                result = -RT_ERROR;
            }
        }
    }
    else
    {
        rt_kprintf("Usage: \n");
        rt_kprintf("pwm probe      <device name>               - probe pwm by name\n");
        rt_kprintf("pwm enable     <channel>                   - enable pwm channel\n");
        rt_kprintf("pwm disable    <channel>                   - disable pwm channel\n");
        rt_kprintf("pwm get        <channel>                   - get pwm channel info\n");
        rt_kprintf("pwm set        <channel> <period> <pulse>  - set pwm channel info\n");
		rt_kprintf("pwm pulse      <channel> <pulse>           - set pwm pulse\n");
        rt_kprintf("pwm phase      <channel> <phase>           - set pwm phase\n");
        rt_kprintf("pwm dead_time  <channel> <dead_time>       - set pwm dead time\n");
        result = -RT_ERROR;
    }

    return RT_EOK;
}
MSH_CMD_EXPORT(pwm, pwm [option]);