成果展示
颜色记忆游戏机 | Arduino DIY
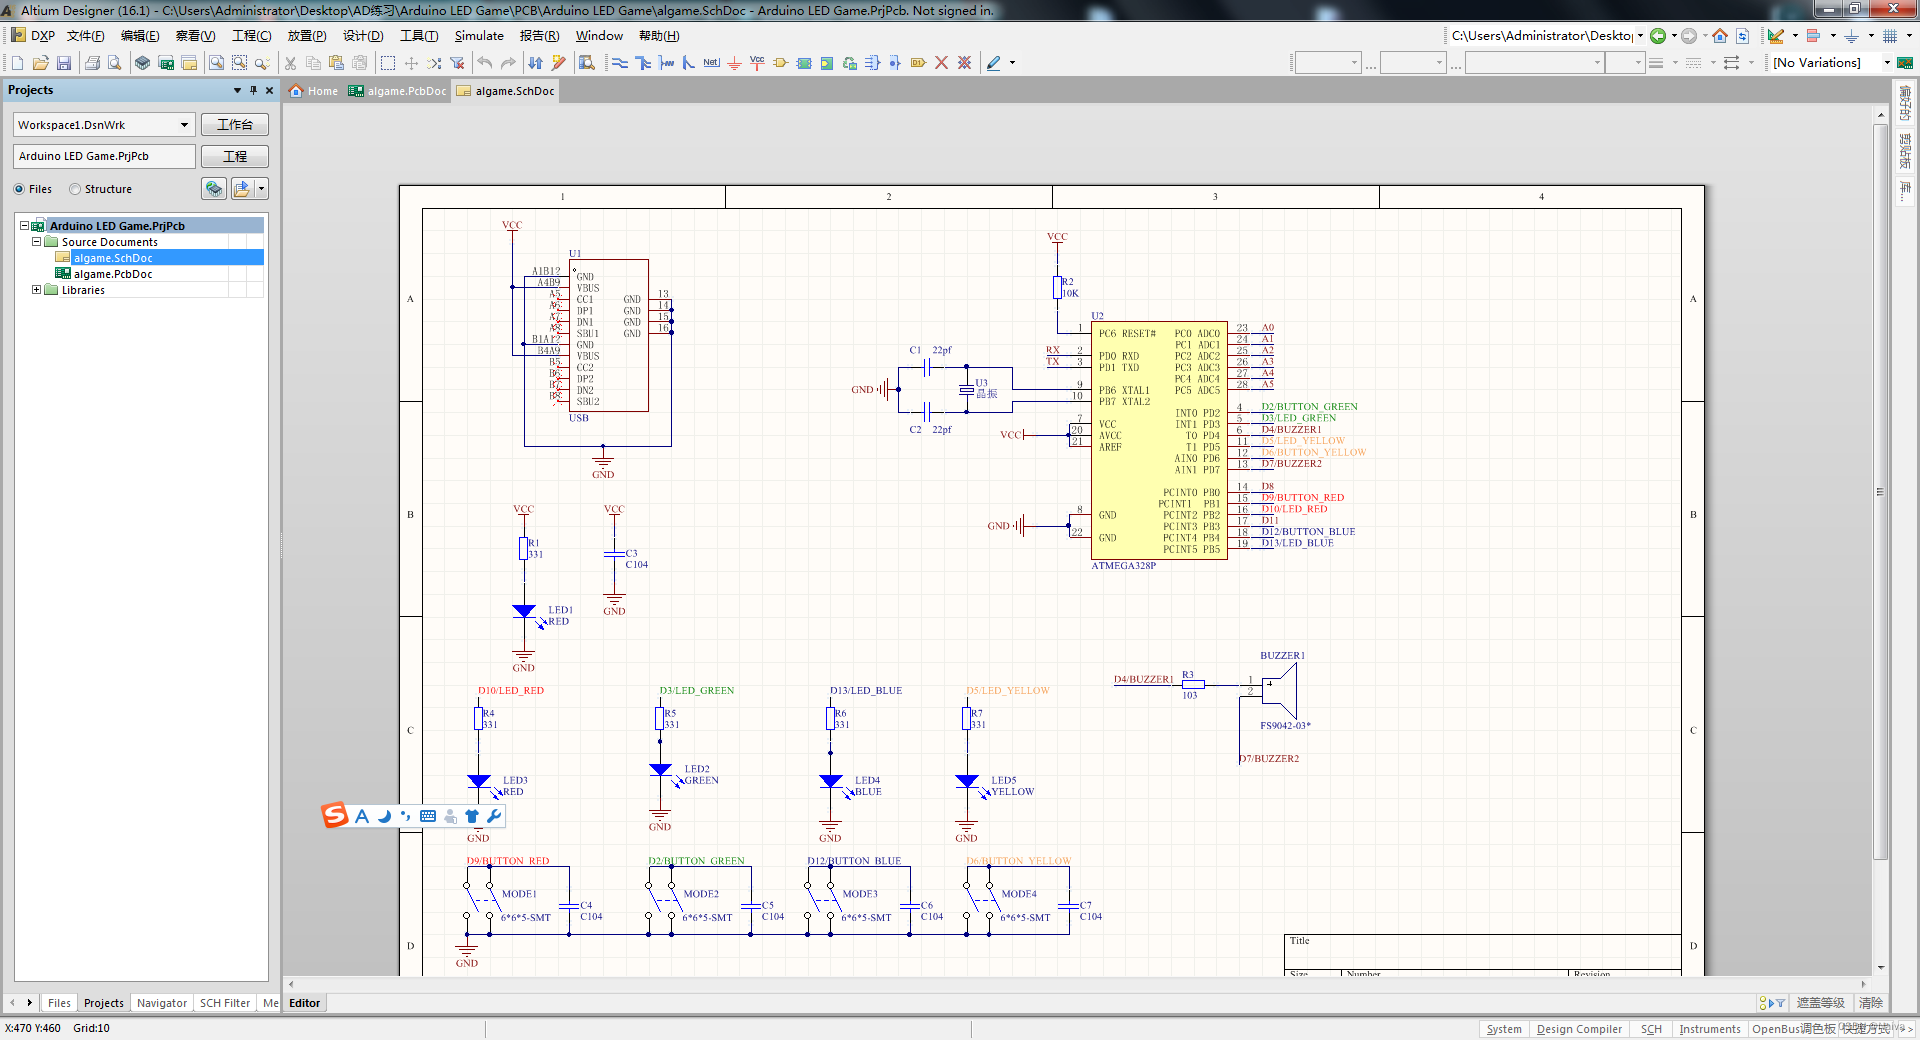
1. 线路链连接

1.1 原理图
1.2 PCB

免费PCB打样
Arduino LED Memory Game 颜色记忆机资料下载
1.3 烧录 Bootloader

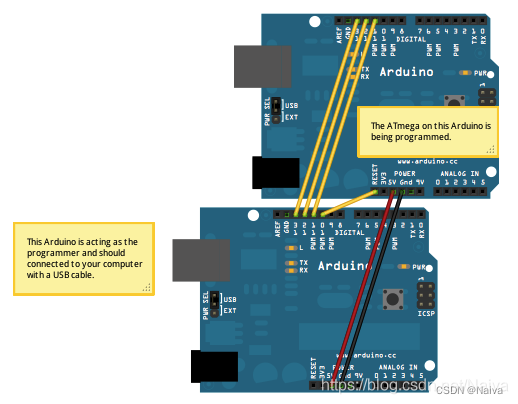
第二部分:Burn bootloader
2. 程序实现
#define NOTE_B0 31
#define NOTE_C1 33
#define NOTE_CS1 35
#define NOTE_D1 37
#define NOTE_DS1 39
#define NOTE_E1 41
#define NOTE_F1 44
#define NOTE_FS1 46
#define NOTE_G1 49
#define NOTE_GS1 52
#define NOTE_A1 55
#define NOTE_AS1 58
#define NOTE_B1 62
#define NOTE_C2 65
#define NOTE_CS2 69
#define NOTE_D2 73
#define NOTE_DS2 78
#define NOTE_E2 82
#define NOTE_F2 87
#define NOTE_FS2 93
#define NOTE_G2 98
#define NOTE_GS2 104
#define NOTE_A2 110
#define NOTE_AS2 117
#define NOTE_B2 123
#define NOTE_C3 131
#define NOTE_CS3 139
#define NOTE_D3 147
#define NOTE_DS3 156
#define NOTE_E3 165
#define NOTE_F3 175
#define NOTE_FS3 185
#define NOTE_G3 196
#define NOTE_GS3 208
#define NOTE_A3 220
#define NOTE_AS3 233
#define NOTE_B3 247
#define NOTE_C4 262
#define NOTE_CS4 277
#define NOTE_D4 294
#define NOTE_DS4 311
#define NOTE_E4 330
#define NOTE_F4 349
#define NOTE_FS4 370
#define NOTE_G4 392
#define NOTE_GS4 415
#define NOTE_A4 440
#define NOTE_AS4 466
#define NOTE_B4 494
#define NOTE_C5 523
#define NOTE_CS5 554
#define NOTE_D5 587
#define NOTE_DS5 622
#define NOTE_E5 659
#define NOTE_F5 698
#define NOTE_FS5 740
#define NOTE_G5 784
#define NOTE_GS5 831
#define NOTE_A5 880
#define NOTE_AS5 932
#define NOTE_B5 988
#define NOTE_C6 1047
#define NOTE_CS6 1109
#define NOTE_D6 1175
#define NOTE_DS6 1245
#define NOTE_E6 1319
#define NOTE_F6 1397
#define NOTE_FS6 1480
#define NOTE_G6 1568
#define NOTE_GS6 1661
#define NOTE_A6 1760
#define NOTE_AS6 1865
#define NOTE_B6 1976
#define NOTE_C7 2093
#define NOTE_CS7 2217
#define NOTE_D7 2349
#define NOTE_DS7 2489
#define NOTE_E7 2637
#define NOTE_F7 2794
#define NOTE_FS7 2960
#define NOTE_G7 3136
#define NOTE_GS7 3322
#define NOTE_A7 3520
#define NOTE_AS7 3729
#define NOTE_B7 3951
#define NOTE_C8 4186
#define NOTE_CS8 4435
#define NOTE_D8 4699
#define NOTE_DS8 4978

#define CHOICE_OFF      0 //Used to control LEDs
#define CHOICE_NONE     0 //Used to check buttons
#define CHOICE_RED  (1 << 0)
#define CHOICE_GREEN    (1 << 1)
#define CHOICE_BLUE (1 << 2)
#define CHOICE_YELLOW   (1 << 3)

#define LED_RED     10
#define LED_GREEN   3
#define LED_BLUE    13
#define LED_YELLOW  5

// Button pin definitions
#define BUTTON_RED    9
#define BUTTON_GREEN  2
#define BUTTON_BLUE   12
#define BUTTON_YELLOW 6

// Buzzer pin definitions
#define BUZZER1  4
#define BUZZER2  7

// Define game parameters
#define ROUNDS_TO_WIN      13 //Number of rounds to succesfully remember before you win. 13 is do-able.
#define ENTRY_TIME_LIMIT   3000 //Amount of time to press a button before game times out. 3000ms = 3 sec

#define MODE_MEMORY  0
#define MODE_BATTLE  1
#define MODE_BEEGEES 2

// Game state variables
byte gameMode = MODE_MEMORY; //By default, let's play the memory game
byte gameBoard[32]; //Contains the combination of buttons as we advance
byte gameRound = 0; //Counts the number of succesful rounds the player has made it through

void setup()
{
  //Setup hardware inputs/outputs. These pins are defined in the hardware_versions header file

  //Enable pull ups on inputs
  pinMode(BUTTON_RED, INPUT_PULLUP);
  pinMode(BUTTON_GREEN, INPUT_PULLUP);
  pinMode(BUTTON_BLUE, INPUT_PULLUP);
  pinMode(BUTTON_YELLOW, INPUT_PULLUP);

  pinMode(LED_RED, OUTPUT);
  pinMode(LED_GREEN, OUTPUT);
  pinMode(LED_BLUE, OUTPUT);
  pinMode(LED_YELLOW, OUTPUT);

  pinMode(BUZZER1, OUTPUT);
  pinMode(BUZZER2, OUTPUT);

  //Mode checking
  gameMode = MODE_MEMORY; // By default, we're going to play the memory game

  // Check to see if the lower right button is pressed
  if (checkButton() == CHOICE_YELLOW) play_beegees();

  // Check to see if upper right button is pressed
  if (checkButton() == CHOICE_GREEN)
  {
    gameMode = MODE_BATTLE; //Put game into battle mode

    //Turn on the upper right (green) LED
    setLEDs(CHOICE_GREEN);
    toner(CHOICE_GREEN, 150);

    setLEDs(CHOICE_RED | CHOICE_BLUE | CHOICE_YELLOW); // Turn on the other LEDs until you release button

    while(checkButton() != CHOICE_NONE) ; // Wait for user to stop pressing button

    //Now do nothing. Battle mode will be serviced in the main routine
  }

  play_winner(); // After setup is complete, say hello to the world
}

void loop()
{
  attractMode(); // Blink lights while waiting for user to press a button

  // Indicate the start of game play
  setLEDs(CHOICE_RED | CHOICE_GREEN | CHOICE_BLUE | CHOICE_YELLOW); // Turn all LEDs on
  delay(1000);
  setLEDs(CHOICE_OFF); // Turn off LEDs
  delay(250);

  if (gameMode == MODE_MEMORY)
  {
    // Play memory game and handle result
    if (play_memory() == true)
      play_winner(); // Player won, play winner tones
    else
      play_loser(); // Player lost, play loser tones
  }

  if (gameMode == MODE_BATTLE)
  {
    play_battle(); // Play game until someone loses

    play_loser(); // Player lost, play loser tones
  }
}

//-=-=-=-=-=-=-=-=-=-=-=-=-=-=-=-=-=-=-=-=-=-=-=-=-=-=-=-=-=-=
//The following functions are related to game play only

// Play the regular memory game
// Returns 0 if player loses, or 1 if player wins
boolean play_memory(void)
{
  randomSeed(millis()); // Seed the random generator with random amount of millis()

  gameRound = 0; // Reset the game to the beginning

  while (gameRound < ROUNDS_TO_WIN)
  {
    add_to_moves(); // Add a button to the current moves, then play them back

    playMoves(); // Play back the current game board

    // Then require the player to repeat the sequence.
    for (byte currentMove = 0 ; currentMove < gameRound ; currentMove++)
    {
      byte choice = wait_for_button(); // See what button the user presses

      if (choice == 0) return false; // If wait timed out, player loses

      if (choice != gameBoard[currentMove]) return false; // If the choice is incorect, player loses
    }

    delay(1000); // Player was correct, delay before playing moves
  }

  return true; // Player made it through all the rounds to win!
}

// Play the special 2 player battle mode
// A player begins by pressing a button then handing it to the other player
// That player repeats the button and adds one, then passes back.
// This function returns when someone loses
boolean play_battle(void)
{
  gameRound = 0; // Reset the game frame back to one frame

  while (1) // Loop until someone fails
  {
    byte newButton = wait_for_button(); // Wait for user to input next move
    gameBoard[gameRound++] = newButton; // Add this new button to the game array

    // Then require the player to repeat the sequence.
    for (byte currentMove = 0 ; currentMove < gameRound ; currentMove++)
    {
      byte choice = wait_for_button();

      if (choice == 0) return false; // If wait timed out, player loses.

      if (choice != gameBoard[currentMove]) return false; // If the choice is incorect, player loses.
    }

    delay(100); // Give the user an extra 100ms to hand the game to the other player
  }

  return true; // We should never get here
}

// Plays the current contents of the game moves
void playMoves(void)
{
  for (byte currentMove = 0 ; currentMove < gameRound ; currentMove++)
  {
    toner(gameBoard[currentMove], 150);

    // Wait some amount of time between button playback
    // Shorten this to make game harder
    delay(150); // 150 works well. 75 gets fast.
  }
}

// Adds a new random button to the game sequence, by sampling the timer
void add_to_moves(void)
{
  byte newButton = random(0, 4); //min (included), max (exluded)

  // We have to convert this number, 0 to 3, to CHOICEs
  if(newButton == 0) newButton = CHOICE_RED;
  else if(newButton == 1) newButton = CHOICE_GREEN;
  else if(newButton == 2) newButton = CHOICE_BLUE;
  else if(newButton == 3) newButton = CHOICE_YELLOW;

  gameBoard[gameRound++] = newButton; // Add this new button to the game array
}

//The following functions control the hardware

// Lights a given LEDs
// Pass in a byte that is made up from CHOICE_RED, CHOICE_YELLOW, etc
void setLEDs(byte leds)
{
  if ((leds & CHOICE_RED) != 0)
    digitalWrite(LED_RED, HIGH);
  else
    digitalWrite(LED_RED, LOW);

  if ((leds & CHOICE_GREEN) != 0)
    digitalWrite(LED_GREEN, HIGH);
  else
    digitalWrite(LED_GREEN, LOW);

  if ((leds & CHOICE_BLUE) != 0)
    digitalWrite(LED_BLUE, HIGH);
  else
    digitalWrite(LED_BLUE, LOW);

  if ((leds & CHOICE_YELLOW) != 0)
    digitalWrite(LED_YELLOW, HIGH);
  else
    digitalWrite(LED_YELLOW, LOW);
}

// Wait for a button to be pressed.
// Returns one of LED colors (LED_RED, etc.) if successful, 0 if timed out
byte wait_for_button(void)
{
  long startTime = millis(); // Remember the time we started the this loop

  while ( (millis() - startTime) < ENTRY_TIME_LIMIT) // Loop until too much time has passed
  {
    byte button = checkButton();

    if (button != CHOICE_NONE)
    {
      toner(button, 150); // Play the button the user just pressed

      while(checkButton() != CHOICE_NONE) ;  // Now let's wait for user to release button

      delay(10); // This helps with debouncing and accidental double taps

      return button;
    }

  }

  return CHOICE_NONE; // If we get here, we've timed out!
}

// Returns a '1' bit in the position corresponding to CHOICE_RED, CHOICE_GREEN, etc.
byte checkButton(void)
{
  if (digitalRead(BUTTON_RED) == 0) return(CHOICE_RED);
  else if (digitalRead(BUTTON_GREEN) == 0) return(CHOICE_GREEN);
  else if (digitalRead(BUTTON_BLUE) == 0) return(CHOICE_BLUE);
  else if (digitalRead(BUTTON_YELLOW) == 0) return(CHOICE_YELLOW);

  return(CHOICE_NONE); // If no button is pressed, return none
}

// Light an LED and play tone
// Red, upper left:     440Hz - 2.272ms - 1.136ms pulse
// Green, upper right:  880Hz - 1.136ms - 0.568ms pulse
// Blue, lower left:    587.33Hz - 1.702ms - 0.851ms pulse
// Yellow, lower right: 784Hz - 1.276ms - 0.638ms pulse
void toner(byte which, int buzz_length_ms)
{
  setLEDs(which); //Turn on a given LED

  //Play the sound associated with the given LED
  switch(which)
  {
  case CHOICE_RED:
    buzz_sound(buzz_length_ms, 1136);
    break;
  case CHOICE_GREEN:
    buzz_sound(buzz_length_ms, 568);
    break;
  case CHOICE_BLUE:
    buzz_sound(buzz_length_ms, 851);
    break;
  case CHOICE_YELLOW:
    buzz_sound(buzz_length_ms, 638);
    break;
  }

  setLEDs(CHOICE_OFF); // Turn off all LEDs
}

// Toggle buzzer every buzz_delay_us, for a duration of buzz_length_ms.
void buzz_sound(int buzz_length_ms, int buzz_delay_us)
{
  // Convert total play time from milliseconds to microseconds
  long buzz_length_us = buzz_length_ms * (long)1000;

  // Loop until the remaining play time is less than a single buzz_delay_us
  while (buzz_length_us > (buzz_delay_us * 2))
  {
    buzz_length_us -= buzz_delay_us * 2; //Decrease the remaining play time

    // Toggle the buzzer at various speeds
    digitalWrite(BUZZER1, LOW);
    digitalWrite(BUZZER2, HIGH);
    delayMicroseconds(buzz_delay_us);

    digitalWrite(BUZZER1, HIGH);
    digitalWrite(BUZZER2, LOW);
    delayMicroseconds(buzz_delay_us);
  }
}

// Play the winner sound and lights
void play_winner(void)
{
  setLEDs(CHOICE_GREEN | CHOICE_BLUE);
  winner_sound();
  setLEDs(CHOICE_RED | CHOICE_YELLOW);
  winner_sound();
  setLEDs(CHOICE_GREEN | CHOICE_BLUE);
  winner_sound();
  setLEDs(CHOICE_RED | CHOICE_YELLOW);
  winner_sound();
}

// Play the winner sound
// This is just a unique (annoying) sound we came up with, there is no magic to it
void winner_sound(void)
{
  // Toggle the buzzer at various speeds
  for (byte x = 250 ; x > 70 ; x--)
  {
    for (byte y = 0 ; y < 3 ; y++)
    {
      digitalWrite(BUZZER2, HIGH);
      digitalWrite(BUZZER1, LOW);
      delayMicroseconds(x);

      digitalWrite(BUZZER2, LOW);
      digitalWrite(BUZZER1, HIGH);
      delayMicroseconds(x);
    }
  }
}

// Play the loser sound/lights
void play_loser(void)
{
  setLEDs(CHOICE_RED | CHOICE_GREEN);
  buzz_sound(255, 1500);

  setLEDs(CHOICE_BLUE | CHOICE_YELLOW);
  buzz_sound(255, 1500);

  setLEDs(CHOICE_RED | CHOICE_GREEN);
  buzz_sound(255, 1500);

  setLEDs(CHOICE_BLUE | CHOICE_YELLOW);
  buzz_sound(255, 1500);
}

// Show an "attract mode" display while waiting for user to press button.
void attractMode(void)
{
  while(1)
  {
    setLEDs(CHOICE_RED);
    delay(100);
    if (checkButton() != CHOICE_NONE) return;

    setLEDs(CHOICE_BLUE);
    delay(100);
    if (checkButton() != CHOICE_NONE) return;

    setLEDs(CHOICE_GREEN);
    delay(100);
    if (checkButton() != CHOICE_NONE) return;

    setLEDs(CHOICE_YELLOW);
    delay(100);
    if (checkButton() != CHOICE_NONE) return;
  }
}


// Notes in the melody. Each note is about an 1/8th note, "0"s are rests.
int melody[] = {
  NOTE_G4, NOTE_A4, 0, NOTE_C5, 0, 0, NOTE_G4, 0, 0, 0,
  NOTE_E4, 0, NOTE_D4, NOTE_E4, NOTE_G4, 0,
  NOTE_D4, NOTE_E4, 0, NOTE_G4, 0, 0,
  NOTE_D4, 0, NOTE_E4, 0, NOTE_G4, 0, NOTE_A4, 0, NOTE_C5, 0};

int noteDuration = 115; // This essentially sets the tempo, 115 is just about right for a disco groove :)
int LEDnumber = 0; // Keeps track of which LED we are on during the beegees loop

// Do nothing but play bad beegees music
// This function is activated when user holds bottom right button during power up
void play_beegees()
{
  //Turn on the bottom right (yellow) LED
  setLEDs(CHOICE_YELLOW);
  toner(CHOICE_YELLOW, 150);

  setLEDs(CHOICE_RED | CHOICE_GREEN | CHOICE_BLUE); // Turn on the other LEDs until you release button

  while(checkButton() != CHOICE_NONE) ; // Wait for user to stop pressing button

  setLEDs(CHOICE_NONE); // Turn off LEDs

  delay(1000); // Wait a second before playing song

  digitalWrite(BUZZER1, LOW); // setup the "BUZZER1" side of the buzzer to stay low, while we play the tone on the other pin.

  while(checkButton() == CHOICE_NONE) //Play song until you press a button
  {
    // iterate over the notes of the melody:
    for (int thisNote = 0; thisNote < 32; thisNote++) {
      changeLED();
      tone(BUZZER2, melody[thisNote],noteDuration);
      // to distinguish the notes, set a minimum time between them.
      // the note's duration + 30% seems to work well:
      int pauseBetweenNotes = noteDuration * 1.30;
      delay(pauseBetweenNotes);
      // stop the tone playing:
      noTone(BUZZER2);
    }
  }
}

// Each time this function is called the board moves to the next LED
void changeLED(void)
{
  setLEDs(1 << LEDnumber); // Change the LED

  LEDnumber++; // Goto the next LED
  if(LEDnumber > 3) LEDnumber = 0; // Wrap the counter if needed
}
待改进地方:
- 锂电池充电电路TP4056;
- 电源开关;
- 单片机芯片尺寸小一点、便宜点的封装和型号(TSSOP20封装);
- 外壳设计
参考资料
-
[1] 【YouTube】https://www.youtube.com/watch?v=Tcp_6L80kY0&ab_channel=ViralScience-ThehomeofCreativity
-
[2] 【B站】Arduino颜色记忆游戏机,你能过几关?
-
[3] 【YouTube】 HOW TO MAKE LED MEMORY GAME USING ARDUINO
-
[4] KiCad #学习笔记02#|国产在线电路设计软件立创EDA (Arduino UNO 单片机最小系统电路原理图)
-
[5] 【烧录bootloader报错!】 Yikes Invalid device signature.Double check connections and try again, or use -F to over 原因是
芯片坏了!;还有端口号灰色是因为忘记安装串口驱动了! -
[6] Yikes! Invalid device signature. Fail to burn bootloader and read fuses
-
[7] 【YouTube】SOLVED !!! 1E 95 0F or Yikes Invalid Device Signature Error of Arduino Bootloader :
Atmega 328 U


![[SWPUCTF 2022 新生赛]numgame](https://img-blog.csdnimg.cn/a8bce61e72ad4002ab5967e0bf9352a3.png)