前言
(1)因为博客编辑字数超过1W字会导致MD编辑器非常卡顿。所以我将发挥题和基础题的思路拆开了。
(2)更新日记:
<1>2023年8月4日,9点20分。分离发挥题思路和基础题思路,增加了博主Huiyeee整体代码,增加关于红点被黑带吸收问题的调试方法
关于红点被黑带吸收问题
让IDE上出现红点
(1)很多人反馈,红点被黑色矩形框吸收了,识别不到。
(2)这边推荐的调试办法如下:
<1>首要目的是让PC端的IDE上人们肉眼能够看到红色激光。所以外面要适当调整下面初始化部分代码。
<2>我们可以将RGB565改成GRAYSCALE的灰度图。
<3>适当提高图像分辨率,将QQVGA改成其他图像画质。
<4>设置亮度,因为是从OpenART移植过来的,所以亮度不能是3000。使用OpenMV的同学请注意,应该是-3到+3.

<5>曝光度可以按照另外一位博主的来。通过调整曝光度,可以控制图像的明暗程度,从而创造出不同的视觉效果。我们这里没有使用sensor.set_auto_exposure()函数设置曝光度,所以是默认打开了的。你们可以看看另外一位博主的思路和调整。
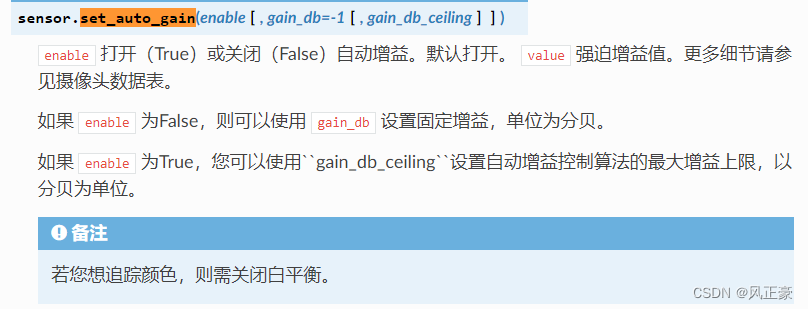
<6>我们图像识别要关闭白平衡和自增益。但是如果调节出来没结果。可以尝试打开看看有木有优化
# 初始化摄像头
sensor.reset()
sensor.set_pixformat(sensor.RGB565) # 设置图像色彩格式为RGB565格式
sensor.set_framesize(sensor.QQVGA)  # 设置图像大小为160*120
sensor.set_auto_whitebal(True)      # 设置自动白平衡
sensor.set_brightness(3000)         # 设置亮度为3000
sensor.skip_frames(time = 20)       # 跳过帧
(3)注意,这一阶段只需要调整摄像头的初始化!!!PC端IDE出现了红色斑点再开始处理!!!
白平衡和自增益的作用
(1)关闭白平衡和自增益可能适用于以下场景:
<1>保持色彩一致性:在某些图像识别应用中,特别是涉及色彩信息重要性较高的场景,关闭白平衡可以保持图像中的色彩一致性。白平衡会根据不同光源调整图像颜色,这可能导致相同对象在不同光照条件下的颜色出现差异,影响识别的准确性。
<2>特定光照条件下的优化:在一些特殊环境中,如低光照条件或强烈光线照射的情况下,关闭自增益可以避免图像过度曝光或欠曝光。这样做可以保留图像中更多细节,有助于图像识别算法更好地处理图像。
<3>原始数据分析:在某些图像分析应用中,关闭白平衡和自增益可以使用原始的传感器数据进行分析,而不受相机的颜色处理和亮度调整影响。这可以提供更纯粹、更原始的数据,有助于一些特定图像处理和识别算法的优化。
(2)需要注意的是,关闭白平衡和自增益也可能导致一些挑战,比如图像中的颜色信息可能会出现较大的变化,而且在某些场景下可能需要更复杂的图像处理算法来应对不同光照条件下的挑战。因此,在图像识别应用中是否关闭白平衡和自增益需要根据具体的情况和应用场景进行权衡和决策。
发挥题思路
第一问 — 追踪
(1)我个人认为这个必须上PID了。我个人认为这个题目和OpenMV的追小球云台代码类似。
(2)基础题目我认为一个OpenMV就可以完成。而发挥题目需要两个OpenMV。这两个OpenMV一个放红色激光笔,一个放绿色激光笔。
(3)各位可以综合追小球云台的代码,以及我下面讲的:关于C站那位博主代码的注意事项 部分。
(4)追踪的绿色激光笔建议。
<1>变成灰度图,这样可以消除其他颜色的干扰,只观察红色。然后追踪。
<2>提高分辨率,较高的分辨率,能够提供更好的效果。
<3>使用多组颜色阈值,就像OpenMV多颜色识别详解的代码那样。让识别的颜色阈值变成多组。提高分辨效果。
第二问 — 追踪和走基础题3,4问
如果基础题做出来了,以及发挥题的追踪做出来了。那么就直接用基础题的红色激光笔走,然后发挥题追踪。这个和上面的代码应该是差不多的。
第三问 — 暂停键
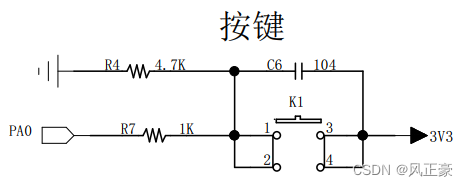
这个我还是建议自己焊接一个按键,并联一个104的电容,进行硬件方面的按键消抖。然后自己写逻辑代码。
main.py
(1)以下为官方的追小球云台代码,我增加了中文注释。
(2)因为GitHub是在外网,所以我直接复制过来了。但是总是有一些网友,硬要官方的GitHub链接。我也贴到了前言部分。
代码
import sensor, image, time

from pid import PID
from pyb import Servo  #从内置pyb导入servo类,也就是舵机控制类

pan_servo=Servo(1)  #定义两个舵机,对应P7引脚
tilt_servo=Servo(2) #定义两个舵机,对应P8引脚

pan_servo.calibration(500,2500,500)
tilt_servo.calibration(500,2500,500)

red_threshold  = (13, 49, 18, 61, 6, 47)  #设置红色阈值

pan_pid = PID(p=0.07, i=0, imax=90) #PID参数,只需要调整P量即可,设置P7引脚的PI值
tilt_pid = PID(p=0.05, i=0, imax=90) #PID参数,只需要调整P量即可,设置P8引脚的PI值
#pan_pid = PID(p=0.1, i=0, imax=90)#在线调试使用这个PID
#tilt_pid = PID(p=0.1, i=0, imax=90)#在线调试使用这个PID

sensor.reset() # 初始化摄像头传感器
sensor.set_pixformat(sensor.RGB565) # 使用 RGB565 彩图
sensor.set_framesize(sensor.QQVGA) # 使用 QQVGA 分辨率
sensor.skip_frames(10) #跳过几帧,让新的设置生效。
sensor.set_auto_whitebal(False) # 因为是颜色识别,所以需要把白平衡关闭
clock = time.clock() # 追踪帧率,影响不大

#__________________________________________________________________
#定义寻找最大色块的函数,因为图像中有多个色块,所以追踪最大的那个
def find_max(blobs):
    max_size=0
    for blob in blobs:
        if blob[2]*blob[3] > max_size:
            max_blob=blob
            max_size = blob[2]*blob[3]
    return max_blob

#__________________________________________________________________
while(True):
    clock.tick() # 跟踪快照()之间经过的毫秒数。
    img = sensor.snapshot() # 截取一张图片

    blobs = img.find_blobs([red_threshold]) #识别红色阈值
    if blobs:   #如果找到红色色块
        max_blob = find_max(blobs)  #调用上面自定义函数,找到最大色块
        pan_error = max_blob.cx()-img.width()/2
        tilt_error = max_blob.cy()-img.height()/2

        print("pan_error: ", pan_error)

        img.draw_rectangle(max_blob.rect()) # 在找到最大色块画一个矩形框
        img.draw_cross(max_blob.cx(), max_blob.cy()) # cx, cy

        pan_output=pan_pid.get_pid(pan_error,1)/2
        tilt_output=tilt_pid.get_pid(tilt_error,1) #上面两个都说进行PID运算
        print("pan_output",pan_output)
        pan_servo.angle(pan_servo.angle()+pan_output) #将最终值传入两个舵机中,追踪目标
        tilt_servo.angle(tilt_servo.angle()-tilt_output)# 因为两个舵机方向和摆放位置不同,所以一个是+一个是-
舵机控制
舵机选择
(1)Servo是舵机控制类。因为我们使用from pyb import Servo直接从pyd导入了servo类。所以可以直接写成Servo()。
(2)引脚对应关系:Servo(1)——P7,Servo(2)——P8,Servo(3)——P9。
(3)
<1>因此我们可以知道,pan_servo.calibration就是对P7进行相应的控制,因为pan_servo=Servo(1)。
<2>tilt_servo.calibration就是对P8控制,因为tilt_servo=Servo(2)

舵机脉冲设置
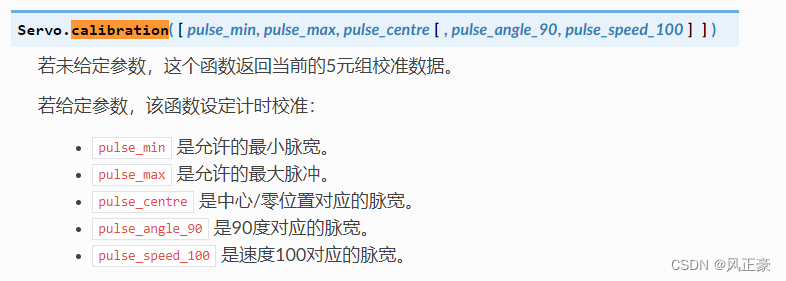
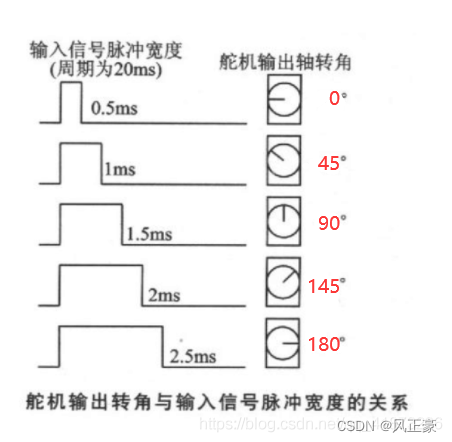
(1)pan_servo.calibration(500,2500,500) , 这个其实就是设置舵机的脉宽的。因为我们知道,常见的舵机周期都是20ms,脉宽都是再500us到2500us之间。
(2)所以这里的第一个参数是500,第二个参数是2500。第三个参数是舵机0°位置,根据下图可以知道,也是500。最后两个值是可以填可不填的,个人不建议填写。
颜色阈值设置
(1)因为我们要追踪红色,所以是使用red_threshold = (13, 49, 18, 61, 6, 47) 进行设置阈值。
(2)颜色阈值设置教程:OpenMV颜色阈值设置
PID的P和I参数设置
(1)注意,因为云台是比较稳定的,不要求高反应速度,所以我猜测只使用了PI,而没有使用PID。因此我们可以看到pan_pid和tilt_pid只有P和I两个参数。
(2)I的参数不需要进行调整!imax是用于积分限幅的,这个也别更改!,如果你的云台抖动厉害,说明P过大了,需要调小。
(3)如果你感觉你云台反应太慢,就需要调高P值。
(4)最佳的P值是,你云台有抖动的前一个值。这个才是P的最优值。但是我认为,P没必要太大,因为云台还是比较稳的。
(5)所以说,只需要调整P值,I值和imax值不需要进行调整!!!
帧率禁用
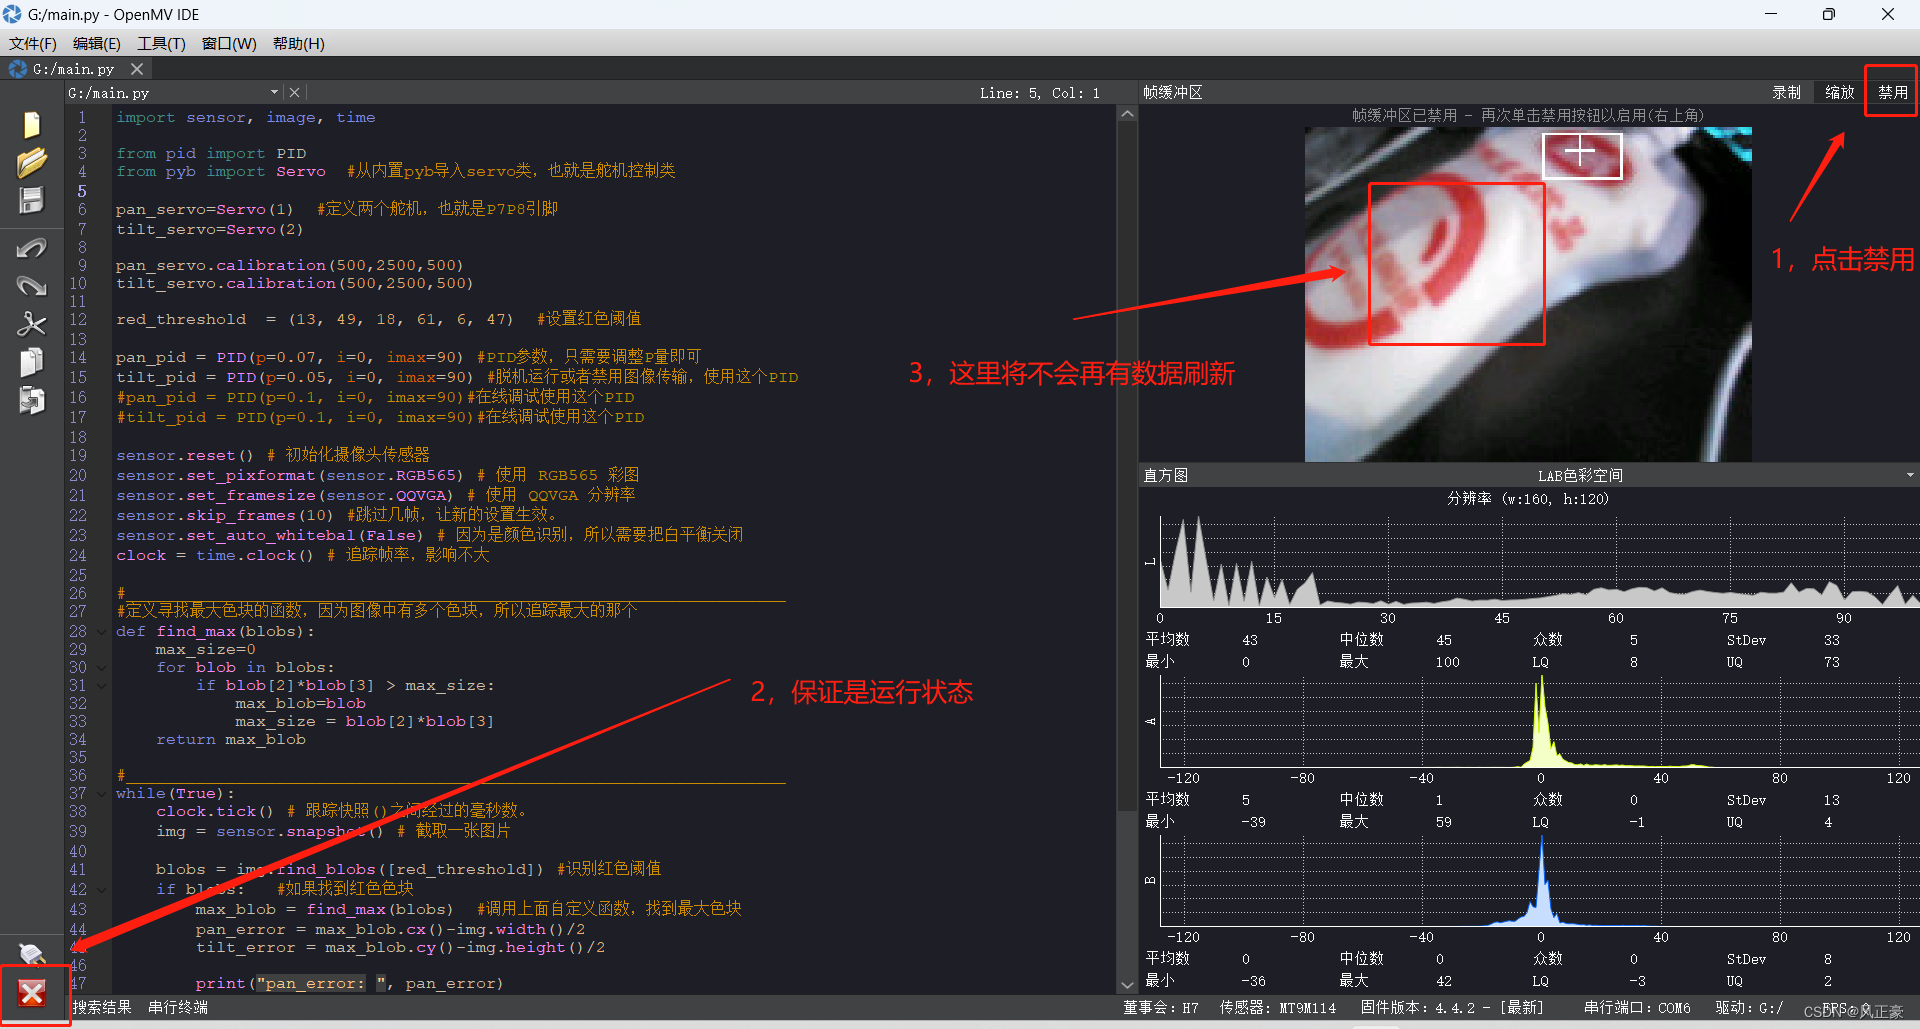
(1)当OpenMV连接电脑端IDE的时候,运行帧率和不连接电脑端IDE是不一样的。因为我们连接上电脑端IDE的时候,OpenMV会向电脑端IDE传输数据,所以会导致帧率下降。
(2)帧率下降,会导致我们实际脱机跑的时候,PID参数和连接上电脑端IDE时候的PID参数不一样。
(3)所以我们需要点击电脑端右上角的禁用,或者是Disable。被禁用之后,我们的效果就是脱机之后真实运行效果。
pid.py
(1)这里面的代码我们不需要管,就算PID的代码。
(2)再次强调,这里请别擅自更改,出现问题自己负责。
from pyb import millis
from math import pi, isnan

class PID:
    _kp = _ki = _kd = _integrator = _imax = 0
    _last_error = _last_derivative = _last_t = 0
    _RC = 1/(2 * pi * 20)
    def __init__(self, p=0, i=0, d=0, imax=0):
        self._kp = float(p)
        self._ki = float(i)
        self._kd = float(d)
        self._imax = abs(imax)
        self._last_derivative = float('nan')

    def get_pid(self, error, scaler):
        tnow = millis()
        dt = tnow - self._last_t
        output = 0
        if self._last_t == 0 or dt > 1000:
            dt = 0
            self.reset_I()
        self._last_t = tnow
        delta_time = float(dt) / float(1000)
        output += error * self._kp
        if abs(self._kd) > 0 and dt > 0:
            if isnan(self._last_derivative):
                derivative = 0
                self._last_derivative = 0
            else:
                derivative = (error - self._last_error) / delta_time
            derivative = self._last_derivative + \
                                     ((delta_time / (self._RC + delta_time)) * \
                                        (derivative - self._last_derivative))
            self._last_error = error
            self._last_derivative = derivative
            output += self._kd * derivative
        output *= scaler
        if abs(self._ki) > 0 and dt > 0:
            self._integrator += (error * self._ki) * scaler * delta_time
            if self._integrator < -self._imax: self._integrator = -self._imax
            elif self._integrator > self._imax: self._integrator = self._imax
            output += self._integrator
        return output
    def reset_I(self):
        self._integrator = 0
        self._last_derivative = float('nan')
关于C站那位博主代码的注意事项
代码
原文链接 : https://blog.csdn.net/weixin_52385589/article/details/126334744
感光器初始化代码
sensor.reset()
    sensor.set_auto_gain(False)
    sensor.set_pixformat(sensor.GRAYSCALE) # or sensor.RGB565
    sensor.set_framesize(sensor.  QVGA) # or sensor.QVGA (or others)
    sensor.skip_frames(time=900) # Let new settings take affect.
    sensor.set_auto_exposure(False, 1000)#在这里调节曝光度,调节完可以比较清晰地看清激光点
    sensor.set_auto_whitebal(False) # turn this off.
    sensor.set_auto_gain(False) # 关闭增益(色块识别时必须要关)
识别激光点代码
def color_blob(threshold):

    blobs = img.find_blobs(threshold,x_stride=1, y_stride=1, area_threshold=0, pixels_threshold=0,merge=False,margin=1)

    if len(blobs)>=1 :#有色块
        # Draw a rect around the blob.
        b = blobs[0]
        #img.draw_rectangle(b[0:4]) # rect
        cx = b[5]
        cy = b[6]
        for i in range(len(blobs)-1):
            #img.draw_rectangle(b[0:4]) # rect
            cx = blobs[i][5]+cx
            cy = blobs[i][6]+cy
        cx=int(cx/len(blobs))
        cy=int(cy/len(blobs))
        #img.draw_cross(cx, cy) # cx, cy
        print(cx,cy)
        return int(cx), int(cy)
    return -1, -1 #表示没有找到
颜色阈值
threshold=[(60, 255, -20, 20, -20, 20)]
整体代码
(1)这个是那位博主的整体代码,感兴趣的可以拿过来用。
(2)版权归C站博主Huiyeee所有!用了代码的同学,一定要去Huiyeee的博主下面感谢!!!
def find_max(blobs):
    max_size=0
    for blob in blobs:
        if blob[2]*blob[3] > max_size :
            max_blob=blob
            max_size = blob[2]*blob[3]
    return max_blob


def FindCR():

    counts=0
    w_avg=0
    x_avg=0
    y_avg=0
    judge=0
    shape=0
    c_times=0
    r_times=0
    max_size=0
    cx=0
    cy=0
    while(counts<30):
        if(pin1.value()==0):
            break
        counts=counts+1
        clock.tick()#返回以毫秒计的通电后的运行时间。
        img = sensor.snapshot().lens_corr(strength = 1.8, zoom = 1.0)#抓取一帧的图像并返回一个image对象
        #img.find_blobs()查找图像中所有色块,并返回包含每个色块的色块对象列表

        flag=0
        blobs=img.find_blobs(thresholds, pixels_threshold=200, area_threshold=300, merge=True)
        if blobs:
            max_blob=find_max(blobs)
            if max_blob:
                if judge==0:
                    for c in img.find_circles(max_blob.rect(),threshold = 5000, x_margin = 5, y_margin = 5,
                     r_margin = 5, r_min = 2, r_max = 200 , r_step = 2):
                        print(c)
                        if c.magnitude()>5000:
                            c_times=c_times+1
                            cx=cx+c.x()
                            cy=cy+c.y()
                            #img.draw_circle(c.x(),c.y(),c.r(),(0,255,0))
                        if c_times>5:
                            judge=1
                            shape=1
                            print("circle")
                            cx=int(cx/c_times)
                            cy=int(cy/c_times)
                            break
                    for r in img.find_rects(max_blob.rect(),threshold = 10):
                        img.draw_rectangle(r.x(),r.y(),r.w(),r.h(),(0,255,0))
                        print(r)
                        if r.magnitude()>50000 and judge==0:
                            r_times=r_times+1
                        if r_times:
                            judge=1
                            shape=0
                            print("rect")
                            break
                if abs(max_blob.w()-max_blob.h())<4:
                    if shape==1:
                        x_avg=cx
                        y_avg=cy
                    else:
                        x_avg=(max_blob.x()+0.5*max_blob.w()+x_avg)+max_blob.cx()
                        y_avg=(max_blob.y()+0.5*max_blob.h()+y_avg)+max_blob.cy()
                        max_size=max_size+2
                    flag=1
                #if(max_blob.cx()-max_blob.x()>w_avg):
                    #w_avg=max_blob.cx()-max_blob.x()
                #if(max_blob.w()-max_blob.cx()+max_blob.x())>x_avg:
                    #x_avg=max_blob.w()-max_blob.cx()+max_blob.x()

                #if(max_blob.cy()-max_blob.y()>w_avg):
                    #w_avg=max_blob.cy()-max_blob.y()
                #if(max_blob.w()-max_blob.cy()+max_blob.y())>x_avg:
                    #x_avg=max_blob.w()-max_blob.cy()+max_blob.y()
                if max_blob.w()>w_avg:
                    w_avg=max_blob.w()
                if max_blob.h()>w_avg:
                    w_avg=max_blob.h()
                #a=math.sqrt((max_blob.cx()-max_blob.x())**2-(max_blob.cy()-max_blob.y())**2)
                #if a>w_avg:
                    #w_avg=a
                img.draw_rectangle(max_blob.rect())#画矩形框 blob.rect() ---> 返回一个矩形元组(可当作roi区域)

                img.draw_cross(max_blob.cx(),max_blob.cy())
        if flag==0:
            counts=counts-1
        else:
            if shape==0:
                img.draw_cross(int(x_avg/max_size),int(y_avg/max_size))#画十字 blob.cx(), blob.cy() --->返回中心点x和y坐标
            else:
                img.draw_cross(x_avg,y_avg)
           #print(clock.fps())#clock.fps() ---> 停止追踪运行时间,并返回当前FPS(必须先调用tick)。
    if shape==0:
        print(int(x_avg/max_size),int(y_avg/max_size),int(w_avg))
        data=[int(x_avg/max_size)+1,int(y_avg/max_size)-2 ,int(w_avg),shape]
    elif shape==1:
        data=[x_avg,y_avg,int(w_avg),shape]

    return data


def detect():
    sensor.reset() #初始化设置
    sensor.set_pixformat(sensor.RGB565) #设置为彩色
    sensor.set_framesize(sensor.QVGA) #设置清晰度
    sensor.skip_frames(time = 2000) #跳过前2000ms的图像
    sensor.set_auto_gain(False) # 关闭自动自动增益。默认开启的。
    sensor.set_auto_whitebal(False) #关闭白平衡。在颜色识别中,一定要关闭白平衡。
    clock = time.clock() #创建一个clock便于计算FPS,看看到底卡不卡

    judge=0
    r_time=0
    a_r=0
    a_c=0
    a_rt=0
    c_time=0
    rt_time=0
    row_data=[-1,-1]

    while(judge==0): #不断拍照
        clock.tick()
        img = sensor.snapshot().lens_corr(strength = 1.8, zoom = 1.0)

        blobs=img.find_blobs(thresholds,pixels_threshold=10,area_threshold=10)
        #openmv自带的寻找色块函数。
        #pixels_threshold是像素阈值,面积小于这个值的色块就忽略
        #roi是感兴趣区域,只在这个区域内寻找色块
        #are_threshold是面积阈值,如果色块被框起来的面积小于这个值,会被过滤掉
            #print('该形状占空比为',blob.density())
        if blobs:
            max_blob=find_max(blobs)
            if max_blob:


            #print('该形状的面积为',area)
             #density函数居然可以自动返回色块面积/外接矩形面积这个值,太神奇了,官方文档还是要多读!
                if max_blob.density()>0.78:#理论上矩形和他的外接矩形应该是完全重合
            #但是测试时候发现总会有偏差,多次试验取的这个值。下面圆形和三角形亦然

                    r_time=r_time+1
                    #a_r=a_r+area
                    #area=int(max_blob.x()*max_blob.y()*max_blob.density()*0.0185)
                    img.draw_rectangle(max_blob.rect())
                    print('长方形长',max_blob.density())
                    if r_time>1:
                        #area=int(a_r/r_time)
                        #print(area)
                        judge=1
                        row_data[0]=1
                        print("检测为长方形  ",end='')
                elif max_blob.density()>0.46:

                    #area=int(max_blob.x()*max_blob.y()*max_blob.density()*0.0575)
                    c_time=c_time+1
                    #a_c=a_c+area
                    img.draw_circle((max_blob.cx(), max_blob.cy(),int((max_blob.w()+max_blob.h())/4)))
                    print('圆形半径',max_blob.density())
                    if c_time>8:
                        #area=int(a_c/c_time)
                        #print(area)
                        judge=1
                        row_data[0]=2
                        print("检测为圆  ",end='')
                elif max_blob.density()>0.2:
                    #area=int(max_blob.x()*max_blob.y()*max_blob.density()*0.0207)
                    rt_time=rt_time+1
                    #a_rt=a_rt+area
                    img.draw_cross(max_blob.cx(), max_blob.cy())
                    print(max_blob.density(),)
                    if rt_time>20:
                        #area=int(a_rt/rt_time)
                        #if c_time>0:
                            #area=area-10*c_time
                        #print(area)
                        judge=1
                        row_data[0]=3
                        print("检测为三角型  ",end='')
                else: #基本上占空比小于0.4的都是干扰或者三角形,索性全忽略了。
                    continue

                #row_data[1]=area

    area=0
    count=0
    while(1):
        clock.tick()
        img = sensor.snapshot().lens_corr(strength = 1.8, zoom = 1.0)
        img.binary(thresholds)
        img.draw_rectangle(80,40,150,120)
        x_init=80
        y_init=40

        for i in range(150):
            for j in range(100):
                if img.get_pixel(i+x_init,j+y_init)[0]==255:
                    count=count+1

        break
        #img.draw_rectangle(80,40,150,120)
        #sta=img.get_statistics(thresholds, invert=False, roi=(80,40,150,120))
        #area=area+(30-sta.mean())*1000
        #counts=counts+1
        #print(sta.mean())
        #if(counts>50):
            #area=int(area/counts*0.0031495)
            #print(area)
            #break
    row_data[1]=int(count*0.02329*1.14946236559)
    #
    \

    print(row_data[1])
    data=bytearray(row_data)
    uart.write(u_start)
    uart.write(data)
    uart.write(u_over)


#-------------------------------------------------------------------------

#threshold=[(90, 100, -101, 87, -94, 84)]
threshold=[(60, 255, -20, 20, -20, 20)]

def color_blob(threshold):

    blobs = img.find_blobs(threshold,x_stride=1, y_stride=1, area_threshold=0, pixels_threshold=0,merge=False,margin=1)

    if len(blobs)>=1 :
        # Draw a rect around the blob.
        b = blobs[0]
        #img.draw_rectangle(b[0:4]) # rect
        cx = b[5]
        cy = b[6]
        for i in range(len(blobs)-1):
            #img.draw_rectangle(b[0:4]) # rect
            cx = blobs[i][5]+cx
            cy = blobs[i][6]+cy
        cx=int(cx/len(blobs))
        cy=int(cy/len(blobs))
        #img.draw_cross(cx, cy) # cx, cy
        print(cx,cy)
        return int(cx), int(cy)
    return -1, -1

import sensor, image, time ,math,utime
from pyb import UART
from pyb import Pin
from pyb import ExtInt
from pyb import LED


uart = UART(3, 115200, timeout_char=1000)  # i使用给定波特率初始化
uart.init(115200, bits=8, parity=None, stop=1, timeout_char=1000)
u_start=bytearray([0xb3,0xb3])
u_over=bytearray([0x0d,0x0a])
thresholds = [(0, 15, -21,10, -18, 6),(0, 22, -28, 19, -4, 13),
(0, 25, -22, 10, -30, 10),(0, 25, -20, 15, -37, 12),(3,22,-4,40,-10,13)]#LAB阈值
pin1 = Pin('P1', Pin.IN, Pin.PULL_UP)
pin2 = Pin('P2',Pin.IN,Pin.PULL_UP)


#extint = ExtInt(pin2, ExtInt.IRQ_FALLING, Pin.PULL_UP, callback_PIN2)
#顺序:(L Min, L Max, A Min, A Max, B Min, B Max)

clock = time.clock()#定义时钟对象clock


while(1):
    while(pin1.value()==0):
        continue
    row_data = [-1,-1,-1,-1,-1,-1]
    sensor.reset()
    sensor.set_pixformat(sensor.RGB565)
    sensor.set_framesize(sensor.QVGA)
    sensor.skip_frames(time = 500)
    sensor.set_auto_gain(False) # 关闭增益(色块识别时必须要关)
    sensor.set_auto_whitebal(False) # 关闭白平衡
    LED(1).on()
    if(pin1.value()==0):
        continue
    if(pin2.value()==0):
        detect()

    row_data[0],row_data[1],row_data[2],row_data[3]=FindCR()
    if(pin1.value()==0):
        continue
    if(pin2.value()==0):
        detect()
    LED(1).off()
    LED(2).on()
    data=bytearray(row_data)
    uart.write(u_start)
    uart.write(data)
    uart.write(u_over)
    print(row_data)
    LED(2).off()
    if(pin1.value()==0):
        continue
    sensor.reset()
    sensor.set_auto_gain(False)
    sensor.set_pixformat(sensor.GRAYSCALE) # or sensor.RGB565
    sensor.set_framesize(sensor.  QVGA) # or sensor.QVGA (or others)
    sensor.skip_frames(time=900) # Let new settings take affect.
    sensor.set_auto_exposure(False, 1000)
    sensor.set_auto_whitebal(False) # turn this off.
    sensor.set_auto_gain(False) # 关闭增益(色块识别时必须要关)
    times=0
    num=[-1,-1,-1]
    add=[-1,-1]
    while(True):
        if(pin1.value()==0):
            break
        if(pin2.value()==0):
            detect()
        #EXPOSURE_TIME_SCALE = 1.01
        #current_exposure_time_in_microseconds = sensor.get_exposure_us()

        # 默认情况下启用自动曝光控制(AEC)。调用以下功能可禁用传感器自动曝光控制。
        # 另外“exposure_us”参数在AEC被禁用后覆盖自动曝光值。
        #sensor.set_auto_exposure(False, \
            #exposure_us = int(current_exposure_time_in_microseconds * EXPOSURE_TIME_SCALE))
        #roi=(int(row_data[0]-0.5*row_data[2]),int(row_data[1]-0.5*row_data[2]),row_data[2],row_data[2])
        clock.tick()
        img = sensor.snapshot().lens_corr(strength = 1.8, zoom = 1.0)#抓取一帧的图像并返回一个image对象
        img.draw_circle(data[0],data[1],int(data[2]*0.5))
        img.draw_cross(data[0],data[1])
        img = sensor.snapshot().lens_corr(strength = 1.8, zoom = 1.0)#抓取一帧的图像并返回一个image对象
        row_data[4],row_data[5]=color_blob(threshold)

        if row_data[4]!=-1:
            if times==0:
                num[times]=[row_data[4],row_data[5]]
            else:
                if abs(row_data[4]-num[0][0])>10 or abs(row_data[5]-num[0][1])>10:

                    continue #丢弃数据
            times=times+1
            num[0]=[row_data[4],row_data[5]]
            #img.draw_cross(row_data[4],row_data[5])
            data=bytearray(row_data)
            uart.write(u_start)
            uart.write(data)
            uart.write(u_over)
            print(row_data)

        print(pin2.value())
代码部分解读
图像类型
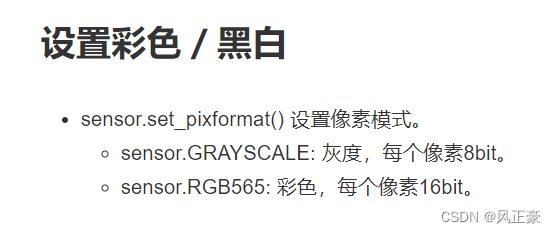
(1)sensor.set_pixformat设置的图像类型不同。
<1>我拿官方代码和上面贴出来的那个代码进行了对比,发现了一件事情。他的sensor.set_pixformat是设置成GRAYSCALE图像,而我们这里是设置成RGB565图像。
<2>将图像画质设置成GRAYSCALE好处在于,如果只有两个颜色,更容易进行分辨,而且每个像素所占空间也减少了,可以适当的增加分辨率。但是也有缺点,如果是多颜色识别就会出现问题。
<3>本题只有三种颜色,底板白色,追踪的绿点,被追踪的红点。因为只需要追踪一个颜色,所以各位可以尝试将 sensor.set_pixformat(sensor.RGB565) 改成 sensor.set_pixformat(sensor.GRAYSCALE)
图像分辨率
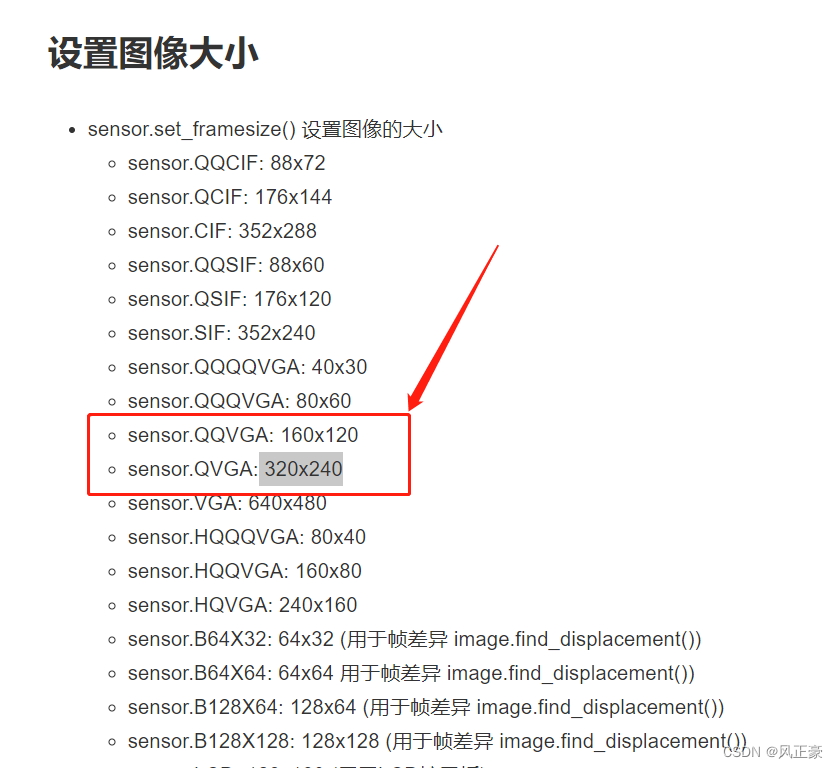
(2)图像分辨率,sensor.set_framesize(sensor.QQVGA)
<1>官方例程的分辨率是QQVGA,像素点是160x120。而那个博客的分辨率是QVGA,像素点是 320x240。
<2>更高的分辨率,识别效果更好,但是分辨率也别无脑调高,否则颜色阈值方便会很难设置。
跳过帧数
(3)跳过帧数,sensor.skip_frames(10)
<1>这个就是给OpenMV初始化一个缓冲时间,他那边是设置的跳过900张图片。官方例程是跳过10个图片。
<2>这个选取看你自己,我感觉没必要900,太多了。

曝光度设置
(4)sensor.set_auto_exposure(False, 1000)
<1>这个是用于设置曝光度的,曝光过度照片看起来会过亮,曝光不足图片看起来会太暗。
<2>官方例程没有调用这个函数,说明曝光是一直打开的。
<3>C站那位是设置的每1ms曝光一次。你们可以根据自己测试结果来设置。

白平衡和自增益
(5)sensor.set_auto_whitebal(False)和sensor.set_auto_gain(False)
<1>按理来说颜色识别的话,这两个都需要关闭的。C站另外那个博客就是都关闭了。但是官方只关闭了set_auto_whitebal()白平衡。
<2>我个人建议还是先都关闭
