目录
- 一、clone仓库
- 二、数据集下载与处理
- 1、数据集下载
- 2、数据集标记化(耗时较长)
- 三、修改配置
- 四、开始训练
- 五、模型推理
- 六、train.py训练代码讲解
- 1、导包
- 2、定义模型训练参数与相关设置
- 3、加载模型配置
- 4、迭代生成数据
- 5、模型初始化
- 6、设置自动混合精度与优化函数
- 7、损失评估与学习率获取
- 8、日志保存初始化
- 9、循环训练
- 七、run.c推理代码讲解
- 1、结构及内存管理
- 2、模型初始化:读取checkpoint
- 3、神经网络模块
- 4、main函数入口
Llama 2,基于优化的 Transformer 架构,是Meta AI正式发布的最新一代开源大模型,一系列模型(7b、13b、70b)均开源可商用,效果直逼gpt3.5。
下面我们来介绍如何使用Llama 2来训练一个故事生成模型。
如果迫不及待想爽一把先,请直接跳到这里,可直接运行:llama2-c,学习不就是先让自己爽起来,而后才有欲望去深究为什么!!!
一、clone仓库
首先从github将仓库拉到本地:
git clone https://github.com/karpathy/llama2.c
进入目录
cd llama2.c
二、数据集下载与处理
注:具体内容可见[玩转AIGC]sentencepiece训练一个Tokenizer(标记器)这篇文章
1、数据集下载
python tinystories.py download
2、数据集标记化(耗时较长)
python tinystories.py pretokenize
注:在运行文末的kaggle代码时,不需要运行这一步,我已经提前编好的,只要运行!cp /kaggle/input/llama2tranningdatabin/databin/* /kaggle/working/llama2.c/data/TinyStories_all_data就可把文件拷贝到对应目录下,因为编号太久了,而且在kaggle里面容易挂掉
三、修改配置
然后修改一些配置:
train.py里面有几个参数要修改
batch_size改小一点,否则会报’CUDA out of memory’ 的错误(土豪卡多随意,不介意的话送我一张)
dtype要改为"float16",否则会报’Current CUDA Device does not support bfloat16’的错误
compile要改为False,否则会报CUDA Capability过低或complex64不支持的错误
batch_size = 64
dtype = "float16"
compile = False
可选改的参数:
max_iters:是迭代次数,可改小一点,在kaggle里面运行一代是1.2s,运行100000代的话,大概还得34小时,而kaggle免费时长最长也才30小时,且一次运行最长12小时,所以要改小(还是那句话,土豪有卡的随意)
warmup_iters:是热身的迭代次数,主要是为了确定合适得学习率,卡有限的话可改小一些。
max_iters = 100000
warmup_iters = 1000
注:在运行文末的kaggle代码时,这里不用自己修改了,直接把我修改好的复制过来即可,运行!cp /kaggle/input/llama2trainpy4/train.py ./train.py即可复制,因为kaggle里面也手动改不了,能改也是很麻烦。
四、开始训练
python train.py
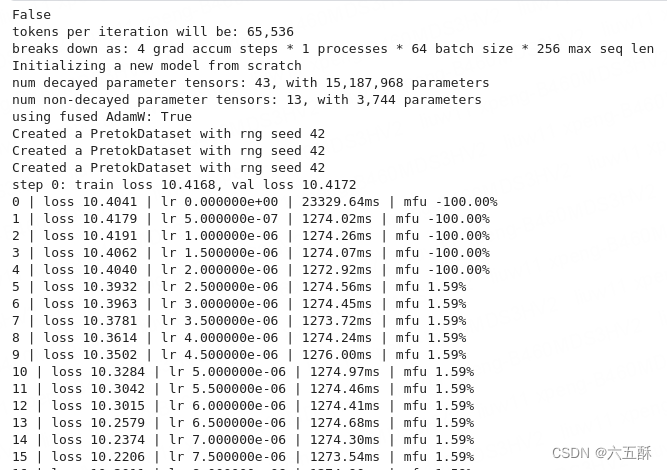
训练后可在out文件夹下看到以下文件:

当然还可以在命令行中指定训练参数(单GPU上训练):
python -m train.py --compile=False --eval_iters=10 --batch_size=8
如果是多GPU,可采用分布式训练,例如采用DDP 在1个node,4个 gpu 上训练:
torchrun --standalone --nproc_per_node=4 train.py
采用DDP 在2个node,4个 gpu 上训练:
torchrun --nproc_per_node=8 --nnodes=2 --node_rank=0 --master_addr=123.456.123.456 --master_port=1234 train.py
注:如果觉得训练太久了,可以跑我训练出来的模型,拷贝过来就可以了:
!cp /kaggle/input/llama2-out-model/* ./out
如果你没运行过train.py,那就是不会有llama2/out这个目录,这时候要先创建好out这个目录:
mkdir out
五、模型推理
先编译run(只需要运行一次)
make run
运行模型推理
./run out/model.bin
输出如下:
Once upon a time there was a little bear named manner. He was very playful, and he loved to jump around. One day, he saw a big pillow in his den. It was bright blue, just like the sky, and it seemed just right for him. He decided he would try to jump on it.
He pASHed into the air, feeling the pillow with his fluffy paws and carried on the giant. He bounced up and down, dodgingages and twists. He felt so free and happy as he jumped higher and higher.
But then he started to struggle. The pillow was too hard and he couldn’t jump on it! He tried and tried and even though he was tired and frustrated, he couldn’t take a kick. Finally, he gave up. But he still felt free, like nothing could stop him.
Close was tired, panting and relieved at its same time. He jumped and flew away, still feeling happy after exploring the sky. He curled up on the pillow to take his nap and finally fell asleep, dreaming of himself jumping across the sky.
感兴趣的话,也可以跑其它模型试试:
wget https://huggingface.co/karpathy/tinyllamas/resolve/main/stories15M.bin
./run stories15M.bin

wget https://huggingface.co/karpathy/tinyllamas/resolve/main/stories42M.bin
./run stories42M.bin
当然还可指定参数运行:
./run stories42M.bin 1.0 256 "One day, Lily met a Shoggoth"
注:在本小节末尾的kaggle代码时,可能会报找不到triton模块,此时运行
!pip3 install triton,进行安装即可。
以上可在kaggle运行:llama2-c
六、train.py训练代码讲解
注:为了方便讲解,已经把部分ddp(分布式训练,多gpu可用,我的kaggle是单gpu,所以去掉了)跟wandb_log(记录日志)去掉了,整体代码在train.py里面,此处不再赘述了。
1、导包
import math
import os
import time
from contextlib import nullcontext
from datetime import datetime
from functools import partial

import torch
from model import Transformer, ModelArgs # 在model.py里的模型
from torch.distributed import destroy_process_group, init_process_group
from torch.nn.parallel import DistributedDataParallel as DDP
#import torch._dynamo

from tinystories import Task
2、定义模型训练参数与相关设置
# -----------------------------------------------------------------------------
# I/O
out_dir = "out"
eval_interval = 2000
log_interval = 1
eval_iters = 100
eval_only = False  # if True, script exits right after the first eval
always_save_checkpoint = False  # if True, always save a checkpoint after each eval
init_from = "scratch"  # 'scratch' or 'resume'
# wandb logging
wandb_log = False  # disabled by default
wandb_project = "llamac"
wandb_run_name = "run" + datetime.now().strftime("%Y_%m_%d_%H_%M_%S")
# data
batch_size = 64  # if gradient_accumulation_steps > 1, this is the micro-batch size
max_seq_len = 256
# model
dim = 288
n_layers = 6
n_heads = 6
multiple_of = 32
dropout = 0.0
# adamw optimizer
gradient_accumulation_steps = 4  # used to simulate larger batch sizes
learning_rate = 5e-4  # max learning rate
max_iters = 5000  # total number of training iterations
weight_decay = 1e-1
beta1 = 0.9
beta2 = 0.95
grad_clip = 1.0  # clip gradients at this value, or disable if == 0.0
# learning rate decay settings
decay_lr = True  # whether to decay the learning rate
warmup_iters = 100  # how many steps to warm up for
# system
device = "cuda"  # examples: 'cpu', 'cuda', 'cuda:0', 'cuda:1' etc., or try 'mps' on macbooks
dtype = "float16"  # float32|bfloat16|float16
compile = False  # use PyTorch 2.0 to compile the model to be faster
# -----------------------------------------------------------------------------
下面是各个参数的解释:
I/O

    out_dir: 模型训练输出路径。
    eval_interval: 多少个训练步骤后进行一次模型评估。
    log_interval: 多少个训练步骤后进行一次日志记录。
    eval_iters: 在进行模型评估时,评估器将处理多少个数据集条目。
    eval_only: 如果为 True,则仅进行一次模型评估并退出脚本。
    always_save_checkpoint: 如果为 True,则在每次模型评估后始终保存一个检查点。
    init_from: 模型初始化方法,可以是 'scratch'(从头开始训练)或 'resume'(从之前的检查点恢复)。

wandb 日志记录

    wandb_log: 是否启用 wandb 日志记录。
    wandb_project: wandb 项目名称。
    wandb_run_name: wandb 运行名称。

数据

    batch_size: 训练的批次大小。
    max_seq_len: 输入序列的最大长度。

模型

    dim: Transformer 模型中的隐藏层维度。
    n_layers: Transformer 模型中的层数。
    n_heads: Transformer 模型中的多头注意力头数。
    multiple_of: 批次大小必须是此值的倍数。在 TPU 上训练时,批次大小必须是 8 的倍数。
    dropout: 模型中的 dropout 概率。

adamw 优化器

    gradient_accumulation_steps: 用于模拟较大批次大小的梯度累积步骤数。
    learning_rate: 最大学习率。
    max_iters: 总训练迭代次数。
    weight_decay: AdamW 优化器中的权重衰减系数。
    beta1: AdamW 优化器的 beta1 超参数。
    beta2: AdamW 优化器的 beta2 超参数。
    grad_clip: 梯度裁剪值,如果设为 0.0 则不进行梯度裁剪。

学习率衰减设置

    decay_lr: 是否对学习率进行衰减。
    warmup_iters: 学习率预热步骤数。

系统

    device: 训练设备,可以是 'cpu'、'cuda'、'cuda:0'、'cuda:1' 等,或在 MacBook 上尝试 'mps'。
    dtype: 训练数据类型,可以是 'float32'、'bfloat16' 或 'float16'。
    compile: 是否使用 PyTorch 2.0 编译模型以提高速度。
3、加载模型配置
# -----------------------------------------------------------------------------
config_keys = [
    k
    for k, v in globals().items()
    if not k.startswith("_") and isinstance(v, (int, float, bool, str))
]
exec(open("configurator.py").read())  # overrides from command line or config file
config = {k: globals()[k] for k in config_keys}  # will be useful for logging
# -----------------------------------------------------------------------------

# fixing some hyperparams to sensible defaults
lr_decay_iters = max_iters  # should be ~= max_iters per Chinchilla
min_lr = 0.0  # minimum learning rate, should be ~= learning_rate/10 per Chinchilla

master_process = True
seed_offset = 0
ddp_world_size = 1

tokens_per_iter = gradient_accumulation_steps * ddp_world_size * batch_size * max_seq_len
if master_process:
    print(f"tokens per iteration will be: {tokens_per_iter:,}")
    print(f"breaks down as: {gradient_accumulation_steps} grad accum steps * {ddp_world_size} processes * {batch_size} batch size * {max_seq_len} max seq len")

if master_process:
    os.makedirs(out_dir, exist_ok=True)
torch.manual_seed(1337 + seed_offset)
torch.backends.cuda.matmul.allow_tf32 = True  # allow tf32 on matmul
torch.backends.cudnn.allow_tf32 = True  # allow tf32 on cudnn
device_type = "cuda" if "cuda" in device else "cpu"  # for later use in torch.autocast
# note: float16 data type will automatically use a GradScaler
ptdtype = {"float32": torch.float32, "bfloat16": torch.bfloat16, "float16": torch.float16}[dtype]
ctx = (
    nullcontext()
    if device_type == "cpu"
    else torch.amp.autocast(device_type=device_type, dtype=ptdtype)
)
4、迭代生成数据
用于将输入数据集划分为若干个大小相同的批次,并对每个批次进行预处理和编码,以便于送入模型进行训练。在模型训练过程中,需要不断地生成训练数据批次,然后将这些批次送入模型进行训练。因此,这个新函数 iter_batches 就是用于迭代生成数据批次的迭代器函数,它会在每个迭代步骤中调用 Task.iter_batches() 函数生成一个数据批次,并返回给调用者。这样,就可以通过简单的 for 循环来不断地生成数据批次,然后将这些批次送入模型进行训练。
# task-specific setup
iter_batches = partial(
    Task.iter_batches,
    batch_size=batch_size,
    max_seq_len=max_seq_len,
    device=device,
    num_workers=0,
)
5、模型初始化
iter_num: 当前迭代次数
best_val_loss:最佳验证集损失值
以上两个值用于记录模型训练的状态。这些变量的初始值为 0 和一个较大的数值,表示模型训练尚未开始,最佳验证集损失值尚未确定。
# init these up here, can override if init_from='resume' (i.e. from a checkpoint)
iter_num = 0
best_val_loss = 1e9
使用 ModelArgs 类来设置模型参数 model_args
# model init
model_args = dict(
    dim=dim,
    n_layers=n_layers,
    n_heads=n_heads,
    n_kv_heads=n_heads,
    vocab_size=32000,
    multiple_of=multiple_of,
    max_seq_len=max_seq_len,
    dropout=dropout,
)  # start with model_args from command line
然后,根据 init_from 参数的取值来初始化模型。如果 init_from 的值为 “scratch”,则表示从头开始训练一个新模型,如果 init_from 的值为 “resume”,则表示从之前的训练中恢复训练。
先来看:init_from == “scratch”
直接根据model_args创建参数类,然后通过 Transformer 类来创建一个新的 Transformer 模型 model。
if init_from == "scratch":
    # init a new model from scratch
    print("Initializing a new model from scratch")
    gptconf = ModelArgs(**model_args)
    model = Transformer(gptconf)
再来看:init_from == “resume”
1)先从checkpoint加载模型(“ckpt.pt”)
2)然后根据model_args创建参数类,然后通过 Transformer 类来创建一个新的 Transformer 模型 model。
3)最后修复模型状态字典中的键名,因为有时候在保存模型的时候会在键名前面加上不必要的前缀,导致在加载模型时出现问题。坦白说我们也不清楚这个前缀是怎么产生的,需要进一步进行调试和研究。
elif init_from == "resume":
    print(f"Resuming training from {out_dir}")
    # resume training from a checkpoint.
    ckpt_path = os.path.join(out_dir, "ckpt.pt")
    checkpoint = torch.load(ckpt_path, map_location=device)
    checkpoint_model_args = checkpoint["model_args"]
    # force these config attributes to be equal otherwise we can't even resume training
    # the rest of the attributes (e.g. dropout) can stay as desired from command line
    for k in ["dim", "n_layers", "n_heads", "n_kv_heads", "vocab_size", "multiple_of", "max_seq_len"]:
        model_args[k] = checkpoint_model_args[k]
    # create the model
    gptconf = ModelArgs(**model_args)
    model = Transformer(gptconf)
    state_dict = checkpoint["model"]
    # fix the keys of the state dictionary :(
    # honestly no idea how checkpoints sometimes get this prefix, have to debug more
    unwanted_prefix = "_orig_mod."
    for k, v in list(state_dict.items()):
        if k.startswith(unwanted_prefix):
            state_dict[k[len(unwanted_prefix) :]] = state_dict.pop(k)
    model.load_state_dict(state_dict)
    iter_num = checkpoint["iter_num"]
    best_val_loss = checkpoint["best_val_loss"]
无论是从头开始训练新模型还是从之前的训练中恢复模型,最后都将模型 model 移动到指定的设备 device 上进行训练。
model.to(device)
6、设置自动混合精度与优化函数
scaler:设置自动混合精度
optimizer:优化函数
如果是恢复训练的,并且checkpoint里面存在optimizer,那么optimizer会从checkpoint里面加载
# initialize a GradScaler. If enabled=False scaler is a no-op
scaler = torch.cuda.amp.GradScaler(enabled=(dtype == "float16"))

# optimizer
optimizer = model.configure_optimizers(weight_decay, learning_rate, (beta1, beta2), device_type)
if init_from == "resume" and "optimizer" in checkpoint:
    optimizer.load_state_dict(checkpoint["optimizer"])
checkpoint = None  # free up memory
7、损失评估与学习率获取
estimate_loss():
使用多个数据批次来计算一个任意精度的损失值,用于评估模型在指定数据集上的性能。该函数会将模型置为评估模式(调用 model.eval() 函数),然后对训练集和验证集分别进行评估。对于每个数据集,该函数会使用 iter_batches() 函数生成一个数据批次迭代器 batch_iter,然后对迭代器中的每个数据批次进行前向传播和损失计算,得到一个损失值。这里使用 eval_iters 次评估来对整个数据集进行评估,从而得到一个更准确的损失值。
最后,该函数返回一个字典 out,其中包含了训练集和验证集的平均损失值。需要注意的是,评估完成后,该函数将模型重新置为训练模式(调用 model.train() 函数),以便于之后的模型训练。
get_lr(it):
这段代码定义了一个函数 get_lr(),用于根据当前迭代次数来动态计算学习率。具体来说,该函数使用了一种余弦退火(cosine annealing)的学习率调度策略,即先进行一定步数的学习率线性预热(linear warmup),然后使用余弦函数进行学习率退火,直到学习率降到最小值为止。
该函数的输入参数是当前迭代次数 it,输出参数是当前迭代次数下的学习率。具体来说,该函数首先判断当前迭代次数是否小于预热步数 warmup_iters,如果是,则按照线性预热的方式逐步增加学习率,直到达到 learning_rate。如果当前迭代次数已经超过了学习率退火的步数 lr_decay_iters,则直接返回最小学习率 min_lr。如果当前迭代次数在预热步数和退火步数之间,则使用余弦函数计算当前迭代次数下的学习率,将学习率从初始值 learning_rate 逐渐下降到最小学习率 min_lr。
需要注意的是,在函数中使用了一个系数 coeff,它的值在 0 和 1 之间,用于调整学习率的下降速度。这个系数是通过余弦函数计算得到的,随着迭代次数的增加,系数的值逐渐从 1 下降到 0,从而实现学习率的下降。
# helps estimate an arbitrarily accurate loss over either split using many batches
@torch.no_grad()
def estimate_loss():
    out = {}
    model.eval()
    for split in ["train", "val"]:
        batch_iter = iter_batches(split)
        losses = torch.zeros(eval_iters)  # keep on CPU
        for k in range(eval_iters):
            X, Y = next(batch_iter)
            with ctx:
                logits, loss = model(X, Y)
            losses[k] = loss.item()
        out[split] = losses.mean()
    model.train()
    return out

# learning rate decay scheduler (cosine with warmup)
def get_lr(it):
    # 1) linear warmup for warmup_iters steps
    if it < warmup_iters:
        return learning_rate * it / warmup_iters
    # 2) if it > lr_decay_iters, return min learning rate
    if it > lr_decay_iters:
        return min_lr
    # 3) in between, use cosine decay down to min learning rate
    decay_ratio = (it - warmup_iters) / (lr_decay_iters - warmup_iters)
    assert 0 <= decay_ratio <= 1
    coeff = 0.5 * (1.0 + math.cos(math.pi * decay_ratio))  # coeff ranges 0..1
    return min_lr + coeff * (learning_rate - min_lr)
8、日志保存初始化
没什么可说的,就是采用wandb,并进行初始化
# logging
if wandb_log and master_process:
    import wandb
    wandb.init(project=wandb_project, name=wandb_run_name, config=config)
9、循环训练
这部分主要实现了模型的训练循环。具体来说,该循环会在训练集上进行多次迭代,每次迭代会使用一个数据批次进行前向传播、反向传播和参数更新。在每次迭代过程中,该循环会根据当前迭代次数来动态调整学习率,并使用学习率和损失函数对模型参数进行更新。此外,该循环还会定期对训练集和验证集进行损失评估,并保存模型checkpoint。
开始时,该循环会使用 iter_batches() 函数生成一个训练集数据批次迭代器 train_batch_iter,然后从迭代器中获取第一个数据批次 X, Y。接着,该循环会不断迭代,直到达到指定的最大迭代次数 max_iters 为止。
在while True的每次迭代中:该循环会先根据当前迭代次数调整学习率,然后使用优化器对模型参数进行更新。如果当前迭代次数是评估间隔 eval_interval 的倍数,并且当前进程是主进程,那么该循环会对训练集和验证集进行损失评估,并将评估结果保存到 losses 中。如果当前验证集的损失值比之前的最佳损失值要小,或者总是保存检查点的标志 always_save_checkpoint 被设置为真,那么该循环会将模型参数和优化器状态保存到检查点文件中。
接着,该循环会使用当前数据批次 X, Y 进行前向传播和反向传播,并根据梯度累积步数 gradient_accumulation_steps 进行梯度平均。如果在训练过程中使用了混合精度训练,那么该循环还会使用 scaler 对梯度进行缩放。然后,该循环会使用裁剪梯度的方法对梯度进行限幅,并使用优化器对模型参数进行更新。最后,该循环会将梯度清零,以便于下一次迭代。
在训练过程中,该循环会定期打印当前迭代次数、损失值、学习率、迭代时间和模型的内存使用率等信息。此外,该循环会根据指定的最大迭代次数 max_iters 判断是否终止训练。
# training loop
train_batch_iter = iter_batches("train")
X, Y = next(train_batch_iter)  # fetch the very first batch
t0 = time.time()
local_iter_num = 0  # number of iterations in the lifetime of this process
raw_model = model.module if ddp else model  # unwrap DDP container if needed
running_mfu = -1.0
while True:
    # determine and set the learning rate for this iteration
    lr = get_lr(iter_num) if decay_lr else learning_rate
    for param_group in optimizer.param_groups:
        param_group["lr"] = lr

    # evaluate the loss on train/val sets and write checkpoints
    if iter_num % eval_interval == 0 and master_process:
        losses = estimate_loss()
        print(f"step {iter_num}: train loss {losses['train']:.4f}, val loss {losses['val']:.4f}")
        if losses["val"] < best_val_loss or always_save_checkpoint:
            best_val_loss = losses["val"]
            if iter_num > 0:
                checkpoint = {
                    "model": raw_model.state_dict(),
                    "optimizer": optimizer.state_dict(),
                    "model_args": model_args,
                    "iter_num": iter_num,
                    "best_val_loss": best_val_loss,
                    "config": config,
                }
                print(f"saving checkpoint to {out_dir}")
                torch.save(checkpoint, os.path.join(out_dir, "ckpt.pt"))
                raw_model.export(os.path.join(out_dir, "model.bin"))
    if iter_num == 0 and eval_only:
        break

    # forward backward update, with optional gradient accumulation to simulate larger batch size
    # and using the GradScaler if data type is float16
    for micro_step in range(gradient_accumulation_steps):
        with ctx:
            logits, loss = model(X, Y)
            loss = loss / gradient_accumulation_steps
        # immediately async prefetch next batch while model is doing the forward pass on the GPU
        X, Y = next(train_batch_iter)
        # backward pass, with gradient scaling if training in fp16
        scaler.scale(loss).backward()
    # clip the gradient
    if grad_clip != 0.0:
        scaler.unscale_(optimizer)
        torch.nn.utils.clip_grad_norm_(model.parameters(), grad_clip)
    # step the optimizer and scaler if training in fp16
    scaler.step(optimizer)
    scaler.update()
    # flush the gradients as soon as we can, no need for this memory anymore
    optimizer.zero_grad(set_to_none=True)

    # timing and logging
    t1 = time.time()
    dt = t1 - t0
    t0 = t1
    if iter_num % log_interval == 0 and master_process:
        # get loss as float, scale up due to the divide above. note: this is a CPU-GPU sync point
        lossf = loss.item() * gradient_accumulation_steps
        if local_iter_num >= 5:  # let the training loop settle a bit
            mfu = raw_model.estimate_mfu(batch_size * gradient_accumulation_steps, dt)
            running_mfu = mfu if running_mfu == -1.0 else 0.9 * running_mfu + 0.1 * mfu
        print(
            f"{iter_num} | loss {lossf:.4f} | lr {lr:e} | {dt*1000:.2f}ms | mfu {running_mfu*100:.2f}%"
        )
    iter_num += 1
    local_iter_num += 1

    # termination conditions
    if iter_num > max_iters:
        break
七、run.c推理代码讲解
注:整体代码在run.c里面。
1、结构及内存管理
定义了一个基于Transformer架构的神经网络模型的配置参数、运行状态和内存管理。
具体来说:
Config结构体定义了Transformer模型的一些超参数,例如Transformer的维度、隐藏层维度、层数、查询头数、键/值头数、词汇表大小、最大序列长度等等。
TransformerWeights结构体定义了Transformer模型的所有权重矩阵,包括Token嵌入表、RMSNorm的权重、矩阵乘积的权重、前馈网络的权重、RoPE相对位置编码的频率矩阵以及用于分类的权重(可选)。
RunState结构体定义了Transformer模型每个时间步的状态,例如当前激活值、残差分支内的激活值、FFN中的隐藏层激活值、查询、键、值、注意力得分、输出概率分布等等,同时还包括用于缓存键/值的缓存矩阵。函数malloc_run_state用于为RunState结构体中的各个数组分配内存空间。
函数free_run_state用于释放RunState结构体中各个数组占用的内存空间。
在代码中,这些数组的内存分配和释放都使用了calloc和free函数。calloc函数与malloc函数类似,但它会在分配内存后将其初始化为零,避免出现未初始化的内存访问问题。在分配内存后,代码还会检查是否分配成功以避免出现内存分配失败的情况。
// ----------------------------------------------------------------------------
// Transformer and RunState structs, and related memory management

typedef struct {
    int dim; // transformer dimension
    int hidden_dim; // for ffn layers
    int n_layers; // number of layers
    int n_heads; // number of query heads
    int n_kv_heads; // number of key/value heads (can be < query heads because of multiquery)
    int vocab_size; // vocabulary size, usually 256 (byte-level)
    int seq_len; // max sequence length
} Config;

typedef struct {
    // token embedding table
    float* token_embedding_table;    // (vocab_size, dim)
    // weights for rmsnorms
    float* rms_att_weight; // (layer, dim) rmsnorm weights
    float* rms_ffn_weight; // (layer, dim)
    // weights for matmuls
    float* wq; // (layer, dim, dim)
    float* wk; // (layer, dim, dim)
    float* wv; // (layer, dim, dim)
    float* wo; // (layer, dim, dim)
    // weights for ffn
    float* w1; // (layer, hidden_dim, dim)
    float* w2; // (layer, dim, hidden_dim)
    float* w3; // (layer, hidden_dim, dim)
    // final rmsnorm
    float* rms_final_weight; // (dim,)
    // freq_cis for RoPE relatively positional embeddings
    float* freq_cis_real; // (seq_len, dim/2)
    float* freq_cis_imag; // (seq_len, dim/2)
    // (optional) classifier weights for the logits, on the last layer
    float* wcls;
} TransformerWeights;

typedef struct {
    // current wave of activations
    float *x; // activation at current time stamp (dim,)
    float *xb; // same, but inside a residual branch (dim,)
    float *xb2; // an additional buffer just for convenience (dim,)
    float *hb; // buffer for hidden dimension in the ffn (hidden_dim,)
    float *hb2; // buffer for hidden dimension in the ffn (hidden_dim,)
    float *q; // query (dim,)
    float *k; // key (dim,)
    float *v; // value (dim,)
    float *att; // buffer for scores/attention values (n_heads, seq_len)
    float *logits; // output logits
    // kv cache
    float* key_cache;   // (layer, seq_len, dim)
    float* value_cache; // (layer, seq_len, dim)
} RunState;

void malloc_run_state(RunState* s, Config* p) {
    // we calloc instead of malloc to keep valgrind happy
    s->x = calloc(p->dim, sizeof(float));
    s->xb = calloc(p->dim, sizeof(float));
    s->xb2 = calloc(p->dim, sizeof(float));
    s->hb = calloc(p->hidden_dim, sizeof(float));
    s->hb2 = calloc(p->hidden_dim, sizeof(float));
    s->q = calloc(p->dim, sizeof(float));
    s->k = calloc(p->dim, sizeof(float));
    s->v = calloc(p->dim, sizeof(float));
    s->att = calloc(p->n_heads * p->seq_len, sizeof(float));
    s->logits = calloc(p->vocab_size, sizeof(float));
    s->key_cache = calloc(p->n_layers * p->seq_len * p->dim, sizeof(float));
    s->value_cache = calloc(p->n_layers * p->seq_len * p->dim, sizeof(float));
    // ensure all mallocs went fine
    if (!s->x || !s->xb || !s->xb2 || !s->hb || !s->hb2 || !s->q
     || !s->k || !s->v || !s->att || !s->logits || !s->key_cache
     || !s->value_cache) {
        printf("malloc failed!\n");
        exit(1);
    }
}

void free_run_state(RunState* s) {
    free(s->x);
    free(s->xb);
    free(s->xb2);
    free(s->hb);
    free(s->hb2);
    free(s->q);
    free(s->k);
    free(s->v);
    free(s->att);
    free(s->logits);
    free(s->key_cache);
    free(s->value_cache);
}
2、模型初始化:读取checkpoint
具体来说,该函数的输入包括:
- 一个指向TransformerWeights结构体的指针w,用于存储从文件中读取的权重;
- 一个指向Config结构体的指针p,包含Transformer模型的超参数;
- 一个指向float类型的指针f,指向从文件中读取的所有模型权重的连续内存块;
- 一个布尔值shared_weights,指示是否共享Token嵌入表和分类器权重。
该函数的实现方式是,首先将指向连续内存块的指针f按照顺序分别指向各个数组的起始位置,然后使用指针算术运算逐个填充这些数组。填充顺序与数组在TransformerWeights结构体中的定义顺序相同。
需要注意的是,最后一个权重数组wcls的起始位置可能与前面的数组不同,这取决于shared_weights的值。如果shared_weights为true,则Token嵌入表和分类器权重共享相同的内存空间,此时wcls指向Token嵌入表的起始位置;否则,wcls指向连续内存块的当前位置。
该函数的作用是将从文件中读取的权重初始化到内存中,以便后续的Transformer模型推理过程中使用。
// ----------------------------------------------------------------------------
// initialization: read from checkpoint

void checkpoint_init_weights(TransformerWeights *w, Config* p, float* f, int shared_weights) {
    float* ptr = f;
    w->token_embedding_table = ptr;
    ptr += p->vocab_size * p->dim;
    w->rms_att_weight = ptr;
    ptr += p->n_layers * p->dim;
    w->wq = ptr;
    ptr += p->n_layers * p->dim * p->dim;
    w->wk = ptr;
    ptr += p->n_layers * p->dim * p->dim;
    w->wv = ptr;
    ptr += p->n_layers * p->dim * p->dim;
    w->wo = ptr;
    ptr += p->n_layers * p->dim * p->dim;
    w->rms_ffn_weight = ptr;
    ptr += p->n_layers * p->dim;
    w->w1 = ptr;
    ptr += p->n_layers * p->dim * p->hidden_dim;
    w->w2 = ptr;
    ptr += p->n_layers * p->hidden_dim * p->dim;
    w->w3 = ptr;
    ptr += p->n_layers * p->dim * p->hidden_dim;
    w->rms_final_weight = ptr;
    ptr += p->dim;
    w->freq_cis_real = ptr;
    int head_size = p->dim / p->n_heads;
    ptr += p->seq_len * head_size / 2;
    w->freq_cis_imag = ptr;
    ptr += p->seq_len * head_size / 2;
    w->wcls = shared_weights ? w->token_embedding_table : ptr;
}
3、神经网络模块
这些方法用于实现神经网络模型,具体来说是Transformer模型。以下是每个方法的简要描述:
1)accum(float a, float b, int size):此方法将数组b的每个元素加到数组a的相应元素上。
2)rmsnorm(float o, float x, float* weight, int size):此方法使用作为参数提供的权重向量,在输入向量x上执行RMS归一化。结果存储在输出向量o中。
3)softmax(float* x, int size):此方法对输入向量x应用softmax函数,该函数是类别集上的概率分布。结果是相同类别集上的概率分布,输出向量中的每个元素表示相应类别的概率。
4)matmul(float* xout, float* x, float* w, int n, int d):此方法在输入向量x和权重矩阵w之间执行矩阵乘法,得到输出向量xout。矩阵和向量的维度由参数n和d指定。
5)transformer(int token, int pos, Config* p, RunState* s, TransformerWeights* w):此方法为给定的输入token和位置实现Transformer模型。它使用提供的权重计算给定输入的输出向量,并将结果存储在RunState对象的输出向量中。
6)sample(float* probabilities, int n):此方法从由输入向量probabilities指定的概率分布中抽取一个元素。向量的长度由整数参数n给出。
7)argmax(float* v, int n):此方法返回输入向量v中最大元素的索引。向量的长度由整数参数n给出。
// ----------------------------------------------------------------------------
// neural net blocks

void accum(float *a, float *b, int size) {
    for (int i = 0; i < size; i++) {
        a[i] += b[i];
    }
}

void rmsnorm(float* o, float* x, float* weight, int size) {
    // calculate sum of squares
    float ss = 0.0f;
    for (int j = 0; j < size; j++) {
        ss += x[j] * x[j];
    }
    ss /= size;
    ss += 1e-5f;
    ss = 1.0f / sqrtf(ss);
    // normalize and scale
    for (int j = 0; j < size; j++) {
        o[j] = weight[j] * (ss * x[j]);
    }
}

void softmax(float* x, int size) {
    // find max value (for numerical stability)
    float max_val = x[0];
    for (int i = 1; i < size; i++) {
        if (x[i] > max_val) {
            max_val = x[i];
        }
    }
    // exp and sum
    float sum = 0.0f;
    for (int i = 0; i < size; i++) {
        x[i] = expf(x[i] - max_val);
        sum += x[i];
    }
    // normalize
    for (int i = 0; i < size; i++) {
        x[i] /= sum;
    }
}

void matmul(float* xout, float* x, float* w, int n, int d) {
    // W (d,n) @ x (n,) -> xout (d,)
    // by far the most amount of time is spent inside this little function
    int i;
    #pragma omp parallel for private(i)
    for (i = 0; i < d; i++) {
        float val = 0.0f;
        for (int j = 0; j < n; j++) {
            val += w[i * n + j] * x[j];
        }
        xout[i] = val;
    }
}

void transformer(int token, int pos, Config* p, RunState* s, TransformerWeights* w) {

    // a few convenience variables
    float *x = s->x;
    int dim = p->dim;
    int hidden_dim =  p->hidden_dim;
    int head_size = dim / p->n_heads;

    // copy the token embedding into x
    float* content_row = &(w->token_embedding_table[token * dim]);
    memcpy(x, content_row, dim*sizeof(*x));

    // pluck out the "pos" row of freq_cis_real and freq_cis_imag
    float* freq_cis_real_row = w->freq_cis_real + pos * head_size / 2;
    float* freq_cis_imag_row = w->freq_cis_imag + pos * head_size / 2;

    // forward all the layers
    for(int l = 0; l < p->n_layers; l++) {

        // attention rmsnorm
        rmsnorm(s->xb, x, w->rms_att_weight + l*dim, dim);

        // qkv matmuls for this position
        matmul(s->q, s->xb, w->wq + l*dim*dim, dim, dim);
        matmul(s->k, s->xb, w->wk + l*dim*dim, dim, dim);
        matmul(s->v, s->xb, w->wv + l*dim*dim, dim, dim);

        // apply RoPE rotation to the q and k vectors for each head
        for (int h = 0; h < p->n_heads; h++) {
            // get the q and k vectors for this head
            float* q = s->q + h * head_size;
            float* k = s->k + h * head_size;
            // rotate q and k by the freq_cis_real and freq_cis_imag
            for (int i = 0; i < head_size; i+=2) {
                float q0 = q[i];
                float q1 = q[i+1];
                float k0 = k[i];
                float k1 = k[i+1];
                float fcr = freq_cis_real_row[i/2];
                float fci = freq_cis_imag_row[i/2];
                q[i]   = q0 * fcr - q1 * fci;
                q[i+1] = q0 * fci + q1 * fcr;
                k[i]   = k0 * fcr - k1 * fci;
                k[i+1] = k0 * fci + k1 * fcr;
            }
        }

        // save key,value at this time step (pos) to our kv cache
        int loff = l * p->seq_len * dim; // kv cache layer offset for convenience
        float* key_cache_row = s->key_cache + loff + pos * dim;
        float* value_cache_row = s->value_cache + loff + pos * dim;
        memcpy(key_cache_row, s->k, dim*sizeof(*key_cache_row));
        memcpy(value_cache_row, s->v, dim*sizeof(*value_cache_row));

        // multihead attention. iterate over all heads
        int h;
        #pragma omp parallel for private(h)
        for (h = 0; h < p->n_heads; h++) {
            // get the query vector for this head
            float* q = s->q + h * head_size;
            // attention scores for this head
            float* att = s->att + h * p->seq_len;
            // iterate over all timesteps, including the current one
            for (int t = 0; t <= pos; t++) {
                // get the key vector for this head and at this timestep
                float* k = s->key_cache + loff + t * dim + h * head_size;
                // calculate the attention score as the dot product of q and k
                float score = 0.0f;
                for (int i = 0; i < head_size; i++) {
                    score += q[i] * k[i];
                }
                score /= sqrtf(head_size);
                // save the score to the attention buffer
                att[t] = score;
            }

            // softmax the scores to get attention weights, from 0..pos inclusively
            softmax(att, pos + 1);

            // weighted sum of the values, store back into xb
            float* xb = s->xb + h * head_size;
            memset(xb, 0, head_size * sizeof(float));
            for (int t = 0; t <= pos; t++) {
                // get the value vector for this head and at this timestep
                float* v = s->value_cache + loff + t * dim + h * head_size;
                // get the attention weight for this timestep
                float a = att[t];
                // accumulate the weighted value into xb
                for (int i = 0; i < head_size; i++) {
                    xb[i] += a * v[i];
                }
            }
        }

        // final matmul to get the output of the attention
        matmul(s->xb2, s->xb, w->wo + l*dim*dim, dim, dim);

        // residual connection back into x
        accum(x, s->xb2, dim);

        // ffn rmsnorm
        rmsnorm(s->xb, x, w->rms_ffn_weight + l*dim, dim);

        // Now for FFN in PyTorch we have: self.w2(F.silu(self.w1(x)) * self.w3(x))
        // first calculate self.w1(x) and self.w3(x)
        matmul(s->hb, s->xb, w->w1 + l*dim*hidden_dim, dim, hidden_dim);
        matmul(s->hb2, s->xb, w->w3 + l*dim*hidden_dim, dim, hidden_dim);

        // F.silu; silu(x)=x*σ(x),where σ(x) is the logistic sigmoid
        for (int i = 0; i < hidden_dim; i++) {
            s->hb[i] = s->hb[i] * (1.0f / (1.0f + expf(-s->hb[i])));
        }

        // elementwise multiply with w3(x)
        for (int i = 0; i < hidden_dim; i++) {
            s->hb[i] = s->hb[i] * s->hb2[i];
        }

        // final matmul to get the output of the ffn
        matmul(s->xb, s->hb, w->w2 + l*dim*hidden_dim, hidden_dim, dim);

        // residual connection
        accum(x, s->xb, dim);
    }

    // final rmsnorm
    rmsnorm(x, x, w->rms_final_weight, dim);

    // classifier into logits
    matmul(s->logits, x, w->wcls, p->dim, p->vocab_size);
}

int sample(float* probabilities, int n) {
    // sample index from probabilities, they must sum to 1
    float r = (float)rand() / (float)RAND_MAX;
    float cdf = 0.0f;
    for (int i = 0; i < n; i++) {
        cdf += probabilities[i];
        if (r < cdf) {
            return i;
        }
    }
    return n - 1; // in case of rounding errors
}

int argmax(float* v, int n) {
    // return argmax of v in elements 0..n
    int max_i = 0;
    float max_p = v[0];
    for (int i = 1; i < n; i++) {
        if (v[i] > max_p) {
            max_i = i;
            max_p = v[i];
        }
    }
    return max_i;
}
4、main函数入口
程序通过读取已经训练好的模型和分词器,生成指定长度的文本。下面是主函数的作用:
1)解析命令行参数,包括模型文件路径、温度和步数等,如果缺少必要的参数,则打印出用法说明并返回1。
2)读取模型文件,并将其映射到内存中,同时读取词汇表文件。
3)初始化运行状态,包括分配内存和初始化状态。
4)生成文本,通过不断调用Transformer模型并使用softmax函数和采样方法获取下一个词语,直到生成指定长度的文本。
5)打印生成的文本,并计算生成速度。
6)释放分配的内存,关闭文件句柄。
程序主要的工作是在while循环中完成的,每次循环生成一个词语,并更新运行状态。生成的词语通过printf函数打印出来,最后计算生成速度并输出。
int main(int argc, char *argv[]) {

    // poor man's C argparse
    char *checkpoint = NULL;  // e.g. out/model.bin
    float temperature = 0.9f; // e.g. 1.0, or 0.0
    int steps = 256;          // max number of steps to run for, 0: use seq_len
    // 'checkpoint' is necessary arg
    if (argc < 2) {
        printf("Usage: %s <checkpoint_file> [temperature] [steps]\n", argv[0]);
        return 1;
    }
    if (argc >= 2) {
        checkpoint = argv[1];
    }
    if (argc >= 3) {
        // optional temperature. 0.0 = (deterministic) argmax sampling. 1.0 = baseline
        temperature = atof(argv[2]);
    }
    if (argc >= 4) {
        steps = atoi(argv[3]);
    }

    // seed rng with time. if you want deterministic behavior use temperature 0.0
    srand((unsigned int)time(NULL));

    // read in the model.bin file
    Config config;
    TransformerWeights weights;
    int fd = 0;         // file descriptor for memory mapping
    float* data = NULL; // memory mapped data pointer
    long file_size;     // size of the checkpoint file in bytes
    {
        FILE *file = fopen(checkpoint, "rb");
        if (!file) { printf("Couldn't open file %s\n", checkpoint); return 1; }
        // read in the config header
        if(fread(&config, sizeof(Config), 1, file) != 1) { return 1; }
        // negative vocab size is hacky way of signaling unshared weights. bit yikes.
        int shared_weights = config.vocab_size > 0 ? 1 : 0;
        config.vocab_size = abs(config.vocab_size);
        // figure out the file size
        fseek(file, 0, SEEK_END); // move file pointer to end of file
        file_size = ftell(file); // get the file size, in bytes
        fclose(file);
        // memory map the Transformer weights into the data pointer
        fd = open(checkpoint, O_RDONLY); // open in read only mode
        if (fd == -1) { printf("open failed!\n"); return 1; }
        data = mmap(NULL, file_size, PROT_READ, MAP_PRIVATE, fd, 0);
        if (data == MAP_FAILED) { printf("mmap failed!\n"); return 1; }
        float* weights_ptr = data + sizeof(Config)/sizeof(float);
        checkpoint_init_weights(&weights, &config, weights_ptr, shared_weights);
    }
    // right now we cannot run for more than config.seq_len steps
    if (steps <= 0 || steps > config.seq_len) { steps = config.seq_len; }

    // read in the tokenizer.bin file
    char** vocab = (char**)malloc(config.vocab_size * sizeof(char*));
    {
        FILE *file = fopen("tokenizer.bin", "rb");
        if (!file) { printf("Couldn't load tokenizer.bin\n"); return 1; }
        int len;
        for (int i = 0; i < config.vocab_size; i++) {
            if(fread(&len, sizeof(int), 1, file) != 1) { return 1; }
            vocab[i] = (char *)malloc(len + 1);
            if(fread(vocab[i], len, 1, file) != 1) { return 1; }
            vocab[i][len] = '\0'; // add the string terminating token
        }
        fclose(file);
    }

    // create and init the application RunState
    RunState state;
    malloc_run_state(&state, &config);

    // the current position we are in
    long start = 0; // used to time our code, only initialized after first iteration
    int next;
    int token = 1; // 1 = BOS token in Llama-2 sentencepiece
    int pos = 0;
    printf("<s>\n"); // explicit print the initial BOS token (=1), stylistically symmetric
    while (pos < steps) {

        // forward the transformer to get logits for the next token
        transformer(token, pos, &config, &state, &weights);

        // sample the next token
        if(temperature == 0.0f) {
            // greedy argmax sampling
            next = argmax(state.logits, config.vocab_size);
        } else {
            // apply the temperature to the logits
            for (int q=0; q<config.vocab_size; q++) { state.logits[q] /= temperature; }
            // apply softmax to the logits to get the probabilities for next token
            softmax(state.logits, config.vocab_size);
            // we now want to sample from this distribution to get the next token
            next = sample(state.logits, config.vocab_size);
        }
        // following BOS token (1), sentencepiece decoder strips any leading whitespace (see PR #89)
        char *token_str = (token == 1 && vocab[next][0] == ' ') ? vocab[next]+1 : vocab[next];
        printf("%s", token_str);
        fflush(stdout);

        // advance forward
        token = next;
        pos++;
        // init our timer here because the first iteration is slow due to memmap
        if (start == 0) { start = time_in_ms(); }
    }

    // report achieved tok/s
    long end = time_in_ms();
    printf("\nachieved tok/s: %f\n", (steps-1) / (double)(end-start)*1000);

    // memory and file handles cleanup
    free_run_state(&state);
    for (int i = 0; i < config.vocab_size; i++) { free(vocab[i]); }
    free(vocab);
    if (data != MAP_FAILED) munmap(data, file_size);
    if (fd != -1) close(fd);
    return 0;
}
至此,你已经基本知道怎么训练llama2了,并且还知道训练跟推理大致是怎么实现的,虽然没有对代码逐一细讲,但也觉得没必要一一细讲,只要把大致流程说清楚,其余部分自然也就通了,LLM是不是其实也并不难,跟着教程玩起来吧!!!
参考文献:
https://zhuanlan.zhihu.com/p/634267984
