ALSA 是Advanced Linux Sound Architecture的缩写,先进的Linux音频架构,为Linux操作系统提供音频和MIDI功能。
aplay命令
aplay是播放命令。
root@imx6ul7d:~# aplay -h
Usage: aplay [OPTION]... [FILE]...

-h, --help              help
    --version           print current version
-l, --list-devices      list all soundcards and digital audio devices
-L, --list-pcms         list device names
-D, --device=NAME       select PCM by name
-q, --quiet             quiet mode
-t, --file-type TYPE    file type (voc, wav, raw or au)
-c, --channels=#        channels
-f, --format=FORMAT     sample format (case insensitive)
-r, --rate=#            sample rate
-d, --duration=#        interrupt after # seconds
-s, --samples=#         interrupt after # samples per channel
-M, --mmap              mmap stream
-N, --nonblock          nonblocking mode
-F, --period-time=#     distance between interrupts is # microseconds
-B, --buffer-time=#     buffer duration is # microseconds
    --period-size=#     distance between interrupts is # frames
    --buffer-size=#     buffer duration is # frames
-A, --avail-min=#       min available space for wakeup is # microseconds
-R, --start-delay=#     delay for automatic PCM start is # microseconds
                        (relative to buffer size if <= 0)
-T, --stop-delay=#      delay for automatic PCM stop is # microseconds from xrun
-v, --verbose           show PCM structure and setup (accumulative)
-V, --vumeter=TYPE      enable VU meter (TYPE: mono or stereo)
-I, --separate-channels one file for each channel
-i, --interactive       allow interactive operation from stdin
-m, --chmap=ch1,ch2,..  Give the channel map to override or follow
    --disable-resample  disable automatic rate resample
    --disable-channels  disable automatic channel conversions
    --disable-format    disable automatic format conversions
    --disable-softvol   disable software volume control (softvol)
    --test-position     test ring buffer position
    --test-coef=#       test coefficient for ring buffer position (default 8)
                        expression for validation is: coef * (buffer_size / 2)
    --test-nowait       do not wait for ring buffer - eats whole CPU
    --max-file-time=#   start another output file when the old file has recorded
                        for this many seconds
    --process-id-file   write the process ID here
    --use-strftime      apply the strftime facility to the output file name
    --dump-hw-params    dump hw_params of the device
    --fatal-errors      treat all errors as fatal
Recognized sample formats are: S8 U8 S16_LE S16_BE U16_LE U16_BE S24_LE S24_BE U24_LE U24_BE S32_LE S32_BE U32_LE U32_BE FLOAT_LE FLOAT_BE FLOAT64_LE FLOAT64_BE IEC958_SUBFRAME_LE IEC958_SUBFRAME_BE MU_LAW A_LAW IMA_ADPCM MPEG GSM S20_LE S20_BE U20_LE U20_BE SPECIAL S24_3LE S24_3BE U24_3LE U24_3BE S20_3LE S20_3BE U20_3LE U20_3BE S18_3LE S18_3BE U18_3LE U18_3BE G723_24 G723_24_1B G723_40 G723_40_1B DSD_U8 DSD_U16_LE DSD_U32_LE DSD_U16_BE DSD_U32_BE
Some of these may not be available on selected hardware
The available format shortcuts are:
-f cd (16 bit little endian, 44100, stereo)
-f cdr (16 bit big endian, 44100, stereo)
-f dat (16 bit little endian, 48000, stereo)
-t, 指定输出数据格式,默认是wave格式,还支持raw,voc,au,后两种格式不懂。
-D,指定播放设备,设备名的格式为hw:0,0,表示0号card的0号device。
-c,指定channel数。
-f, 指定语音数据格式,有很多格式可以选择。
-r, 指定采样频率,例如5512/8000/11025/16000/22050/32000/44100/48000/64000/88200/96000/176400/192000。
-d,指定播放的时长,单位秒。
-l, 播放设备列表
实例
罗列播放设备。
root@imx6ul7d:~# aplay -l
**** List of PLAYBACK Hardware Devices ****
card 0: wm8962audio [wm8962-audio], device 0: HiFi wm8962-0 [HiFi wm8962-0]
  Subdevices: 1/1
  Subdevice #0: subdevice #0
card 0: wm8962audio [wm8962-audio], device 1: HiFi-ASRC-FE (*) []
  Subdevices: 1/1
  Subdevice #0: subdevice #0
root@imx6ul7d:~#
播放音频文件。其中-Dhw:0,0 表示card0,device0,对应到aplay -l命令中的设备列表; -d 5表示播放5秒。
root@imx6ul7d:~# aplay -Dhw:0,0 -d5 /unit_tests/ASRC/audio8k16S.wav
Playing WAVE '/unit_tests/ASRC/audio8k16S.wav' : Signed 16 bit Little Endian, Rate 8000 Hz, Stereo
root@imx6ul7d:~#
arecord 命令
arecord是录音命令。
root@imx6ul7d:~# arecord -h
Usage: arecord [OPTION]... [FILE]...

-h, --help              help
    --version           print current version
-l, --list-devices      list all soundcards and digital audio devices
-L, --list-pcms         list device names
-D, --device=NAME       select PCM by name
-q, --quiet             quiet mode
-t, --file-type TYPE    file type (voc, wav, raw or au)
-c, --channels=#        channels
-f, --format=FORMAT     sample format (case insensitive)
-r, --rate=#            sample rate
-d, --duration=#        interrupt after # seconds
-s, --samples=#         interrupt after # samples per channel
-M, --mmap              mmap stream
-N, --nonblock          nonblocking mode
-F, --period-time=#     distance between interrupts is # microseconds
-B, --buffer-time=#     buffer duration is # microseconds
    --period-size=#     distance between interrupts is # frames
    --buffer-size=#     buffer duration is # frames
-A, --avail-min=#       min available space for wakeup is # microseconds
-R, --start-delay=#     delay for automatic PCM start is # microseconds
                        (relative to buffer size if <= 0)
-T, --stop-delay=#      delay for automatic PCM stop is # microseconds from xrun
-v, --verbose           show PCM structure and setup (accumulative)
-V, --vumeter=TYPE      enable VU meter (TYPE: mono or stereo)
-I, --separate-channels one file for each channel
-i, --interactive       allow interactive operation from stdin
-m, --chmap=ch1,ch2,..  Give the channel map to override or follow
    --disable-resample  disable automatic rate resample
    --disable-channels  disable automatic channel conversions
    --disable-format    disable automatic format conversions
    --disable-softvol   disable software volume control (softvol)
    --test-position     test ring buffer position
    --test-coef=#       test coefficient for ring buffer position (default 8)
                        expression for validation is: coef * (buffer_size / 2)
    --test-nowait       do not wait for ring buffer - eats whole CPU
    --max-file-time=#   start another output file when the old file has recorded
                        for this many seconds
    --process-id-file   write the process ID here
    --use-strftime      apply the strftime facility to the output file name
    --dump-hw-params    dump hw_params of the device
    --fatal-errors      treat all errors as fatal
Recognized sample formats are: S8 U8 S16_LE S16_BE U16_LE U16_BE S24_LE S24_BE U24_LE U24_BE S32_LE S32_BE U32_LE U32_BE FLOAT_LE FLOAT_BE FLOAT64_LE FLOAT64_BE IEC958_SUBFRAME_LE IEC958_SUBFRAME_BE MU_LAW A_LAW IMA_ADPCM MPEG GSM S20_LE S20_BE U20_LE U20_BE SPECIAL S24_3LE S24_3BE U24_3LE U24_3BE S20_3LE S20_3BE U20_3LE U20_3BE S18_3LE S18_3BE U18_3LE U18_3BE G723_24 G723_24_1B G723_40 G723_40_1B DSD_U8 DSD_U16_LE DSD_U32_LE DSD_U16_BE DSD_U32_BE
Some of these may not be available on selected hardware
The available format shortcuts are:
-f cd (16 bit little endian, 44100, stereo)
-f cdr (16 bit big endian, 44100, stereo)
-f dat (16 bit little endian, 48000, stereo)
-t,指定输出数据格式,默认是wave格式,还支持raw,voc,au,后两种格式不懂。
-D,指定record设备,设备名的格式为hw:0,0,表示0号card的0号device。
-c,指定channel数,默认是mono,即one channel,最大可以到32。但实际上,如果只有一个麦克风,就只能录制mono音轨。
-f,指定语音数据格式,有很多格式可以选择,例如S8 U8 S16_LE S16_BE U16_LE U16_BE…。
-r,指定采样频率,例如5512/8000/11025/16000/22050/32000/44100/48000/64000/88200/96000/176400/192000。
-d,指定录音的时长。
-vv,在命令行录音的时候使用,可以看到一个由#符号组成的横向的实时音量显示。
实例
罗列录音设备。
root@imx6ul7d:~# arecord -l
**** List of CAPTURE Hardware Devices ****
card 0: wm8962audio [wm8962-audio], device 0: HiFi wm8962-0 [HiFi wm8962-0]
  Subdevices: 1/1
  Subdevice #0: subdevice #0
card 0: wm8962audio [wm8962-audio], device 1: HiFi-ASRC-FE (*) []
  Subdevices: 1/1
  Subdevice #0: subdevice #0
root@imx6ul7d:~#
一边录音,一边播放。其中 -d5表示录音5秒,-Dhw0,0表示card0,device0;r48000表示采样率是48000;-c2表示两声道;-fS16_LE表示数据格式是S16_LE;-traw表示录音是raw文件。
root@imx6ul7d:~# arecord -d5 -Dhw:0,0 -r48000 -c2 -fS16_LE -traw | aplay -Dhw:0,0 -r48000 -c2 -fS16_LE
Recording raw data 'stdin' : Signed 16 bit Little Endian, Rate 48000 Hz, Stereo
Playing raw data 'stdin' : Signed 16 bit Little Endian, Rate 48000 Hz, Stereo
root@imx6ul7d:~#
aplay和arecord其他参考命令
root@imx6ul7d:~# arecord | aplay
用上面的命令,你就能感知到默认情况的input delay,感觉大概半秒多钟。如果这样:
root@imx6ul7d:~# arecord --period-size 128 | aplay -B 10
就几乎感觉不到延迟。以上两种情况,区别非常明显。
查看系统语音设备:
root@imx6ul7d:~# cat /proc/asound/cards
 0 [wm8962audio    ]: wm8962-audio - wm8962-audio
                      wm8962-audio
root@imx6ul7d:~#
amixer命令
amixer用于配置音频的各个参数。
root@imx6ul7d:~# amixer -h
Usage: amixer <options> [command]

Available options:
  -h,--help       this help
  -c,--card N     select the card
  -D,--device N   select the device, default 'default'
  -d,--debug      debug mode
  -n,--nocheck    do not perform range checking
  -v,--version    print version of this program
  -q,--quiet      be quiet
  -i,--inactive   show also inactive controls
  -a,--abstract L select abstraction level (none or basic)
  -s,--stdin      Read and execute commands from stdin sequentially
  -R,--raw-volume Use the raw value (default)
  -M,--mapped-volume Use the mapped volume

Available commands:
  scontrols       show all mixer simple controls
  scontents       show contents of all mixer simple controls (default command)
  sset sID P      set contents for one mixer simple control
  sget sID        get contents for one mixer simple control
  controls        show all controls for given card
  contents        show contents of all controls for given card
  cset cID P      set control contents for one control
  cget cID        get control contents for one control

Available advanced commands:
  sevents         show the mixer events for simple controls
  events          show the mixer events for controls
root@imx6ul7d:~#
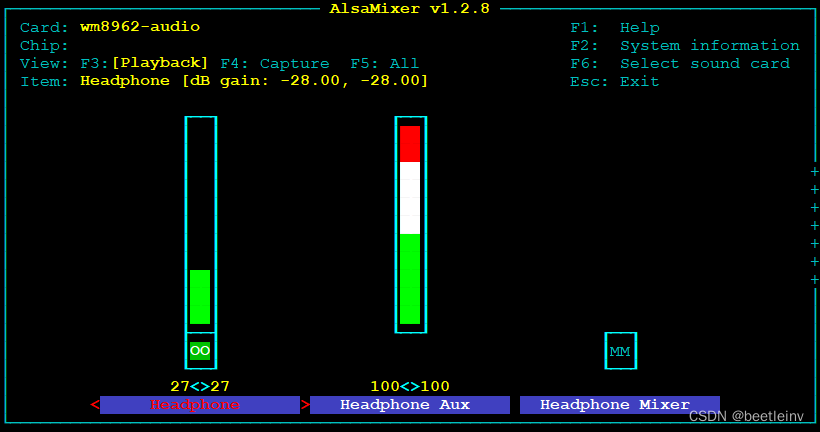
alsamixer命令可以获取图形化界面,通过方向键来设置对应参数。如下所示。
root@imx6ul7d:~# alsamixer
除了图形化模式,我们还可以用命令行模式。首先查看一下contents,如下。
root@imx6ul7d:~# amixer contents
numid=124,iface=CARD,name='Headphone Jack'
  ; type=BOOLEAN,access=r-------,values=1
  : values=on
numid=29,iface=MIXER,name='Headphone Aux Volume'
  ; type=INTEGER,access=rw---R--,values=2,min=0,max=7,step=0
  : values=7,7
  | dBscale-min=-7.00dB,step=1.00dB,mute=0
numid=30,iface=MIXER,name='Headphone Mixer Switch'
  ; type=BOOLEAN,access=rw------,values=2
  : values=off,off
numid=28,iface=MIXER,name='Headphone ZC Switch'
  ; type=BOOLEAN,access=rw------,values=2
  : values=off,off
numid=27,iface=MIXER,name='Headphone Switch'
  ; type=BOOLEAN,access=rw------,values=2
  : values=on,on
numid=26,iface=MIXER,name='Headphone Volume'
  ; type=INTEGER,access=rw---R--,values=2,min=0,max=127,step=0
  : values=93,93
  | dBscale-min=-121.00dB,step=1.00dB,mute=1
numid=24,iface=MIXER,name='ADC High Performance Switch'
  ; type=BOOLEAN,access=rw------,values=1
  : values=on
numid=21,iface=MIXER,name='ADC L/R Swap Switch'
  ; type=BOOLEAN,access=rw------,values=1
  : values=off
numid=23,iface=MIXER,name='ADC Monomix Switch'
  ; type=BOOLEAN,access=rw------,values=1
  : values=on
numid=14,iface=MIXER,name='Capture HPF Cutoff'
  ; type=INTEGER,access=rw------,values=1,min=0,max=7,step=0
  : values=0
numid=13,iface=MIXER,name='Capture HPF Mode'
  ; type=ENUMERATED,access=rw------,values=1,items=2
  ; Item #0 'Hi-fi'
  ; Item #1 'Application'
  : values=0
numid=12,iface=MIXER,name='Capture HPF Switch'
  ; type=BOOLEAN,access=rw------,values=1
  : values=on
... ...
根据contents中的内容,可以用cget或cset读取设置参数。
查看获取某个设置项的值用amixer cget +控制参数
根据控制参数类型设置控制参数使用amixer cset +控制参数+" "+参数
以contents中的第二项为例来演示cget和cset。
读取耳机的音量为7。
root@imx6ul7d:~# amixer cget numid=29,iface=MIXER,name='Headphone Aux Volume'
numid=29,iface=MIXER,name='Headphone Aux Volume'
  ; type=INTEGER,access=rw---R--,values=2,min=0,max=7,step=0
  : values=7,7
  | dBscale-min=-7.00dB,step=1.00dB,mute=0
root@imx6ul7d:~#
设置耳机的音量为5。
root@imx6ul7d:~# amixer cset numid=29,iface=MIXER,name='Headphone Aux Volume' 5
numid=29,iface=MIXER,name='Headphone Aux Volume'
  ; type=INTEGER,access=rw---R--,values=2,min=0,max=7,step=0
  : values=5,5
  | dBscale-min=-7.00dB,step=1.00dB,mute=0
root@imx6ul7d:~#
cget/cset命令在controls、cset cID P、cget cID亦适用。
controls show all controls for given card
contents show contents of all controls for given card
cset cID P set control contents for one control
cget cID get control contents for one control
类似的,还有另外一套sget/sset系列的命令:
scontrols show all mixer simple controls
scontents show contents of all mixer simple controls (default command)
sset sID P set contents for one mixer simple control
sget sID get contents for one mixer simple control
也是同样做法,例如用scontents查看有哪些参数可以控制:
root@imx6ul7d:~# amixer scontents
Simple mixer control 'Headphone',0
  Capabilities: volume pswitch
  Playback channels: Front Left - Front Right
  Capture channels: Front Left - Front Right
  Limits: 0 - 127
  Front Left: 93 [73%] [-28.00dB] Playback [on]
  Front Right: 93 [73%] [-28.00dB] Playback [on]
Simple mixer control 'Headphone Aux',0
  Capabilities: volume
  Playback channels: Front Left - Front Right
  Capture channels: Front Left - Front Right
  Limits: 0 - 7
  Front Left: 7 [100%] [0.00dB]
  Front Right: 7 [100%] [0.00dB]
Simple mixer control 'Headphone Mixer',0
  Capabilities: pswitch
  Playback channels: Front Left - Front Right
  Mono:
  Front Left: Playback [off]
  Front Right: Playback [off]
... ...
同理,scontents的项目用sget和sset配置。
root@imx6ul7d:~# amixer sget 'Headphone',0
Simple mixer control 'Headphone',0
  Capabilities: volume pswitch
  Playback channels: Front Left - Front Right
  Capture channels: Front Left - Front Right
  Limits: 0 - 127
  Front Left: 93 [73%] [-28.00dB] Playback [on]
  Front Right: 93 [73%] [-28.00dB] Playback [on]
root@imx6ul7d:~#
如果想要修改对应设置,用amixer sset ,具体用法是:
amixer sset sID(控制字符串) P(支持的某个值)
其中sID,就是上面的Simple mixer control后面的那个字符串,比如’Headphone’,0
而对其设置就是,先看看其提供了哪些供你设置的值:
root@imx6ul7d:~# amixer sset 'Headphone',0 100
Simple mixer control 'Headphone',0
  Capabilities: volume pswitch
  Playback channels: Front Left - Front Right
  Capture channels: Front Left - Front Right
  Limits: 0 - 127
  Front Left: 100 [79%] [-21.00dB] Playback [on]
  Front Right: 100 [79%] [-21.00dB] Playback [on]
root@imx6ul7d:~#
参考资料
https://www.cnblogs.com/cslunatic/p/3227655.html
https://cs.pynote.net/sf/linux/shell/202207131/