这里介绍的是创建redis集群的方式,一种是通过create-cluster配置文件创建部署在一个物理机上的伪集群,一种是先在不同物理机启动单体redis,然后通过命令行使这些redis加入集群的方式。
一,通过配置文件创建伪集群
进入redis源码目录,进入utils目录,展示如下:
[root@localhost redis-7.0.12]# cd utils/
[root@localhost utils]# ls
build-static-symbols.tcl  generate-commands-json.py   lru                    speed-regression.tcl
cluster_fail_time.tcl     generate-module-api-doc.rb  redis-copy.rb          srandmember
corrupt_rdb.c             gen-test-certs.sh           redis_init_script      systemd-redis_multiple_servers@.service
create-cluster            graphs                      redis_init_script.tpl  systemd-redis_server.service
generate-command-code.py  hyperloglog                 redis-sha1.rb          tracking_collisions.c
generate-command-help.rb  install_server.sh           releasetools           whatisdoing.sh
里面有一个create-cluster目录,进入这个目录,展示如下:
[root@localhost utils]# cd create-cluster/
[root@localhost create-cluster]# ls
create-cluster  README
我们通过create-cluster创建伪集群,先看一下这个文件
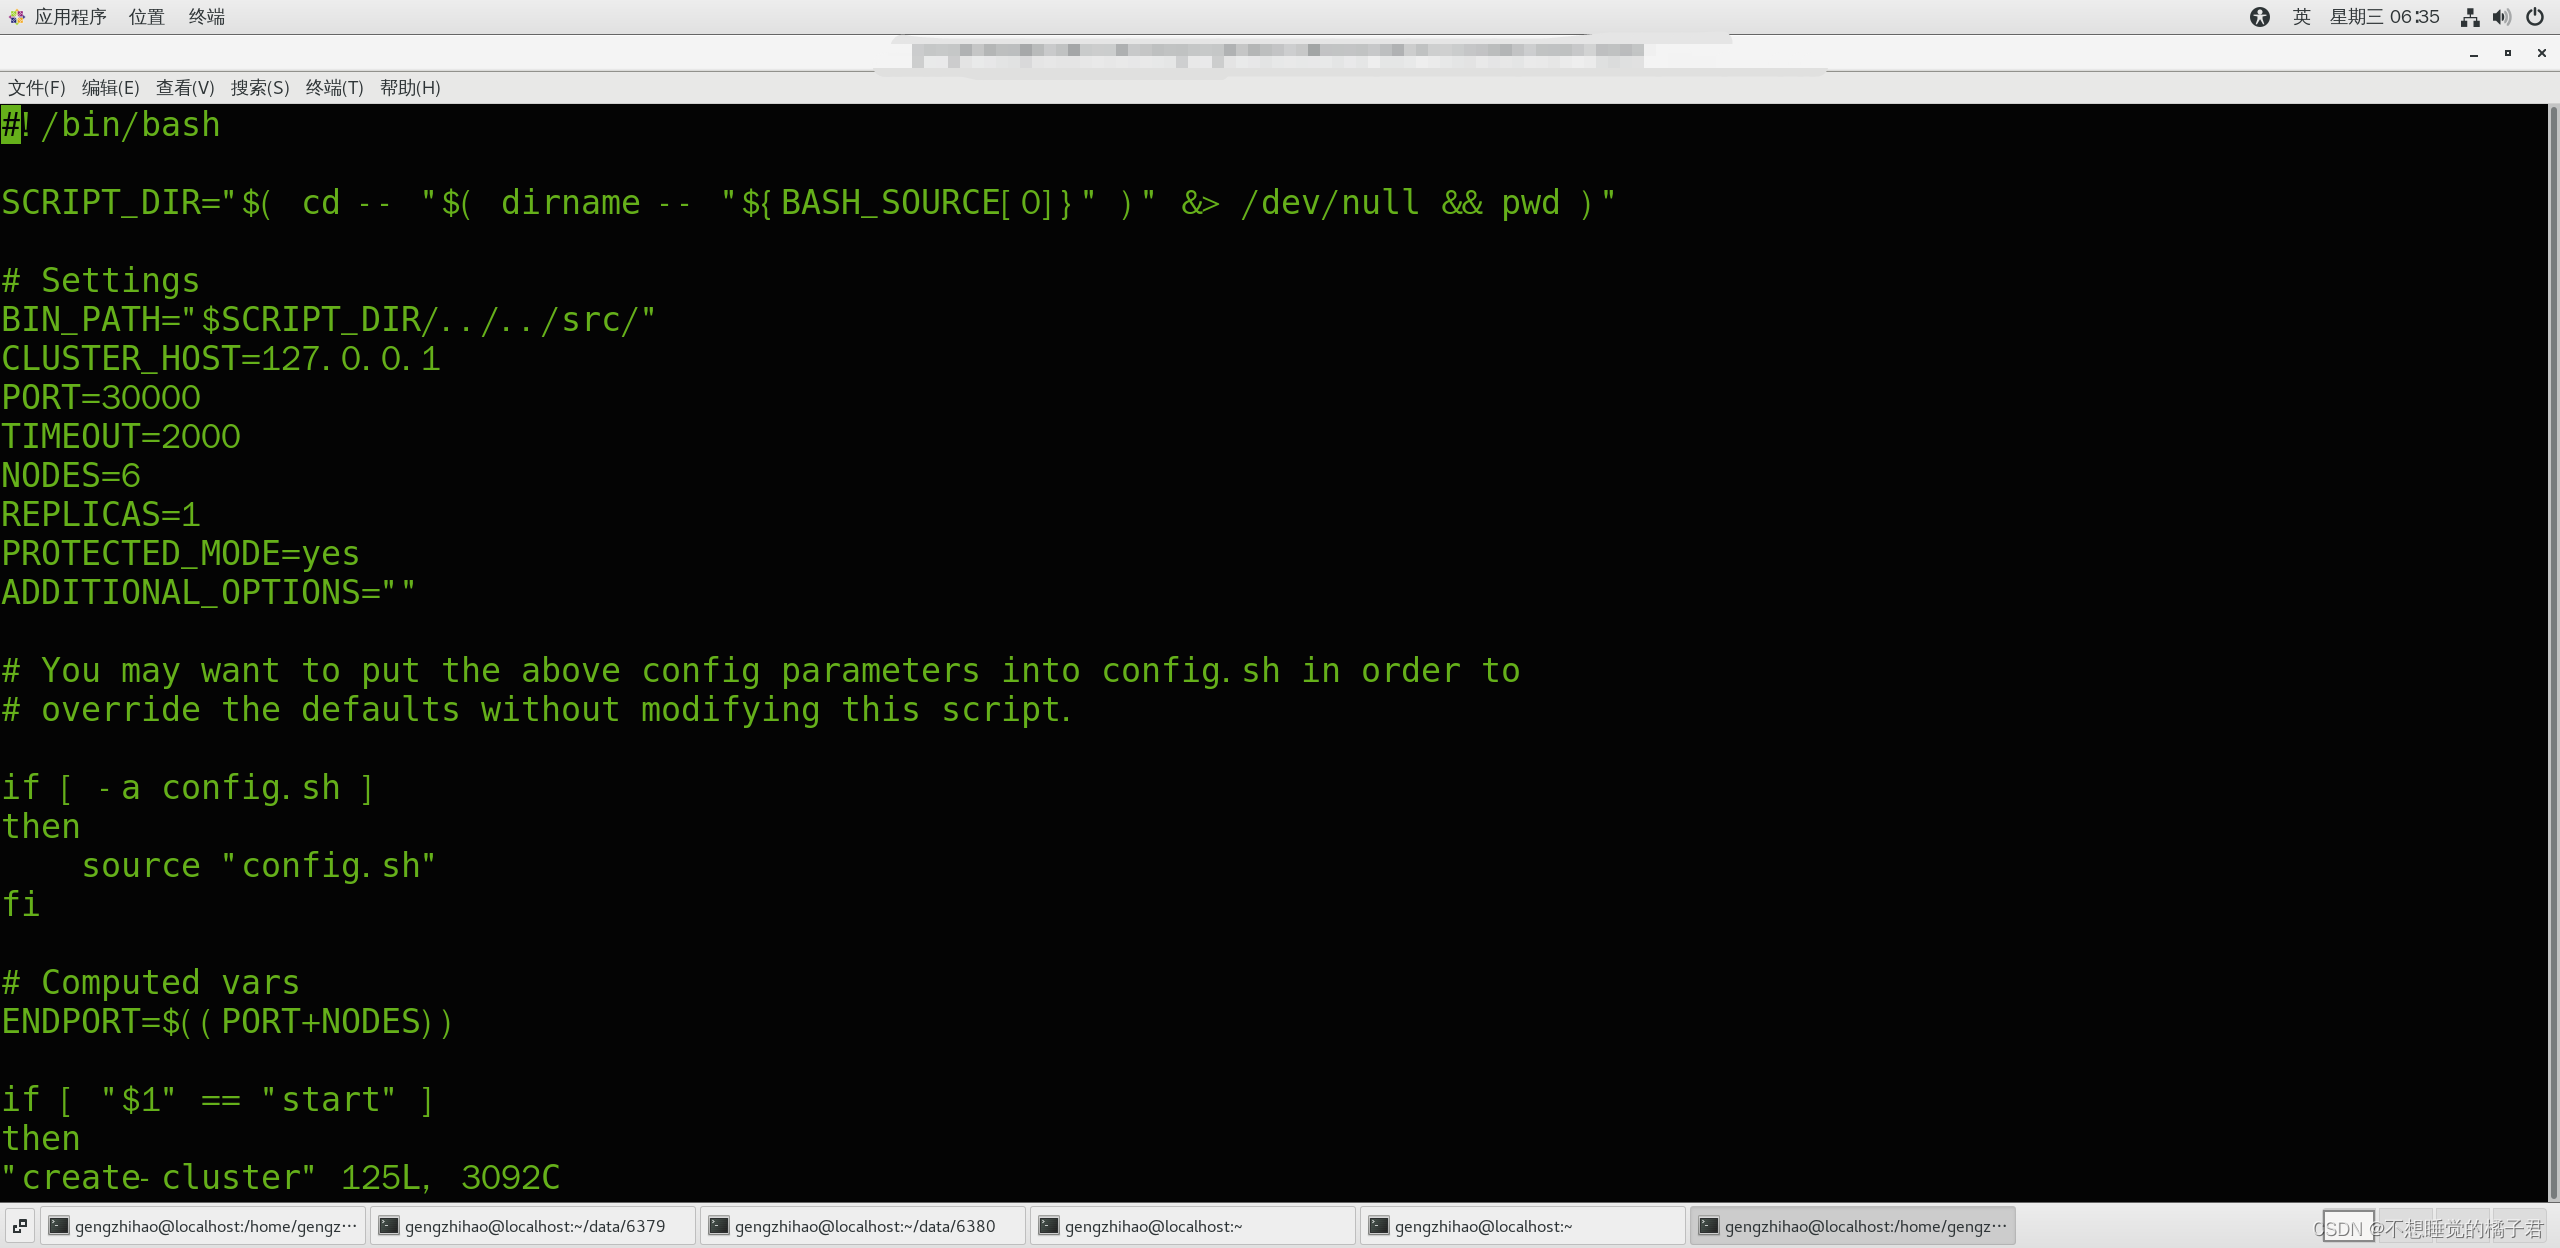
这里的host只能指定一个host,所以只能创建出部署在一个物理机上的伪集群。下面解释一下这里面的几个配置,nodes为6,replica为1,表示有3个master3个replica会被创建出来。port为30000,则这6个实例的端口号从30000以此向后递增。
创建6个单体redis实例
[root@localhost create-cluster]# ./create-cluster start
Starting 30001
Starting 30002
Starting 30003
Starting 30004
Starting 30005
Starting 30006
将6个实例创建集群
[root@localhost create-cluster]# ./create-cluster create
>>> Performing hash slots allocation on 6 nodes...
Master[0] -> Slots 0 - 5460
Master[1] -> Slots 5461 - 10922
Master[2] -> Slots 10923 - 16383
Adding replica 127.0.0.1:30005 to 127.0.0.1:30001
Adding replica 127.0.0.1:30006 to 127.0.0.1:30002
Adding replica 127.0.0.1:30004 to 127.0.0.1:30003
>>> Trying to optimize slaves allocation for anti-affinity
[WARNING] Some slaves are in the same host as their master
M: 6183b5a00da994d47e38dffa49269535eeef4395 127.0.0.1:30001
   slots:[0-5460] (5461 slots) master
M: a80106ab7e62d7b9137b35204a61e5b5aa762ad9 127.0.0.1:30002
   slots:[5461-10922] (5462 slots) master
M: b23c2febd9b9c80f9c5f8fc99e1befab0f475fc2 127.0.0.1:30003
   slots:[10923-16383] (5461 slots) master
S: 4ee7bf9bb65727d19eaca56888ed3881c5cd2876 127.0.0.1:30004
   replicates a80106ab7e62d7b9137b35204a61e5b5aa762ad9
S: 88f1790d65f894e8344122b4d29b569f830198ac 127.0.0.1:30005
   replicates b23c2febd9b9c80f9c5f8fc99e1befab0f475fc2
S: 70b468ecdd60c7a05a8980d16d447a0a560344c5 127.0.0.1:30006
   replicates 6183b5a00da994d47e38dffa49269535eeef4395
Can I set the above configuration? (type 'yes' to accept): yes
>>> Nodes configuration updated
>>> Assign a different config epoch to each node
>>> Sending CLUSTER MEET messages to join the cluster
Waiting for the cluster to join

>>> Performing Cluster Check (using node 127.0.0.1:30001)
M: 6183b5a00da994d47e38dffa49269535eeef4395 127.0.0.1:30001
   slots:[0-5460] (5461 slots) master
   1 additional replica(s)
M: b23c2febd9b9c80f9c5f8fc99e1befab0f475fc2 127.0.0.1:30003
   slots:[10923-16383] (5461 slots) master
   1 additional replica(s)
S: 4ee7bf9bb65727d19eaca56888ed3881c5cd2876 127.0.0.1:30004
   slots: (0 slots) slave
   replicates a80106ab7e62d7b9137b35204a61e5b5aa762ad9
M: a80106ab7e62d7b9137b35204a61e5b5aa762ad9 127.0.0.1:30002
   slots:[5461-10922] (5462 slots) master
   1 additional replica(s)
S: 88f1790d65f894e8344122b4d29b569f830198ac 127.0.0.1:30005
   slots: (0 slots) slave
   replicates b23c2febd9b9c80f9c5f8fc99e1befab0f475fc2
S: 70b468ecdd60c7a05a8980d16d447a0a560344c5 127.0.0.1:30006
   slots: (0 slots) slave
   replicates 6183b5a00da994d47e38dffa49269535eeef4395
[OK] All nodes agree about slots configuration.
>>> Check for open slots...
>>> Check slots coverage...
[OK] All 16384 slots covered.
如果是普通的客户端,如果要取出的数据在其他实例上,会报错
[root@localhost create-cluster]# redis-cli -p 30001
127.0.0.1:30001> set k1 fjiet
(error) MOVED 12706 127.0.0.1:30003
127.0.0.1:30001> exit
加个-c即为集群使用的客户端,数据在其他实例上,会转到其他实例
[root@localhost create-cluster]# redis-cli -c -p 30001
127.0.0.1:30001> set k1 fjieji
-> Redirected to slot [12706] located at 127.0.0.1:30003
OK
但是如果在执行事务时,转移到了其他实例,为了安全考虑,会报错。
此时我们需要人为的保证事务中的数据都在一个实例中。如在set数据时,通过添加key的前缀{},可以使数据都在同一个实例,进而事务不会报错。
127.0.0.1:30002> watch {cmcc}k1
OK
127.0.0.1:30002> multi
OK
127.0.0.1:30002(TX)> set {cmcc}k2 dfjaiet
QUEUED
127.0.0.1:30002(TX)> get {cmcc}k2
QUEUED
127.0.0.1:30002(TX)> exec
1) OK
2) "dfjaiet"
中止stop,清除clean
[root@localhost create-cluster]# ./create-cluster stop
Stopping 30001
Stopping 30002
Stopping 30003
Stopping 30004
Stopping 30005
Stopping 30006
[root@localhost create-cluster]# ./create-cluster clean
Cleaning *.log
Cleaning appendonlydir-*
Cleaning dump-*.rdb
Cleaning nodes-*.conf
[root@localhost create-cluster]# ll
总用量 8
-rwxrwxr-x. 1 root root 3092 7月  10 04:39 create-cluster
-rw-rw-r--. 1 root root 1437 7月  10 04:39 README
二,通过命令行创建集群
这种方式需要有已经准备好的单体redis,命令行起到的作用类似于上面的create命令,是将这些单体redis整合成一个集群。
[root@localhost create-cluster]# redis-cli --cluster help
Cluster Manager Commands:
  create         host1:port1 ... hostN:portN
                 --cluster-replicas <arg>
  check          <host:port> or <host> <port> - separated by either colon or space
                 --cluster-search-multiple-owners
  info           <host:port> or <host> <port> - separated by either colon or space
  fix            <host:port> or <host> <port> - separated by either colon or space
                 --cluster-search-multiple-owners
                 --cluster-fix-with-unreachable-masters
  reshard        <host:port> or <host> <port> - separated by either colon or space
                 --cluster-from <arg>
                 --cluster-to <arg>
                 --cluster-slots <arg>
                 --cluster-yes
                 --cluster-timeout <arg>
                 --cluster-pipeline <arg>
                 --cluster-replace
  rebalance      <host:port> or <host> <port> - separated by either colon or space
                 --cluster-weight <node1=w1...nodeN=wN>
                 --cluster-use-empty-masters
                 --cluster-timeout <arg>
                 --cluster-simulate
                 --cluster-pipeline <arg>
                 --cluster-threshold <arg>
                 --cluster-replace
  add-node       new_host:new_port existing_host:existing_port
                 --cluster-slave
                 --cluster-master-id <arg>
  del-node       host:port node_id
  call           host:port command arg arg .. arg
                 --cluster-only-masters
                 --cluster-only-replicas
  set-timeout    host:port milliseconds
  import         host:port
                 --cluster-from <arg>
                 --cluster-from-user <arg>
                 --cluster-from-pass <arg>
                 --cluster-from-askpass
                 --cluster-copy
                 --cluster-replace
  backup         host:port backup_directory
  help

For check, fix, reshard, del-node, set-timeout, info, rebalance, call, import, backup you can specify the host and port of any working node in the cluster.

Cluster Manager Options:
  --cluster-yes  Automatic yes to cluster commands prompts
这里我们还是先通过create-cluster在一台物理机上准备3主3从,
[root@localhost create-cluster]# ./create-cluster start
Starting 30001
Starting 30002
Starting 30003
Starting 30004
Starting 30005
Starting 30006
创建集群,参数为–cluster,create指定要创建集群的实例的ip和端口,–cluster-replicas 1指定每个master配置1个replica副本。
[root@localhost create-cluster]# redis-cli --cluster create 127.0.0.1:30001 127.0.0.1:30002 127.0.0.1:30003 127.0.0.1:30004 127.0.0.1:30005 127.0.0.1:30006 --cluster-replicas 1
>>> Performing hash slots allocation on 6 nodes...
Master[0] -> Slots 0 - 5460
Master[1] -> Slots 5461 - 10922
Master[2] -> Slots 10923 - 16383
Adding replica 127.0.0.1:30005 to 127.0.0.1:30001
Adding replica 127.0.0.1:30006 to 127.0.0.1:30002
Adding replica 127.0.0.1:30004 to 127.0.0.1:30003
>>> Trying to optimize slaves allocation for anti-affinity
[WARNING] Some slaves are in the same host as their master
M: 516b6edd9231cbae586458d05cef9ab66e8c4135 127.0.0.1:30001
   slots:[0-5460] (5461 slots) master
M: 6213a983c44d9cf48c253f97931095c5c3e5ab31 127.0.0.1:30002
   slots:[5461-10922] (5462 slots) master
M: 1cb320162c631fab028ca2742d8b5ac343b51acb 127.0.0.1:30003
   slots:[10923-16383] (5461 slots) master
S: b5dfe58651d0afeaca07c4cf5a7f6abaa5b42dad 127.0.0.1:30004
   replicates 516b6edd9231cbae586458d05cef9ab66e8c4135
S: 807550a84b1073fe2dcd04c38c5f94f78e9b93bd 127.0.0.1:30005
   replicates 6213a983c44d9cf48c253f97931095c5c3e5ab31
S: f73f34070f4051be8a20e30488a3beeed5556b56 127.0.0.1:30006
   replicates 1cb320162c631fab028ca2742d8b5ac343b51acb
Can I set the above configuration? (type 'yes' to accept): yes
>>> Nodes configuration updated
>>> Assign a different config epoch to each node
>>> Sending CLUSTER MEET messages to join the cluster
Waiting for the cluster to join

>>> Performing Cluster Check (using node 127.0.0.1:30001)
M: 516b6edd9231cbae586458d05cef9ab66e8c4135 127.0.0.1:30001
   slots:[0-5460] (5461 slots) master
   1 additional replica(s)
S: f73f34070f4051be8a20e30488a3beeed5556b56 127.0.0.1:30006
   slots: (0 slots) slave
   replicates 1cb320162c631fab028ca2742d8b5ac343b51acb
M: 1cb320162c631fab028ca2742d8b5ac343b51acb 127.0.0.1:30003
   slots:[10923-16383] (5461 slots) master
   1 additional replica(s)
S: b5dfe58651d0afeaca07c4cf5a7f6abaa5b42dad 127.0.0.1:30004
   slots: (0 slots) slave
   replicates 516b6edd9231cbae586458d05cef9ab66e8c4135
M: 6213a983c44d9cf48c253f97931095c5c3e5ab31 127.0.0.1:30002
   slots:[5461-10922] (5462 slots) master
   1 additional replica(s)
S: 807550a84b1073fe2dcd04c38c5f94f78e9b93bd 127.0.0.1:30005
   slots: (0 slots) slave
   replicates 6213a983c44d9cf48c253f97931095c5c3e5ab31
[OK] All nodes agree about slots configuration.
>>> Check for open slots...
>>> Check slots coverage...
[OK] All 16384 slots covered.
新加入节点,或者数据倾斜时,可以使用reshard进行重新分槽。
[root@localhost create-cluster]# redis-cli --cluster reshard 127.0.0.1:30001
>>> Performing Cluster Check (using node 127.0.0.1:30001)
M: 516b6edd9231cbae586458d05cef9ab66e8c4135 127.0.0.1:30001
   slots:[0-5460] (5461 slots) master
   1 additional replica(s)
S: f73f34070f4051be8a20e30488a3beeed5556b56 127.0.0.1:30006
   slots: (0 slots) slave
   replicates 1cb320162c631fab028ca2742d8b5ac343b51acb
M: 1cb320162c631fab028ca2742d8b5ac343b51acb 127.0.0.1:30003
   slots:[10923-16383] (5461 slots) master
   1 additional replica(s)
S: b5dfe58651d0afeaca07c4cf5a7f6abaa5b42dad 127.0.0.1:30004
   slots: (0 slots) slave
   replicates 516b6edd9231cbae586458d05cef9ab66e8c4135
M: 6213a983c44d9cf48c253f97931095c5c3e5ab31 127.0.0.1:30002
   slots:[5461-10922] (5462 slots) master
   1 additional replica(s)
S: 807550a84b1073fe2dcd04c38c5f94f78e9b93bd 127.0.0.1:30005
   slots: (0 slots) slave
   replicates 6213a983c44d9cf48c253f97931095c5c3e5ab31
[OK] All nodes agree about slots configuration.
>>> Check for open slots...
>>> Check slots coverage...
[OK] All 16384 slots covered.

#要重新分3333个slot
How many slots do you want to move (from 1 to 16384)? 3333
What is the receiving node ID? 1cb320162c631fab028ca2742d8b5ac343b51acb
Please enter all the source node IDs.
  Type 'all' to use all the nodes as source nodes for the hash slots.
  Type 'done' once you entered all the source nodes IDs.

  #all为从所有实例平均分一些slot给指定的实例,这里我们只从一台实例中拿走slot
Source node #1: 516b6edd9231cbae586458d05cef9ab66e8c4135
#开始执行
Source node #2: done

Ready to move 3333 slots.
  Source nodes:
    M: 516b6edd9231cbae586458d05cef9ab66e8c4135 127.0.0.1:30001
       slots:[0-5460] (5461 slots) master
       1 additional replica(s)
  Destination node:
    M: 1cb320162c631fab028ca2742d8b5ac343b51acb 127.0.0.1:30003
       slots:[10923-16383] (5461 slots) master
       1 additional replica(s)
  Resharding plan:
    Moving slot 0 from 516b6edd9231cbae586458d05cef9ab66e8c4135
    Moving slot 1 from 516b6edd9231cbae586458d05cef9ab66e8c4135
    Moving slot 2 from 516b6edd9231cbae586458d05cef9ab66e8c4135
    Moving slot 3 from 516b6edd9231cbae586458d05cef9ab66e8c4135
    Moving slot 4 from 516b6edd9231cbae586458d05cef9ab66e8c4135
    Moving slot 5 from 516b6edd9231cbae586458d05cef9ab66e8c4135
查看集群节点信息
[root@localhost create-cluster]# redis-cli --cluster info 127.0.0.1:30001
127.0.0.1:30001 (516b6edd...) -> 0 keys | 2128 slots | 1 slaves.
127.0.0.1:30003 (1cb32016...) -> 1 keys | 8794 slots | 1 slaves.
127.0.0.1:30002 (6213a983...) -> 0 keys | 5462 slots | 1 slaves.
[OK] 1 keys in 3 masters.
0.00 keys per slot on average.
可以看到有一个master的slot明显少了很多。


