文章目录
- 案例搭建
案例搭建
创建一个JOB实现类
package org.quartz.examples.example13;

import org.quartz.*;

import java.util.Date;

/**
 * This job has the same functionality of SimpleRecoveryJob except that this job implements is 'stateful', in that it
 * will have it's data (JobDataMap) automatically re-persisted after each execution, and only one instance of the
 * JobDetail can be executed at a time.
 *
 * @author Bill Kratzer
 */
@PersistJobDataAfterExecution
@DisallowConcurrentExecution
public class SimpleRecoveryStatefulJob implements Job{

    public SimpleRecoveryStatefulJob() {

    }


    private static final String COUNT = "count";

    /**
     * <p>
     * Called by the <code>{@link org.quartz.Scheduler}</code> when a <code>{@link org.quartz.Trigger}</code> fires that
     * is associated with the <code>Job</code>.
     * </p>
     *
     * @throws JobExecutionException if there is an exception while executing the job.
     */
    public void execute(JobExecutionContext context) throws JobExecutionException {

        JobKey jobKey = context.getJobDetail().getKey();

        // if the job is recovering print a message
        if (context.isRecovering()) {
            System.err.println("SimpleRecoveryJob: " + jobKey + " RECOVERING at " + new Date());
        } else {
            System.err.println("SimpleRecoveryJob: " + jobKey + " starting at " + new Date());
        }

        // delay for ten seconds
        long delay = 10L * 1000L;
        try {
            Thread.sleep(delay);
        } catch (Exception e) {
            //
        }

        JobDataMap data = context.getJobDetail().getJobDataMap();
        int count;
        if (data.containsKey(COUNT)) {
            count = data.getInt(COUNT);
        } else {
            count = 0;
        }
        count++;
        data.put(COUNT, count);

        System.err.println("SimpleRecoveryJob: " + jobKey + " done at " + new Date() + "\n Execution #" + count);

    }

}
创建一个测试类
/*
 * All content copyright Terracotta, Inc., unless otherwise indicated. All rights reserved.
 *
 * Licensed under the Apache License, Version 2.0 (the "License"); you may not
 * use this file except in compliance with the License. You may obtain a copy
 * of the License at
 *
 *   http://www.apache.org/licenses/LICENSE-2.0
 *
 * Unless required by applicable law or agreed to in writing, software
 * distributed under the License is distributed on an "AS IS" BASIS, WITHOUT
 * WARRANTIES OR CONDITIONS OF ANY KIND, either express or implied. See the
 * License for the specific language governing permissions and limitations
 * under the License.
 *
 */

package org.quartz.examples.example13;

import org.quartz.DateBuilder.IntervalUnit;
import org.quartz.JobDetail;
import org.quartz.Scheduler;
import org.quartz.SchedulerFactory;
import org.quartz.SimpleTrigger;
import org.quartz.impl.StdSchedulerFactory;
import org.slf4j.Logger;
import org.slf4j.LoggerFactory;

import static org.quartz.DateBuilder.futureDate;
import static org.quartz.JobBuilder.newJob;
import static org.quartz.SimpleScheduleBuilder.simpleSchedule;
import static org.quartz.TriggerBuilder.newTrigger;

/**
 * Used to test/show the clustering features of JDBCJobStore (JobStoreTX or JobStoreCMT).
 * <p>
 * All instances MUST use a different properties file, because their instance Ids must be different, however all other
 * properties should be the same.
 * </p>
 * <p>
 * If you want it to clear out existing jobs & triggers, pass a command-line argument called "clearJobs".
 * </p>
 * <p>
 * You should probably start with a "fresh" set of tables (assuming you may have some data lingering in it from other
 * tests), since mixing data from a non-clustered setup with a clustered one can be bad.
 * </p>
 * <p>
 * Try killing one of the cluster instances while they are running, and see that the remaining instance(s) recover the
 * in-progress jobs. Note that detection of the failure may take up to 15 or so seconds with the default settings.
 * </p>
 * <p>
 * Also try running it with/without the shutdown-hook plugin registered with the scheduler.
 * (org.quartz.plugins.management.ShutdownHookPlugin).
 * </p>
 * <p>
 * <i>Note:</i> Never run clustering on separate machines, unless their clocks are synchronized using some form of
 * time-sync service (such as an NTP daemon).
 * </p>
 *
 * @author James House
 * @see SimpleRecoveryJob
 * @see SimpleRecoveryStatefulJob
 */
public class ClusterExample {

    private static Logger _log = LoggerFactory.getLogger(ClusterExample.class);

    public void run(boolean inClearJobs, boolean inScheduleJobs) throws Exception {

        // First we must get a reference to a scheduler
        SchedulerFactory sf = new StdSchedulerFactory();
        Scheduler sched = sf.getScheduler();

        if (inClearJobs) {
            _log.warn("***** Deleting existing jobs/triggers *****");
            sched.clear();
        }

        _log.info("------- Initialization Complete -----------");

        if (inScheduleJobs) {

            _log.info("------- Scheduling Jobs ------------------");

            String schedId = sched.getSchedulerInstanceId();

            int count = 1;

            JobDetail job = newJob(SimpleRecoveryStatefulJob.class).withIdentity("job_" + count, schedId) // put triggers in group named
                    // after the cluster node
                    // instance just to
                    // distinguish (in logging)
                    // what was scheduled from
                    // where
                    .requestRecovery() // ask scheduler to re-execute this job if it was in progress when the scheduler went
                    // down...
                    .build();

            SimpleTrigger trigger = newTrigger().withIdentity("triger_" + count, schedId)
                    .startAt(futureDate(1, IntervalUnit.SECOND))
                    .withSchedule(simpleSchedule().withRepeatCount(10).withIntervalInSeconds(30)).build();

            _log.info(job.getKey() + " will run at: " + trigger.getNextFireTime() + " and repeat: "
                    + trigger.getRepeatCount() + " times, every " + trigger.getRepeatInterval() / 1000 + " seconds");
            sched.scheduleJob(job, trigger);
        }

        // jobs don't start firing until start() has been called...
        _log.info("------- Starting Scheduler ---------------");
        sched.start();
        _log.info("------- Started Scheduler ----------------");

        _log.info("------- Waiting for one hour... ----------");
        try {
            Thread.sleep(36000L * 1000L);
        } catch (Exception e) {
            //
        }

        _log.info("------- Shutting Down --------------------");
        sched.shutdown();
        _log.info("------- Shutdown Complete ----------------");
    }

    public static void main(String[] args) throws Exception {
        boolean clearJobs = true;
        boolean scheduleJobs = true;

        for (String arg : args) {
            if (arg.equalsIgnoreCase("clearJobs")) {
                clearJobs = true;
            } else if (arg.equalsIgnoreCase("dontScheduleJobs")) {
                scheduleJobs = false;
            }
        }

        ClusterExample example = new ClusterExample();
        example.run(clearJobs, scheduleJobs);
    }
}
这里启动两个实例,需要两份配置文件,必须明确指定实例编号。instance1.properties(实例instance_one)内容如下
#============================================================================
# Configure Main Scheduler Properties
#============================================================================

org.quartz.scheduler.instanceName: TestScheduler
org.quartz.scheduler.instanceId: instance_one

org.quartz.scheduler.skipUpdateCheck: true

#============================================================================
# Configure ThreadPool
#============================================================================

org.quartz.threadPool.class: org.quartz.simpl.SimpleThreadPool
org.quartz.threadPool.threadCount: 5
org.quartz.threadPool.threadPriority: 5

#============================================================================
# Configure JobStore
#============================================================================

org.quartz.jobStore.misfireThreshold: 60000

org.quartz.jobStore.class=org.quartz.impl.jdbcjobstore.JobStoreTX
org.quartz.jobStore.useProperties=false
org.quartz.jobStore.driverDelegateClass = org.quartz.impl.jdbcjobstore.StdJDBCDelegate
org.quartz.jobStore.tablePrefix = QRTZ_
org.quartz.jobStore.dataSource = myDS

#============================================================================
# Configure Datasources
#============================================================================

org.quartz.dataSource.myDS.connectionProvider.class:com.alibaba.druid.support.quartz.DruidQuartzConnectionProvider
org.quartz.dataSource.myDS.driverClassName = com.mysql.cj.jdbc.Driver
org.quartz.dataSource.myDS.url = jdbc:mysql://191.168.1.60:3306/quartz?characterEncoding=utf-8
org.quartz.dataSource.myDS.username = tools_user
org.quartz.dataSource.myDS.password = xams_tools_20230714
org.quartz.dataSource.myDS.maxActive: 5
org.quartz.dataSource.myDS.validationQuery: select 0
org.quartz.jobStore.isClustered=true

#============================================================================
# Other Example Delegates
#============================================================================
#org.quartz.jobStore.driverDelegateClass=org.quartz.impl.jdbcjobstore.DB2v6Delegate
#org.quartz.jobStore.driverDelegateClass=org.quartz.impl.jdbcjobstore.DB2v7Delegate
#org.quartz.jobStore.driverDelegateClass=org.quartz.impl.jdbcjobstore.DriverDelegate
#org.quartz.jobStore.driverDelegateClass=org.quartz.impl.jdbcjobstore.HSQLDBDelegate
#org.quartz.jobStore.driverDelegateClass=org.quartz.impl.jdbcjobstore.MSSQLDelegate
#org.quartz.jobStore.driverDelegateClass=org.quartz.impl.jdbcjobstore.PointbaseDelegate
#org.quartz.jobStore.driverDelegateClass=org.quartz.impl.jdbcjobstore.PostgreSQLDelegate
#org.quartz.jobStore.driverDelegateClass=org.quartz.impl.jdbcjobstore.StdJDBCDelegate
#org.quartz.jobStore.driverDelegateClass=org.quartz.impl.jdbcjobstore.WebLogicDelegate
#org.quartz.jobStore.driverDelegateClass=org.quartz.impl.jdbcjobstore.oracle.OracleDelegate
#org.quartz.jobStore.driverDelegateClass=org.quartz.impl.jdbcjobstore.oracle.WebLogicOracleDelegate

#============================================================================
# Configure Plugins
#============================================================================

#org.quartz.plugin.shutdownHook.class: org.quartz.plugins.management.ShutdownHookPlugin
#org.quartz.plugin.shutdownHook.cleanShutdown: true


#org.quartz.plugin.triggHistory.class: org.quartz.plugins.history.LoggingJobHistoryPlugin
instance2.properties(实例instance_two)与上面除了org.quartz.scheduler.instanceId配置为instance_two,其他一模一样。
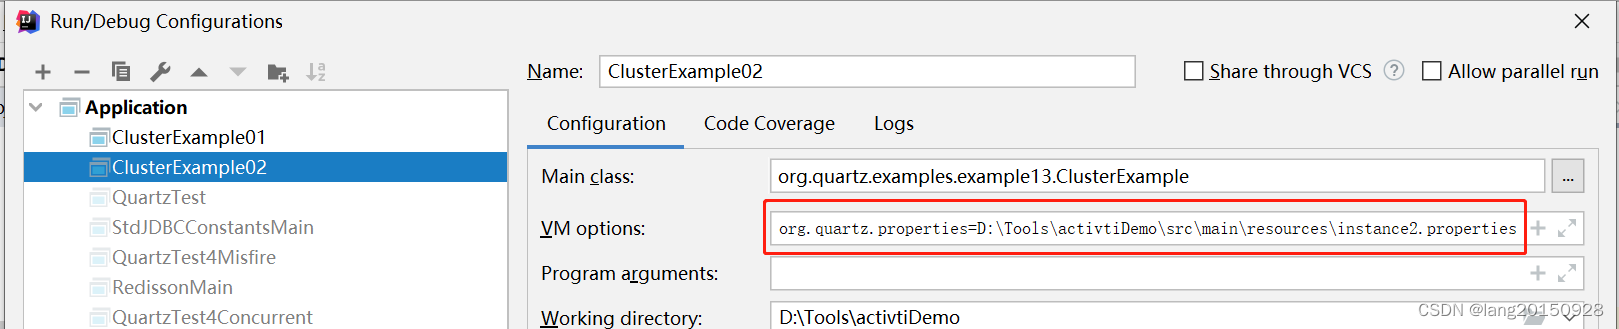
启动程序,需要配置两个启动器。通过org.quartz.properties启动参数指定不同的配置文件。

 #### 源码分析
集群模式下,使用数据库锁,而不是普通的内存锁
参考org.quartz.impl.jdbcjobstore.JobStoreSupport#initialize
// If the user hasn't specified an explicit lock handler, then
// choose one based on CMT/Clustered/UseDBLocks.
if (getLockHandler() == null) {

    // If the user hasn't specified an explicit lock handler,
    // then we *must* use DB locks with clustering
    if (isClustered()) {
// 集群模式 使用数据库锁
        setUseDBLocks(true);
    }

    if (getUseDBLocks()) {
// 使用数据库锁
        // ... 特定数据库
        getLog().info("Using db table-based data access locking (synchronization).");
        setLockHandler(new StdRowLockSemaphore(getTablePrefix(), getInstanceName(), getSelectWithLockSQL()));
    } else {
        getLog().info(
            "Using thread monitor-based data access locking (synchronization).");
        setLockHandler(new SimpleSemaphore());
    }
}
StdRowLockSemaphore通过数据库中的QRTZ_LOCKS来控制对资源的并发操作,保证数据安全。在这个锁实例构造时会初始化内部的属性,比如
sql = "SELECT * FROM {0}LOCKS WHERE SCHED_NAME = {1} AND LOCK_NAME = ? FOR UPDATE"
insertSql = "INSERT INTO {0}LOCKS(SCHED_NAME, LOCK_NAME) VALUES ({1}, ?)"
tablePrefix = "QRTZ_"
schedName = "TestScheduler"
expandedSQL = "SELECT * FROM QRTZ_LOCKS WHERE SCHED_NAME = 'TestScheduler' AND LOCK_NAME = ? FOR UPDATE"
expandedInsertSQL = "INSERT INTO QRTZ_LOCKS(SCHED_NAME, LOCK_NAME) VALUES ('TestScheduler', ?)"
schedNameLiteral = "'TestScheduler'"
通过DBSemaphore#obtainLock操作获取锁就会执行上面的expandedSQL,如果对应的数据不存在,则通过expandedInsertSQL 插入数据。
集群模式下,还会启动一个后台线程ClusterManager用于定时执行节点签到操作以及清除长时间未签到的节点。参考JobStoreSupport#schedulerStarted。
if (isClustered()) {
// 创建另一个线程
    clusterManagementThread = new ClusterManager();
    if(initializersLoader != null)
        clusterManagementThread.setContextClassLoader(initializersLoader);
    clusterManagementThread.initialize();
} else {
    try {
        recoverJobs();
    } catch (SchedulerException se) {
        throw new SchedulerConfigException(
                "Failure occured during job recovery.", se);
    }
}
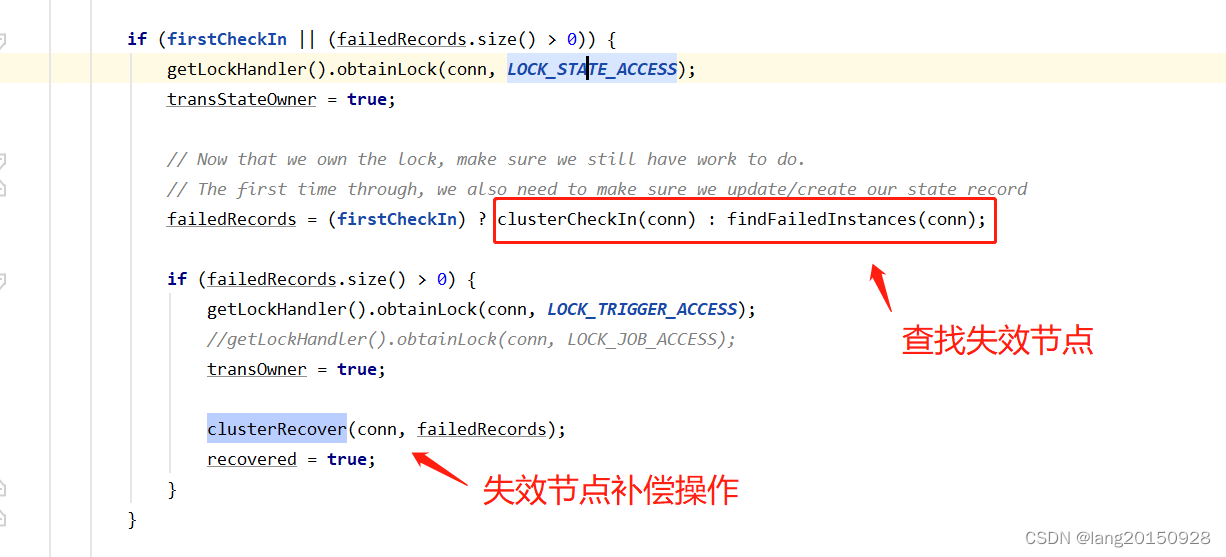
最终会调用到org.quartz.impl.jdbcjobstore.JobStoreSupport#doCheckin方法
protected boolean doCheckin() throws JobPersistenceException {
    boolean transOwner = false;
    boolean transStateOwner = false;
    boolean recovered = false;

    Connection conn = getNonManagedTXConnection();
    try {
        // Other than the first time, always checkin first to make sure there is
        // work to be done before we acquire the lock (since that is expensive,
        // and is almost never necessary).  This must be done in a separate
        // transaction to prevent a deadlock under recovery conditions.
        List<SchedulerStateRecord> failedRecords = null;
        if (!firstCheckIn) {
            failedRecords = clusterCheckIn(conn);
            commitConnection(conn);
        }

        if (firstCheckIn || (failedRecords.size() > 0)) {
            getLockHandler().obtainLock(conn, LOCK_STATE_ACCESS);
            transStateOwner = true;

            // Now that we own the lock, make sure we still have work to do.
            // The first time through, we also need to make sure we update/create our state record
            failedRecords = (firstCheckIn) ? clusterCheckIn(conn) : findFailedInstances(conn);

            if (failedRecords.size() > 0) {
                getLockHandler().obtainLock(conn, LOCK_TRIGGER_ACCESS);
                //getLockHandler().obtainLock(conn, LOCK_JOB_ACCESS);
                transOwner = true;

                clusterRecover(conn, failedRecords);
                recovered = true;
            }
        }

        commitConnection(conn);
    } catch (JobPersistenceException e) {
        rollbackConnection(conn);
        throw e;
    } finally {
        try {
            releaseLock(LOCK_TRIGGER_ACCESS, transOwner);
        } finally {
            try {
                releaseLock(LOCK_STATE_ACCESS, transStateOwner);
            } finally {
                cleanupConnection(conn);
            }
        }
    }

    firstCheckIn = false;

    return recovered;
}
这里通过firstCheckIn 标识是否第一次执行签到操作。如果是第一次签到操作,则要考虑恢复当前节点的任务和触发器状态。所以在org.quartz.impl.jdbcjobstore.JobStoreSupport#findFailedInstances方法中,查询失效实例时,如果是第一次,都把当前实例作为失效的,这样后面就会进行状态恢复操作。而对于非当前节点,则是比较当前时间与上一次签到+一定阈值进行比较,也就是说当超过了一定时间,其他某个节点未进行签到操作,则也认为是失效节点。如果是第一次,还会在JobStoreSupport#findOrphanedFailedInstances中查询QRTZ_FIRED_TRIGGERS已触发记录对应的实例信息,作为失效节点。失效节点的判断逻辑源码如下所示
/**
 * Get a list of all scheduler instances in the cluster that may have failed.
 * This includes this scheduler if it is checking in for the first time.
 */
protected List<SchedulerStateRecord> findFailedInstances(Connection conn)
    throws JobPersistenceException {
    try {
        List<SchedulerStateRecord> failedInstances = new LinkedList<SchedulerStateRecord>();
        boolean foundThisScheduler = false;
        long timeNow = System.currentTimeMillis();

        List<SchedulerStateRecord> states = getDelegate().selectSchedulerStateRecords(conn, null);

        for(SchedulerStateRecord rec: states) {

            // find own record...
            if (rec.getSchedulerInstanceId().equals(getInstanceId())) {
                foundThisScheduler = true;
                if (firstCheckIn) {
                    failedInstances.add(rec);
                }
            } else {
                // find failed instances...
                if (calcFailedIfAfter(rec) < timeNow) {
                    failedInstances.add(rec);
                }
            }
        }

        // The first time through, also check for orphaned fired triggers.
        if (firstCheckIn) {
            failedInstances.addAll(findOrphanedFailedInstances(conn, states));
        }

        // If not the first time but we didn't find our own instance, then
        // Someone must have done recovery for us.
        if ((!foundThisScheduler) && (!firstCheckIn)) {
            // FUTURE_TODO: revisit when handle self-failed-out impl'ed (see FUTURE_TODO in clusterCheckIn() below)
            getLog().warn(
                "This scheduler instance (" + getInstanceId() + ") is still " +
                "active but was recovered by another instance in the cluster.  " +
                "This may cause inconsistent behavior.");
        }

        return failedInstances;
    } catch (Exception e) {
        lastCheckin = System.currentTimeMillis();
        throw new JobPersistenceException("Failure identifying failed instances when checking-in: "
                + e.getMessage(), e);
    }
}
在进行失效节点的扫描之后,会进行当前节点的签到操作。
protected List<SchedulerStateRecord> clusterCheckIn(Connection conn)
    throws JobPersistenceException {

    List<SchedulerStateRecord> failedInstances = findFailedInstances(conn);

    try {
        // FUTURE_TODO: handle self-failed-out

        // check in...
        lastCheckin = System.currentTimeMillis();
        if(getDelegate().updateSchedulerState(conn, getInstanceId(), lastCheckin) == 0) {
            getDelegate().insertSchedulerState(conn, getInstanceId(),
                    lastCheckin, getClusterCheckinInterval());
        }

    } catch (Exception e) {
        throw new JobPersistenceException("Failure updating scheduler state when checking-in: "
                + e.getMessage(), e);
    }

    return failedInstances;
}
最后会针对失效节点进行补偿或清理工作。查找失效节点必须获取STATE_ACCESS锁,然后失效节点补偿操作还需要获取TRIGGER_ACCESS锁。
失效节点补偿操作,分为以下几步:
- 查询QRTZ_FIRED_TRIGGERS表中当前失效节点对应的数据,会尝试进行状态的修改,比如BLOCKED->WAITING,PAUSED_BLOCKED->PAUSED,释放被阻塞的触发器。ACQUIRED->WAITING,释放准备执行的触发器。如果任务不支持并发,还会恢复QRTZ_TRIGGERS状态为BLOCKED->WAITING,PAUSED_BLOCKED->PAUSED。这样这些被恢复状态的任务才能被再次查询并触发。
- 删除失效节点对应的QRTZ_FIRED_TRIGGERS表数据,节点已失效,不会再执行
getDelegate().deleteFiredTriggers(conn,rec.getSchedulerInstanceId());
- 针对第一步查询的QRTZ_FIRED_TRIGGERS表中数据,判断对应的QRTZ_TRIGGERS表中状态是否为COMPLETE状态,由于QRTZ_FIRED_TRIGGERS表中数据已在第二步删除,状态为COMPLETE则代表任务已经结束。则会删除触发器以及对应的任务。
// Check if any of the fired triggers we just deleted were the last fired trigger
// records of a COMPLETE trigger.
int completeCount = 0;
for (TriggerKey triggerKey : triggerKeys) {

    if (getDelegate().selectTriggerState(conn, triggerKey).
            equals(STATE_COMPLETE)) {
        List<FiredTriggerRecord> firedTriggers =
                getDelegate().selectFiredTriggerRecords(conn, triggerKey.getName(), triggerKey.getGroup());
        if (firedTriggers.isEmpty()) {

            if (removeTrigger(conn, triggerKey)) {
                completeCount++;
            }
        }
    }
}
- 最后,如果失效节点不是当前节点,则删除
QRTZ_SCHEDULER_STATE表中该节点对应的数据。代表溢出该失效节点。
if (!rec.getSchedulerInstanceId().equals(getInstanceId())) {
    getDelegate().deleteSchedulerState(conn,
            rec.getSchedulerInstanceId());
}
至此,失效补偿工作完成。
总结一下:Quartz集群模式与其他模式的区别主要有两点:首先操作的锁要使用两个实例都可以公用的锁,一般直接使用数据库锁,另外,会创建一个后台线程进行定时签到,一方面为当前节点实例续命,同时发现失效节点,并进行节点补偿。