目录
背景
1. Handler基本使用
2. Handler的Looper源码分析
3. Handler的Message以及消息池、MessageQueue
4. Handler的Native实现
4.1 MessageQueue
4.2 Native结构体和类
4.2.1 Message结构体
4.2.2 消息处理类
4.2.3 回调类
4.2.5 ALooper类
5. 总结:
背景
Android有主线程概念用于刷新UI ,但是主线程是不能够耗时的。 比如当某个子线程耗时操作完之后,想要通知到主线程更新UI,这个时候就需要一套线程通讯机制通知到主线程 。我想这就是Handler诞生的背景。
接下来我们从基础使用,慢慢根据源码分析Handler的基本原理 。
1. Handler基本使用
主线程里面使用Handler
private val mainThreadHandler = object : Handler(Looper.getMainLooper()) {
        override fun handleMessage(msg: Message) {
            if(msg.what ==1){
                Log.i(TAG, "handleMessage: MainThreadHandler receive message ")
            }
        }
    }
Looper.getMainLooper() 可以获得Looper里面的 sMainLooper 对象,而在ActivityThread在main函数调用Looper.prepareMainLooper()初始化了主线程的Looper 。
子线程使用Handler
 thread {
            Looper.prepare()
            threadHandler = object : Handler(Looper.myLooper()!!) {
                override fun handleMessage(msg: Message) {
                   if(msg.what ==0){
                       Log.i(TAG, "handleMessage: threadHandler receive message ")
                   }
                }
            }
            Looper.loop()
        }
Loop.prepare() 源码:
  if (sThreadLocal.get() != null) {
            throw new RuntimeException("Only one Looper may be created per thread");
        }
        sThreadLocal.set(new Looper(quitAllowed));
通过源代码中可以得知Loop.prepare() 通过ThreadLocal存储了一个Looper对象,也就说一个线程只有一个Looper对象。 那么Looper到底做了什么事情呢?
2. Handler的Looper源码分析
通过Looper源码分析,Looper构造函数上初始化了 MessageQueued队列和保存了当前Thread对象 。
 private Looper(boolean quitAllowed) {
        mQueue = new MessageQueue(quitAllowed);
        mThread = Thread.currentThread();
    }
我们知道了Looper.prepare()静态方法会初始化当前线程唯一的Looper对象,并且用ThreadLocal储存起来,此外Looper还有一个非常关键的静态方法Looper.loop() ,接下来我们通过源码分析一下loop()做了那些事情
public static void loop() {
        final Looper me = myLooper();
        if (me == null) {
            throw new RuntimeException("No Looper; Looper.prepare() wasn't called on this thread.");
        }
        if (me.mInLoop) {
            Slog.w(TAG, "Loop again would have the queued messages be executed"
                    + " before this one completed.");
        }

        me.mInLoop = true;

        // 确保该线程的标识是本地进程的标识, 并跟踪该身份令牌实际上是什么。
        Binder.clearCallingIdentity();
        final long ident = Binder.clearCallingIdentity();

      // 允许使用系统属性覆盖阈值。 例如
       // adb shell 'setprop log.looper.1000.main.slow 1 && 停止 && 开始'
        final int thresholdOverride =
                SystemProperties.getInt("log.looper."
                        + Process.myUid() + "."
                        + Thread.currentThread().getName()
                        + ".slow", 0);

        me.mSlowDeliveryDetected = false;

        for (;;) {
            if (!loopOnce(me, ident, thresholdOverride)) {
                return;
            }
        }
    }
looper方法最后执行逻辑是一个for死循环,只有当loopOnce()返回false时候才会退出这个死循环。 loopOnce传入了当前线程的looper对象和线程标识,接下里我们看下loopOnce逻辑
    private static boolean loopOnce(final Looper me,
            final long ident, final int thresholdOverride) {
        Message msg = me.mQueue.next(); // might block
        if (msg == null) {
            // No message indicates that the message queue is quitting.
            return false;
        }

        // This must be in a local variable, in case a UI event sets the logger
        final Printer logging = me.mLogging;
        if (logging != null) {
            logging.println(">>>>> Dispatching to " + msg.target + " "
                    + msg.callback + ": " + msg.what);
        }
        // Make sure the observer won't change while processing a transaction.
        final Observer observer = sObserver;

        final long traceTag = me.mTraceTag;
        long slowDispatchThresholdMs = me.mSlowDispatchThresholdMs;
        long slowDeliveryThresholdMs = me.mSlowDeliveryThresholdMs;
        if (thresholdOverride > 0) {
            slowDispatchThresholdMs = thresholdOverride;
            slowDeliveryThresholdMs = thresholdOverride;
        }
        final boolean logSlowDelivery = (slowDeliveryThresholdMs > 0) && (msg.when > 0);
        final boolean logSlowDispatch = (slowDispatchThresholdMs > 0);

        final boolean needStartTime = logSlowDelivery || logSlowDispatch;
        final boolean needEndTime = logSlowDispatch;

        if (traceTag != 0 && Trace.isTagEnabled(traceTag)) {
            Trace.traceBegin(traceTag, msg.target.getTraceName(msg));
        }

        final long dispatchStart = needStartTime ? SystemClock.uptimeMillis() : 0;
        final long dispatchEnd;
        Object token = null;
        if (observer != null) {
            token = observer.messageDispatchStarting();
        }
        long origWorkSource = ThreadLocalWorkSource.setUid(msg.workSourceUid);
        try {
            msg.target.dispatchMessage(msg);
            if (observer != null) {
                observer.messageDispatched(token, msg);
            }
            dispatchEnd = needEndTime ? SystemClock.uptimeMillis() : 0;
        } catch (Exception exception) {
            if (observer != null) {
                observer.dispatchingThrewException(token, msg, exception);
            }
            throw exception;
        } finally {
            ThreadLocalWorkSource.restore(origWorkSource);
            if (traceTag != 0) {
                Trace.traceEnd(traceTag);
            }
        }
        if (logSlowDelivery) {
            if (me.mSlowDeliveryDetected) {
                if ((dispatchStart - msg.when) <= 10) {
                    Slog.w(TAG, "Drained");
                    me.mSlowDeliveryDetected = false;
                }
            } else {
                if (showSlowLog(slowDeliveryThresholdMs, msg.when, dispatchStart, "delivery",
                        msg)) {
                    // Once we write a slow delivery log, suppress until the queue drains.
                    me.mSlowDeliveryDetected = true;
                }
            }
        }
        if (logSlowDispatch) {
            showSlowLog(slowDispatchThresholdMs, dispatchStart, dispatchEnd, "dispatch", msg);
        }

        if (logging != null) {
            logging.println("<<<<< Finished to " + msg.target + " " + msg.callback);
        }

        // Make sure that during the course of dispatching the
        // identity of the thread wasn't corrupted.
        final long newIdent = Binder.clearCallingIdentity();
        if (ident != newIdent) {
            Log.wtf(TAG, "Thread identity changed from 0x"
                    + Long.toHexString(ident) + " to 0x"
                    + Long.toHexString(newIdent) + " while dispatching to "
                    + msg.target.getClass().getName() + " "
                    + msg.callback + " what=" + msg.what);
        }

        msg.recycleUnchecked();

        return true;
    }
通过代码分析可以知道 Loop退出机制,当拿到Message为null时候就会跳出looper,且利用loop对象拿到MessageQueue队列的对象,然后一直在读取队列的值,这个是一个可能会阻塞的方法。
到这里可以得出结论: Looper职责比较单一,新建MessageQueue队列,然后从维护的队列里面拿出Message ,然后在Message拿到自已target就是Handler对象然后回调,(详细的Message原理下面会讲到) msg.target.dispatchMessage(msg) 。loop一直在循环等待新的Message发送过来。
接下来我们分析一下Message做了哪些事情?
3. Handler的Message以及消息池、MessageQueue
Message分析
Handler传递消息载体是Message,获取Message方式也很多,可以直接通过构建方法构建,也可以通过Handler对象获取到Message,那么这2种方式有什么不一样呢?

通过源码发现Message持有了一个单向的链表的消息池,这个消息池限制在50个。每一次我们通过Handler对象拿到的Message其实就是消息池里面缓存起来对象,这样避免了多次创建Message实例。 sPool采取先进后出方式,Message提供了一个recycle()方法,可以把Message加入到消息池 。把新加入的放到了链表头部,消息池的数量加一。
 void recycleUnchecked() {
        .....
        synchronized (sPoolSync) {
            if (sPoolSize < MAX_POOL_SIZE) {
                next = sPool;
                sPool = this;
                sPoolSize++;
            }
        }
    }
所以可以得出通过Hander对象obtain方法获取到Message对象和直接构造方法创建的Message主要区别是减少了Message对象的创建实例。
Message的target 就是Handler对象,Message通过调用target来回调方法通知到handler
1. Message如何被发送出去? 如何加入到MessageQueue ?
Hander对象调用sendMessageAtTime() ,最后调用enqueueMessage() 方法 ,hander对象的queue就是Looper创建的。message被加到MessageQueue接下来就是队列唤醒的逻辑。
MessageQueue分析
Java层有一个MessageQueue处理Java消息,native层也有一个MessageQueue处理Native的消息。首先MessageQueue初始化是在Looper对象,然后也给到Hander对象持有。方法enqueueMessage()被调用之后就开始队列逻辑工作。 看一下enqueueMessage的部分源码:
  boolean enqueueMessage(Message msg, long when) {
           ......

            msg.markInUse();
            msg.when = when;
            Message p = mMessages;
            boolean needWake;
            if (p == null || when == 0 || when < p.when) {
                // 插入队列的中间。通常我们不必重新唤醒
                msg.next = p;
                mMessages = msg;
                needWake = mBlocked;
            } else {

                //插入队列的中间。通常我们不必重新唤醒
                //排在事件队列的前面,除非队列的前面有挂起的
                //并且该消息是队列中最早的异步消息。
                needWake = mBlocked && p.target == null && msg.isAsynchronous();
                Message prev;
                for (;;) {
                    prev = p;
                    p = p.next;
                    if (p == null || when < p.when) {
                        break;
                    }
                    if (needWake && p.isAsynchronous()) {
                        needWake = false;
                    }
                }
                msg.next = p; // invariant: p == prev.next
                prev.next = msg;
            }

            // We can assume mPtr != 0 because mQuitting is false.
            if (needWake) {
                nativeWake(mPtr);
            }
        }
        return true;
    }
该函数首先会判断判断是否msg.target有Handler的引用,消息会被按着时间顺序被添加到队列中。
next() 方法
  Message next() {

        ......
        int pendingIdleHandlerCount = -1; // -1 only during first iteration
        int nextPollTimeoutMillis = 0;
        for (;;) {
            if (nextPollTimeoutMillis != 0) {
                Binder.flushPendingCommands();
            }

            // 在没有消息的时候回阻塞管道读取端,只有nativePollOnce返回之后才能往下执行

            nativePollOnce(ptr, nextPollTimeoutMillis);

            synchronized (this) {
                // Try to retrieve the next message.  Return if found.
                final long now = SystemClock.uptimeMillis();
                Message prevMsg = null;
                Message msg = mMessages;
                if (msg != null && msg.target == null) {
                    // Stalled by a barrier.  Find the next asynchronous message in the queue.
                    do {
                        prevMsg = msg;
                        msg = msg.next;
                    } while (msg != null && !msg.isAsynchronous());
                }
                if (msg != null) {
                    if (now < msg.when) {
                        // Next message is not ready.  Set a timeout to wake up when it is ready.
                        nextPollTimeoutMillis = (int) Math.min(msg.when - now, Integer.MAX_VALUE);
                    } else {
                        // Got a message.
                        mBlocked = false;
                        if (prevMsg != null) {
                            prevMsg.next = msg.next;
                        } else {
                            mMessages = msg.next;
                        }
                        msg.next = null;
                        if (DEBUG) Log.v(TAG, "Returning message: " + msg);
                        msg.markInUse();
                        return msg;
                    }
                } else {
                    // No more messages.
                    nextPollTimeoutMillis = -1;
                }
            .......
        }
}其中nextPollTimeoutMillis代表下一个消息到来前,还需要等待的时长;当nextPollTimeoutMillis = -1时,表示消息队列中无消息,会一直等待下去。当处于空闲时,往往会执行IdleHandler中的方法。当nativePollOnce()返回后,next()从mMessages中提取一个消息。
nativePollOnce()很重要,是一个native的函数,在native做了大量的工作,主要涉及到epoll机制的处理(在没有消息处理时阻塞在管道的读端)
4. Handler的Native实现
4.1 MessageQueue
MessageQueue类里面涉及到多个native方法,除了MessageQueue的native方法,native层本身也有一套完整的消息机制,用于处理native的消息,而MessageQueue是连接Java层和Native层的纽带,换言之,Java层可以向MessageQueue消息队列中添加消息,Native层也可以向MessageQueue消息队列中添加消息,接下来来看看MessageQueue。
native方法:
private native static long nativeInit();
private native static void nativeDestroy(long ptr);
private native void nativePollOnce(long ptr, int timeoutMillis);
private native static void nativeWake(long ptr);
private native static boolean nativeIsPolling(long ptr);
private native static void nativeSetFileDescriptorEvents(long ptr, int fd, int events);
nativeInit()初始化链路调用
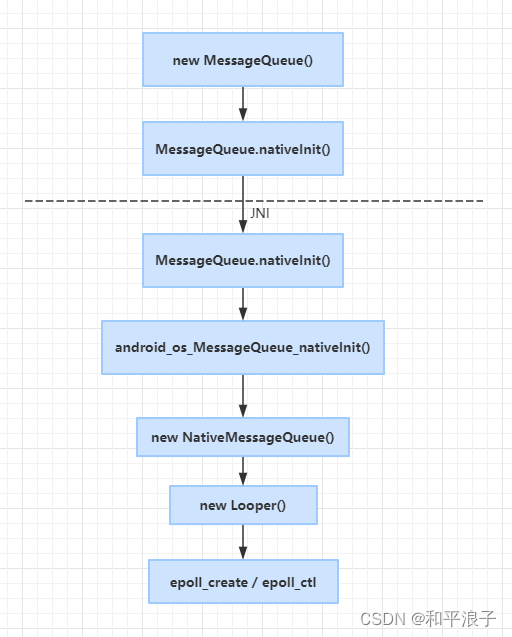
此处Native层的Looper与Java层的Looper没有任何的关系,只是在Native层重实现了一套类似功能的逻辑。Looper对象中的mWakeEventFd添加到epoll监控,以及mRequests也添加到epoll的监控范围内。
- nativeInit()方法:
- 创建了NativeMessageQueue对象,增加其引用计数,并将NativeMessageQueue指针mPtr保存在Java层的MessageQueue
- 创建了Native Looper对象
- 调用epoll的epoll_create()/epoll_ctl()来完成对mWakeEventFd和mRequests的可读事件监听
- nativeDestroy()方法
- 调用RefBase::decStrong()来减少对象的引用计数
- 当引用计数为0时,则删除NativeMessageQueue对象
- nativePollOnce()方法
- 调用Looper::pollOnce()来完成,空闲时停留在epoll_wait()方法,用于等待事件发生或者超时
- nativeWake()方法
- 调用Looper::wake()来完成,向管道mWakeEventfd写入字符;
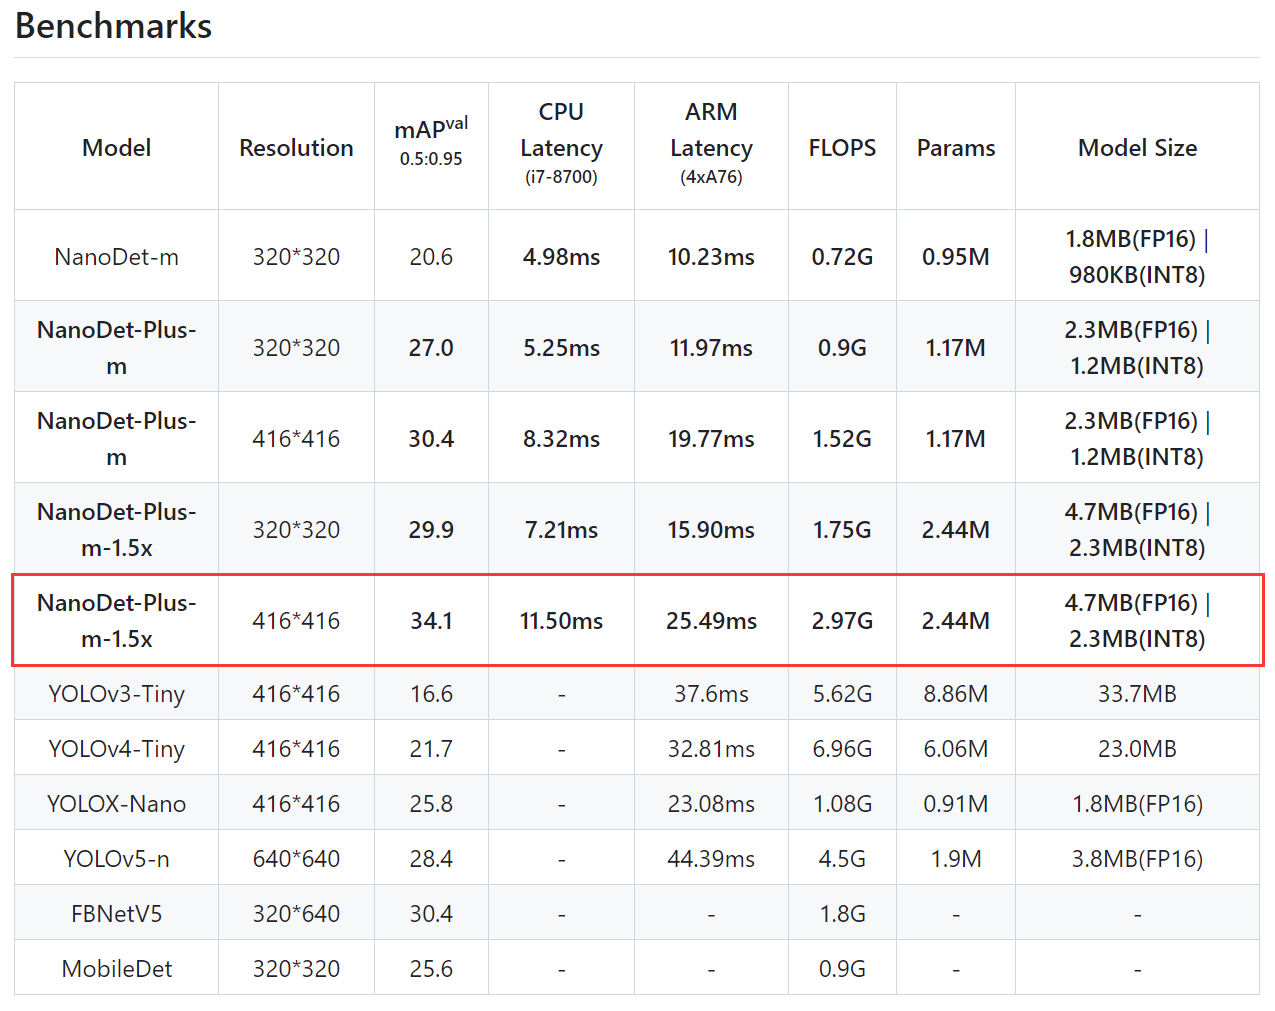
下面列举Java层与Native层的对应图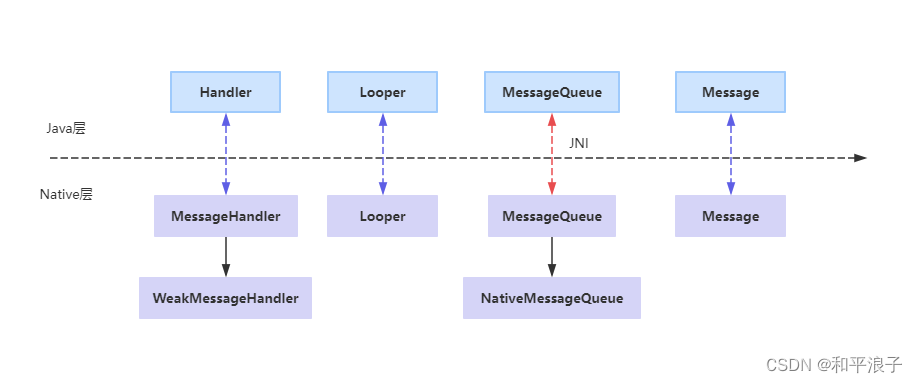
红色虚线部分:Java层和Native层的MessageQueue通过Jni建立关联,相互之间可以互相调用。 蓝色部分: Handler/Looper/Message 三大类Java层和Native层没有关联,分别在Java层和Native层Handler消息模型中具有类似功能,彼此独立各自实现对应逻辑。
另外,消息处理流程是先处理Native Message,再处理Native Request,最后处理Java Message。也就为什么有时上层消息很少,但响应时间却较长的真正原因。
4.2 Native结构体和类
4.2.1 Message结构体
struct Message {
    Message() : what(0) { }
    Message(int what) : what(what) { }
    int what; // 消息类型
};
4.2.2 消息处理类
class MessageHandler : public virtual RefBase {
protected:
    virtual ~MessageHandler() { }
public:
    virtual void handleMessage(const Message& message) = 0;
};
WeakMessageHandler类,继承于MessageHandler类
4.2.3 回调类
class LooperCallback : public virtual RefBase {
protected:
    virtual ~LooperCallback() { }
public:
    //用于处理指定的文件描述符的poll事件
    virtual int handleEvent(int fd, int events, void* data) = 0;
};
4.2.4 Looper类
static const int EPOLL_SIZE_HINT = 8; //每个epoll实例默认的文件描述符个数
static const int EPOLL_MAX_EVENTS = 16; //轮询事件的文件描述符的个数上限
其中Looper类的内部定义了Request,Response,MessageEnvelope这3个结构体
MessageEnvelope正如其名字,信封。MessageEnvelope里面记录着收信人(handler),发信时间(uptime),信件内容(message)
4.2.5 ALooper类
ALooper类定义在通过looper.cpp/looper.h
static inline Looper* ALooper_to_Looper(ALooper* alooper) {
    return reinterpret_cast<Looper*>(alooper);
}
static inline ALooper* Looper_to_ALooper(Looper* looper) {
    return reinterpret_cast<ALooper*>(looper);
}
ALooper类 与前面介绍的Looper类,更多的操作是通过ALooper_to_Looper(), Looper_to_ALooper()这两个方法转换完成的,也就是说ALooper类中定义的所有方法,都是通过转换为Looper类,再执行Looper中的方法。
5. 总结:
我们得出Handler消息机制其实就是一个典型的生产者-消费者模型。
可以用一张图,来表示整个消息机制
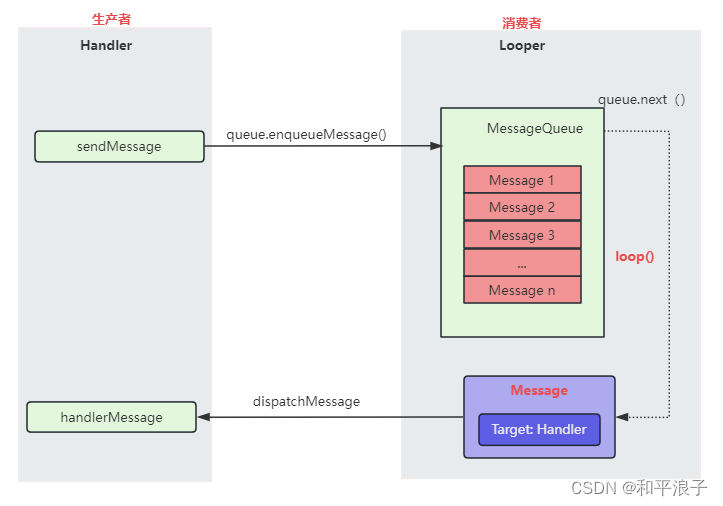
1. Handler通过sendMessage()发送Message到MessageQueue队列;
2. Looper通过loop(),不断提取出达到触发条件的Message,并将Message交给target来处理;
3. 经过dispatchMessage()后,交回给Handler的handleMessage()来进行相应地处理。
4. 将Message加入MessageQueue时,处往管道写入字符,可以会唤醒loop线程;
消息分发的优先级:
- Message的回调方法:
message.callback.run(),优先级最高; - Handler的回调方法:
Handler.mCallback.handleMessage(msg),优先级仅次于1; - Handler的默认方法:
Handler.handleMessage(msg),优先级最低。
消息缓存池:
为了提供效率,提供了一个大小为50的Message缓存队列,减少对象不断创建与销毁的过程。
参考文章: Android消息机制2-Handler(Native层) - Gityuan博客 | 袁辉辉的技术博客