数据库与表结构
oracle
Oracle 为每个项目创建单独user,oracle数据表存放在表空间下,每个用户有独立表空间
- 创建用户及密码
  语法[创建用户]: create user 用户名 identified by 口令[即密码];
例子: create user test identified by test; - 授权
  语法: grant connect, resource to 用户名;
   例子: grant connect, resource to test
PLSQL集成开发
- 连接数据库
打开PLSQL,先以system用户登陆
- 创建用户并授权
创建用户

授权

1.对象权限是指针对于某一张表的操作权限
2.系统权限是指对表的CRUD操作权限,
3.角色权限是系统权限的集合
4.我们设置时一般是设置角色权限,设置resource与connect
- 退出当前用户,再重新以创建的用户登录即可
- 表结构
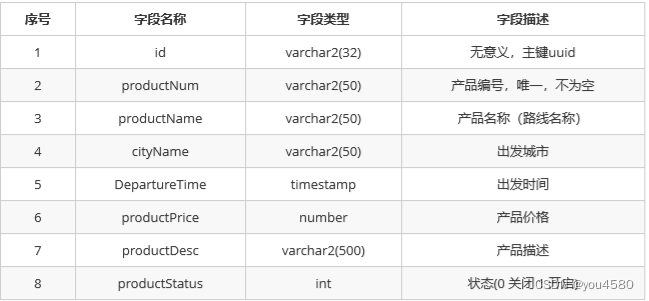
注意,不适用productNum作为主键,因为一般将表主键设为无意义的值,用uuid
建表sql如下
CREATE TABLE product(  id varchar2(32) default SYS_GUID() PRIMARY KEY,  productNum VARCHAR2(50) NOT NULL,  productName VARCHAR2(50),  cityName VARCHAR2(50),  DepartureTime timestamp,  productPrice Number,  productDesc VARCHAR2(500),  productStatus INT,  CONSTRAINT product UNIQUE (id, productNum) )

insert into PRODUCT (id, productnum, productname, cityname, departuretime, productprice, productdesc, productstatus) values ('676C5BD1D35E429A8C2E114939C5685A', 'itcast-002', '北京三日游', '北京', to_timestamp('1010-2018 10:10:00.000000', 'dd-mm-yyyy hh24:mi:ss.ff'), 1200, '不错的旅行', 1); insert into PRODUCT (id, productnum, productname, cityname, departuretime, productprice, productdesc, productstatus) values ('12B7ABF2A4C544568B0A7C69F36BF8B7', 'itcast-003', '上海五日游', '上海', to_timestamp('2504-2018 14:30:00.000000', 'dd-mm-yyyy hh24:mi:ss.ff'), 1800, '魔都我来了', 0); insert into PRODUCT (id, productnum, productname, cityname, departuretime, productprice, productdesc, productstatus) values ('9F71F01CB448476DAFB309AA6DF9497F', 'itcast-001', '北京三日游', '北京', to_timesta
- 在PLSQL中打开SQL Window
将上述建表语句,插入数据语句复制到SQL Window
- 先将SQLWindow中的建表语句选中,点击左上角齿轮即可
- 再将SQLWindow中的插入语句选中点击左上角齿轮
- 注意,一定要再点击左上角的绿色下箭头,做事务提交
- 校验:写一条select执行即可
- default SYS_GUID() ,如果未指定值会默认生成一个随机值,oracle中的函数
IDEA maven工程搭建
创建maven工程
注意不选择骨架
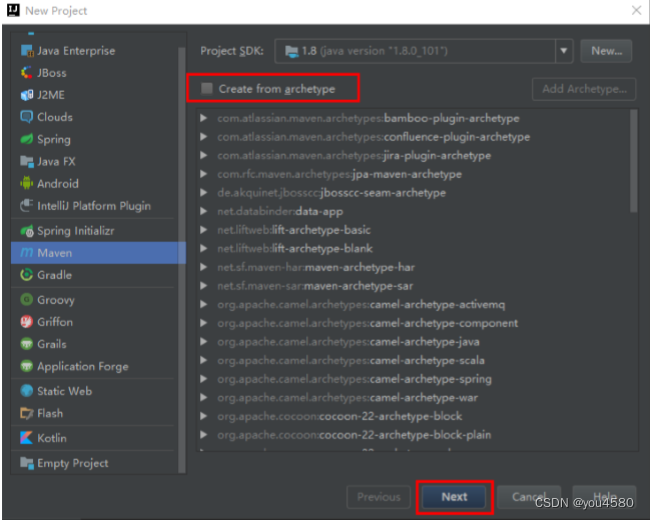
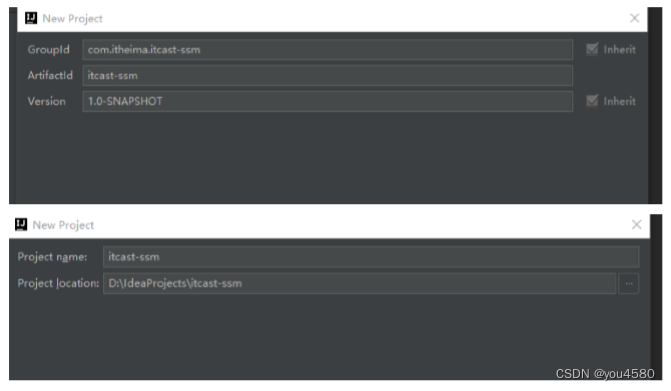
创建子模块
- itcast-ssm-web
- itcast-ssm-domain
- itcast-ssm-service
- itcast-ssm-dao
- itcast-ssm-utils
itcast-ssm-web
创建该子模块时要选择一个web工程,其他的子模块在创建maven工程时均不选择骨架
在父工程中—File—>new module—>(注意一定要指明父工程)

pom.xml
导入合适依赖
SSM整合
思路
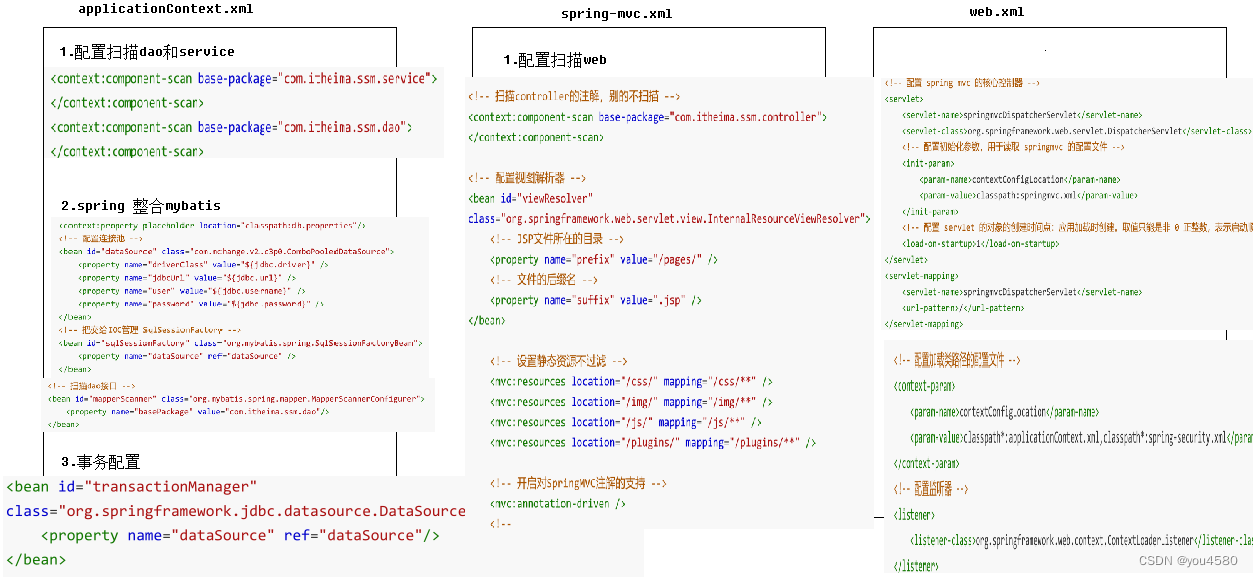
在Spirng的配置文件 applicationContext.xml中
1.配置扫描dao和dervice
2.spring整合mybatis(本质上是配置数据库连接池,spring进行sqlsessionFactorybean管理,指定dao接口扫描)
3.事务配置
springmvc.xml配置
4. 配置扫描controller
5. 配置视图解析器
6. 设置静态资源不过滤
7. 开启SpringMVC注解支持
web.xml
1.配置contexConfig.location(完成spring配置文件加载工作)
2.配置监听器(监听request域对象的创建和销毁的)
3.配置dispatcherservelet前端控制器
4.解决中文乱码过滤器
创建文件
- heima_ssm_web模块/src/main 上
new Directory(java) 并指定为SourcesRoot
new Directory?(resources)并指定为ResourcesRoot
- 在heima_ssm_web/src/main/resources下
new file(applicationContext.xml)
new file(spring-mvc.xml)
- 在heima_ssm_web/src/main/webapp/WEB-INF已经存在web.xml
配置applicationContext.xml
		<?xml version="1.0" encoding="UTF-8"?>
<beans xmlns="http://www.springframework.org/schema/beans"
	xmlns:xsi="http://www.w3.org/2001/XMLSchema-instance"
	xmlns:context="http://www.springframework.org/schema/context"
	xmlns:aop="http://www.springframework.org/schema/aop"
	xmlns:tx="http://www.springframework.org/schema/tx"
	xsi:schemaLocation="http://www.springframework.org/schema/beans
	http://www.springframework.org/schema/beans/spring-beans.xsd
	http://www.springframework.org/schema/context
	http://www.springframework.org/schema/context/spring-context.xsd
	http://www.springframework.org/schema/aop
	http://www.springframework.org/schema/aop/spring-aop.xsd
	http://www.springframework.org/schema/tx
	http://www.springframework.org/schema/tx/spring-tx.xsd">


	<!-- 开启注解扫描,管理service和dao -->
	<context:component-scan base-package="com.itheima.ssm.service">
	</context:component-scan>
	<context:component-scan base-package="com.itheima.ssm.dao">
	</context:component-scan>

	<context:property-placeholder location="classpath:db.properties"/>
	<!-- 配置连接池 -->
	<bean id="dataSource" class="com.mchange.v2.c3p0.ComboPooledDataSource">
   		<property name="driverClass" value="${jdbc.driver}" />
   		<property name="jdbcUrl" value="${jdbc.url}" />
   		<property name="user" value="${jdbc.username}" />
   		<property name="password" value="${jdbc.password}" />
   	</bean>
	<!-- 把交给IOC管理 SqlSessionFactory -->
	<bean id="sqlSessionFactory" class="org.mybatis.spring.SqlSessionFactoryBean">
   		<property name="dataSource" ref="dataSource" />
   		<!-- 传入PageHelper的插件 -->
   		<property name="plugins">
   			<array>
   				<!-- 传入插件的对象 -->
   				<bean class="com.github.pagehelper.PageInterceptor">
   					<property name="properties">
   						<props>
   							<prop key="helperDialect">mysql</prop>
   							<prop key="reasonable">true</prop>
   						</props>
   					</property>
   				</bean>
   			</array>
   		</property>
   	</bean>

	<!-- 扫描dao接口 -->
	<bean id="mapperScanner" class="org.mybatis.spring.mapper.MapperScannerConfigurer">
   		<property name="basePackage" value="com.itheima.ssm.dao"/>
   	</bean>

	<!-- 配置Spring的声明式事务管理 -->
	<!-- 配置事务管理器 -->
   	<bean id="transactionManager" class="org.springframework.jdbc.datasource.DataSourceTransactionManager">
   		<property name="dataSource" ref="dataSource"/>
   	</bean>

  <tx:annotation-driven transaction-manager="transactionManager"/>

</beans>
注意,其中关于是数据库连接池配置处

需要在heima_ssm_web/src/main/resources下创建配置文件db.properties,做配置即可

配置applicationContext.xml
配置web.xml
	<!-- 配置加载类路径的配置文件 -->
	  <context-param>
	    <param-name>contextConfigLocation</param-name>
	    <param-value>classpath*:applicationContext.xml,classpath*:spring-security.xml</param-value>
	  </context-param>

	  <!-- 配置监听器 -->
	  <listener>
	    <listener-class>org.springframework.web.context.ContextLoaderListener</listener-class>
	  </listener>
	  <!-- 配置监听器,监听request域对象的创建和销毁的 -->
	  <listener>
	    <listener-class>org.springframework.web.context.request.RequestContextListener</listener-class>
	  </listener>


	  <!-- 前端控制器(加载classpath:springmvc.xml 服务器启动创建servlet) -->
	  <servlet>
	    <servlet-name>dispatcherServlet</servlet-name>
	    <servlet-class>org.springframework.web.servlet.DispatcherServlet</servlet-class>
	    <!-- 配置初始化参数,创建完DispatcherServlet对象,加载springmvc.xml配置文件 -->
	    <init-param>
	      <param-name>contextConfigLocation</param-name>
	      <param-value>classpath:springmvc.xml</param-value>
	    </init-param>
	    <!-- 服务器启动的时候,让DispatcherServlet对象创建 -->
	    <load-on-startup>1</load-on-startup>
	  </servlet>
	  <servlet-mapping>
	    <servlet-name>dispatcherServlet</servlet-name>
	    <url-pattern>*.do</url-pattern>
	  </servlet-mapping>

	  <!-- 解决中文乱码过滤器 -->
	  <filter>
	    <filter-name>characterEncodingFilter</filter-name>
	    <filter-class>org.springframework.web.filter.CharacterEncodingFilter</filter-class>
	    <init-param>
	      <param-name>encoding</param-name>
	      <param-value>UTF-8</param-value>
	    </init-param>
	  </filter>
	  <filter-mapping>
	    <filter-name>characterEncodingFilter</filter-name>
	    <url-pattern>/*</url-pattern>
	  </filter-mapping>

	  <!-- 委派过滤器 -->
	  <filter>
	    <filter-name>springSecurityFilterChain</filter-name>
	    <filter-class>org.springframework.web.filter.DelegatingFilterProxy</filter-class>
	  </filter>
	  <filter-mapping>
	    <filter-name>springSecurityFilterChain</filter-name>
	    <url-pattern>/*</url-pattern>
	  </filter-mapping>
	//默认加载的页面
	  <welcome-file-list>
	    <welcome-file>index.html</welcome-file>
	    <welcome-file>index.htm</welcome-file>
	    <welcome-file>index.jsp</welcome-file>
	    <welcome-file>default.html</welcome-file>
	    <welcome-file>default.htm</welcome-file>
	    <welcome-file>default.jsp</welcome-file>
	  </welcome-file-list>
完善目录
在heima_ssm_web/src/main.java上 new package(com.itheima.ssm.controller),在该包内创建一个类 new java class(ProuductC)
产品操作
编写实体类
ssm_domain中编写实体类
(heima_ssm_domaian模块的src/main/java上new package—com.itheima.ssm.domain)
为所有属性生成getter和setter(Alt+Insert)
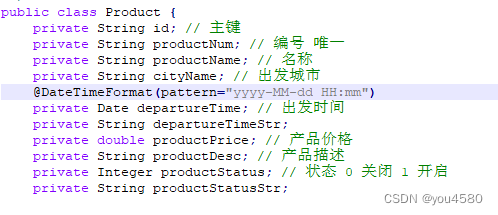
  		public class Product {
  				 private String id; // 主键
  			     private String productNum; // 编号 唯一
  			     private String productName; // 名称
  				 private String cityName; // 出发城市
  			     private Date departureTime; // 出发时间
  			     private String departureTimeStr;
  			     private double productPrice; // 产品价格
  		         private String productDesc; // 产品描述
  				  private Integer productStatus; // 状态 0 关闭 1 开启
  				  private String productStatusStr;
  		  }
编写持久层接口
heima_ssm_dao模块的src/main/java上new package—com.itheima.ssm.dao
new interface—IProductDAO
注意,在创建的模块后,发现/src/main下 java和resources都是灰色的,要分别MarDirectory ad SourcesRoot ResourcesRoot
public interface IProductDao {

  @Select("select * from product")
     List<Product> findAll() throws Exception;
 }
发现泛红,在Product上Alt+Enter添加依赖(去该模块pom.xml查看依赖是否添加)

编写业务接口
- heima_ssm_service模块的src/main/java上new package—com.itheima.ssm.service
- new interface—IProductService
- 在com.itheima.ssm.service,new package—impl,并new java.class(ProductServiceImpl)
  	public interface IProductService {

  	    List<Product> findAll() throws Exception;

  	}


  			@Service
  			@Transactional
  			public class ProductServiceImpl implements IProductService{
     				 @Autowired
    				  private IProductDao productDao

     				 @Override
  				    public List<Product> findAll() throws Exception {
               	 	 return productDao.findAll()
  			    }
  			}
查询所有产品
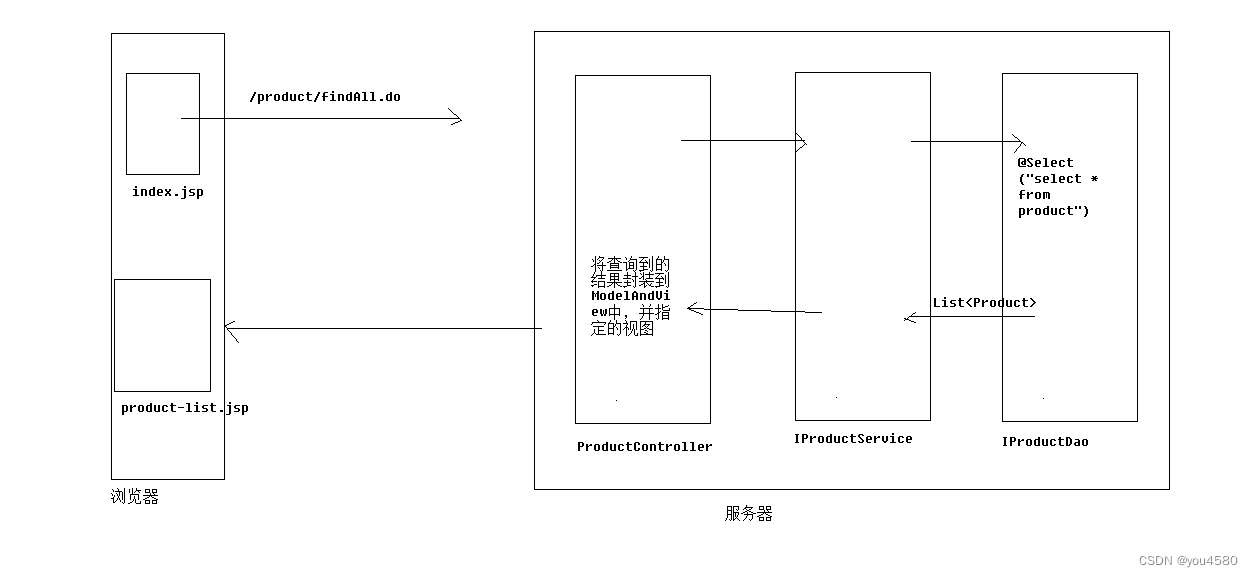
查询到的结果封装到ModelAndView中,并指定并指定视图
视图位置
- springmvc.xml中指定了视图存放的位置
- 目录前缀为/pages
- 文件后缀名为.jsp
- 在\heima_ssm_web/src/main/webapp上新建一个/pages目录,在该目录中放置指定的.jsp文件
 将制作好的jsp页面复制进/pages
- 将product-list.jsp复制进/pages
调试
- 在/webapp上新建一个index.jsp,注意修改其约束头,在上面添加一个a标签
<a href="${pageContext.request.contextPath}/product/findAll.do">查询所有商品</a>
- 但是注意product-all.list中存在AdminLTE原生的静态资源,需要将这些原生资源拷贝进IDEA
- 将/css /img /plugins 复制到/webapp
效果如图

- prouductlist.jsp
页面中报错

需要将aside.jsp和header.jsp拷贝进IDEA的/pages
- Controller层的返回视图的名字是与前端页面协商一致的
![]()
前端使用了productlist,故后端控制器中也使用这个
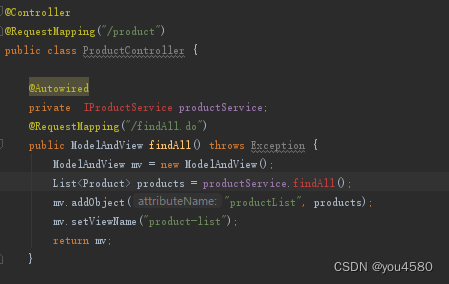
- 启动项目需要给该项目加上tomcat插件,在heima_ssm_web的pom.xml中

在此空格处,右键—>Genenrete(Alt+insert)—>plugins template—>再输入tomcat选择org.apache.tomcat.maven,版本选择2.2,同时新建一个标签指定端口
<configuration>
  	<port>8888	<port>
</configuration>

- 在IDEA中配置运行
![]()
Edit Configuration
添加一个maven

添加信息

做完配置后要在Maven Projects中 重新clean在install(发布)
然后就可以将项目跑起来了(配置完启动的maven工程后出现了这些按钮变绿)
![]()
成功启动后,打开浏览器,键入
localhost:8888/heima_ssm_web/
跳转到的是项目部署的index.jsp页面,点击上面的a标签会将所有查询商品的信息显示在页面上(跳转到了product.list)
页面调试
状态显示
发现【状态】和【出发时间】栏没有输出,但是数据库中是有这个值的
![]()
页面上用的是产品状态的字符串展示,
![]()
则修改

服务端源码修改后一定要将工程clean再发布然后再运行
日期显示
因为时间的处理在各个jsp都可能会用到,所以抽取成一个工具类
heima_ssm_utils模块下/src/main/java —> new package(com.itheima.ssm.utils)—>new java class(DateUtils)

再去对domain进行修改
public String getDepartureTimeStr() {
        if(departureTime!=null){
            departureTimeStr= DateUtils.date2String(departureTime,"yyyy-MM-dd HH:mm:ss");
        }
        return departureTimeStr;
    }
product-list.jsp制作
制作,直接在IDEA中对导入的product-list.jsp模板进行修改即可
main.jsp
制作一个main.jsp放到/pages
这个页面包括头部,和侧边栏,侧边栏主要做功能区,而主界面就是一张图片
为了不再访问时看到空白界面(index.jsp),在index.jsp进行修改,访问首页
  <body>
  <jsp:forword page =“/pages/main.jsp”>
  </body>
产品添加操作
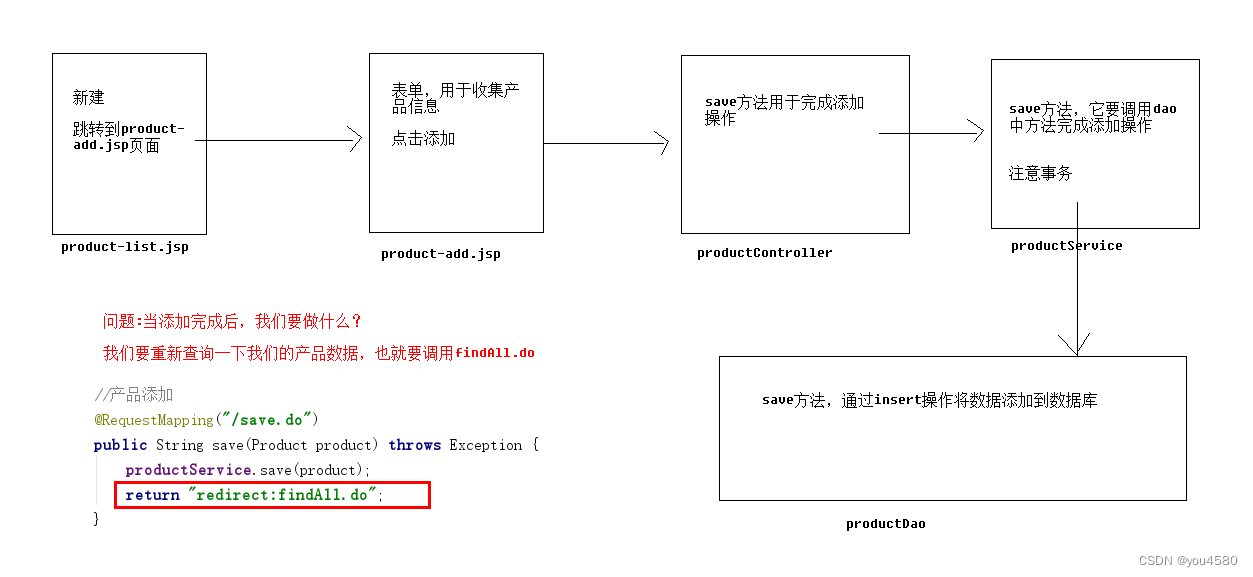
product.add 主要有 头部侧边栏,主界面有表单,有提交按钮(提交到save.do)
Controller
先编写Controller,调用service的save方法保存product
  @Controller
  @RequestMapping("/product")
  public class ProductController {

      @Autowired
      private IProductService productService;

      //产品添加
      @RequestMapping("/save.do")
      public String save(Product product) throws Exception {
          productService.save(product);
          return "redirect:findAll.do";
      }
  }
Service
目前save方法没有,则直接Alt+Enter选择Create生成,会直接跳转到该方法定义处(IProductService)

在impl实现类中重写该方法(IDEA的强大之处在于,只要输入save就会自动生成定义),同样alt+enter创建该方法

Dao
dao中
  public interface IProductDao {

  	    @Select("select * from product")    List<Product> findAll() throws Exception;

  	    @Insert("insert into product(productNum,productName,cityName,departureTime,productPrice,productDesc,productStatus) values(#{productNum},#{productName},#{cityName},#{departureTime},#{productPrice},# {productDesc},#{productStatus})")
  	    void save(Product product); }
   }
  }
添加完后重新查询

由controller代码可知,添加完产品后 进行了重定向
重定向/转发
重定向在客户端完成,速度慢,两次请求,URL改变,request域数据丢失
转发在服务器完成,速度快,一次请求,URL不改变,request域数据不丢失
调试
启动工程后报错,在heima_ssm_web/src/main/resources 加入日志log4j.properties重新启动日志,查看错误
页面提交的数据,时间是S字符串类型,而在后端product中为Date类型
SpringMVC类型转换(进行SpringMVC绑定参数类型转换)
- 实体类加日期格式化注解(简单,缺陷是该注解是局部处理方式)
- 属性编辑器
