目录
- 参考
- 效果
- 实现
- main.cpp
- widget.h
- widget.cpp
- custombtn.h 自定义按钮
- custombtn.cpp 自定义按钮
- slidingSideWindow.h 滑动侧边栏
- slidingSideWindow.cpp 滑动侧边栏
- 模糊知识点
- 源码
参考
Python版本:GitHub地址
B站主页
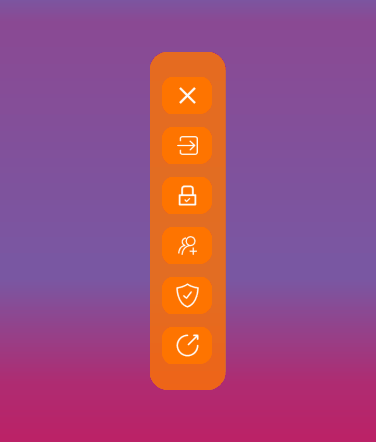
效果
实现
main.cpp
#include "widget.h"
#include <QApplication>
int main(int argc, char *argv[])
{
    QApplication a(argc, argv);
    widget w;
    w.show();
    return a.exec();
}
widget.h
widget.cpp
#include "widget.h"
#include "slidingSideWindow.h"
#include <QDebug>
widget::widget(QWidget *parent)
    : QWidget{parent}
{
    this->resize(800,600);
    this->setWindowFlag(Qt::WindowStaysOnTopHint);
    //线性渐变
    setStyleSheet("background-color: qlineargradient(spread:pad, x1:0, y1:1, x2:0, y2:0, "
                  "stop:0 #e60042, stop:0.05 #d40f52, stop:0.20 #c21d62, stop:0.31 #af2c72, "
                  "stop:0.45 #7958a3, stop:0.79 #8b4993, stop:0.86 #6667b3, stop:0.935 #5475c3);");
    auto pSideWindow=new SlidingSideWindow(this);
    pSideWindow->move(this->rect().center().x()-pSideWindow->width()/2,
                      this->rect().center().y()-pSideWindow->height()/2);
    qDebug()<<__FUNCTION__<<" :x ="<<this->rect().center().x()-pSideWindow->width()/2;
    qDebug()<<__FUNCTION__<<" :y ="<<this->rect().center().y()-pSideWindow->height()/2;
}

widget::~widget()
{

}
custombtn.h 自定义按钮
#ifndef CUSTOMBTN_H
#define CUSTOMBTN_H

#include <QFrame>
#include <QObject>
#include <QPushButton>
#include <QPropertyAnimation>
#include <QPainter>
#include <QPainterPath>

class customBtn : public QFrame
{
    Q_OBJECT
    /* 将m_color属性声明为可用于属性系统的属性。然后,提供了一个getColor函数作为该属性的读取器,
     * 以及一个setColor函数作为写入器。
     *  在setColor函数中,我们可以执行一些自定义逻辑,并在属性值发生变化时进行处理。 */
    Q_PROPERTY(QColor m_color READ getColor WRITE setColor)
    Q_PROPERTY(QSize m_size READ getSize WRITE setSize)
public:
    customBtn(QWidget *parent = nullptr, QString text = "", QString iconFile = "");
    ~customBtn();
    QColor getColor() const { return m_color; }
    void setColor(const QColor& color);
    QSize getSize() const { return m_size; }
    void setSize(const QSize& color);
    QPushButton *pushButton(){return m_pPushButtonRight;}
    int getWidth(){return this->width();}
    int getHeight(){return this->height();}
protected:
    void paintEvent(QPaintEvent *event) override;
    void enterEvent(QEvent *event) override ;
    void leaveEvent(QEvent *event) override ;
signals:
    void colorChanged();            //响应m_color属性动画
private slots:
    void updateColor();
private:
    QSize m_size;
    QColor  m_color;
    QString m_iconFile;
    QString m_btnText;
    QPropertyAnimation *m_pAnimation;  //属性动画
    QPushButton* m_pPushButtonIcon;
    QPushButton* m_pPushButtonRight;
    void initUI();
    void hoveringAnimation();           //鼠标悬停动画
};

#endif // CUSTOMBTN_H
custombtn.cpp 自定义按钮
#include "custombtn.h"
#include <QDebug>
customBtn::customBtn(QWidget *parent, QString text, QString iconFile)
    : QFrame(parent), m_color(QColor(255, 116, 0, 255)), m_iconFile(iconFile), m_btnText(text)
{
    this->initUI();
}

customBtn::~customBtn()
{

}

void customBtn::setColor(const QColor &color)
{
    if (m_color != color) {
        m_color = color;
        emit colorChanged();
    }
}

void customBtn::setSize(const QSize &size)
{
    if (m_size != size) {
        m_size = size;
        this->resize(size);
    }
}

void customBtn::hoveringAnimation()
{
    m_pAnimation->setTargetObject(this);        //动画的目标对象设置为当前对象
    m_pAnimation->setPropertyName("m_color");   //动画关联到属性m_color,这意味着动画将修改该属性的值来实现动画效果
    m_pAnimation->setDuration(300);             //动画的持续时间
    //动画的开始值和结束值
    m_pAnimation->setStartValue(QColor(255, 116, 0, 255));
    m_pAnimation->setEndValue(QColor(255, 116, 255, 225));
    m_pAnimation->start();
}

void customBtn::paintEvent(QPaintEvent *event)
{
    QFrame::paintEvent(event);

    QPainter painter(this);
    painter.setRenderHint(QPainter::Antialiasing); // 抗锯齿
    //设置画笔; Qt::NoPen 表示不使用画笔,也就是不绘制边框
    painter.setPen(Qt::NoPen);

    // 绘制圆角矩形背景
    QPainterPath path;
    path.addRoundedRect(this->rect(), 10, 10);
    painter.fillPath(path, m_color);
}

void customBtn::enterEvent(QEvent *event)
{
    // 设置动画的方向为正向
    m_pAnimation->setDirection(QAbstractAnimation::Forward);
    hoveringAnimation();
    QFrame::enterEvent(event);
}

void customBtn::leaveEvent(QEvent *event)
{
    //将动画设置为反向播放
    m_pAnimation->setDirection(QAbstractAnimation::Backward);
    this->hoveringAnimation();
    QFrame::leaveEvent(event);
}

void customBtn::updateColor()
{
    //按钮的背景颜色需要设置成透明,以便于绘制显示QFrame底色
    this->setStyleSheet(QString("QFrame{border-radius: 10px; background-color: rgba(255, 116, 200, 225);} "
                          "QPushButton{border-radius: 10px; background-color: transparent; color: rgb(255, 255, 255);}"));
    this->update();
}

void customBtn::initUI()
{
    this->resize(110, 30);
    this->setMinimumSize(40, 30);
    this->setMaximumSize(110, 30);
    m_size=this->size();
    //QFrame背景颜色和按钮的背景颜色一样,这样就看不见两个按钮之间的边框圆角
    this->setStyleSheet(QString("QFrame{border-radius: 10px; background-color: rgba(255, 116, 0, 255); color: rgb(255, 255, 255);} "
                          "QPushButton{border-radius: 10px; background-color: rgba(255, 116, 0, 255); color: rgb(255, 255, 255);}"));
    m_pPushButtonIcon = new QPushButton(this);
    m_pPushButtonIcon->setGeometry(QRect(0, 0, 30, 31));
    m_pPushButtonIcon->setStyleSheet("padding-left:10px");//设置左边内边距的大小
    QIcon icon(m_iconFile);
    m_pPushButtonIcon->setIcon(icon);
    m_pPushButtonIcon->setIconSize(QSize(20, 20));

    m_pPushButtonRight = new QPushButton(this);
    m_pPushButtonRight->setGeometry(QRect(30, 0, 80, 31));
    m_pPushButtonRight->setStyleSheet("padding-left:15px; text-align: left;");
    m_pPushButtonRight->setIconSize(QSize(20, 20));
    m_pPushButtonRight->setText(m_btnText);
    m_pPushButtonRight->setCheckable(true);
    connect(this,SIGNAL(colorChanged()), this, SLOT(updateColor()));

    m_pAnimation=new QPropertyAnimation(this);
}
slidingSideWindow.h 滑动侧边栏
#ifndef SLIDINGSIDEWINDOW_H
#define SLIDINGSIDEWINDOW_H

#include <QFrame>
#include <QPropertyAnimation>
#include <QAbstractAnimation>
#include <QParallelAnimationGroup>
#include <QPushButton>
#include "custombtn.h"


class SlidingSideWindow : public QFrame
{
    Q_OBJECT

public:
    SlidingSideWindow(QWidget *parent = nullptr);
    ~SlidingSideWindow();
protected:
    void enterEvent(QEvent *event) override;
    void leaveEvent(QEvent *event) override;
private:
    int m_widthHide;                //滑动侧边栏隐藏时宽度
    int m_widthShow;                //滑动侧边栏显示时宽度
    int m_widthChange;              //变化使用宽度
    int m_xShow;
    int m_xHide;
    int m_y;
    int m_customBtn_widthShow;
    int m_customBtn_widthHide;
    int m_customBtn_height;
    bool enterFlag;                 // 判断是否第一次进入
    QParallelAnimationGroup *animationGroup;//并行播放多个动画的动画组
    void initUI();
    void configInit();
    void animationGroupConfig();
    void anewRecordPos();            //重新记录位置
};

#endif // SLIDINGSIDEWINDOW_H
slidingSideWindow.cpp 滑动侧边栏
#include "slidingSideWindow.h"
#include <QDebug>
SlidingSideWindow::SlidingSideWindow(QWidget *parent)
    : QFrame(parent)
{
    initUI();
    configInit();
}

SlidingSideWindow::~SlidingSideWindow()
{
}

void SlidingSideWindow::enterEvent(QEvent *event)
{
    QFrame::enterEvent(event);
    // 跳过第一次
    if (!enterFlag)
    {
        enterFlag = true;
        /*因为new时 this->x()和y() 都是0; move之后才有值;只记录第一次进入this的Pos()*/
        anewRecordPos();            //重新记录位置
        return;
    }

    // 显示包含文字的按钮
    QList<customBtn *> frames = this->findChildren<customBtn *>();
    for (auto item : frames)
    {
        item->pushButton()->show();
    }

    animationGroup->setDirection(QAbstractAnimation::Backward);
    animationGroup->start();
}

void SlidingSideWindow::leaveEvent(QEvent *event)
{
    QFrame::leaveEvent(event);
    QList<customBtn *> frames = this->findChildren<customBtn *>();
    for (auto item : frames)
    {
        item->pushButton()->hide();
    }

    animationGroup->setDirection(QAbstractAnimation::Forward);
    animationGroup->start();
}


void SlidingSideWindow::initUI()
{
    this->resize(141, 271);
    this->setStyleSheet("QFrame{border-radius: 15px;"
            "background-color: rgba(255, 116, 0,200);}");
    // 判断是否第一次进入
    enterFlag = false;

    //并行播放多个动画的动画组
    animationGroup = new QParallelAnimationGroup(this);
}

void SlidingSideWindow::configInit()
{
    auto childFrame =new customBtn(this,"Close",":/icon/Close.png");
    childFrame->setGeometry(QRect(10, 20, 110, 30));
    auto childFrame_2 =new customBtn(this,"Enter",":/icon/Enter.png");
    childFrame_2->setGeometry(QRect(10, 60, 110, 30));
    auto childFrame_3 =new customBtn(this,"SetKey",":/icon/SetKey.png");
    childFrame_3->setGeometry(QRect(10, 100, 110, 30));
    auto childFrame_4 =new customBtn(this,"Resign",":/icon/Resign.png");
    childFrame_4->setGeometry(QRect(10, 140, 110, 30));
    auto childFrame_5 =new customBtn(this,"Verify",":/icon/Verify.png");
    childFrame_5->setGeometry(QRect(10, 180, 110, 30));
    auto childFrame_6 =new customBtn(this,"Share",":/icon/Share.png");
    childFrame_6->setGeometry(QRect(10, 220, 110, 30));
    m_customBtn_widthShow = childFrame->getWidth();
    m_customBtn_widthHide = 40;
    m_customBtn_height = childFrame->getHeight();

    anewRecordPos();            //重新记录位置
}

void SlidingSideWindow::animationGroupConfig()
{
    // 清空动画组
    animationGroup->clear();

    /*在leaveEvent和enterEvent中对右侧按钮隐藏后,通过QPropertyAnimation属性动画修改customBtn的
     *自定义属性m_size,以更改customBtn底下的QFrame大小。否则QFrame存在background-color就看不到
     *customBtn图标的右侧圆角*/
    // 按钮动画
    QList<customBtn *> frames = this->findChildren<customBtn *>();
    for (auto childFrame : frames)
    {
        QPropertyAnimation *btnAnimation = new QPropertyAnimation(childFrame, "m_size");
        btnAnimation->setDuration(150);
        btnAnimation->setStartValue(QSize(m_customBtn_widthShow, m_customBtn_height));
        btnAnimation->setEndValue(QSize(m_customBtn_widthHide, m_customBtn_height));
        animationGroup->addAnimation(btnAnimation);      // 添加属性动画到动画组
    }

    // 侧边栏动画
    QPropertyAnimation *frameAnimation = new QPropertyAnimation(this, "geometry");
    frameAnimation->setDuration(150);
    frameAnimation->setStartValue(QRect(m_xShow, m_y, m_widthShow, this->height()));
    frameAnimation->setEndValue(QRect(m_xHide, m_y, m_widthHide, this->height()));
    animationGroup->addAnimation(frameAnimation);         // 添加属性动画到动画组
}

//重新计算位置
void SlidingSideWindow::anewRecordPos()
{
    // 设置变形部件尺寸
    m_widthHide = 61;
    m_widthShow = this->width();
    m_widthChange = m_widthShow - m_widthHide;
    m_xShow = this->x();
    m_xHide = this->x() + m_widthChange / 2;
    m_y = this->y();

    animationGroupConfig();
}
模糊知识点
QPropertyAnimation::setDirection(Direction )设置动画的播放方向Q_PROPERTY将成员变量(或者称为属性)公开为可由其他对象访问和操作的属性
Q_PROPERTY 宏的基本语法如下:
Q_PROPERTY(type name READ getterFunction [WRITE setterFunction] [RESET resetFunction]
               [NOTIFY notifySignal] [REVISION int]
               [DESIGNABLE bool] [SCRIPTABLE bool] [STORED bool]
               [USER bool] [CONSTANT] [FINAL])
其中,常用的属性选项包括:

type:属性的数据类型。
name:属性的名称。
READ getterFunction:返回属性值的函数。
WRITE setterFunction:设置属性值的函数(可选)。
NOTIFY notifySignal:当属性值发生变化时发出的信号(可选)。
源码
Gitee:07SlidingSideWindow滑动侧边栏