文章地址:https://arxiv.org/abs/1803.04189
ICML github 代码: https://github.com/NVlabs/noise2noise
本文整理和参考代码: https://github.com/shivamsaboo17/Deep-Restore-PyTorch
文章目录
- 1. 理论背景
- 2. 实验结果
- 3. 代码实现
- (1) 网络结构
- (2) 数据加载
- (3) 网络训练
- (4) 完整流程
- 4. 总结
文章核心句子: ‘learn to turn bad images into good images by only looking at bad images, and do this just as well, sometimes even better.’
1. 理论背景
如果有一系列观测不怎么精确的数据(y1,y2…yn),想要得到一个可信的结果最简单的方法就是让这些观测数据的 “方差”(可以是其他度量)最小
a
r
g
m
i
n
z
E
y
{
L
(
z
,
y
)
}
\underset{z}{argmin} E_y \{ L(z,y)\}
zargminEy{L(z,y)}
不同的损失函数这里查找的最优位置不同:
- L2 损失,
L
(
z
,
y
)
=
(
z
−
y
)
2
L(z,y) = (z-y)^2
L(z,y)=(z−y)2的时候,最优位置是期望
z = E y { y } z = E_y \{ y\} z=Ey{y} - L1 损失, L ( z , y ) = ∣ z − y ∣ L(z,y) = |z-y| L(z,y)=∣z−y∣,最优值就是中值位置 z = m e d i a n { y } z = median \{y \} z=median{y}
- L0损失, L ( z , y ) = ∣ z − y ∣ 0 L(z,y) = |z-y|_0 L(z,y)=∣z−y∣0, 最优值是众数, z = m o d e { y } z = mode\{ y\} z=mode{y}
将这里的z用网络进行表示
a
r
g
m
i
n
θ
E
(
x
,
y
)
{
L
(
f
θ
(
x
)
)
,
y
}
\underset{\theta}{argmin} E_{(x,y)} \{ L(f_{\theta}(x)),y \}
θargminE(x,y){L(fθ(x)),y}
通过贝叶斯变换也等价于
a
r
g
m
i
n
θ
E
x
{
E
y
∣
x
{
L
(
f
θ
(
x
)
,
y
)
}
}
\underset{\theta}{argmin} E_x \{ E_{y|x} \{ L(f_{\theta}(x), y)\} \}
θargminEx{Ey∣x{L(fθ(x),y)}}
理论上可通过优化每一个噪声图像对 ( x i , y i x_i,y_i xi,yi) 得到一个最好的拟合器 f θ f_{\theta} fθ ,但这是一个多解且不稳定的过程。比如对于一个超分辨问题来说,对于每一个输入的低分辨图像,其可能对应于多张高分辨图像,或者说多张高分辨图像的下采样可能对应同一张图像。而在高低分辨率的图像对上,使用L2损失函数训练网络,网络会学习到输出所有结果的平均值。这也是我们想要的,如果网络经过优化之后,输出的结果不是和 x i x_i xi一一对应的,而是在一个范围内的随机值,该范围的期望是 y i y_i yi。
- 当网络还没有收敛的时候,其解空间大,方差大,得到的 y i y_i yi偏离真实结果很多
- 而充分训练的网络,解空间变小,方差小,得到的 y i y_i yi接近真实结果
- 解空间的大小不会随着训练的增加而无限减小,但其期望/均值总是不变的
那么上面的结论也就告诉我们,如果用一个期望和目标相匹配的随机数替换原始目标,那么其估计值是将保持不变的。也就是说如果输入条件目标分布
p
(
y
∣
x
)
p(y|x)
p(y∣x)被具有相同条件期望值的任意分布替换,最佳网络参数是保持不变的。训练的目标表示为
a
r
g
m
i
n
θ
∑
i
L
(
f
θ
(
x
i
^
)
,
y
i
^
)
\underset{\theta}{argmin} \sum_i L(f_{\theta}(\hat{x_i}),\hat{y_i})
θargmini∑L(fθ(xi^),yi^)
其中,输出和目标都是来自于有噪声的分布,其满足 E { y i ^ ∣ x i ^ } = y i E\{ \hat{y_i} | \hat{x_i} \} = y_i E{yi^∣xi^}=yi
当给定的训练数据足够多的时候,该目标函数的解和原目标函数是相同的.当训练数据有限的时候,估计的均方误差等于目标中的噪声平方差除以训练样例数目
E
y
^
[
1
N
∑
i
y
i
−
1
N
∑
i
y
i
^
]
2
=
1
N
[
1
N
∑
i
v
a
r
(
y
i
)
]
E_{\hat{y}} [\frac{1}{N} \sum_i y_i - \frac{1}{N} \sum_i \hat{y_i}]^2 = \frac{1}{N}[\frac{1}{N} \sum_i var(y_i)]
Ey^[N1i∑yi−N1i∑yi^]2=N1[N1i∑var(yi)]
- 随着样本数量的增加,误差将接近于0。
- 即使数量有限,估计也是无偏的。
方法总结:
- 强行让NN学习两张 零均值噪声图片之间的映射关系
- 样本数量少:学习了两种零均值噪声的映射变换
- 样本数量多:噪声不可预测,需要最小化loss,NN倾向于输出所有可能的期望值,也就是干净图片
2. 实验结果
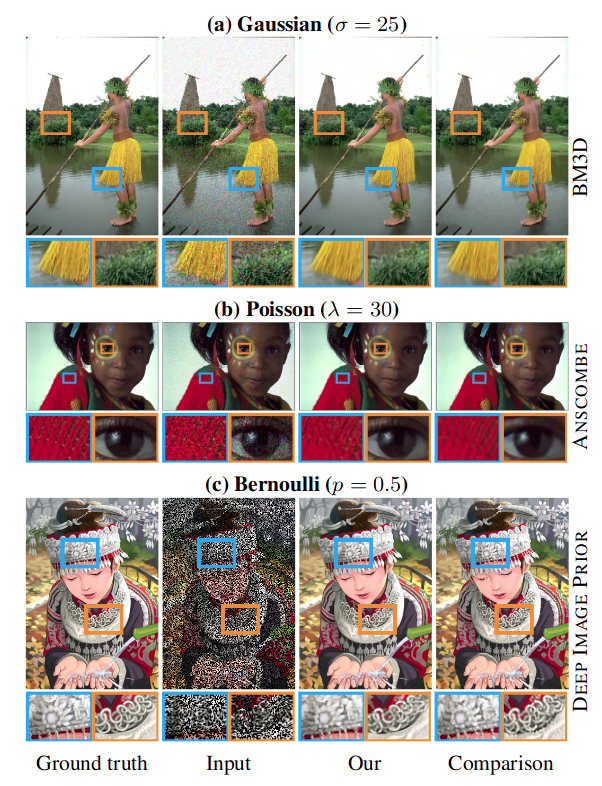
(1) 不同噪声:高斯噪声、poisson噪声、Bernoulli噪声
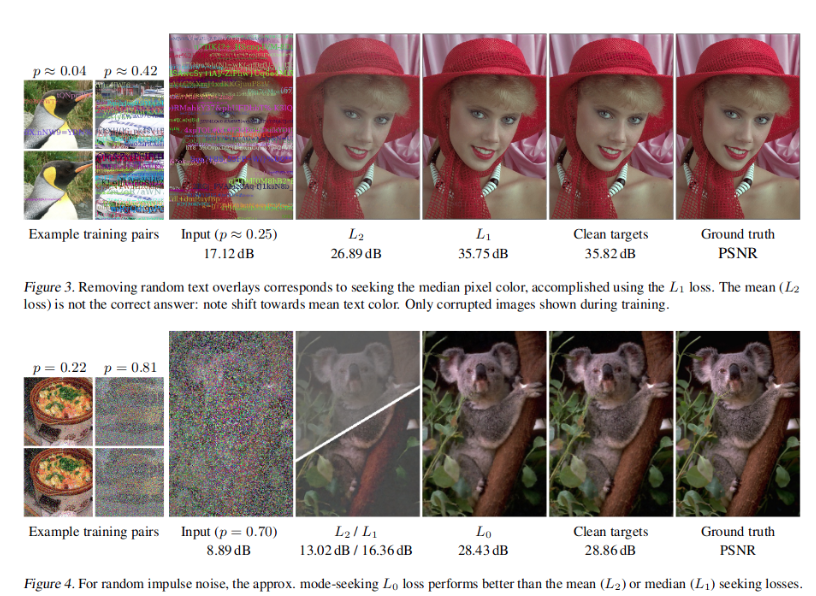
(2) 不同场景:图去文字、脉冲噪声
3. 代码实现
(1) 网络结构
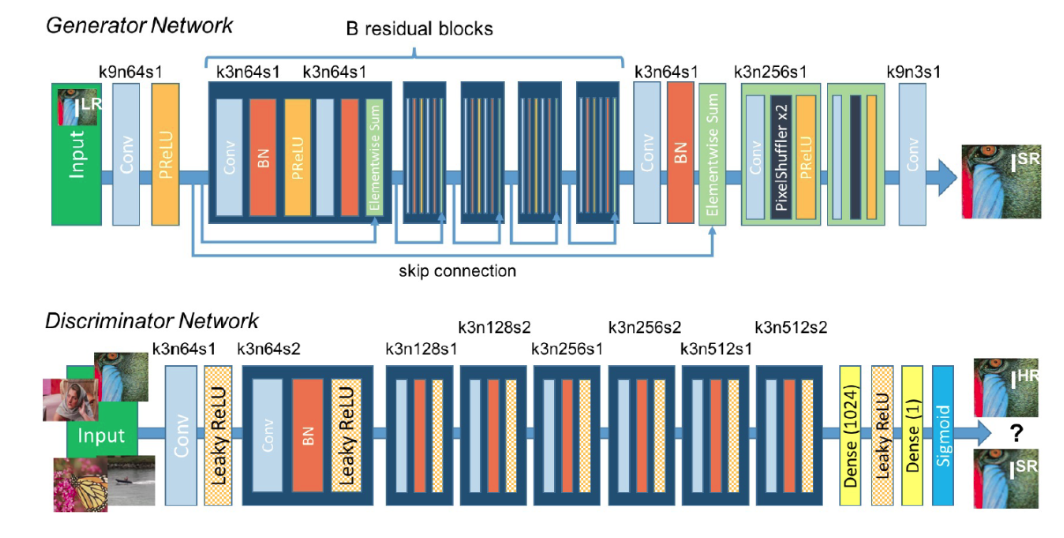
SRResNet模型结构: SRGAN 图像超分辨率结构
import torch
import torch.nn as nn
import torch.nn.functional as F

class ConvBlock(nn.Module):
    def __init__(self,input_channels,output_channels,kernel_size,stride=1,pad=1,use_act=True):
        super(ConvBlock,self).__init__()
        self.use_act = use_act
        self.conv = nn.Conv2d(input_channels,output_channels,kernel_size,stride=stride,padding=pad)
        self.bn = nn.BatchNorm2d(output_channels)
        self.act = nn.LeakyReLU(0.2,inplace=True)
    def forward(self,x):
        """
            conv2d
            batch normalization
            PReLU
        """
        op = self.bn(self.conv(x))
        if self.use_act:
            return self.act(op)
        else:
            return op

class ResBlock(nn.Module):
    def __init__(self,input_channels,output_channels,kernel_size):
        super(ResBlock,self).__init__()
        self.block1 = ConvBlock(input_channels,output_channels,kernel_size)
        self.block2 = ConvBlock(input_channels,output_channels,kernel_size,use_act=False)

    def forward(self,x):
        """
            conv2d
            BN
            PReLU
            conv2d
            BN
            element sum (residule skip connection)
        """
        return x + self.block2(self.block1(x))


class SRResnet(nn.Module):
    def __init__(self,input_channels,output_channels,res_layers=16):
        super(SRResnet,self).__init__()
        self.conv1 = nn.Conv2d(input_channels,output_channels,kernel_size=3,stride=1,padding=1)
        self.act = nn.LeakyReLU(0.2,inplace=True)

        _resl = [ResBlock(output_channels,output_channels,3) for i in range(res_layers)]
        self.resl = nn.Sequential(*_resl)

        self.conv2 = ConvBlock(output_channels,output_channels,3,use_act=False)
        self.conv3 = nn.Conv2d(output_channels,input_channels,kernel_size=3,stride=1,padding=1)

    def forward(self,input):
        _op1 = self.act(self.conv1(input))
        _op2 = self.conv2(self.resl(_op1))
        op = self.conv3(torch.add(_op1,_op2))
        return op


model = SRResnet(3,64)
model
(2) 数据加载
这里用的数据是从 https://github.com/shivamsaboo17/Deep-Restore-PyTorch 下载的coco2017的数据,当然也可以从官网下载,然后将数据分为 train 和 valid两个部分。
这里准备的噪声数据有四种不同的方法,也是对应的文章中的内容
- gaussian
- poisson
- multiplicative_bernoulli
- text
from torch.utils.data import Dataset,DataLoader
import torchvision.transforms.functional as tvF
from PIL import Image,ImageFont,ImageDraw
from random import choice
from sys import platform
from random import choice
from string import ascii_letters
import numpy as np
import os
import scipy
import cv2
import random
import matplotlib.pyplot as plt

class NoisyDataset(Dataset):
    def __init__(self, root_dir, crop_size=128, train_noise_model=('gaussian', 50), clean_targ=False):
        """
            root_dir: Path of image directory
            crop_size: Crop image to given size
            clean_targ: Use clean targets for training
        """
        self.root_dir = root_dir
        self.crop_size = crop_size
        self.clean_targ = clean_targ
        self.noise = train_noise_model[0]
        self.noise_param = train_noise_model[1]
        self.imgs = os.listdir(root_dir)

    def _random_crop_to_size(self, imgs):
        w, h = imgs[0].size
        assert w >= self.crop_size and h >= self.crop_size, 'Cannot be croppped. Invalid size'


        cropped_imgs = []
        i = np.random.randint(0, h - self.crop_size + 2)
        j = np.random.randint(0, w - self.crop_size + 2)

        for img in imgs:
            if min(w, h) < self.crop_size:
                img = tvF.resize(img, (self.crop_size, self.crop_size))
            cropped_imgs.append(tvF.crop(img, i, j, self.crop_size, self.crop_size))

        #cropped_imgs = cv2.resize(np.array(imgs[0]), (self.crop_size, self.crop_size))
        return cropped_imgs

    def _add_gaussian_noise(self, image):
        """
        Added only gaussian noise
        """
        w, h = image.size
        c = len(image.getbands())

        std = np.random.uniform(0, self.noise_param)
        _n = np.random.normal(0, std, (h, w, c))
        noisy_image = np.array(image) + _n

        noisy_image = np.clip(noisy_image, 0, 255).astype(np.uint8)
        return {'image':Image.fromarray(noisy_image), 'mask': None, 'use_mask': False}


    def _add_poisson_noise(self, image):
        """
            Added poisson Noise
        """
        noise_mask = np.random.poisson(np.array(image))
        #print(noise_mask.dtype)
        #print(noise_mask)
        return {'image':noise_mask.astype(np.uint8), 'mask': None, 'use_mask': False}

    def _add_m_bernoulli_noise(self, image):
        """
            Multiplicative bernoulli
        """
        sz = np.array(image).shape[0]
        prob_ = random.uniform(0, self.noise_param)
        mask = np.random.choice([0, 1], size=(sz, sz), p=[prob_, 1 - prob_])
        mask = np.repeat(mask[:, :, np.newaxis], 3, axis=2)
        return {'image':np.multiply(image, mask).astype(np.uint8), 'mask':mask.astype(np.uint8), 'use_mask': True}

    def _add_text_overlay(self, image):
        """
            Add text overlay to image
        """
        assert self.noise_param < 1, 'Text parameter should be probability of occupancy'

        w, h = image.size
        c = len(image.getbands())

        if platform == 'linux':
            serif = '/usr/share/fonts/truetype/dejavu/DejaVuSerif.ttf'
        else:
            serif = 'Times New Roman.ttf'

        text_img = image.copy()
        text_draw = ImageDraw.Draw(text_img)
        mask_img = Image.new('1', (w, h))
        mask_draw = ImageDraw.Draw(mask_img)

        max_occupancy = np.random.uniform(0, self.noise_param)

        def get_occupancy(x):
            y = np.array(x, np.uint8)
            return np.sum(y) / y.size

        while 1:
            font = ImageFont.truetype(serif, np.random.randint(16, 21))
            length = np.random.randint(10, 25)
            chars = ''.join(choice(ascii_letters) for i in range(length))
            color = tuple(np.random.randint(0, 255, c))
            pos = (np.random.randint(0, w), np.random.randint(0, h))
            text_draw.text(pos, chars, color, font=font)

            # Update mask and check occupancy
            mask_draw.text(pos, chars, 1, font=font)
            if get_occupancy(mask_img) > max_occupancy:
                break

        return {'image':text_img, 'mask':None, 'use_mask': False}

    def corrupt_image(self, image):

        if self.noise == 'gaussian':
            return self._add_gaussian_noise(image)
        elif self.noise == 'poisson':
            return self._add_poisson_noise(image)
        elif self.noise == 'multiplicative_bernoulli':
            return self._add_m_bernoulli_noise(image)
        elif self.noise == 'text':
            return self._add_text_overlay(image)
        else:
            raise ValueError('No such image corruption supported')

    def __getitem__(self, index):
        """
        Read a image, corrupt it and return it
        """
        img_path = os.path.join(self.root_dir, self.imgs[index])
        image = Image.open(img_path).convert('RGB')

        # 对图片进行随机切割
        if self.crop_size > 0:
            image = self._random_crop_to_size([image])[0]

        # 噪声图片1
        source_img_dict = self.corrupt_image(image)
        source_img_dict['image'] = tvF.to_tensor(source_img_dict['image'])

        if source_img_dict['use_mask']:
            source_img_dict['mask'] = tvF.to_tensor(source_img_dict['mask'])

        # 噪声图片2
        if self.clean_targ:
            #print('clean target')
            target = tvF.to_tensor(image)
        else:
            #print('corrupt target')
            _target_dict = self.corrupt_image(image)
            target = tvF.to_tensor(_target_dict['image'])

        image = np.array(image).astype(np.uint8)
        if source_img_dict['use_mask']:
            return [source_img_dict['image'], source_img_dict['mask'], target,image]
        else:
            return [source_img_dict['image'], target, image]

    def __len__(self):
        return len(self.imgs)
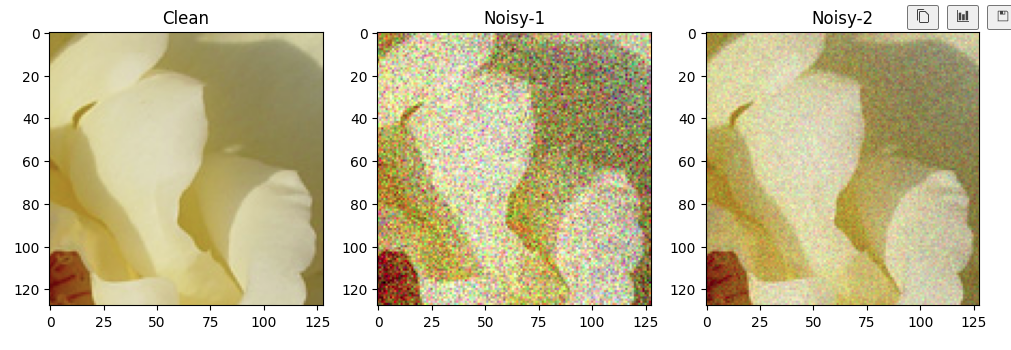
也可以对数据进行查看
data = NoisyDataset("./dataset/train/", crop_size=128) # Default gaussian noise without clean targets
dl = DataLoader(data, batch_size=1, shuffle=True)

index = 10
[img_noise1,img_noise2,img] = data.__getitem__(index)

plt.figure(figsize=(12,4))
plt.subplot(131)
plt.imshow(img)
plt.title("Clean")
plt.subplot(132)
plt.imshow(np.transpose(img_noise1,(1,2,0)))
plt.title("Noisy-1")
plt.subplot(133)
plt.imshow(np.transpose(img_noise2,(1,2,0)))
plt.title("Noisy-2")
plt.show()
(3) 网络训练
import torch
import torch.nn as nn
import torch.optim as optim
from torch.autograd import Variable
import torch.nn.functional as F
from torch.optim import lr_scheduler
from tqdm import tqdm
import matplotlib.pyplot as plt
import numpy as np

class Train():
    def __init__(self,model,train_dir,val_dir,params) -> None:
        self.cuda = params['cuda']
        if self.cuda:
            self.model = model.cuda()
        else:
            self.model = model
        self.train_dir = train_dir
        self.val_dir = val_dir
        # how to add noise: gaussian/poison/ text
        self.noise_model = params['noise_model']
        self.crop_size = params['crop_size']
        # pair with noise figure or clean figure
        self.clean_targs = params['clean_targs']
        self.lr = params['lr']
        self.epochs = params['epochs']
        # Wbatch size
        self.bs = params['bs']

        self.train_dl, self.val_dl = self.__getdataset__()
        self.optimizer = self.__getoptimizer__()
        self.scheduler = self.__getscheduler__()
        self.loss_fn = self.__getlossfn__(params['lossfn'])

    def __getdataset__(self):
        train_ds = NoisyDataset(self.train_dir,
                                crop_size=self.crop_size,
                                train_noise_model=self.noise_model,
                                clean_targ=self.clean_targs)
        train_dl = DataLoader(train_ds,
                                batch_size=self.bs,
                                shuffle=True)

        val_ds = NoisyDataset(self.val_dir,
                                crop_size=self.crop_size,
                                train_noise_model=self.noise_model,
                                clean_targ=True)
        val_dl = DataLoader(val_ds, batch_size=self.bs)
        return train_dl, val_dl

    def __getoptimizer__(self):

        return optim.Adam(self.model.parameters(), self.lr)

    def __getscheduler__(self):
        return lr_scheduler.ReduceLROnPlateau(self.optimizer, patience=self.epochs/4, factor=0.5, verbose=True)

    def __getlossfn__(self, lossfn):
        if lossfn == 'l2':
            return nn.MSELoss()
        elif lossfn == 'l1':
            return nn.L1Loss()
        else:
            raise ValueError('No such loss function supported')

    def evaluate(self):
        val_loss = 0
        self.model.eval()
        for _, valid_datalist in enumerate(self.val_dl):
            if self.cuda:
                source = valid_datalist[0].cuda()
                target = valid_datalist[-2].cuda()
            else:
                source = valid_datalist[0]
                target = valid_datalist[-2]
            _op = self.model(Variable(source))
            if len(valid_datalist) == 4:
                if self.cuda:
                    mask = Variable(valid_datalist[1].cuda())
                else:
                    mask = Variable(valid_datalist[1])
                _loss = self.loss_fn(mask * _op, mask * Variable(target))
            else:
                _loss = self.loss_fn(_op, Variable(target))
            val_loss += _loss.data

        return val_loss

    def train(self):
        pbar = tqdm(range(self.epochs))
        for i in pbar:
            tr_loss = 0
            # train mode
            self.model.train()
            for train_datalist in self.train_dl:
                # the the pair noise data
                if self.cuda:
                    source = train_datalist[0].cuda()
                    target = train_datalist[-2].cuda()
                else:
                    source = train_datalist[0]
                    target = train_datalist[-2]
                # train the nueral network
                _op = self.model(Variable(source))

                # if use the "multiplicative_bernoulli" just calculate the difference with the masked place
                if len(train_datalist) == 4:
                    if self.cuda:
                        mask = Variable(train_datalist[1].cuda())
                    else:
                        mask = Variable(train_datalist[1])
                    _loss = self.loss_fn(mask * _op, mask * Variable(target))
                else:
                    _loss = self.loss_fn(_op, Variable(target))
                tr_loss += _loss.data

                self.optimizer.zero_grad()
                _loss.backward()
                self.optimizer.step()

            val_loss = self.evaluate()
            #self.scheduler.step(val_loss)
            pbar.set_description('Train loss: {:.4f}, Val loss: {:.4f}'.format(tr_loss,val_loss))

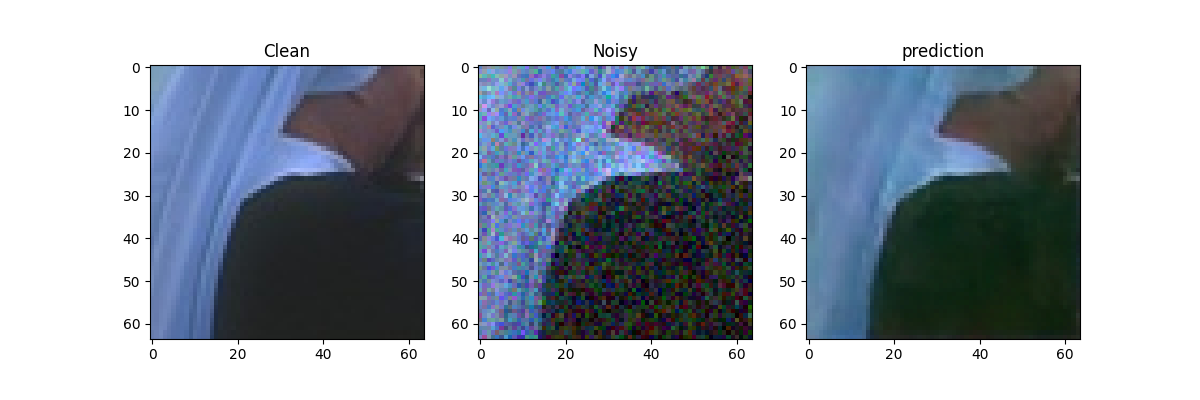
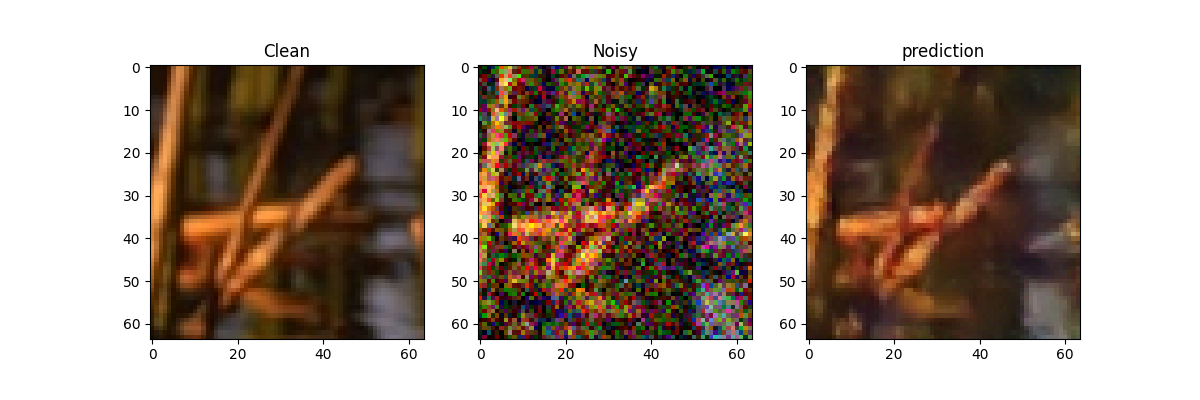
            # save temp reuslt
            with torch.no_grad():
                if i%50==0:
                    source = train_datalist[0].cuda()
                    pred = self.model(Variable(source))
                    img = train_datalist[-1].cuda()
                    plt.figure(figsize=(12,4))
                    plt.subplot(131)
                    plt.imshow(torch.squeeze(img[0]).cpu().detach().numpy())
                    plt.title("Clean")
                    plt.subplot(132)
                    plt.imshow(np.transpose(torch.squeeze(source[0]).cpu().detach().numpy(),(1,2,0)))
                    plt.title("Noisy")
                    plt.subplot(133)
                    plt.imshow(np.transpose(torch.squeeze(abs(pred[0])).cpu().detach().numpy(),(1,2,0)))
                    plt.title("prediction")

                    if not os.path.exists("./result/{}".format(self.noise_model[0]+"_"+str(self.noise_model[1]))):
                        os.makedirs("./result/{}".format(self.noise_model[0]+"_"+str(self.noise_model[1])))
                    plt.savefig("./result/{}/{}.png".format(self.noise_model[0]+"_"+str(self.noise_model[1]),i))
                    plt.close()
(4) 完整流程
model = SRResnet(3, 64)

params = {
    'noise_model': ('gaussian', 50),
    'crop_size': 64,
    'clean_targs': False,
    'lr': 0.001,
    'epochs': 1000,
    'bs': 32,
    'lossfn': 'l2',
    'cuda': True
}

trainer = Train(model, 'dataset/train/', 'dataset/valid/', params)
4. 总结
方法:
- 强行让NN学习两张 零均值噪声图片之间的映射关系
- 样本数量少:学习了两种零均值噪声的映射变换
- 样本数量多:噪声不可预测,需要最小化loss,NN倾向于输出所有可能的期望值,也就是干净图片
结果:
- 对于DIP、Self2Self的方法,不需要估计图像的先验信息、对噪声图像进行似然估计
- 对于监督学习方法,无需干净图像,只需要噪声数据对
- 性能有的时候回超过监督训练方法
问题:
- 当损失函数和噪声不匹配的时候,该方法训练的模型误差较大
- 均值为0的假设太强,很难进行迁移、范围性有限


