Neo4j 系列
1、图数据库 Neo4j 学习随笔之基础认识
2、图数据库 Neo4j 学习随笔之核心内容
3、图数据库 Neo4j 学习随笔之基础操作
4、图数据库 Neo4j 学习随笔之高级操作
5、图数据库 Neo4j 学习之JAVA-API操作
6、图数据库 Neo4j 学习之SpringBoot整合
文章目录
- Neo4j 系列
- 前言
- 一、pom依赖
- 二、Neo4j配置
- 三、添加Mapping实体
- 四、增删改查操作
- 4.1 新增节点和关系
- 4.2 删除节点和关系
- 4.3 修改节点和关系
- 4.4 查询节点和关系
- 4.5 自定义查询
- 五、总结
前言
相对于Java通过Neo4j驱动来连接Neo4j数据库操作来说,SpringBoot引入starter组件来操作Neo4j 简直要上天,简单易用。
一、pom依赖
首先这是一个SpringBoot项目测试,为了方便,直接继承人家管理好的版本,版本就选择了最新的 2.6.13。
<parent>
    <groupId>org.springframework.boot</groupId>
    <artifactId>spring-boot-starter-parent</artifactId>
    <version>2.6.13</version>
</parent>
那关于 Neo4j 和单元测试的 starter 组件如下。
<dependency>
    <groupId>org.springframework.boot</groupId>
    <artifactId>spring-boot-starter-data-neo4j</artifactId>
</dependency>
<dependency>
    <groupId>org.springframework.boot</groupId>
    <artifactId>spring-boot-starter-test</artifactId>
    <scope>test</scope>
</dependency>
二、Neo4j配置
配置 Neo4j 的连接信息。
spring:
  neo4j:
    uri: bolt://localhost:7687
    authentication:
      username: neo4j
      password: ******
三、添加Mapping实体
象牙山村的村民定义为 Person 实体,属性有 id,name 都不说了,重要的就是 @Relationship 注解注释的和他们有具体关系的人,比如他们的 妻子、父亲、暗恋对象、初恋都有谁,可以把这些有关系的人定义为 List 。
@Relationship 注解属性:type 是那种类型的关系,direction 是关系的方向,有两个值:OUTGOING(向外的关系),INCOMING(向内的关系)
@Node(labels = "loveperson")
public class Person {
    @Id
    @GeneratedValue
    private Long id;
    @Property("name")
    private String name;
    @Relationship(type = "夫妻", direction = Relationship.Direction.OUTGOING)
    private List<Person> partners;
    @Relationship(type = "父子", direction = Relationship.Direction.OUTGOING)
    private List<Person> fathers;
    @Relationship(type = "暗恋", direction = Relationship.Direction.OUTGOING)
    private List<Person> girlfriend;
    @Relationship(type = "老丈人", direction = Relationship.Direction.OUTGOING)
    private List<Person> outFather;
    @Relationship(type = "初恋", direction = Relationship.Direction.OUTGOING)
    private List<Person> fistGirlfriend;
    @Relationship(type = "老弟", direction = Relationship.Direction.OUTGOING)
    private List<Person> brother;
}
四、增删改查操作
主要用 SpringBoot 的单元测试来测试,因为需要用到提供好的 Neo4jRepository 接口来实现操作。
新建一个操作接口 Neo4jPersonRepository 继承 Neo4jRepository 接口,并定义泛型是 Person 对象。
@EnableNeo4jRepositories
public interface Neo4jPersonRepository extends Neo4jRepository<Person,Long> {

}
4.1 新增节点和关系
@Test
public void createNode(){
    Person person = new Person();
    person.setName("王天来");
    Person girlfriend = new Person();
    girlfriend.setName("李秋歌");
    person.setFistGirlfriend(Arrays.asList(girlfriend));
    Person p = neo4jPersonRepository.save(person);
    System.out.println(p.getId() + ":" + p.getName());
}
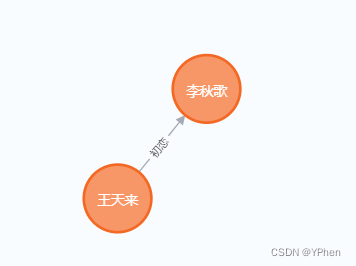
创建节点成功:
4.2 删除节点和关系
创建好了 Person 和 节点的 Mapping,可以直接调用 SpringBoot 提供好的 Neo4jRepository 来删除 Person 对象,需要指定 Person 的 id,以及有关系的 Person 对象。
@Test
public void deleteNode(){
    Person person = new Person();
    person.setId(124L);
    Person p = new Person();
    p.setId(125L);
    person.setFistGirlfriend(Arrays.asList(p));
    neo4jPersonRepository.delete(person);
    neo4jPersonRepository.delete(p);
    System.out.println("删除成功");
}
4.3 修改节点和关系
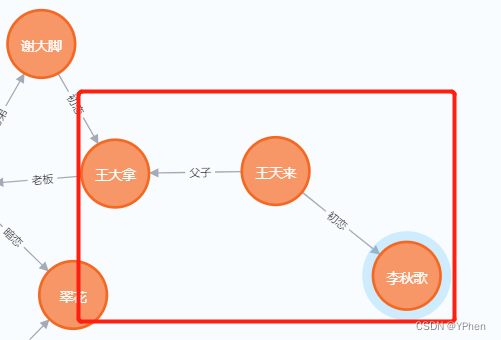
王天来追到了李秋歌,李秋歌的妈妈是王大拿的老伴,所以王天来就认了王大拿为父亲,这样一来王天来的关系就变了。
创建 Person(王大拿),设置为王天来的父亲,当然也不能丢了李秋歌为对象的关系。
@Test
public void saveOrUpdateNode(){
    Person person = new Person();
    person.setId(131L);
    person.setName("王天来");
    Person father = new Person();
    father.setId(115L);
    father.setName("王大拿");
    person.setFathers(Arrays.asList(father));
    Person gf = new Person();
    gf.setId(123L);
    gf.setName("李秋歌");
    person.setFistGirlfriend(Arrays.asList(gf));
    Person p = neo4jPersonRepository.save(person);
    System.out.println(p.getId() + ":" + p.getName());
}
测试结果,他们的关系修改成功:
4.4 查询节点和关系
调用 findAll() 方法来获取 loveperson 为标签的所有 节点信息,当然按条件查询API也是差不多的。
@Test
public void queryAll(){
    List<Person> persons = neo4jPersonRepository.findPersonAll();
    persons.forEach(person -> {
        System.out.println(person.getId() + ":" +person.getName());
        if(!CollectionUtils.isEmpty(person.getPartners())){
            System.out.print("妻子:");
            person.getPartners().forEach(p -> System.out.println(p.getName()));
        }
        if(!CollectionUtils.isEmpty(person.getFathers())){
            System.out.print("父亲:");
            person.getFathers().forEach(p -> System.out.println(p.getName()));
        }
        if(!CollectionUtils.isEmpty(person.getGirlfriend())){
            System.out.print("女朋友:");
            person.getGirlfriend().forEach(p -> System.out.println(p.getName()));
        }
        System.out.println("==================");
    });
}
4.5 自定义查询
首先创建自定义查询,使用 @Query 注解来定义查询语句。
@EnableNeo4jRepositories
public interface Neo4jPersonRepository extends Neo4jRepository<Person,Long> {

    @Query("match (n:loveperson) where n.name = $name return n")
    List<Person> findByName(String name);

}
@Test
public void queryByCustom(){
    List<Person> persons = neo4jPersonRepository.findByName("王香秀");
    persons.forEach(person -> System.out.println(person.getName()));
}
查询出王香秀了,嗯,李大国好眼光啊。
五、总结
SpringBoot 整合 Neo4j 构建起来还是有点小复杂的,查了一天的资料,尤其版本和pom依赖不好确定,但是一旦 pom 和配置都搞定后,那 增删改查基本的操作就很方便了,而且关系的创建和维护也很清楚。
