目录
一、项目界面
二、博客系统自动化测试用例
三、自动化测试
1)准备工作
2)登录界面测试
测试正确的登录案例
登录界面测试出现问题
测试错误的登录案例
3)博客列表界面测试
4)博客详情界面测试
5)博客编辑界面测试
1、写博客和发布博客进行效验
2、效验发布博客标题
6)删除功能博客测试
7)注销功能测试
四、整体自动化测试
整体代码
一、项目界面
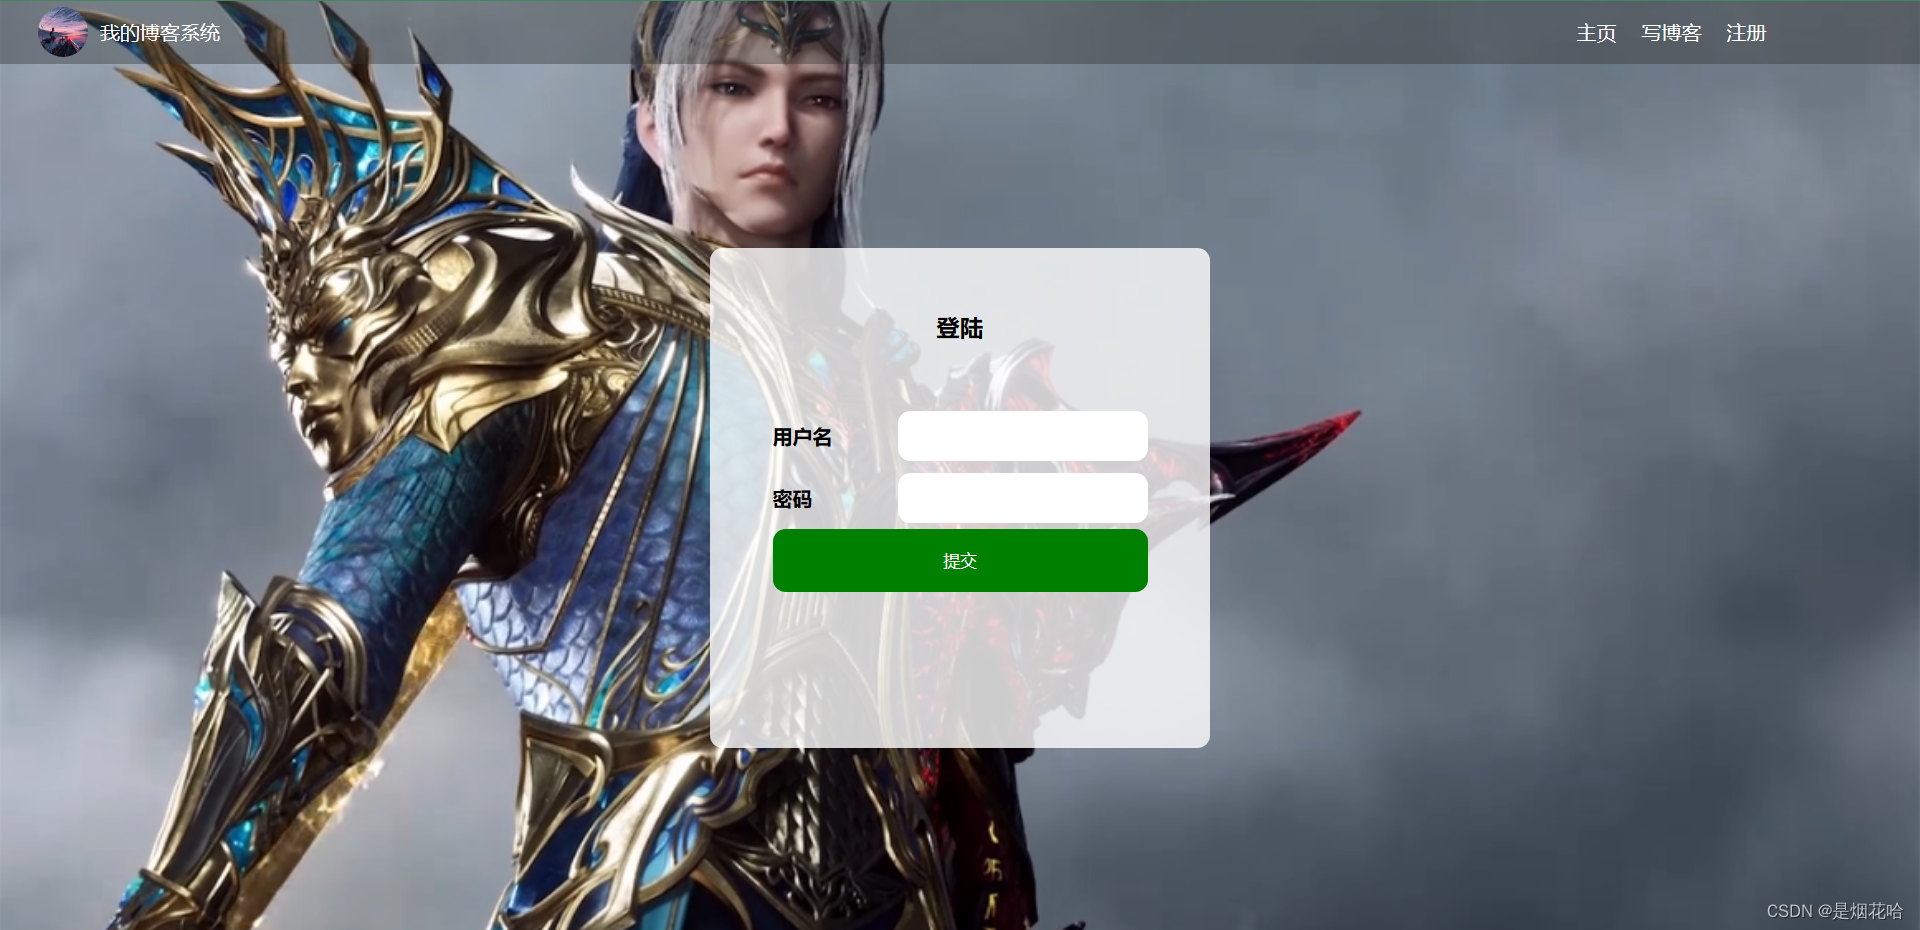
登录界面
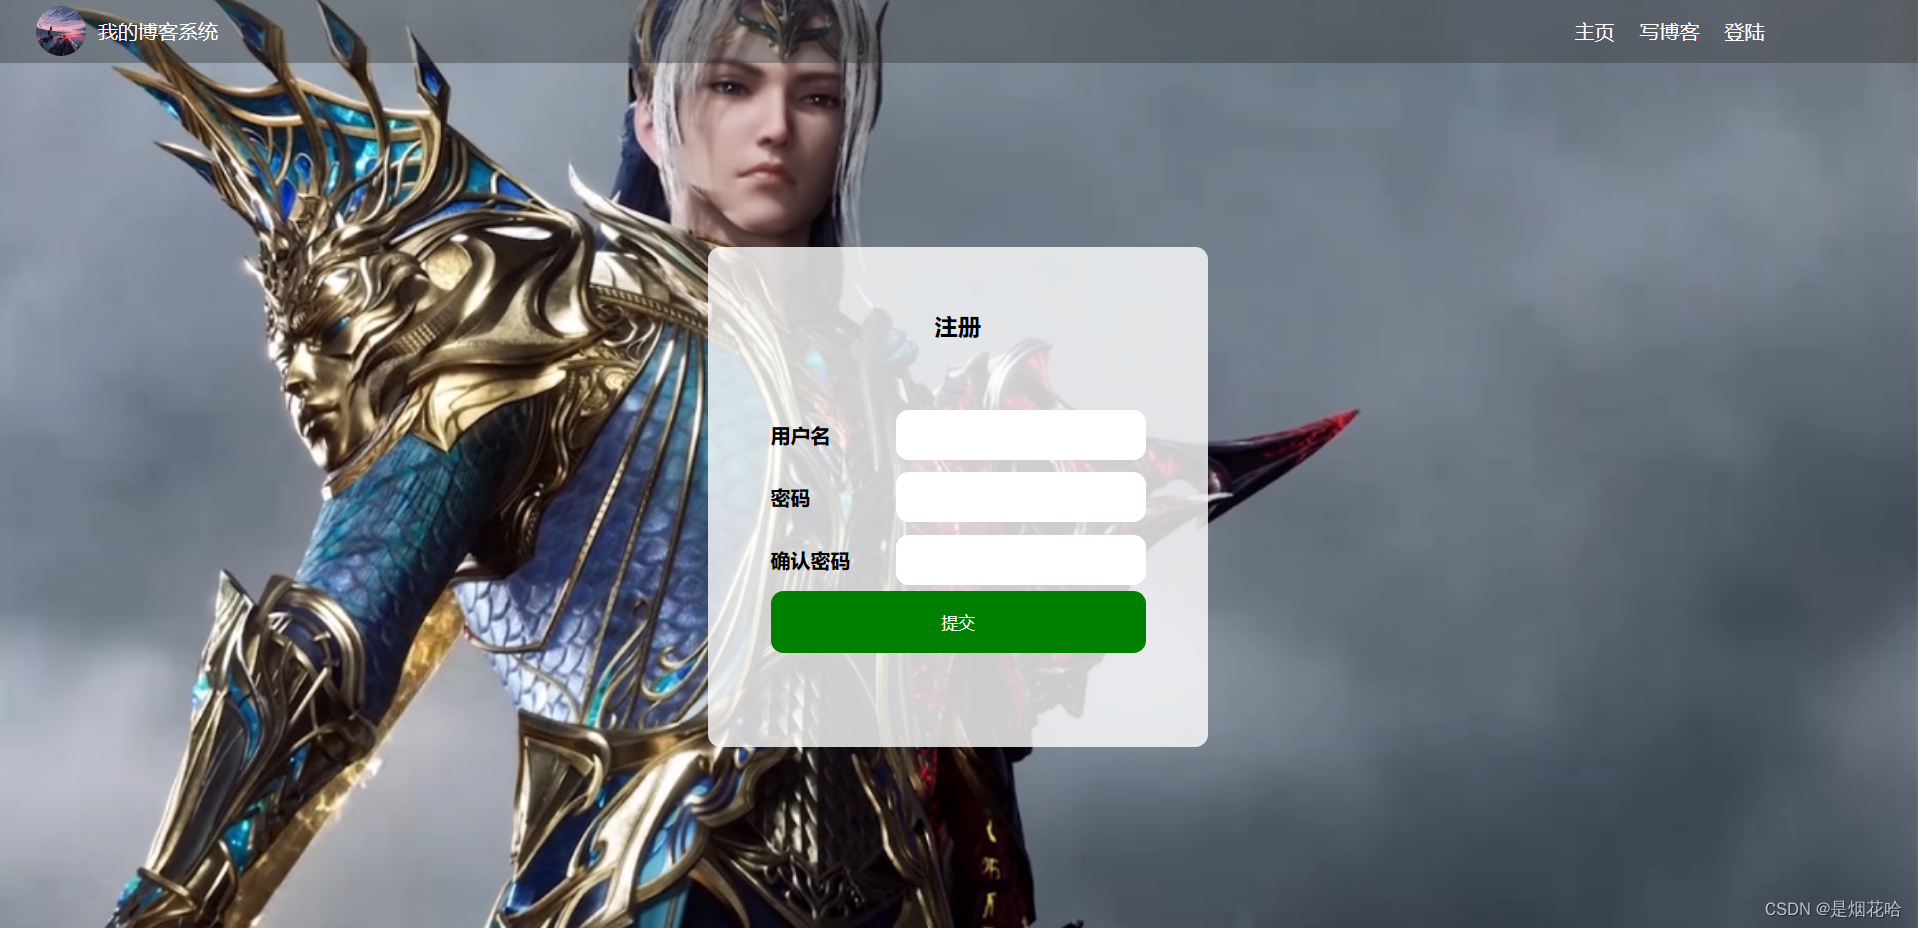
注册界面
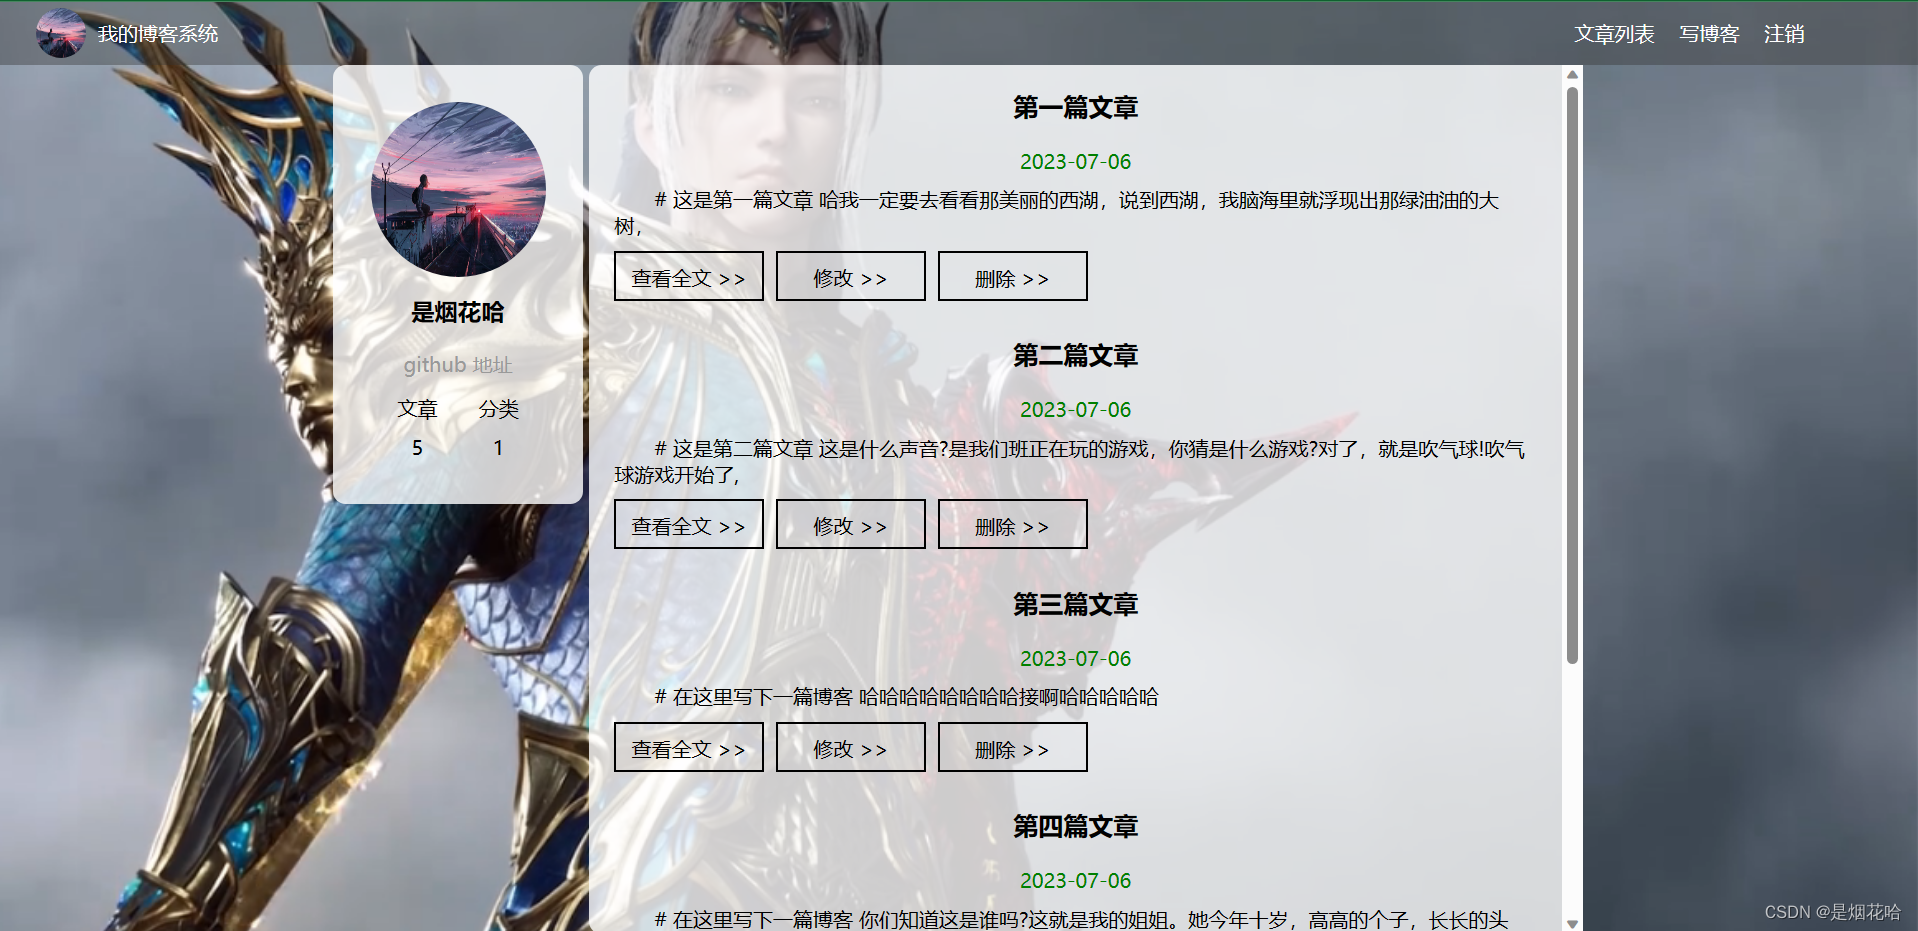
博客列表界面
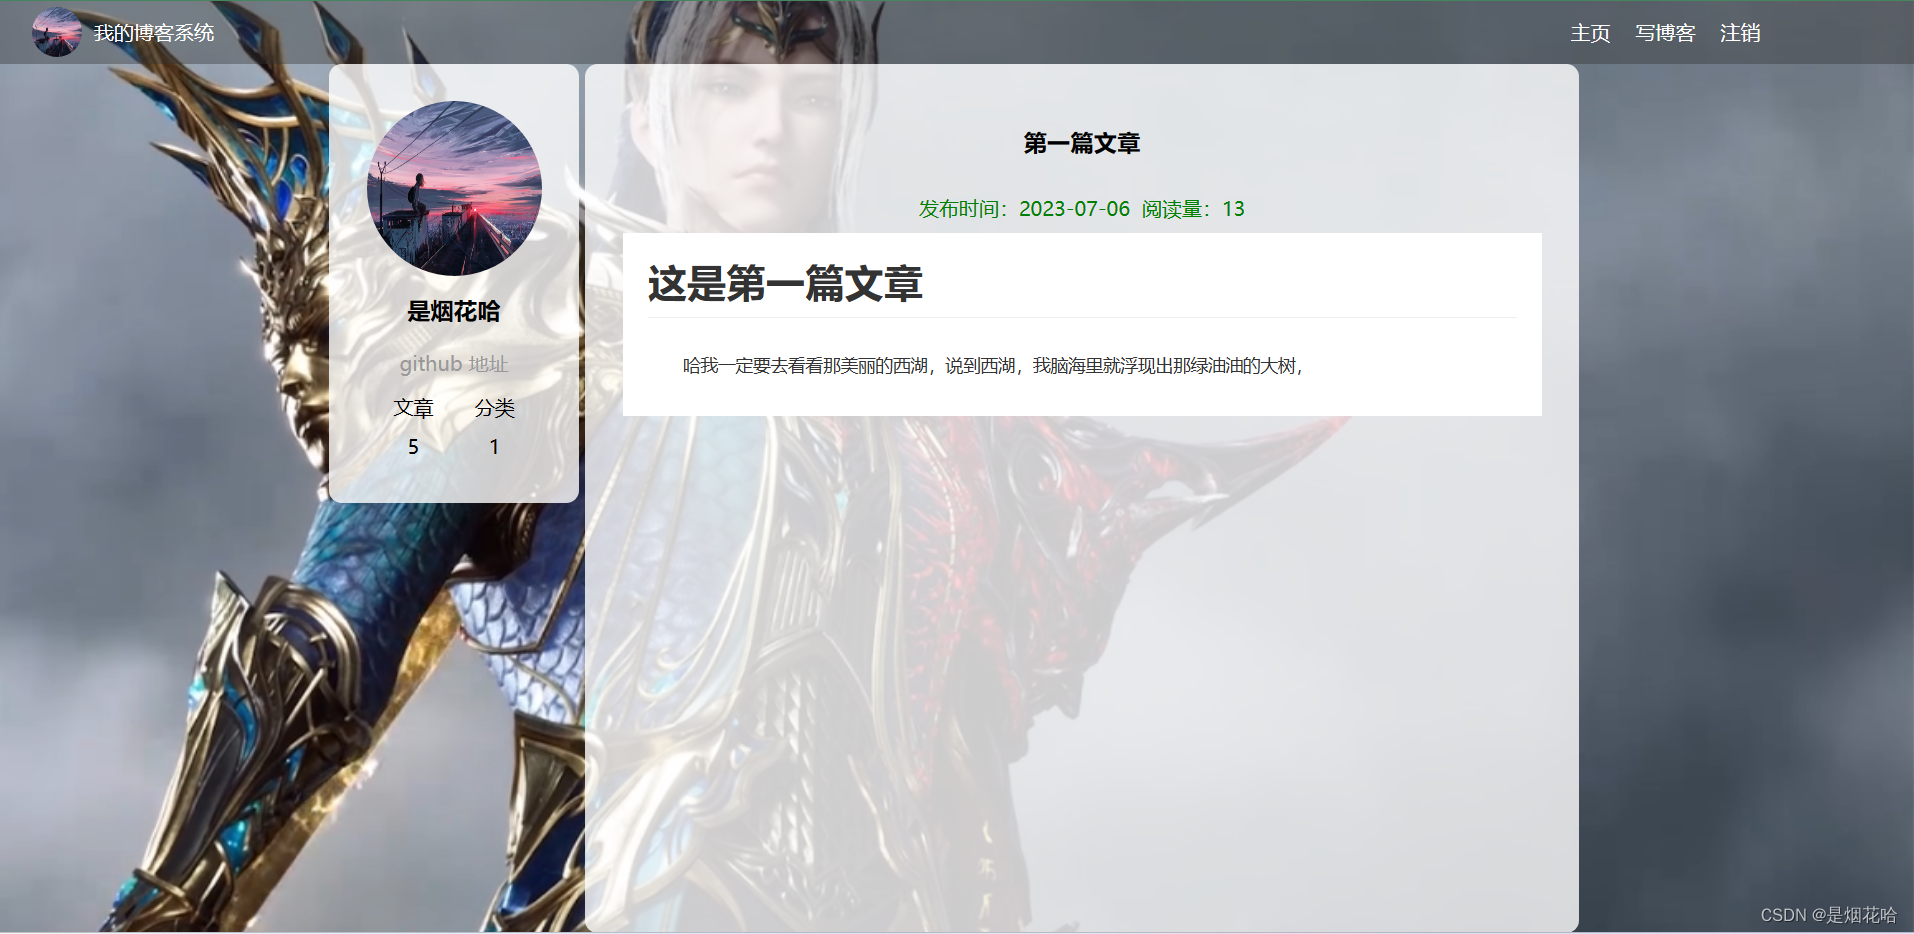
博客详情界面
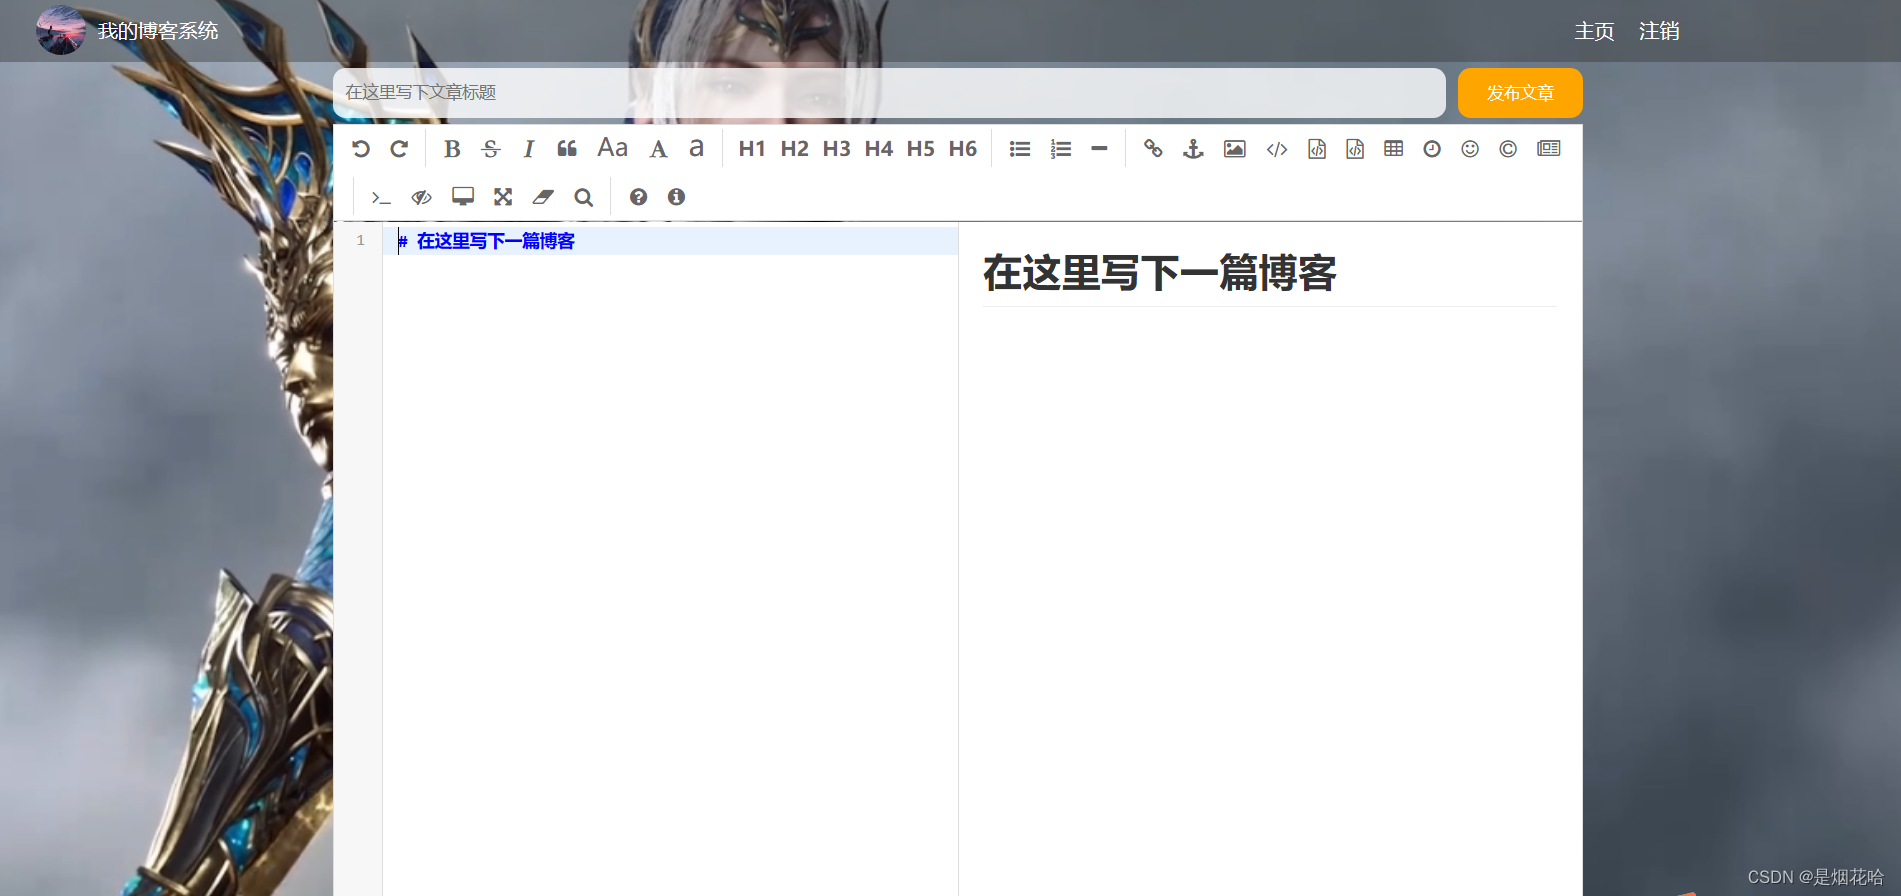
博客编辑界面
博客修改页面

二、博客系统自动化测试用例

三、自动化测试
接下来就将一一介绍上面测试用例来进行自动化测试,
1)准备工作
1、准备selenium环境搭建:https://blog.csdn.net/qq_73471456/article/details/130836494
2、在IDEA创建Maven项目,导入pom.xml相关依赖
<dependencies>
<!-- 导入selenium依赖 -->
<dependency>
<groupId>org.seleniumhq.selenium</groupId>
<artifactId>selenium-java</artifactId>
<version>3.141.59</version>
</dependency>
<!-- 保存屏幕截图需要用到的包-->
<dependency>
<groupId>commons-io</groupId>
<artifactId>commons-io</artifactId>
<version>2.6</version>
</dependency>
<!-- 导入Junit测试框架 -->
<!-- https://mvnrepository.com/artifact/org.junit.jupiter/junit-jupiter-api -->
<dependency>
<groupId>org.junit.jupiter</groupId>
<artifactId>junit-jupiter-api</artifactId>
<version>5.9.2</version>
</dependency>
<!-- 导入junit 参数化依赖-->
<!-- https://mvnrepository.com/artifact/org.junit.jupiter/junit-jupiter-params -->
<dependency>
<groupId>org.junit.jupiter</groupId>
<artifactId>junit-jupiter-params</artifactId>
<version>5.9.2</version>
</dependency>
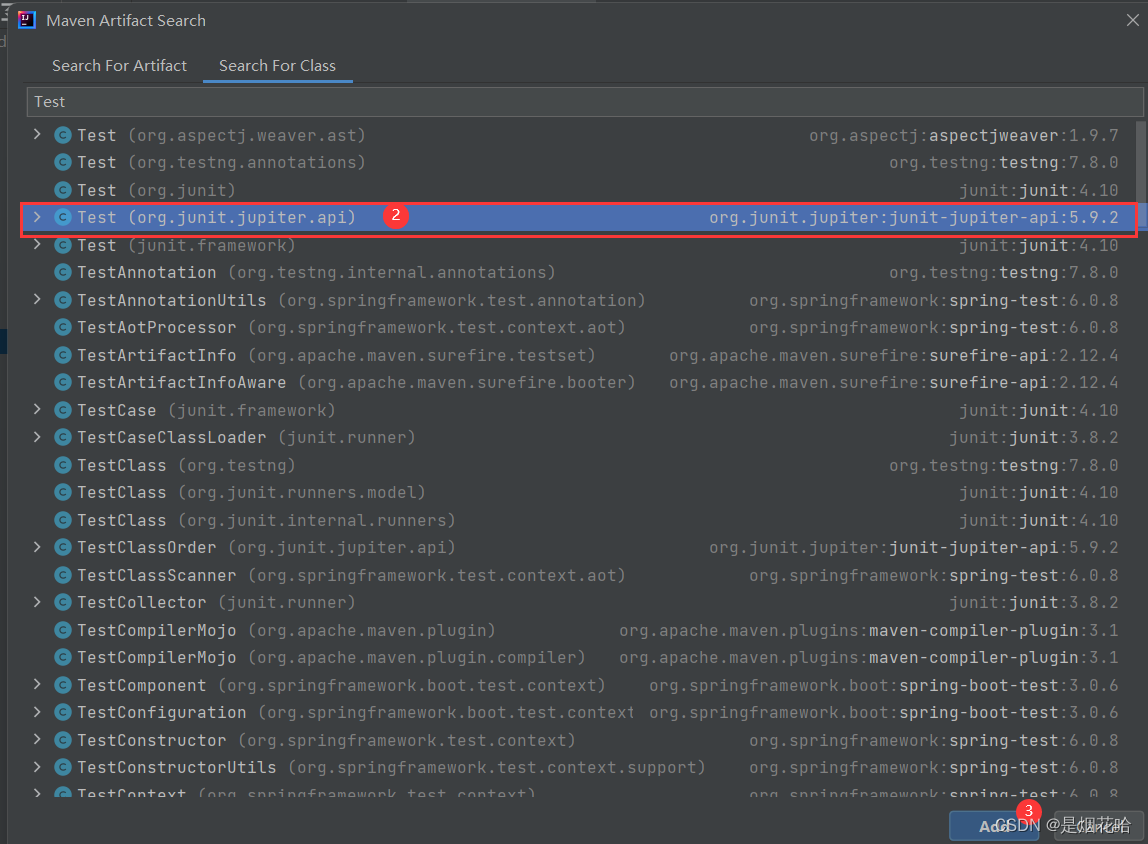
</dependencies>注意事项:若导入Junit依赖后,使用@Test注解无法成功时,需要点击@Test注解,选择add Maven选项和即可
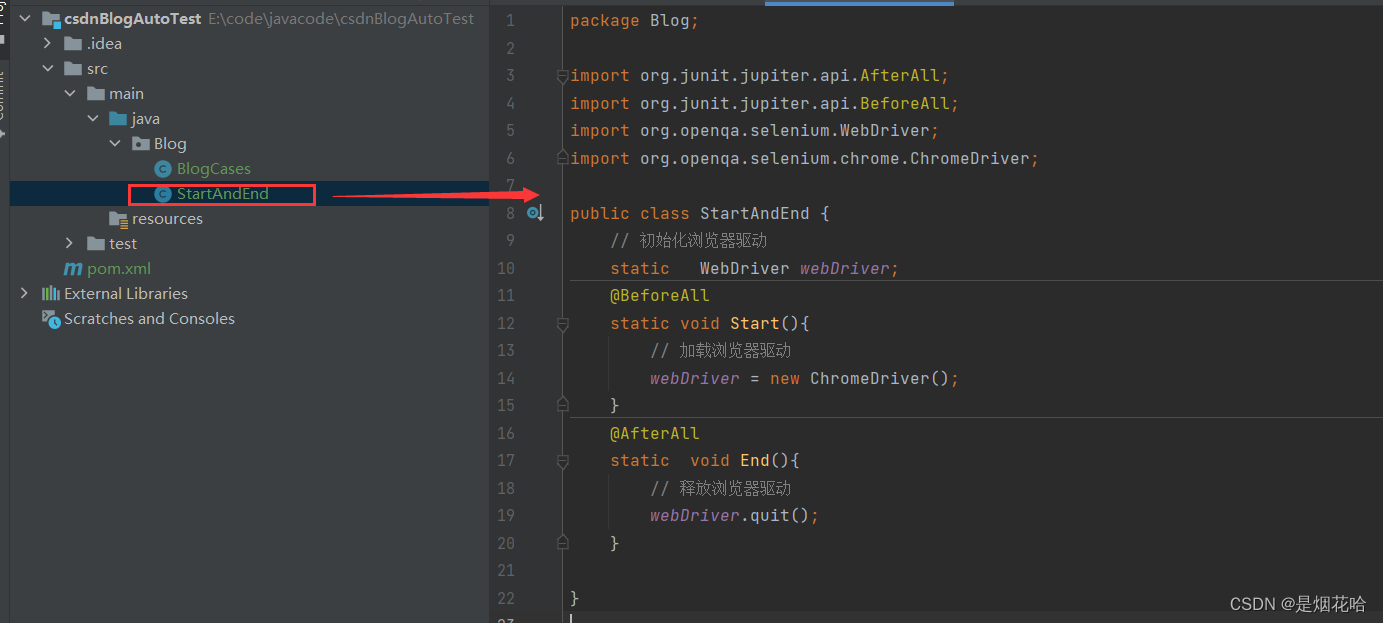
3、初始化浏览器驱动,因为在运行每个自动化测试用例之前都需要进行创建驱动,运行所有的测试方法结束之后来需要释放浏览器驱动,于是此时创建一个类来初始化浏览器驱动和释放浏览器
package Blog;

import org.junit.jupiter.api.AfterAll;
import org.junit.jupiter.api.BeforeAll;
import org.openqa.selenium.WebDriver;
import org.openqa.selenium.chrome.ChromeDriver;

public class StartAndEnd {
    // 初始化浏览器驱动
    static   WebDriver webDriver;
    @BeforeAll
    static void Start(){
        // 加载浏览器驱动
        webDriver = new ChromeDriver();
    }
    @AfterAll
    static  void End(){
        // 释放浏览器驱动
        webDriver.quit();
    }

}
2)登录界面测试
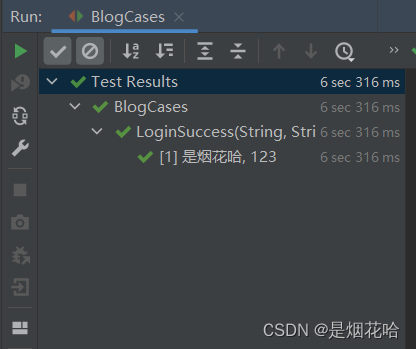
测试正确的登录案例
 /**
     * 登录成功界面测试用例
     */
    @Order(2)
    @ParameterizedTest
    @CsvSource("是烟花哈,123")
    void LoginSuccess(String username, String password) throws InterruptedException {
        // 打开博客登录界面
        webDriver.get("http://121.43.190.21:8080/login.html");
        // 隐式等待3秒钟
        webDriver.manage().timeouts().implicitlyWait(3, TimeUnit.SECONDS);

        // 输入账号:是烟花哈
        webDriver.findElement(By.cssSelector("#username")).sendKeys(username);
        // 隐式等待3秒钟
        webDriver.manage().timeouts().implicitlyWait(3, TimeUnit.SECONDS);

        // 输入密码:123
        webDriver.findElement(By.cssSelector("#password")).sendKeys(password);
        // 隐式等待3秒钟
        webDriver.manage().timeouts().implicitlyWait(3, TimeUnit.SECONDS);

        // 点击提交按钮
        webDriver.findElement(By.cssSelector("#submit")).click();
        // 强制等待3秒钟
        sleep(1000);
        webDriver.switchTo().alert().accept();//跳转到弹窗  点击确认,如果有取消按钮就用dismiss()方法


        // 跳转到博客列表页 (判断当前跳转页面url == http://121.43.190.21:8080/myblog_list.html 测试通过  否则测试不通过)
        String url = webDriver.getCurrentUrl();
        Assertions.assertEquals("http://121.43.190.21:8080/myblog_list.html", url);
        // 隐式等待3秒钟
        webDriver.manage().timeouts().implicitlyWait(3, TimeUnit.SECONDS);

        // 博客列表页展示用户信息为“是烟花哈” (判断当前用户名 == 是烟花哈  测试通过 否则测试不通过)
        String name = webDriver.findElement(By.cssSelector("#username")).getText();
        Assertions.assertEquals("是烟花哈", name);
    }
登录界面测试出现问题

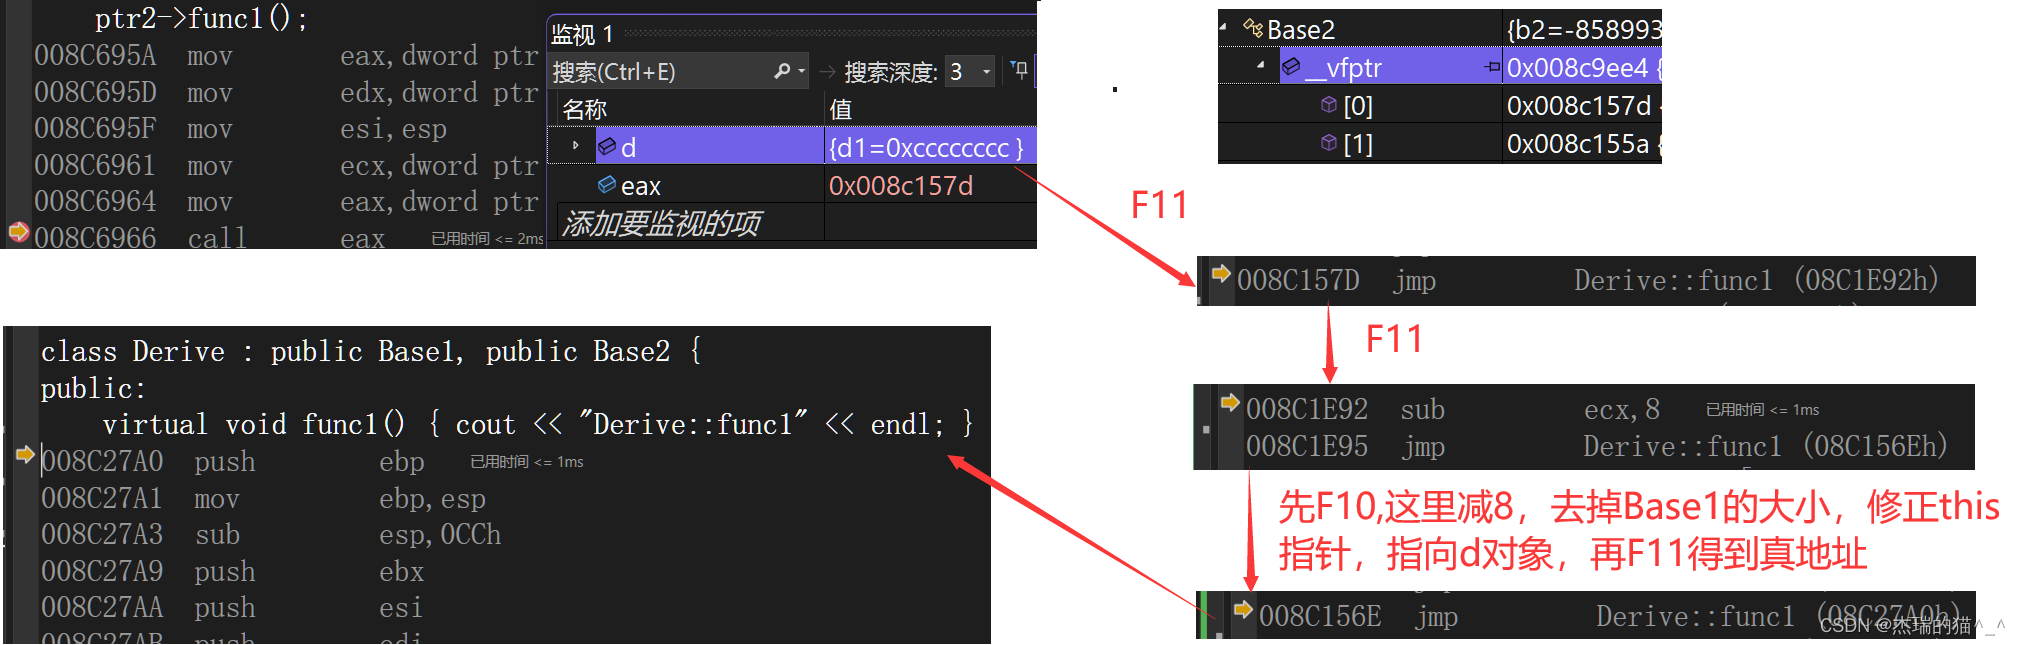
分析原因:隐式等待无法识别非HTML的弹窗,弹窗是无法等待,此时页面还没加载完,弹窗还没出现,程序就开始去寻找弹窗,当程序未找到弹窗时便报异常错误了。此时处理弹窗就不能使用隐式等待,需要使用强制等待或者显示等待。
在上面代码中已经使用了隐式等待,当显示等待与隐式等待同时出现在同一个程序中时,会可能出现错误,因此就只能选择强制等待来代替隐式等待

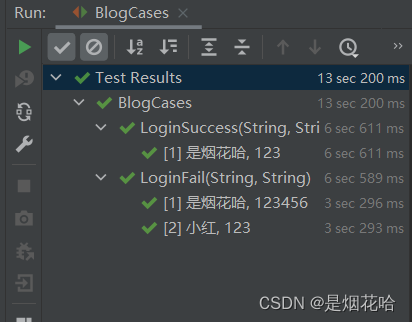
测试错误的登录案例
/**
     * 登录失败界面测试用例
     */
    @Order(1)
    @ParameterizedTest
    @CsvSource({"是烟花哈,123456", "小红,123"})
    // 验证用户名或者密码错误情况
    void LoginFail(String username, String password) throws InterruptedException {
        // 打开博客登录界面
        webDriver.get("http://121.43.190.21:8080/login.html");
        // 隐式等待3秒钟
        webDriver.manage().timeouts().implicitlyWait(3, TimeUnit.SECONDS);

        // 输入账号:是烟花哈
        webDriver.findElement(By.cssSelector("#username")).sendKeys(username);
        // 隐式等待3秒钟
        webDriver.manage().timeouts().implicitlyWait(3, TimeUnit.SECONDS);

        // 输入密码:123
        webDriver.findElement(By.cssSelector("#password")).sendKeys(password);
        // 隐式等待3秒钟
        webDriver.manage().timeouts().implicitlyWait(3, TimeUnit.SECONDS);

        // 点击提交按钮
        webDriver.findElement(By.cssSelector("#submit")).click();
        // 强制等待3秒钟
        sleep(2000);
        // 获取弹窗内容 == 登录失败!用户名或密码错误,请重新输入 登录失败
        String text = webDriver.switchTo().alert().getText();//跳转到弹窗  点击确认,如果有取消按钮就用dismiss()方法
        Assertions.assertEquals("登录失败!用户名或密码错误,请重新输入", text);
        //点击弹窗确定按钮
        webDriver.switchTo().alert().accept();

        // 判断当前跳转页面url == http://121.43.190.21:8080/login.html 测试通过  否则测试不通过)
        String url = webDriver.getCurrentUrl();
        Assertions.assertEquals("http://121.43.190.21:8080/login.html", url);
    }
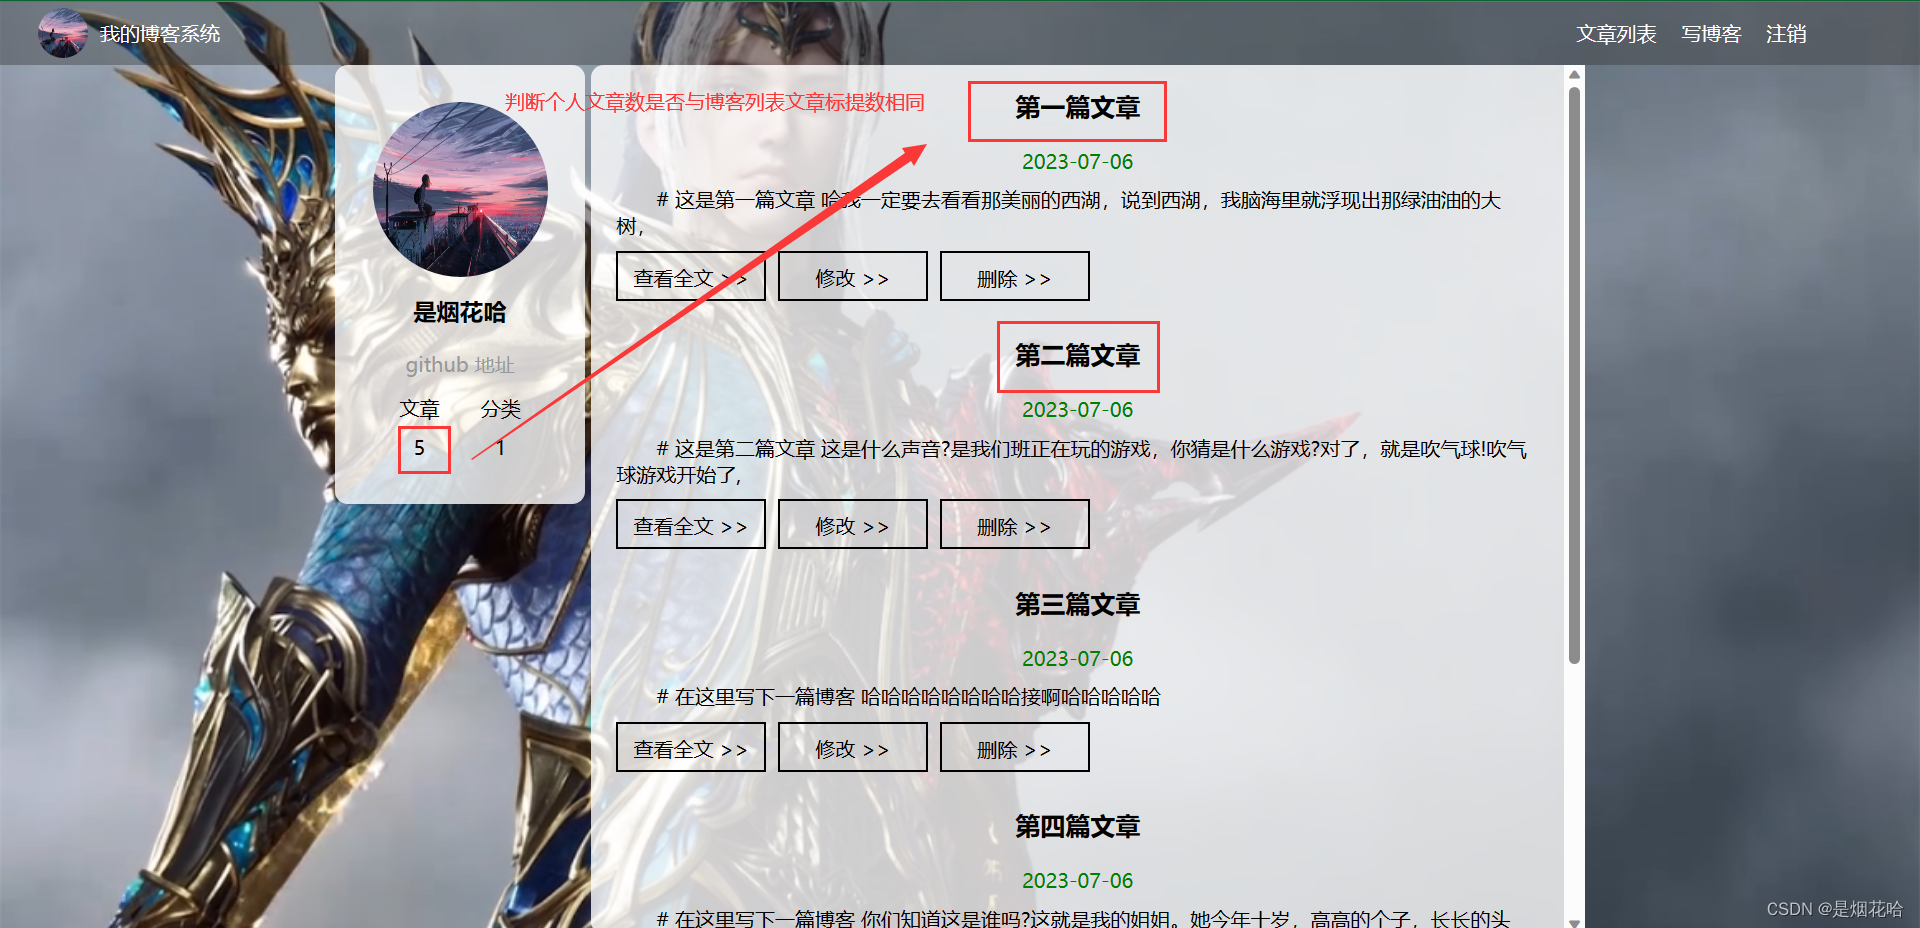
3)博客列表界面测试
 /**
     * 查看博客列表界面测试
     * 效验博客列表文章数量不为0
     */
    @Order(3)
    @Test
    void BlogList() {
        // 获取博客列表页网址
        webDriver.get("http://121.43.190.21:8080/myblog_list.html");
        // 隐式等待3秒
        webDriver.manage().timeouts().implicitlyWait(3, TimeUnit.SECONDS);

        // 获取博客列表页所有博客文章标题数量
        // (注意点:获取多个标题数量 使用findElements ,定位具体的div标签 #artDiv > div.blog > div.title)

        int num = webDriver.findElements(By.cssSelector("#artDiv > div.blog > div.title")).size();
        System.out.println(num);
        // 隐式等待3秒
        webDriver.manage().timeouts().implicitlyWait(3, TimeUnit.SECONDS);
        // 判断所有文章数量不为0 测试通过
        Assertions.assertNotEquals(0, num);

        // 判断个人信息中的文章数量是否与博客列表文章标题数量是否一致
        String articleNum = webDriver.findElement(By.cssSelector("#artCount")).getText();
        Assertions.assertEquals(articleNum, num + "");
    }
注意点:获取博客列表页所有博客文章标题数量, 获取多个标题数量 使用findElements ,定位多个具体的div标签 #artDiv > div.blog > div.title
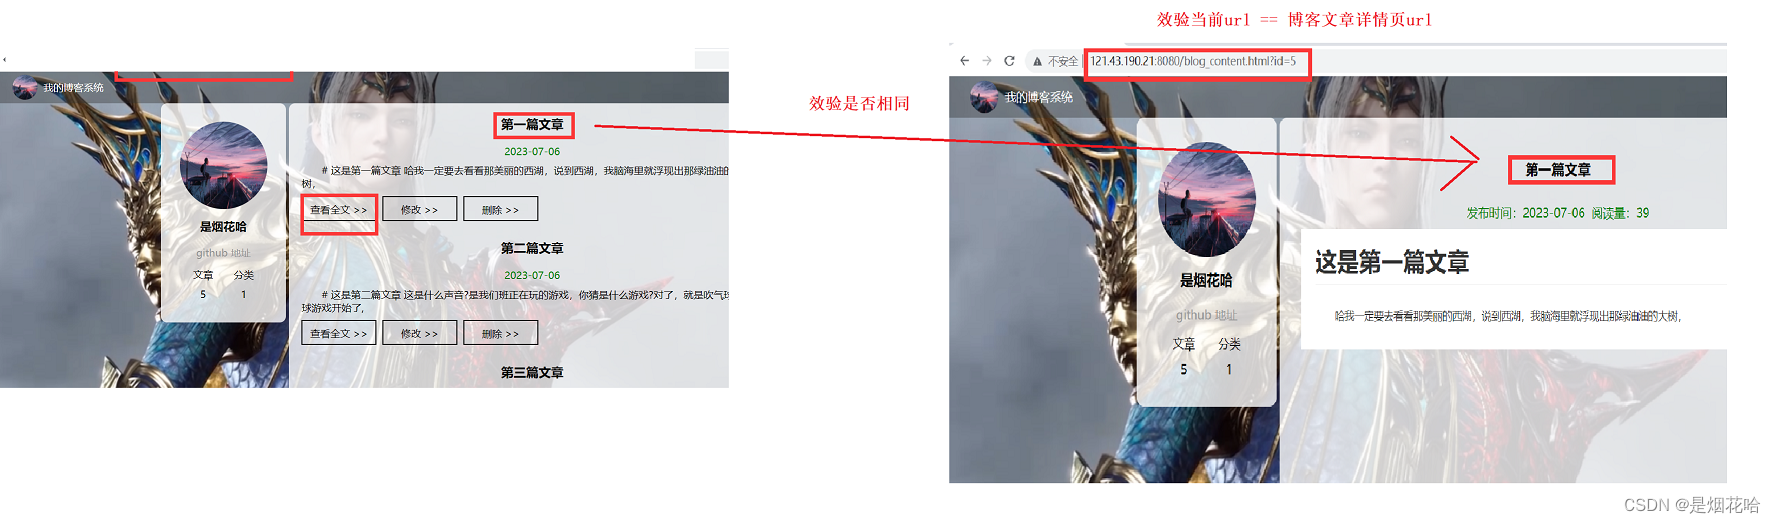
4)博客详情界面测试
 /**
     * 博客详情界面测试
     * 点击查看全文按钮是否能跳转到文章详情页,效验URL
     * 效验文章详情页的博客文章标题是否与博客标题一致,若一致则测试通过
     */
    @Order(4)
    @Test
    void Blog_content() {
        // 获取博客列表页网址
        webDriver.get("http://121.43.190.21:8080/myblog_list.html");
        webDriver.manage().timeouts().implicitlyWait(3, TimeUnit.SECONDS);

        // 点击第一篇文章的查看全文按钮
        webDriver.findElement(By.cssSelector("#artDiv > div:nth-child(1) > a:nth-child(4)")).click();
        webDriver.manage().timeouts().implicitlyWait(3, TimeUnit.SECONDS);

        // 效验跳转页面url == http://121.43.190.21:8080/blog_content.html?id=5
        String url = webDriver.getCurrentUrl();
        Assertions.assertEquals("http://121.43.190.21:8080/blog_content.html?id=5", url);

    }
注意点:当CSS选择器定位不到div元素中的标题时,找到标题在div盒子的具体路径,分别列出div路径
使用这种定位方式:
body > div.container > div.container-right > div.blog-content > h3
5)博客编辑界面测试
1、写博客和发布博客进行效验
 /**
     * 博客编辑界面测试
     * 写博客和发布博客测试
     */
    @Order(5)
    @Test
    void BlogEdit() throws InterruptedException {
        // 找到写博客按钮并点击
        webDriver.findElement(By.cssSelector("body > div.nav > a:nth-child(5)")).click();
        // 隐式等待3秒
        webDriver.manage().timeouts().implicitlyWait(3, TimeUnit.SECONDS);

        // 找到输入框输入标题
        webDriver.findElement(By.cssSelector("#title")).sendKeys("自动化测试");
        // 隐式等待3秒
        webDriver.manage().timeouts().implicitlyWait(3, TimeUnit.SECONDS);
        // 点击发布按钮
        webDriver.findElement(By.cssSelector("body > div.blog-edit-container > div.title > button")).click();
        // 点击发布文章跳出弹窗进行确认
        sleep(2000);
        webDriver.switchTo().alert().accept();
        // 强制等待2秒
        sleep(2000);
        webDriver.switchTo().alert().accept();
        // 强制等待2秒
        sleep(2000);
        webDriver.switchTo().alert().dismiss();

        // 效验发布成功跳转页面url == 博客文章列表页url
        String url = webDriver.getCurrentUrl();
        Assertions.assertEquals("http://121.43.190.21:8080/myblog_list.html", url);
    }
2、效验发布博客标题
 /**
     * 效验已发布博客标题
     * 效验已发布博客时间
     */
    @Order(6)
    @Test
    void BlogInfoCheck(){
        // 回到文章列表页
        webDriver.get("http://121.43.190.21:8080/myblog_list.html");
        // 获取发布博客标题
        String text = webDriver.findElement(By.cssSelector("#artDiv > div:nth-child(7) > div.title")).getText();
        // 获取发布博客时间
        String blog_time = webDriver.findElement(By.xpath("//*[@id=\"artDiv\"]/div[7]/div[2]")).getText();
        // 效验发布博客标题是否一致
        Assertions.assertEquals("自动化测试",text);
        // 效验博客列表页发布博客时间是否与发布博客时间一致
        Assertions.assertEquals("2023-07-27",blog_time);
    }
6)删除功能博客测试
 /**
     * 删除已发布的博客文章
     * 效验删除之前文章数量与删除之后文章数量不相同
     */
    @Order(7)
    @Test
    void Delete() throws InterruptedException {
        // 打开博客列表页
        webDriver.get("http://121.43.190.21:8080/myblog_list.html");
        // 隐式等待3秒
        webDriver.manage().timeouts().implicitlyWait(3, TimeUnit.SECONDS);

        // 查询删除之前文章数量
        // 获取删除之前博客列表页所有博客文章标题数量
        // (注意点:获取多个标题数量 使用findElements ,定位具体的div标签 #artDiv > div.blog > div.title)
        int  BeforNum = webDriver.findElements(By.cssSelector("#artDiv > div.blog > div.title")).size();

        // 隐式等待3秒
        webDriver.manage().timeouts().implicitlyWait(3, TimeUnit.SECONDS);
        // 点击删除按钮
        webDriver.findElement(By.cssSelector("#artDiv > div:nth-child(7) > a:nth-child(6)")).click();
        // 强制等待3秒
       sleep(2000);
        // 进行删除弹窗确认
        webDriver.switchTo().alert().accept();
        // 强制等待3秒
        sleep(2000);
        // 进行删除弹窗二次确认
        webDriver.switchTo().alert().accept();

        // 效验删除之后文章数量与删除之前文章数量是否不一致 ,若不一致则删除测试成功
        // 获取删除之后的博客列表页所有博客文章标题数量
        // (注意点:获取多个标题数量 使用findElements ,定位具体的div标签 #artDiv > div.blog > div.title)

        int AfterNum = webDriver.findElements(By.cssSelector("#artDiv > div.blog > div.title")).size();
        Assertions.assertNotEquals(BeforNum,AfterNum);
    }
7)注销功能测试
 /**
     * 注销功能测试
     * 点击注销按钮,页面跳转到登录界面,判断当前页面是否为登录界面,测试通过
     */
    @Order(8)
    @Test
    void logout() throws InterruptedException {
        // 找到注销按钮并点击
        webDriver.findElement(By.cssSelector("body > div.nav > a:nth-child(6)")).click();
        // 强制等待3秒 等待注销弹窗
        sleep(2000);

        // 定位到弹窗并确认
        webDriver.switchTo().alert().accept();
        sleep(2000);
        // 获取当前跳转页面url
        String url = webDriver.getCurrentUrl();
        // 效验当前页面 == 登录界面url
        Assertions.assertEquals("http://121.43.190.21:8080/login.html",url);

    }
四、整体自动化测试
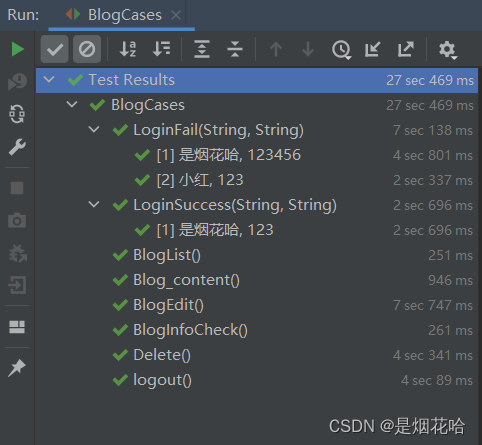
博客系统自动化测试
整体代码

package Blog;

import org.junit.jupiter.api.*;
import org.junit.jupiter.params.ParameterizedTest;
import org.junit.jupiter.params.provider.CsvSource;
import org.openqa.selenium.By;
import org.openqa.selenium.WebElement;

import java.util.concurrent.TimeUnit;

import static java.lang.Thread.sleep;

/**
 * 自动化测试用例
 */
@TestMethodOrder(MethodOrderer.OrderAnnotation.class)
public class BlogCases extends StartAndEnd { // 继承初始化浏览器驱动和释放驱动
    /**
     * 登录成功界面测试用例
     */
    @Order(2)
    @ParameterizedTest
    @CsvSource("是烟花哈,123")
    void LoginSuccess(String username, String password) throws InterruptedException {
        // 打开博客登录界面
        webDriver.get("http://121.43.190.21:8080/login.html");
        // 隐式等待3秒钟
        webDriver.manage().timeouts().implicitlyWait(3, TimeUnit.SECONDS);

        // 输入账号:是烟花哈
        webDriver.findElement(By.cssSelector("#username")).sendKeys(username);
        // 隐式等待3秒钟
        webDriver.manage().timeouts().implicitlyWait(3, TimeUnit.SECONDS);

        // 输入密码:123
        webDriver.findElement(By.cssSelector("#password")).sendKeys(password);
        // 隐式等待3秒钟
        webDriver.manage().timeouts().implicitlyWait(3, TimeUnit.SECONDS);

        // 点击提交按钮
        webDriver.findElement(By.cssSelector("#submit")).click();
        // 强制等待3秒钟
        sleep(1000);
        webDriver.switchTo().alert().accept();//跳转到弹窗  点击确认,如果有取消按钮就用dismiss()方法


        // 跳转到博客列表页 (判断当前跳转页面url == http://121.43.190.21:8080/myblog_list.html 测试通过  否则测试不通过)
        String url = webDriver.getCurrentUrl();
        Assertions.assertEquals("http://121.43.190.21:8080/myblog_list.html", url);
        // 隐式等待3秒钟
        webDriver.manage().timeouts().implicitlyWait(3, TimeUnit.SECONDS);

        // 博客列表页展示用户信息为“是烟花哈” (判断当前用户名 == 是烟花哈  测试通过 否则测试不通过)
        String name = webDriver.findElement(By.cssSelector("#username")).getText();
        Assertions.assertEquals("是烟花哈", name);
    }

    /**
     * 登录失败界面测试用例
     */

    @Order(1)
    @ParameterizedTest
    @CsvSource({"是烟花哈,123456", "小红,123"})
    // 验证用户名或者密码错误情况
    void LoginFail(String username, String password) throws InterruptedException {
        // 打开博客登录界面
        webDriver.get("http://121.43.190.21:8080/login.html");
        // 隐式等待3秒钟
        webDriver.manage().timeouts().implicitlyWait(3, TimeUnit.SECONDS);

        // 输入账号:是烟花哈
        webDriver.findElement(By.cssSelector("#username")).sendKeys(username);
        // 隐式等待3秒钟
        webDriver.manage().timeouts().implicitlyWait(3, TimeUnit.SECONDS);

        // 输入密码:123
        webDriver.findElement(By.cssSelector("#password")).sendKeys(password);
        // 隐式等待3秒钟
        webDriver.manage().timeouts().implicitlyWait(3, TimeUnit.SECONDS);

        // 点击提交按钮
        webDriver.findElement(By.cssSelector("#submit")).click();
        // 强制等待3秒钟
        sleep(2000);
        // 获取弹窗内容 == 登录失败!用户名或密码错误,请重新输入 登录失败
        String text = webDriver.switchTo().alert().getText();//跳转到弹窗  点击确认,如果有取消按钮就用dismiss()方法
        Assertions.assertEquals("登录失败!用户名或密码错误,请重新输入", text);
        //点击弹窗确定按钮
        webDriver.switchTo().alert().accept();

        // 判断当前跳转页面url == http://121.43.190.21:8080/login.html 测试通过  否则测试不通过)
        String url = webDriver.getCurrentUrl();
        Assertions.assertEquals("http://121.43.190.21:8080/login.html", url);
    }

    /**
     * 查看博客列表界面测试
     * 效验博客列表文章数量不为0
     */
    @Order(3)
    @Test
    void BlogList() {
        // 获取博客列表页网址
        webDriver.get("http://121.43.190.21:8080/myblog_list.html");
        // 隐式等待3秒
        webDriver.manage().timeouts().implicitlyWait(3, TimeUnit.SECONDS);

        // 获取博客列表页所有博客文章标题数量
        // (注意点:获取多个标题数量 使用findElements ,定位具体的div标签 #artDiv > div.blog > div.title)

        int num = webDriver.findElements(By.cssSelector("#artDiv > div.blog > div.title")).size();
        System.out.println(num);
        // 隐式等待3秒
        webDriver.manage().timeouts().implicitlyWait(3, TimeUnit.SECONDS);
        // 判断所有文章数量不为0 测试通过
        Assertions.assertNotEquals(0, num);

        // 判断个人信息中的文章数量是否与博客列表文章标题数量是否一致
        String articleNum = webDriver.findElement(By.cssSelector("#artCount")).getText();
        Assertions.assertEquals(articleNum, num + "");
    }

    /**
     * 博客详情界面测试
     * 点击查看全文按钮是否能跳转到文章详情页,效验URL
     * 效验文章详情页的博客文章标题是否与博客标题一致,若一致则测试通过
     */
    @Order(4)
    @Test
    void Blog_content() {
        // 获取博客列表页网址
        webDriver.get("http://121.43.190.21:8080/myblog_list.html");
        webDriver.manage().timeouts().implicitlyWait(3, TimeUnit.SECONDS);

        // 点击第一篇文章的查看全文按钮
        webDriver.findElement(By.cssSelector("#artDiv > div:nth-child(1) > a:nth-child(4)")).click();
        webDriver.manage().timeouts().implicitlyWait(3, TimeUnit.SECONDS);

        // 效验跳转页面url == http://121.43.190.21:8080/blog_content.html?id=5
        String url = webDriver.getCurrentUrl();
        Assertions.assertEquals("http://121.43.190.21:8080/blog_content.html?id=5", url);

    }

    /**
     * 博客编辑界面测试
     * 写博客和发布博客测试
     */
    @Order(5)
    @Test
    void BlogEdit() throws InterruptedException {
        // 找到写博客按钮并点击
        webDriver.findElement(By.cssSelector("body > div.nav > a:nth-child(5)")).click();
        // 隐式等待3秒
        webDriver.manage().timeouts().implicitlyWait(3, TimeUnit.SECONDS);

        // 找到输入框输入标题
        webDriver.findElement(By.cssSelector("#title")).sendKeys("自动化测试");
        // 隐式等待3秒
        webDriver.manage().timeouts().implicitlyWait(3, TimeUnit.SECONDS);
        // 点击发布按钮
        webDriver.findElement(By.cssSelector("body > div.blog-edit-container > div.title > button")).click();
        // 点击发布文章跳出弹窗进行确认
        sleep(2000);
        webDriver.switchTo().alert().accept();
        // 强制等待2秒
        sleep(2000);
        webDriver.switchTo().alert().accept();
        // 强制等待2秒
        sleep(2000);
        webDriver.switchTo().alert().dismiss();

        // 效验发布成功跳转页面url == 博客文章列表页url
        String url = webDriver.getCurrentUrl();
        Assertions.assertEquals("http://121.43.190.21:8080/myblog_list.html", url);
    }
    /**
     * 效验已发布博客标题
     * 效验已发布博客时间
     */
    @Order(6)
    @Test
    void BlogInfoCheck(){
        // 回到文章列表页
        webDriver.get("http://121.43.190.21:8080/myblog_list.html");
        // 获取发布博客标题
        String text = webDriver.findElement(By.cssSelector("#artDiv > div:nth-child(7) > div.title")).getText();
        // 获取发布博客时间
        String blog_time = webDriver.findElement(By.xpath("//*[@id=\"artDiv\"]/div[7]/div[2]")).getText();
        // 效验发布博客标题是否一致
        Assertions.assertEquals("自动化测试",text);
        // 效验博客列表页发布博客时间是否与发布博客时间一致
        Assertions.assertEquals("2023-07-27",blog_time);
    }
    /**
     * 删除已发布的博客文章
     * 效验删除之前文章数量与删除之后文章数量不相同
     */
    @Order(7)
    @Test
    void Delete() throws InterruptedException {
        // 打开博客列表页
        webDriver.get("http://121.43.190.21:8080/myblog_list.html");
        // 隐式等待3秒
        webDriver.manage().timeouts().implicitlyWait(3, TimeUnit.SECONDS);

        // 查询删除之前文章数量
        // 获取删除之前博客列表页所有博客文章标题数量
        // (注意点:获取多个标题数量 使用findElements ,定位具体的div标签 #artDiv > div.blog > div.title)
        int  BeforNum = webDriver.findElements(By.cssSelector("#artDiv > div.blog > div.title")).size();

        // 隐式等待3秒
        webDriver.manage().timeouts().implicitlyWait(3, TimeUnit.SECONDS);
        // 点击删除按钮
        webDriver.findElement(By.cssSelector("#artDiv > div:nth-child(7) > a:nth-child(6)")).click();
        // 强制等待3秒
       sleep(2000);
        // 进行删除弹窗确认
        webDriver.switchTo().alert().accept();
        // 强制等待3秒
        sleep(2000);
        // 进行删除弹窗二次确认
        webDriver.switchTo().alert().accept();

        // 效验删除之后文章数量与删除之前文章数量是否不一致 ,若不一致则删除测试成功
        // 获取删除之后的博客列表页所有博客文章标题数量
        // (注意点:获取多个标题数量 使用findElements ,定位具体的div标签 #artDiv > div.blog > div.title)

        int AfterNum = webDriver.findElements(By.cssSelector("#artDiv > div.blog > div.title")).size();
        Assertions.assertNotEquals(BeforNum,AfterNum);
    }
    /**
     * 注销功能测试
     * 点击注销按钮,页面跳转到登录界面,判断当前页面是否为登录界面,测试通过
     */
    @Order(8)
    @Test
    void logout() throws InterruptedException {
        // 找到注销按钮并点击
        webDriver.findElement(By.cssSelector("body > div.nav > a:nth-child(6)")).click();
        // 强制等待3秒 等待注销弹窗
        sleep(2000);

        // 定位到弹窗并确认
        webDriver.switchTo().alert().accept();
        sleep(2000);
        // 获取当前跳转页面url
        String url = webDriver.getCurrentUrl();
        // 效验当前页面 == 登录界面url
        Assertions.assertEquals("http://121.43.190.21:8080/login.html",url);

    }
}