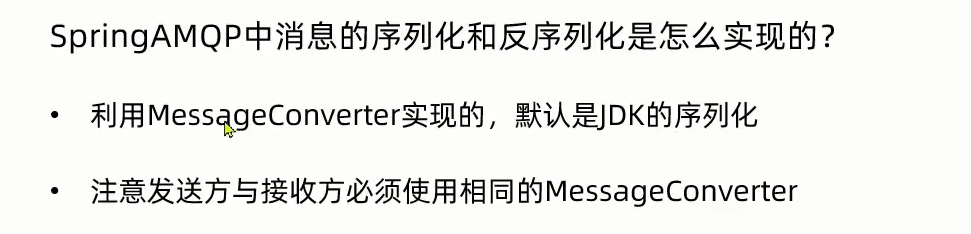
微信支付
微信支付流程
当我们需要支付一件商品时,首先从前端像后端传来商品ID,后端根据商品ID查询商品信息,然后封装订单信息,保存订单。下一步就是向微信远程调用支付接口,微信返回code_url,后端封装code_url返回前端,前端根据code_url显示二维码。
用户扫面二维码后进行支付,如果支付成功,就可以从微信端查询出支付信息。后端可以获取支付的状态(result_code),根据支付的状态修改订单信息。封装返回结果。
我们需要做的就是:
- 根据商品id查询商品信息。
- 封装成订单对象。
- 保存订单。
- 远程调用微信系统的接口。
- 封装code_url。
下单后的操作:
- 向微信端远程调用查询下单情况
- 根据状态
result_code修改订单的状态。 - 封装结果
前端需要做的是:
- 点击下单按钮发送下单请求,根据返回的code_url显示支付二维码,加载定时器,每3秒查询一下支付状态
- 查询支付状态,如果为已支付,关闭二维码,关闭定时器,提示支付成功。
微信支付实现
1. 引入jar包
<!-- 微信需要的依赖 -->
<dependency>
	<groupId>com.github.wxpay</groupId>
	<artifactId>wxpay-sdk</artifactId>
	<version>0.0.3</version>
</dependency>

<!-- java端发送请求,在Java端模拟浏览器远程访问微信的接口 -->
<dependency>
	<groupId>org.apache.httpcomponents</groupId>
	<artifactId>httpclient</artifactId>
	<version>4.5.3</version>
</dependency>
2. 编写配置文件
配置文件主要为微信支付所需要的appid,mch_id,api_key。这是需要营业执照才可以申请的,个人无法获得

3. 代码模块
1. 解决跨域请求
package com.example.config;

import org.springframework.context.annotation.Configuration;
import org.springframework.web.servlet.config.annotation.CorsRegistry;
import org.springframework.web.servlet.config.annotation.WebMvcConfigurer;

/**
 * 解决跨域问题
 */
@Configuration
public class CrossConfig implements WebMvcConfigurer {


    @Override
    public void addCorsMappings(CorsRegistry registry) {
        registry.addMapping("/**")
                .allowedOriginPatterns("*")
                .allowedMethods("GET", "HEAD", "POST", "PUT", "DELETE", "OPTIONS")
                .allowCredentials(true)
                .maxAge(3600)
                .allowedHeaders("*");
    }
}
2. 远程访问工具类
package com.example.utils;

import org.apache.http.Consts;
import org.apache.http.HttpEntity;
import org.apache.http.NameValuePair;
import org.apache.http.client.ClientProtocolException;
import org.apache.http.client.entity.UrlEncodedFormEntity;
import org.apache.http.client.methods.*;
import org.apache.http.conn.ssl.SSLConnectionSocketFactory;
import org.apache.http.conn.ssl.SSLContextBuilder;
import org.apache.http.conn.ssl.TrustStrategy;
import org.apache.http.entity.StringEntity;
import org.apache.http.impl.client.CloseableHttpClient;
import org.apache.http.impl.client.HttpClients;
import org.apache.http.message.BasicNameValuePair;
import org.apache.http.util.EntityUtils;

import javax.net.ssl.SSLContext;
import java.io.IOException;
import java.security.cert.CertificateException;
import java.security.cert.X509Certificate;
import java.text.ParseException;
import java.util.HashMap;
import java.util.LinkedList;
import java.util.List;
import java.util.Map;

/**
 * 远程访问工具类
 */
public class HttpClient {
    private String url;
    private Map<String, String> param;
    private int statusCode;
    private String content;
    private String xmlParam;
    private boolean isHttps;

    public boolean isHttps() {
        return isHttps;
    }

    public void setHttps(boolean isHttps) {
        this.isHttps = isHttps;
    }

    public String getXmlParam() {
        return xmlParam;
    }

    public void setXmlParam(String xmlParam) {
        this.xmlParam = xmlParam;
    }

    public HttpClient(String url, Map<String, String> param) {
        this.url = url;
        this.param = param;
    }

    public HttpClient(String url) {
        this.url = url;
    }

    public void setParameter(Map<String, String> map) {
        param = map;
    }

    public void addParameter(String key, String value) {
        if (param == null) {
            param = new HashMap<String, String>();
        }
        param.put(key, value);
    }

    public void post() throws ClientProtocolException, IOException {
        HttpPost http = new HttpPost(url);
        setEntity(http);
        execute(http);
    }

    public void put() throws ClientProtocolException, IOException {
        HttpPut http = new HttpPut(url);
        setEntity(http);
        execute(http);
    }

    public void get() throws ClientProtocolException, IOException {
        if (param != null) {
            StringBuilder url = new StringBuilder(this.url);
            boolean isFirst = true;
            for (String key : param.keySet()) {
                if (isFirst) {
                    url.append("?");
                } else {
                    url.append("&");
                }
                url.append(key).append("=").append(param.get(key));
            }
            this.url = url.toString();
        }
        HttpGet http = new HttpGet(url);
        execute(http);
    }

    /**
     * set http post,put param
     */
    private void setEntity(HttpEntityEnclosingRequestBase http) {
        if (param != null) {
            List<NameValuePair> nvps = new LinkedList<NameValuePair>();
            for (String key : param.keySet()) {
                nvps.add(new BasicNameValuePair(key, param.get(key))); // 参数
            }
            http.setEntity(new UrlEncodedFormEntity(nvps, Consts.UTF_8)); // 设置参数
        }
        if (xmlParam != null) {
            http.setEntity(new StringEntity(xmlParam, Consts.UTF_8));
        }
    }

    private void execute(HttpUriRequest http) throws ClientProtocolException,
            IOException {
        CloseableHttpClient httpClient = null;
        try {
            if (isHttps) {
                SSLContext sslContext = new SSLContextBuilder()
                        .loadTrustMaterial(null, new TrustStrategy() {
                            // 信任所有
                            @Override
                            public boolean isTrusted(X509Certificate[] chain,
                                                     String authType)
                                    throws CertificateException {
                                return true;
                            }
                        }).build();
                SSLConnectionSocketFactory sslsf = new SSLConnectionSocketFactory(
                        sslContext);
                httpClient = HttpClients.custom().setSSLSocketFactory(sslsf)
                        .build();
            } else {
                httpClient = HttpClients.createDefault();
            }
            CloseableHttpResponse response = httpClient.execute(http);
            try {
                if (response != null) {
                    if (response.getStatusLine() != null) {
                        statusCode = response.getStatusLine().getStatusCode();
                    }
                    HttpEntity entity = response.getEntity();
                    // 响应内容
                    content = EntityUtils.toString(entity, Consts.UTF_8);
                }
            } finally {
                response.close();
            }
        } catch (Exception e) {
            e.printStackTrace();
        } finally {
            httpClient.close();
        }
    }

    public int getStatusCode() {
        return statusCode;
    }

    public String getContent() throws ParseException, IOException {
        return content;
    }
}
3. controller层的代码
package com.example.controller;

import com.example.domain.CommonResult;
import com.example.service.OrderService;
import org.springframework.beans.factory.annotation.Autowired;
import org.springframework.web.bind.annotation.*;


/**
 * @Author shangtf
 * @Date 2023/7/25 15:18
 * @Description: TODO
 */
@RestController
@RequestMapping("order")
@CrossOrigin
public class OrderController {

    @Autowired
    private OrderService orderService;

    /**
     * 下单操作
     * @param orderId
     * @return
     */
    @PostMapping("createNative/{orderId}")
    private CommonResult createNative(@PathVariable String orderId) {

        return orderService.createNative(orderId);
    }

    /**
     * 查询订单状态
     * @param orderId
     * @return
     */
    @PostMapping("queryPayStatus/{orderId}")
    private CommonResult queryPayStatus(@PathVariable String orderId) {

        return orderService.queryPayStatus(orderId);
    }
}
service层
package com.example.service.impl;

import com.baomidou.mybatisplus.core.conditions.query.QueryWrapper;
import com.example.domain.CommonResult;
import com.example.domain.Order;
import com.example.mapper.OrderMapper;
import com.example.service.OrderService;
import com.example.utils.HttpClient;
import com.github.wxpay.sdk.WXPayUtil;
import org.springframework.beans.factory.annotation.Autowired;
import org.springframework.beans.factory.annotation.Value;
import org.springframework.stereotype.Service;
import org.springframework.util.ObjectUtils;

import java.math.BigDecimal;
import java.util.HashMap;
import java.util.Map;

/**
 * @Author shangtf
 * @Date 2023/7/25 15:21
 * @Description: TODO
 */
@Service
public class OrderServiceImpl implements OrderService {
    @Autowired
    private OrderMapper orderMapper;

    @Value("${weixin.appid}")
    private String appId;
    @Value("${weixin.mch_id}")
    private String mchId;

    @Value("${weixin.api_key}")
    private String apiKey;

    /**
     * 下单操作
     * @param orderId
     * @return
     */
    @Override
    public CommonResult createNative(String orderId) {
        //1. 先根据orderId查询出商品信息
        //2. 生成订单,添加到订单表。

        //这里直接从订单表中拿到一条订单(省略了上面步骤)
        QueryWrapper<Order> wrapper = new QueryWrapper<>();
        wrapper.eq("order_id",orderId);
        wrapper.eq("pay_status",0);
        Order order = orderMapper.selectOne(wrapper);

        if (!ObjectUtils.isEmpty(order)){

            try {

                Map<String,String> params = new HashMap<>();
                params.put("appid",appId);
                params.put("mch_id",mchId);
                params.put("nonce_str", WXPayUtil.generateNonceStr());
                params.put("body",order.getCourseTitle());
                params.put("out_trade_no",orderId);
                params.put("total_fee",new BigDecimal(0.01).multiply(new BigDecimal(100)).longValue()+"");
                //未来写成项目部署的ip
                params.put("spbill_create_ip","127.0.0.1");
                params.put("notify_url","http://localhost:9000/pay/back");
                params.put("trade_type","NATIVE");
                //创建Httpclient对象
                HttpClient client = new HttpClient("https://api.mch.weixin.qq.com/pay/unifiedorder");
                //支持https协议
                client.setHttps(true);
                //设置请求的参数
                client.setXmlParam(WXPayUtil.generateSignedXml(params,apiKey));
                //发送post请求
                client.post();
                //获取请求的响应结果
                String content = client.getContent();
                Map<String, String> map = WXPayUtil.xmlToMap(content);
                if (map.get("result_code").equals("SUCCESS")){
                    Map<String,Object> result = new HashMap<>();
                    result.put("codeUrl",map.get("code_url"));
                    result.put("price",order.getTotalFee());
                    result.put("orderNo",orderId);
                    return new CommonResult(200,"生成二维码成功",result);
                }
            } catch (Exception e) {
                throw new RuntimeException(e);
            }

        }
        return new CommonResult(500,"订单失效",null);
    }

    /**
     * 查询订单状态
     * @param orderId
     * @return
     */
    @Override
    public CommonResult queryPayStatus(String orderId) {

        try {
            HttpClient client = new HttpClient("https://api.mch.weixin.qq.com/pay/orderquery");
            Map<String,String> params = new HashMap<>();
            params.put("appid",appId);
            params.put("mch_id",mchId);
            params.put("out_trade_no",orderId);
            params.put("nonce_str",WXPayUtil.generateNonceStr());

            client.setHttps(true);
            client.setXmlParam(WXPayUtil.generateSignedXml(params,apiKey));
            client.post();

            String content = client.getContent();
            System.out.println("content = " + content);
            Map<String, String> map = WXPayUtil.xmlToMap(content);
            if (map.get("trade_state").equals("SUCCESS")){
                //1. 修改订单状态
                Order order = new Order();
                //修改订单状态为设为已支付,支付时间也可以设置
                order.setPayStatus(1);
                QueryWrapper<Order> wrapper = new QueryWrapper<>();
                wrapper.eq("order_id",orderId);
                wrapper.eq("pay_status",0);
                orderMapper.update(order,wrapper);
                //todo 2. 往支付记录表中添加支付记录
                return new CommonResult(200,"支付成功",null);
            }
        } catch (Exception e) {
            throw new RuntimeException(e);
        }

        return  new CommonResult(500,"支付失败",null);
    }

}
4. mapper层
/**
 * @Author shangtf
 * @Date 2023/7/25 15:22
 * @Description: TODO
 */
@Mapper
public interface OrderMapper extends BaseMapper<Order> {

}
5. 前端页面
前端需要显示二维码,可以使用vue带的插件进行展示
npm install vue-qr
使用如下:先引入vue-qr,然后components引用一下,最后使用<vue-qr>标签即可
<template>
<div>
<el-button type="primary" @click="pay">下单</el-button>
<el-dialog
title="下单"
:visible.sync="centerDialogVisible"
width="30%"
v-model="payResult"
center>
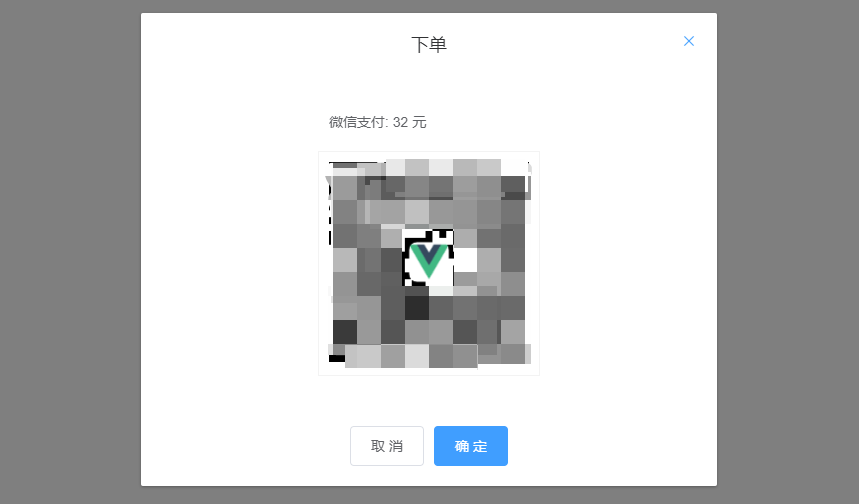
<p style=" width: 200px;padding: 10px;margin: 10px auto;">
微信支付: {{ payResult.price }} 元
</p>
<div style="border: 1px solid #f3f3f3;width: 200px;padding: 10px;margin: 10px auto;">
<vue-qr
:text="payResult.codeUrl"
:margin="0"
:logoSrc="require('@/assets/logo.png')"
colorLight="#fff"
:size="200"
>
</vue-qr>
</div>
<span slot="footer" class="dialog-footer">
<el-button @click="centerDialogVisible = false">取 消</el-button>
<el-button type="primary" @click="centerDialogVisible = false">确 定</el-button>
</span>
</el-dialog>
</div>
</template>
<script>
import vueQr from "vue-qr"
export default {
data() {
return {
centerDialogVisible: false,
orderNo: "8624efa8396e4af7a912e7c4bf3fbb11",
payResult: "",
timer1:""
};
},
methods: {
pay() {
this.centerDialogVisible = true
this.$http.post("/order/createNative/" + this.orderNo).then(res => {
if (res.data.code===200){
this.payResult = res.data.data;
this.timer1 = setInterval(()=>{
this.queryPayStatus(this.payResult.orderNo)
},3000);
}
})
},
queryPayStatus(){
this.$http.post("/order/queryPayStatus/" + this.orderNo).then(res => {
if (res.data.code===200){
this.centerDialogVisible=false;
clearInterval(this.timer1);
this.timer1=null;
this.$message({
message: '支付成功',
type: 'success'
});
}
})
}
},
components: {
vueQr
}
}
</script>
<style scoped>
</style>