官方文档:https://github.com/alibaba/spring-cloud-alibaba/wiki/Nacos-config
市面上比较有名的配置中心:
- Spring Cloud Config
- Apollo
- Spring Cloud Alibaba Nacos Config
Spring Cloud Config 大部分场景结合 git 使用,动态变更还需要依赖Spring Cloud Bus消息总线来通知所有的客户端变化。并且Spring Cloud Config 不提供可视化界面。
Spring Cloud Alibaba Nacos Config使用长轮询更新配置,一旦配置发生变更后,通知 provider 的过程非常迅速,速度上秒杀 Spring Cloud Config。
Spring Cloud Alibaba Nacos Config的优势:
- 维护性
- 时效性
- 安全性
维护性:在一个大型微服务项目中,可能会有几百上千个微服务。而每个微服务中都可能会有相同的配置项 ( Redis配置、MySQL配置、MQ配置等 ),给运维人员带来极大的负担,并且也不利于后期的维护。所以通过 Nacos 配置中心集中统一配置管理这些公共配置部分,然后在需要的微服务中引入这些配置,极大地降低了维护成本。
时效性:某个配置文件发生变更后,需要对服务器进行重启是配置文件生效,而这个过程是需要一定的时间的,这就有可能造成多个服务之间数据的不一致(比如OrderService服务集群了5台服务器,而我们修改了OrderService服务中的Redis配置发生了变更,那么这5台服务器都需要重启,但重启是有先后顺序的,当你重启了第一台服务器,后面4台还未来得及重启时,这个过程中它们的一致性是无法保证的,因为在第一台服务器重启时,其它4台服务器可能会发生数据变更)。
安全性:避免在配置文件中暴露敏感信息(如暴露数据库的用户名和密码,出现删库跑路之类的问题),而Naocs配置中心提供了不同的权限控制来解决这些问题。

NameSpace / Group / Data-Id

Namespace:代表不同的环境,如:开发、生产、测试环境。
Group:代表某项目,如:xx医疗项目、xx电商项目。不同的Group可以有相同的Data-Id
Data-Id:每个项目下有若干个工程(微服务),每个配置集(Data-Id)是一个工程(微服务)的主配置文件。
Nacos 权限控制
要使用 nacos 权限控制功能,必须要将 nacos 安装目录下conf目录中的 application.properties 配置文件中的 nacos.core.auth.enabled=false 配置项修改成 nacos.core.auth.enabled=true 开启权限功能,否则在 Nacos Server 控制台中的权限管理设置就无法生效。
### If turn on auth system:
nacos.core.auth.enabled=true
为什么要使用 nacos 权限控制 ?
- 对于不同的开发人员,基于不同的权限,可以有效的保证数据的安全性。比如某些开发人员只有读配置文件的权限,可以有效的防止类似于删库跑路的情况发生。
Nacos配置中心使用 [官网]
服务端准备
1. 执行./usr/local/nacos/nacos8849/bin/startup.sh命令启动 Nacos Server。启动方式可见 Nacos 官网
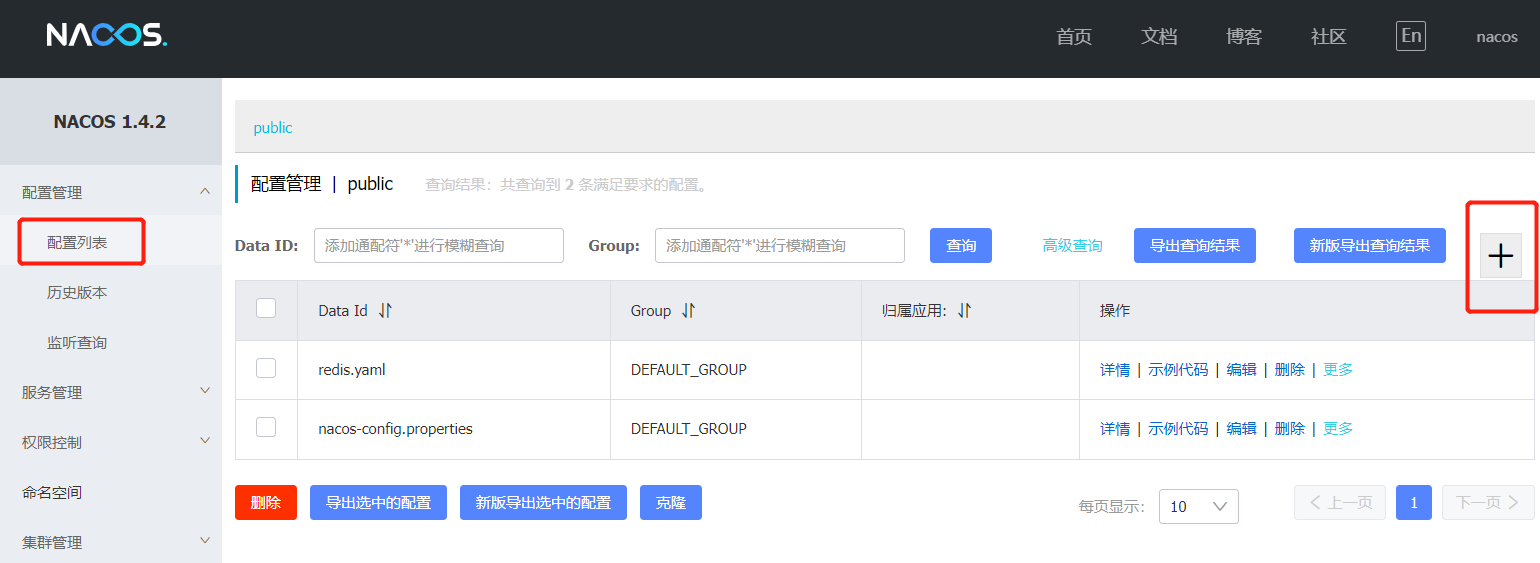
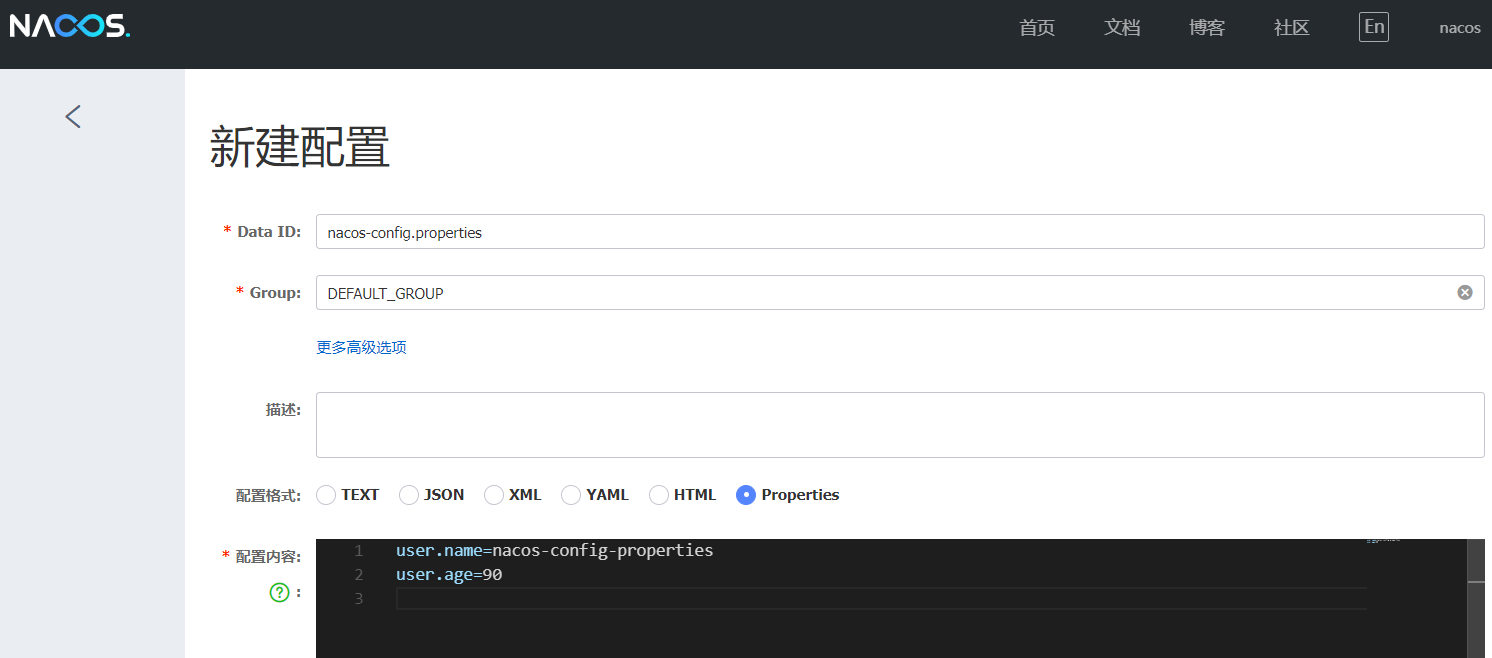
2. 启动 Nacos Server之后,在 Nacos 控制台中添加如下配置:
- 注意:dataId 默认是以 properties ( 默认的文件扩展名方式 ) 为扩展名。
Data ID:    nacos-config.properties

Group  :    DEFAULT_GROUP

配置格式:    Properties

配置内容:   user.name=nacos-config-properties
            user.age=90
客户端准备
1. 如果要在项目中使用 Nacos 来实现应用的外部配置 ( 客户端使用 Nacos 配置中心 )。需要引入如下依赖
<dependency>
    <groupId>com.alibaba.cloud</groupId>
    <artifactId>spring-cloud-starter-alibaba-nacos-config</artifactId>
</dependency>
2. 在使用 Nacos 配置中心的配置文件之前,必须使用 bootstrap.properties 配置文件来配置Nacos Server 地址:(注意:要使用 Nacos 配置中心,必需要在bootstrap.properties / bootstrap.yml中配置,bootstrap.yml配置文件的加载顺序要优先于application.yml)
- bootstrap.properties
spring.application.name=nacos-config
spring.cloud.nacos.config.server-addr=192.168.184.129:8849
# 需要配置nacos的 用户名和密码,否则报unknown user!错误
spring.cloud.nacos.config.username=nacos
spring.cloud.nacos.config.password=nacos
- 注意:在 SpringBoot 2.4.x 的版本之后,对于 bootstrap.properties/bootstrap.yml 配置文件的支持,需要导入以下依赖配合使用,否则 bootstrap.properties 配置不生效
<!--否则不生效-->
<dependency>
    <groupId>org.springframework.cloud</groupId>
    <artifactId>spring-cloud-starter-bootstrap</artifactId>
</dependency>
3. 创建一个标准的 SpringBoot 应用进行测试
@SpringBootApplication
public class Nacos8030Apllication {

    public static void main(String[] args) {
        ConfigurableApplicationContext applicationContext = SpringApplication.run(Nacos8030Apllication.class, args);

        String username = applicationContext.getEnvironment().getProperty("user.name");
        String age = applicationContext.getEnvironment().getProperty("user.age");
        System.out.println("username: " + username + ", age: " + age);
    }

}
4. 启动这个 Example,可以看到如下输出结果:
2022-12-08 20:42:14.112  INFO 10884 --- [  restartedMain] c.a.c.n.refresh.NacosContextRefresher    : listening config: dataId=nacos-config, group=DEFAULT_GROUP
username: nacos-config-properties, age: 90
基于 dataId 为 yaml 的文件扩展名配置方式 [官网]
Nacos客户端默认读取的是 properties 的文件扩展名,对于其它扩展名的配置文件无法感知。但 spring-cloud-starter-alibaba-nacos-config 对于 yaml 格式也是完美支持的,只需要完成以下两步:
1. 在应用的 bootstrap.yml 或 bootstrap.properties 配置文件中显示的声明 dataId 文件扩展名。如下所示
bootstrap.yml
spring:
    cloud:
        nacos:
            config:
                file-extension: yaml
spring:
    application:
        name: nacos-config
    cloud:
        nacos:
            config:
                server-addr: 192.168.184.129:8849
                # 需要配置nacos的 用户名和密码,否则报unknown user!错误
                username: nacos
                password: nacos
                # 如果在nacos控制台中选择的配置文件扩展名为yaml,则需要在应用的bootstrap.yml中指定该文件扩展名为yaml
                file-extension: yaml
bootstrap.properties
spring.cloud.nacos.config.file-extension=yaml
spring.application.name=nacos-config
spring.cloud.nacos.config.server-addr=192.168.184.129:8849
# 需要配置nacos的 用户名和密码,否则报unknown user!错误
spring.cloud.nacos.config.username=nacos
spring.cloud.nacos.config.password=nacos
# 如果在nacos控制台中选择的配置文件扩展名为yaml,则需要在应用的bootstrap.properties中指定该文件扩展名为yaml
spring.cloud.nacos.config.file-extension=yaml
2. 在 Nacos 控制台中新增一个 dataId 为 yaml 扩展名的配置,如下所示
Data ID:        nacos-config.yaml

Group  :        DEFAULT_GROUP

配置格式:        YAML

配置内容:        user.name: nacos-config-yaml
                user.age: 68
3. 这两步完成后,重启测试程序。
@SpringBootApplication
public class Nacos8030Apllication {

    public static void main(String[] args) {
        ConfigurableApplicationContext applicationContext = SpringApplication.run(Nacos8030Apllication.class, args);

        String username = applicationContext.getEnvironment().getProperty("user.name");
        String age = applicationContext.getEnvironment().getProperty("user.age");
        System.out.println("username: " + username + ", age: " + age);
    }

}
4. 可以看到如下输出结果。
2022-12-07 15:00:00.720  INFO 19812 --- [  restartedMain] c.a.c.n.refresh.NacosContextRefresher    : listening config: dataId=redis.yaml, group=DEFAULT_GROUP
username: nacos-config-yaml, age: 68





![[附源码]JAVA毕业设计-心理健康管理-(系统+LW)](https://img-blog.csdnimg.cn/7444b85f87c84c4f90a1716b06b6193b.png)

