先对大图中的标定板框选,然后再标定计算
工程目录结构

如果提示没有win32gui则
pip install pywin32
如果是conda的环境则
conda install pywin32
drawROI.py
import copy
import json
import cv2
import numpy as np
import os
import matplotlib.pyplot as plt
from matplotlib.widgets import Button
WIN_NAME = 'draw_rect'
from win32 import win32gui, win32print
from win32.lib import win32con
def get_list0(path):
if not os.path.exists(path):
print("记录该型号标准位置的文件缺失/或输入型号与其对应标准文件名称不一致")
file1 = open(path, 'r')
lines = file1.readlines()
# for line in lines:
# if (any(kw in line for kw in kws)):
# SeriousFix.write(line + '\n')
zb0, list0 = [], []
for i in range(len(lines)): # 取坐标
if lines[i] != '(pt1,pt2):\n':
zb0.append(lines[i][:-1])
# print(zb0)
for i in range(0, len(zb0)): # 转换整数
zb0[i] = int(zb0[i])
# print(zb0)
for i in range(0, len(zb0), 4): # 每四个取一次,加入列表
x0, y0, x1, y1 = zb0[i: i + 4]
# 使点设为左上至右下
if y1<=y0:
temp = y0
y0 = y1
y1 = temp
# print(x0,y0,x1,y1)
list0.append([x0, y0, x1, y1])
print("list0:", list0)
file1.close()
return list0
'''
初始校验文件,文件名代表类型,检验时读取文件名作为类型判断标准
打开sourse文件夹,读取标准件原始图片,保存标准位置到biaozhun/labels,保存画有标准位置的图片到biaozhun/imgs
'''
def define_start(img_name, img_path, type):
class Rect(object):
def __init__( self ):
self.tl = (0, 0)
self.br = (0, 0)
def regularize( self ):
"""
make sure tl = TopLeft point, br = BottomRight point
"""
pt1 = (min(self.tl[0], self.br[0]), min(self.tl[1], self.br[1]))
pt2 = (max(self.tl[0], self.br[0]), max(self.tl[1], self.br[1]))
self.tl = pt1
self.br = pt2
class DrawRects(object):
def __init__( self, image, color, thickness=1, center=(10, 10), radius=100 ):
self.original_image = image
self.image_for_show = image.copy()
self.color = color
self.thickness = thickness
self.rects = []
self.current_rect = Rect()
self.left_button_down = False
self.center = center
self.radius = radius
self.image_for_show_line = np.zeros((image.shape[0], image.shape[1], 3), dtype=np.uint8)
@staticmethod
def __clip( value, low, high):
"""
clip value between low and high
Parameters
----------
value: a number
value to be clipped
low: a number
low limit
high: a number
high limit
Returns
-------
output: a number
clipped value
"""
output = max(value, low)
output = min(output, high)
return output
def shrink_point( self, x, y ):
"""
shrink point (x, y) to inside image_for_show
Parameters
----------
x, y: int, int
coordinate of a point
Returns
-------
x_shrink, y_shrink: int, int
shrinked coordinate
"""
height, width = self.image_for_show.shape[0:2]
x_shrink = self.__clip(x, 0, width)
y_shrink = self.__clip(y, 0, height)
return (x_shrink, y_shrink)
if type == 1:
def getROI( self ):
roi = image[self.current_rect.tl[1]:self.current_rect.br[1],
self.current_rect.tl[0]:self.current_rect.br[0]]
roi_h = abs(self.current_rect.tl[1] - self.current_rect.br[1])
roi_w = abs(self.current_rect.tl[0] - self.current_rect.br[0])
if roi_h > 0 and roi_w > 0:
cv2.imwrite(f"./biaozhun/ROI/{img_name}.jpg", roi)
# cv2.imwrite("J30J_holes.jpg", roi)
#
# roi = image[self.current_rect.tl[1]:self.current_rect.br[1],
# self.current_rect.tl[0]:self.current_rect.br[0]]
# cv2.imwrite(f"./DrawRect/biaozhun/yiwubiaoding/{img_name}.jpg", roi)
def append( self ):
"""
add a rect to rects list
"""
self.rects.append(copy.deepcopy(self.current_rect))
def pop( self ):
"""
pop a rect from rects list
"""
rect = Rect()
if self.rects:
rect = self.rects.pop()
return rect
def reset_image( self ):
"""
reset image_for_show using original image
"""
self.image_for_show = self.original_image.copy()
def draw( self ):
"""
draw rects on image_for_show
"""
for rect in self.rects:
cv2.rectangle(self.image_for_show, rect.tl, rect.br,
color=self.color, thickness=self.thickness)
def draw_current_rect( self ):
"""
draw current rect on image_for_show
"""
cv2.rectangle(self.image_for_show,
self.current_rect.tl, self.current_rect.br,
color=self.color, thickness=self.thickness)
# 保存结果
def save_images_rect( self ):
cv2.imwrite("./biaozhun/imgs/" + img_name + '.jpg', draw_rects.image_for_show)
def trans_img( self ):
self.image_for_show_line = np.zeros((image.shape[0], image.shape[1], 3), dtype=np.uint8)
def draw_crossline( self ):
self.trans_img()
pt_left = (self.center[0] - self.radius, self.center[1])
pt_right = (self.center[0] + self.radius, self.center[1])
pt_top = (self.center[0], self.center[1] - self.radius)
pt_bottom = (self.center[0], self.center[1] + self.radius)
cv2.line(self.image_for_show_line, pt_left, pt_right,
(0, 0, 255), self.thickness)
cv2.line(self.image_for_show_line, pt_top, pt_bottom,
(0, 0, 255), self.thickness)
# cv2.imshow("crossLine", self.image_for_show_line)
# print("crossline")
def onmouse_draw_rect( event, x, y, flags, draw_rects ):
draw_rects.center = (x, y)
# txt_save = []
if event == cv2.EVENT_LBUTTONDOWN:
# pick first point of rect
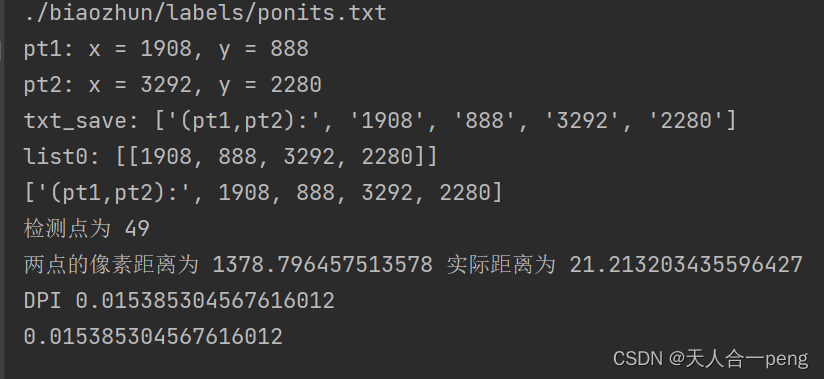
print('pt1: x = %d, y = %d' % (x, y))
txt_save.append("(pt1,pt2):")
txt_save.append(str(x))
txt_save.append(str(y))
# f.write("(pt1,pt2):\n" + str(x) + '\n' + str(y) + '\n')
draw_rects.left_button_down = True
draw_rects.current_rect.tl = (x, y)
if draw_rects.left_button_down and event == cv2.EVENT_MOUSEMOVE:
# pick second point of rect and draw current rect
draw_rects.current_rect.br = draw_rects.shrink_point(x, y)
draw_rects.reset_image()
draw_rects.draw()
draw_rects.draw_current_rect()
draw_rects.save_images_rect()
if event == cv2.EVENT_LBUTTONUP:
# finish drawing current rect and append it to rects list
draw_rects.left_button_down = False
draw_rects.current_rect.br = draw_rects.shrink_point(x, y)
print('pt2: x = %d, y = %d' % (draw_rects.current_rect.br[0],
draw_rects.current_rect.br[1]))
# txt_save.append("(pt1,pt2):\n")
txt_save.append(str(draw_rects.current_rect.br[0]))
txt_save.append(str(draw_rects.current_rect.br[1]))
# f.write(str(draw_rects.current_rect.br[0]) + '\n' + str(draw_rects.current_rect.br[1]) + '\n')
draw_rects.current_rect.regularize()
draw_rects.append()
draw_rects.getROI()
if (not draw_rects.left_button_down) and event == cv2.EVENT_RBUTTONDOWN:
# pop the last rect in rects list
draw_rects.pop()
draw_rects.reset_image()
draw_rects.draw()
draw_rects.save_images_rect()
# txt_save = txt_save[:-5]
txt_save.append('delete')
# print("clear")
draw_rects.draw_crossline()
# return txt_save
# 根据显示器的大小设置窗口缩放的比例
def set_ratio(image):
if image is None:
return 0, 0, 0
# print(image.shape)
img_h, img_w = image.shape[:2]
"""获取真实的分辨率"""
hDC = win32gui.GetDC(0)
screen_w = win32print.GetDeviceCaps(hDC, win32con.DESKTOPHORZRES) # 横向分辨率
screen_h = win32print.GetDeviceCaps(hDC, win32con.DESKTOPVERTRES) # 纵向分辨率
# print(img_w,img_h)
num_wh = 1
if img_w * img_h > 1.9e7: # 两千万像素
num_wh = 4
elif img_w * img_h > 1.0e7: # 一千万像素
num_wh = 3
elif min(img_w, img_h) >= min(screen_w, screen_h) or \
max(img_w, img_h) >= max(screen_w, screen_h):
num_wh = 2
else:
num_wh = 1
ratio_h = int(img_h / num_wh)
ratio_w = int(img_w / num_wh)
return ratio_h, ratio_w, num_wh
(filepath, file) = os.path.split(img_path)
# file = 'r.jpg' # 需要用户选择图片,传入图片的名称
if file.endswith(".jpg") or file.endswith(".png"): # 如果file以jpg结尾
# img_dir = os.path.join(file_dir, file)
image = cv2.imread(img_path)
# cv2.namedWindow(WIN_NAME, 2)
# cv2.imshow(WIN_NAME, image)
# cv2.waitKey()
ratio_h, ratio_w, num_wh = set_ratio(image)
if ratio_h == 0 and ratio_w == 0 and num_wh == 0:
print("No image")
# draw_rects = DrawRects(image, (0, 255, 0), 2, (10, 10), 10000)
draw_rects = DrawRects(image, (0, 255, 0), num_wh, (10, 10), 10000)
# cv2.namedWindow(WIN_NAME, cv2.WINDOW_NORMAL)
cv2.namedWindow(WIN_NAME, 2)
cv2.resizeWindow(WIN_NAME, ratio_w, ratio_h)
txt_path = "./biaozhun/labels/%s.txt" % (img_name)
print(txt_path)
open(txt_path, 'w').close() # 清空文件数据
f = open(txt_path, mode='a+')
txt_save = []
cv2.setMouseCallback(WIN_NAME, onmouse_draw_rect, draw_rects) # 画框并保存
while True:
dest = cv2.add(draw_rects.image_for_show_line, draw_rects.image_for_show)
cv2.imshow(WIN_NAME, dest)
if cv2.waitKey(1) == 13 or cv2.getWindowProperty(WIN_NAME, 0) == -1: # enter回车键
# 保存txt坐标
num_txt_i = 0
for txt_i in range(len(txt_save)):
txt_i = txt_i - num_txt_i
if txt_save[txt_i] == 'delete':
for j in range(6):
del txt_save[txt_i - j]
num_txt_i += 6
for txt_i in txt_save:
f.write(str(txt_i) + '\n')
print("txt_save:", txt_save)
break
f.close()
cv2.destroyAllWindows()
# 查找距离较近的,删除
points_list = get_list0(txt_path)
new_points_list = []
for i in points_list:
x0, y0, x1, y1 = i[0], i[1], i[2], i[3]
if abs(x1 - x0) > 5 and abs(y1 - y0) > 5:
new_points_list.append('(pt1,pt2):')
new_points_list.append(x0)
new_points_list.append(y0)
new_points_list.append(x1)
new_points_list.append(y1)
print(new_points_list)
file2 = open(txt_path, 'w')
for i in new_points_list:
file2.write(str(i) + '\n')
file2.close()
else:
print("输入图片类型错误!请输入JPG/PNG格式的图片!")
if __name__ == '__main__':
# image = cv2.imread("result.jpg")
# image = cv2.imread("../OpencvCircleLJQ/Images/Final/E_0_8.jpg")
# imagePath ="../OpencvCircleLJQ/Images/Final/E_0_2.jpg"
# imagePath ="./OpencvCircleLJQ/Images/Final/E_0_2.jpg"
imagePath ="./121001.jpg"
define_start("ponits",imagePath, 1)运行完上面的脚本再运行下面这个
CaluateDPI.py
# coding:utf-8
import math
import cv2
import numpy as np
import xml.etree.ElementTree as ET
import matplotlib.pyplot as plt
global DPI
DPI = 0.00245
def mainFigure(img):
w = 20
h = 5
params = cv2.SimpleBlobDetector_Params()
# Setup SimpleBlobDetector parameters.
# print('params')
# print(params)
# print(type(params))
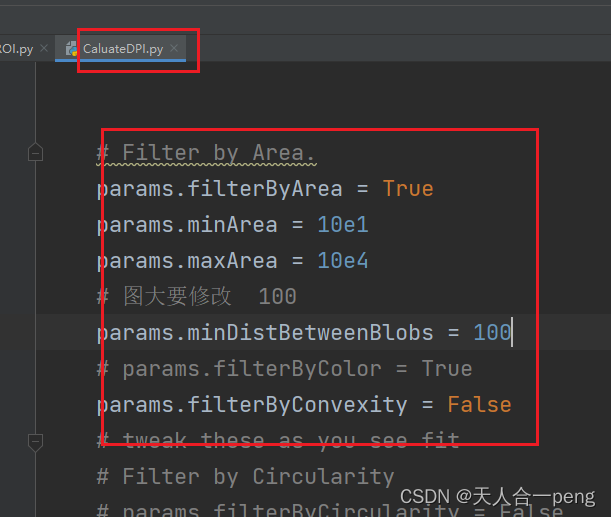
# Filter by Area.
params.filterByArea = True
params.minArea = 10e1
params.maxArea = 10e4
# 图大要修改 100
params.minDistBetweenBlobs = 100
# params.filterByColor = True
params.filterByConvexity = False
# tweak these as you see fit
# Filter by Circularity
# params.filterByCircularity = False
# params.minCircularity = 0.2
# params.blobColor = 0
# # # Filter by Convexity
# params.filterByConvexity = True
# params.minConvexity = 0.87
# Filter by Inertia
# params.filterByInertia = True
# params.filterByInertia = False
# params.minInertiaRatio = 0.01
gray= cv2.cvtColor(img,cv2.COLOR_BGR2GRAY)
# Detect blobs.
# image = cv2.resize(gray_img, (int(img.shape[1]/4),int(img.shape[0]/4)), 1, 1, cv2.INTER_LINEAR)
# image = cv2.resize(gray_img, dsize=None, fx=0.25, fy=0.25, interpolation=cv2.INTER_LINEAR)
minThreshValue = 40
_, gray = cv2.threshold(gray, minThreshValue, 255, cv2.THRESH_BINARY)
# gray = cv2.resize(gray, dsize=None, fx=1, fy=1, interpolation=cv2.INTER_LINEAR)
# gray = cv2.resize(gray, dsize=None, fx=2, fy=2, interpolation=cv2.INTER_LINEAR)
# plt.imshow(gray)
cv2.imshow("gray",gray)
cv2.waitKey()
# 找到距离原点(0,0)最近和最远的点
h, w = img.shape[:2]
detector = cv2.SimpleBlobDetector_create(params)
keypoints = detector.detect(gray)
print("检测点为", len(keypoints))
# opencv
im_with_keypoints = cv2.drawKeypoints(gray, keypoints, np.array([]), (0, 255, 0), cv2.DRAW_MATCHES_FLAGS_DRAW_RICH_KEYPOINTS)
# plt
# fig = plt.figure()
# im_with_keypoints = cv2.drawKeypoints(gray, keypoints, np.array([]), (0, 0, 255), cv2.DRAW_MATCHES_FLAGS_DRAW_RICH_KEYPOINTS)
color_img = cv2.cvtColor(im_with_keypoints, cv2.COLOR_BGR2RGB)
DPIall = []
if keypoints is not None:
# 找到距离(0,0)最近和最远的点
kpUpLeft = []
disUpLeft = []
for i in range(len(keypoints)):
dis = math.sqrt(math.pow(keypoints[i].pt[0],2) + math.pow(keypoints[i].pt[1],2))
disUpLeft.append(dis)
kpUpLeft.append(keypoints[i].pt)
# cv2.circle(img, (int(keypoints[i].pt[0]), int(keypoints[i].pt[1])), 10, (0, 255, 0), 2)
# 找到距离(640*2,0)最近和最远的点
kpUpRight = []
disUpRight=[]
for i in range(len(keypoints)):
# 最大距离坐标
dis2 = math.sqrt(math.pow(abs(keypoints[i].pt[0]-w),2) + math.pow(abs(keypoints[i].pt[1]),2))
disUpRight.append(dis2)
kpUpRight.append(keypoints[i].pt)
if disUpRight and disUpLeft:
disDownLeftIndex = disUpRight.index(max(disUpRight))
pointDL = kpUpRight[disDownLeftIndex]
disUpRightIndex = disUpRight.index(min(disUpRight))
pointUR = kpUpLeft[disUpRightIndex]
disDownRightIndex = disUpLeft.index(max(disUpLeft))
pointDR = kpUpLeft[disDownRightIndex]
disUpLeftIndex = disUpLeft.index(min(disUpLeft))
pointUL = kpUpLeft[disUpLeftIndex]
if (pointDR is not None) and (pointUL is not None) and (pointDL is not None) and (pointUR is not None):
# cv2.circle(color_img, (int(pointDR[0]),int(pointDR[1])), 30, (0, 255, 0),2)
# cv2.circle(color_img, (int(pointUL[0]),int(pointUL[1])), 30, (0, 255, 0),2)
# cv2.line(color_img,(int(pointDR[0]),int(pointDR[1])), (int(pointDL[0]),int(pointDL[1])),(0, 0, 255),2)
#
# cv2.circle(color_img, (int(pointDL[0]),int(pointDL[1])), 30, (0, 255, 0),2)
# cv2.circle(color_img, (int(pointUR[0]),int(pointUR[1])), 30, (0, 255, 0),2)
# cv2.line(color_img, (int(pointDL[0]),int(pointDL[1])), (int(pointUR[0]),int(pointUR[1])), (0, 0, 255), 2)
# cv2.line(color_img, (int(pointUL[0]),int(pointUL[1])), (int(pointUR[0]),int(pointUR[1])), (0, 0, 255), 2)
# 显示在原图上 原图减半因为之前放大了
# cv2.circle(img, (int(pointDR[0]/2), int(pointDR[1]/2)), 10, (0, 255, 0), 2)
# cv2.circle(img, (int(pointUL[0]/2), int(pointUL[1]/2)), 10, (0, 255, 0), 2)
# cv2.line(img,(int(pointDR[0]/2),int(pointDR[1]/2)), (int(pointUL[0]/2),int(pointUL[1]/2)),(0, 0, 255),2)
# dis_UR_DL = math.sqrt(math.pow(pointUR[0]-pointDL[0], 2) + math.pow(pointUR[1]-pointDL[1], 2))/2
cv2.circle(img, (int(pointDR[0] ), int(pointDR[1] )), 10, (0, 255, 0), 2)
cv2.circle(img, (int(pointUL[0] ), int(pointUL[1] )), 10, (0, 255, 0), 2)
cv2.line(img, (int(pointDR[0] ), int(pointDR[1] )), (int(pointUL[0] ), int(pointUL[1] )),
(0, 0, 255), 2)
dis_UR_DL = math.sqrt(math.pow(pointUR[0] - pointDL[0], 2) + math.pow(pointUR[1] - pointDL[1], 2))
DPIall.append(dis_UR_DL)
global DPI
# 只计算斜对角线,约束条件简单一些,增加适用性
# 单边长a = 0.05*19 对角线
# DPI = (math.sqrt(1.3435)) / sum(DPIall)
dis_mm = math.sqrt(math.pow(15, 2) + math.pow(15, 2))
print("两点的像素距离为", dis_UR_DL, "实际距离为", dis_mm)
DPI = dis_mm / dis_UR_DL
print("DPI", DPI)
# configFile_xml = "wellConfig.xml"
# tree = ET.parse(configFile_xml)
# root = tree.getroot()
# secondRoot = root.find("DPI")
# print(secondRoot.text)
#
# secondRoot.text = str(DPI)
# tree.write("wellConfig.xml")
# print("DPI", DPI)
else:
pass
print(DPI)
# plt.imshow(color_img,interpolation='bicubic')
# fname = "key points"
# titlestr = '%s found %d keypoints' % (fname, len(keypoints))
# plt.title(titlestr)
# # fig.canvas.set_window_title(titlestr)
# plt.show()
# cv2.imshow('color_img', color_img)
cv2.namedWindow('findCorners',2)
cv2.imshow('findCorners', img)
cv2.waitKey()
if __name__ == "__main__":
# # # 单张图片测试
# DPI hole
# 0.01221465904139037
#
# DPI needle
# 0.012229753249515942
# img = cv2.imread("TwoBiaoDing/ROI_needle.jpg",1)
img = cv2.imread("biaozhun/ROI/ponits.jpg",1)
img_roi = img.copy()
# img_roi = img[640:2000, 1530:2800]
# cv2.namedWindow("img_roi",2)
# cv2.imshow("img_roi", img_roi)
# cv2.waitKey()
# img = cv2.imread("circles/Snap_0.jpg",1)
mainFigure(img_roi)
# # 所有图片测试
# for i in range(15):
# fileName = "Snap_" + str(i) + ".jpg"
# # img = cv2.imread("circles/Snap_007.jpg",1)
# img = cv2.imread("circles/" + fileName,1)
# print(fileName)
# mainFigure(img)
检测点为 49
两点的像素距离为 1378.8390883031043 实际距离为 21.213203435596427
DPI 0.015384828886525748
0.015384828886525748
或者通过下面的方式运行一次全搞定
只需要修改drawROI.py
# 上面的是一样的
import CaluateDPI
if __name__ == '__main__':
    # image = cv2.imread("result.jpg")
    # image = cv2.imread("../OpencvCircleLJQ/Images/Final/E_0_8.jpg")
    # imagePath ="../OpencvCircleLJQ/Images/Final/E_0_2.jpg"
    # imagePath ="./OpencvCircleLJQ/Images/Final/E_0_2.jpg"
    imagePath ="./121001.jpg"

    define_start("ponits",imagePath, 1)

    CaluateDPI.read_img()

这儿不同标定板的图片可能需要修改参数

这样一次性就全搞定了