基本思想:简单使用nvidia的硬件解码进行oak相机的编码和解码学习
一、在本机rtx3060配置好显卡驱动和cuda之后进行下面操作50、ubuntu18.04&20.04+CUDA11.1+cudnn11.3+TensorRT7.2/8.6+Deepsteam5.1+vulkan环境搭建和YOLO5部署_ubuntu18.04安装vulkan_sxj731533730的博客-CSDN博客
二、配置环境和编译库
ubuntu@ubuntu:~$ sudo apt-get install libtool automake autoconf nasm yasm
ubuntu@ubuntu:~$ sudo apt-get install libx264-dev
ubuntu@ubuntu:~$ sudo apt-get install libx265-dev
ubuntu@ubuntu:~$ sudo apt-get install libmp3lame-dev
ubuntu@ubuntu:~$ sudo apt-get install libvpx-dev
ubuntu@ubuntu:~$ sudo apt-get install libfaac-dev

ubuntu@ubuntu:~$ git clone https://git.videolan.org/git/ffmpeg/nv-codec-headers.git
ubuntu@ubuntu:~$ cd nv-codec-headers
ubuntu@ubuntu:~$ make
ubuntu@ubuntu:~$ sudo make install


ubuntu@ubuntu:~$ git clone https://github.com/FFmpeg/FFmpeg
ubuntu@ubuntu:~$ cd FFmpeg/
ubuntu@ubuntu:~$ mkdir build
ubuntu@ubuntu:~$ cd build/
 ubuntu@ubuntu:~/FFmpeg$./configure  --prefix=/usr/local --enable-gpl --enable-nonfree --enable-libfreetype --enable-libmp3lame --enable-libvpx --enable-libx264 --enable-libx265 --enable-gpl --enable-version3 --enable-nonfree --enable-shared --enable-ffmpeg --enable-ffplay --enable-ffprobe --enable-libx264 --enable-nvenc --enable-cuda --enable-cuvid --enable-libnpp --extra-cflags=-I/usr/local/cuda/include --extra-ldflags=-L/usr/local/cuda/lib64
ubuntu@ubuntu:~/FFmpeg$ sudo ldconfig
ubuntu@ubuntu:~$
三、使用oak相机进行h264解码测试
cmakelists.txt
cmake_minimum_required(VERSION 3.16)
project(depthai)
set(CMAKE_CXX_STANDARD 11)
find_package(OpenCV REQUIRED)
#message(STATUS ${OpenCV_INCLUDE_DIRS})
#添加头文件
include_directories(${OpenCV_INCLUDE_DIRS})
include_directories(${CMAKE_SOURCE_DIR}/utility)
#链接Opencv库
find_package(depthai CONFIG REQUIRED)
add_executable(depthai main.cpp utility/utility.cpp)
target_link_libraries(depthai ${OpenCV_LIBS}  depthai::opencv -lavformat -lavcodec -lswscale -lavutil -lz)
main.cpp
#include <stdio.h>
#include <string>
#include <iostream>
#include <opencv2/core/core.hpp>
#include <opencv2/highgui/highgui.hpp>
#include <opencv2/imgproc/imgproc.hpp>

extern "C"
{
#include <libavformat/avformat.h>
#include <libavcodec/avcodec.h>
#include <libavutil/imgutils.h>
#include <libswscale/swscale.h>
}


#include "utility.hpp"

#include "depthai/depthai.hpp"

using namespace std::chrono;

int main(int argc, char **argv) {
    dai::Pipeline pipeline;
    //定义
    auto cam = pipeline.create<dai::node::ColorCamera>();
    cam->setBoardSocket(dai::CameraBoardSocket::RGB);
    cam->setResolution(dai::ColorCameraProperties::SensorResolution::THE_1080_P);
    cam->setVideoSize(1920, 1080);
    auto Encoder = pipeline.create<dai::node::VideoEncoder>();
    Encoder->setDefaultProfilePreset(cam->getVideoSize(), cam->getFps(),
                                     dai::VideoEncoderProperties::Profile::H264_MAIN);


    cam->video.link(Encoder->input);
    cam->setFps(60);

    //定义输出
    auto xlinkoutpreviewOut = pipeline.create<dai::node::XLinkOut>();
    xlinkoutpreviewOut->setStreamName("out");

    Encoder->bitstream.link(xlinkoutpreviewOut->input);


    //结构推送相机
    dai::Device device(pipeline);
    //取帧显示
    auto outqueue = device.getOutputQueue("out", cam->getFps(), false);//maxsize 代表缓冲数据


    // auto videoFile = std::ofstream("video.h265", std::ios::binary);


    int width = 1920;
    int height = 1080;
    //const AVCodec *pCodec = avcodec_find_decoder(AV_CODEC_ID_H264);
    const AVCodec *pCodec = avcodec_find_decoder_by_name("h264_cuvid");
    AVCodecContext *pCodecCtx = avcodec_alloc_context3(pCodec);

    AVDictionary* decoderOptions = nullptr;
    av_dict_set(&decoderOptions, "threads", "auto", 0);
    av_dict_set(&decoderOptions, "gpu", "cuda", 0);


    int ret = avcodec_open2(pCodecCtx, pCodec, &decoderOptions);
    if (ret < 0) {//打开解码器
        printf("Could not open codec.\n");
        return -1;
    }

    if (pCodecCtx != nullptr) {
        // 打印解码器支持的格式
        printf("Supported Formats:\n");
        const AVPixelFormat *pixFmt = pCodec->pix_fmts;
        while (*pixFmt != AV_PIX_FMT_NONE) {
            printf("- %s\n", av_get_pix_fmt_name(*pixFmt));
            pixFmt++;
        }

    }
    AVFrame *picture = av_frame_alloc();
    picture->width = width;
    picture->height = height;
    picture->format = AV_PIX_FMT_NV12;
    ret = av_frame_get_buffer(picture, 1);
    if (ret < 0) {
        printf("av_frame_get_buffer error\n");
        return -1;
    }
    AVFrame *pFrame = av_frame_alloc();
    pFrame->width = width;
    pFrame->height = height;
    pFrame->format = AV_PIX_FMT_NV12;
    ret = av_frame_get_buffer(pFrame, 1);
    if (ret < 0) {
        printf("av_frame_get_buffer error\n");
        return -1;
    }
    AVFrame *pFrameRGB = av_frame_alloc();
    pFrameRGB->width = width;
    pFrameRGB->height = height;
    pFrameRGB->format = AV_PIX_FMT_RGB24;
    ret = av_frame_get_buffer(pFrameRGB, 1);
    if (ret < 0) {
        printf("av_frame_get_buffer error\n");
        return -1;
    }


    int picture_size = av_image_get_buffer_size(AV_PIX_FMT_NV12, width, height,
                                                1);//计算这个格式的图片,需要多少字节来存储
    uint8_t *out_buff = (uint8_t *) av_malloc(picture_size * sizeof(uint8_t));
    av_image_fill_arrays(picture->data, picture->linesize, out_buff, AV_PIX_FMT_NV12, width,
                         height, 1);
    //这个函数 是缓存转换格式,可以不用 以为上面已经设置了AV_PIX_FMT_YUV420P
    SwsContext *img_convert_ctx = sws_getContext(width, height, AV_PIX_FMT_NV12,
                                                 width, height, AV_PIX_FMT_RGB24, 4,
                                                 NULL, NULL, NULL);
    AVPacket *packet = av_packet_alloc();
    auto startTime = steady_clock::now();
    int counter = 0;
    float fps = 0;

    while (true) {

        auto h265Packet = outqueue->get<dai::ImgFrame>();
        //videoFile.write((char *) (h265Packet->getData().data()), h265Packet->getData().size());

        packet->data = (uint8_t *) h265Packet->getData().data();    //这里填入一个指向完整H264数据帧的指针
        packet->size = h265Packet->getData().size();        //这个填入H265 数据帧的大小
        packet->stream_index = 0;
        ret = avcodec_send_packet(pCodecCtx, packet);
        if (ret < 0) {
            printf("avcodec_send_packet \n");
            continue;
        }
        av_packet_unref(packet);
        int got_picture = avcodec_receive_frame(pCodecCtx, pFrame);
        av_frame_is_writable(pFrame);
        if (got_picture < 0) {
            printf("avcodec_receive_frame \n");
            continue;
        }

        sws_scale(img_convert_ctx, pFrame->data, pFrame->linesize, 0,
                  height,
                  pFrameRGB->data, pFrameRGB->linesize);


        cv::Mat mRGB(cv::Size(width, height), CV_8UC3);
        mRGB.data = (unsigned char *) pFrameRGB->data[0];
        cv::Mat mBGR;
        cv::cvtColor(mRGB, mBGR, cv::COLOR_RGB2BGR);
        counter++;
        auto currentTime = steady_clock::now();
        auto elapsed = duration_cast<duration<float>>(currentTime - startTime);
        if (elapsed > seconds(1)) {
            fps = counter / elapsed.count();
            counter = 0;
            startTime = currentTime;
        }


        std::stringstream fpsStr;
        fpsStr << "NN fps: " << std::fixed << std::setprecision(2) << fps;
        printf("fps %f\n",fps);
        cv::putText(mBGR, fpsStr.str(), cv::Point(32, 24), cv::FONT_HERSHEY_TRIPLEX, 0.4,
                    cv::Scalar(0, 255, 0));


        cv::imshow("demo", mBGR);
        cv::waitKey(1);


    }


    return 0;
}
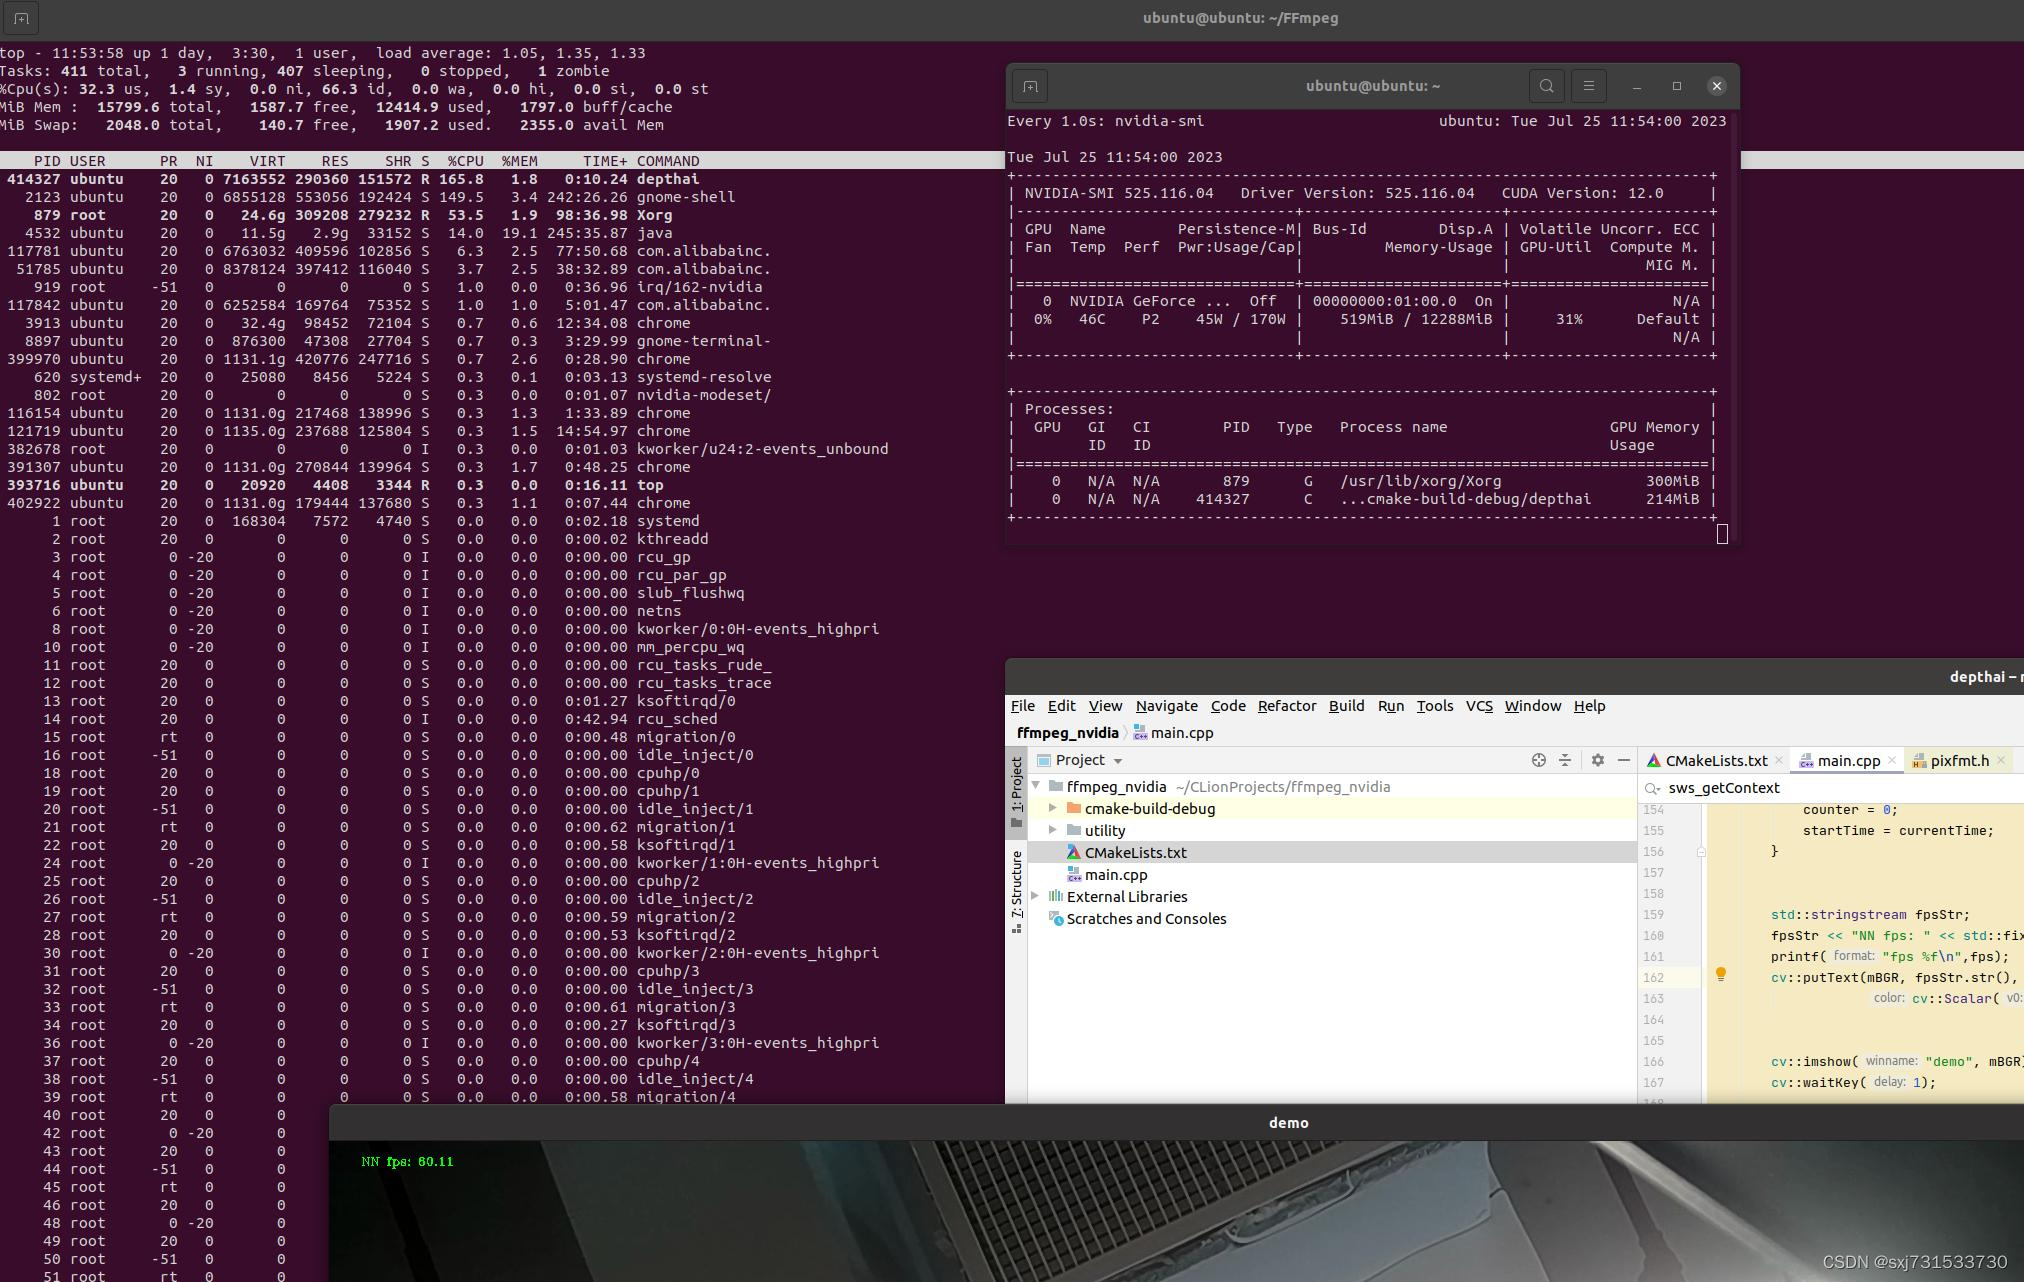
测试结果
四、使用oak进行解码测试
cmakelists.txt
cmake_minimum_required(VERSION 3.16)
project(depthai)
set(CMAKE_CXX_STANDARD 11)
find_package(OpenCV REQUIRED)
#message(STATUS ${OpenCV_INCLUDE_DIRS})
#添加头文件
include_directories(${OpenCV_INCLUDE_DIRS})
include_directories(${CMAKE_SOURCE_DIR}/utility)
#链接Opencv库
find_package(depthai CONFIG REQUIRED)
add_executable(depthai main.cpp utility/utility.cpp)
target_link_libraries(depthai ${OpenCV_LIBS}  depthai::opencv -lavformat -lavcodec -lswscale -lavutil -lz)
main.cpp
#include <iostream>
#include <stdio.h>
#include <string>
#include <iostream>
#include <opencv2/core/core.hpp>
#include <opencv2/highgui/highgui.hpp>
#include <opencv2/imgproc/imgproc.hpp>

extern "C"
{
#include <libavformat/avformat.h>
#include <libavcodec/avcodec.h>
#include <libavutil/imgutils.h>
#include <libswscale/swscale.h>
}

#include "fstream"

#include "utility.hpp"

#include "depthai/depthai.hpp"

using namespace std;

int main() {

    int WIDTH = 1920;
    int HEIGHT = 1080;
    AVPacket pack;
    int vpts = 0;
    uint8_t *in_data[AV_NUM_DATA_POINTERS] = {0};
    SwsContext *sws_context =NULL;
    // AVCodecContext *codec_context = nullptr;
    int in_size[AV_NUM_DATA_POINTERS] = {0};

    std::ofstream videoFile;
    // 2.初始化格式转换上下文
    int fps = 25;
     sws_context = sws_getCachedContext(sws_context,
                                                   WIDTH, HEIGHT, AV_PIX_FMT_BGR24,    // 源格式
                                                   WIDTH, HEIGHT, AV_PIX_FMT_YUV420P,  // 目标格式
                                                   SWS_BICUBIC,    // 尺寸变化使用算法
                                                   0, 0, 0);

    if (NULL == sws_context) {
        cout << "sws_getCachedContext error" << endl;
        return -1;
    }


    // 3.初始化输出的数据结构
    AVFrame *yuv = av_frame_alloc();
    yuv->format = AV_PIX_FMT_YUV420P;
    yuv->width = WIDTH;
    yuv->height = HEIGHT;
    yuv->pts = 0;

    // 分配yuv空间
    int ret_code = av_frame_get_buffer(yuv, 32);
    if (0 != ret_code) {
        cout << "  yuv init fail" << endl;
        return -1;
    }

    // 4.初始化编码上下文
    // 4.1找到编码器
    // const AVCodec *codec = avcodec_find_encoder(AV_CODEC_ID_H264);
    const AVCodec *codec = avcodec_find_encoder_by_name("h264_nvenc");//nvenc nvenc_h264 h264_nvenc

    // const AVCodec * codec = avcodec_find_encoder_by_name("nvenc");
    if (NULL == codec) {
        cout << "Can't find h264 encoder." << endl;
        return -1;
    }

    // 4.2创建编码器上下文
    AVCodecContext *codec_context = avcodec_alloc_context3(codec);
    if (NULL == codec_context) {
        cout << "avcodec_alloc_context3 failed." << endl;
        return -1;
    }


    // 4.3配置编码器参数
    // vc->flags           |= AV_CODEC_FLAG_GLOBAL_HEADER;
    codec_context->codec_id = codec->id;
    codec_context->thread_count = 16;

    // 压缩后每秒视频的bit流 5M
    codec_context->bit_rate = 5 * 1024 * 1024;
    codec_context->width = WIDTH;
    codec_context->height = HEIGHT;
    codec_context->time_base = {1, fps};
    codec_context->framerate = {fps, 1};
    // 画面组的大小,多少帧一个关键帧
    codec_context->gop_size = 50;
    codec_context->max_b_frames = 0;
    codec_context->pix_fmt = AV_PIX_FMT_YUV420P;
    codec_context->qmin = 10;
    codec_context->qmax = 51;

    AVDictionary *codec_options = nullptr;
    //(baseline | high | high10 | high422 | high444 | main)
//    av_dict_set(&codec_options, "profile", "baseline", 0);
//    av_dict_set(&codec_options, "preset", "superfast", 0);
//    av_dict_set(&codec_options, "tune", "zerolatency", 0);
    AVDictionary* decoderOptions = nullptr;
    av_dict_set(&decoderOptions, "threads", "auto", 0);
    av_dict_set(&decoderOptions, "gpu", "cuda", 0);

//
//    if (codec->id == AV_CODEC_ID_H264) {
//        av_dict_set(&codec_options, "preset", "medium", 0);
//        av_dict_set(&codec_options, "tune", "zerolatency", 0);
//        av_dict_set(&codec_options, "rc", "cbr", 0);
//    }
    // 4.4打开编码器上下文
    ret_code = avcodec_open2(codec_context, codec, &codec_options);
    if (0 != ret_code) {

        return -1;
    }

    videoFile = std::ofstream("video.h264", std::ios::binary);


    dai::Pipeline pipeline;
    //定义左相机
    auto mono = pipeline.create<dai::node::ColorCamera>();
    mono->setBoardSocket(dai::CameraBoardSocket::RGB);

    //定义输出
    auto xlinkOut = pipeline.create<dai::node::XLinkOut>();
    xlinkOut->setStreamName("rgb");

    //相机和输出链接
    mono->video.link(xlinkOut->input);;
    //结构推送相机
    dai::Device device(pipeline);
    //取帧显示
    auto queue = device.getOutputQueue("rgb", 1);//maxsize 代表缓冲数据


    while (1) {

        auto image = queue->get<dai::ImgFrame>();

        auto frame = image->getCvFrame();

        memset(&pack, 0, sizeof(pack));

        in_data[0] = frame.data;
        // 一行(宽)数据的字节数
        in_size[0] = frame.cols * frame.elemSize();
        int h = sws_scale(sws_context, in_data, in_size, 0, frame.rows,
                          yuv->data, yuv->linesize);
        if (h <= 0) { return -1; }

        // h264编码
        yuv->pts = vpts;
        vpts++;

        int ret_code = avcodec_send_frame(codec_context, yuv);
        if (0 != ret_code) { return -1; }

        ret_code = avcodec_receive_packet(codec_context, &pack);

        if (0 != ret_code || pack.buf != nullptr) {//
            cout << "avcodec_receive_packet." << endl;

        } else {
            cout << "avcodec_receive_packet contiune." << endl;
            return -1;
        }
        //写入文件

        videoFile.write((char *) (pack.data), pack.size);

    }
    return 0;
}
使用ffplay 播放h264文件,感觉有问题,cpu占比还是比较高,待研究手册

