最近在跟着大神学习vue3,学习过程中遇到各种问题,简直跟几年前学习vue2时一样的不知所措。
认识vite_vue3 初始化项目到打包:http://t.csdn.cn/B3bwC

为了方便,我是直接在stepin-template项目的基础上操作的,省略了上面的几个步骤。在使用过程中,还是会遇到各种问题:
效果图如下:

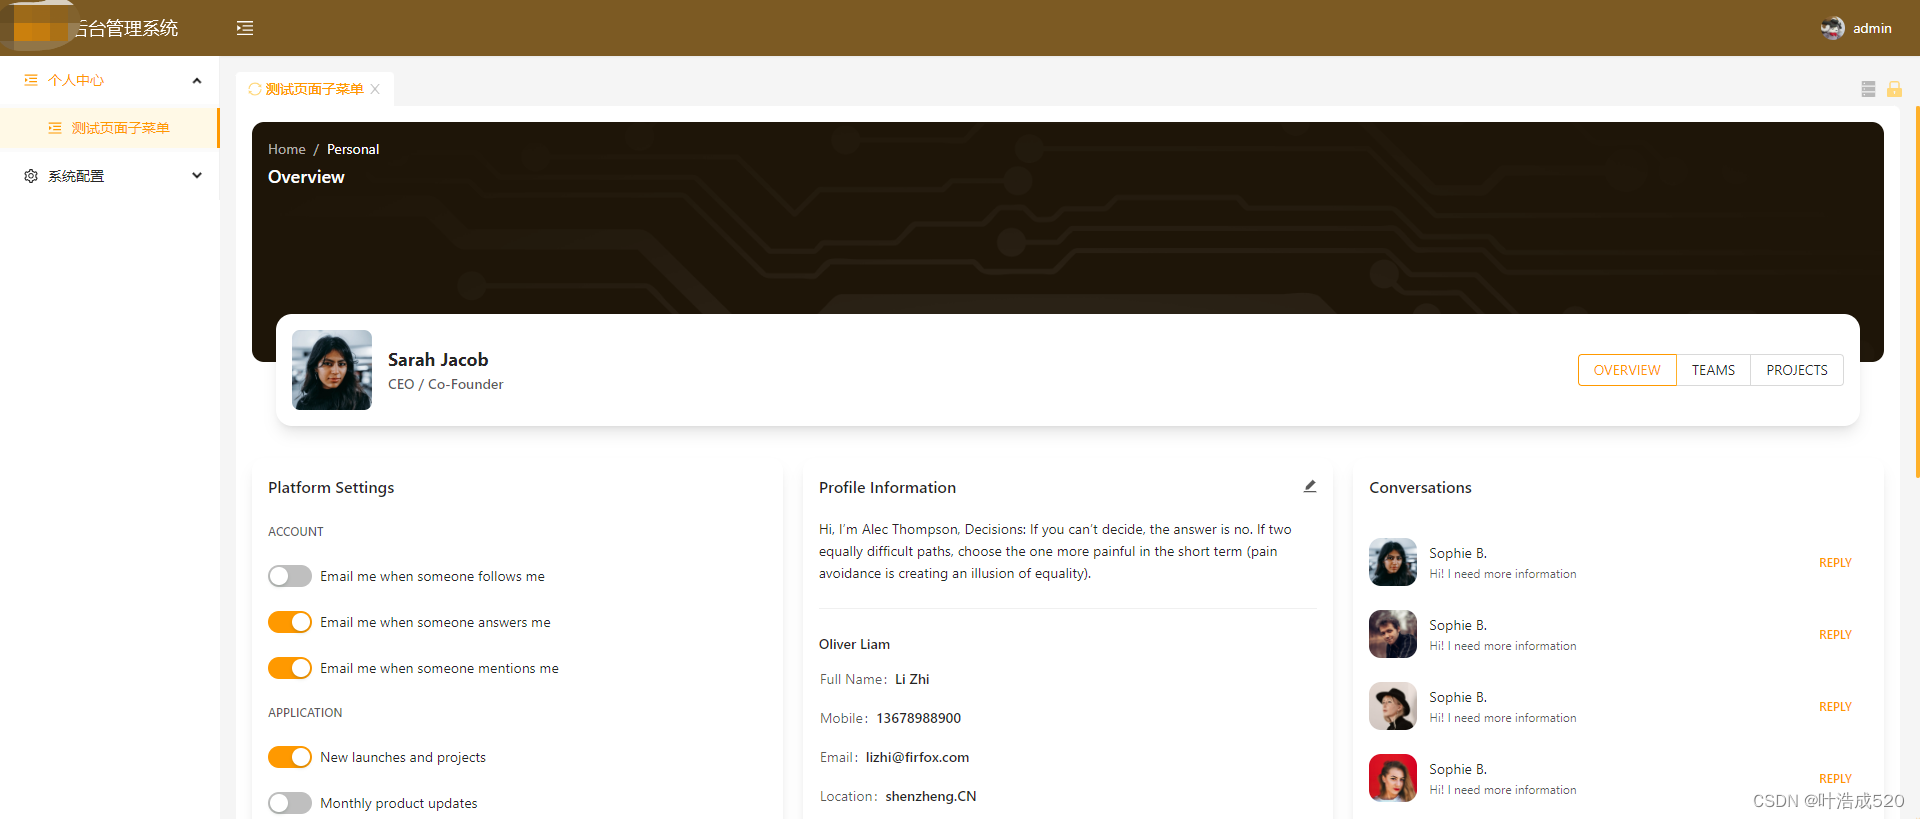
下面汇总一下遇到的问题,有不对的地方请指正。感谢!!!
1.添加环境变量——.env .env.developmet .env.test
1.1 vue2中的环境变量
在vue2中编写项目时,有三种环境,开发环境(.env.development)+测试环境(.env.test)+生产环境(.env)
1.1.1 .env.xx文件中变量的命名方式
以.env.development文件为例:
NODE_ENV = development
VUE_APP_API_BASE_URL = http://xxxx:5572
VUE_APP_API_BASE_LOGIN = http://xxxx:5572
VUE_APP_API_HREF_URL = http://xxxx:8894
1.1.2 package.json中的启动方式
对应的在package.json文件中也有相应的触发方式:
"scripts": {
  "serve": "vue-cli-service serve",
  "test": "vue-cli-service serve --mode test",
  "build": "vue-cli-service build",
  "build:test": "vue-cli-service build --mode test"
},
1.1.3 环境变量的使用——process.env.xxx
1.2 vue3中的环境变量
相对应的vue3中也有同样的环境变量:开发环境(.env.development)+测试环境(.env.test)+生产环境(.env)
区别如下:
1.2.1 .env.xx文件中变量的命名方式
以.env.development文件为例:
NODE_ENV=development
VITE_BASE_URL=https://xxxx:5572
VITE_BASE_LOGIN=https://xxxx:5572
VITE_BASE_INFO=https://xxxx:5572
定义变量必须以VITE开头,因为我是用的vite,如果你用vue3不用vite就太亏了,vite的运行速度简直是秒开。
1.2.2 package.json中的启动方式
对应的在package.json文件中也有相应的触发方式:
"scripts": {
  "dev": "vite",
  "build": "vue-tsc --noEmit && vite build",
  "build:test": "vue-tsc --noEmit && vite build --mode test",
},
1.2.3 环境变量的使用——import.meta.env.xxx
2.自行封装request.ts文件
stepin-template项目上是有http的封装好的请求文件的,但是我不太懂,因此有些问题不知道从何下手,所以自行封装一个request.ts文件,内容如下:
import axios, { AxiosRequestConfig, AxiosInstance, AxiosResponse } from 'axios';
import router from "../router";
import Cookie from 'js-cookie'
import {message} from 'ant-design-vue';
const xsrfHeaderName = 'Authorization'
// 进度条
import nprogress from "nprogress";
import "nprogress/nprogress.css";
const service: AxiosInstance = axios.create({
  baseURL: import.meta.env.VITE_BASE_URL, // URL地址
  timeout: 120 * 1000, // 超时时间
});
// 添加请求拦截器
service.interceptors.request.use(
  (config: AxiosRequestConfig) => {
    // 在发送请求之前做些什么
    nprogress.start();
    const { url, xsrfCookieName, headers } = config;
    if (
      headers.Authorization &&
      xsrfCookieName &&
      !Cookie.get(xsrfCookieName)
    ) {
      message.warning('认证 token 已过期,请重新登录');
    }
    if (!headers.__tenant) {
      config.headers['Authorization'] = Cookie.get(xsrfHeaderName);
    } else {
      delete config.headers.Authorization;
    }
    return Promise.resolve(config);
  },
  (error: any) => {
    // 处理请求错误
    return Promise.reject(error);
  },
);

// 添加响应拦截器
service.interceptors.response.use(
  (response: AxiosResponse<any>) => {
    // 对响应数据做点什么
    const res = response.data;
    console.log('response:', res);
    if (res.status == 401) {
      localStorage.removeItem("xsrfHeaderName");
      router.replace({ path: "/login" });
      nprogress.done();
      return Promise.reject(res);
    }else{
      nprogress.done();
      return Promise.resolve(res);
    }
  },
  (error: any) => {
    // 处理响应错误
    return Promise.reject(error);
  },
);
export default service;
其他页面的使用:
2.1引入request.ts文件
import request from './request'; 注意不要在文件尾部添加.ts,否则会报错。
2.2 以login登录接口为例,代码应当如下:
import qs from 'querystring';
export async function login(username, password, tenant) {
  const params = {
    username: username,
    password: password,
  };
  return request({
    headers: {
        'Content-Type': 'application/x-www-form-urlencoded'
    },
    method: 'post',
    url: apiObj.LOGIN,//这个是登录的接口地址,改成自己项目的即可
    data: qs.stringify(params)
})
}
注意上面代码中,关于修改headers请求的content-type的方式,这个经常会出现在formData格式的数据中,默认的基本上都是application/json。
由于我这边的登录接口是post的请求方式,而入参是formData的形式,因此我通过qs进行了对象参数的转化。也就是上面代码中的qs.stringify(params)。
3.添加setAuthorization checkAuthorization removeAuthorization
function setAuthorization(auth){
  Cookie.set(xsrfHeaderName, 'Bearer ' + auth.token, {
    expires: auth.expireAt * 1000,
  });
}
function removeAuthorization(){
  Cookie.remove(xsrfHeaderName);
}
function checkAuthorization(){
  if (Cookie.get(xsrfHeaderName)) {
    const token = Cookie.get(xsrfHeaderName);
    if (token ) {
        return true
    }
 }
}
export default {
  setAuthorization,
  removeAuthorization,
  checkAuthorization,
};
页面上的使用:
import http from '@/store/http';
http.setAuthorization({
  token: xxxx,
  expireAt: new Date(new Date().getTime() + xxxx),
});
http.removeAuthorization();
http.checkAuthorization()
4.修改accout.ts的vuex文件——用于存储用户信息和权限等
直接上代码:
import { defineStore } from 'pinia';
import http from './http';
import { Response } from '@/types';
import { useAuthStore } from '@/plugins';
import { applicationConfiguration } from '@/utils/user';
import { GetUserInfo } from '@/services/storehouse/common';
export interface Profile {
  account: Account;
  permissions: string[];
  role: string;
}
export interface Account {
  username: string;
  avatar: string;
  gender: number;
}
export function handlePermissions(obj) {
  let permissions = [];
  if (!obj) {
    return permissions;
  }
  permissions = Object.keys(obj).map((x) => {
    return {
      id: x,
      operation: [],
    };
  });
  return permissions;
}
export type TokenResult = {
  token: string;
  expires: number;
};
export const useAccountStore = defineStore('account', {
  state() {
    return {
      account: {} as Account,
      permissions: [] as string[],
      role: '',
      logged: true,
    };
  },
  actions: {
    async logout() {
      return new Promise<boolean>((resolve) => {
        localStorage.removeItem('stepin-menu');
        http.removeAuthorization();
        this.logged = false;
        resolve(true);
      });
    },
    async profile(callback) {
      applicationConfiguration()
        .then((res) => {
          const data = res.data;
          data.currentUser.tenantName = data.currentTenant.name;
          let permissions = handlePermissions(data.auth.grantedPolicies);
          const { setAuthorities } = useAuthStore();
          this.permissions = permissions;
          this.role = data.currentUser.roles;
          GetUserInfo().then((res) => {
            if (res.code == 1) {
              this.account = {
                ...data.currentUser,
                headPhoto: res.data?.extraProperties?.HeadPhoto,
              };
              setAuthorities(permissions);
              callback && callback('success');
            }
          });
        })
        .catch(() => {
          callback && callback('error');
        });
    },
    setLogged(logged: boolean) {
      this.logged = logged;
    },
  },
});
页面上的使用:
import { message } from 'ant-design-vue';
import { useRouter } from 'vue-router';
setup(){
	const { profile } = useAccountStore();
	const router = useRouter();
	profile((res) => {
	  if (res == 'success') {
	    message.success('登录成功', 3);
	    router.push('/test');//页面跳转到测试页面
	  }
	}).finally(() => {
	//
	});
}
5.编写登录页面
5.1 template代码如下:
<template>
  <div class="common-layout">
    <div class="login_box">
      <div class="login_left">
        <img src="../../assets/loginlogo.png" alt="" />
      </div>
      <div class="login_right">
        <div class="top">
          <div class="header">
            <span class="title">后台管理系统</span>
          </div>
        </div>
        <div class="login">
          <a-form @finish="onSubmit" :model="form">
            <a-alert
              type="error"
              :closable="true"
              v-show="error"
              :message="error"
              showIcon
              style="margin-bottom: 24px"
            />
            <a-form-item :rules="[{ required: true, message: '请输入账户名' }]" name="username">
              <a-input autocomplete="autocomplete" size="large" placeholder="账户名" v-model:value="form.username">
                <template #prefix><user-outlined /></template>
              </a-input>
            </a-form-item>
            <a-form-item :rules="[{ required: true, message: '请输入密码' }]" name="password">
              <a-input
                size="large"
                placeholder="密码"
                autocomplete="autocomplete"
                type="password"
                v-model:value="form.password"
              >
                <template #prefix><lock-outlined /></template>
              </a-input>
            </a-form-item>
            <a-form-item>
              <a-button
                :loading="loading"
                style="width: 100%; margin-top: 24px"
                size="large"
                htmlType="submit"
                type="primary"
                class="login_btn"
                >登录</a-button
              >
            </a-form-item>
          </a-form>
        </div>
      </div>
    </div>
  </div>
</template>
5.2 script代码如下:
<script lang="ts">
  import { defineComponent, getCurrentInstance, reactive, ref } from 'vue';
  import { useAccountStore } from '@/store';
  import { login } from '@/utils/user';
  import http from '@/store/http';
  import { message } from 'ant-design-vue';
  import { useRouter } from 'vue-router';
  export interface LoginFormProps {
    username: string;
    password: string;
  }
  export default defineComponent({
    setup() {
      const loading = ref(false);
      const error = ref('');
      const form = reactive({
        username: undefined,
        password: undefined,
        tenant: undefined,
      });
      const onSubmit = function () {
        http.removeAuthorization();
        loading.value = true;
        login(form.username, form.password, form.tenant)
          .then(afterLogin)
          .finally(() => {
            loading.value = false;
          });
      };
      const router = useRouter();
      const { profile } = useAccountStore();
      function afterLogin(res) {
        const loginRes = res;
        if (loginRes) {
          http.setAuthorization({
            token: loginRes.access_token,
            expireAt: new Date(new Date().getTime() + loginRes.expires_in),
          });

          if (http.checkAuthorization()) {
            profile((res) => {
              if (res == 'success') {
                message.success('登录成功', 3);
                router.push('/test');
              }
            }).finally(() => {
              loading.value = false;
            });
          }
        } else {
          error.value = loginRes.message;
        }
      }
      return {
        onSubmit,
        error,
        form,
        loading,
      };
    },
  });
</script>
完成!!!多多积累,多多收获!
