在微服务应用中,考虑到技术栈的组合,团队人员的开发水平,以及易维护性等因素,一个比较通用的做法是,利用 AOP 技术 + 自定义注解实现 对特定的方法或接口进行限流。
下面基于这个思路来分别介绍下几种常用的限流方案的实现:
- 基于 guava 限流实现(单机版)
- 基于 sentinel 限流实现(分布式版)
- 基于 redis+lua 限流实现(分布式版)
- 网关限流(分布式版)
- 自定义 starter 限流实现
1. 基于 guava 限流实现(单机版)
guava 为谷歌开源的一个比较实用的组件,利用这个组件可以帮助开发人员完成常规的限流操作,接下来看具体的实现步骤
1、引入依赖:
<dependency>
    <groupId>com.google.guava</groupId>
    <artifactId>guava</artifactId>
    <version>30.1-jre</version>
</dependency>
2、自定义限流注解
自定义一个限流用的注解,后面在需要限流的方法或接口上面只需添加该注解即可
@Documented
@Target(value = ElementType.METHOD)
@Retention(value = RetentionPolicy.RUNTIME)
public @interface GuavaLimitRateAnnotation {
    // 限制类型
    String limitType();

    // 每秒 5 个请求
    double limitCount() default 5d;
}
3、限流 AOP 类
通过AOP前置通知的方式拦截添加了上述自定义限流注解的方法,解析注解中的属性值,并以该属性值作为 guava 提供的限流参数,该类为整个实现的核心所在
@Aspect
@Component
public class GuavaLimitRateAspect {

    private static Logger logger = LoggerFactory.getLogger(GuavaLimitRateAspect.class);

    @Before("execution(@GuavaLimitRateAnnotation * *(..))")
    public void limit(JoinPoint joinPoint) {
        // 1.获取当前方法
        Method currentMethod = getCurrentMethod(joinPoint);
        if (Objects.isNull(currentMethod)) {
            return;
        }
        // 2.从方法注解定义上获取限流的类型
        String limitType = currentMethod.getAnnotation(GuavaLimitRateAnnotation.class).limitType();
        double limitCount = currentMethod.getAnnotation(GuavaLimitRateAnnotation.class).limitCount();
        // 3.使用guava的令牌桶算法获取一个令牌,获取不到先等待
        RateLimiter rateLimiter = RateLimitHelper.getRateLimiter(limitType, limitCount);
        boolean b = rateLimiter.tryAcquire();
        if (b) {
            System.out.println("获取到令牌");
        } else {
            HttpServletResponse resp = ((ServletRequestAttributes) RequestContextHolder.getRequestAttributes()).getResponse();
            JSONObject jsonObject = new JSONObject();
            jsonObject.put("success",false);
            jsonObject.put("msg","限流中");
            try {
                output(resp, jsonObject.toJSONString());
            } catch (Exception e) {
                logger.error("error,e:{}", e);
            }
        }
    }

    public void output(HttpServletResponse response, String msg) throws IOException {
        response.setContentType("application/json;charset=UTF-8");
        ServletOutputStream outputStream = null;
        try {
            outputStream = response.getOutputStream();
            outputStream.write(msg.getBytes("UTF-8"));
        } catch (IOException e) {
            e.printStackTrace();
        } finally {
            assert outputStream != null;
            outputStream.flush();
            outputStream.close();
        }
    }

    private Method getCurrentMethod(JoinPoint joinPoint) {
        Method[] methods = joinPoint.getTarget().getClass().getMethods();
        Method target = null;
        for (Method method : methods) {
            if (method.getName().equals(joinPoint.getSignature().getName())) {
                target = method;
                break;
            }
        }
        return target;
    }

}
其中限流的核心 API 即为 RateLimiter 这个对象,涉及到的 RateLimitHelper 类如下:
public class RateLimitHelper {

    private RateLimitHelper(){}

    private static Map<String, RateLimiter> rateMap = new HashMap<>();

    public static RateLimiter getRateLimiter(String limitType, double limitCount ){
        RateLimiter rateLimiter = rateMap.get(limitType);
        if(rateLimiter == null){
            rateLimiter = RateLimiter.create(limitCount);
            rateMap.put(limitType,rateLimiter);
        }
        return rateLimiter;
    }

}
4、测试
@RestController
@RequestMapping("/limit")
public class LimitController {

    @GetMapping("/limitByGuava")
    @GuavaLimitRateAnnotation(limitType = "测试限流", limitCount = 1)
    public String limitByGuava() {
        return "limitByGuava";
    }

}
在接口中为了模拟出效果,我们将参数设置的非常小,即QPS为1,可以预想当每秒请求超过1时将会出现被限流的提示,启动工程并验证接口,每秒1次的请求,可以正常得到结果,效果如下:

快速刷接口,将会看到下面的效果:

2. 基于 sentinel 限流实现(分布式版)
sentinel 通常是需要结合 springcloud-alibaba 框架一起实用的,而且与框架集成之后,可以配合控制台一起使用达到更好的效果,实际上,sentinel 官方也提供了相对原生的 SDK 可供使用,接下来就以这种方式进行整合
1、引入依赖
<dependency>
    <groupId>com.alibaba.csp</groupId>
    <artifactId>sentinel-core</artifactId>
    <version>1.8.0</version>
</dependency>
2、自定义限流注解
@Documented
@Target(value = ElementType.METHOD)
@Retention(value = RetentionPolicy.RUNTIME)
public @interface SentinelLimitRateAnnotation {

    // 限制类型
    String resourceName();

    // 每秒 5 个
    int limitCount() default 5;

}
3、自定义AOP类实现限流
该类的实现思路与上述使用guava类似,不同的是,这里使用的是sentinel原生的限流相关的API,对此不够属性的可以查阅官方的文档进行学习,这里就不展开来说了
@Aspect
@Component
public class SentinelLimitRateAspect {

    @Pointcut(value = "@annotation(com.hcr.sbes.limit.sentinel.SentinelLimitRateAnnotation)")
    public void rateLimit() {

    }

    @Around("rateLimit()")
    public Object around(ProceedingJoinPoint joinPoint) {
        // 1.获取当前方法
        Method currentMethod = getCurrentMethod(joinPoint);
        if (Objects.isNull(currentMethod)) {
            return null;
        }
        // 2.从方法注解定义上获取限流的类型
        String resourceName = currentMethod.getAnnotation(SentinelLimitRateAnnotation.class).resourceName();
        if(StringUtils.isEmpty(resourceName)){
            throw new RuntimeException("资源名称为空");
        }
        int limitCount = currentMethod.getAnnotation(SentinelLimitRateAnnotation.class).limitCount();
        // 3.初始化规则
        initFlowRule(resourceName,limitCount);
        Entry entry = null;
        Object result = null;
        try {
            entry = SphU.entry(resourceName);
            try {
                result = joinPoint.proceed();
            } catch (Throwable throwable) {
                throwable.printStackTrace();
            }
        } catch (BlockException ex) {
            // 资源访问阻止,被限流或被降级,在此处进行相应的处理操作
            System.out.println("blocked");
            return "被限流了";
        } catch (Exception e) {
            Tracer.traceEntry(e, entry);
        } finally {
            if (entry != null) {
                entry.exit();
            }
        }
        return result;
    }

    private static void initFlowRule(String resourceName,int limitCount) {
        List<FlowRule> rules = new ArrayList<>();
        FlowRule rule = new FlowRule();
        //设置受保护的资源
        rule.setResource(resourceName);
        //设置流控规则 QPS
        rule.setGrade(RuleConstant.FLOW_GRADE_QPS);
        //设置受保护的资源阈值
        rule.setCount(limitCount);
        rules.add(rule);
        //加载配置好的规则
        FlowRuleManager.loadRules(rules);
    }

    private Method getCurrentMethod(JoinPoint joinPoint) {
        Method[] methods = joinPoint.getTarget().getClass().getMethods();
        Method target = null;
        for (Method method : methods) {
            if (method.getName().equals(joinPoint.getSignature().getName())) {
                target = method;
                break;
            }
        }
        return target;
    }

}
4、测试接口
@GetMapping("/limitBySentinel")
@SentinelLimitRateAnnotation(resourceName = "测试限流2", limitCount = 1)
public String limitBySentinel() {
    return "limitBySentinel";
}
3. 基于 redis+lua 限流实现(分布式版)
redis是线程安全的,天然具有线程安全的特性,支持原子性操作,限流服务不仅需要承接超高QPS,还要保证限流逻辑的执行层面具备线程安全的特性,利用Redis这些特性做限流,既能保证线程安全,也能保证性能
基于redis的限流实现完整流程如下图:
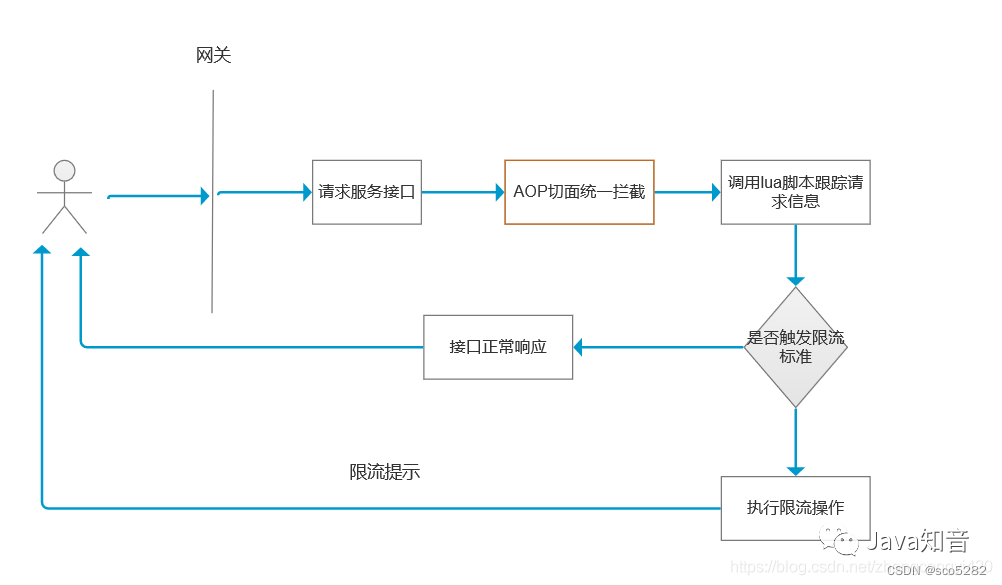
结合上面的流程图,这里梳理出一个整体的实现思路:
- 编写 lua 脚本,指定入参的限流规则,比如对特定的接口限流时,可以根据某个或几个参数进行判定,调用该接口的请求,在一定的时间窗口内监控请求次数;
- 既然是限流,最好能够通用,可将限流规则应用到任何接口上,那么最合适的方式就是通过自定义注解形式切入;
- 提供一个配置类,被 spring 的容器管理,redisTemplate 中提供了 DefaultRedisScript这个 bean;
- 提供一个能动态解析接口参数的类,根据接口参数进行规则匹配后触发限流;
1、引入 redis 依赖
<dependency>
    <groupId>org.springframework.boot</groupId>
    <artifactId>spring-boot-starter-data-redis</artifactId>
</dependency>
2、自定义注解
@Documented
@Target(value = ElementType.METHOD)
@Retention(value = RetentionPolicy.RUNTIME)
public @interface RedisLimitAnnotation {

    /**
     * key
     */
    String key() default "";

    /**
     * Key的前缀
     */
    String prefix() default "";

    /**
     * 限流时间内限流次数
     */
    int count();

    /**
     * 限流时间,单位秒
     */
    int period();

    /**
     * 限流的类型(接口、请求ip、用户自定义key)
     */
    LimitTypeEnum limitType() default LimitTypeEnum.INTERFACE;

}
LimitTypeEnum:枚举类,定义限流类型
@Getter
public enum LimitTypeEnum {

    // 默认限流策略,针对某一个接口进行限流
    INTERFACE
    ,

    // 根据IP地址进行限流
    IP
    ,

    // 自定义的Key
    CUSTOMER
    ;

}
3、自定义 redis 配置类:解决 redis 序列化与读取 lua 脚本
@Configuration
public class RedisConfiguration {

    @Bean
    public DefaultRedisScript<Number> redisLuaScript() {
        DefaultRedisScript<Number> redisScript = new DefaultRedisScript<>();
        redisScript.setScriptSource(new ResourceScriptSource(new ClassPathResource("lua\\limit.lua")));
        // 设置lua脚本返回值类型 需要同lua脚本中返回值一致
        redisScript.setResultType(Number.class);
        return redisScript;
    }

    @Bean("redisTemplate")
    public RedisTemplate<String, Object> redisTemplate(RedisConnectionFactory redisConnectionFactory) {
        RedisTemplate<String, Object> redisTemplate = new RedisTemplate<>();
        redisTemplate.setConnectionFactory(redisConnectionFactory);
        Jackson2JsonRedisSerializer jackson2JsonRedisSerializer = new Jackson2JsonRedisSerializer(Object.class);
        //设置value的序列化方式为JSOn
        redisTemplate.setValueSerializer(jackson2JsonRedisSerializer);
        //设置key的序列化方式为String
        redisTemplate.setKeySerializer(new StringRedisSerializer());
        redisTemplate.setHashKeySerializer(new StringRedisSerializer());
        redisTemplate.setHashValueSerializer(jackson2JsonRedisSerializer);
        redisTemplate.afterPropertiesSet();
        return redisTemplate;
    }

}
4、自定义限流 AOP 类:进行限流操作
@Aspect
@Component
public class RedisLimitAspect {

    private static final Logger logger = LoggerFactory.getLogger(RedisLimitAspect.class);

    @Autowired
    private RedisTemplate<String, Object> redisTemplate;

    @Autowired
    private DefaultRedisScript<Number> redisLuaScript;

    @Pointcut(value = "@annotation(com.hcr.sbes.limit.redis.RedisLimitAnnotation)")
    public void rateLimit() {

    }

    @Around("rateLimit()")
    public Object interceptor(ProceedingJoinPoint joinPoint) throws Throwable {
        MethodSignature signature = (MethodSignature) joinPoint.getSignature();
        Method method = signature.getMethod();
        RedisLimitAnnotation rateLimit = method.getAnnotation(RedisLimitAnnotation.class);
        if (Objects.isNull(rateLimit)) {
            return joinPoint.proceed();
        }
        String key = getKeyByLimitType(rateLimit, signature);
        //调用lua脚本,获取返回结果,这里即为请求的次数
        Number number = redisTemplate.execute(redisLuaScript, Collections.singletonList(key), rateLimit.count(), rateLimit.period());
        if (number != null && number.intValue() != 0 && number.intValue() <= rateLimit.count()) {
            logger.info("限流时间段内访问了第:{} 次", number);
            return joinPoint.proceed();
        }
        throw new RuntimeException("访问频率过快,被限流了");
    }

    /**
     * redis key 有三种
     * 1. 自定义Key: prefix + ":" + key (key 不能为空)
     * 2. 接口key:prefix + ":" + 接口全类名
     * 3. Ip key:prefix + ":" + ip + "-" + 接口全类名
     *
     * @author zzc
     * @date 2023/7/20 16:33
     * @param redisLimitAnnotation
     * @param signature
     * @return java.lang.String
     */
    private String getKeyByLimitType(RedisLimitAnnotation redisLimitAnnotation, MethodSignature signature) {
        String key = "";
        LimitTypeEnum limitTypeEnum = redisLimitAnnotation.limitType();
        String prefix = redisLimitAnnotation.prefix();
        if (StringUtils.isNotBlank(prefix)) {
            key = prefix + ":";
        }
        if (LimitTypeEnum.CUSTOMER == limitTypeEnum) {
            // 自定义
            String tempKey = redisLimitAnnotation.key();
            if (StringUtils.isBlank(tempKey)) {
                throw new RuntimeException("自定义类型下 key 不能为空!");
            }
            return key + tempKey;
        }
        Method method = signature.getMethod();
        Class<?> targetClass = method.getDeclaringClass();
        String classFullName = targetClass.getName() + "-" + method.getName();
        if (LimitTypeEnum.INTERFACE == limitTypeEnum) {
            return key + classFullName;
        }
        // IP
        HttpServletRequest request = ((ServletRequestAttributes) RequestContextHolder.getRequestAttributes()).getRequest();
        String ipAddress = IpUtil.getIpAddr(request);
        return key + ipAddress + "-" + classFullName;
    }

}
IpUtil:获取 ip
public class IpUtil {

    public static String getIpAddr(HttpServletRequest request) {
        String ip = request.getHeader("x-forwarded-for");
        if (ip == null || ip.length() == 0 || "unknown".equalsIgnoreCase(ip)) {
            ip = request.getHeader("Proxy-Client-IP");
        }
        if (ip == null || ip.length() == 0 || "unknown".equalsIgnoreCase(ip)) {
            ip = request.getHeader("WL-Proxy-Client-IP");
        }
        if (ip == null || ip.length() == 0 || "unknown".equalsIgnoreCase(ip)) {
            ip = request.getHeader("HTTP_CLIENT_IP");
        }
        if (ip == null || ip.length() == 0 || "unknown".equalsIgnoreCase(ip)) {
            ip = request.getHeader("HTTP_X_FORWARDED_FOR");
        }
        if (ip == null || ip.length() == 0 || "unknown".equalsIgnoreCase(ip)) {
            ip = request.getRemoteAddr();
        }
        // 本机访问
        if ("localhost".equalsIgnoreCase(ip) || "127.0.0.1".equalsIgnoreCase(ip) || "0:0:0:0:0:0:0:1".equalsIgnoreCase(ip)){
            // 根据网卡取本机配置的IP
            InetAddress inet;
            try {
                inet = InetAddress.getLocalHost();
                ip = inet.getHostAddress();
            } catch (UnknownHostException e) {
                e.printStackTrace();
            }
        }
        // 对于通过多个代理的情况,第一个IP为客户端真实IP,多个IP按照','分割
        //"***.***.***.***".length() = 15
        if (null != ip && ip.length() > 15) {
            if (ip.indexOf(",") > 15) {
                ip = ip.substring(0, ip.indexOf(","));
            }
        }
        return ip;
    }

}
该类要做的事情和上面的两种限流措施类似,不过在这里核心的限流是通过读取lua脚步,通过参数传递给lua脚步实现的
5、自定义 lua 脚本:保证redis中操作原子性
在工程的 resources/lua 目录下,添加如下的 lua 脚本
-- 定义变量:redis中key值、规定的时间段内访问次数、redis中过期时间、当前访问次数

local key = KEYS[1]
local limit = tonumber(ARGV[1])
local count = tonumber(ARGV[2])
local current = tonumber(redis.call('get', key) or "0")

if current + 1 > limit then
  return 0
end
   -- 没有超阈值,将当前访问数量+1,
   current = redis.call("INCRBY", key, "1")
if tonumber(current) == 1 then
   -- 设置过期时间
   redis.call("expire", key, count)
end
   return tonumber(current)
6、测试接口
@RestController
@RequestMapping("/limit")
public class LimitController {

    @GetMapping("/limitByRedis")
    @RedisLimitAnnotation(key = "limitByRedis", period = 1, count = 1, limitType = LimitTypeEnum.IP)
    public String limitByRedis() {
        return "limitByRedis";
    }

}
JAVA自定义注解实现接口/ip限流
4. 基于网关 gateway 限流(分布式版)
gateway:使用的是 Redis 加 lua 脚本的方式实现的令牌桶
暂不作介绍
5. 自定义starter限流实现
上面通过案例介绍了几种常用的限流实现,可以看到这些限流的实现都是在具体的工程模块中嵌入的。
事实上,在真实的微服务开发中,一个项目可能包含了众多的微服务模块,为了减少重复造轮子,避免每个微服务模块中单独实现,可以考虑将限流的逻辑实现封装成一个 SDK,即作为一个 springboot 的 starter 的方式被其他微服务模块进行引用即可。
这也是目前很多生产实践中比较通用的做法,接下来看看具体的实现吧。
5.1 准备
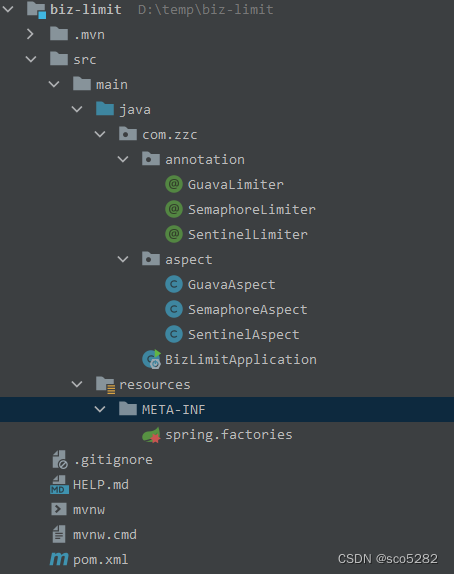
创建一个空的springboot工程,工程目录结构如下图,目录说明:
- annotation:存放自定义的限流相关的注解;
- aspect:存放不同的限流实现,比如基于guava的aop,基于sentinel的aop实现等;
- spring.factories:自定义待装配的aop实现类
5.2 代码实战
5.2.1 导入基础的依赖
这里包括如下几个必须的依赖:
- spring-boot-starter;
- guava;
- spring-boot-autoconfigure;
- sentinel-core;
<dependencies>
    <dependency>
        <groupId>org.springframework.boot</groupId>
        <artifactId>spring-boot-starter</artifactId>
    </dependency>
    <dependency>
        <groupId>org.springframework.boot</groupId>
        <artifactId>spring-boot-starter-web</artifactId>
    </dependency>
    <dependency>
        <groupId>org.aspectj</groupId>
        <artifactId>aspectjweaver</artifactId>
    </dependency>
    <dependency>
        <groupId>com.google.guava</groupId>
        <artifactId>guava</artifactId>
        <version>31.1-jre</version>
    </dependency>
    <dependency>
        <groupId>com.alibaba.csp</groupId>
        <artifactId>sentinel-core</artifactId>
        <version>1.8.0</version>
    </dependency>
    <dependency>
        <groupId>org.projectlombok</groupId>
        <artifactId>lombok</artifactId>
        <optional>true</optional>
    </dependency>
    <dependency>
        <groupId>com.alibaba</groupId>
        <artifactId>fastjson</artifactId>
        <version>1.2.78</version>
    </dependency>
</dependencies>

<!--springboot打包-->
<!--<build>
    <plugins>
        <plugin>
            <groupId>org.springframework.boot</groupId>
            <artifactId>spring-boot-maven-plugin</artifactId>
        </plugin>
    </plugins>
</build>-->

<!--maven打包-->
<build>
    <plugins>
        <plugin>
            <groupId>org.apache.maven.plugins</groupId>
            <artifactId>maven-compiler-plugin</artifactId>
            <version>3.8.1</version>
            <configuration>
                <source>1.8</source>
                <target>1.8</target>
            </configuration>
        </plugin>
    </plugins>
</build>
【注意】:这里需要替换成 maven 打包工具。
5.2.2 自定义注解
目前该SDK支持三种限流方式,即后续其他微服务工程中可以通过添加这3种注解即可实现限流,分别是基于guava的令牌桶,基于sentinel的限流,基于java自带的Semaphore限流,三个自定义注解类如下:
令牌桶:
@Target(value = ElementType.METHOD)
@Retention(value = RetentionPolicy.RUNTIME)
public @interface GuavaLimiter {

    int value() default 50;

}
Semaphore:
@Target(value = ElementType.METHOD)
@Retention(value = RetentionPolicy.RUNTIME)
public @interface SemaphoreLimiter {

    int value() default 50;

}
sentinel:
@Target(value = ElementType.METHOD)
@Retention(value = RetentionPolicy.RUNTIME)
public @interface SentinelLimiter {

    String resourceName();

    int limitCount() default 50;

}
5.2.3 限流实现 AOP 类
具体的限流在 AOP 中进行实现,思路和上一章节类似,即通过环绕通知的方式,先解析那些添加了限流注解的方法,然后解析里面的参数,进行限流的业务实现
基于 guava 的 aop 实现:
@Slf4j
@Aspect
@Component
public class GuavaAspect {

    private final Map<String, RateLimiter> rateLimiters = new ConcurrentHashMap<>();

    @Pointcut("@annotation(com.zzc.annotation.GuavaLimiter)")
    public void aspect() {
    }

    @Around(value = "aspect()")
    public Object around(ProceedingJoinPoint point) throws Throwable {
        log.debug("准备限流");
        Object target = point.getTarget();
        String targetName = target.getClass().getName();
        String methodName = point.getSignature().getName();
        Object[] arguments = point.getArgs();
        Class<?> targetClass = Class.forName(targetName);
        Class<?>[] argTypes = ReflectUtils.getClasses(arguments);
        Method method = targetClass.getDeclaredMethod(methodName, argTypes);
        // 获取目标method上的限流注解@Limiter
        GuavaLimiter limiter = method.getAnnotation(GuavaLimiter.class);
        RateLimiter rateLimiter = null;
        Object result = null;
        if (Objects.isNull(limiter)) {
            return point.proceed();
        }
        // 以 class + method + parameters为key,避免重载、重写带来的混乱
        String key = targetName + "." + methodName + Arrays.toString(argTypes);
        rateLimiter = rateLimiters.get(key);
        if (null == rateLimiter) {
            // 获取限定的流量
            // 为了防止并发
            rateLimiters.putIfAbsent(key, RateLimiter.create(limiter.value()));
            rateLimiter = rateLimiters.get(key);
        }
        boolean b = rateLimiter.tryAcquire();
        if(b) {
            log.debug("得到令牌,准备执行业务");
            return point.proceed();
        } else {
            HttpServletResponse resp = ((ServletRequestAttributes) RequestContextHolder.getRequestAttributes()).getResponse();
            JSONObject jsonObject = new JSONObject();
            jsonObject.put("success",false);
            jsonObject.put("msg","限流中");
            try {
                output(resp, jsonObject.toJSONString());
            }catch (Exception e){
                e.printStackTrace();
            }
        }
        log.debug("退出限流");
        return result;
    }

    public void output(HttpServletResponse response, String msg) throws IOException {
        response.setContentType("application/json;charset=UTF-8");
        ServletOutputStream outputStream = null;
        try {
            outputStream = response.getOutputStream();
            outputStream.write(msg.getBytes("UTF-8"));
        } catch (IOException e) {
            e.printStackTrace();
        } finally {
            outputStream.flush();
            outputStream.close();
        }
    }
}
基于 Semaphore 的 aop 实现:
@Slf4j
@Aspect
@Component
public class SemaphoreAspect {

    private final Map<String, Semaphore> semaphores = new ConcurrentHashMap<>();

    @Pointcut("@annotation(com.zzc.annotation.SemaphoreLimiter)")
    public void aspect() {

    }

    @Around(value = "aspect()")
    public Object around(ProceedingJoinPoint point) throws Throwable {
        log.debug("进入限流aop");
        Object target = point.getTarget();
        String targetName = target.getClass().getName();
        String methodName = point.getSignature().getName();
        Object[] arguments = point.getArgs();
        Class<?> targetClass = Class.forName(targetName);
        Class<?>[] argTypes = ReflectUtils.getClasses(arguments);
        Method method = targetClass.getDeclaredMethod(methodName, argTypes);
        // 获取目标method上的限流注解@Limiter
        SemaphoreLimiter limiter = method.getAnnotation(SemaphoreLimiter.class);
        Object result = null;
        if (Objects.isNull(limiter)) {
            return point.proceed();
        }
        // 以 class + method + parameters为key,避免重载、重写带来的混乱
        String key = targetName + "." + methodName + Arrays.toString(argTypes);
        // 获取限定的流量
        Semaphore semaphore = semaphores.get(key);
        if (null == semaphore) {
            semaphores.putIfAbsent(key, new Semaphore(limiter.value()));
            semaphore = semaphores.get(key);
        }
        try {
            semaphore.acquire();
            result = point.proceed();
        } finally {
            if (null != semaphore) {
                semaphore.release();
            }
        }
        log.debug("退出限流");
        return result;
    }

}
基于 sentinel 的 aop 实现:
@Aspect
@Component
public class SentinelAspect {

    @Pointcut(value = "@annotation(com.zzc.annotation.SentinelLimiter)")
    public void rateLimit() {

    }

    @Around("rateLimit()")
    public Object around(ProceedingJoinPoint joinPoint) {
        //1、获取当前的调用方法
        Method currentMethod = getCurrentMethod(joinPoint);
        if (Objects.isNull(currentMethod)) {
            return null;
        }
        //2、从方法注解定义上获取限流的类型
        String resourceName = currentMethod.getAnnotation(SentinelLimiter.class).resourceName();
        if(StringUtils.isEmpty(resourceName)){
            throw new RuntimeException("资源名称为空");
        }
        int limitCount = currentMethod.getAnnotation(SentinelLimiter.class).limitCount();
        initFlowRule(resourceName,limitCount);

        Entry entry = null;
        Object result = null;
        try {
            entry = SphU.entry(resourceName);
            try {
                result = joinPoint.proceed();
            } catch (Throwable throwable) {
                throwable.printStackTrace();
            }
        } catch (BlockException ex) {
            // 资源访问阻止,被限流或被降级
            // 在此处进行相应的处理操作
            System.out.println("blocked");
            return "被限流了";
        } catch (Exception e) {
            Tracer.traceEntry(e, entry);
        } finally {
            if (entry != null) {
                entry.exit();
            }
        }
        return result;
    }

    private static void initFlowRule(String resourceName,int limitCount) {
        List<FlowRule> rules = new ArrayList<>();
        FlowRule rule = new FlowRule();
        //设置受保护的资源
        rule.setResource(resourceName);
        //设置流控规则 QPS
        rule.setGrade(RuleConstant.FLOW_GRADE_QPS);
        //设置受保护的资源阈值
        rule.setCount(limitCount);
        rules.add(rule);
        //加载配置好的规则
        FlowRuleManager.loadRules(rules);
    }

    private Method getCurrentMethod(JoinPoint joinPoint) {
        Method[] methods = joinPoint.getTarget().getClass().getMethods();
        Method target = null;
        for (Method method : methods) {
            if (method.getName().equals(joinPoint.getSignature().getName())) {
                target = method;
                break;
            }
        }
        return target;
    }

}
5.2.4 配置自动装配 AOP 实现
在resources目录下创建上述的spring.factories文件,内容如下,通过这种方式配置后,其他应用模块引入了当前的SDK的jar之后,就可以实现开箱即用了;
org.springframework.boot.autoconfigure.EnableAutoConfiguration=\
  com.zzc.aspect.GuavaAspect,\
  com.zzc.aspect.SemaphoreAspect,\
  com.zzc.aspect.SentinelAspect
5.2.5 将工程打成 jar 进行安装
mvn-install 命令
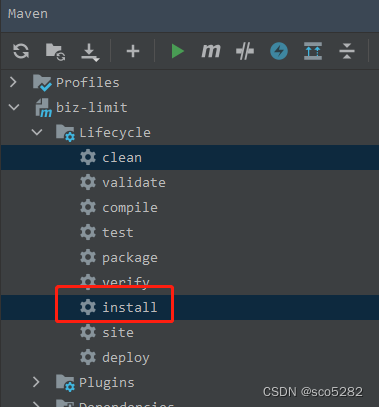
5.2.6 在其他的工程中引入上述 SDK
<dependency>
    <groupId>com.zzc</groupId>
    <artifactId>biz-limit</artifactId>
    <version>0.0.1-SNAPSHOT</version>
</dependency>
5.2.7 编写测试接口
@RestController
@RequestMapping("/limit")
public class LimitController {

    @GuavaLimiter(1)
    @GetMapping("/guavaLimiter")
    public String guavaLimiter(){
        return "guavaLimiter";
    }

}
上述通过starter的方式实现了一种更优雅的限流集成方式,也是生产中比较推荐的一种方式,不过当前的案例还比较粗糙,需要使用的同学还需根据自己的情况完善里面的逻辑,进一步的封装以期得到更好的效果。
