目录
1.CrawlSpider介绍
2.使用方法
(1)提取链接
(2)模拟使用
(3)提取连接
(4)注意事项
3.运行原理
4.Mysql
5.pymysql的使用步骤
6.数据入库
(1)settings配置参数
(2)管道配置
7.CrawlSpider案例:读书网数据入库
(1)案例分析
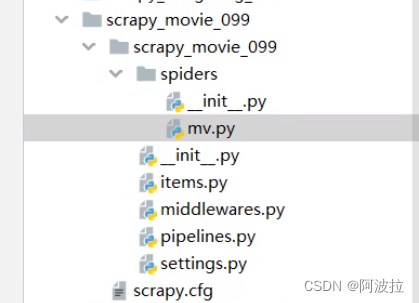
(2)项目结构
(3)items.py文件
(4)middlewares.py文件
(5)pipelines.py文件
(6)settings.py文件
(7)read.py文件
1.CrawlSpider介绍
- 继承自scrapy.Spider
- CrawlSpider可以定义规则,再解析html内容的时候,可以根据链接规则提取出指定的链接,然后再向这些链接发送请求
- 所以,如果有需要跟进链接的需求,意思就是爬取了网页之后,需要提取链接再次爬取,使用CrawlSpider是非常合适的
2.使用方法
(1)提取链接
链接提取器,在这里就可以写规则提取指定链接
scrapy.linkextractors.LinkExtractor(
allow = (), # 正则表达式 提取符合正则的链接
deny = (), # (不用)正则表达式 不提取符合正则的链接
allow_domains = (), #(不用)允许的域名
deny_domains = (), #(不用)不允许的域名
restrict_xpaths = (), # xpath,提取符合xpath规则的链接
restrict_css = () # 提取符合选择器规则的链接
)
(2)模拟使用
正则用法: links1 = LinkExtractor(allow=r'list_23_\d+\.html')
xpath用法:links2 = LinkExtractor(restrict_xpaths=r'//div[@class="x"]')
css用法: links3 = LinkExtractor(restrict_css='.x')
(3)提取连接
link.extract_links(response)
(4)注意事项
【注1】callback只能写函数名字符串, callback='parse_item'
【注2】在基本的spider中,如果重新发送请求,那里的callback写的是 callback=self.parse_item
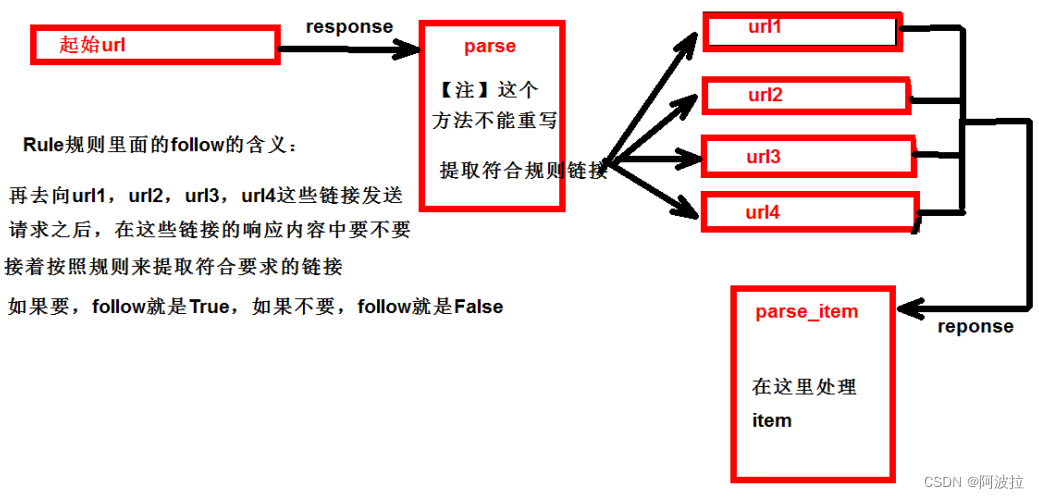
【注3】follow=true 是否跟进 就是按照提取连接规则进行提取
3.运行原理
4.Mysql
(1)下载(https://dev.mysql.com/downloads/windows/installer/5.7.html)
(2)安装(https://jingyan.baidu.com/album/d7130635f1c77d13fdf475df.html)
5.pymysql的使用步骤
1.pip install pymysql
2.pymysql.connect(host,port,user,password,db,charset)
3.conn.cursor()
4.cursor.execute()
6.数据入库
(1)settings配置参数
DB_HOST = '192.168.231.128'
DB_PORT = 3306
DB_USER = 'root'
DB_PASSWORD = '1234'
DB_NAME = 'test'
DB_CHARSET = 'utf8'
(2)管道配置
from scrapy.utils.project import get_project_settings
import pymysql
class MysqlPipeline(object):
#__init__方法和open_spider的作用是一样的
#init是获取settings中的连接参数
def __init__(self):
settings = get_project_settings()
self.host = settings['DB_HOST']
self.port = settings['DB_PORT']
self.user = settings['DB_USER']
self.pwd = settings['DB_PWD']
self.name = settings['DB_NAME']
self.charset = settings['DB_CHARSET']
self.connect()
# 连接数据库并且获取cursor对象
def connect(self):
self.conn = pymysql.connect(host=self.host, port=self.port, user=self.user, password=self.pwd, db=self.name, charset=self.charset)
self.cursor = self.conn.cursor()
def process_item(self, item, spider):
sql = 'insert into book(image_url, book_name, author, info) values("%s", "%s", "%s", "%s")' % (item['image_url'], item['book_name'], item['author'], item['info'])
sql = 'insert into book(image_url,book_name,author,info) values ("{}","{}","{}","{}")'.format(item['image_url'], item['book_name'], item['author'], item['info'])
# 执行sql语句
self.cursor.execute(sql)
self.conn.commit()
return item
def close_spider(self, spider):
self.conn.close()
self.cursor.close()
7.CrawlSpider案例:读书网数据入库
(1)案例分析
1.创建项目: scrapy startproject 项目的名字
2.跳转到spiders路径 cd 项目名字\项目名字\spiders
3.创建爬虫类: scrapy genspider ‐t crawl read www.dushu.com
4.items
5.spiders
6.settings
7.pipelines
数据保存到本地
数据保存到mysql数据库
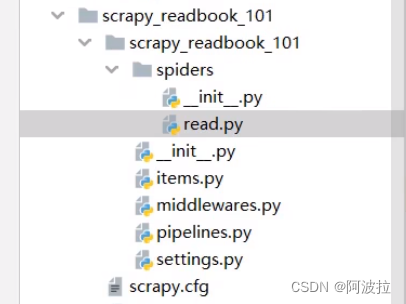
(2)项目结构
(3)items.py文件
# Define here the models for your scraped items
#
# See documentation in:
# https://docs.scrapy.org/en/latest/topics/items.html

import scrapy


class ScrapyReadbook101Item(scrapy.Item):
    # define the fields for your item here like:
    # name = scrapy.Field()
    name = scrapy.Field()
    src = scrapy.Field()
(4)middlewares.py文件
# Define here the models for your spider middleware
#
# See documentation in:
# https://docs.scrapy.org/en/latest/topics/spider-middleware.html

from scrapy import signals

# useful for handling different item types with a single interface
from itemadapter import is_item, ItemAdapter


class ScrapyReadbook101SpiderMiddleware:
    # Not all methods need to be defined. If a method is not defined,
    # scrapy acts as if the spider middleware does not modify the
    # passed objects.

    @classmethod
    def from_crawler(cls, crawler):
        # This method is used by Scrapy to create your spiders.
        s = cls()
        crawler.signals.connect(s.spider_opened, signal=signals.spider_opened)
        return s

    def process_spider_input(self, response, spider):
        # Called for each response that goes through the spider
        # middleware and into the spider.

        # Should return None or raise an exception.
        return None

    def process_spider_output(self, response, result, spider):
        # Called with the results returned from the Spider, after
        # it has processed the response.

        # Must return an iterable of Request, or item objects.
        for i in result:
            yield i

    def process_spider_exception(self, response, exception, spider):
        # Called when a spider or process_spider_input() method
        # (from other spider middleware) raises an exception.

        # Should return either None or an iterable of Request or item objects.
        pass

    def process_start_requests(self, start_requests, spider):
        # Called with the start requests of the spider, and works
        # similarly to the process_spider_output() method, except
        # that it doesn’t have a response associated.

        # Must return only requests (not items).
        for r in start_requests:
            yield r

    def spider_opened(self, spider):
        spider.logger.info('Spider opened: %s' % spider.name)


class ScrapyReadbook101DownloaderMiddleware:
    # Not all methods need to be defined. If a method is not defined,
    # scrapy acts as if the downloader middleware does not modify the
    # passed objects.

    @classmethod
    def from_crawler(cls, crawler):
        # This method is used by Scrapy to create your spiders.
        s = cls()
        crawler.signals.connect(s.spider_opened, signal=signals.spider_opened)
        return s

    def process_request(self, request, spider):
        # Called for each request that goes through the downloader
        # middleware.

        # Must either:
        # - return None: continue processing this request
        # - or return a Response object
        # - or return a Request object
        # - or raise IgnoreRequest: process_exception() methods of
        #   installed downloader middleware will be called
        return None

    def process_response(self, request, response, spider):
        # Called with the response returned from the downloader.

        # Must either;
        # - return a Response object
        # - return a Request object
        # - or raise IgnoreRequest
        return response

    def process_exception(self, request, exception, spider):
        # Called when a download handler or a process_request()
        # (from other downloader middleware) raises an exception.

        # Must either:
        # - return None: continue processing this exception
        # - return a Response object: stops process_exception() chain
        # - return a Request object: stops process_exception() chain
        pass

    def spider_opened(self, spider):
        spider.logger.info('Spider opened: %s' % spider.name)
(5)pipelines.py文件
# Define your item pipelines here
#
# Don't forget to add your pipeline to the ITEM_PIPELINES setting
# See: https://docs.scrapy.org/en/latest/topics/item-pipeline.html


# useful for handling different item types with a single interface
from itemadapter import ItemAdapter


class ScrapyReadbook101Pipeline:

    def open_spider(self,spider):
        self.fp = open('book.json','w',encoding='utf-8')


    def process_item(self, item, spider):
        self.fp.write(str(item))
        return item

    def close_spider(self,spider):
        self.fp.close()

# 加载settings文件
from scrapy.utils.project import get_project_settings
import pymysql


class MysqlPipeline:

    def open_spider(self,spider):
        settings = get_project_settings()
        self.host = settings['DB_HOST']
        self.port =settings['DB_PORT']
        self.user =settings['DB_USER']
        self.password =settings['DB_PASSWROD']
        self.name =settings['DB_NAME']
        self.charset =settings['DB_CHARSET']

        self.connect()

    def connect(self):
        self.conn = pymysql.connect(
                            host=self.host,
                            port=self.port,
                            user=self.user,
                            password=self.password,
                            db=self.name,
                            charset=self.charset
        )

        self.cursor = self.conn.cursor()


    def process_item(self, item, spider):

        sql = 'insert into book(name,src) values("{}","{}")'.format(item['name'],item['src'])
        # 执行sql语句
        self.cursor.execute(sql)
        # 提交
        self.conn.commit()


        return item


    def close_spider(self,spider):
        self.cursor.close()
        self.conn.close()
(6)settings.py文件
# Scrapy settings for scrapy_readbook_101 project
#
# For simplicity, this file contains only settings considered important or
# commonly used. You can find more settings consulting the documentation:
#
#     https://docs.scrapy.org/en/latest/topics/settings.html
#     https://docs.scrapy.org/en/latest/topics/downloader-middleware.html
#     https://docs.scrapy.org/en/latest/topics/spider-middleware.html

BOT_NAME = 'scrapy_readbook_101'

SPIDER_MODULES = ['scrapy_readbook_101.spiders']
NEWSPIDER_MODULE = 'scrapy_readbook_101.spiders'


# Crawl responsibly by identifying yourself (and your website) on the user-agent
#USER_AGENT = 'scrapy_readbook_101 (+http://www.yourdomain.com)'

# Obey robots.txt rules
ROBOTSTXT_OBEY = True

# Configure maximum concurrent requests performed by Scrapy (default: 16)
#CONCURRENT_REQUESTS = 32

# Configure a delay for requests for the same website (default: 0)
# See https://docs.scrapy.org/en/latest/topics/settings.html#download-delay
# See also autothrottle settings and docs
#DOWNLOAD_DELAY = 3
# The download delay setting will honor only one of:
#CONCURRENT_REQUESTS_PER_DOMAIN = 16
#CONCURRENT_REQUESTS_PER_IP = 16

# Disable cookies (enabled by default)
#COOKIES_ENABLED = False

# Disable Telnet Console (enabled by default)
#TELNETCONSOLE_ENABLED = False

# Override the default request headers:
#DEFAULT_REQUEST_HEADERS = {
#   'Accept': 'text/html,application/xhtml+xml,application/xml;q=0.9,*/*;q=0.8',
#   'Accept-Language': 'en',
#}

# Enable or disable spider middlewares
# See https://docs.scrapy.org/en/latest/topics/spider-middleware.html
#SPIDER_MIDDLEWARES = {
#    'scrapy_readbook_101.middlewares.ScrapyReadbook101SpiderMiddleware': 543,
#}

# Enable or disable downloader middlewares
# See https://docs.scrapy.org/en/latest/topics/downloader-middleware.html
#DOWNLOADER_MIDDLEWARES = {
#    'scrapy_readbook_101.middlewares.ScrapyReadbook101DownloaderMiddleware': 543,
#}

# Enable or disable extensions
# See https://docs.scrapy.org/en/latest/topics/extensions.html
#EXTENSIONS = {
#    'scrapy.extensions.telnet.TelnetConsole': None,
#}


# 参数中一个端口号 一个是字符集 都要注意
DB_HOST = '192.168.231.130'
# 端口号是一个整数
DB_PORT = 3306
DB_USER = 'root'
DB_PASSWROD = '1234'
DB_NAME = 'spider01'
# utf-8的杠不允许写
DB_CHARSET = 'utf8'


# Configure item pipelines
# See https://docs.scrapy.org/en/latest/topics/item-pipeline.html
ITEM_PIPELINES = {
   'scrapy_readbook_101.pipelines.ScrapyReadbook101Pipeline': 300,
   # MysqlPipeline
   'scrapy_readbook_101.pipelines.MysqlPipeline':301
}

# Enable and configure the AutoThrottle extension (disabled by default)
# See https://docs.scrapy.org/en/latest/topics/autothrottle.html
#AUTOTHROTTLE_ENABLED = True
# The initial download delay
#AUTOTHROTTLE_START_DELAY = 5
# The maximum download delay to be set in case of high latencies
#AUTOTHROTTLE_MAX_DELAY = 60
# The average number of requests Scrapy should be sending in parallel to
# each remote server
#AUTOTHROTTLE_TARGET_CONCURRENCY = 1.0
# Enable showing throttling stats for every response received:
#AUTOTHROTTLE_DEBUG = False

# Enable and configure HTTP caching (disabled by default)
# See https://docs.scrapy.org/en/latest/topics/downloader-middleware.html#httpcache-middleware-settings
#HTTPCACHE_ENABLED = True
#HTTPCACHE_EXPIRATION_SECS = 0
#HTTPCACHE_DIR = 'httpcache'
#HTTPCACHE_IGNORE_HTTP_CODES = []
#HTTPCACHE_STORAGE = 'scrapy.extensions.httpcache.FilesystemCacheStorage'
(7)read.py文件
import scrapy
from scrapy.linkextractors import LinkExtractor
from scrapy.spiders import CrawlSpider, Rule

from scrapy_readbook_101.items import ScrapyReadbook101Item


class ReadSpider(CrawlSpider):
    name = 'read'
    allowed_domains = ['www.dushu.com']
    start_urls = ['https://www.dushu.com/book/1188_1.html']

    rules = (
        Rule(LinkExtractor(allow=r'/book/1188_\d+.html'),
                           callback='parse_item',
                           follow=True),
    )

    def parse_item(self, response):

        img_list = response.xpath('//div[@class="bookslist"]//img')

        for img in img_list:
            name = img.xpath('./@data-original').extract_first()
            src = img.xpath('./@alt').extract_first()

            book = ScrapyReadbook101Item(name=name,src=src)
            yield book
