目录
1.Nuget中安装prism框架:
2.改造程序启动入口
3.View和ViewModel自动关联
4.绑定
5.Command
6.Event Aggregator(事件聚合器)、消息通知
7.弹窗、对话服务 DialogService
8.Region区域
10.module 模块
1.Nuget中安装prism框架:
Prism.Unity(IOC容器) 其中的prism.wpf和prism.core会自动添加过来
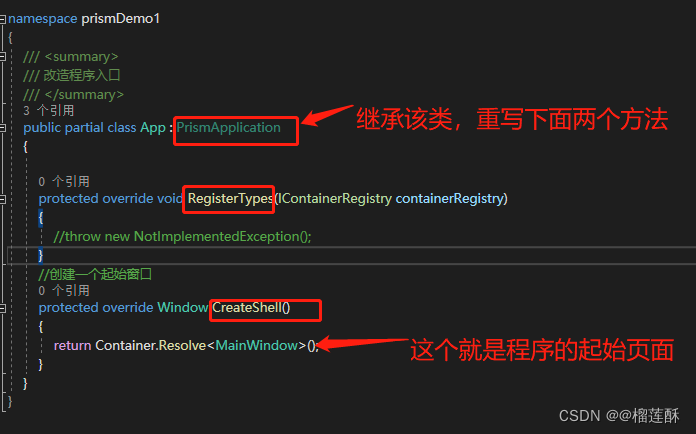
2.改造程序启动入口
app.xaml中按照截图改造:

app.xaml 点击F7查看代码,具体代码如下图。其中CreateShell()就是程序的入口
3.View和ViewModel自动关联
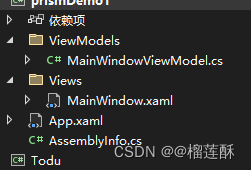
规则: ① View文件必须放在Views文件夹下,ViewModel文件必须放在ViewModels文件夹下且文件命名开头要和view文件相同,结尾则是以ViewModel结尾。如下图:
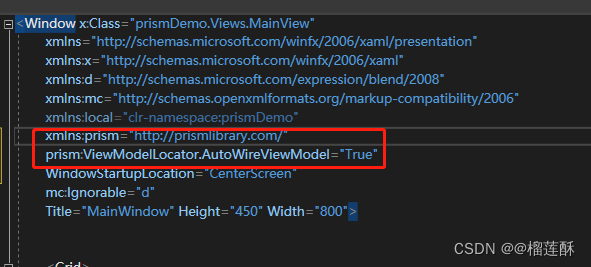
② xaml中添加
xmlns:prism="http://prismlibrary.com/"
prism:ViewModelLocator.AutoWireViewModel="True"
如下图
4.绑定
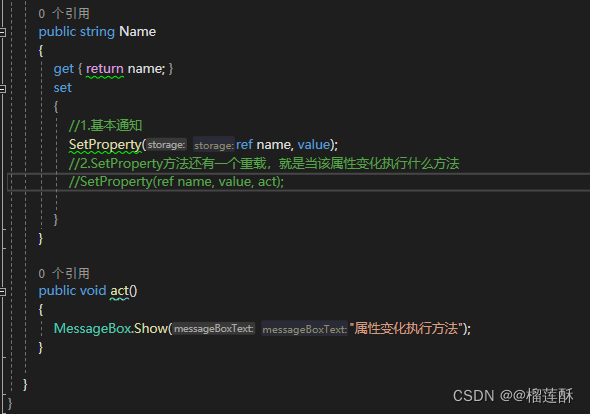
继承BindableBase,该类实现了通知属性
如下图:同时SetProperty有2个重载方法,第二种可以当该属性变化执行什么方法
5.Command
常规有参和无参方法
        public DelegateCommand noparmCommadn { get; private set; }//无参方法
        public DelegateCommand<string> haveparmCommadn { get; private set; }//有参方法

        public MainWindowViewModel()
        {

            noparmCommadn = new DelegateCommand(noparm);
            haveparmCommadn = new DelegateCommand<string>(haveparm);
        }

        private void haveparm(string obj)
        {
            MessageBox.Show($"我是有参方法,参数是{obj}");
        }

        private void noparm()
        {
            MessageBox.Show("我是无参方法");

        }
检查是否可执行
① 调用RaiseCanExecuteChanged的调用更新CanExecute;
public MainWindowViewModel()
{
SaveCommand = new DelegateCommand(DoSave, CanExecute);
}
public DelegateCommand SaveCommand {get;}
private void DoSave()
{
//执行逻辑
}
private bool CanExecute()
{
//能否执行的逻辑
return Age < 200;
}
private int _age= 100;
public int Age
{
get{ return _age;}
set
{
SetProperty(ref _age, value);
SaveCommand.RaiseCanExecuteChanged();
}
}② ObservesProperty:
ObservesProperty是指监听一个属性的变化,当发生变化时,进行状态检查;支持多条件;
public MainWindowViewModel()
{
SaveCommand = new DelegateCommand(DoSave, CanExecute)
.ObservesProperty(()=>Name)
.ObservesProperty(()=>Age);
}
public DelegateCommand SaveCommand {get;}
private void DoSave()
{
//执行逻辑
}
private bool CanExecute()
{
//能否执行的逻辑
return Age < 200 && Name!=string.Empty;
}
private int _age;
public int Age
{
get { return _age; }
set { SetProperty(ref _age, value); }
}
private int _name;
public int Name
{
get { return _name; }
set { SetProperty(ref _name, value); }
}③ObservesCanExecute 它监听一个属性值,当其为true可用,false不可用
        public DelegateCommand SaveCommand2 { get; }

        public MainWindowViewModel()
        {

         SaveCommand2 = new DelegateCommand(DoSave2).ObservesCanExecute(()=>IsEnable);
        }

        private bool isEnable;

        public bool IsEnable
        {
            get { return isEnable; }
            set { isEnable = value; }
        }
6.Event Aggregator(事件聚合器)、消息通知
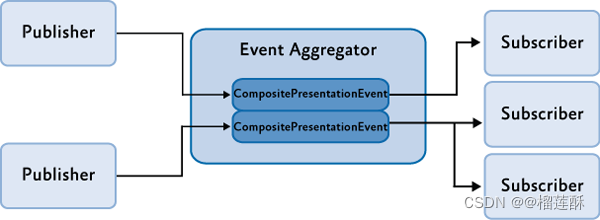
Prism 提供了一种机制,可以实现应用程序中松散耦合组件之间的通信。这种机制基于事件聚合器服务,允许发布者和订阅者通过事件进行通信,并且彼此之间仍然没有直接引用。
事件聚合器提供多播发布/订阅功能。这意味着可以有多个发布者引发相同的事件,并且可以有多个订阅者监听相同的事件。当然订阅者也可以过滤消息,只收到自己需要的。
通过事件聚合器服务可以使用IEventAggregator接口获取到事件聚合器。事件聚合器负责定位或构建事件,并在系统中保存事件的集合。首次访问一个事件时,如果该事件尚未构建,则构建
经典图如下:
用途:一般用在VM之间的消息交互,VM调用View中的方法等其他无法直接实例化调用方法类的情况
1.创建事件(无参),继承PubSubEvent即可
    public class MessageEventNoParm:PubSubEvent
    {
    }
有参,继承PubSubEvent<T>
    public class MessageEventHaveParm :PubSubEvent<string>
    {
    }
订阅:
    public partial class MainWindow : Window
    {
        public MainWindow(IEventAggregator aggregator)
        {
            InitializeComponent();
            aggregator.GetEvent<MessageEventHaveParm>().Subscribe(ShowMethod, arg => arg == "key");//有参订阅,同时加过滤

            aggregator.GetEvent<MessageEventNoParm>().Subscribe(ShowMethodNoParm);//无参

        }

        private void ShowMethodNoParm()
        {
            //throw new NotImplementedException();
            MessageBox.Show("ShowMethodNoParm");
        }

        private void ShowMethod(string obj)
        {

            MessageBox.Show("ShowMethodHaveParm :    "+obj);
        }
    }
关于Subscribe函数,有几个重载,其中参数最多的有4个:
action: 发布事件时执行的委托。
ThreadOption枚举: 指定在哪个线程上接收委托回
KeepSubscriberReferenceAlive: 如果为true,则Prism.Events.PubSubEvent保留对订阅者的引用因此它不会收集垃圾。
filter: 进行筛选以评估订阅者是否应接收事件。是一个Predicate委托,结果为true时才接收。
发布:
        public DelegateCommand MessageEventNoParmCommad { get; private set; }
        public DelegateCommand<string> MessageEventHaveParmCommad { get; private set; }


        private readonly IEventAggregator _aggregator;//事件聚合器

        public MainWindowViewModel(IEventAggregator aggregator)
        {


            _aggregator=aggregator;
            MessageEventNoParmCommad = new DelegateCommand(noparmME);
            MessageEventHaveParmCommad = new DelegateCommand<string>(haveparmME);

        }

        private void haveparmME(string obj)
        {
            _aggregator.GetEvent<MessageEventHaveParm>().Publish(obj);//有参发布
        }

        private void noparmME()
        {
            _aggregator.GetEvent<MessageEventNoParm>().Publish();//无参发布
        }
该节参考:Prism事件聚合器(Event/发布订阅) - 傲慢与偏见luc - 博客园 (cnblogs.com)
7.弹窗、对话服务 DialogService
Prism提供了一组对话服务, 封装了常用的对话框组件的功能, 例如:
- RegisterDialog/IDialogService (注册对话及使用对话)
- 打开对话框传递参数/关闭对话框返回参数
- 回调通知对话结果
①新建用户控件 UserControl ,比如叫DialogUserControl
<UserControl x:Class="prismDemo1.Views.DialogUserControl"
             xmlns="http://schemas.microsoft.com/winfx/2006/xaml/presentation"
             xmlns:x="http://schemas.microsoft.com/winfx/2006/xaml"
             xmlns:mc="http://schemas.openxmlformats.org/markup-compatibility/2006"
             xmlns:d="http://schemas.microsoft.com/expression/blend/2008"
             xmlns:prism="http://prismlibrary.com/"
             prism:ViewModelLocator.AutoWireViewModel="True"
             xmlns:local="clr-namespace:prismDemo1.Views"
             mc:Ignorable="d"
             d:DesignHeight="450" d:DesignWidth="800">
    <Grid>
            <StackPanel>
                <TextBlock Text="{Binding Title}"/>
            <TextBlock Text="{Binding Message}" FontSize="25" Foreground="Red"/>
                <Button Command="{Binding btnCliclCommand}" Content="点击传值演示"/>
            </StackPanel>
    </Grid>
</UserControl>
②创建ViewModel,对应起名叫DialogUserControlViewModel。然后继承IDialogAware
IDialogAware中方法说明:
- CanCloseDialog()函数是决定窗体是否关闭
- OnDialogClosed()函数是窗体关闭时触发,触发条件取决于CanCloseDialog()函数
- OnDialogOpened()函数时窗体打开时触发,比窗体Loaded事件早触发
- Title为窗体的标题
- RequestClose为关闭事件,可由此控制窗体的关闭
using Prism.Commands;
using Prism.Mvvm;
using Prism.Services.Dialogs;
using System;
using System.Collections.Generic;
using System.Linq;
using System.Text;
using System.Threading.Tasks;

namespace prismDemo1.ViewModels
{
    //弹窗对话在使用对话时则继承IDialogAware
    public class DialogUserControlViewModel : IDialogAware
    {
        //窗体的标题
        public string Title { get; set; }
    private string message;

    public string Message
    {
        get { return message; }
        set { message = value; }
    }


    /// <summary>
    /// 关闭事件,可由此控制窗体的关闭
    /// </summary>
    public event Action<IDialogResult> RequestClose;

        /// <summary>
        /// 决定窗体是否关闭
        /// </summary>
        /// <returns></returns>
        /// <exception cref="NotImplementedException"></exception>
        public bool CanCloseDialog()
        {
            return true;
        }
        /// <summary>
        /// 窗体关闭时触发,触发条件取决于CanCloseDialog()函数
        /// </summary>
        /// <exception cref="NotImplementedException"></exception>
        public void OnDialogClosed()
        {
            //IDialogParameters parameters = new DialogParameters();
            //parameters.Add("param1", "Hello Baby");
            //RequestClose?.Invoke(new DialogResult(ButtonResult.OK, parameters));  这里为何传参为空  不理解

        }
        /// <summary>
        /// 窗体打开时触发,比窗体Loaded事件早触发
        /// 一般用来接受参数
        /// </summary>
        /// <param name="parameters"></param>
        /// <exception cref="NotImplementedException"></exception>
        public void OnDialogOpened(IDialogParameters parameters)
        {
            Message = parameters.GetValue<string>("message");
            Title = parameters.GetValue<string>("Title");
        }
        public DelegateCommand btnCliclCommand { get; private set; }
        public DialogUserControlViewModel()
        {
            btnCliclCommand = new DelegateCommand(btnClick);

        }

        private void btnClick()
        {
            IDialogParameters parameters = new DialogParameters();
            parameters.Add("param1", "Hello Baby");
            RequestClose?.Invoke(new DialogResult(ButtonResult.OK, parameters));
        }
    }
}
③ 在App.cs中注册对话服务
containerRegistry.RegisterDialog<DialogUserControl, DialogUserControlViewModel>();//注册弹窗④IdialogService接口说明
public interface IDialogService
{
    void Show(string name, IDialogParameters parameters, Action<IDialogResult> callback);
    void Show(string name, IDialogParameters parameters, Action<IDialogResult> callback, string windowName);
    void ShowDialog(string name, IDialogParameters parameters, Action<IDialogResult> callback);
    void ShowDialog(string name, IDialogParameters parameters, Action<IDialogResult> callback, string windowName);
}


//
// 摘要:
//     Extensions for the IDialogService
public static class IDialogServiceExtensions
{
    public static void Show(this IDialogService dialogService, string name);
    public static void Show(this IDialogService dialogService, string name, Action<IDialogResult> callback);
    public static void ShowDialog(this IDialogService dialogService, string name);
    public static void ShowDialog(this IDialogService dialogService, string name, Action<IDialogResult> callback);
}
接口的实现中,最多有四个参数:
- name:指的是Dialog的name,由注册的时候指定,没有指定的时候默认为View类的类名
- parameters:传递给对话框的参数
- callback:对话框被关闭时的回调函数
- windowName:注册对话框的父窗体名
⑤ 使用弹出对话:
       private readonly  IDialogService _dialogService;//弹窗服务

        public MainWindowViewModel(IEventAggregator aggregator, IDialogService dialogService)
        {

            _dialogService = dialogService;
            openDialogCommand = new DelegateCommand(openDiaglog);//打开弹窗
        }

        private void openDiaglog()
        {
            DialogParameters dialogParameters = new DialogParameters
            {
                {"Title","我是弹窗"},
                {"message","我是消息"}
            } ;
            _dialogService.ShowDialog("DialogUserControl", dialogParameters, DialogCallback);
        }
        private void DialogCallback(IDialogResult result)
        {
            //对话框关闭之后的回调函数,可以在这解析结果。
            ButtonResult result1 = result.Result;

            var param = result.Parameters.GetValue<string>("param1");
        }
8.Region区域
什么是区域
在Prism当中,一个页面我们可以不再为其固定显示的内容,而这种概念变成了区域(Region)划分的概念。将页面显示的区域划分成N个Region,每一个Region将动态分配区域。它将负责承担我们的UI组件或者控件。
①给页面分区域,如下代码分开leftRegion和mainRegion2个区域,注意如果是单页面切换用ContentControl,多页面用TabControl
        <Grid Grid.Row="1" >
            <Grid.ColumnDefinitions>
                <ColumnDefinition Width="180"/>
                <ColumnDefinition/>
            </Grid.ColumnDefinitions>
            <ContentControl prism:RegionManager.RegionName="leftRegion"/>
            <!--如果是单页面切换用ContentControl,多页面用TabControl-->
            <ContentControl Grid.Column="1" prism:RegionManager.RegionName="mainRegion"/>
            <!--<TabControl Grid.Column="1" prism:RegionManager.RegionName="mainRegion"/>-->
        </Grid>
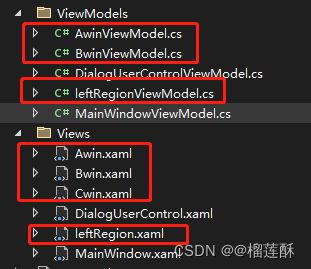
②创建4个用户控件并且关联上ViewModel,如图
③在App.cs注册view
        protected override void RegisterTypes(IContainerRegistry containerRegistry)
        {
            //throw new NotImplementedException();
            containerRegistry.RegisterDialog<DialogUserControl, DialogUserControlViewModel>();//注册弹窗

            //containerRegistry.RegisterDialog<DialogUserControl, DialogUserControlViewModel>("dd");//注册弹窗 dd是给弹窗起名,不写默认为类名

            //注册区域
            containerRegistry.RegisterForNavigation<leftRegion>();
            containerRegistry.RegisterForNavigation<Awin>();
            containerRegistry.RegisterForNavigation<Bwin>();
            containerRegistry.RegisterForNavigation<Cwin>();

        }
④把页面关联到区域
        private readonly IRegionManager _regionManager;//区域服务
        public MainWindowViewModel(IEventAggregator aggregator, IDialogService dialogService,IRegionManager regionManager)
        {

            _regionManager = regionManager;
            _regionManager.RegisterViewWithRegion("leftRegion", "leftRegion");
            //_regionManager.RegisterViewWithRegion("leftRegion", "leftRegion");
        }
leftRegion页面切换,这里注意用RegisterViewWithRegion来做页面切换有问题,需要用Navigation即可。接下面一章对Navigation进行讲解
9.Navigation导航
① 导航是在区域的基础上进行的。
RequestNavigate最多有4个参数:
第一个参数是RegionName,第二个参数是我们前面注册的ViewName。其实它还有很多重载函数,还有另外两个参数Action navigationCallback,导航完成时的回调和NavigationParameters navigationParameters导航是传参
region.RequestNavigate("ContentRegion", page);

            _regionManager.RequestNavigate("mainRegion", obj, NavigationCallback, parameters);


        //请求导航完成的回调函数
        private void NavigationCallback(NavigationResult result)
        {
            MessageBox.Show(result.Context.Uri  +"  :"+ result.Error?.Message+"   :"+ result.Result);

            journal=result.Context.NavigationService.Journal;//添加到导航日志
        }
② 导航页面切换的接口INavigationAware
    public class AwinViewModel : INavigationAware
    {
        //IConfirmNavigationRequest 该类也是继承INavigationAware 允许用户针对导航请求进行拦截。同时也需要多实现一个方法ConfirmNavigationRequest
        //是否创建新示例。为true的时候表示不创建新示例,页面还是之前的;如果为false,则创建新的页面
        public bool IsNavigationTarget(NavigationContext navigationContext)
        {
            //throw new NotImplementedException();
            return true;
        }
        //导航离开当前页面前。
        public void OnNavigatedFrom(NavigationContext navigationContext)
        {
            //throw new NotImplementedException();
        }
        //导航到当前页面前, 此处可以传递过来的参数以及是否允许导航等动作的控制
        public void OnNavigatedTo(NavigationContext navigationContext)
        {
            var vale = navigationContext.Parameters["key"];

        }
    }
③ IConfirmNavigationRequest接口,该类也是继承INavigationAware 允许用户针对导航请求进行拦
    public void ConfirmNavigationRequest(NavigationContext navigationContext, Action<bool> continuationCallback)
    {
        bool result = true;

        if (MessageBox.Show("Do you to navigate?", "Navigate?", MessageBoxButton.YesNo) == MessageBoxResult.No)
            result = false;

        //true则同意 false则拒绝
        continuationCallback(result);
    }
④ IRegionNavigationJournal导航日志接口
导航日志,其实就是对导航系统的一个管理功能,理论上来说,我们应该知道我们上一步导航的位置、以及下一步导航的位置,包括我们导航的历史记录。以便于我们使用导航对应用程序可以灵活的控制。
IRegionNavigationJournal接口有如下功能:
GoBack() : 返回上一页
CanGoBack : 是否可以返回上一页
GoForward(): 返回后一页
CanGoForward : 是否可以返回后一页
 public class leftRegionViewModel
    {
        public DelegateCommand<string> openWindowCommand { get; }
        private readonly IRegionManager _regionManager;
        private IRegionNavigationJournal journal;//导航日志
        public DelegateCommand backCommand { get; }//上一页
        public DelegateCommand forwardCommand { get; }//下一页


        public leftRegionViewModel(IRegionManager regionManager)
        {
            openWindowCommand = new DelegateCommand<string>(openwin);
            backCommand = new DelegateCommand(back);
            forwardCommand = new DelegateCommand(forward);
            _regionManager = regionManager;
        }

        private void forward()
        {
            if (journal.CanGoForward)
            {
                journal.GoForward();
            }
        }

        private void back()
        {
            if (journal.CanGoBack)
            {
                journal.GoBack();
            }
        }

        private void openwin(string obj)
        {
            //用这种方法在页面切换时有问题,它只显示第一个页面
            //_regionManager.RegisterViewWithRegion("mainRegion", obj);

            //需要用Navigation即可
            //_regionManager.RequestNavigate("mainRegion", obj);

            //其他重载
            //传参
            NavigationParameters parameters=new NavigationParameters();
            parameters.Add("key", "value");
            _regionManager.RequestNavigate("mainRegion", obj, NavigationCallback, parameters);

        }
        //请求导航完成的回调函数
        private void NavigationCallback(NavigationResult result)
        {
            MessageBox.Show(result.Context.Uri  +"  :"+ result.Error?.Message+"   :"+ result.Result);

            journal=result.Context.NavigationService.Journal;//添加到导航日志
        }
    }
10.module 模块
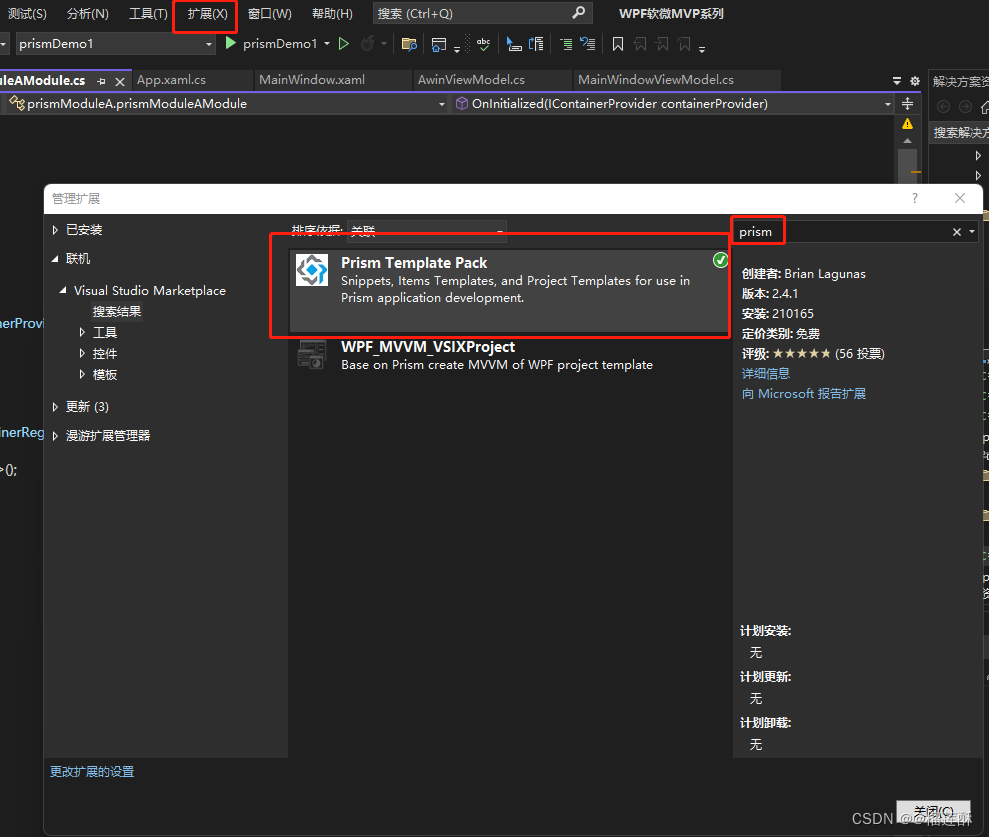
①首先窗体模块A和模块C 这里我使用prism在VS中的插件直接创建,安装路径 扩展-->管理扩展->搜索prism 如下图:
②在模块A中注册,同理模块C也是
namespace prismModuleA
{
    public class prismModuleAModule : IModule
    {
        public void OnInitialized(IContainerProvider containerProvider)
        {

        }

        public void RegisterTypes(IContainerRegistry containerRegistry)
        {
            containerRegistry.RegisterForNavigation<ViewA>();

        }
    }
}
③ 在主程序中重写ConfigureModuleCatalog方法
        protected override void ConfigureModuleCatalog(IModuleCatalog moduleCatalog)
        {
            //加入模块后这时候我就能在需要打开该窗体的地方使用 regionManager.RegisterViewWithRegion("mainRegion", 模块名);
            moduleCatalog.AddModule<prismModuleAModule>();
            moduleCatalog.AddModule<prismModuleCModule>();

            base.ConfigureModuleCatalog(moduleCatalog);

        }
④ 在需要打开模块中页面地方可使用
egionManager.RegisterViewWithRegion("mainRegion", 模块名中的页面名);
参考:Prism入门之模块(Module) - 傲慢与偏见luc - 博客园 (cnblogs.com)

